Downloads |
 Feedback Feedback
|
Table Of Contents
Setting E-Mail List Preference
Setting Preferences
The CAM Preferences button allows you to set up preferences for CAM. Topics covered in this chapter include:
•
Setting E-Mail List Preference
Note
1. Multi-window (yes or no)
2. MCC view attribute
Preferences other than UI are system wide. Only the CAM administrator can make these changes.Setting UI Preference
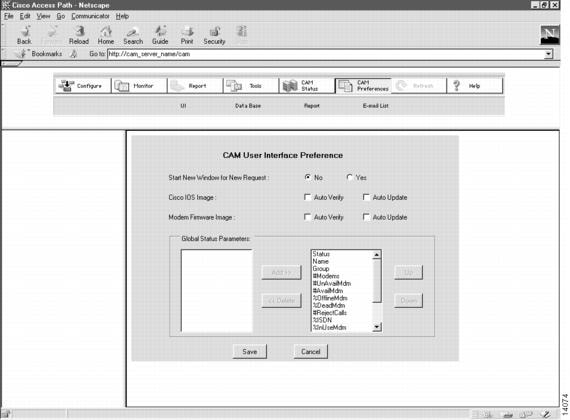
Use the CAM User Interface Preference dialog box to select preferences for the UI:
1
Click CAM Preferences.
The Task Selection bar displays all the preferences you can set.
2
Click UI.
The CAM User Interface Preference dialog box appears. (See .)
3
Select yes or no.
Select whether or not you want to start a new window for each new request.
4
For the Cisco IOS Image and Modem Firmware Image fields, select Auto Verify and/or Auto Update.
Select Auto Verify and/or Auto Update depending on what you want the Cisco IOS Image Manager and Modem Image Manager to do:
•
•
•
The default setting for both image managers is for both Auto Verify and Auto Update to be off. If only Auto Update is selected, Auto Verify is automatically turned on.
5
Click Add>> or <<Delete. to select which Global Status parameters you want to appear on the Global Status display.
The parameters to the left box do not display; the parameters to the right box do display. See the "Global Status Fields" section on page 2-6 for descriptions of the Global Status fields.
6
Click Save.
Save the preferences you have set for the UI. Otherwise, click Cancel.
Figure 3-1 CAM User Interface Preference Dialog Box
Setting DataBase Preference
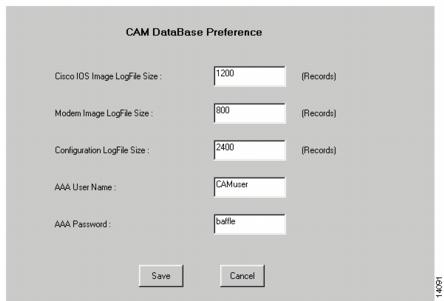
The CAM DataBase Preference dialog box allows you to configure database log file sizes and also set the AAA username and password. (See .)
CAM keeps track of all the changes you make to the Cisco IOS image, the modem image, and the configuration in the respective log files. You can set the maximum size for these log files.
To set the preferences for the log file sizes and AAA information:
Figure 3-2 CAM DataBase Preference Dialog Box
Setting Report Preference
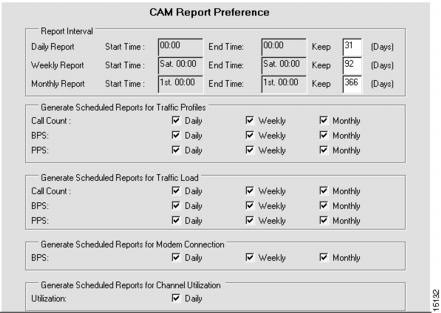
The Report Preference allows you to specify the scheduled reports you want generated and the interval (daily, weekly, and monthly) at which you want them to be generated.
By default, all reports (Traffic Profiles, Traffic Loads, Modem Connections, and Channel Utilization) are scheduled to run after CAM installation. Daily reports are saved for 31 days, weekly reports for 92 days, and monthly reports for 366 days. During this time, the reports can be viewed. When the period expires, the reports are deleted.
Using the Report Preference you can modify these defaults. We recommend that you do so. Generating scheduled reports affect system performance.
To set the parameters for the Report Preference:
Figure 3-3 Report Preference Dialog Box
Setting E-Mail List Preference
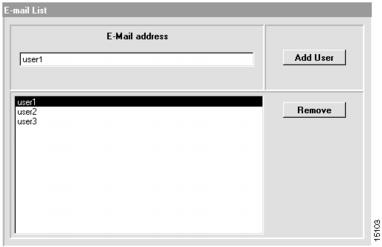
The E-mail List Preference allows you to create and modify an e-mail list for notifying users of the availability of scheduled reports.
Scheduled reports are generated in both HTML and Comma-Separated Values (CSV) formats and placed in specified locations. Users whose e-mail addresses are added to the e-mail list receive notification of the reports being available.
Note
CAM sends notifications similar to the following to the users on the e-mail list:
•
Subject: Daily Reports -- Oct-10-1998 to Oct-11-1998Daily scheduled reports for CAM 3.0 were generated successfully.The resulting HTML and CSV (comma-separated value) files areavailable at:http://<server-name>/cam/resultsReporting Range: Oct-10-1998 00:00:00 to Oct-11-1998 00:00:00•
Subject: Weekly Reports -- Oct-10-1998 to Oct-17-1998Weekly scheduled reports for CAM 3.0 were generated successfully.The resulting HTML and CSV (comma-separated value) files areavailable at:http://<server-name>/cam/resultsReporting Range: Oct-10-1998 00:00:00 to Oct-17-1998 00:00:00•
Subject: Monthly Reports -- Oct-01-1998 to Nov-01-1998Monthly scheduled reports for CAM 3.0 were generated successfully.The resulting HTML and CSV (comma-separated value) files areavailable at:http://<server-name>/acam/resultsReporting Range: Oct-01-1998 00:00:00 to Nov-01-1998 00:00:00For information about selecting reports to generate, see the "Setting Report Preference" section.
To set the parameters for the E-mail List Preference:
Figure 3-4 E-Mail List Preference Dialog Box