- Getting Started
- Log In
- Add Product Instance
- Edit Product Instance
- Delete Product Instance
- System Status Information
- Dashboard View
- License Usage View
- License Fulfillment View
- Migrate Licenses to Cisco Prime License Manager
- New License Planning and Fulfillment
- Upgrade Existing Licenses
- Other Fulfillment Options
Configuration
The following sections provide information about how to use Cisco Prime License Manager.
- Getting Started
- Log In
- Add Product Instance
- Edit Product Instance
- Delete Product Instance
- System Status Information
- Dashboard View
- License Usage View
- License Fulfillment View
- Migrate Licenses to Cisco Prime License Manager
- New License Planning and Fulfillment
- Upgrade Existing Licenses
- Other Fulfillment Options
Getting Started
Follow these steps to begin using Cisco Prime License Manager:
-
Log in to Cisco Prime License Manager. See Log In.
-
Add a product instance. See Add Product Instance.
-
Use the Dashboard or the License Usage page to determine what licenses are required for your product. For more information on the Dashboard or the License Usage pages, see System Status Information.
-
Migrate your existing licenses if your Cisco Prime License Manager is managing any product instances that have been upgraded from a prior version of the product that implemented a different licensing methodology.
-
Perform new license fulfillment. See License Planning.
Log In
To log into a standalone Cisco Prime License Manager, enter your username and password. Click Login.
For coresident configurations, use the following procedure to log in:
| Step 1 | Select Cisco Prime License Manager from the list of installed applications. | ||||
| Step 2 | Enter your
username and password. Click
Login
The "Getting Started" window appears with options for the following:
|
Add Product Instance
The following procedure describes how to add a product instance in Cisco Prime License Manager.
Install licenses that are installable at the product instance prior to adding the product instance. This will ensure that those licenses are eligible for migration.
If you want to add a Cisco Unified Communications Manager instance, check the status of the account using the following command: show accountlocking. The account locking setting must be set to disabled to avoid a 401 error when you attempt to add the product instance.
| Step 1 | Log in to Cisco Prime License Manager. | ||||
| Step 2 | Choose Product Instances. | ||||
| Step 3 | Click Add. The Product Add dialog box appears. | ||||
| Step 4 | Enter the
following information:
| ||||
| Step 5 | Click OK to add the product instance. | ||||
| Step 6 | Once the
product instance has been successfully added, the product appears in the
Product Instances table.
|
Edit Product Instance
The following procedure describes how to edit a product instance in Cisco Prime License Manager.
Delete Product Instance
System Status Information
The Cisco Prime License Manager interface provides the following views that enable you to monitor the system status:
Dashboard View
The Dashboard provides an “at-a-glance” view of the system. Links in the Dashboard navigate to their related pages within Cisco Prime License Manager.
 Note | When Cisco Prime License Manager is first installed, it operates in Demo mode until a license file is installed. While Cisco Prime License Manager is in Demo mode, a warning appears at the top of the GUI. |
Note | Demo mode in Cisco Prime License Manager refers to the fact that no license file has been installed yet. During the first license file installation process, Cisco Prime License Manager is registered with the Cisco licensing back office and is no longer in Demo mode. Product instances managed by Cisco Prime License Manager are not in compliance as long as Cisco Prime License Manager is in Demo mode. Each product type (for example, Unified CM, Unity Connection) has its own version of "demo mode" that operates independently of Cisco Prime License Manager’s Demo mode. |
The Dashboard contains the following:
Overview
Provides information on Product Instances, Last License Update, and Last Synchronization date and time.
License Usage
Lists the product type and the number of licenses:
License Alerts
Lists alerts according to product type, the status of the alert and the number of licenses available. Alerts indicate:
Product Instance Alerts
Lists the product instance name, status (including product grace period expiration), and last successful synchronization.
Note | The product grace period expiration provides additional information for products with insufficient licenses. Clicking on the red "x" or alert symbol in the Status column provides more detailed information (for example: "This product instance is consuming more licenses than are available in Cisco Prime License Manager and may experience service degradation until you install sufficient licenses to cover its usage. Check your product documentation for more information."). |
License Usage View
The License Usage view, accessed by selecting Licenses > Usage in the Cisco Prime License Manager interface, identifies the licenses installed on the system and how those licenses have been used at the time of the last synchronization.
There are three views available from the License Usage view:
Table View
The Table View provides the following information for each license type:
-
Type of licenses in use
-
Product Type
-
Number of licenses required
-
Number of licenses installed
-
Number of licenses available
-
Status of that license type (for example: in compliance, in violation, and so on)
Note | License versions are shown as “9.x” rather than “9.0”. This reduces confusion as 9.0 licenses are valid for all 9.x licenses. |
You can also view license properties and usage by selecting one of license types installed on the system. The License Type details page contains the following information:
For a comprehensive view of all license types, click the View All License Type Descriptions and Device Classifications (new window) link under the License Description section.
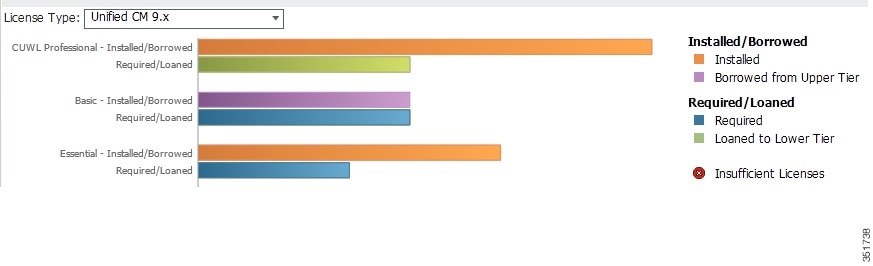
Chart View
The Chart View tab presents a graphical view of the number of licenses used for a particular product.
Select the License Type from the drop-down menu to view the chart for that license version. Place your mouse over each of the chart's bars to reveal license count information. The figure below shows a Chart View, customized for each product type, which illustrates the number of licenses:
The Chart View also identifies, with a red “x”, instances where there are insufficient licenses.
Note | The chart you see depends largely on the license type you select from the drop-down menu. For example, Unified CM and has borrowing and tiering whereas Emergency Responder does not. The legend is hidden for product types that do not support license substitution. |
History
This History tab enables you to view how your license usage has changed over time. Usage data is collected at every synchronization with product instance and with each action that changes license usage. To download your usage history, select a date range and the product and click the Generate File button.
Clicking the Generate File button creates a History report that appears at the bottom of the History tab. You can download the History report into a csv file that can be opened in a spreadsheet application. The History report shows licensing installed and license consumption, including the compliance status.
Substitution and Tiering
Note | Substitution and tiering does not apply to all products supported by Cisco Prime License Manager. If your product supports substitution and tiering, refer to the following description and examples. |
License types are categorized into license tiers, where the higher license tiers offer more functionality than the lower tiers. For example, CUWL Professional, the highest Unified CM-tiered type, offers more functionality than CUWL Premium or Advanced (the exact functionality is specified in the License Usage Details screen). The License Usage Table View and Chart View (as shown in the figure above) display the types in order of tier, highest to lowest.
License substitution refers to the Cisco Prime License Manager feature where a higher tier license type can be substituted for a lower-tiered type that would otherwise be in overage. In the Chart View example (in the above figure), there are 50 spare CUWL Professional licenses on loan to Basic. In this example, the 50 spare licenses are sufficient to cover the entire Basic overage. If the user installs a license file that adds Basic licenses, the spare CUWL Professional license would then be available for future CUWL Professional requirements.
License Fulfillment View
Once a product instance has been added (see Add Product Instance), you must then identify your licensing requirements and plan accordingly.
Note | You may wish to check your Dashboard or License Usage page first, to determine what licenses are required for your product. For more information on the Dashboard or the License Usage pages, see System Status Information. |
Cisco Prime License Manager provides two main options for performing license fulfillment:
Under each of these fulfillment options, you may choose to do one of the following:
e-Fulfillment is the quicker and easier option of the two; however, in deployments where internet connectivity is not available (a locked-down lab for example) Manual fulfillment may be the only option.
e-Fulfillment supports:
- License feature upgrades (for example, a Basic UCL to Enhanced UCL upgrade)
- License version upgrades (for example, a version 9.0 to version 10.0(1) license upgrade)
License Product Authorization Keys (PAKs) can be fulfilled and installed directly from the Cisco Prime License Manager.
e-Fulfillment
Use the following procedure to add new licenses via e-Fulfillment.
-
Log in to Cisco Prime License Manager.
-
Select Licenses > Fulfillment.
-
If not already selected, click the Enable button to enable e-Fulfillment.
-
Select Fulfill Licenses from PAK. The Fulfill Licenses from PAK window appears.
-
Select the Add licenses from a new PAK option and enter the Product Authorization Key (PAK) code.
If you have previously entered PAKs in Cisco Prime License Manager, you may select the second option, "Add licenses from an already-installed PAK that supports partial fulfillment". Once you have selected that option, select the existing PAK code from the drop-down menu.
-
Click the Next button. If prompted for your Cisco.com account information, enter the username and password you entered when you registered at Cisco.com.
-
Click the Ok button. The Fulfill Licenses section appears.
-
The licenses within the PAK are listed by SKU name. The numbers of each license are categorized under a number of headings to indicate how many have been fulfilled and how many are remaining.
You can specify the number of licenses you want to fulfill by selecting Fulfill in the Actions column for that license type. The Fulfill Licenses window appears. In this window you can specify the count in the Fulfill column, and click Save then click OK to close the window. The updated count now appears in the Fulfill column of the Fulfill Licenses table.
Important: Some PAKs are not eligible for partial fulfillment.
Note
If licenses are listed as "Fulfilled" (under "Before Fulfillment" in the Fulfill Licenses table), those licenses have been fulfilled by this or another Cisco Prime License Manager.
Note
Once you have fulfilled your licenses as selected, you may wish to click the Run Compliance Check button to ensure that you are in compliance. - Click the Next button to review your changes. If you are not satisfied with your changes, click Previous to return to the Fulfill Licenses section. If you are satisfied with the changes, click Next to move to the next section.
-
Clicking Next in the Fulfill Licenses section opens the Transaction Options and License Agreement section. In this section, you may enter a description (optional). You may also associate this transaction with a saved license summary by selecting that option and then selecting the name of the license summary from the drop-down list.
-
Select the checkbox to accept the conditions of the End User License Agreement.
-
Click the Finish button.
-
Upon successful completion of the e-Fulfillment process, the new fulfillment appears in the License Fulfillment table.
Adjust PAK fulfillment
In e-Fulfillment mode, you can perform partial fulfillment of a particular PAK that has already been partially fulfilled on that Cisco Prime License Manager using the following procedure:
-
In the Licenses > Fulfillment page, in the License Fulfillment table, select the PAK from the list under the PAK column.
Note
An edit (pencil) icon denotes PAKs which support partial fulfillment.
-
The PAK Details window opens, showing the original number of licenses in the PAK. Select Adjust PAK Fulfillment to retrieve the current status of the PAK.
-
If prompted, enter your Cisco.com username and password (the information entered when you registered at Cisco.com).
-
You can specify the number of licenses you want to fulfill by selecting Fulfill in the Actions column for that license type. The Fulfill Licenses window appears. In this window you can specify the count in the Fulfill column, and click Save then click OK to close the window. The updated count now appears in the Fulfill column of the Fulfill Licenses table.
-
You have the option of entering a description in the Transaction Options field. This allows you to track this transaction.
-
Once you have adjusted your PAK fulfillment numbers, click the Update PAK Fulfillment button.
Note
Fulfillment numbers can only be increased, never decreased.
Manual Fulfillment
Manual fulfillment requires additional steps to perform license fulfillment. In situations where internet connectivity is not available, Manual fulfillment is the only method available. Manual fulfillment is also necessary for license migration, as described below:
-
Migrate existing licenses (if applicable) into Cisco Prime License Manager. To migrate existing licenses, see Migrate Licenses to Cisco Prime License Manager
-
Once any existing licenses have been migrated, acquire new licenses using the following procedure: License Planning.
Migrate Licenses to Cisco Prime License Manager
This section describes the different migration paths you can follow using Cisco Prime License Manager.
A standard product is any product type supported by Cisco Prime License Manager other than Cisco Unified Communications Manager or Cisco Unity Connection.
Note |
The migration path you follow depends upon a number of factors (For example: the product type, whether servers contain data from a previous version, etc). The following flow charts provide a guide for the decisions that must be made to successfully complete your migration. For a broader view of the migration process, see the release notes for the product instance in question.
Note | If Cisco Prime License Manager is in demo mode, do not create multiple migration requests. Complete the first migration, including installation of the license, prior to initiating a second migration. If a migration request results in multiple license files, install all of them, in order, before proceeding. |
Note | Cisco Unified Communications Manager and Cisco Unity Connection each have unique migration processes. |
Use the following procedure to plan for migration of product instances whose licenses have not yet been migrated to Cisco Prime License Manager if e-Fulfillment is enabled.
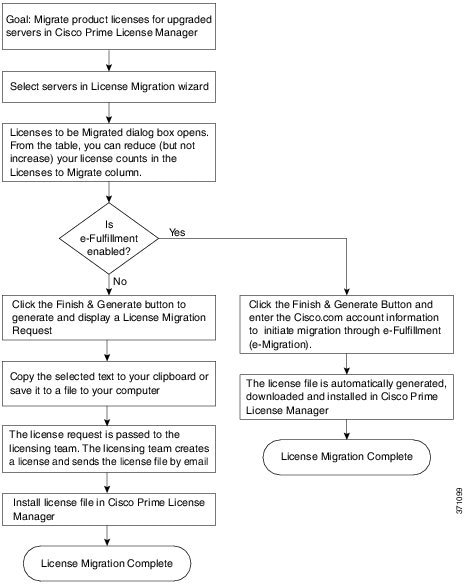
Standard Product Migration Path with E-Fulfillment Enabled
Standard Product Migration Path with E-Fulfillment Disabled
Use the following procedure to plan for migration of product instances whose licenses have not yet been migrated to Cisco Prime License Manager if e-Fulfillment is disabled.
Cisco Unified Communications Manager Migration Path
The following flow chart will aid you in migrating Cisco Unified Communications Manager licenses to Cisco Prime License Manager:

Use the following procedure to plan for migration of all Unified Communication product instances whose licenses have not yet been migrated to Cisco Prime License Manager if e-Fulfillment is disabled.
Cisco Unity Connection Migration Path
The following flow chart will aid you in migrating Cisco Unity Connection licenses to Cisco Prime License Manager:
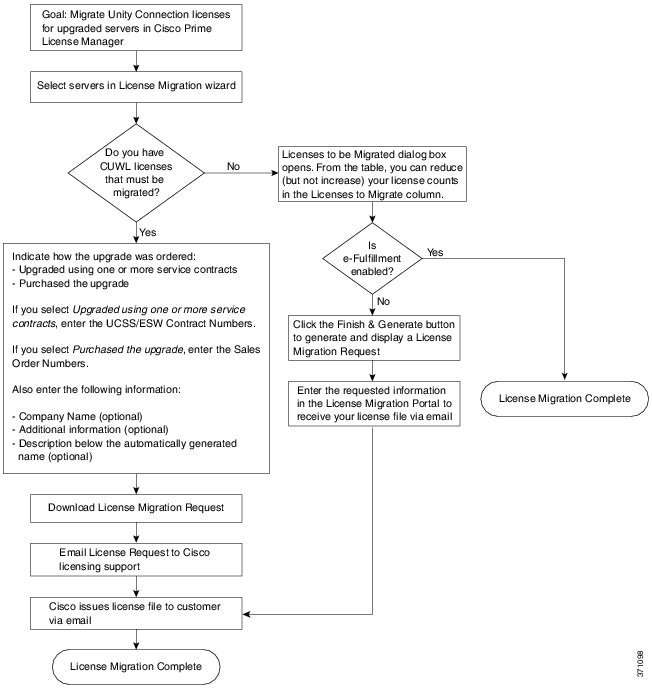
Use the following procedure to plan for migration of all Unity Connection product instances whose licenses have not yet been migrated to Cisco Prime License Manager.
| Step 1 | From the Licenses > Fulfillment page in Cisco Prime License Manager, click . | ||||||||||
| Step 2 | The Migrate Licenses to Cisco Prime License Manager wizard window appears. The first step involves choosing the product type. From the Choose Product Type section, select Unity Connection from the drop-down menu. The migration process is outlined in this section, and is dependent on the type of product you select. Click Next. | ||||||||||
| Step 3 | The Choose
Product Instances section appears. To upgrade a product instance, select it in
the Available Product Instances window and click the arrow to move it to the
Product Instances to Migrate window.
Click Next. | ||||||||||
| Step 4 | The License
Counts section appears. This section prompts you to choose between two options
relating to Cisco Unified Workshop Licenses (CUWL):
| ||||||||||
| Step 5 | The Summary
and Next Steps section appears. The option you selected in Step 4 determines
the information displayed in this section.
|
Alternate Cisco Unified Communications Manager Migrations Path
The following are alternate migration paths, available for use under specific circumstances:
- Upgrades completed without the License Count Utility (LCU) Report
- Fresh install with imported pre-9.x data
Upgrades completed without LCU Report
The Cisco Prime License Manager Migration Utility relies on DLU and license usage retained during the upgrade.
In situations where a product is upgraded to 10.x without running License Count Utility on a pre-9.x version. Please contact the Cisco licensing office and have the license file reissued if changes are required.
Fresh install with imported pre-9.x data
A migration may be required following a fresh install in situations where pre-9.0 DLU or license information is not available in Release 10.x VM. This may occur when:
- UC Release 8.6 needs to be upgraded as a new VM, with phone data exported
- A new Release10.x VM is created, with phone data imported
The following procedure enables you to perform a migration after a fresh install. This procedure requires that an LCU report be run against pre-upgrade product instance, if still accessible, or that MAC addresses of the pre-upgrade product instances be available.
| Step 1 | From the Licenses > Fulfillment page in Cisco Prime License Manager, click . |
| Step 2 | The Migrate Licenses to Cisco Prime License Manager wizard window appears. The first step involves choosing the product type. From the Choose Product Type section, select the type of product to upgrade and the version from the drop-down menus. Click Next. |
| Step 3 | The Choose Product Instances section appears. Check the checkbox next to Show additional Unified CM product instances. Selecting this option allows you to view products without prior version data. |
| Step 4 | To migrate a product instance, select it in the Available Product Instances window and click the arrow to move it to the Product Instances to Migrate window. Click Next. |
| Step 5 | The Additional Information Will Be Required window appears. Once you have read the contents of the window, click Continue to close the window. |
| Step 6 | The License Counts section appears. Enter the following information Click Next. |
| Step 7 | The License Migration Request and Next Steps window appears. Download the License Migration Request zip file to your PC. |
| Step 8 | Email the License Migration Request to Cisco licensing support using the link provided. |
| Step 9 | Click Close to return to the License Planning page. |
Licensing Migration Support
Product licensing has a grace period from the time that users are configured on the system. For Cisco Unified Communications Manager and Unity Connection, the grace period is 60 days.
The Global Licensing Operations (GLO) Team is available 24 x 7 x 365 and has knowledgeable agents that can help process your request and route it to the team best able to assist you. Expect a response within 48-72 hours
To obtain migration support, select one of the following options:
- Open your service request through the web: https://tools.cisco.com/ServiceRequestTool/scm/mgmt/case
- Open any service request through licensing@cisco.com (include Cisco.com user ID)
- Open a service request by telephone using country-specific numbers: http://www.cisco.com/en/US/support/tsd_cisco_worldwide_contacts.html
New License Planning and Fulfillment
License Planning
Use the following procedure to plan the addition of new licenses.
| Step 1 | From the Licenses > Planning page, click Create an Add Licenses Plan. The Create an Add Licenses Plan wizard window appears. |
| Step 2 | From the Choose Product section, choose the product type and license version of the product to which you will be adding a licence. Click Next. |
| Step 3 | From the License
Counts section, adjust the number of licenses that
will be allocated to each type of license and click
Save to
save your changes for that license type. You may also choose to run a
compliance check by clicking Run Compliance Check, or reset the
license values by clicking Reset Values. After the number of licenses
has been set, click
Next.
Clicking the arrow next to each license type reveals additional information about that license type. A window appears to indicate whether the compliance check passed or failed. |
| Step 4 | If your compliance check fails, you can return to License Counts to make additional changes. If the compliance check passed, click Continue to move to the next section. |
| Step 5 | In Summary and Next Steps section, you can view and save a summary of the changes you made. You can also enter your own summary name and description. |
| Step 6 | To view the summary, click View Summary. The Save Summary in Cisco Prime License Manager option is selected by default. A default name for the summary also appears in the Name field using the format <product-type>-add-<date-time-stamp> format. Instructions for placing your order and fulfilling your licenses also appear in this section. |
| Step 7 | Click Finish |
What to Do Next
-
Place your order: Purchase your licenses or use your service contract to get a PAK.
-
Fulfill your licenses: Enter your PAK into the License Fulfillment screen of Cisco Prime License Manager and, through the e-Fulfillment process, fulfill your licenses. Cisco Prime License Manager communicates with Cisco licensing servers and your new licenses will be installed and ready to use.
Configure License Fulfillment Electronically
Complete the following procedure to electronically fulfill your licenses.
Create a licenses plan.
| Step 1 | From the Cisco Prime License Manager main menu, select Licenses > Fulfillment. The License Fulfillment page opens. | ||||
| Step 2 | In eFulfillment mode, click Fulfill Licenses from PAK. The Fulfill Licenses from PAK window appears. | ||||
| Step 3 | Choose the Add licenses from a new PAK option and enter the Product Authorization Key (PAK) code. If you have previously entered PAKs in Cisco Prime License Manager, you may select the second option, "Add licenses from an already-installed PAK that supports partial fulfillment". After you have chosen that option, select the existing PAK code from the drop-down menu. | ||||
| Step 4 | Click Next. | ||||
| Step 5 | If prompted for your Cisco.com account information, enter the username and password you entered when you registered at Cisco.com. | ||||
| Step 6 | Click OK. If there are licenses remaining to be fulfilled (and the PAK username and password are validated), the Fulfill Licenses section appears. | ||||
| Step 7 | The licenses
within the PAK are listed by SKU name. The numbers of each license are
categorized under a number of headings to indicate how many have been fulfilled
and how many are remaining.
You can
specify the number of licenses you want to fulfill by selecting
Fulfill in
the Actions column for that license type. The Fulfill Licenses window appears.
In this window you can specify the count in the Fulfill column, and click
Save, then
click
OK to
close the window. The updated count now appears in the Fulfill column of the
Fulfill Licenses table.
| ||||
| Step 8 | Click Next to review your changes. If you are not satisfied with your changes, click Previous to return to the Fulfill Licenses section. If you are satisfied with the changes, click Next to move to the next section. | ||||
| Step 9 | Click Next in the Fulfill Licenses section. | ||||
| Step 10 | In the Transaction Options and License Agreement section, you may enter a description (optional). You may also associate this transaction with a saved license summary by selecting that option and then selecting the name of the license summary from the drop-down list. | ||||
| Step 11 | Indicate that you accept the conditions of the End User License Agreement. | ||||
| Step 12 | Click Finish. Upon successful completion of the e-Fulfillment process, the new fulfillment appears in the License Fulfillment table. |
Upgrade Existing Licenses
There are three types of license upgrades:
Note | The content of the PAK determines whether a license can be upgraded by feature or version. |
Use the following procedure to fulfill a major version upgrade using eFulfillment.
| Step 1 | From the Cisco Prime License Manager main menu, select Licenses > Fulfillment. The License Fulfillment page opens. | ||||
| Step 2 | In eFulfillment mode, click the Fulfill Licenses from PAK button. The Fulfill Licenses from PAK window appears. | ||||
| Step 3 | Select the Add licenses from a new PAK option and enter the Product Authorization Key (PAK) code. If you have previously entered PAKs in Cisco Prime License Manager, you may select the second option, "Add licenses from an already-installed PAK that supports partial fulfillment". Once you have selected that option, select the existing PAK code from the drop-down menu. | ||||
| Step 4 | Click the Next button. If prompted for your Cisco.com account information, enter the username and password you entered when you registered at Cisco.com. | ||||
| Step 5 | Click the Ok button. If there are licenses remaining to be fulfilled (and the PAK username and password are validated), the Fulfill Licenses section appears. | ||||
| Step 6 | The licenses
within the PAK are listed by SKU name. The numbers of each license are
categorized under a number of headings to indicate how many have been fulfilled
and how many are remaining.
You can
specify the number of licenses you want to fulfill by selecting
Fulfill in
the Actions column for that license type. The Fulfill Licenses window appears.
In this window you can specify the license version, feature, or both, and click
Save then
click
OK to
close the window. The updated count now appears in the Fulfill column of the
Fulfill Licenses table.
| ||||
| Step 7 | Click the Next button to review your changes. If you are not satisfied with your changes, click Previous to return to the Fulfill Licenses section. If you are satisfied with the changes, click Next to move to the next section. | ||||
| Step 8 | Clicking Next in the Fulfill Licenses section opens the Transaction Options and License Agreement section. In this section, you may enter a description (optional). You may also associate this transaction with a saved license summary by selecting that option and then selecting the name of the license summary from the drop-down list. | ||||
| Step 9 | Select the checkbox to accept the conditions of the End User License Agreement. | ||||
| Step 10 | Click the Finish button. | ||||
| Step 11 | Upon successful completion of the e-Fulfillment process, the new fulfillment appears in the License Fulfillment table. |
Other Fulfillment Options
Next to the Fulfill Licenses from PAK option on the License Fulfillment page, there is another option entitled "Other Fulfillment Options".
In Manual Fulfillment mode, selecting the drop-down arrow under this option reveals only one option: Generate License Request.
In eFulfillment mode, selecting the drop-down arrow under this option reveals three options:
Fulfill Licenses From File
To fulfill licenses from a file on your PC:
- Select Other Fulfillment Options > Fulfill Licenses from File.
- The Install License File window opens. Click the Browse button to locate the file on your PC. Select the file and click Open.
- You can add a description and associate the transaction with a saved license plan (optional).
- Click the Install button to install the license file.
Generate License Request
To obtain a new license (using Manual fulfillment), you must first generate a license request through the Licenses > Fulfillment page, and then use the information generated to submit a request. You will then receive your license file via email. Use the following procedure to generate a license request.
- Log in to Cisco Prime License Manager.
- From the Licenses > Fulfillment page, select Generate License Request from the drop-down list under Other Fulfillment Options.
- The License Request and Next Steps window appears. Copy the selected text to your clipboard or click Save it to a file on your PC.
Retrieve Fulfilled Licenses
The "Retrieve Fulfilled Licenses" option is exclusive to e-Fulfillment. This feature connects to the Cisco licensing servers to retrieve and install the licenses that have been fulfilled for this Prime License Manager. This feature is useful if you wish to synchronize your Cisco Prime License Manager with the Cisco back office with regard to licenses that have been fulfilled.
Use the following procedure to retrieve fulfilled licenses:
-
Log in to Cisco Prime License Manager.
-
Select Licenses > Fulfillment.
-
If not already selected, click the Enable button to enable e-Fulfillment.
-
Under Other Fulfillment Options, select Retrieve Fulfilled Licenses. The Retrieve Fulfilled Licenses window appears.
-
Enter your Cisco Username and Password. You can add a description (optional) in the Transaction Description field.
-
Click the Retrieve and Install Licenses button.
-
Your Cisco Prime License Manager is synchronized with the Cisco back office and all licenses currently fulfilled are installed.
 Feedback