Administration Guide for the Cisco Unified Application Environment, Release 8.5
Bias-Free Language
The documentation set for this product strives to use bias-free language. For the purposes of this documentation set, bias-free is defined as language that does not imply discrimination based on age, disability, gender, racial identity, ethnic identity, sexual orientation, socioeconomic status, and intersectionality. Exceptions may be present in the documentation due to language that is hardcoded in the user interfaces of the product software, language used based on RFP documentation, or language that is used by a referenced third-party product. Learn more about how Cisco is using Inclusive Language.
- Updated:
- December 15, 2010
Chapter: Managing System Settings
Managing System Settings
This chapter includes these topics:
•![]() Managing Secure Connections to the Management Service
Managing Secure Connections to the Management Service
•![]() Managing Secure Connections to the Etch Bridge
Managing Secure Connections to the Etch Bridge
Setting Global Parameters
This section includes these topics:
•![]() Setting Parameters for the Server
Setting Parameters for the Server
•![]() Setting Parameters for the Cisco Unified Application Server
Setting Parameters for the Cisco Unified Application Server
•![]() Setting Parameters for the Cisco Unified Media Engine
Setting Parameters for the Cisco Unified Media Engine
Setting Parameters for the Server
To set parameters for the server, follow these steps:
Procedure
Step 1 ![]() Log in to the Cisco Unified Application Environment Administration.
Log in to the Cisco Unified Application Environment Administration.
Step 2 ![]() Choose System > Global Parameters.
Choose System > Global Parameters.
Step 3 ![]() Under Server, in the Host Name/IP Address field, enter a fully-qualified host name or IP address that other servers can use to access the services on this server.
Under Server, in the Host Name/IP Address field, enter a fully-qualified host name or IP address that other servers can use to access the services on this server.
Step 4 ![]() Click Save.
Click Save.
Setting Parameters for the Cisco Unified Application Server
To set parameters for the Cisco Unified Application Server, follow these steps:
Procedure
Step 1 ![]() Log in to the Cisco Unified Application Environment Administration.
Log in to the Cisco Unified Application Environment Administration.
Step 2 ![]() Choose System > Global Parameters.
Choose System > Global Parameters.
Step 3 ![]() Under Application Server, enter the values as described in Table 3-1.
Under Application Server, enter the values as described in Table 3-1.
Step 4 ![]() Click Save.
Click Save.
Setting Parameters for the Cisco Unified Media Engine
To set parameters for the Cisco Unified Media Engine, follow these steps:
Procedure
Step 1 ![]() Log in to the Cisco Unified Application Environment Administration.
Log in to the Cisco Unified Application Environment Administration.
Step 2 ![]() Choose System > Global Parameters.
Choose System > Global Parameters.
Step 3 ![]() Under Media Engine, enter the values as described in Table 3-2:
Under Media Engine, enter the values as described in Table 3-2:
Step 4 ![]() Click Save.
Click Save.
Support for MCS Server
The Cisco Unified Application Environment runs on the following MCS servers:
•![]() MCS 7816H3, 7816H4
MCS 7816H3, 7816H4
•![]() MCS 7816H3, 7816H4
MCS 7816H3, 7816H4
•![]() MCS 7825I3, 7825H3, 7825I4, 7825H4
MCS 7825I3, 7825H3, 7825I4, 7825H4
•![]() MCS 7835I3, 7835H3, 7835I4, 7835H4
MCS 7835I3, 7835H3, 7835I4, 7835H4
•![]() MCS 7845I3, 7845I4, 7845H3, 7845H4
MCS 7845I3, 7845I4, 7845H3, 7845H4
Installation and Deployment Requirements
Once the Operating System is installed on the MCS server, the Cisco Unified Application Environment software must be installed. The standard installation of the Cisco Unified Application Environment software on the MCS server takes approximately 15 minutes. For more information about installation, see http://www.cisco.com/en/US/docs/voice_ip_comm/cuae/8_0/english/install/guide/uaein.html
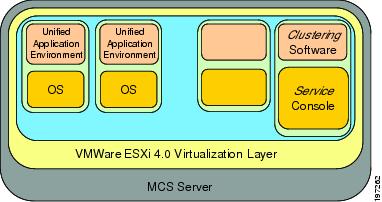
Deployment on VMware ESXi 4.0'
VMware ESXi 4.0 provides a virtualized hardware to the guest operating system(s), as shown in Figure 3-1. The Cisco Unified Application Environment is deployed on a guest operating system that is running on VMware ESXi 4.0 virtualization layer. Multiple Cisco Unified Application Environments can coexist on the same physical server on separate guest operating systems.
VMware vSphere Client provides a graphical user interface to manage the VMware ESXi 4.0 host and its virtual machines. Developers can use the VMware vSphere Client on their local machine to manage the VMware ESXi host and its virtual machines, to connect to the host to add or delete virtual machines, run OS installations from their local machine, and make configuration changes.
Figure 3-1 VMware vSphere Client Interface

Note ![]() Cisco Unified Application Environment 8.5 supports virtualization in a lab/demo environment only and not in production.
Cisco Unified Application Environment 8.5 supports virtualization in a lab/demo environment only and not in production.
Managing Licenses
This section includes these topics:
•![]() Viewing License Statistics and Modes
Viewing License Statistics and Modes
Overview
By applying the appropriate licenses, you enable either the Cisco Unified Application Server software on the server or the Cisco Unified Media Engine software, or both. In addition, you can incrementally increase the capabilities for the Cisco Unified Application Server or for the Cisco Unified Media Engine with supplementary licenses. There are dedicated licenses files for both mode and for media resource instances.
•![]() Mode (Premium, Standard, or Basic)
Mode (Premium, Standard, or Basic)
The mode of the Cisco Unified Application Server or Cisco Unified Media Engine defines the upper limit of script instances.
If no licenses are applied to the server, the server operates in software developer kit (SDK) mode.
Note ![]() This mode may not be used for commercial purposes.
This mode may not be used for commercial purposes.
It is intended to enable development, demos, and trials. In this mode, the server auto-licenses itself to:
–![]() 6 script instances
6 script instances
–![]() 6 RTP (G.711)
6 RTP (G.711)
–![]() 0 ERTP (Low-bit rate: G.723 & G.729)
0 ERTP (Low-bit rate: G.723 & G.729)
–![]() 6 Voice (Media operations such as Play, Record, and GatherDigits)
6 Voice (Media operations such as Play, Record, and GatherDigits)
–![]() 6 Conference
6 Conference
–![]() 0 Speech Recognition (also known as continuous speech processing (CSP)
0 Speech Recognition (also known as continuous speech processing (CSP)
–![]() 1 text-to-speech port
1 text-to-speech port
•![]() Media Resource Instance Licenses
Media Resource Instance Licenses
Licenses can be applied to the Cisco Unified Media Engine mode license to increase the number of media resources instances allowed to concurrently execute on the media engine.An incremental license increases the overall amount of media resources instances, but the total amount of media resources instances cannot exceed the upper limit dictated by the mode of the Cisco Unified Media Engine license. Therefore, if the number of licensed application instances exceeds this mode limit, the total allowed instances will not exceed the mode limit.
Licenses are node locked to the MAC address of the server. If you upload a licence that does not have the same MAC address as the server, the features specified by the license will not be enabled.
The MAC Address of the Server is shown in the License management page.
For both VMware and Virtual environment, the Cisco Unified Application Environment server generates the Virtual MAC address and displays it on the License Management page. The license file that you upload should be the same as the license file that is displayed on the License Management page.
Viewing License Statistics and Modes
To view license statistics and modes, follow these steps:
Procedure
Step 1 ![]() Log in to the Cisco Unified Application Environment Administration.
Log in to the Cisco Unified Application Environment Administration.
Step 2 ![]() Choose System > License Management.
Choose System > License Management.
Table 3-3 describes information provided for the license mode and statistics.
|
|
|
|---|---|
License Modes |
|
Cisco Unified Application Server License Mode |
Mode of the Cisco Unified Application Server, which defines the upper limit of script instances. |
Cisco Unified Media Engine License Mode |
Mode of the Cisco Unified Media Engine, which defines the upper limit of script instances. |
License Statistics |
|
Resource |
Resource name. |
Max |
Maximum number of resource units that can be licensed with the current license mode. To increase the number, you must obtain a higher-mode license. |
Licensed |
Number of licensed resource units. To increase this number you must purchase additional, incremental licenses. However, this number cannot be larger than the one shown in the Max field. |
Active |
Currently-used number of license units. |
Stats |
Click to view a graphical representation of the current usage statistics. For more information, see Viewing Usage Statistics, page 8-7. |
Managing License Files
This section contains the following topics:
Uploading a License
To upload a license, follow these steps:
Procedure
Step 1 ![]() Log in to the Cisco Unified Application Environment Administration.
Log in to the Cisco Unified Application Environment Administration.
Step 2 ![]() Choose System > License Management.
Choose System > License Management.
Step 3 ![]() Under Upload License File, click Browse to locate the license, then click Upload.
Under Upload License File, click Browse to locate the license, then click Upload.
Deleting a License
To delete a license, follow these steps:
Procedure
Step 1 ![]() Log in to the Cisco Unified Application Environment Administration.
Log in to the Cisco Unified Application Environment Administration.
Step 2 ![]() Choose System > License Management.
Choose System > License Management.
Step 3 ![]() Under License File Management, select the license that you want to delete, then click Delete.
Under License File Management, select the license that you want to delete, then click Delete.
Deployment and Licensing for VMware or Virtualized Environment
When the Cisco Unified Application Environment is deployed on a virtual environment, the MAC address used for licensing is not the one configured on the network interface of the virtual machine. The MAC address is generated from the system parameters such as Host name, IP address, and Subnet mask. When you obtain a license, make sure that you specify the MAC address that is displayed on the License Management page.

Note ![]() Cisco Unified Application Environment 8.5 supports virtualization in a lab/demo environment only and not in production.
Cisco Unified Application Environment 8.5 supports virtualization in a lab/demo environment only and not in production.
Redundant Licensing
Redundant licensing is only applicable to the primary and backup Cisco Unified Application Environment application server deployment. Therefore, if you plan to deploy a Primary application/media and a redundant, backup application/media server, you must upload a redundant license file in the backup application/media server. Redundant license file is similar to the non-redundant/Primary/Stand-alone license file, except that it will contain the keyword `Redundant'.
Failover Strategies
This section describes the licensing strategy to overcome failover.
|
|
|
|
|
|---|---|---|---|
UP |
UP |
Primary |
Only Primary |
DOWN |
UP |
Backup |
Only Backup |
UP |
DOWN |
Primary |
Only Primary |
Note ![]() Backup Media server is the one with redundant media resource licenses. The scenario in the above table assumes that Backup Application Server has the backup media engine configured.
Backup Media server is the one with redundant media resource licenses. The scenario in the above table assumes that Backup Application Server has the backup media engine configured.
License Limits
This section describes the license limits of the various Cisco Unified Application Environment components.
Cisco Unified Application Server
Table 3-4 describes the license limits of the Cisco Unified Application Server.
|
|
|
|---|---|
Standard (STD) |
25 script instances |
Enhanced (Enh) |
75 script instances |
Enhanced (Prem) |
9999 script instances |
Cisco Unified Media Engine
Table 3-5 describes the license limits of the Cisco Unified Media Engine.
Configuring Redundancy
You can configure a master and standby Cisco Unified Application Server. The standby server attempts to contact the master server every few seconds. If the specified number of attempts fails, the standby server takes over.
This section contains these topics:
Overview
The Cisco Unified Application Environment supports redundant configurations for certain protocols, including Session Initiation Protocol (SIP), Skinny Client Control Protocol (SCCP), and computer telephony integration (CTI). Specifically, when these protocols are configured in station (phone) device appearances in Cisco Unified Communications Manager, such as a CTI Route Point, CTI Port, SCCP phone, or SIP phone, the steps outlined in this section allow redundancy.
Creating a master/standby configuration is not always necessary to achieve redundancy. If the device appearance of the Cisco Unified Application Server in the Cisco Unified Communications Manager is a gateway or trunk, then the Cisco Unified Communications Manager Route Lists and Route Groups can be used to define groups of Cisco Unified Application Servers. Route groups defined in the Cisco Unified Communication Manager inherently support failover and/or load balancing. For example, if a call is placed to a gateway or trunk in a route group, and the receiving gateway or trunk is not responding, then Cisco Unified Communications Manager contacts the next device in the group, essentially providing redundancy.
A pair of servers can be both a master and standby servers to each other. This configuration allows you to place half of the devices to be registered on one server and the other half on the second server. When both servers are up, neither server is fully loaded. Only when a server is down is the other fully loaded. This allows minimum system resource usage during up times thereby creating optimum performance.
Figure 3-2 shows the deployment model for redundant licensing.
Figure 3-2 Deployment Model Redundant Licensing

The above illustration shows Unified Media Engine deployed independently. The same rule applies to Media Engine that is co-resident with the Appserver.
Note ![]() A standby server supports the applications when the primary server fails. For such scenarios, you can use the Cisco Unified Application Environment software part numbers and media resources at a discounted price. These licenses are only for installation on a redundant server and cannot be used for more than 30 days at a stretch.
A standby server supports the applications when the primary server fails. For such scenarios, you can use the Cisco Unified Application Environment software part numbers and media resources at a discounted price. These licenses are only for installation on a redundant server and cannot be used for more than 30 days at a stretch.
Setting Up Redundancy
To assign a unique ID number for each of the servers and to configure the master and standby servers, follow these steps:
Procedure
Step 1 ![]() Log in to the Master Cisco Unified Application Environment Administration.
Log in to the Master Cisco Unified Application Environment Administration.
Step 2 ![]() Choose System > Redundancy.
Choose System > Redundancy.
Step 3 ![]() Enter a unique identification number for the Server ID.
Enter a unique identification number for the Server ID.
Note ![]() If you change the server ID or its IP address, the Cisco Unified Application Server and all related services, including the database, will restart.
If you change the server ID or its IP address, the Cisco Unified Application Server and all related services, including the database, will restart.
Step 4 ![]() Under As Master, enter the values as described Table 3-6.
Under As Master, enter the values as described Table 3-6.
Step 5 ![]() Log in to the Standby Cisco Unified Application Environment Administration.
Log in to the Standby Cisco Unified Application Environment Administration.
Step 6 ![]() Choose System > Redundancy.
Choose System > Redundancy.
Step 7 ![]() Enter a unique identification number for the Server ID.
Enter a unique identification number for the Server ID.
Note ![]() If you change the server ID or its IP address, the Cisco Unified Application Server and all related services, including the database, will restart.
If you change the server ID or its IP address, the Cisco Unified Application Server and all related services, including the database, will restart.
Step 8 ![]() Under As StandBy, enter the values as described Table 3-7.
Under As StandBy, enter the values as described Table 3-7.
Step 9 ![]() Under As Standby, enter the values as described in Table 3-8
Under As Standby, enter the values as described in Table 3-8
Step 10 ![]() Click Save.
Click Save.
You need to create database users (on both master and standby Cisco Unified Application Environment) apart from the root account as mentioned below.
C:\>mysql -u root -p
Enter password: *******
Welcome to the MySQL monitor. Commands end with ; or \g.
Your MySQL connection id is 35 to server version: 4.1.20-community-nt
Type 'help;' or '\h' for help. Type '\c' to clear the buffer.
mysql> show databases;
+------------------+
| Database |
+------------------+
| ciscodevicelistx |
| mce |
| mce_standby |
| mysql |
| prashanth |
| test |
+------------------+
6 rows in set (0.00 sec)
mysql> use mysql;
Database changed
mysql> GRANT ALL PRIVILEGES ON *.* TO 'pks'@'localhost'IDENTIFIED BY 'metreos' WITH GRANT
OPTION;
Query OK, 0 rows affected (0.03 sec)
mysql> GRANT ALL PRIVILEGES ON *.* TO 'pks'@'%' IDENTIFIED BY 'metreos' WITH GRANT OPTION;
Query OK, 0 rows affected (0.00 sec)
Redundant Application Server
Redundant application server serves license only on failover, that is, when the primary application server is down. When the primary application server is active, it will not serve license to any application.
Redundant Media Server
Redundant media server will not serve any license while Primary Application Server is active. It will serve license only when Backup application server is in failover mode, that is when primary application server is active, it will not serve any license.
The application server and media server checks for the availability of license before executing application script and requesting media resources respectively, applications will not run on a redundant server when it is in fail back (Primary Application Server is active) mode.
Configuring SSL Management
The Cisco Unified Application Environment uses OpenSSL to provide HTTPS secure client access to the Cisco Unified Application Environment Administration web interface. You can upload your own SSL certificate and private key or use the interface to generate a self-signed certificate and key. You can also enable or disable SSL, and restart the Apache service via the user interface.
This section contains these topics:
•![]() Uploading SSL Certificate and Key
Uploading SSL Certificate and Key
•![]() Generating SSL Certificate and Key
Generating SSL Certificate and Key
Overview
The high-level steps involved in enabling SSL are:
1. ![]() Upload or generate an SSL certificate and key.
Upload or generate an SSL certificate and key.
2. ![]() Enable SSL by clicking the Enable SSL button on the SSL Management page.
Enable SSL by clicking the Enable SSL button on the SSL Management page.
3. ![]() Restart the Apache service.
Restart the Apache service.
Uploading SSL Certificate and Key
To upload your own SSL certificate and private key for the Cisco Unified Application Server, follow these steps:
Procedure
Step 1 ![]() Log in to the Cisco Unified Application Environment Administration.
Log in to the Cisco Unified Application Environment Administration.
Step 2 ![]() Choose System > SSL Management.
Choose System > SSL Management.
Step 3 ![]() Under Upload SSL Certificate/Key, click Browse to locate and select the SSL certificate.
Under Upload SSL Certificate/Key, click Browse to locate and select the SSL certificate.
Step 4 ![]() Click Browse to locate and select the SSL private key.
Click Browse to locate and select the SSL private key.
Step 5 ![]() When both the Certificate and Key fields are populated, click Upload.
When both the Certificate and Key fields are populated, click Upload.
The page refreshes and the Current Status section displays the Enable SSL button.
Note ![]() SSL is not enabled until you click the Enable SSL button and receive a success message.
SSL is not enabled until you click the Enable SSL button and receive a success message.
Passphrase Protection
The Cisco Unified Application Environment Administration interface will not prompt for a passphrase. Therefore, do not attempt to use passphrase protection for any private keys that you upload.
Certificate and Key Backups
If you upload or create a new SSL certificate and key when a set already exists, your previously installed certificates and keys are backed up automatically. Backups are stored in C:\Program Files\Apache Group\Apache\conf\ssl on the Cisco Unified Application Server machine and named in the format of [oldfilname.extension].[yyMMddHHmmssZ].bak. For example: my-server.cert.080919164130-0500.bak.
You can delete SSL certificate and key files from the file system manually.
Generating SSL Certificate and Key
To generate an SSL certificate and key for the Cisco Unified Application Server, follow these steps:
Procedure
Step 1 ![]() Log in to the Cisco Unified Application Environment Administration.
Log in to the Cisco Unified Application Environment Administration.
Step 2 ![]() Choose System > SSL Management.
Choose System > SSL Management.
Step 3 ![]() Under Generate SSL Certificate/Key, provide the requested information.
Under Generate SSL Certificate/Key, provide the requested information.
Step 4 ![]() Click Generate.
Click Generate.
The page refreshes and the Current Status section displays a new message to inform you if certificate and key generated successfully.

Tip ![]() In addition to the self-signed certificate and key, a certificate signing request is also created that you can use if you prefer to use an SSL certificate from a trusted certifying authority.
In addition to the self-signed certificate and key, a certificate signing request is also created that you can use if you prefer to use an SSL certificate from a trusted certifying authority.
Note ![]() Generating an SSL certificate and key does not automatically enable SSL. SSL is enabled after you click the Enable SSL button and receive a success message.
Generating an SSL certificate and key does not automatically enable SSL. SSL is enabled after you click the Enable SSL button and receive a success message.
Enabling SSL
To enable SSL after you have uploaded or generated a certificate and key, follow these steps:
Procedure
Step 1 ![]() Log in to the Cisco Unified Application Environment Administration.
Log in to the Cisco Unified Application Environment Administration.
Step 2 ![]() Choose System > SSL Management.
Choose System > SSL Management.
Step 3 ![]() Under Current Status, click Enable SSL.
Under Current Status, click Enable SSL.
Step 4 ![]() After you enable or disable SSL, you must restart the Apache service. For instructions, see "Restarting the Apache Service" section
After you enable or disable SSL, you must restart the Apache service. For instructions, see "Restarting the Apache Service" section
Note ![]() The Enable SSL button only appears when SSL is disabled and a certificate and key have been uploaded or generated.
The Enable SSL button only appears when SSL is disabled and a certificate and key have been uploaded or generated.
Note ![]() Restarting the Apache service causes the Cisco Unified Application Environment to be unavailable until it finishes restarting.
Restarting the Apache service causes the Cisco Unified Application Environment to be unavailable until it finishes restarting.
Disabling SSL
Disabling turns off SSL. After the Apache service is restarted, SSL will be turned off. The private key and certificate file are still present in the file system afterwards, but are not being used.
To disable SSL, follow these steps:
Procedure
Step 1 ![]() Log in to the Cisco Unified Application Environment Administration.
Log in to the Cisco Unified Application Environment Administration.
Step 2 ![]() Choose System > SSL Management.
Choose System > SSL Management.
Step 3 ![]() Under Current Status, click Disable SSL.
Under Current Status, click Disable SSL.
Step 4 ![]() After you enable or disable SSL, you must restart the Apache service. For instructions, see "Restarting the Apache Service" section
After you enable or disable SSL, you must restart the Apache service. For instructions, see "Restarting the Apache Service" section
Note ![]() The Disable SSL button only appears when SSL is enabled.
The Disable SSL button only appears when SSL is enabled.
Note ![]() Restarting the Apache service causes the Cisco Unified Application Environment to be unavailable until it finishes restarting.
Restarting the Apache service causes the Cisco Unified Application Environment to be unavailable until it finishes restarting.
Restarting the Apache Service
After you enable or disable SSL, you must restart the Apache service.
Note ![]() Restarting the Apache service causes the Cisco Unified Application Environment to be unavailable until it finishes restarting.
Restarting the Apache service causes the Cisco Unified Application Environment to be unavailable until it finishes restarting.
There are three ways to restart the Apache service:
•![]() Using the command-line:
Using the command-line:
a. ![]() On the Application Server, open a command prompt.
On the Application Server, open a command prompt.
b. ![]() Stop the Apache service:
Stop the Apache service:
net apache stop
c. ![]() Start the Apache service:
Start the Apache service:
net apache start
•![]() Using the Windows Services console:
Using the Windows Services console:
a. ![]() Choose Start > Control Panel > Administrative Tools > Services.
Choose Start > Control Panel > Administrative Tools > Services.
b. ![]() Click the Apache service.
Click the Apache service.
c. ![]() On the Action menu, click Restart.
On the Action menu, click Restart.
•![]() Using the Cisco Unified Application Environment Administration interface:
Using the Cisco Unified Application Environment Administration interface:
a. ![]() Log in to the Cisco Unified Application Environment Administration interface.
Log in to the Cisco Unified Application Environment Administration interface.
b. ![]() Choose System > SSL Management.
Choose System > SSL Management.
c. ![]() Under Current Status, click Restart Apache.
Under Current Status, click Restart Apache.
Managing Secure Connections to the Management Service
By default, Transport Layer Security (TLS) is enabled on the Management Service, which causes the CUAE command-line tool and Cisco Unified Application Environment Administration to consume the Management Service API using TLS. After installation, encryption is ON but authentication is OFF. Authentication can be enabled for the connection between the CUAE command-line tool and the Management Service.
Note ![]() There are two types of authentication possible between the CUAE command-line tool and the Management Service. Server authentication is on by default and developers are always prompted for the administration user name and password to install, remove, or update applications. Protocol authentication using TLS is configurable, but disabled by default.
There are two types of authentication possible between the CUAE command-line tool and the Management Service. Server authentication is on by default and developers are always prompted for the administration user name and password to install, remove, or update applications. Protocol authentication using TLS is configurable, but disabled by default.
This section describes the following configuration options:
•![]() Generating the Certificate and Key
Generating the Certificate and Key
•![]() Managing the CUAE Command-line Tool Protocol
Managing the CUAE Command-line Tool Protocol
•![]() Enabling Authentication between CUAE Command-line Tool and Management Service
Enabling Authentication between CUAE Command-line Tool and Management Service
•![]() Disabling TLS on the Management Service
Disabling TLS on the Management Service
Generating the Certificate and Key
The Cisco Unified Application Environment Platform Services installer automatically generates the TLS certificate and key during installation for production and places it in \MgmtServiceLauncher\conf. The keystore name is default.keystore.
Note ![]() You can create your own certificate and key using keytool. The keytool program is a security tool included in the bin directory of the Java SDK. For more information, see http://java.sun.com/j2se/1.5.0/docs/tooldocs/windows/keytool.html.
You can create your own certificate and key using keytool. The keytool program is a security tool included in the bin directory of the Java SDK. For more information, see http://java.sun.com/j2se/1.5.0/docs/tooldocs/windows/keytool.html.
Managing the CUAE Command-line Tool Protocol
Developers use the CUAE command-line tool when creating and managing etch-based applications. When using the following commands, the developer is prompted to supply the protocol (TCP or TLS) to be used for communication between the application server and the developer's client machine.
•![]() cuae install
cuae install
•![]() cuae remove
cuae remove
•![]() cuae update
cuae update
The developer should supply the protocol that is set on the Management Service. TLS is the default supported protocol. If the user selects TLS, they have the option to select only encryption or encryption and authentication.
If you want developers to use authentication, follow the instructions in the "Enabling Authentication between CUAE Command-line Tool and Management Service" section.
If you want developers to use TCP, follow the instructions in the "Disabling TLS on the Management Service" section to change the default URI of the Management Service before developers use these commands.
Enabling Authentication between CUAE Command-line Tool and Management Service
When using TLS, encryption is enabled by default. To enable TLS authentication, follow these steps:
Procedure
Step 1 ![]() Provide developers with the security certificate.
Provide developers with the security certificate.
Note ![]() The private key's matching certificate is located by default in \MgmtServiceLauncher\conf\default.cer. However, if you create your own private key and matching certificate, you will have to first export the certificate before giving it to a developer by using the keytool -export command. For more information, see http://java.sun.com/j2se/1.5.0/docs/tooldocs/windows/keytool.html.
The private key's matching certificate is located by default in \MgmtServiceLauncher\conf\default.cer. However, if you create your own private key and matching certificate, you will have to first export the certificate before giving it to a developer by using the keytool -export command. For more information, see http://java.sun.com/j2se/1.5.0/docs/tooldocs/windows/keytool.html.
Step 2 ![]() Instruct developers to import the certificate into the truststore using keytool or makecert.exe on the machine where they will run the CUAE command-line tool. They will be prompted for the protocol details when running the CUAE command-line tool. For more information, direct developers to the Cisco Unified Application Environment wiki at this URL:http://developer.cisco.com/web/cuae/wikidocs.
Instruct developers to import the certificate into the truststore using keytool or makecert.exe on the machine where they will run the CUAE command-line tool. They will be prompted for the protocol details when running the CUAE command-line tool. For more information, direct developers to the Cisco Unified Application Environment wiki at this URL:http://developer.cisco.com/web/cuae/wikidocs.
Disabling TLS on the Management Service
You can disable TLS support for the Management Service. If you do, you must also modify the Cisco Unified Application Environment Administration configuration and inform developers to choose TCP when prompted by the CUAE command-line tools for the protocol.
To disable TLS on the Management Service, follow these steps:
Procedure
Step 1 ![]() Open \MgmtServiceLauncher\conf\production.properties on the Application Server.
Open \MgmtServiceLauncher\conf\production.properties on the Application Server.
Step 2 ![]() Locate and modify the URI setting to resemble the following:
Locate and modify the URI setting to resemble the following:
listenerUri=tcp://0.0.0.0:9001
#uncomment the following line to enable tls
#listenerUri=tls://0.0.0.0:9001
Step 3 ![]() Restart the CUAE Management Server service.
Restart the CUAE Management Server service.
Configure Management Service Connection Details
To configure the new Management Service connection to match the production.properties on the Cisco Unified Application Server, follow these procedures:
Procedure
Step 1 ![]() Open the Management Service Launcher file: C:\Program Files\Cisco Systems\Unified Application Environment\MgmtServiceLauncher\conf\mgmt-service-launcher.conf.
Open the Management Service Launcher file: C:\Program Files\Cisco Systems\Unified Application Environment\MgmtServiceLauncher\conf\mgmt-service-launcher.conf.
Step 2 ![]() Locate the Java Additional Parameters section of the code. It contains a series of wrapper.java.addtional.N properties, where N is an incrementing integer value.
Locate the Java Additional Parameters section of the code. It contains a series of wrapper.java.addtional.N properties, where N is an incrementing integer value.
Step 3 ![]() Pass the cuae.managment-service-uri system parameter to the JVM. For example, the following parameter syntax points the Cisco Unified Application Environment Administration to the local TCP connection on port 9001 configured in the above example:
Pass the cuae.managment-service-uri system parameter to the JVM. For example, the following parameter syntax points the Cisco Unified Application Environment Administration to the local TCP connection on port 9001 configured in the above example:
wrapper.java.additional.5=-Dcuae.management-service-uri=tcp://localhost:9001/
Managing Secure Connections to the Etch Bridge
By default, Transport Layer Security (TLS) is enabled on the Etch Bridge, which allows etch-based applications and plugins to connect to the Etch Bridge using TLS.
This section contains the following topics:
•![]() Enabling TLS on the Etch Bridge
Enabling TLS on the Etch Bridge
•![]() Disabling TLS on the Etch Bridge
Disabling TLS on the Etch Bridge
•![]() Creating a New Etch-Bridge Certificate
Creating a New Etch-Bridge Certificate
Understanding Client-Server Connections
TLS or TCP is used for connections between the applications and plugins to the Etch Bridge. Figure 3-3 illustrates the connections between the components.
Figure 3-3 Plugin and Application Connections to the Etch Bridge
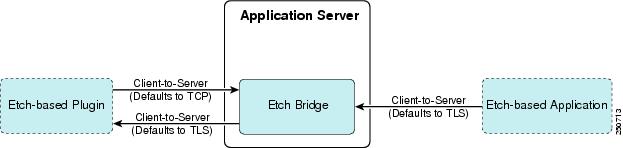
For applications, the Etch Bridge is the server and the machine running the application is the client.
Technically a plugin can act as both a server and client of the Etch Bridge.When the plugin connects to the Etch Bridge to use methods exposed by the Cisco Unified Application Environment, the plugin acts as the client and the Etch Bridge is the server.
When the Etch Bridge connects to the plugin as a proxy for an application that is using the plugin's API, the plugin acts as the server and the Etch Bridge is the client.
Enabling TLS on the Etch Bridge
By default, TLS is enabled on the Etch Bridge. The Platform Services installer creates a default TLS certificate.
Note ![]() You can also create your own certificate. For more information about creating your own certificate, see "Creating a New Etch-Bridge Certificate" section.
You can also create your own certificate. For more information about creating your own certificate, see "Creating a New Etch-Bridge Certificate" section.
There are two types of TLS connections:
•![]() Encryption—The server sends a certificate to the client machine that contains its public key, which is then used for the client and server to conduct a "handshake."
Encryption—The server sends a certificate to the client machine that contains its public key, which is then used for the client and server to conduct a "handshake."
•![]() Authentication—When authentication is enabled, the server requests a certificate from the client that enables the connection to be mutually authenticated.
Authentication—When authentication is enabled, the server requests a certificate from the client that enables the connection to be mutually authenticated.
Note ![]() No action is required by the administrator to enable either encryption or authentication on the Etch Bridge. However, the developer must modify the connection string URIs in their applications or plugins to connect properly to the Etch Bridge. See "Disabling TLS on the Etch Bridge" section for more information.
No action is required by the administrator to enable either encryption or authentication on the Etch Bridge. However, the developer must modify the connection string URIs in their applications or plugins to connect properly to the Etch Bridge. See "Disabling TLS on the Etch Bridge" section for more information.
Disabling TLS on the Etch Bridge
If you do not want to use TLS for encryption or authentication, you can disable it on the Etch Bridge by modifying the application server configuration file.
Note ![]() If you disable TLS, all connections to the Etch Bridge will use TCP. Inform developers of this change so that they can properly configure their application and plugin connection string URIs. See "Disabling TLS on the Etch Bridge" section for more information.
If you disable TLS, all connections to the Etch Bridge will use TCP. Inform developers of this change so that they can properly configure their application and plugin connection string URIs. See "Disabling TLS on the Etch Bridge" section for more information.
To modify the application server configuration file, follow these steps:
Procedure
Step 1 ![]() Open %CUAE_HOME%/AppServer/AppServerService.exe.config on the Application Server.
Open %CUAE_HOME%/AppServer/AppServerService.exe.config on the Application Server.
Step 2 ![]() Locate and modify the value in the following line:
Locate and modify the value in the following line:
<add key="EtchBridgeCertificate" value="Etch"/>
Step 3 ![]() Remove the value, leaving only the opening and closing quotation marks.
Remove the value, leaving only the opening and closing quotation marks.
<add key="EtchBridgeCertificate" value=""/>
Step 4 ![]() Restart the Cisco Unified Application Server.
Restart the Cisco Unified Application Server.
Developer Tasks
To configure etch-based client applications and plugins, the developer must know which protocol is supported, TCP or TLS, and whether or not to require authentication.
•![]() Encryption—To enable encryption, application developers must modify the connection string URIs in their code for applications and plugins to connect to the Etch Bridge. The connection string is where the developers declare the connection protocol and the IP address and port of the server listener.
Encryption—To enable encryption, application developers must modify the connection string URIs in their code for applications and plugins to connect to the Etch Bridge. The connection string is where the developers declare the connection protocol and the IP address and port of the server listener.
•![]() Authentication—To enable authentication, developers must also copy the server certificate to the client machine and import it to a truststore.
Authentication—To enable authentication, developers must also copy the server certificate to the client machine and import it to a truststore.
For more information, direct developers to the Cisco Unified Application Environment wiki at this URL:http://developer.cisco.com/web/cuae/wikidocs.
Note ![]() To encrypt or authenticate a plugin server, the developer must create a certificate on the plugin machine. For authentication, you must copy that certificate to the Application Server, which acts as the client in this scenario.
To encrypt or authenticate a plugin server, the developer must create a certificate on the plugin machine. For authentication, you must copy that certificate to the Application Server, which acts as the client in this scenario.
Creating a New Etch-Bridge Certificate
You can create a new certificate to use on the Etch Bridge using the makecert.exe tool.
Before You Begin
To get the Microsoft Certificate Creation tool (makecert.exe), do one of the following things:
•![]() Download and install Microsoft .NET 2.0 SDK; makecert.exe is included in the installed directory
Download and install Microsoft .NET 2.0 SDK; makecert.exe is included in the installed directory
•![]() Copy makecert.exe from a machine that has Microsoft Visual Studio 2005 or Microsoft .NET 2.0 SDK installed.
Copy makecert.exe from a machine that has Microsoft Visual Studio 2005 or Microsoft .NET 2.0 SDK installed.
To create a new Etch Bridge certificate, follow these steps:
Procedure
Step 1 ![]() Log on to the Cisco Unified Application Server as the CiscoUAE user.
Log on to the Cisco Unified Application Server as the CiscoUAE user.
This is required because Windows certificates created by makecert.exe belong to the current Windows user account. If you log in as a different user to create the certificate, the certificate will not work because the Cisco Unified Application Service runs using the CiscoUAE user credentials.
Step 2 ![]() Create a certificate using the makecert.exe tool. For example:
Create a certificate using the makecert.exe tool. For example:
makecert -pe -n "CN=Test And Dev Root Authority" -ss my -sr LocalMachine -a sha1 -sky
signature -r "Test And Dev Root Authority.cer"
Note ![]() The above command creates a Root certificate. Your personal certificates extend from this root certificate.
The above command creates a Root certificate. Your personal certificates extend from this root certificate.
Step 3 ![]() To create a personal certificate:
To create a personal certificate:
makecert -pe -n "CN=PluginEt" -ss my -sr LocalMachine -a sha1 -sky exchange -in "Test And
Dev Root Authority" -is my -ir LocalMachine -sp "Microsoft RSA SChannel Cryptographic
Provider" -sy 12 PluginEt
Note ![]() In this example, you can change the certificate name options, but make sure the -in option matches the name of the root certificate.
In this example, you can change the certificate name options, but make sure the -in option matches the name of the root certificate.
Step 4 ![]() Run the MMC application.
Run the MMC application.
Step 5 ![]() Add the Certificate snap-in:
Add the Certificate snap-in:
a. ![]() Choose New > Add-Remove Snap-In.
Choose New > Add-Remove Snap-In.
b. ![]() Click Add.
Click Add.
c. ![]() Select Certificates and click Add.
Select Certificates and click Add.
d. ![]() Select Computer Account and click Next.
Select Computer Account and click Next.
e. ![]() Select Local Computer.
Select Local Computer.
f. ![]() Click Finish.
Click Finish.
g. ![]() Click Close.
Click Close.
h. ![]() Click OK.
Click OK.
Step 6 ![]() Choose Certificates > Personal. You should see your newly created certificates.
Choose Certificates > Personal. You should see your newly created certificates.
Step 7 ![]() In the certificates snap-in, right-click the Test and Dev Root Authority certificate and copy it to the Trusted Root Certification Authorities node. Once done, if you expand this node, and then select certificates your newly created root certificate should appear.
In the certificates snap-in, right-click the Test and Dev Root Authority certificate and copy it to the Trusted Root Certification Authorities node. Once done, if you expand this node, and then select certificates your newly created root certificate should appear.
Step 8 ![]() Choose Trusted Root Certification Authorities > Certificates.
Choose Trusted Root Certification Authorities > Certificates.
Step 9 ![]() Open %CUAE_HOME%/AppServer/AppServerService.exe.config on the Application Server.
Open %CUAE_HOME%/AppServer/AppServerService.exe.config on the Application Server.
Step 10 ![]() Set the EtchBridgeCertificate value to the name of the personal certificate you created.
Set the EtchBridgeCertificate value to the name of the personal certificate you created.
Step 11 ![]() Restart the Cisco Unified Application Server.
Restart the Cisco Unified Application Server.
If you only intend to enable encryption with the new certificate, no further steps are necessary.
If you intend to enable authentication, you must also export certificate to a file that can be given to developer to copy to client application and plugin machines:
a. ![]() Right-click the root certificate you created and select All Tasks > Export.
Right-click the root certificate you created and select All Tasks > Export.
b. ![]() In the Certificate Export wizard, click Next.
In the Certificate Export wizard, click Next.
c. ![]() Click No, do not export the private key.
Click No, do not export the private key.
d. ![]() Select DER encoded binary X509 for the Export File Format.
Select DER encoded binary X509 for the Export File Format.
e. ![]() Enter any file name and click Finish (for example server.cer).
Enter any file name and click Finish (for example server.cer).
Etch Connection String URI
For applications and plugins to connect to the Etch Bridge, application developers must properly configure the connection stringURI in their applications and plugins. This section describes the connection string URI parameters and how settings on the Cisco Unified Application Server impact the parameters.
This section contains the following topics to further describe the connection string URI parameters:
Overview
The connection protocol and KeepAlive filter must be set on the connection string URI for applications and plugins to work correctly. Additional parameters, MaxPktSize parameter and ReconnectDelay parameter can also be included in the URI. For example:
tls://localhost:9000?TlsConnection.authReqd=false&filter=KeepAlive&KeepAlive.Count=5&Packe
tizer.maxPktSize=102400&TcpTransport.reconnectDelay=4000"
This URI connects to Etch Bridge on localhost using TLS without authentication, using KeepAlive and resetting the number of KeepAlive messages to 5, setting the Max Packet Size to 100 KB and setting the reconnect delay to 4 seconds.
KeepAlive
In order to rapidly detect connection failures, the Etch KeepAlive message filter periodically checks the health of the client-server connection and resets it if it is not responsive. By default, KeepAlive messages are 15 seconds apart, and if four KeepAlive messages fail, the connection is reset.
Note ![]() KeepAlive is enabled at the server by default. Developers must append the KeepAlive filter to the connection string URI in client applications and plugins or disable KeepAlive on the application server or connections will drop after 60 seconds.
KeepAlive is enabled at the server by default. Developers must append the KeepAlive filter to the connection string URI in client applications and plugins or disable KeepAlive on the application server or connections will drop after 60 seconds.
Enabling KeepAlive
To enable KeepAlive, developers append the KeepAlive filter to the connection string URI. For example:
String uri =
"tls://appserver_ipaddress:port?TlsConnection.authReqd=false&filter=KeepAlive";
Modifying KeepAlive Parameters
The KeepAlive filter has two parameters: KeepAlive.Delay and KeepAlive.Count. Delay controls the number of seconds between KeepAlive messages and Count controls the number of messages sent before the connection is reset. By default, KeepAlive messages are 15 seconds apart and if four KeepAlive messages fail, the connection is reset. Developers can override the defaults by modifying the connection string URI.
Disabling KeepAlive
To disable KeepAlive, follow these steps:
Procedure
Step 1 ![]() Open %CUAE_HOME%/AppServer/AppServerService.exe.config on the Application Server.
Open %CUAE_HOME%/AppServer/AppServerService.exe.config on the Application Server.
Step 2 ![]() Locate the following line:
Locate the following line:
<add key="EtchBridgeKeepAliveDelay" value="15"/>
Step 3 ![]() Set the EtchBridgeKeepAliveDelay value to 0:
Set the EtchBridgeKeepAliveDelay value to 0:
<add key="EtchBridgeKeepAliveDelay" value="0"/>
Step 4 ![]() Restart the Cisco Unified Application Server.
Restart the Cisco Unified Application Server.
Max Packet Size
By default, Etch sets the Max Packet Size at 16KB for applications and plugins and the Etch Bridge defaults to 100KB. The smaller of the two is the default.
Note ![]() You can also set the Max Packet Size to unlimited. To do so, you must set the value on the Etch Bridge to "" and the developer must also set the URI to "".
You can also set the Max Packet Size to unlimited. To do so, you must set the value on the Etch Bridge to "" and the developer must also set the URI to "".
Using the Etch Bridge Max Packet Size
To change the Max Packet Size to 100KB, the developer must add a Packetizer.maxPktSize parameter to their connection string URIs to override the Etch default. For example:
tls://appserver_ipaddress:9000?TlsConnection.authReqd=false&filter=KeepAlive&Packetizer.ma
xPktSize="102392"
Note ![]() If the developer does not specify a Max Packet Size in the URI, it defaults to 16KB.
If the developer does not specify a Max Packet Size in the URI, it defaults to 16KB.
Using the Etch MaxPacketSize
To use the default Etch MaxPacketSize, follow these steps:
Procedure
Step 1 ![]() Open %CUAE_HOME%/AppServer/AppServerService.exe.config on the Application Server.
Open %CUAE_HOME%/AppServer/AppServerService.exe.config on the Application Server.
Step 2 ![]() Locate the following line and remove the value from the EtchBridgeMaxPacketSize, leaving the quotations only:
Locate the following line and remove the value from the EtchBridgeMaxPacketSize, leaving the quotations only:
<add key="EtchBridgeMaxPacketSize" value="102392"/>
Step 3 ![]() Remove the value from the EtchBridgeMaxPacketSize, leaving the quotations only:
Remove the value from the EtchBridgeMaxPacketSize, leaving the quotations only:
<add key="EtchBridgeMaxPacketSize" value=""/>
Step 4 ![]() Restart the Cisco Unified Application Server.
Restart the Cisco Unified Application Server.
ReconnectDelay
If set in the connection string URI, theTCPTransport.reconnectDelay setting causes the Etch transport to attempt to reconnect if the application or plugin connection to the Etch Bridge is dropped. If it is not set, there is no reconnect attempt made.
Note ![]() Developers must call registerApplication or registerPlugin when the connection is re-established.
Developers must call registerApplication or registerPlugin when the connection is re-established.
 Feedback