- Initializing the Fabric
- Switch Discovery
- About Switch Discovery with the APIC
- Switch Registration with the APIC Cluster
- Registering the Unregistered Switches Using the GUI
- Switch Discovery Validation and Switch Management from the APIC
- Validating the Registered Switches Using the GUI
- Validating the Fabric Topology
- Validating the Fabric Topology Using the GUI
- Unmanaged Switch Connectivity in VM Management
Fabric Initialization and Switch Discovery
This chapter contains the following sections:
Initializing the Fabric
About Fabric Initialization
You can build a fabric by adding switches to be managed by the APIC and then validating the steps using the GUI, the CLI, or the API.
 Note | Before you can build a fabric, you must have already created an APIC cluster over the out-of-band network. |
Example Topology
An example topology is as follows:
-
Two spine switches (spine1, spine2)
-
Two leaf switches (leaf1, leaf2)
-
Three instances of APIC (apic1, apic2, apic3)
The following figure shows an example of a fabric topology.
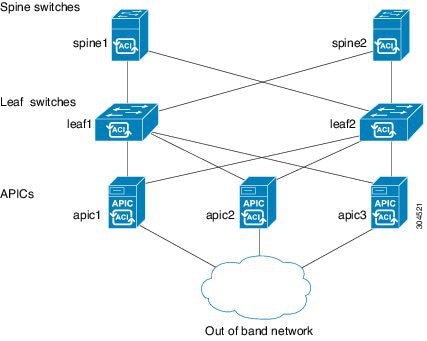
Example Topology Connections
An example topology with connection details is as follows:
| Name | Connection Details |
|---|---|
|
leaf1 |
eth1/1 = apic1 (eth2/1) eth1/2 = apic2 (eth2/1) eth1/3 = apic3 (eth2/1) eth1/49 = spine1 (eth5/1) eth1/50 = spine2 (eth5/2) |
|
leaf2 |
eth1/1 = apic1 (eth 2/2) eth1/2 = apic2 (eth 2/2) eth1/3 = apic3 (eth 2/2) eth1/49 = spine2 (eth5/1) eth1/50 = spine1 (eth5/2) |
|
spine1 |
eth5/1 = leaf1 (eth1/49) eth5/2 = leaf2 (eth1/50) |
|
spine2 |
eth5/1 = leaf2 (eth1/49) eth5/2 = leaf1 (eth1/50) |
Switch Discovery
About Switch Discovery with the APIC
The APIC is a central point of automated provisioning and management for all the switches that are part of the ACI fabric. A single data center might include multiple ACI fabrics; each data center might have its own APIC cluster and Cisco Nexus 9000 Series switches that are part of the fabric. To ensure that a switch is managed only by a single APIC cluster, each switch must be registered with that specific APIC cluster that manages the fabric.
The APIC discovers new switches that are directly connected to any switch it currently manages. Each APIC instance in the cluster first discovers only the leaf switch to which it is directly connected. After the leaf switch is registered with the APIC, the APIC discovers all spine switches that are directly connected to the leaf switch. As each spine switch is registered, that APIC discovers all the leaf switches that are connected to that spine switch. This cascaded discovery allows the APIC to discover the entire fabric topology in a few simple steps.
Switch Registration with the APIC Cluster
Note | Before you begin registering a switch, make sure that all switches in the fabric are physically connected and booted in the desired configuration. For information about the installation of the chassis, see http://www.cisco.com/c/en/us/support/cloud-systems-management/application-policy-infrastructure-controller-apic/products-installation-guides-list.html. |
After a switch is registered with the APIC, the switch is part of the APIC-managed fabric inventory. With the Application Centric Infrastructure fabric (ACI fabric), the APIC is the single point of provisioning, management, and monitoring for switches in the infrastructure.
Note | The infrastructure IP address range must not overlap with other IP addresses used in the ACI fabric for in-band and out-of-band networks. |
Registering the Unregistered Switches Using the GUI
Note | The infrastructure IP address range must not overlap with other IP addresses used in the ACI fabric for in-band and out-of-band networks. |
Make sure that all switches in the fabric are physically connected and booted.
Switch Discovery Validation and Switch Management from the APIC
After the switches are registered with the APIC, the APIC performs fabric topology discovery automatically to gain a view of the entire network and to manage all the switches in the fabric topology.
Each switch can be configured, monitored, and upgraded from the APIC without having to access the individual switches.
Validating the Registered Switches Using the GUI
Validating the Fabric Topology
After all the switches are registered with the APIC cluster, the APIC automatically discovers all the links and connectivity in the fabric and discovers the entire topology as a result.
Validating the Fabric Topology Using the GUI
Unmanaged Switch Connectivity in VM Management
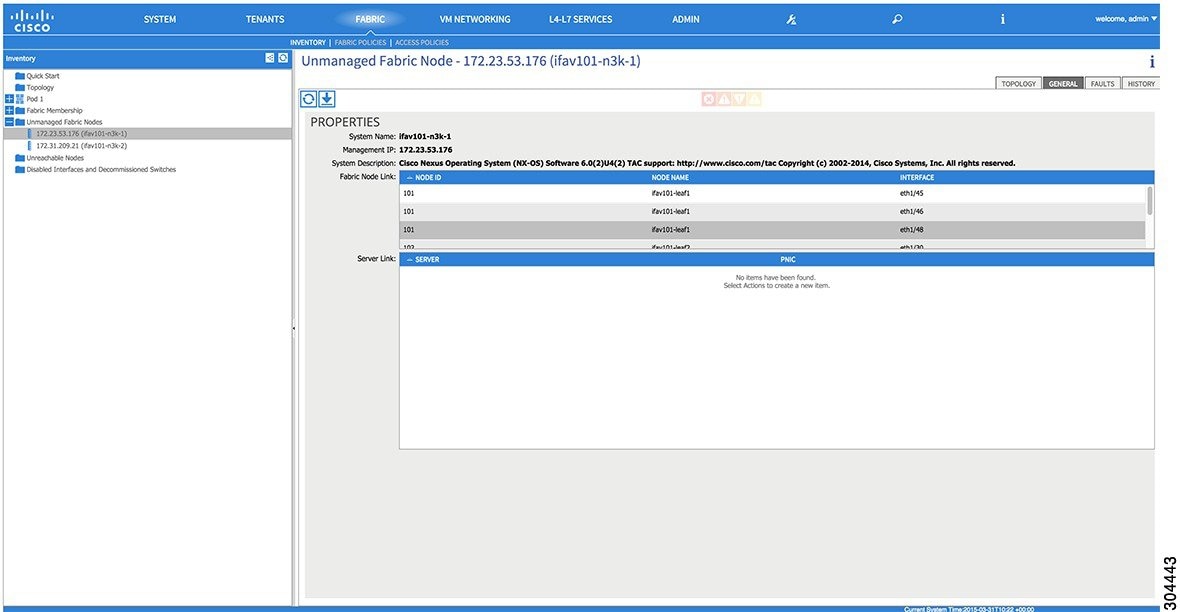
The hosts that are managed by the VM controller (for example, a vCenter), can be connected to the leaf port through a Layer 2 switch. The only prerequisite required is that the Layer 2 switch must be configured with a management address, and this management address must be advertised by Link Layer Discovery Protocol (LLDP) or Cisco Discovery Protocol (CDP) on the ports that are connected to the switches. Layer 2 switches are automatically discovered by the APIC, and they are identified by the management address. The following figure shows the APIC GUI displaying unmanaged switches in the view.
 Feedback