- About this Guide
-
- Information About Cisco Unified Communications Features
- Using the Cisco Unified Communication Wizard
- Configuring the Cisco Phone Proxy
- Configuring the TLS Proxy for Encrypted Voice Inspection
- Configuring Cisco Mobility Advantage
- Configuring Cisco Unified Presence
- Configuring Cisco Unified Communications Intercompany Media Engine
- Index
CLI Book 2: Cisco ASA Series Firewall CLI Configuration Guide, 9.1
Bias-Free Language
The documentation set for this product strives to use bias-free language. For the purposes of this documentation set, bias-free is defined as language that does not imply discrimination based on age, disability, gender, racial identity, ethnic identity, sexual orientation, socioeconomic status, and intersectionality. Exceptions may be present in the documentation due to language that is hardcoded in the user interfaces of the product software, language used based on RFP documentation, or language that is used by a referenced third-party product. Learn more about how Cisco is using Inclusive Language.
- Updated:
- August 14, 2014
Chapter: Configuring the ASA CSC Module
- Information About the CSC SSM
- Licensing Requirements for the CSC SSM
- Prerequisites for the CSC SSM
- Guidelines and Limitations
- Default Settings
- Configuring the CSC SSM
- Monitoring the CSC SSM
- Troubleshooting the CSC Module
Configuring the ASA CSC Module
This chapter describes how to configure the Content Security and Control (CSC) application that is installed in a CSC SSM in the ASA.
This chapter includes the following sections:
- Information About the CSC SSM
- Licensing Requirements for the CSC SSM
- Prerequisites for the CSC SSM
- Guidelines and Limitations
- Default Settings
- Configuring the CSC SSM
- Monitoring the CSC SSM
- Troubleshooting the CSC Module
- Configuration Examples for the CSC SSM
- Additional References
- Feature History for the CSC SSM
Information About the CSC SSM
Some ASA models support the CSC SSM, which runs Content Security and Control software. The CSC SSM provides protection against viruses, spyware, spam, and other unwanted traffic by scanning the FTP, HTTP/HTTPS, POP3, and SMTP packets that you configure the ASA to send to it.
For more information about the CSC SSM, see the following URL:
http://www.cisco.com/en/US/products/ps6823/index.html
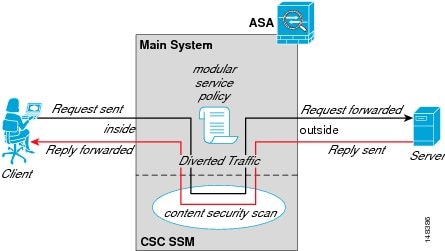
Figure 32-1 shows the flow of traffic through an ASA that has the following:
- A CSC SSM installed and configured.
- A service policy that determines what traffic is diverted to the CSC SSM for scanning.
In this example, the client could be a network user who is accessing a website, downloading files from an FTP server, or retrieving mail from a POP3 server. SMTP scans differ in that you should configure the ASA to scan traffic sent from the outside to SMTP servers protected by the ASA.
Figure 32-1 Flow of Scanned Traffic with the CSC SSM
You use ASDM for system setup and monitoring of the CSC SSM. For advanced configuration of content security policies in the CSC SSM software, you access the web-based GUI for the CSC SSM by clicking links within ASDM. The CSC SSM GUI appears in a separate web browser window. To access the CSC SSM, you must enter the CSC SSM password. To use the CSC SSM GUI, see the Cisco Content Security and Control SSM Administrator Guide .

Note ASDM and the CSC SSM maintain separate passwords. You can configure their passwords to be identical; however, changing one of these two passwords does not affect the other password.
The connection between the host running ASDM and the ASA is made through a management port on the ASA. The connection to the CSC SSM GUI is made through the SSM management port. Because these two connections are required to manage the CSC SSM, any host running ASDM must be able to reach the IP address of both the ASA management port and the SSM management port.
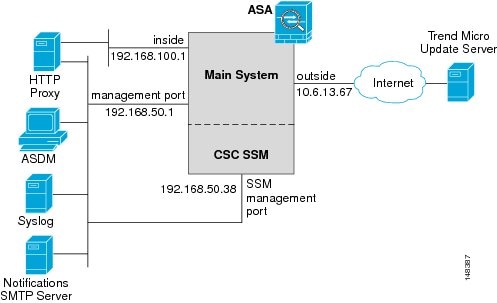
Figure 32-2 shows an ASA with a CSC SSM that is connected to a dedicated management network. While use of a dedicated management network is not required, we recommend it. In this configuration, the following items are of particular interest:
- An HTTP proxy server is connected to the inside network and to the management network. This HTTP proxy server enables the CSC SSM to contact the Trend Micro Systems update server.
- The management port of the ASA is connected to the management network. To allow management of the ASA and the CSC SSM, hosts running ASDM must be connected to the management network.
- The management network includes an SMTP server for e-mail notifications for the CSC SSM and a syslog server to which the CSC SSM can send syslog messages.
Figure 32-2 CSC SSM Deployment with a Management Network
Determining What Traffic to Scan
The CSC SSM can scan FTP, HTTP/HTTPS, POP3, and SMTP traffic only when the destination port of the packet requesting the connection is the well-known port for the specified protocol. The CSC SSM can scan only the following connections:
- FTP connections opened to TCP port 21.
- HTTP connections opened to TCP port 80.
- HTTPS connections opened to TCP port 443.
- POP3 connections opened to TCP port 110.
- SMTP connections opened to TCP port 25.
You can choose to scan traffic for all of these protocols or any combination of them. For example, if you do not allow network users to receive POP3 e-mail, do not configure the ASA to divert POP3 traffic to the CSC SSM. Instead, block this traffic.
To maximize performance of the ASA and the CSC SSM, divert only the traffic to the CSC SSM that you want the CSC SSM to scan. Diverting traffic that you do not want scanned, such as traffic between a trusted source and destination, can adversely affect network performance.
Note When traffic is first classified for CSC inspection, it is flow-based. If traffic is part of a pre-existing connection, the traffic goes directly to the service policy set for that connection.
You can apply service policies that include CSC scanning globally or to specific interfaces; therefore, you can choose to enable CSC scans globally or for specific interfaces.
Based on the configuration shown in Figure 32-3, configure the ASA to divert to the CSC SSM only requests from clients on the inside network for HTTP, FTP, and POP3 connections to the outside network, and incoming SMTP connections from outside hosts to the mail server on the DMZ network. Exclude from scanning HTTP requests from the inside network to the web server on the DMZ network.
Figure 32-3 Common Network Configuration for CSC SSM Scanning
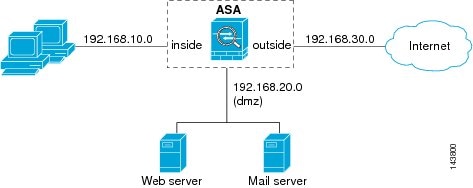
There are many ways you could configure the ASA to identify the traffic that you want to scan. One approach is to define two service policies: one on the inside interface and the other on the outside interface, each with ACLs that match traffic to be scanned.
Figure 32-4 shows service policy rules that select only the traffic that the ASA should scan.
Figure 32-4 Optimized Traffic Selection for CSC Scans
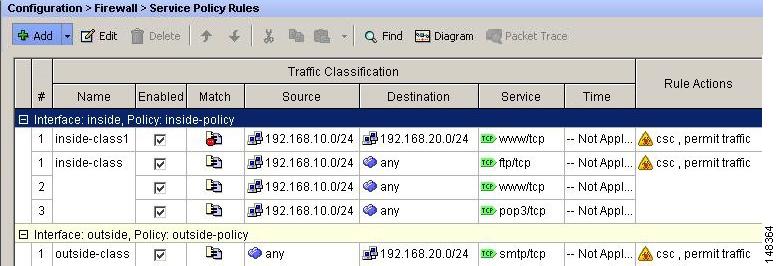
In the inside-policy, the first class, inside-class1, ensures that the ASA does not scan HTTP traffic between the inside network and the DMZ network. The Match column indicates this setting by displaying the “Do not match” icon. This setting does not mean the ASA blocks traffic sent from the 192.168.10.0 network to TCP port 80 on the 192.168.20.0 network. Instead, this setting exempts the traffic from being matched by the service policy applied to the inside interface, which prevents the ASA from sending the traffic to the CSC SSM.
The second class of the inside-policy, inside-class matches FTP, HTTP, and POP3 traffic between the inside network and any destination. HTTP connections to the DMZ network are exempted because of the inside-class1 setting. As previously mentioned, policies that apply CSC scanning to a specific interface affect both incoming and outgoing traffic, but by specifying 192.168.10.0 as the source network, inside-class1 matches only connections initiated by the hosts on the inside network.
In the outside-policy, outside-class matches SMTP traffic from any outside source to the DMZ network. This setting protects the SMTP server and inside users who download e-mail from the SMTP server on the DMZ network, without having to scan connections from SMTP clients to the server.
If the web server on the DMZ network receives files uploaded by HTTP from external hosts, you can add a rule to the outside policy that matches HTTP traffic from any source to the DMZ network. Because the policy is applied to the outside interface, the rule would only match connections from HTTP clients outside the ASA.
Licensing Requirements for the CSC SSM
Prerequisites for the CSC SSM
The CSC SSM has the following prerequisites:
- A CSC SSM card must be installed in the ASA.
- A Product Authorization Key (PAK) for use in registering the CSC SSM.
- Activation keys that you receive by e-mail after you register the CSC SSM.
- The management port of the CSC SSM must be connected to your network to allow management and automatic updates of the CSC SSM software.
- The CSC SSM management port IP address must be accessible by the hosts used to run ASDM.
- You must obtain the following information to use in configuring the CSC SSM:
– The CSC SSM management port IP address, netmask, and gateway IP address.
– HTTP proxy server IP address (needed only if your security policies require the use of a proxy server for HTTP access to the Internet).
– Domain name and hostname for the CSC SSM.
– An e-mail address and an SMTP server IP address and port number for e-mail notifications.
– E-mail address(es) for product license renewal notifications.
– IP addresses of hosts or networks that are allowed to manage the CSC SSM. The IP addresses for the CSC SSM management port and the ASA management interface can be in different subnets.
Guidelines and Limitations
This section includes the guidelines and limitations for this feature.
Supported in single and multiple context modes.
Supported in routed and transparent firewall modes.
Does not support sessions in Stateful Failover. The CSC SSM does not maintain connection information, and therefore cannot provide the failover unit with the required information. The connections that a CSC SSM is scanning are dropped when the ASA in which the CSC SSM is installed fails. When the standby ASA becomes active, it forwards the scanned traffic to the CSC SSM and the connections are reset.
Supported on the ASA 5510, ASA 5520, and ASA 5540 only. Not supported on the ASA 5580 and the ASA 5585-X.
You cannot change the software type installed on the module; if you purchase a CSC module, you cannot later install IPS software on it.
Default Settings
Table 32-1 lists the default settings for the CSC SSM.
Configuring the CSC SSM
This section describes how to configure the CSC SSM and includes the following topics:
Before Configuring the CSC SSM
Before configuring the ASA and the CSC SSM, perform the following steps:
Step 1 If the CSC SSM did not come preinstalled in a Cisco ASA, install it and connect a network cable to the management port of the SSM. For assistance with installation and connecting the SSM, see the Cisco ASA 5500 Series Quick Start Guide .
The management port of the CSC SSM must be connected to your network to allow management of and automatic updates to the CSC SSM software. Additionally, the CSC SSM uses the management port for e-mail notifications and syslog messages.
Step 2 You should have received a Product Authorization Key (PAK) with the CSC SSM. Use the PAK to register the CSC SSM at the following URL.
http://www.cisco.com/go/license
After you register, you receive activation keys by e-mail. The activation keys are required before you can complete Step 6.
Step 3 Obtain the following information for use in Step 6:
- Activation keys
- CSC SSM management port IP address, netmask, and gateway IP address
- DNS server IP address
- HTTP proxy server IP address (needed only if your security policies require the use of a proxy server for HTTP access to the Internet)
- Domain name and hostname for the CSC SSM
- An e-mail address, and SMTP server IP address and port number for e-mail notifications
- E-mail address(es) for product license renewal notifications
- IP addresses of hosts or networks that are allowed to manage the CSC SSM
- Password for the CSC SSM
Step 4 In a web browser, access ASDM for the ASA in which the CSC SSM is installed.
Note If you are accessing ASDM for the first time, see the “Additional References” section.
For more information about enabling ASDM access, see the “Configuring ASA Access for ASDM, Telnet, or SSH” section in the general operations configuration guide.
Step 5 Verify time settings on the ASA. Time setting accuracy is important for logging of security events and for automatic updates of CSC SSM software. Do one of the following:
Step 7 Connect to and log in to the CSC SSM. For instructions, see the “Connecting to the CSC SSM” section.
Step 8 Configure service policies to divert traffic that you want scanned to the CSC SSM. For instructions, see the “Diverting Traffic to the CSC SSM” section.
Step 9 Run the CSC Setup Wizard.
Step 10 Complete the CSC Setup Wizard.
Note If you create a global service policy to divert traffic for CSC scans, all traffic (inbound and outbound) for the supported protocols is scanned. To maximize performance of the ASA and the CSC SSM, scan traffic only from untrusted sources.
Step 11 To reduce the load on the CSC SSM, configure the service policy rules that send packets to the CSC SSM to support only HTTP/HTTPS, SMTP, POP3, or FTP traffic.
Step 12 (Optional) Review the default content security policies in the CSC SSM GUI, which are suitable for most implementations. You review the content security policies by viewing the enabled features in the CSC SSM GUI. For the availability of features, see the “Licensing Requirements for the CSC SSM” section. For the default settings, see the “Default Settings” section.
What to Do Next
See the “Connecting to the CSC SSM” section.
Connecting to the CSC SSM
With each session you start in ASDM, the first time you access features related to the CSC SSM, you must specify the management IP address and provide the password for the CSC SSM. After you successfully connect to the CSC SSM, you are not prompted again for the management IP address and password. If you start a new ASDM session, the connection to the CSC SSM is reset and you must specify the IP address and the CSC SSM password again. The connection to the CSC SSM is also reset if you change the time zone on the ASA.
Note The CSC SSM has a password that is maintained separately from the ASDM password. You can configure the two passwords to be identical, but changing the CSC SSM password does not affect the ASDM password.
To connect to the CSC SSM, perform the following steps:
Step 1 In the ASDM main application window, click the Content Security tab.
Step 2 In the Connecting to CSC dialog box, click one of the following radio buttons:
- To connect to the IP address of the management port on the SSM, click Management IP Address . ASDM automatically detects the IP address for the SSM in the ASA. If this detection fails, you can specify the management IP address manually.
- To connect to an alternate IP address or hostname on the SSM, click Other IP Address or Hostname .
Step 3 Enter the port number in the Port field, and then click Continue .
Step 4 In the CSC Password field, type your CSC password, and then click OK .
Note If you have not completed the CSC Setup Wizard (choose Configuration > Trend Micro Content Security > CSC Setup > Wizard Setup), complete the configuration in the CSC Setup Wizard, which includes changing the default password, “cisco.”
For ten minutes after you have entered the password, you do not need to reenter the CSC SSM password to access other parts of the CSC SSM GUI.
Step 5 To access the CSC SSM GUI, choose Configuration > Trend Micro Content Security , and then click one of the following tabs: Web , Mail , File Transfer , or Updates .
Diverting Traffic to the CSC SSM
You use Modular Policy Framework commands to configure the ASA to divert traffic to the CSC SSM.
Prerequisites
Before configuring the ASA to divert traffic to the CSC SSM, see “Configuring a Service Policy Using the Modular Policy Framework,” which introduces Modular Policy Framework concepts and common commands.
To configure the ASA to divert traffic to the CSC SSM, perform the following steps:
Detailed Steps
Creates an ACL that matches the traffic you want scanned by the CSC SSM. Create as many ACEs as are needed to match all the traffic. For example, to specify FTP, HTTP/HTTPS, POP3, and SMTP traffic, you need four ACEs. For guidance on identifying the traffic that you want to scan, see the “Determining What Traffic to Scan” section. |
||
Creates a class map to identify the traffic that should be diverted to the CSC SSM. The class_map_name argument is the name of the traffic class. When you enter the class-map command, the CLI enters class map configuration mode. |
||
Identifies the traffic to be scanned with the ACL that you created in Step 1. The acl-name argument is the name of the ACL. |
||
Creates a policy map or modify an existing policy map that you want to use to send traffic to the CSC SSM. The policy_map_name argument is the name of the policy map. When you enter the policy-map command, the CLI enters policy map configuration mode. |
||
Specifies the class map, created in Step 2, that identifies the traffic to be scanned. The class_map_name argument is the name of the class map that you created in Step 2. The CLI enters the policy map class configuration mode. |
||
Lets you configure limits to thwart DoS attacks. The per-client-max parameter limits the maximum number of connections that individual clients can open. If a client uses more network resources simultaneously than is desired, you can enforce a per-client limit for simultaneous connections that the ASA diverts to the CSC SSM. The n argument is the maximum number of simultaneous connections that the ASA allows per client. This command prevents a single client from abusing the services of the CSC SSM or any server protected by the SSM, including prevention of attempts at DoS attacks on HTTP/HTTPS, FTP, POP3, or SMTP servers that the CSC SSM protects. |
||
Enables traffic scanning with the CSC SSM and assigns the traffic identified by the class map as traffic to be sent to the CSC SSM. Must be part of a service policy, which can be applied globally or to specific interfaces. Ensures that all unencrypted connections through the ASA are scanned by the CSC SSM; however, this setting may mean that traffic from trusted sources is needlessly scanned. If enabled in interface-specific service policies, this command is bi-directional. Bi-directionality means that when the ASA opens a new connection, if this command is active on either the inbound or the outbound interface of the connection and the class map for the policy identifies traffic for scanning, the ASA diverts this traffic to the CSC SSM. However, bi-directionality also means that if you divert any of the supported traffic types that cross a given interface to the CSC SSM, it is probably performing unnecessary scans on traffic from your trusted inside networks. Therefore, to further limit the traffic selected by the class maps of CSC SSM service policies, we recommend using ACLs that match the following:
The fail-close and fail-open keywords control how the ASA handles traffic when the CSC SSM is unavailable. For more information about the operating modes and failure behavior, see the “Guidelines and Limitations” section. |
||
|
ciscoasa(config-pmap-c)# service-policy policy_map_name [global | interface interface_ID ] |
Applies the policy map globally or to a specific interface. The policy_map_name argument is the policy map that you configured in Step 4. To apply the policy map to traffic on all the interfaces, use the global keyword. To apply the policy map to traffic on a specific interface, use the interface interface_ID keyword and argument pair, where interface_ID is the name assigned to the interface with the nameif command. Only one global policy is allowed. You can override the global policy on an interface by applying a service policy to that interface. You can only apply one policy map to each interface. |
What to Do Next
See the “Monitoring the CSC SSM” section.
Monitoring the CSC SSM
To check the status of a module, enter one of the following commands:
Examples
The following is sample output from the show module command for an ASA with a CSC SSM installed:
The following is sample output from the show module details command, which provides additional information about an ASA with a CSC SSM installed:
The following is sample output from the show module recover command, which includes recovery details for an ASA with a CSC SSM installed:
Troubleshooting the CSC Module
This section includes procedures that help you recover or troubleshoot the module and includes the following topics:
- Installing an Image on the Module
- Resetting the Password
- Reloading or Resetting the Module
- Shutting Down the Module
Note This section covers all ASA module types; follow the steps appropriate for your module.
Installing an Image on the Module
If the module suffers a failure, and the module application image cannot run, you can reinstall a new image on the module from a TFTP server.
Note Do not use the upgrade command within the module software to install the image.
Prerequisites
Be sure the TFTP server that you specify can transfer files up to 60 MB in size.
Note This process can take approximately 15 minutes to complete, depending on your network and the size of the image.
Detailed Steps
Resetting the Password
You can reset the module password to the default. The default password is cisco. After resetting the password, you should change it to a unique value using the module application.
Resetting the module password causes the module to reboot. Services are not available while the module is rebooting.
To reset the module password to the default of cisco, perform the following steps.
Detailed Steps
Reloading or Resetting the Module
To reload or reset the module, enter one of the following commands at the ASA CLI.
Configuration Examples for the CSC SSM
To identify the traffic that you want to scan, you can configure the ASA in different ways. One approach is to define two service policies, one on the inside interface and one on the outside interface, each with an ACL that matches traffic to be scanned. The following example is based on the network shown in Figure 32-3 and shows the creation of two service policies for a common CSC SSM scanning scenario:
- The first policy, csc_out_policy, is applied to the inside interface and uses the csc_out ACL to ensure that all outbound requests for FTP and POP3 are scanned. The csc_out ACL also ensures that HTTP connections from inside to networks on the outside interface are scanned, but it includes a deny ACE to exclude HTTP connections from inside to servers on the DMZ network.
- The second policy, csc_in_policy, is applied to the outside interface and uses the csc_in ACL to ensure that requests for SMTP and HTTP originating on the outside interface and destined for the DMZ network are scanned by the CSC SSM. Scanning HTTP requests protects the web server from HTTP file uploads.
ciscoasa(config)# access-list csc_out deny tcp 192.168.10.0 255.255.255.0 192.168.20.0 255.255.255.0 eq 80
The following example shows how to use an ACL to exempt the traffic from being matched by the policy map and prevent the ASA from sending traffic to the CSC SSM:
ciscoasa(config)# access-list csc_out deny tcp 192.168.10.0 255.255.255.0 192.168.20.0 255.255.255.0 eq 80
The following example shows how to add an ACE to the csc_out ACL to exclude HTTP connections between the trusted external web server and inside hosts from being scanned by the CSC SSM:
ciscoasa(config)# access-list csc_out deny tcp 192.168.10.0 255.255.255.0 209.165.201.7 255.255.255.255 eq 80
The following example shows how to use the ACL on the service policy applied to the outside interface:
The following example shows how to add an ACE to the csc_in ACL to use the CSC SSM to protect the web server on a DMZ network from infected files uploaded by HTTP from external hosts:
Additional References
For additional information related to implementing the CSC SSM, see the following documents:
Feature History for the CSC SSM
Table 32-2 lists each feature change and the platform release in which it was implemented.
 Feedback