Cisco Service Control Value Added Services Solution Guide, Release 3.6.x
Bias-Free Language
The documentation set for this product strives to use bias-free language. For the purposes of this documentation set, bias-free is defined as language that does not imply discrimination based on age, disability, gender, racial identity, ethnic identity, sexual orientation, socioeconomic status, and intersectionality. Exceptions may be present in the documentation due to language that is hardcoded in the user interfaces of the product software, language used based on RFP documentation, or language that is used by a referenced third-party product. Learn more about how Cisco is using Inclusive Language.
- Updated:
- January 25, 2011
Chapter: Configuring the SCA BB Application to Support VAS Traffic Forwarding
Configuring the SCA BB Application to Support VAS Traffic Forwarding
This chapter describes how to configure the SCA BB application to support VAS traffic forwarding.
Configuring VAS in the SCA BB Application: Traffic-Forwarding Tables
In the SCA BB application, you define a set of parameters that enable the application to relate a particular traffic flow to a VAS service. Based on the combination of IP protocol and port number, traffic flows are assigned to a VAS server group. You can create one or more VAS forwarding tables defining the traffic forwarding schemes. Each forwarding table is then assigned to a package. Subscriber traffic in a package is forwarded to the respective VAS server groups according to the assigned VAS forwarding table.
There are four broad aspects to VAS traffic forwarding configuration in the SCA BB application:
•![]() Enabling VAS traffic forwarding in the SCA BB application.
Enabling VAS traffic forwarding in the SCA BB application.
•![]() (Optional) Assigning meaningful names to the server groups that were defined in the SCE platform.
(Optional) Assigning meaningful names to the server groups that were defined in the SCE platform.
•![]() Configuring the VAS forwarding tables to configure which traffic goes to which VAS server group. If there are different traffic forwarding schemes for different groups of subscribers, create a traffic-forwarding table for each scheme.
Configuring the VAS forwarding tables to configure which traffic goes to which VAS server group. If there are different traffic forwarding schemes for different groups of subscribers, create a traffic-forwarding table for each scheme.
•![]() Assigning the VAS forwarding tables to the relevant packages.
Assigning the VAS forwarding tables to the relevant packages.
This chapter contains the following topics:
•![]() How to Enable VAS Traffic Forwarding
How to Enable VAS Traffic Forwarding
•![]() How to Rename the VAS Server Groups
How to Rename the VAS Server Groups
•![]() How to Manage the VAS Traffic-Forwarding Tables
How to Manage the VAS Traffic-Forwarding Tables
•![]() How to Assign a VAS Forwarding Table to a Package
How to Assign a VAS Forwarding Table to a Package
How to Enable VAS Traffic Forwarding
By default, VAS traffic forwarding is disabled. You can enable it at any time.

Note ![]() VAS traffic forwarding is not supported in asymmetric routing classification mode. If you try to enable traffic forwarding when asymmetric routing classification mode is enabled, a VAS error message appears.
VAS traffic forwarding is not supported in asymmetric routing classification mode. If you try to enable traffic forwarding when asymmetric routing classification mode is enabled, a VAS error message appears.
Step 1 ![]() From the Service Configuration Editor, choose Configuration > Policies > VAS Settings.
From the Service Configuration Editor, choose Configuration > Policies > VAS Settings.
The VAS Settings dialog box appears. (See Figure 3-1.)
Figure 3-1 VAS Settings
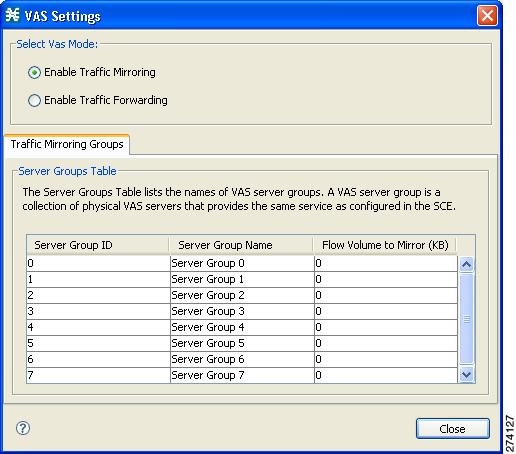
Step 2 ![]() Click the Enable Traffic Forwarding radio button.
Click the Enable Traffic Forwarding radio button.
A VAS warning message appears.
Step 3 ![]() Click Yes.
Click Yes.
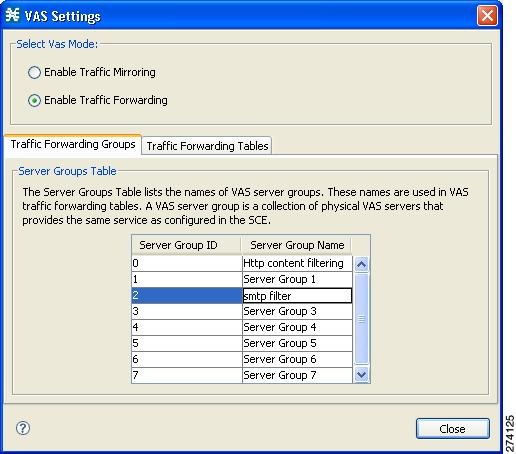
How to Rename the VAS Server Groups
An SCE platform can forward flows to up to eight different VAS server groups. By default, the eight server groups are named "Server Group n", where n takes a value from 0 to 7 and corresponds to the number you assigned to the server group when you created it using the SCE platform CLI.
For your own convenience, you can give the server groups meaningful names. The names you give appear in the drop-down list in the Server Group field when creating traffic-forwarding tables (see Managing VAS Table Parameters).
Step 1 ![]() From the Service Configuration Editor, choose Configuration > Policies > VAS Settings. The VAS Settings dialog box appears.
From the Service Configuration Editor, choose Configuration > Policies > VAS Settings. The VAS Settings dialog box appears.
Step 2 ![]() Click the Traffic Forwarding Groups tab.
Click the Traffic Forwarding Groups tab.
Step 3 ![]() In the table in the Server Groups Table area, double-click in the cell containing a server group name. Enter a significant name in the cell.
In the table in the Server Groups Table area, double-click in the cell containing a server group name. Enter a significant name in the cell.
Step 4 ![]() Repeat Step 2 and Step 3 for other server groups you wish to rename.
Repeat Step 2 and Step 3 for other server groups you wish to rename.
Figure 3-2 Traffic Forwarding Groups Tab
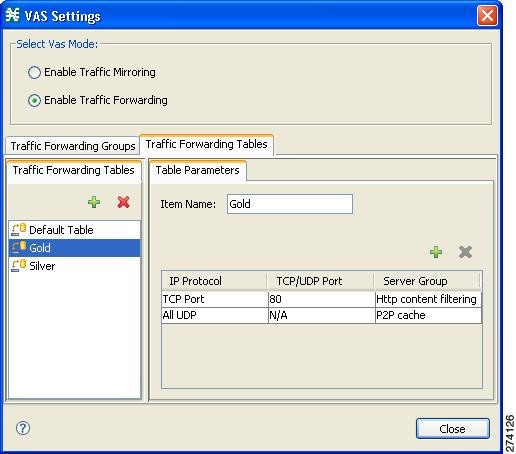
How to Manage the VAS Traffic-Forwarding Tables
SCA BB decides whether a flow passing through an SCE platform should be forwarded to a VAS server group based on a traffic-forwarding table. Each entry in a traffic-forwarding table defines which VAS server group the specified flows should be forwarded to. Flows are defined by IP protocol and port number.
Adding a VAS Traffic-Forwarding Table
A default traffic-forwarding table is included in the service configuration. You can add up to 63 more traffic-forwarding tables, and then assign different traffic-forwarding tables to different packages.
Step 1 ![]() From the Service Configuration Editor, choose Configuration > Policies > VAS Settings. The VAS Settings dialog box appears.
From the Service Configuration Editor, choose Configuration > Policies > VAS Settings. The VAS Settings dialog box appears.
Step 2 ![]() Click the Traffic-Forwarding Tables tab.
Click the Traffic-Forwarding Tables tab.
The Traffic-Forwarding Tables tab opens.
Step 3 ![]() In the Traffic Forwarding Tables area, click
In the Traffic Forwarding Tables area, click  (Add).
A new table named Table n, where n is a value between 1 and 63, is added to the list of traffic-forwarding tables.
The table name is also displayed in the Item Name box in the Table Parameters tab.
Step 4 ![]() In the Item Name field, enter a unique and relevant name for the traffic-forwarding table.
In the Item Name field, enter a unique and relevant name for the traffic-forwarding table.
You can now add table parameters to the new traffic-forwarding table (see Adding VAS Table Parameters).
Step 5 ![]() Click Close to save the changes and close the dialog box.
Click Close to save the changes and close the dialog box.
Viewing VAS Traffic-Forwarding Tables
Step 1 ![]() From the Service Configuration Editor, choose Configuration > Policies > VAS Settings. The VAS Settings dialog box appears.
From the Service Configuration Editor, choose Configuration > Policies > VAS Settings. The VAS Settings dialog box appears.
Step 2 ![]() Click the Traffic-Forwarding Tables tab.
Click the Traffic-Forwarding Tables tab.
The Traffic-Forwarding Tables tab opens, displaying a list of all traffic-forwarding tables in the left pane.
Step 3 ![]() Click a table in the list to display the table parameters.
Click a table in the list to display the table parameters.
A list of all table parameters defined for this traffic-forwarding table opens in the Table Parameters tab (see Figure 3-3).
Figure 3-3 Traffic-Forwarding Tables Tab
Deleting VAS Traffic-Forwarding Tables
You can delete all user-created traffic-forwarding tables. The default traffic-forwarding table cannot be deleted.
Note ![]() A traffic-forwarding table cannot be deleted while it is associated with a package.
A traffic-forwarding table cannot be deleted while it is associated with a package.
Step 1 ![]() From the Service Configuration Editor, choose Configuration > Policies > VAS Settings. The VAS Setting dialog box appears.
From the Service Configuration Editor, choose Configuration > Policies > VAS Settings. The VAS Setting dialog box appears.
Step 2 ![]() Click the Traffic-Forwarding Tables tab.
Click the Traffic-Forwarding Tables tab.
Step 3 ![]() From the list of traffic-forwarding tables in the Traffic-Forwarding Tables area, select a table.
From the list of traffic-forwarding tables in the Traffic-Forwarding Tables area, select a table.
Step 4 ![]() Click
Click  (Delete).
A VAS Warning message appears (see Figure 3-4).
Figure 3-4 VAS Warning
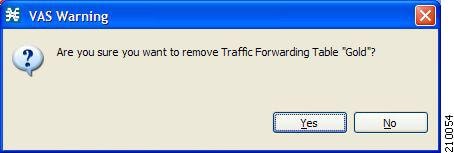
Step 5 ![]() Click Yes.
Click Yes.
Managing VAS Table Parameters
A table parameter is an entry in the VAS table. It consists of three parts:
•![]() IP protocol type
IP protocol type
•![]() Associated TCP/UDP port or range of ports (where applicable)
Associated TCP/UDP port or range of ports (where applicable)
•![]() VAS server group or a range of IP addresses
VAS server group or a range of IP addresses
A traffic-forwarding table can contain up to 64 table parameters.
This section contains the following topics:
•![]() Deleting VAS Table Parameters
Deleting VAS Table Parameters
Adding VAS Table Parameters
You can add up to 64 table parameters to a traffic-forwarding table.
Step 1 ![]() From the Service Configuration Editor, choose Configuration > Policies > VAS Settings. The VAS Settings dialog box appears.
From the Service Configuration Editor, choose Configuration > Policies > VAS Settings. The VAS Settings dialog box appears.
Step 2 ![]() Click the Traffic-Forwarding Tables tab.
Click the Traffic-Forwarding Tables tab.
Step 3 ![]() From the list of traffic-forwarding tables in the Traffic-Forwarding Tables area, select a table.
From the list of traffic-forwarding tables in the Traffic-Forwarding Tables area, select a table.
Step 4 ![]() In the Traffic Parameters tab, click (Add).
In the Traffic Parameters tab, click (Add).
A new table parameter is added to the list of table parameters in the Table Parameters tab.
Note ![]() Each new table parameter has the default values as listed in Table 3-1.
Each new table parameter has the default values as listed in Table 3-1.
|
|
|
IP Protocol |
TCP Port |
Server Group |
Server Group 0 |
TCP/UDP Port |
80 |
You can now edit the new table parameter, as described in the following section.
Editing VAS Table Parameters
Step 1 ![]() From the Service Configuration Editor, choose Configuration > Policies > VAS Settings. The VAS Settings dialog box appears.
From the Service Configuration Editor, choose Configuration > Policies > VAS Settings. The VAS Settings dialog box appears.
Step 2 ![]() Click the Traffic-Forwarding Tables tab.
Click the Traffic-Forwarding Tables tab.
Step 3 ![]() From the list of traffic-forwarding tables in the Traffic-Forwarding Tables area, select a table.
From the list of traffic-forwarding tables in the Traffic-Forwarding Tables area, select a table.
Step 4 ![]() From the table in the Table Parameters tab, select a protocol, port, and server group.
From the table in the Table Parameters tab, select a protocol, port, and server group.
a. ![]() Click in a cell in the IP Protocol column, and, from the drop-down list that opens, select an IP protocol type (Figure 3-5).
Click in a cell in the IP Protocol column, and, from the drop-down list that opens, select an IP protocol type (Figure 3-5).
Figure 3-5 Table Parameters Tab
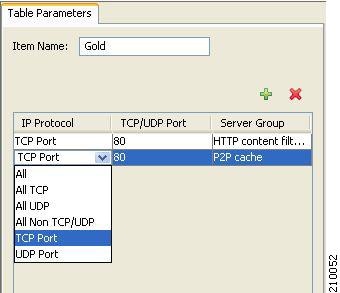
If you select All, All TCP, All UDP, or All Non TCP/UDP, "N/A" will replace the TCP/UDP Port cell. "N/A" appears once you move to another cell in the table.
b. ![]() If you select TCP Port or UDP Port, double-click in the cell in the TCP/UDP Port column, and enter the port number or a range of ports in the format port1-port2.
If you select TCP Port or UDP Port, double-click in the cell in the TCP/UDP Port column, and enter the port number or a range of ports in the format port1-port2.
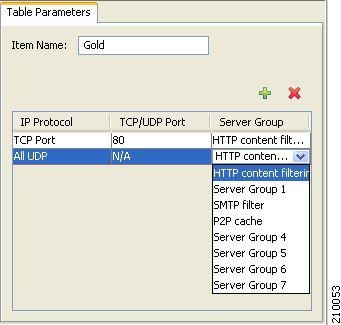
c. ![]() Click in the cell in the Server Group column, and, from the drop-down list that opens, select a server group (Figure 3-6).
Click in the cell in the Server Group column, and, from the drop-down list that opens, select a server group (Figure 3-6).
Figure 3-6 Tables Parameters Tab
Step 5 ![]() Click Close to save the changes and close the dialog box.
Click Close to save the changes and close the dialog box.
Deleting VAS Table Parameters
Step 1 ![]() From the Service Configuration Editor, choose Configuration > Policies > VAS Settings. The VAS Settings dialog box appears.
From the Service Configuration Editor, choose Configuration > Policies > VAS Settings. The VAS Settings dialog box appears.
Step 2 ![]() Click the Traffic-Forwarding Tables tab.
Click the Traffic-Forwarding Tables tab.
Step 3 ![]() From the list of traffic-forwarding tables in the Traffic-Forwarding Tables area, select a table.
From the list of traffic-forwarding tables in the Traffic-Forwarding Tables area, select a table.
Step 4 ![]() From the list of table parameters in the Table Parameters tab, select a table parameter.
From the list of table parameters in the Table Parameters tab, select a table parameter.
Step 5 ![]() Click (Delete).
Click (Delete).
The selected table parameter is deleted and is no longer displayed in the list of table parameters.
Step 6 ![]() Click Close to save the changes and close the dialog box.
Click Close to save the changes and close the dialog box.
How to Assign a VAS Forwarding Table to a Package
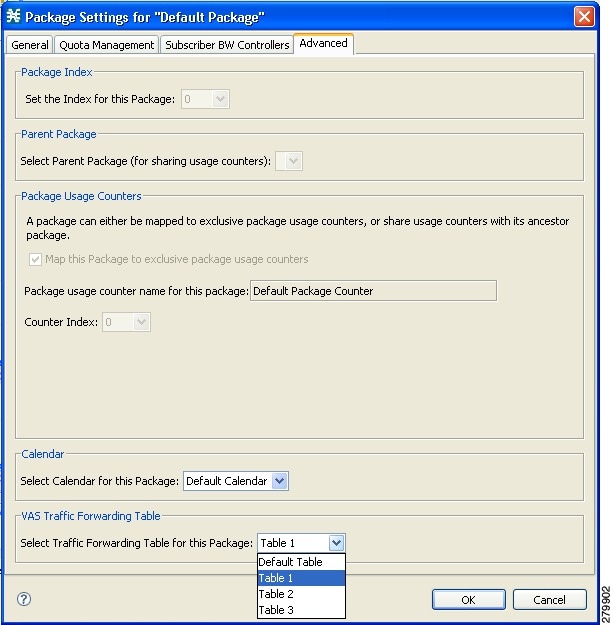
Traffic is forwarded to the appropriate VAS server group based on the package assigned to the subscriber. A traffic-forwarding table defining the desired traffic forwarding scheme is assigned to the package. The SCE platform then forwards all traffic for that package to the server groups according to protocol and port as defined in the assigned traffic-forwarding table.
Step 1 ![]() In the Policies tab of the Service Configuration Editor, right-click the desired package name and select Edit Package.
In the Policies tab of the Service Configuration Editor, right-click the desired package name and select Edit Package.
The Package Settings dialog box for the selected package appears.
Step 2 ![]() Click the Advanced tab.
Click the Advanced tab.
Step 3 ![]() At the bottom of the tab, in the VAS Traffic-Forwarding Table area, select the desired traffic-forwarding table from the drop-down list.
At the bottom of the tab, in the VAS Traffic-Forwarding Table area, select the desired traffic-forwarding table from the drop-down list.
Figure 3-7 Edit Package Advanced Tab
 Feedback