Removing the Downstream PHY Module in the Interface Line Card
The Downstream PHY module is removed for replacement or upgrade.
 Caution |
Do not touch the cLGA connector. |
Before you begin
-
Attach an ESD-preventive wrist strap to your wrist and connect the other end to the grounding lug connected to the chassis.
-
Be aware of the weight and size of the equipment. Handle it with care.
Restrictions
-
Ensure that a working Downstream PHY module is available for replacement.
-
Ensure that the interface line card removed for the Downstream PHY module replacement, is re-installed or replaced by another interface line card or a line card blank, within three minutes of removal.
Caution
The line card slot must not remain empty for more than three minutes, to avoid critical thermal alarms relating to overheating of individual components.
Required Tools and Equipment
-
ESD-preventive wrist strap
-
T10 Torx-blade screwdriver
-
Replacement line card or line card blank
-
Antistatic Bag or mat
Procedure
| Step 1 |
Loosen the retaining screws (two in the front and one in the rear) using a T10 Torx-blade torque driver. |
||||||||||
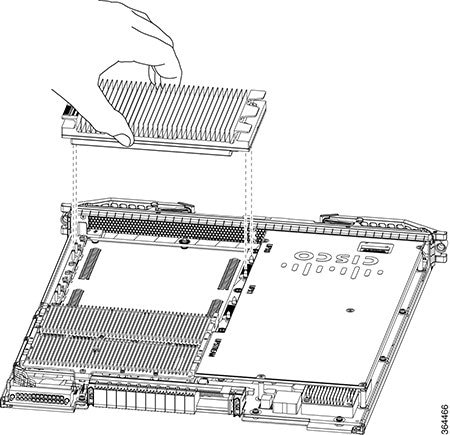
| Step 2 |
Grasp the Downstream PHY module by its sides. |
||||||||||
| Step 3 |
Lift the Downstream PHY module off the cLGA connector guide pins and the rear guide pins on the line card.
|
||||||||||
| Step 4 |
Place the removed Downstream PHY module in an antistatic bag. |
 Feedback