- Index
- Preface
- Introduction to Cisco WAAS
- Planning Your WAAS Network
- Using Device Groups and Device Locations
- Configuring Traffic Interception
- Configuring Network Settings
- Configuring Administrative Login Authentication, Authorization, and Accounting
- Creating and Managing Administrator User Accounts and Groups
- Creating and Managing IP Access Control Lists for WAAS Devices
- Configuring Other System Settings
- Using the WAE Device Manager GUI
- Configuring Wide Area File Services
- Configuring Application Acceleration
- Configuring and Managing WAAS Print Services
- Configuring Virtualization
- Maintaining Your WAAS System
- Monitoring and Troubleshooting Your WAAS Network
- Configuring SNMP Monitoring
- Default Application Policies
Cisco Wide Area Application Services Configuration Guide (Software Version 4.1.1)
Bias-Free Language
The documentation set for this product strives to use bias-free language. For the purposes of this documentation set, bias-free is defined as language that does not imply discrimination based on age, disability, gender, racial identity, ethnic identity, sexual orientation, socioeconomic status, and intersectionality. Exceptions may be present in the documentation due to language that is hardcoded in the user interfaces of the product software, language used based on RFP documentation, or language that is used by a referenced third-party product. Learn more about how Cisco is using Inclusive Language.
- Updated:
- August 28, 2008
Chapter: Configuring Wide Area File Services
Configuring Wide Area File Services
This chapter describes how to configure Wide Area File Services (WAFS), which allows branch office users to more efficiently access data stored at centralized data centers. The WAFS feature overcomes the WAN latency and bandwidth limitations by caching data on Edge WAEs near branch office users.

Note Throughout this chapter, the term WAAS device is used to refer collectively to the WAAS Central Managers and WAEs in your network. The term WAE refers to WAE appliances and WAE Network Modules (the NME-WAE family of devices).
About File Services
Enterprises today have remote offices in different parts of the country and around the world. Typically, these remote offices have their own file servers to store and manage the data needed by their local users.
The problem with this method of operation is that it is costly to purchase, manage, and upgrade file servers at each remote office. A great deal of resources and manpower must be dedicated to maintaining these file servers, and especially to protect the data in case of server failure. To achieve the required level of data assurance, the remote office must devote resources to back up the data at the remote site and physically move it to a secure location, often at a considerable distance from the site. If you multiply this scenario by tens, hundreds, and thousands of remote offices, and you can see that this approach to enterprise data management not only raises costs exponentially, it also greatly increases the risks to critical data.
The logical solution in this scenario is to move all of the enterprise’s important data to a central location containing the facilities, trained personnel, and storage mass required to manage the data properly. By having a data center provide backup and other storage management facilities, the enterprise can achieve better utilization of both personnel and storage, as well as a higher level of data assurance and security.
The WAN between the enterprise’s data center and its remote offices tends to be unreliable and slow, with limited bandwidth and high latency. In addition, the WAN creates other obstacles to the implementation of the data center solution.
One obstacle is created by the file server protocols that operate over the WAN. CIFS, which is the file server protocol for Windows, was designed to operate over a LAN. Every file operation generates several exchanges of protocol messages between the client and the file server. This situation is usually not noticeable on the LAN, but quickly causes high latency over the WAN. Occasionally, this high latency breaks the file server protocol altogether.
Even in cases where the file server protocol is managing to function correctly over the WAN, there are typically long delays between each transaction. These delays can often cause timeouts in user applications such as word processing programs, image editing programs, and design tools, which stops them from functioning correctly.
All of these problems—unreliable WANs, file system protocol compatibility, and user application compatibility—contribute to an unfriendly work environment that negatively affects the user experience and diminishes productivity.
The WAAS file services feature overcomes the WAN latency and bandwidth limitations by caching data on Edge WAEs near the user. This data caching method allows branch office users to access centralized data at LAN-like speeds over the WAN. The solution is based on several key concepts:
- Use the WAN as little as possible—By minimizing the number of operations that need to traverse the WAN, WAAS effectively shields users from many of the obstacles that WANs create.
- Use the WAN optimally—The file services feature uses sophisticated caching, compression, and network optimization technologies, which enable the system to use the WAN optimally.
- Preserve file system protocol semantics—Although WAAS software uses its own proprietary protocol over the WAN, it leaves the complete semantics of the standard file system protocol commands intact. This is essential to preserve the correctness and coherency of the data in the network.
- Make the solution transparent to users—The best solutions are the ones that do their jobs unnoticed, without interfering with end users’ operations or forcing users to change their ways of doing business. The WAAS file services solution does not require any software installations, either on the server side or at the client, and does not require the user to learn anything new. Users derive all the benefits of having a secure data center without needing to change any of their work habits.
By using the WAAS file services feature, enterprises can consolidate their file servers to a data center that provides the facilities, IT personnel, and storage devices required to manage the data properly. Figure 11-1 shows a typical deployment scenario after WAAS file services have been set up.
Figure 11-1 WAAS File Services Solution

Overview of File Services Features
This section provides an overview of the WAAS file services features and contains the following topics:
WAAS version 4.1.1 supports two mutually exclusive WAFS modes:
- Transparent CIFS accelerator mode—This mode was introduced in WAAS version 4.1.1. The new transparent mode requires no core, edge, or connectivity configuration. It relies on automatic discovery and transparently accelerates CIFS traffic with no configuration needed. Disconnected mode is not supported. We recommend this mode for ease of use.
- Legacy mode—This mode, present in all WAAS versions, requires that you configure a Core cluster, Edge file services, and connections between the Core and Edge devices. Use this mode if you need to interoperate with WAAS 4.0.x devices or if disconnected mode operation is essential.
This mode also includes the ability to automatically discover file servers, but there are some limitations. For more information, see the “Automatic Discovery with Legacy Mode” section.
If you enable the transparent CIFS accelerator on a WAE device or group, the system disables any existing Core or Edge configurations and the Core and Edge configuration windows; additionally, the device cannot belong to a Core cluster. In the CIFS accelerator mode, the WAE device acts as an Edge and a Core simultaneously, depending on the direction of each request. There is no need for a manual setting.
Note WAFS acceleration operates only if the peer WAEs at each end of the connection use the same WAFS mode (transparent CIFS accelerator or legacy).
Automatic Discovery
The automatic discovery feature allows you to enable WAFS without having to register individual file servers in the WAAS Central Manager. With the automatic discovery feature, WAAS will attempt to automatically discover and connect to a new file server when a transparent mode CIFS request is received.
Automatic Discovery with Legacy Mode
The legacy mode of operation also includes the ability to automatically discover file servers, with some limitations. The automatic discovery feature operates by default for CIFS requests to unregistered file servers when you are using legacy mode.
If there are multiple paths to the file server, WAAS chooses the path with the lowest latency. If the latency between the core WAE and the discovered server is more than 25 milliseconds, the server is considered to be too far away, and the connection will not be optimized. Additionally, if the latency between the edge WAE and the server is less than 2 milliseconds, the server is considered to be local, and the connection will not be optimized.
Note If you are using the WAFS legacy mode, and relying on automatic discovery instead of registering file servers, the following WAFS features are not available: prepositioning, dynamic shares, and disconnected mode. Additionally, if the file server requires a digital signature, WAFS cannot cache its data.
As new file servers are added to the policy engine dynamic map by this mode of automatic discovery, you can see them by using the show policy-engine application dynamic EXEC command. A file server remains in the dynamic map for three minutes after the last connection to it is closed.
Prepositioning
The prepositioning feature allows system administrators to proactively “push” frequently used files from the central storage into the cache of selected Edge WAEs. This operation provides users with faster first-time file access, and makes more efficient use of available bandwidth. You create preposition directives from the WAAS Central Manager GUI.
When an end user attempts to open a file that is not found in the Edge WAE cache, the Edge WAE retrieves it across the WAN from the file server where it is stored. Prepositioning is a feature that allows administrators to push large, frequently accessed files from file servers to selected Edge WAE caches according to a predefined schedule. Through the proper use of prepositioning, administrators can allow users to benefit from cache-level performance even during first-time access of these files. Prepositioning improves WAN bandwidth utilization by transferring heavy content when the network is otherwise idle (for example, at night), which frees up bandwidth for other applications during the day.
The WAAS Central Manager GUI allows administrators to create multiple, overlapping preposition policies (each with its own schedule), a list of target Edge WAEs, and defined time and size constraints.
Note Prepositioning includes the ability to configure multiple roots. See the “Creating a New Preposition Directive” section.
Data Coherency
WAAS software ensures data integrity across the system by using two interrelated features – coherency , which manages the freshness of the data, and concurrency , which controls the access to the data by multiple clients.
Maintaining multiple copies of data files in multiple locations increases the likelihood that one or more of these copies will be changed, causing it to lose consistency or coherency with the others. Coherency semantics are used to provide guarantees of freshness (whether the copy is up-to-date or not) and the propagation of updates to and from the origin file server.
The WAAS software applies the following coherency semantics to its built-in coherency policies:
- Strict CIFS behavior for intra-site—Users of the same cache are always guaranteed standard, strict CIFS coherency semantics.
- Cache validation on CIFS open—In CIFS, the File Open operation is passed through to the file server. For coherency purposes, WAAS software validates the freshness of the file on every file open, and invalidates the cached file if a new version exists on the file server.
WAAS software validates data by comparing the time stamp of a file in the cache to the time stamp of the file on the file server. If the time stamps are identical, the cached copy on the Edge WAE is considered valid and the user is permitted to open the file from the Edge WAE cache.
If the time stamps are different, the Edge WAE removes the file from its cache and requests a fresh copy from the file server.
- Proactive cache updating—WAAS software supports the use of change notifications in CIFS environments as a way to keep cached data on the Edge WAEs up-to-date.
When a client makes a change to a directory or file, the Edge WAE sends a change notification to the file server. The file server then sends to all the Edge WAEs a change notification that includes a list of the modified directories and files. Upon receiving the change notification, each Edge WAE checks its cache and invalidates the directories and files listed in the notification, and then updates its cache with the latest versions.
For example, if a user edits an existing Word document and saves the changes to the Edge WAE cache, the Edge WAE sends a change notification to the file server so it knows that the file has been modified. The Edge WAE then sends the changed sections to the file server, and the file server proactively sends change notifications to the other Edge WAEs in the network. These Edge WAEs then update their cache so the file is consistent across all access points.
This process also applies when you rename a directory, add a new subdirectory, rename a file, or create a new file in a cached directory.
- Flush on CIFS close—In CIFS, the File Close operation forces all write buffers to be flushed to the file server, and the Close request is only granted after all updates have been propagated to the file server. From a coherency standpoint, the combination of validate on file open and flush on file close ensures that well-behaved applications, such as Microsoft Office, operate in session semantics. The Open, Lock, Edit, Unlock, and Close commands are guaranteed to work correctly on the WAAS network.
- Age-based validation on directories (CIFS)—Directories are associated with a preconfigured age. When the age expires, the Edge WAE cache revalidates the directory.
When a user first attempts to view the contents of a directory, the Edge WAE enables the file server to perform the authorization check using the directory’s access control list (ACL), which contains the user and group permissions. The Edge WAE monitors which directories the user has accessed and whether the file server permitted that access. If the user tries to access the same directory again during a short period of time (aging period), the Edge WAE does not contact the file server and instead uses the cached permissions to determine if the user should be provided access. After the aging period expires, the Edge WAE contacts the file server to refresh the cached permission of the user.
This authorization process prevents users from accessing directories and files in the cache that they do not have permission to access on the file server.
Data Concurrency
Concurrency control is important when multiple users access the same cached data to read, or write, or both. Concurrency control synchronizes this access by establishing and removing file system locks. This file-locking feature ensures data integrity and provides the following benefits:
- Enables a client to aggressively cache file data so it does not have to rely on retrieving data from the remote file server.
- Provides a performance boost in many applications running on existing CIFS client implementations.
- Preserves data integrity because only one user at a time can make changes to a section of a file.
WAAS software supports the CIFS oplocks feature, which allows a user to lock a file so the user can safely read and write data to its local cache instead of using network bandwidth to perform these functions over the WAN on the file server. By using oplocks, a user can proactively cache read-ahead data because it knows that no other user is accessing the file so there is no chance the cached data can become stale. The user can also write data to its local cache and does not need to update the file server until it closes the file or until another user requests to open the same file.
Oplocks only applies to files. The file server does not grant oplock requests on directories and named pipes.
File-Locking Process
When a user opens a file, it sends a lock request to the file server. The Edge WAE intercepts and forwards all lock requests from the user to the file server as well as all responses from the file server to the user. If no other user has a lock on the file, the file server grants an exclusive lock request so that the user can safely cache the file.
If a second user requests to open the same file, the following actions occur:
1. The file server revokes the exclusive file lock obtained by the first user.
2. The first user performs the following actions:
– Flushes any file changes stored in its cache to the file server. This action ensures that the second user opening the file receives the latest information from the file server.
– Deletes any of its read-ahead buffers for the file because that data is no longer guaranteed to remain up-to-date now that a second user will open the file.
Microsoft Interoperability
The WAAS file services feature interoperates with these Microsoft CIFS features:
- Active Directory for user authentication and authorization
- Offline folders in Microsoft CIFS
- Microsoft DFS infrastructure
- Windows shadow copy for shared folders, as described in the “Windows Shadow Copy for Shared Folders” section)
Windows Shadow Copy for Shared Folders
WAAS file services support the Shadow Copy for Shared Folders feature that is part of the Windows Server 2003/2008 operating system. This feature uses the Microsoft Volume Shadow Copy Service to create snapshots of file systems so that users can easily view previous versions of folders and files.
In a WAAS environment, users view shadow copies in the same way they would in a native Windows environment by right-clicking a folder or file from the Edge WAE cache and choosing Properties > Previous Version .
For more information about Shadow Copy for Shared Folders, including the limitations of the feature, refer to your Microsoft Windows Server 2003/2008 documentation.
Users can perform the same tasks when accessing a shadow copy folder on the Edge WAE as they can in the native environment on the file server. These tasks include the following:
- Browsing the shadow copy folder
- Copying or restoring the contents of the shadow copy folder
- Viewing and copying files in the shadow copy folder
The Shadow Copy for Shared Folders feature does not support the following tasks:
Supported Servers and Clients
WAAS supports Shadow Copy for Shared Folders on the following file servers:
- Windows 2008
- Windows 2003 (with and without SP1)
- NetApp Data OPTap versions 6.5.2, 6.5.4 and 7.0
- EMC Celerra versions 5.3 and 5.4
WAAS supports Shadow Copy for Shared Folders for the following clients:
Note Windows 2000 and Windows XP (without SP2) clients require the Previous Versions Client to be installed to support Shadow Copy for Shared Folders.
Preparing for File Services
Before enabling file services on your WAEs, ensure that you complete the following tasks:
- If you want to configure multiple devices with the same settings, ensure that you have created a device group that contains all the edge devices you want to enable with file services. For information on creating device groups, see Chapter3, “Using Device Groups and Device Locations”
- Identify the edge devices on which you want to enable file services. An edge device may also serve as a core device if it also exports local file servers to other edge devices.
- Identify the file servers that you want to export, and refer to Table 11-1 to verify that these file servers can operate with WAAS software. Other file servers may operate with WAAS, but only those listed in the table were tested.
Note The WAAS file services feature does not support file servers that use the FAT32 file system. You can use the policy engine rules to exclude any file servers that use the FAT32 file system from CIFS optimization.
Using File Services on the NME-WAE
If you are running WAAS on a network module that is installed in a Cisco access router, there are specific memory requirements for supporting file services. The NME-WAE must contain the following amounts of memory in order to support file services:
- Transparent CIFS accelerator mode—1 GB RAM
- Legacy mode, edge file services—1 GB RAM
- Legacy mode, core (or both edge and core) file services—2 GB RAM
If you try to enable file services and the device does not contain enough memory, the WAAS Central Manager will display an error message.
You can check the amount of memory that a device contains in the Device Dashboard window. For details, see the “Device Dashboard Window” section.
Configuring File Services
WAAS version 4.1.1 supports two mutually exclusive WAFS modes that are configured in different ways:
- Transparent CIFS accelerator mode—This mode requires no core, edge, or connectivity configuration. It relies on automatic discovery and transparently accelerates CIFS traffic with no configuration needed. We recommend this mode for ease of use.
Table 11-2 provides an overview of the steps that you must complete to configure transparent CIFS accelerator mode. By using this mode, you can skip most of the configuration steps in this chapter.
- Legacy mode—This mode requires that you configure a Core cluster, Edge file services, and connections between the Core and Edge devices. Use this mode if you need to interoperate with WAAS 4.0.x devices or if disconnected mode operation is essential.
Table 11-3 provides an overview of the steps that you must complete to configure file services.
Prepare for file services. |
Provides the tasks that you need to complete before enabling and configuring file services on your WAAS devices. For more information, see the “Preparing for File Services” section. |
Enable CIFS acceleration. |
Enables the transparent CIFS accelerator. For more information, see the “Enabling and Disabling the Global Optimization Features” section. |
(Optional) Identify dynamic shares. |
Identifies the dynamic shares on an exported file server. If your file server does not contain dynamic shares, you can skip this step. For more information, see the “Creating Dynamic Shares” section. |
(Optional) Create a preposition directive. |
Defines which files are proactively copied from an exported file server to the Edge WAE cache. For more information, see the “Creating a Preposition Directive” section. |
Prepare for file services. |
Provides the tasks that you need to complete before enabling and configuring file services on your WAAS devices. For more information, see the “Preparing for File Services” section. |
Configure a WAFS core cluster. |
WAFS core clusters are required to copy data from the exported file server to the cache of the Edge WAEs. For more information, see the “Configuring the Core Cluster” section. |
Configure the edge devices. |
By default, file services are not enabled on your WAAS devices. To enable and start file services on edge devices, see the “Configuring the Edge Devices” section. |
(Optional) Register a file server with the WAAS Central Manager. |
Identifies to the WAAS system which file servers to export. This step also creates a link between a core cluster and the registered file server. For more information, see the “Setting Up File Servers to Export to the Edge WAE Cache” section. This step is optional if you are using automatic discovery. |
(Optional) Identify dynamic shares. |
Identifies the dynamic shares on a exported file server. If your file server does not contain dynamic shares, you can skip this step. For more information, see the “Creating Dynamic Shares” section. |
Create a connection between a core cluster and your edge devices. |
Enables a core cluster to copy data to the Edge WAE cache. For more information, see the “Creating a Connection Between a Core Cluster and Edge WAEs” section. |
(Optional) Create a preposition directive. |
Defines which files are proactively copied from an exported file server to the Edge WAE cache. For more information, see the “Creating a Preposition Directive” section. |
Configuring the Core Cluster
The first step in setting up file services in legacy mode is to enable Core services on a device and assign the device to a Core cluster. The Core cluster will be responsible for copying data from the exported file server (or multiple file servers) to the cache of the Edge WAEs. In later sections you will assign edge devices and, optionally, file servers to this core cluster, so the cluster knows which file servers to export and which edge devices to populate with cached data.
In Steps 1 through 7 you enable core server services and assign the device to a Core cluster. In Steps 8 through 12 you configure the new core cluster. The last step in this procedure describes how to reload the device, which is required for the device to function as a Core WAE.
To create a WAFS core cluster, follow these steps:
Step 1 From the WAAS Central Manager GUI navigation pane, choose My WAN > Manage Devices .
The Devices window displays a list of devices created on your WAAS system.
Step 2 Click the Edit button next to the device that you want to be a member of the new core cluster.
The Device Dashboard window appears.
Step 3 From the navigation pane, choose Configure > Acceleration > Legacy Services > File Services > Core Configuration .
The Enable Core Server Services window appears. (See Figure 11-2.)
Figure 11-2 Enabling Core Server Services
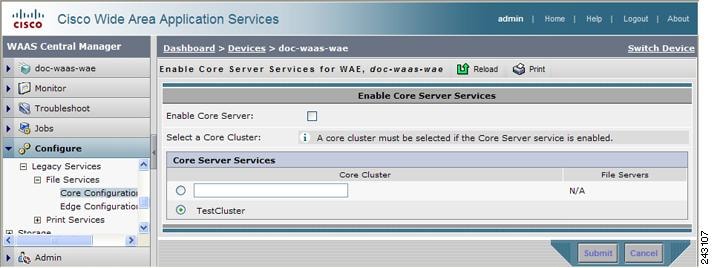
Step 4 Check the Enable Core Server check box.
Step 5 Use one of the following methods to assign this device to a core cluster:
- To create a new core cluster for this device, select the radio button next to the empty Core Cluster field, and enter a name for the new core cluster in this empty field. This name cannot contain spaces or special characters.
- To have this device join an existing core cluster, select the radio button next to that core cluster. If you do not have any existing core clusters, your only option is to create a new core cluster for this device.
A popup message is displayed that the device must be manually rebooted for the device to function as a Core server.
Step 7 Click OK after reading the popup message.
Core Server services are enabled on the device and the device joins the specified Core cluster. The last step in this section describes how to reboot the device, which is required for the Core services to be activated.
If you click Cancel on the popup message you are returned to the Enable Core Server window and your changes are not submitted.
If you are relying on the automatic discovery feature instead of explicitly registering file servers, and you do not need to configure an optional differentiated services code point (DSCP) setting, you can skip to Step 14.
Step 8 Click the Home link at the top right in the WAAS Central Manager GUI to return to the global context, then from the navigation pane, choose My WAN > Manage Device Groups .
Step 9 Click the Edit icon next to the new core cluster.
Step 10 From the navigation pane, choose Cluster Name > Core Server Settings . The Configure Core Server Settings window appears. (See Figure 11-3.)
Figure 11-3 Configuring a Core Cluster Example
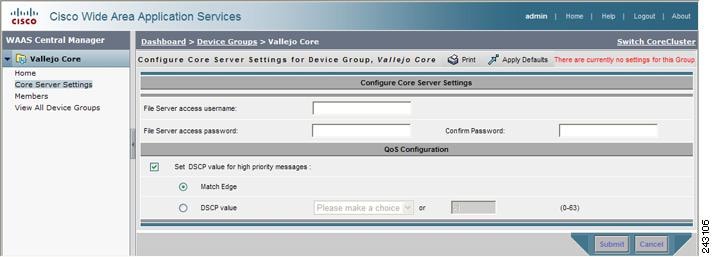
Step 11 In the File Server access username, File Server access password, and Confirm password fields, enter the access information that will be used for all of the CIFS file servers that are configured as part of this Core cluster. If you are relying on the automatic discovery feature instead of explicitly registering file servers, these fields are unnecessary.
You will specify which file servers this core cluster will export in the “Setting Up File Servers to Export to the Edge WAE Cache” section.
Step 12 (Optional) Configure a differentiated services code point (DSCP) value for high-priority messages, as follows:
a. Check the Set DSCP value for high priority messages check box.
b. Choose one of the following options:
– Match Edge —Matches the DSCP value of the Edge WAEs connected to this core cluster. This matching takes place when you create a connection between edge and core devices, as described in the “Creating a Connection Between a Core Cluster and Edge WAEs” section.
– DSCP Value —Allows you to specify a DSCP value for this core cluster.
Select a value from the drop-down list and refer to Table 11-4 for a description of the supported values. If you choose Please Make a Choice from the drop-down list, enter a value from 0 to 63 in the corresponding field.
DSCP is a field in an IP packet that enables different levels of service to be assigned to network traffic. Levels of service are assigned by marking each packet on the network with a DSCP code (shown in Table 11-4 ) and associating a corresponding level of service. DSCP is the combination of IP Precedence and Type of Service (ToS) fields. For more information, see RFC 2474.
We recommend setting a DSCP value for WAFS control traffic to improve system performance. This requires your routers to be configured to enforce the QoS markings accordingly.
Step 14 Reload the device by clicking the Reload WAE icon in the taskbar, or by completing the following steps:
a. From the WAAS Central Manager GUI navigation pane, choose My WAN > Manage Devices .
b. Click the Edit icon next the device on which you enabled Core services. The Device Dashboard window appears.
c. Click the Reload WAE icon in the taskbar. The device is rebooted and Core services are activated on the device.
Configuring the Edge Devices
After you create and configure the core cluster, the next step (for legacy mode) is to configure the edge devices that will contain the exported file server data in their cache.
To enable the edge server on a device or device group, follow these steps:
Step 1 From the WAAS Central Manager GUI navigation pane, choose My WAN > Manage Devices ( or Manage Device Groups ).
Note We recommend enabling file services on an edge device group if WCCP is enabled on your network. If WCCP is disabled, you should enable file services on individual edge devices to prevent name conflicts.
Step 2 Click the Edit icon next to the edge device or device group on which you want to enable file services.
The Device Dashboard window or the Modifying Device Group window appears depending on the selected option.
You cannot enable edge services on the WAAS Central Manager device.
Step 3 From the navigation pane, choose Configure > Acceleration > Legacy Services > File Services > Edge Configuration .
The Enable Edge Server Services window appears. (See Figure 11-4.)
Figure 11-4 Enabling File Services on Edge Devices
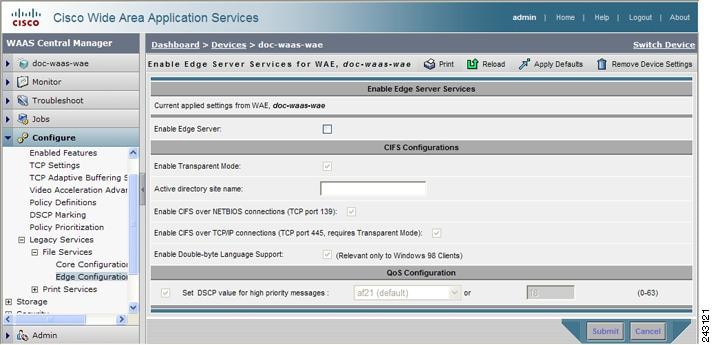
Step 4 Check the Enable Edge Server check box.
The other fields in the window are enabled.
Step 5 Check the Enable Transparent Mode check box if WCCP or PBR is enabled on your network, or if you are using inline mode.
The options for enabling TCP ports 139 and 445 are automatically updated based on whether transparent mode has been enabled.
If you enable transparent mode, the options for enabling TCP port 139 and port 445 are automatically selected. If you disable transparent mode (Enable Transparent Mode is not checked), the option for enabling TCP port 139 is selected and the option for enabling TCP port 445 is not selected, because port 445 is used only in transparent mode.
Step 6 Enter the name of the active directory site in the provided field.
Step 7 Enable the relevant ports on the Edge WAE by checking the following options (at least one must be checked):
If port 139 is not open on your network for security reasons, uncheck this option, and then complete the following tasks:
– Enable WCCP on your routers and Edge WAEs, or enable inline mode on the Edge WAEs. For more information, see Chapter4, “Configuring Traffic Interception”
– Enable port 445 on the Edge WAE by checking the Enable CIFS Over TCP/IP Connections check box.
If port 445 is closed on your network, uncheck this option so that your Edge WAE does not try to establish a connection on this port, and then check the Enable CIFS over NETBIOS connections check box.
When you disable port 445 all clients connect directly to port 139 on the Edge WAE, then the core cluster connects to port 139 on the file server.
Note If you enable or disable connections on port 139 and port 445, existing clients will not lose their connection to the Edge WAEs.
Step 8 Check the Enable Double-byte Language Support check box if you have Windows 98 clients that need to support two-byte languages such as Japanese.
Leave this option unchecked in the following situations:
English will always be supported regardless of how this option is configured.
Step 9 (Optional) Configure a differentiated services code point (DSCP) value for high-priority messages, by following these steps:
a. Place a check in the Set DSCP value for high priority messages check box.
b. Select a value in the drop-down list. Refer to Table 11-4 for a description of the supported values.
If you choose Please Make a Choice from the drop-down list, enter a value from 0 to 63 in the corresponding field.
DSCP is a field in an IP packet that enables different levels of service to be assigned to network traffic. Each packet on the network is marked with a DSCP code (shown in Table 11-4 ) and is assigned to the corresponding level of service. DSCP is the combination of IP Precedence and Type of Service (ToS) fields. For more information, see RFC 2474.
We recommend setting a DSCP value for WAFS control traffic to improve system performance. This requires your routers to be configured to enforce the QoS markings accordingly.
Step 10 Click Submit . A popup message is displayed that the device must be manually rebooted for the device to function as an Edge server.
Step 11 Click OK after reading the popup message. Edge Server services are enabled on the device.
If you click Cancel on the popup message, you are returned to the Edge Configuration window and your changes are not submitted.
Step 12 Reload the device by clicking the Reload WAE icon in the taskbar, or by completing the following steps:
a. From the WAAS Central Manager GUI navigation pane, choose My WAN > Manage Devices ( or Manage Device Groups ).
b. Click the Edit icon next the device or device group on which you enabled Edge services.
c. Click the Reload WAE or the Reboot All Devices icon in the taskbar. The device(s) are rebooted and Edge services are activated on the device(s).
Setting Up File Servers to Export to the Edge WAE Cache
For legacy mode, after you enable file services on a core cluster and Edge WAEs, you can optionally use the WAAS Central Manager GUI to set up the file servers that you want to export. If your network has many file servers that you need to define on the WAAS network (10 or more, for example), you can create and import a comma-separated values (CSV) file to speed up the process.
If you do not want to set up file servers but still want to use legacy mode, you can rely on the automatic discovery feature of legacy mode to allow WAFS to automatically discover file servers when they are accessed by users. If you are not explicitly registering file servers, you can skip this section.
This section contains the following topics on setting up a file server in the WAAS Central Manager GUI:
Registering a File Server with the WAAS Central Manager
To register a file server with the WAAS Central Manager, follow these steps:
Step 1 From the WAAS Central Manager GUI navigation pane, choose Configure > File Services > File Servers . The File Servers window appears.
From this window, you can perform the following tasks:
- Edit the configuration of an existing file server by clicking the Edit icon next to the file server. You can then delete the file server configuration, or modify any of the file server settings.
- Import multiple file server definitions using a CSV file by clicking the Import from CSV icon in the task bar. (See the “Importing File Server Definitions Using a CSV File” section.)
- Identify a new file server to export, as described in the next steps.
Step 2 Click the Create New File Server icon in the taskbar to identify a new file server to export. The Registering New File Server window appears. (See Figure 11-5.)
Figure 11-5 Registering New File Server Window
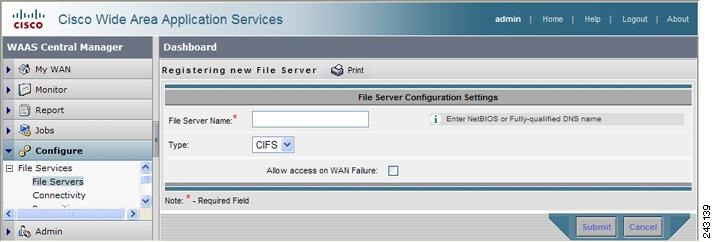
Step 3 In the File Server Name field, enter the hostname of the file server to export. You can enter the server’s NetBIOS name, DNS name, or IP address.
Note If a file server has multiple NetBIOS or DNS names, you must register the file server separately under each one of its names. Otherwise, a client using a NetBIOS name that is not registered will not be able to connect. (Clients using CIFS over TCP port 445 will work fine, however.)
Step 4 Check the Allow Access on WAN Failure check box to provide CIFS clients with read-only access to the cached data on this Edge WAE in the event of a WAN failure.
When a WAN failure occurs, enabling this option allows CIFS clients to browse the cached directory structure and read fully cached files while authentication and authorization is maintained.
For more information, see the “Preparing Your WAAS Network for WAN Failures” section.
The file server is registered with the WAAS system, and the navigation pane refreshes with additional options.
Step 6 Proceed to the “Assigning a Core Cluster to a Registered File Server” section to assign a core cluster to the registered file server.
Importing File Server Definitions Using a CSV File
If your network includes a high number (10 or more, for example) of file servers that you need to define on the WAAS network, you can create and import a comma-separated values (CSV) file to speed up the process. You can use Excel or another spreadsheet application to create the CSV file.
CSV File Creation Requirements
Table 11-5 specifies the CSV file requirements.
Specify the name of the file server. Corresponds to the File Server Name field in the Registering New File Server window (Figure 11-5). |
Same constraints as in Step 3 in Registering a File Server with the WAAS Central Manager. |
|
Corresponds to the Allow access on WAN Failure check box in the Registering New File Server window (Figure 11-5). Set to “true” to apply; set to “false” when not applicable. |
||
Specifies the name of an existing core cluster to which the file server is to be assigned. |
If not specified, file server is not assigned to a core cluster. No error is reported if a cluster name is assigned to a file server more than one time. |
CSV File Considerations
Keep the following in mind when creating CSV files:
- The first row must list the column headings that you are going to specify.
- At a minimum, the file must contain a “Name” column (other columns are optional).
- Column headings are not case sensitive and can be specified in any order.
- To assign a file server to multiple core clusters, you can specify multiple “Cluster” columns. The column headings row must contain multiple “Cluster” columns if you want to specify multiple clusters in the data rows.
- When you specify a row, it is not necessary to have a value for each column. However, you must specify the correct number of columns. That is, the number of columns must correspond to the number of objects defined in the headings row. The following example presents valid CSV file entries (assuming that core clusters c-1, c-2, and c-5 exist). The adjacent pairs of commas indicate that default values are to be used.
name,allowdisconnected,cluster,cluster
s71,TRUE,c-1,
s72,,c-2,c-5
Importing the CSV File
After you have created the CSV file, you use the WAAS Central Manager GUI to import the file.
To import the CSV file, follow these steps:
Step 1 From the WAAS Central Manager GUI navigation pane, choose Configure > File Services > File Servers .
Step 2 In the taskbar, click the
Import from CSV
icon ( ).
).
The Importing File Server Definitions window appears.
Step 4 Navigate to and select the CSV file that you want to import, then click Open . The path and file server name appear in the Path to File Server Definitions field.
Step 5 In the Importing File Server Definitions window, click Submit .
The CSV file is imported and a “successfully imported” message is displayed.
The WAAS Central Manager checks the following:
If the file fails any of these checks, an error message appears in the WAAS Central Manager and no file servers are imported. Error messages may provide error explanations for up to 10 rows. However, if the error is related to the headings or the file cannot be read, no further checking occurs.
Assigning a Core Cluster to a Registered File Server
After you register a file server with the WAAS Central Manager, you need to assign at least one core cluster to the file server. The core cluster will be responsible for exporting the file server to the cache on the Edge WAEs. If you are relying on the automatic discovery feature rather than explicitly registering file servers, you do not need to perform this step.
To assign a core cluster to a registered file server, follow these steps:
Step 1 From the WAAS Central Manager GUI navigation pane, choose Configure > File Services > File Servers .
The File Servers window appears.
Step 2 Click the Edit icon next to the file server that you want to assign to a core cluster.
Step 3 Click the Core Clusters tab. The Core Cluster Assignments window appears.
The Core Cluster Assignments window displays the device groups configured in your WAAS network. By default, the window displays 10 device groups.
Step 4 Assign a core cluster to the file server by doing either of the following:
 in the taskbar to assign all available core clusters to the file server.
 next to each core cluster that you want to assign to the file server. The icon changes to
  when selected.
Note You can only assign core clusters to file servers. You cannot assign regular device groups (identified by  ) to file servers.
Step 5 Click the
Resolve File Server Name
icon ( ) for the WAFS Core Cluster you selected. This icon is located next to the Type column and verifies that the name you entered for the file server can be resolved to an IP address.
This icon is available only for WAFS Core Clusters. If the file server name does not resolve, an error message appears in the Comments column. If this occurs, ensure you entered the correct name for the file server.
The icon next to the Core Clusters you selected changes to  .
.
Step 7 (Optional) If the file server that you just added contains a dynamic share, see the “Creating Dynamic Shares” section.
When a file server contains a dynamic share, you must specify the dynamic share in the WAAS Central Manager GUI.
Creating Dynamic Shares
Many file servers use dynamic shares, which allow multiple users to access the same share but then be automatically mapped to a different directory based on the user’s credentials. Dynamic shares are most commonly used on file servers to set up user home directories.
For example, a directory named Home can be set up as a dynamic share on a file server so each user accessing that share is automatically redirected to their own personal directory.
If a file server contains a dynamic share, you must register that dynamic share with the WAAS Central Manager as described in this section.
Before adding a dynamic share, note the following limitations:
- Each dynamic share on a file server must be unique.
- You cannot add a dynamic share if that share has a preposition directive. You must remove the preposition policy before you can add the dynamic share.
- You can use the WAAS Central Manager GUI to define any directory as a dynamic share. However, if a directory is not set up as a dynamic share on the file server, all users will read or write the same content from the same directory and will not be redirected to different directories based on their credentials.
- If you are using legacy mode, you can add two different dynamic shares with the same file server name and the same share name, but each one needs to be associated with a different core cluster. Each share will have a different ID.
- If you are using legacy mode, you can add dynamic shares only for explicitly registered file servers. Dynamic shares are supported on automatically discovered file servers only if you are using transparent CIFS accelerator mode.
To add a dynamic share, follow these steps:
Step 1 Before adding a dynamic share, verify the following (only if you are using legacy mode):
- The dynamic share is already set up on the CIFS file server.
- You have set up the file server in the WAAS Central Manager GUI. For more information on identifying a file server, see the “Setting Up File Servers to Export to the Edge WAE Cache” section.
Step 2 From the WAAS Central Manager GUI navigation pane, choose Configure > File Services > Dynamic Shares .
A list of dynamic shares appears. The Dynamic Shares window shows all the dynamic shares configured. From this window, you can perform the following tasks:
Step 3 Click the Create New Dynamic Share icon in the taskbar to add a new dynamic share. The Creating a new Dynamic Share window appears.
Step 4 In the Name field, enter a name for the dynamic share. This name appears to users when they access the share on the Edge WAE cache.
The following characters are not supported in the dynamic share name: / \ : * ? " < > |
Step 5 From the Assigned Domain drop-down list, choose the WAAS domain that you want to assign to the dynamic share. Only users who are also assigned to this domain have permission to access the dynamic share.
This kind of WAAS domain does not use entities. (When defining the domain, choose None for the Entity Type.) For more information on domains, see the “Working with Domains” section.
Step 6 (Optional) If you are using legacy mode, check the CIFS - Use WAFS transport mode check box.
Checking this box hides certain fields in this window because some fields are appropriate only for transparent CIFS accelerator mode.
Step 7 In the File Server field, enter the name of the file server with the dynamic share.
The text field is not shown if you checked the CIFS - Use WAFS transport mode check box. Instead, registered file servers are displayed in a drop-down list. For information on registering a file server, see the “Registering a File Server with the WAAS Central Manager” section. (Registering file servers is not required for transparent CIFS mode.)
Step 8 In the User name, Password, and Confirm fields, enter the username and password credentials for the file server. If the username is in a Windows domain, specify the domain name as part of the User name field, as follows: domain\username. (These fields are not shown if you checked the CIFS - Use WAFS transport mode check box.)
Step 9 In the Share Name field, specify the location of the dynamic share by doing one of the following tasks:
Note To make the Browse button appear in legacy mode, you must assign the file server to a Core Cluster and the cluster must contain at least one Core WAE. If these conditions are not met, the Browse button is not displayed in legacy mode. In transparent CIFS accelerator mode, the Browse button appears only if you have at least one WAE device with the CIFS accelerator enabled and registered to the WAAS Central Manager.
Step 10 Ensure that the status of the share is set to enabled. If you change the status to disabled, the share will not be set up as a dynamic share in your WAAS environment.
The specified directory now functions as a dynamic share on the Edge WAE cache.
Creating a Connection Between a Core Cluster and Edge WAEs
After you have registered a file server with the WAAS system, you need to create a connection between a core cluster and your Edge WAEs (for legacy mode). This connection enables the core cluster to copy files to the cache on your Edge WAEs.
Before you define a connection that includes multiple core clusters and Edge WAEs, it is important to confirm that each core cluster-to-Edge WAE link has the same connection parameters, such as allocated bandwidth and roundtrip delay, as well as identical aliasing. If this is not the case, you must define a separate connection for each link.
To create a connection between a core cluster and one or more Edge WAEs, follow these steps:
Step 1 From the WAAS Central Manager GUI navigation pane, choose Configure > File Services > Connectivity .
The Connectivity window appears.
From this window, you can perform the following tasks:
Step 2 Click the Create New Connection icon in the taskbar to add a new connection.
The Creating a New Connection window appears. (See Figure 11-6.)
Figure 11-6 Creating a New Connectivity Directive Window
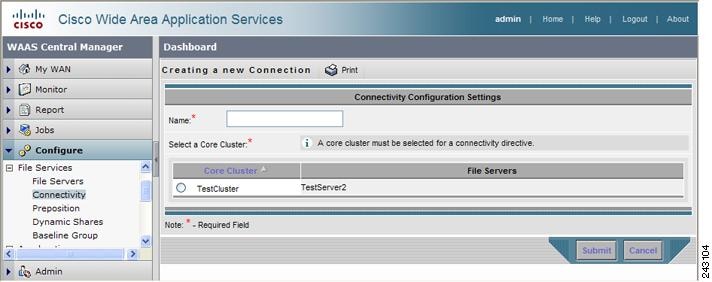
Step 3 Enter a name for the connection.
Step 4 Choose the radio button next to the core cluster that you want included in this connection.
A message appears explaining that if you do not want to export any file servers for this connection, you need to uncheck each file server on the File Server Settings window before you assign an Edge device or group to this connection.
Step 6 Click OK after reading the message.
If you are relying on the automatic discovery feature instead of explicitly registering file servers, you do not need to configure file server settings and you can skip to Step 12.
Step 7 Click the File Server Settings tab.
The Configure File Server Aliases window appears. (See Figure 11-7.)
Figure 11-7 Configuring File Server Aliases
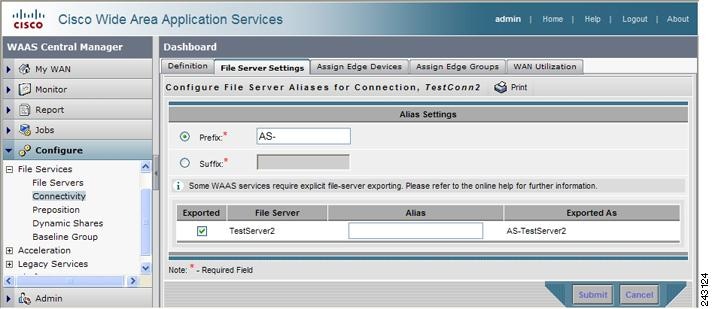
This window allows you to define the naming scheme for each file server. You can use the original file server name, the file server name plus a prefix or suffix, or an alias of your own design. For example, if you specify as- as a prefix and the name of the file server is win3srv , users will see this file server as as-win3srv .
This window also allows you to select the file servers that you want the core cluster to export.
Step 8 Specify a prefix or suffix value by selecting one of the following options:
The default behavior is for WAAS to add the prefix AS- to the beginning of the file server alias. You cannot enter a blank prefix or suffix value. If you specify an alias, as described in Step 10, it overrides the prefix and suffix setting.
Step 9 Check the check box next to each file server that you want to export in this connection (at least one must be selected). By default, all file servers are selected.
Note If no file servers appear in this window, then you have not assigned this core cluster to a file server as described in the “Assigning a Core Cluster to a Registered File Server” section. You must complete the procedures in that section before proceeding.
Step 10 (Optional) Enter an alias for the selected file servers in the Alias column.
An alias, which can be any name (maximum of 15 characters), overrides the default prefix and suffix setting defined in Step 8.
The Exported As column displays the name of each exported file server as it will appear to your end users.
Step 12 Click one of the following tabs:
The Edge Device Assignments window or the Edge Group Assignments window appears depending on the selected option.
Step 13 Choose the edge devices to include in this connection by doing either of the following:
 in the taskbar to assign all available edge devices or groups to this connection.
 next to each edge device or device group that you want to assign to this connection. The icon changes to
  when selected.
Note You can only assign edge devices or device groups with edge services enabled on them. You cannot assign regular core clusters or offline devices (identified by  ) to the connection. For information on enabling edge services, see the “Configuring the Edge Devices” section.
The icon next to each edge device or device group you selected changes to  .
.
Step 15 (Optional) Configure WAN utilization settings for this connection, by completing the following tasks:
a. Click the WAN Utilization tab. The WAN Utilization window appears.
b. Define the following WAN utilization settings that control the bandwidth that is used for WAFS traffic between the Edge and Core WAEs:
– Maximum allocated bandwidth —Enter the maximum bandwidth allocated to the connection (in kilobits per second). This value must be less than or equal to the maximum bandwidth of the physical WAN link between the WAEs in this connection. This setting has a default value of 1544 KB per second. WAFS throttles its bandwidth usage to 1.5 times the value of this setting.
– Minimum roundtrip delay —Enter the length of time (in milliseconds) it takes a bit to travel round-trip from one WAE to the other end and back when the link is idle. This setting has a default value of 80 msec.
Note If you later change any of the WAN utilization settings for this connection, you need to restart the Edge WAE for the new values to take effect.
Creating a Preposition Directive
A preposition directive allows you to determine which files should be proactively copied from CIFS file servers to the cache of selected Edge WAEs. Prepositioning enables you to take advantage of idle time on the WAN to transfer frequently accessed files to selected WAEs, where users can benefit from cache-level performance even during first-time access of these files.
You can add preposition directives only for explicitly registered file servers in legacy mode. Prepositioning is supported on automatically discovered file servers only in transparent CIFS accelerator mode.
When defining a preposition directive, you select the Edge WAEs that you want to be prepositioned with content from the file server, then specify the root directories on the file server to be prepositioned. Initially, the preposition directive is in the unscheduled state. You must create a schedule that determines when and how often the content is prepositioned. Because content can be prepositioned on a regular basis, you can specify whether each new iteration of the task should copy all designated files, or only those files that have changed over a specified time interval.
In addition, you can specify time and size limits to prevent a preposition task from consuming too much bandwidth on the WAN or too much space on the Edge WAE cache. We strongly recommend that you use these limits to optimize network efficiency and prevent misuse of this feature.
When the activation time of a preposition directive arrives, a preposition task starts on the Edge WAE. Each preposition task can be monitored in the WAAS Central Manager GUI during and after processing. You can also terminate active preposition tasks if required.
Prepositioning requires that the username and password needed to access the file server be specified in the Configure Core Server Settings window. For details, see Step 11 in the “Configuring the Core Cluster” section.
Prepositioning includes the ability to configure multiple roots. See the “Creating a New Preposition Directive” section.
Note A warning message appears if the required connections do not exist for defining preposition directives.
The following topics describe how to create a preposition directive:
Creating a New Preposition Directive
To create a preposition directive, follow these steps:
Step 1 From the WAAS Central Manager GUI navigation pane, choose Configure > File Services > Preposition .
The Preposition Directives window appears. This window displays the following information about preposition directives that exist on the system:
– When the type is Full, all the files that match the other filters of the task and that are found on the file server are sent to the Edge to be compared with the cache.
– When the type is Differential, only the files that are found as changed since the last successful preposition are sent to the Edge cache. The time of the last successful preposition is taken from the Edge device, so ensure that the clock is synchronized with the file server. The first scan is always a full scan. If you change the preposition task, the last successful scan time is reset.
– When the type is Since, only the files that are found as changed within a specified time period are sent to the Edge cache.
From the Preposition Directive window, you can perform the following tasks:
Step 2 Click the Create New Preposition Directive icon in the taskbar to create a new preposition directive.
The Creating New Preposition Directive window appears. (See Figure 11-8.)
Figure 11-8 Creating a New Preposition Directive
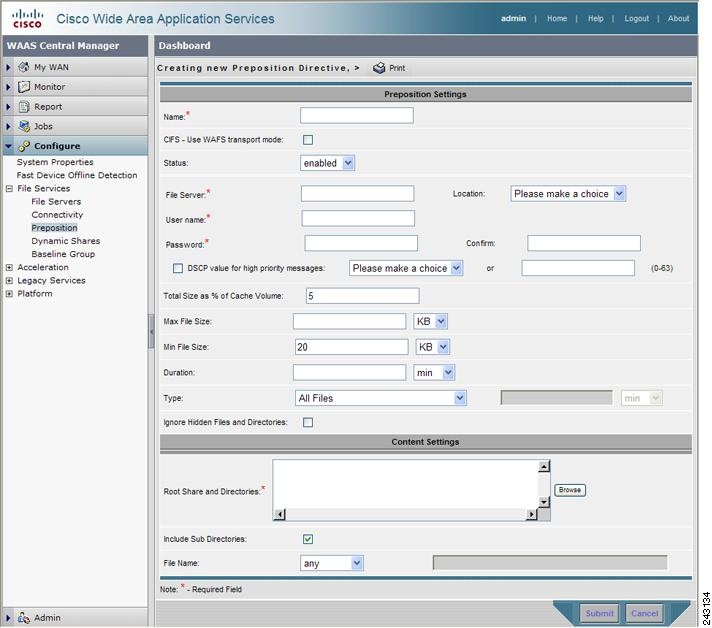
Step 3 Enter a name for the directive.
Step 4 (Optional) If you are using legacy mode, check the CIFS - Use WAFS transport mode check box.
Checking this box hides certain fields in this window because some fields are appropriate only for transparent CIFS accelerator mode.
Step 5 From the Status drop-down list, choose either enabled or disabled . Disabled directives are not put into effect.
Step 6 In the File Server field, enter the name of a file server to export.
The text field is not shown if you checked the CIFS - Use WAFS transport mode check box. Instead, registered file servers are displayed in a drop-down list. For information on registering a file server, see the “Registering a File Server with the WAAS Central Manager” section. (Registering file servers is not required for transparent CIFS mode.)
Step 7 From the Location drop-down list, choose the device location that will provide browsing services for the file server. For the best browsing performance, specify a location that is close to the file server. For more information on defining locations, see the “Working with Device Locations” section. (The Location is not shown if you checked the CIFS - Use WAFS transport mode check box.)
Step 8 In the User name, Password, and Confirm fields, enter the username and password credentials for the file server. If the username is in a Windows domain, specify the domain name as part of the User name field, as follows: domain\username. (These fields are not shown if you checked the CIFS - Use WAFS transport mode check box.)
Step 9 (Optional) Check the DSCP value for high priority messages check box if you want to assign a DSCP marking value to the prepositioning traffic. Choose a DSCP value from the drop-down list or enter a number from 0–63 in the text field. See Table 11-4 for a description of the supported values. (The DSCP settings are not shown if you checked the CIFS - Use WAFS transport mode check box.)
DSCP is a field in an IP packet that enables different levels of service to be assigned to the network traffic. Levels of service are assigned by marking each packet on the network with a DSCP code and associating a corresponding level of service. DSCP is the combination of IP Precedence and Type of Service (ToS) fields. For more information, see RFC 2474.
Step 10 (Optional) Define the time and size limitations using the provided fields.
Table 11-6 describes the time and size limitation fields.
Note If one of these limits is exceeded during a prepositioning task, the task is terminated and a message is sent to the Administrator log. Any remaining files are exported the next time the task is run. If a user requests one of the missing files before this happens, it is fetched over the WAN through WAAS software as usual.
Step 11 (Optional) Check the Ignore Hidden Directories check box if you want to prevent hidden directories on the file server from being prepositioned. This check box is unchecked by default. If you leave this box unchecked, hidden directories will be prepositioned.
Note If you are using legacy mode and relying on the automatic discovery feature instead of explicitly registering file servers, this check box does not apply because prepositioning is not supported for automatically discovered file servers in legacy mode.
Step 12 In the Root Share and Directories field, enter the directories on the file server that you want to export. Use any of the following methods to identify a directory:
When you define multiple root shares, the preposition sequence that is performed for a single root configuration is repeated for each root serially.
- Click the Browse button to browse the directories on the file server. To navigate into a directory, click the file folder icon to the left of the directory name. Check the check box next to the directory that you want to export and then click the Select Directory button. The browse window allows you to choose multiple directories.
In legacy mode, the Browse button appears only if you have configured the File Server access username and the File Server access password fields in the Core Server Settings configuration window. (See Figure 11-3.) In transparent CIFS mode, the browse function operates best when you choose in the Location drop-down list the location of the nearest CIFS accelerator to the file server. If you do not choose a location, the browse request is sent to all devices that have the CIFS accelerator enabled, and the request may time out.
- Check the Include Sub Directories check box to include all subdirectories under the specified root directory. If this option is not selected, only the files in the specified root directory are prepositioned and you cannot select subdirectories when you are browsing.
- Narrow the policy definition to a particular type of file by choosing a pattern operator from the File Name drop-down list and entering the text that describes the pattern in the adjacent text box. For example, enter ends with .doc .
The directive is saved to the system and additional options appear in the navigation pane.
Assigning Edge Devices to a Preposition Directive
After you create a preposition directive, you need to assign Edge WAEs or device groups to the directive. This task determines which Edge WAEs will store preposition content in their cache.
Note Prepositioning includes the ability to configure multiple roots. See the “Creating a New Preposition Directive” section.
To assign an Edge WAE or device group to a preposition directive, follow these steps:
Step 1 From the WAAS Central Manager GUI navigation pane, choose Configure > File Services > Preposition .
The Preposition Directives window appears, which lists the preposition directives that exist on the system.
Step 2 Click the Edit icon next to the preposition directive that you want to assign to an Edge WAE or device group.
Step 3 Click one of the following tabs at the top of the window:
The Edge Device Assignments window or the Device Groups Assignments window appears, depending on the selected option.
Step 4 Choose the Edge WAEs or device groups to assign to this preposition directive by doing either of the following:
 in the taskbar to assign all available Edge WAEs or device groups to this directive.
 next to the individual Edge WAE or device group that you want to assign to this directive. The icon changes to
  when selected.
Note If a device or device group is offline (identified by  ), then you cannot assign that device or group to this directive. The preposition directive, when assigned to a device group, is applied only to connected Edge devices in the assigned device group.
The icon next to each edge device or device group you selected changes to  .
.
Creating a New Preposition Schedule
Once you create a preposition directive and assign WAEs to the directive, we recommend you create a schedule that determines when and how often prepositioning occurs.
For example, you may want to schedule prepositioning to occur at night to minimize the amount of traffic during business hours. Or you may want to schedule prepositioning to occur on a recurring basis if the exported data changes often. This will help ensure that the WAEs assigned to this directive have the latest file updates in their cache.
When a preposition task is scheduled to begin at the same time for multiple Edge WAEs that are located in different timezones, the task will begin on the Edge WAEs based on the Core WAE timezone. If the clocks of the Edge WAE and the Core WAE are not synchronized, the task will not start on time.
To create a preposition schedule, follow these steps:
Step 1 From the WAAS Central Manager GUI navigation pane, choose Configure > File Services > Preposition .
The Preposition Directives window appears, which lists the preposition directives that exist on the system.
Step 2 Click the Edit icon next to the preposition directive for which you want to create a schedule.
Step 3 Click the Schedule tab at the top of the window.
The Creating New Preposition Schedule window appears. By default, no schedule is configured.
Step 4 Choose one of the following scheduling options:
A Now schedule begins again each time you make a change to the preposition directive and click the Submit button. A Now schedule also begins again as soon as an edge device that has been reloaded comes back online.
- Daily—Prepositioning occurs daily at the defined time.
- Date—Prepositioning occurs at the defined time and date.
- Weekly—Prepositioning occurs on the selected days of the week at the defined time.
- Monthly Days—Prepositioning occurs on the selected days of the month at the defined time.
- Monthly Weekdays—Prepositioning occurs on the defined day (as opposed to a defined date) and time during the month. For example, you can schedule prepositioning to occur on the second Tuesday of every month.
Step 5 Specify a start time for the prepositioning task.
The time is expressed in 24-hour format with 00:00 representing midnight.
Note You cannot schedule a start time for the Now option.
The message Changes Submitted appears at the bottom of the window confirming that your schedule was saved.
Step 7 Verify that the preposition directive completed successfully by checking the preposition status. For more information, see the “Checking the Preposition Status” section.
Managing File Services
The following topics in this section describe how to manage file servers:
- Checking the Preposition Status
- Starting and Stopping Preposition Tasks
- Preparing Your WAAS Network for WAN Failures
- Viewing Members of a Core Cluster
Checking the Preposition Status
After you create one or more preposition directives, you can check the status of all the preposition tasks to ensure they completed successfully. If a task does not complete successfully, then some of the prepositioned files may have not been successfully copied to the Edge WAE cache.
To check the status of a prepositioning task, follow these steps:
Step 1 From the WAAS Central Manager GUI navigation pane, choose Configure > File Services > Preposition .
The Preposition Directives window appears, which lists the preposition directives that exist on the system.
Step 2 Click the Edit icon next to the preposition directive for which you want to check.
Step 3 Click the Preposition Status tab at the top of the window. The Preposition Status window appears.
This page displays the following information:
- WAE—The name of each Edge WAE that received the prepositioned files in its cache.
- Start Time—The time the preposition task started.
- Duration—The amount of time in took the preposition task to complete.
- Amount Copied—The amount of data copied to the WAE cache (in bytes).
- Status—Whether the preposition task completed successfully.
- Reason—The reason a preposition task failed.
Step 4 Ensure that the Status column shows Completed.
If this column shows a failure, look in the Reason column for an explanation that can help you troubleshoot why the preposition task failed. After resolving the issue, you can schedule the preposition task to run again now, or wait until the scheduled start time and check the status again later.
Starting and Stopping Preposition Tasks
You can start or stop a preposition task from the Device Manager GUI. For more information, see the “Preposition Option” section.
Preparing Your WAAS Network for WAN Failures
When you set up a connectivity directive that links an Edge WAE to a core cluster, you have the option to configure the Edge WAE to operate in disconnected mode in the event a WAN failure breaks its link to the core cluster.
Note Disconnected mode is not available when you are using the transparent CIFS accelerator mode of file services.
About Disconnected Mode
Disconnected mode allows CIFS clients to continue to browse the cache directory and read fully cached files on an Edge WAE when a WAN failure occurs. Because the Edge WAE cannot verify its cached data against the file server during a WAN failure, CIFS clients are provided with read-only access to the cached data.
When the WAN connection between the Edge WAE and core cluster is restored, the Edge WAE automatically switches back to regular connected mode.
An Edge WAE switches to disconnected mode when the Edge WAE loses its connection to the core cluster. This is known as a WAN failure.
Note A file server crash does not trigger a switch to disconnected mode (assuming the Edge WAE maintains its connection to the core cluster).
An Edge WAE can operate in disconnected mode for one connection and in regular connected mode for another connection. For example, if you create two connectivity directives for an Edge WAE where one directive links it to core cluster A and the other directive links it to core cluster B and a WAN failure breaks its link to core cluster A, then the Edge WAE switches to disconnected mode for that connection. The Edge WAE will remain in regular connected mode when interacting with core cluster B.
Disconnected mode operates only with explicitly registered file servers. Disconnected mode is not supported for automatically discovered file servers.
DNS and Domain Controller Requirements
Disconnected mode requires a local domain controller in the branch office to authenticate CIFS clients. An Edge WAE operating in disconnected mode supports all authentication methods except Kerberos.
In DNS-only environments, a local DNS server at the branch office is also required. If WINS is used instead of DNS, there must be a local WINS server in the branch office.
To enable disconnected mode access to cached files, you must add the Edge WAE to the Active Directory or Windows NT domain (to perform windows authentication in case of WAN failure).
Note By default, Windows domain controllers enforce automatic machine account password changes as part of the authentication process. The machine account password for the Edge WAE is automatically negotiated and changed between the Edge WAE and the domain controller every seven days. However, if the authentication service is down, this process may not occur, and the machine account password for the Edge WAE may expire. To prevent this situation, we recommend that you disable automatic machine account password changes for the Edge WAE. For more information, see the “Disabling the Automatic Machine Account Password Changes for the Edge WAE” section.
Note WINS registrations usually have a three-day timeout. As a result, if WCCP is enabled in disconnected mode there is a chance that the WINS registration of the original file servers will expire and clients will experience name resolution problems.
Data Availability in Disconnected Mode
When an Edge WAE is in disconnected mode, CIFS clients are allowed read-only access to fully cached files on the Edge WAE. CIFS clients are able to view partially cached files and non-cached files in the directory structure, but they are not able to open these files.
Directories are available in disconnected mode only if their ACL is cached. This means that shares that have never been accessed, and therefore are not in the cache, are not displayed.
The best way to ensure a file is available in disconnected mode is to set up a preposition directive that proactively places a copy of the file on the Edge WAE cache. For more information, see the “Creating a New Preposition Directive” section.
Configuring Disconnected Mode
When you register a file server with the WAAS Central Manager, you can configure an Edge WAE to operate in disconnected mode. For more information, see the “Registering a File Server with the WAAS Central Manager” section.
You also must add the Edge WAE to the Active Directory or Windows NT domain. For details, see the “Configuring Windows Domain Server Settings on a WAAS Device” section. Verify that the WAE was successfully added into the domain by clicking the Show Authentication Status button. Even if the authentication status is not OK, as long as the wbinfo -t command executed successfully (trust via RPC is successful), the WAE will provide authentication for Read Only disconnected mode.
Viewing Members of a Core Cluster
Note This functionality is not available when you are using the transparent CIFS accelerator mode of file services because Core Clusters do not exist in this mode.
To view the Core WAEs that are members of a Core Cluster device group, follow these steps:
Step 1 From the WAAS Central Manager GUI navigation pane, choose My WAN > Manage Device Groups . The Device Groups window appears.
Step 2 Click the Edit icon next to the WAFS Core Cluster device group for which you want to view its members. The Modifying Device Group window appears.
Step 3 From the navigation pane, choose Members . A list of the devices that belong to the selected device group appears.
 Feedback