- Index
- Preface
- Introduction to Cisco WAAS
- Planning Your WAAS Network
- Using Device Groups and Device Locations
- Configuring Traffic Interception
- Configuring Network Settings
- Configuring Administrative Login Authentication, Authorization, and Accounting
- Creating and Managing Administrator User Accounts and Groups
- Creating and Managing IP Access Control Lists for WAAS Devices
- Configuring Other System Settings
- Using the WAE Device Manager GUI
- Configuring Wide Area File Services
- Configuring Application Acceleration
- Configuring and Managing WAAS Print Services
- Configuring Virtualization
- Maintaining Your WAAS System
- Monitoring and Troubleshooting Your WAAS Network
- Configuring SNMP Monitoring
- Default Application Policies
Cisco Wide Area Application Services Configuration Guide (Software Version 4.1.1)
Bias-Free Language
The documentation set for this product strives to use bias-free language. For the purposes of this documentation set, bias-free is defined as language that does not imply discrimination based on age, disability, gender, racial identity, ethnic identity, sexual orientation, socioeconomic status, and intersectionality. Exceptions may be present in the documentation due to language that is hardcoded in the user interfaces of the product software, language used based on RFP documentation, or language that is used by a referenced third-party product. Learn more about how Cisco is using Inclusive Language.
- Updated:
- August 28, 2008
Chapter: Configuring Administrative Login Authentication, Authorization, and Accounting
- About Administrative Login Authentication and Authorization
- Configuring Administrative Login Authentication and Authorization
- Configuring AAA Accounting for WAAS Devices
- Viewing Audit Trail Logs
Configuring Administrative Login Authentication, Authorization, and Accounting
This chapter describes how to configure administrative login authentication, authorization, and accounting for Wide Area Application Services (WAAS) devices.
This chapter contains the following sections:
- About Administrative Login Authentication and Authorization
- Configuring Administrative Login Authentication and Authorization
- Configuring AAA Accounting for WAAS Devices
- Viewing Audit Trail Logs
You use the WAAS Central Manager GUI to centrally create and manage two different types of administrator user accounts (device-based CLI accounts and roles-based accounts) for your WAAS devices. For more information, see Chapter7, “Creating and Managing Administrator User Accounts and Groups”

Note Throughout this chapter, the term WAAS device is used to refer collectively to WAAS Central Managers and WAEs in your network. The term WAE refers to WAE appliances and WAE Network Modules (the NME-WAE family of devices).
About Administrative Login Authentication and Authorization
In the WAAS network, administrative login authentication and authorization are used to control login requests from administrators who want to access a WAAS device for configuring, monitoring, or troubleshooting purposes.
Login authentication is the process by which WAAS devices verify whether the administrator who is attempting to log in to the device has a valid username and password. The administrator who is logging in must have a user account registered with the device. User account information serves to authorize the user for administrative login and configuration privileges. The user account information is stored in an AAA database, and the WAAS devices must be configured to access the particular authentication server (or servers) where the AAA database is located. When the user attempts to login to a device, the device compares the person’s username, password, and privilege level to the user account information that is stored in the database.
The WAAS software provides the following authentication, authorization, and accounting (AAA) support for users who have external access servers (for example, RADIUS or TACACS+ servers), and for users who need a local access database with AAA features:
- Authentication (or login authentication) is the action of determining who the user is. It checks the username and password.
- Authorization (or configuration) is the action of determining what a user is allowed to do. It permits or denies privileges for authenticated users in the network. Generally, authentication precedes authorization. Both authentication and authorization are required for a user log in.
- Accounting is the action of keeping track of administrative user activities for system accounting purposes. In the WAAS software, AAA accounting through TACACS+ is supported. For more information, see the “Configuring AAA Accounting for WAAS Devices” section.
Note An administrator can log in to the WAAS Central Manager device through the console port or the WAAS Central Manager GUI. An administrator can log in to a WAAS device that is functioning as a data center or branch WAE through the console port or the WAE Device Manager GUI.
When the system administrator logs in to a WAAS device before authentication and authorization have been configured, the administrator can access the WAAS device by using the predefined superuser account (the predefined username is admin and the predefined password is default). When you log in to a WAAS device using this predefined superuser account, you are granted access to all the WAAS services and entities in the WAAS system.
Note Each WAAS device must have one administrator account with the username admin. You cannot change the username of the predefined superuser account. The predefined superuser account must have the username admin.
After you have initially configured your WAAS devices, we strongly recommend that you immediately change the password for the predefined superuser account (the predefined username is admin, the password is default, and the privilege level is superuser, privilege level 15) on each WAAS device.
If the predefined password for this superuser account has not been changed on a WAAS Central Manager device, the following dialog box is displayed each time you use the account to log in to the WAAS Central Manager GUI. (See Figure 6-1.)
Figure 6-1 Message Indicating the Predefined Password for the Superuser Account Should Be Changed
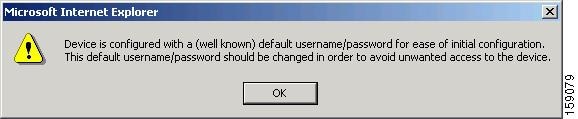
If you have not changed the predefined password for this superuser account, the console will also display the following message each time you use the account to log in to the WAAS CLI on a WAAS device:
For instructions on using the WAAS Central Manager GUI to change the password for the predefined superuser account, see the “Changing the Password for Your Own Account” section.
Figure 6-2 shows how an administrator can log in to a WAE through the console port or the WAAS GUIs (the WAAS Central Manager GUI or the WAE Device Manager GUI). When the WAAS device receives an administrative login request, the WAE can check its local database or a remote third-party database (TACACS+, RADIUS, or Windows domain database) to verify the username with the password and to determine the access privileges of the administrator.
Figure 6-2 Authentication Databases and a WAE
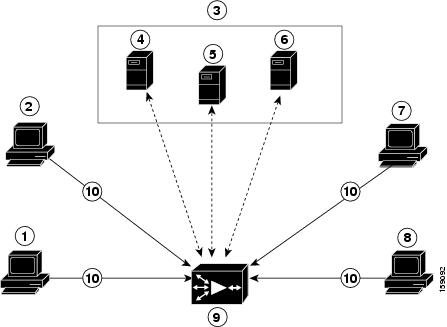
The user account information is stored in an AAA database, and the WAAS devices must be configured to access the particular authentication server (or servers) that contains the AAA database. You can configure any combination of these authentication and authorization methods to control administrative login access to a WAAS device:
Note If you configure authentication using an external authentication server, you still must create a user account in the WAAS Central Manager as described in Chapter7, “Creating and Managing Administrator User Accounts and Groups” The user account must not be a local one; that is, do not check the Local User check box when you create the account.
For more information on the default AAA configuration, see the “Default Administrative Login Authentication and Authorization Configuration” section. For more information on configuring AAA, see the “Configuring Administrative Login Authentication and Authorization” section.
Default Administrative Login Authentication and Authorization Configuration
By default, a WAAS device uses the local database to obtain login authentication and authorization privileges for administrative users.
Table 6-1 lists the default configuration for administrative login authentication and authorization.
Note If you configure a RADIUS or TACACS+ key on the WAAS device (the RADIUS and the TACACS+ client), make sure that you configure an identical key on the external RADIUS or TACACS+ server.
You change these defaults through the WAAS Central Manager GUI, as described in the “Configuring Administrative Login Authentication and Authorization” section.
Multiple Windows domain utilities are included in the WAAS software to assist with Windows domain authentication configuration. You can access these utilities through the WAAS CLI by using the windows-domain diagnostics EXEC command.
To invoke these utilities from the WAAS Central Manager GUI, follow these steps:
Step 1 From the WAAS Central Manager GUI navigation pane, choose My WAN > Manage Devices .
Step 2 Click the Edit icon next to the device for which you want to run the utilities in a predefined order.
Step 3 In the navigation pane, choose Admin > Authentication > Windows Domain .
Step 4 In the displayed window, click the Show Authentication Status button at the bottom of the window.
Configuring Administrative Login Authentication and Authorization
To centrally configure administrative login authentication and authorization for a WAAS device or a device group (a group of WAEs), follow these steps:
Step 1 Determine the login authentication scheme that you want to configure the WAAS device to use when authenticating administrative login requests (for example, use the local database as the primary login database and your RADIUS server as the secondary authentication database).
Step 2 Configure the login access control settings for the WAAS device, as described in the “Configuring Login Access Control Settings for WAAS Devices” section.
Step 3 Configure the administrative login authentication server settings on the WAAS device (if a remote authentication database is to be used). For example, specify the IP address of the remote RADIUS servers, TACACS+ servers, or Windows domain server that the WAAS device should use to authenticate administrative login requests, as described in the following sections:
Step 4 Specify one or all of the following login authentication configuration schemes that the WAAS device should use to process administrative login requests:
For example, specify which authentication database the WAAS device should check to process an administrative login request. See the “Enabling Administrative Login Authentication and Authorization Schemes for WAAS Devices” section.

Caution Make sure that RADIUS, TACACS+, or Windows domain authentication is configured and operating correctly before disabling local authentication and authorization. If you disable local authentication and RADIUS, TACACS+, or Windows domain settings are not configured correctly, or if the RADIUS, TACACS+, or Windows domain server is not online, you may be unable to log in to the WAAS device.
You can enable or disable the local and the remote databases (TACACS+, RADIUS, and Windows domain) through the WAAS Central Manager GUI or the WAAS CLI. The WAAS device verifies whether all databases are disabled and, if so, sets the system to the default state (see Table 6-1 ). If you have configured the WAAS device to use one or more of the external third-party databases (TACACS+, RADIUS, or Windows domain authentication) for administrative authentication and authorization, make sure that you have also enabled the local authentication and authorization method on the WAAS device, and that the local method is specified as the last option; otherwise, the WAAS device will not go to the local authentication and authorization method by default if the specified external third-party databases are not reachable.
By default, local login authentication is enabled first. Local authentication and authorization uses locally configured login and passwords to authenticate administrative login attempts. The login and passwords are local to each WAAS device and are not mapped to individual usernames. When local authentication is disabled, if you disable all other authentication methods, local authentication is reenabled automatically.
You can disable local login authentication only after enabling one or more of the other administrative login authentication methods. However, when local login authentication is disabled, if you disable all other administrative login authentication methods, local login authentication is reenabled automatically. You cannot specify different administrative login authentication methods for console and Telnet connections.
We strongly recommend that you set the administrative login authentication and authorization methods in the same order. For example, configure the WAAS device to use RADIUS as the primary login method, TACACS+ as the secondary login method, Windows as the tertiary method, and the local method as the quaternary method for both administrative login authentication and authorization.
Note A TACACS+ server will not authorize a user who is authenticated by a different method. For example, if you configure Windows as the primary authentication method, but TACACS+ as the primary authorization method, TACACS+ authorization will fail.
We strongly recommend that you specify the local method as the last method in your prioritized list of login authentication and authorization methods. By adhering to this practice, if the specified external third-party servers (TACACS+, RADIUS, or Windows domain servers) are not reachable, a WAAS administrator can still log in to a WAAS device through the local authentication and authorization method.
This section describes how to centrally configure administrative login authentication and contains the following topics:
- Configuring Login Access Control Settings for WAAS Devices
- Configuring Remote Authentication Server Settings for WAAS Devices
- Enabling Administrative Login Authentication and Authorization Schemes for WAAS Devices
Configuring Login Access Control Settings for WAAS Devices
This section describes how to centrally configure remote login and access control settings for a WAAS device or device group and contains the following topics:
Configuring Secure Shell Settings for WAAS Devices
Secure Shell (SSH) consists of a server and a client program. Like Telnet, you can use the client program to remotely log in to a machine that is running the SSH server, but unlike Telnet, messages transported between the client and the server are encrypted. The functionality of SSH includes user authentication, message encryption, and message authentication.
Note By default, the SSH feature is disabled on a WAAS device.
The SSH management window in the WAAS Central Manager GUI allows you to specify the key length, login grace time, and maximum number of password guesses allowed when logging in to a specific WAAS device or device group for configuration, monitoring, or troubleshooting purposes.
To centrally enable the SSH feature on a WAAS device or a device group, follow these steps:
Step 1 From the WAAS Central Manager GUI navigation pane, choose My WAN > Manage Devices (or Manage Device Groups ).
Step 2 Click the Edit icon next to the device (or device group) for which you want to enable SSH.
Step 3 In the navigation pane, choose Admin > Login Access Control > SSH .
The SSH Configuration window appears. (See Figure 6-3.)
Figure 6-3 SSH Configuration Window

Step 4 Check the Enable check box to enable the SSH feature. SSH enables login access to the chosen WAAS device (or the device group) through a secure and encrypted channel.
Step 5 Check the Allow non-admin users check box to allow non-administrative users to gain SSH access to the chosen device (or device group). By default, this option is disabled.
Note Nonadministrative users are non-superuser administrators. All non-superuser administrators only have restricted access to a WAAS device because their login accounts have a privilege level of 0. Superuser administrators have full access to a WAAS device because their login accounts have the highest level of privileges, a privilege level of 15.
Step 6 In the Length of key field, specify the number of bits needed to create an SSH key. The default is 1024.
When you enable SSH, be sure to generate both a private and a public host key, which client programs use to verify the server’s identity. When you use an SSH client and log in to a WAAS device, the public key for the SSH daemon running on the device is recorded in the client machine known_hosts file in your home directory. If the WAAS administrator subsequently regenerates the host key by specifying the number of bits in the Length of key field, you must delete the old public key entry associated with the WAAS device in the known_hosts file before running the SSH client program to log in to the WAAS device. When you use the SSH client program after deleting the old entry, the known_hosts file is updated with the new SSH public key for the WAAS device.
Step 7 In the Login grace time field, specify the number of seconds for which an SSH session will be active during the negotiation (authentication) phase between client and server before it times out. The default is 300 seconds.
Step 8 In the Maximum number of password guesses field, specify the maximum number of incorrect password guesses allowed per connection. The default is 3.
Although the value in the Maximum number of password guesses field specifies the number of allowed password guesses from the SSH server side, the actual number of password guesses for an SSH login session is determined by the combined number of allowed password guesses of the SSH server and the SSH client. Some SSH clients limit the maximum number of allowed password guesses to three (or to one in some cases), even though the SSH server allows more than this number of guesses. When you specify n allowed password guesses, certain SSH clients interpret this number as n + 1. For example, when configuring the number of guesses to two for a particular device, SSH sessions from some SSH clients will allow three password guesses.
Step 9 Specify whether the clients should be allowed to connect using the SSH protocol Version 1 or Version 2:
Note You can enable both SSH Version 1 and Version 2, or you can enable one version and not the other. You cannot disable both versions of SSH unless you disable the SSH feature by unchecking the Enable check box. (See Step 4.)
Step 10 Click Submit to save the settings.
A “Click Submit to Save” message appears in red in the Current Settings line when there are pending changes to be saved after you have applied default or device group settings. You can also revert to the previously configured settings by clicking the Reset button. The Reset button is visible only when you have applied default or group settings to change the current device settings but have not yet submitted the changes.
If you try to exit this window without saving the modified settings, a warning dialog box prompts you to submit the changes. This dialog box only appears if you are using the Internet Explorer browser.
To configure SSH settings from the CLI, you can use the sshd and ssh-key-generate global configuration commands.
Disabling and Reenabling the Telnet Service for WAAS Devices
By default, the Telnet service is enabled on a WAAS device. You must use a console connection instead of a Telnet session to define device network settings on a WAAS device. However, after you have used a console connection to define the device network settings, you can use a Telnet session to perform subsequent configuration tasks.
You must enable the Telnet service before you can use the Telnet button in the Device Dashboard window to Telnet to a device.
To centrally disable the Telnet service on a WAAS device or a device group, follow these steps:
Step 1 From the WAAS Central Manager GUI navigation pane, choose My WAN > Manage Devices (or Manage Device Groups ).
Step 2 Click the Edit icon next to the device (or device group) for which you want to disable Telnet.
Step 3 In the navigation pane, choose Admin > Login Access Control > Telnet . The Telnet Settings window appears.
Step 4 Uncheck the Telnet Enable check box to disable the terminal emulation protocol for remote terminal connection for the chosen device (or device group).
Step 5 Click Submit to save the settings.
A “Click Submit to Save” message appears in red next to the Current Settings line when there are pending changes to be saved after you have applied default or device group settings. You can also revert to the previously configured settings by clicking the Reset button. The Reset button is visible only when you have applied default or group settings to change the current device settings but have not yet submitted the changes.
If you try to exit this window without saving the modified settings, a warning dialog box prompts you to submit the changes. This dialog box only appears if you are using the Internet Explorer browser.
To centrally reenable the Telnet service on the device (or device group) at a later time, check the Telnet Enable check box in the Telnet Settings window and click Submit .
From the CLI, you can use the no telnet enable global configuration command to disable Telnet or the telnet enable global configuration command to enable it.
Configuring Message of the Day Settings for WAAS Devices
The Message of the Day (MOTD) feature enables you to provide information bits to the users when they log in to a device that is part of your WAAS network. There are three types of messages that you can set up:
Note When you run an SSH version 1 client and log in to the device, the MOTD and login banners are not displayed. You need to use SSH version 2 to display the banners when you log in to the device.
To configure the MOTD settings, follow these steps:
Step 1 From the WAAS Central Manager GUI navigation pane, choose My WAN > Manage Devices . The Devices window appears.
Step 2 Click the Edit icon next to the WAAS device for which you want to set up the message of the day. The Device Dashboard window for the chosen device appears.
Step 3 In the navigation pane, choose Admin > Login Access Control > Message of the day. The MOTD Configuration window for the chosen device appears.
Step 4 To enable the MOTD settings, check the Enable check box. The Message of the Day (MOTD) banner, EXEC process creation banner, and Login banner fields become enabled.
Step 5 In the Message of the Day (MOTD) Banner field, enter a string that you want to display as the MOTD banner after a user logs in to the device.
Note In the Message of the Day (MOTD) Banner, EXEC Process Creation Banner, and Login Banner fields, you can enter a maximum of 1024 characters. A new line character (or Enter) is counted as two characters, as it is interpreted as \n by the system. You cannot use special characters such as `, % ,^ , and " in the MOTD text. If your text contains any of these special characters, WAAS software removes it from the MOTD output.
Step 6 In the EXEC Process Creation Banner field, enter a string to be displayed as the EXEC process creation banner when a user enters into the EXEC shell of the device.
Step 7 In the Login Banner field, enter a string to be displayed after the MOTD banner, when a user attempts to login to the device.
Step 8 To save the configuration, click Submit.
Configuring Exec Timeout Settings for WAAS Devices
To centrally configure the length of time that an inactive Telnet session remains open on a WAAS device or device group, follow these steps:
Step 1 From the WAAS Central Manager GUI navigation pane, choose My WAN > Manage Devices (or Manage Device Groups ).
Step 2 Click the Edit icon next to the device (or device group) for which you want to configure the EXEC timeout.
Step 3 In the navigation pane, choose Admin > Login Access Control > Exec Timeout .
Step 4 In the Exec Timeout field, specify the number of minutes after which an active session times out. The default is 15 minutes.
A Telnet session with a WAAS device can remain open and inactive for the period specified in this field. When the EXEC timeout period elapses, the WAAS device automatically closes the Telnet session.
Step 5 Click Submit to save the settings.
A “Click Submit to Save” message appears in red next to the Current Settings line when there are pending changes to be saved after you have applied default or device group settings. You can also revert to the previously configured settings by clicking the Reset button. The Reset button is visible only when you have applied default or group settings to change the current device settings but have not yet submitted the changes.
If you try to exit this window without saving the modified settings, a warning dialog box prompts you to submit the changes. This dialog box only appears if you are using the Internet Explorer browser.
To configure the Telnet session timeout from the CLI, you can use the exec-timeout global configuration command.
Configuring Line Console Carrier Detection for WAAS Devices
You need to enable carrier detection if you plan to connect the WAAS device to a modem for receiving calls.
Note By default, this feature is disabled on a WAAS device.
To centrally enable console line carrier detection for a WAAS device or device group, follow these steps:
Step 1 From the WAAS Central Manager GUI navigation pane, choose My WAN > Manage Devices (or Manage Device Groups ).
Step 2 Click the Edit icon next to the device (or device group) that you want to configure.
Step 3 In the navigation pane, choose Admin > Login Access Control > Console Carrier Detect . The Console Carrier Detect Settings window appears.
Step 4 Check the Enable console line carrier detection before writing to the console check box to enable the window for configuration.
Step 5 Click Submit to save the settings.
A message appears that explains that if a null-modem cable that has no carrier detect pin wired is being used, the WAE may appear unresponsive on the console until the carrier detect signal is asserted. To recover from a misconfiguration, the WAE should be rebooted and the 0x2000 bootflag should be set to ignore the carrier detect setting.
To configure console line carrier detection from the CLI, you can use the line console carrier-detect global configuration command.
Configuring Remote Authentication Server Settings for WAAS Devices
If you have determined that your login authentication scheme is to include one or more external authentication servers, you must configure these server settings before you can configure the authentication scheme in the WAAS Central Manager GUI. The section contains the following topics:
Configuring RADIUS Server Authentication Settings
RADIUS is a client/server authentication and authorization access protocol used by a network access server (NAS) to authenticate users attempting to connect to a network device. The NAS functions as a client, passing user information to one or more RADIUS servers. The NAS permits or denies network access to a user based on the response that it receives from one or more RADIUS servers. RADIUS uses the User Datagram Protocol (UDP) for transport between the RADIUS client and server.
RADIUS authentication clients reside on devices that are running WAAS software. When enabled, these clients send authentication requests to a central RADIUS server, which contains user authentication and network service access information.
You can configure a RADIUS key on the client and server. If you configure a key on the client, it must be the same as the one configured on the RADIUS servers. The RADIUS clients and servers use the key to encrypt all RADIUS packets transmitted. If you do not configure a RADIUS key, packets are not encrypted. The key itself is never transmitted over the network.
Note For more information about how the RADIUS protocol operates, see RFC 2138, Remote Authentication Dial In User Service (RADIUS).
RADIUS authentication usually occurs when an administrator first logs in to the WAAS device to configure the device for monitoring, configuration, or troubleshooting purposes. RADIUS authentication is disabled by default. You can enable RADIUS authentication and other authentication methods at the same time. You can also specify which method to use first.

Tip The WAAS Central Manager does not cache user authentication information. Therefore, the user is reauthenticated against the RADIUS server for every request. To prevent performance degradation caused by many authentication requests, install the WAAS Central Manager device in the same location as the RADIUS server, or as close as possible to it, to ensure that authentication requests can occur as quickly as possible.
To centrally configure RADIUS server settings for a WAAS device or device group, follow these steps:
Step 1 From the WAAS Central Manager GUI navigation pane, choose My WAN > Manage Devices (or Manage Device Groups ).
Step 2 Click the Edit icon next to the name of the device (or device group) that you want to configure.
Step 3 From the navigation pane, choose Admin > Authentication > RADIUS . The RADIUS Server Settings window appears. (See Figure 6-4.)
Figure 6-4 RADIUS Server Settings Window
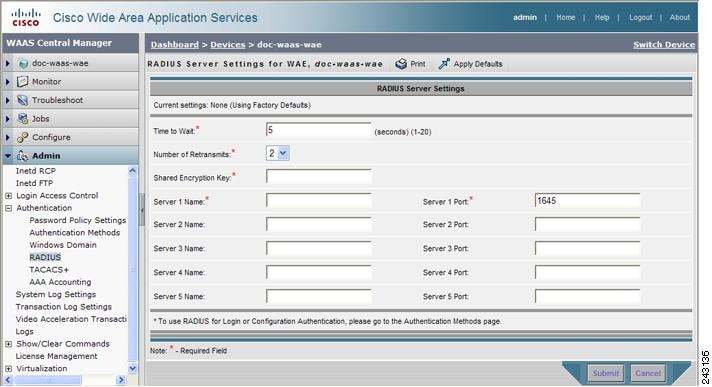
Step 4 In the Time to Wait field, specify how long the device or device group should wait for a response from the RADIUS server before timing out. The range is from 1 to 20 seconds. The default value is 5 seconds.
Step 5 In the Number of Retransmits field, specify the number of attempts allowed to connect to a RADIUS server. The default value is 2 times.
Step 6 In the Shared Encryption Key field, enter the secret key that is used to communicate with the RADIUS server.
Note If you configure a RADIUS key on the WAAS device (the RADIUS client), make sure that you configure an identical key on the external RADIUS server.
Step 7 In the Server Name field, enter an IP address or hostname of the RADIUS server. Five different hosts are allowed.
Step 8 In the Server Port field, enter a UDP port number on which the RADIUS server is listening. You must specify at least one port. Five different ports are allowed.
Step 9 Click Submit to save the settings.
You can now enable RADIUS as an administrative login authentication and authorization method for this WAAS device or device group, as described in the “Enabling Administrative Login Authentication and Authorization Schemes for WAAS Devices” section.
To configure RADIUS settings from the CLI, you can use the radius-server global configuration command.
Configuring TACACS+ Server Authentication Settings
TACACS+ controls access to network devices by exchanging network access server (NAS) information between a network device and a centralized database to determine the identity of a user or an entity. TACACS+ is an enhanced version of TACACS, a UDP-based access-control protocol specified by RFC 1492. TACACS+ uses TCP to ensure reliable delivery and encrypt all traffic between the TACACS+ server and the TACACS+ daemon on a network device.
TACACS+ works with many authentication types, including fixed password, one-time password, and challenge-response authentication. TACACS+ authentication usually occurs when an administrator first logs in to the WAAS device to configure the WAE for monitoring, configuring, or troubleshooting.
When a user requests restricted services, TACACS+ encrypts the user password information using the MD5 encryption algorithm and adds a TACACS+ packet header. This header information identifies the packet type being sent (for example, an authentication packet), the packet sequence number, the encryption type used, and the total packet length. The TACACS+ protocol then forwards the packet to the TACACS+ server.
A TACACS+ server can provide authentication, authorization, and accounting functions. These services, while all part of TACACS+, are independent of one another, so a given TACACS+ configuration can use any or all of the three services.
When the TACACS+ server receives a packet, it does the following:
- Authenticates the user information and notifies the client that the login authentication has either succeeded or failed.
- Notifies the client that authentication will continue and that the client must provide additional information. This challenge-response process can continue through multiple iterations until login authentication either succeeds or fails.
You can configure a TACACS+ key on the client and server. If you configure a key on a WAAS device, it must be the same as the one configured on the TACACS+ servers. The TACACS+ clients and servers use the key to encrypt all TACACS+ packets transmitted. If you do not configure a TACACS+ key, packets are not encrypted.
TACACS+ authentication is disabled by default. You can enable TACACS+ authentication and local authentication at the same time.
The TACACS+ database validates users before they gain access to a WAAS device. TACACS+ is derived from the United States Department of Defense (RFC 1492) and is used by Cisco Systems as an additional control of nonprivileged and privileged mode access. The WAAS software supports TACACS+ only and not TACACS or Extended TACACS.
If you are using TACACS+ for user authentication, you can create WAAS user group names that match the user groups that you have defined on the TACACS+ server. WAAS can then dynamically assign roles and domains to users based on their membership in the groups defined on the TACACS+ server. (See the “Working with Accounts” section.) You must specify associated group names for each user in the TACACS+ configuration file, as follows:
For each user, list the groups they belong to in the waas_rbac_groups attribute, separating each group from the next with a comma.
Tip The WAAS Central Manager does not cache user authentication information, so the user is reauthenticated against the TACACS+ server for every request. To prevent performance degradation caused by many authentication requests, install the WAAS Central Manager device in the same location as the TACACS+ server, or as close as possible to it, to ensure that authentication requests can occur as quickly as possible.
Configuring the TACACS+ Enable Password Attribute
The WAAS software CLI EXEC mode allows you to set, view, and test system operations. The mode is divided into two access levels: user and privileged. To access privileged-level EXEC mode, enter the enable EXEC command at the user access level prompt and specify a privileged EXEC password (superuser or admin-equivalent password) when prompted for a password.
In TACACS+, the enable password feature allows an administrator to define a different enable password per administrative-level user. If an administrative-level user logs in to the WAAS device with a normal-level user account (privilege level of 0) instead of an admin or admin-equivalent user account (privilege level of 15), that user must enter the admin password to access privileged-level EXEC mode.
Note This caveat applies even if the WAAS users are using TACACS+ for login authentication.
To centrally configure TACACS+ server settings on a WAAS device or device group, follow these steps:
Step 1 From the WAAS Central Manager GUI navigation pane, choose My WAN > Manage Devices (or Manage Device Groups ).
Step 2 Click the Edit icon next to the name of the device (or device group) that you want to configure.
Step 3 From the navigation pane, choose Admin > Authentication > TACACS+ . The TACACS+ Server Settings window appears.
Step 4 Check the Use ASCII Password Authentication check box to use the ASCII password type for authentication.
The default password type is PAP (Password Authentication Protocol). However, you can change the password type to ASCII when the authentication packets are to be sent in ASCII cleartext format.
Step 5 In the Time to Wait field, specify how long the device should wait before timing out. The range is from 1 to 20 seconds. The default value is 5 seconds.
Step 6 In the Number of Retransmits field, specify the number of attempts allowed to connect to a TACACS+ server. The range is 1 to 3 times. The default value is 2 times.
Step 7 In the Security Word field, enter the secret key that is used to communicate with the TACACS+ server.
Note If you configure a TACACS+ key on the WAAS device (the TACACS+ client), make sure that you configure an identical key on the external TACACS+ server.
Step 8 In the Primary Server field, enter an IP address or hostname for the primary TACACS+ server.
Step 9 In the Secondary Server field, enter an IP address or hostname for a secondary TACACS+ server.
Step 10 In the Tertiary Server field, enter an IP address or hostname for a tertiary TACACS+ server.
Note You can specify up to two backup TACACS+ servers.
Step 11 Click Submit to save the settings.
You can now enable TACACS+ as an administrative login authentication and authorization method for this WAAS device or device group, as described in the “Enabling Administrative Login Authentication and Authorization Schemes for WAAS Devices” section.
To configure TACACS+ settings from the CLI, you can use the tacacs global configuration command.
Configuring Windows Domain Server Authentication Settings
A Windows domain controller can be configured to control access to the WAAS software services using either a challenge/response or shared secret authentication method. The system administrator can log in to the WAAS device by using an FTP, SSH, or Telnet session, the console, or the WAAS Central Manager GUI with a single user account (username/password/privilege). RADIUS and TACACS+ authentication schemes can be configured simultaneously with Windows domain authentication. Logging of a variety of authentication login statistics can be configured when Windows domain authentication is enabled. The log files and the statistical counters and related information can be cleared at any time.
In a WAAS network, Windows domain authentication is used in the following cases:
- Log in to the WAAS Central Manager GUI
- Log in to the WAE Device Manager GUI
- CLI configuration on any WAAS device
- Disconnected mode operation
You can configure Windows authentication for the WAAS Central Manager device, a single WAAS device, or a group of devices. To configure Windows domain authentication on a WAAS device, you must configure a set of Windows domain authentication settings.
Note Windows domain authentication is not performed unless a Windows domain server is configured on the WAAS device. If the device is not successfully registered, authentication and authorization do not occur. WAAS supports authentication by a Windows domain controller running only on Windows Server 2000 or Windows Server 2003.
Configuring Windows Domain Server Settings on a WAAS Device
You will need to know the name and IP address, or hostname, of the Windows domain controller that will be used for authentication.
To configure Windows Domain server settings on a WAAS device or device group, follow these steps:
Step 1 From the WAAS Central Manager GUI navigation pane, choose My WAN > Manage Devices (or Manage Device Groups ).
Step 2 Click the Edit icon next to the name of the device (or device group) that you want to configure.
Step 3 From the navigation pane, choose Admin > Authentication > Windows Domain . The Windows Domain Server Settings window appears. (See Figure 6-5.)
Figure 6-5 Windows Domain Server Settings Window

Note If the related WINS server and the workgroup or domain name have not been defined for the chosen device (or device group), an informational message is displayed at the top of this window to inform you that these related settings are currently not defined, as shown in Figure 6-5. To define these settings, choose Configure > Network > Windows Name Services.
Step 4 Specify an administrative group for normal users (non-superuser administrators), who only have restricted access to the chosen device (or device group) because their administrator user account only has a privilege level of 0, by entering the name of the group in the Administrative group for normal users field.
Note By default, there are not predefined user groups for Windows domain authorization configured on a WAE.
Step 5 Specify an administrative group for superusers (superuser administrators), who have unrestricted access to the chosen device (or device group) because their administrator user account has a privilege level of 15, by entering the name of the group in the Administrative group for superusers field.
Note In addition to configuring Windows domain administrative group on a WAE, you must configure the Windows domain administrative group on your Microsoft Windows 2000 or 2003 server. You must create a Windows Domain administrative superuser group and a normal user group. Make sure that the group scope for the superuser group is set to global, assign user member to newly created administrative group, and add the user account (for example, the winsuper user) to the Windows domain superuser group. For more information about how to configure the Windows domain administrative group on your Windows server, see your Microsoft documentation.
When a user attempts to access this WAE through a Telnet session, FTP, or SSH session, the WAE is now configured to use the Active Directory user database to authenticate a request for administrative access.
Step 6 Select NTLM or Kerberos as a shared secure authentication method for administrative logins to the chosen device (or device group) as follows:
Note Kerberos version 5 is used for Windows systems running Windows 2000 or higher with users logging in to domain accounts.
NTLM version 1 is used for all Windows systems, including legacy systems such as Windows 98 with Active Directory, Windows NT, and more recent Windows systems, such as Windows 2000, Windows XP, and Windows 2003. We recommend the use of Kerberos if you are using a Windows 2000 SP4 or Windows 2003 domain controller.
NTLM version 2 is used for Windows systems running Windows 98 with Active Directory, Windows NT 4.0 (Service Pack 4 or higher), Windows XP, Windows 2000, and Windows 2003. Enabling NTLM version 2 support on the WAAS print server will not allow access to clients who use NTLM or LM.
Caution Enable NTLM version 2 support in the print server only if all the clients’ security policy has been set to Send NTLMv2 responses only/Refuse LM and NTLM.
- To select Kerberos, check the Kerberos enabled check box. In the Realm field, enter the fully qualified name of the realm in which the WAAS device resides. In the Key Distribution center, enter the fully qualified name or the IP address of the distribution center for the Kerberos key. If desired, enter the name of the organizational unit in the Organizational Unit field.
All Windows 2000 domains are also Kerberos realms. Because the Windows 2000 domain name is also a DNS domain name, the Kerberos realm name for the Windows 2000 domain name is always in uppercase letters. This capitalization follows the recommendation for using DNS names as realm names in the Kerberos Version 5 protocol document (RFC-4120) and affects only interoperability with other Kerberos-based environments.
Step 7 In the Domain Controller field, enter the name of the Windows Domain Controller.
The domain registration will be successful even if the domain controller name is invalid or if the domain controller is not available. This behavior is possible because the registration process makes use of the domain controller name from the password server field of the smb.conf file. The prioritization list in the smb.conf file commonly uses the format, “ DomainControllerName , *” or simply, “*” (asterisk). Samba looks for domain controllers first by name, and if these are unavailable, Samba proceeds to the * and looks for available Domain Controllers in the workgroup. This behavior is an intentional facet of the design, and it allows domain registration even when a domain controller is not available.
Note Make sure that you click Submit now so that the specified changes are committed to the WAAS Central Manager database. The Domain Administrator’s username and password, which you will enter next in Step 9, is not stored in the WAAS Central Manager’s database.
Step 9 Register the chosen device (or device group) with the Windows Domain Controller as follows:
a. In the Domain Administrator username field, enter the administrative username (the domain\username or the domain name plus the username) of the specified Windows Domain Controller.
b. In the Domain Administrator password field, enter the administrative password of the specified Windows Domain Controller.
c. In the Confirm password field, reenter the administrative password of the specified Windows Domain Controller.
Note When you click the Register button, the WAAS Central Manager immediately sends a registration request to the WAAS device (or device group) using SSH (the specified domain administrator password is encrypted by SSH). The registration request instructs the device to perform domain registration with the specified Windows Domain Controller using the specified domain administrator’s username and password. If the device is accessible (if it is behind a NAT and has an external IP address), the registration request is performed by the device (or device group).
e. To check the status of the registration request, you must set Windows as the authentication and authorization method for the device, as described in the “Enabling Administrative Login Authentication and Authorization Schemes for WAAS Devices” section, then wait a few minutes and click the Show Authentication Status button.
You may choose to check the Refresh Authentication Status check box before you click the Show Authentication Status button. When this box is checked, the WAAS Central Manager queries the device for an updated domain registration status. When this box is unchecked, the status is retrieved from the Central Manager local cache.
After you click the Show Authentication Status button, a dialog box appears prompting if you want to continue with this request to view the status of the authentication request. (See Figure 6-6.)
Figure 6-6 Confirmation Dialog Box

f. Click OK to continue or click Cancel to cancel the request.
If the request fails, you will receive an error dialog. Wait a few more minutes and try again to see the updated authentication status.
If the request succeeds, the domain registration status will be shown immediately below the Windows Authentication and Domain Registration heading, in the lower part of Figure 6-5. In addition, the status of windows authentication and disconnected mode is shown in this area.
After configuring the Windows domain settings, to complete the process of enabling Windows authentication, you must set Windows as the authentication and authorization method for the device by using the Authentication Methods window, as described in the “Enabling Administrative Login Authentication and Authorization Schemes for WAAS Devices” section.
We recommend that you use the WAAS Central Manager GUI instead of the WAAS CLI to configure Windows Domain server settings, but if you want to use the CLI, see the following commands in the Cisco Wide Area Application Services Command Reference : windows-domain and kerberos (if you are using Kerberos as a shared secure authentication method)
Next, register the WAAS device with the Windows domain server that you configured, and then verify it, by using the following commands (for Kerberos authentication):
For NTLM authentication, use the following commands instead:
Finally, enable Windows Domain as the administrative login authentication and authorization configuration by using the following commands:
To enable content request authentication in disconnected mode, use the authentication content-request windows-domain disconnected-mode enable configuration command.
Unregistering a WAE from a Windows Domain Controller
If you want to unregister a WAE device from a Windows domain controller, you can do that directly from the WAAS Central Manager, as long as you have used the Kerberos shared secure authentication method. If you have used the NTLM method, you cannot unregister the WAE by using the WAAS Central Manager; you must log into the domain controller and remove the device registration manually.
Before you can unregister a device, you must disable windows authentication for the device.
To unregister a WAE device, follow these steps:
Step 1 From the WAAS Central Manager GUI navigation pane, choose My WAN > Manage Devices (or Manage Device Groups ).
Step 2 Click the Edit icon next to the name of the device (or the device group) that you want to unregister.
Step 3 From the navigation pane, choose Admin > Authentication > Authentication Methods . The Authentication and Authorization Methods window appears. (See Figure 6-7.)
Step 4 Under both the Authentication Login Methods and the Authorization Methods sections, change each of the drop-down lists that are set to WINDOWS so that they are set to something different. For more information about changing these settings, see the “Enabling Administrative Login Authentication and Authorization Schemes for WAAS Devices” section.
Step 5 Click Submit to save the settings.
Step 6 From the navigation pane, choose Admin > Authentication > Windows Domain . The Windows Domain Server Settings window appears. (See Figure 6-5.)
Step 7 (Optional) Enter the administrative username and password in the Domain administrator username, Domain administrator password, and Confirm password fields. It is not mandatory to enter the username and password, but in some cases, the domain controller requires them to perform the unregistration.
Step 8 Scroll down and click the Unregister button.
Note When you click the Unregister button, the WAAS Central Manager immediately sends an unregistration request to the WAAS device (or device group) using SSH. The unregistration request instructs the device to unregister from the specified Windows Domain Controller.
a. Check the status of the unregistration request by waiting a few minutes and clicking the Show Authentication Status button. A dialog box appears prompting if you want to continue with this request to view the status of the authentication request. (See Figure 6-6.)
b. Click OK to continue or click Cancel to cancel the request.
If you want to use the CLI to unregister a WAE device, you must first use the following commands to disable windows authentication:
Next, unregister the WAAS device from the Windows domain server by using the following command (for Kerberos authentication):
There is no CLI command to unregister the WAAS device if it is using NTLM authentication.
Disabling the Automatic Machine Account Password Changes for the Edge WAE
In a WAAS network where a Windows domain controller is configured for authentication and Disconnected Mode is enabled on an Edge WAE operating in WAFS legacy mode, the domain controller authenticates content requests in the event of a WAN failure. By default, Windows domain controllers enforce automatic machine account password changes as part of the authentication process. The machine account password for the Edge WAE is automatically negotiated and changed between the Edge WAE and the domain controller every seven days. However, if the authentication service is down, this process may not occur, and the machine account password for the Edge WAE may expire.
To prevent this situation, we recommend that you disable automatic machine account password changes for the Edge WAE. The procedure that follows describes how to disable automatic machine account password changes for Windows XP and Windows Server 2003 using Group Policy Editor. Refer to Microsoft’s Help and Support page for details on how to disable automatic machine account password changes for the other Windows operating systems.
To disable the automatic machine account password changes for the Edge WAE using Group Policy Editor, follow these steps:
Step 1 On the Windows domain controller, click Start and then choose Run .
Step 2 Enter Gpedit at the prompt, and then click OK .
Step 3 Expand the Local Computer Policy, Windows Settings, Security Settings, Local Policies, Security Settings, Local Policies, Security Options.
Step 4 Configure the following setting: Domain Member: Disable machine account password changes (DisablePasswordChange).
LDAP Server Signing
LDAP server signing is a configuration option of the Microsoft Windows Server’s Network security settings. This option controls the signing requirements for Lightweight Directory Access Protocol (LDAP) clients. LDAP signing is used to verify that an intermediate party did not tamper with the LDAP packets on the network and to guarantee that the packaged data comes from a known source. Windows Server 2003 administration tools use LDAP signing to secure communications between running instances of these tools and the servers that they administer.
By using the Transport Layer Security (TLS, RFC 2830) protocol to provide communications privacy over the Internet, client/server applications can communicate in a way that prevents eavesdropping, tampering, or message forging. TLS v1 is similar to Secure Sockets Layer (SSL). TLS offers the same encryption on regular LDAP connections (ldap://:389) as SSL, while operating on a secure connection (ldaps://:636). A server certificate is used by the TLS protocol to provide a secure, encrypted connection to the LDAP server. A client certificate and key pair are required for client authentication.
In the WAAS software, login authentication with Windows 2003 domains is supported when the LDAP server signing requirements option for the Domain Security Policy is set to “Require signing.” The LDAP server signing feature allows the WAE to join the domain and authenticate users securely.
Note When you configure your Windows domain controller to require an LDAP signature, you must also configure LDAP signing on the client WAE. By not configuring the client to use LDAP signatures, communication with the server is affected, and user authentication, group policy settings, and logon scripts might fail. Install the Certification Authority service on the Microsoft server with the server’s certificate (Programs > Administrative Tools > Certification Authority). Enable the LDAP server signing requirements property on the Microsoft server (Start > Programs > Administrative Tools > Domain Controller Security Policy). In the displayed window, choose Require signing from the drop-down list, and click OK.
For information about how to configure your Windows domain controller to require an LDAP signature, see your Microsoft documentation.
Configuring LDAP Signing on the Client WAEs
You can configure a security setting on Windows 2003 domain controllers to require clients (such as WAEs) to sign LDAP requests. Because unsigned network traffic can be intercepted and manipulated by outside parties, some organizations require LDAP server signing to prevent man-in-the-middle attacks on their LDAP servers. You can only configure LDAP signing on a single WAE; it cannot be configured at a system level. In addition, you must configure LDAP signing on a WAE through the WAAS CLI; you cannot configure LDAP signing through any of the WAAS GUIs (either the WAAS Central Manager GUI or the WAE Device Manager GUI).
By default, LDAP server signing is disabled on a WAE. To enable this feature on a WAE, follow these steps:
Step 1 Enable LDAP server signing on the WAE:
Step 2 Save the configuration on the WAE:
Step 3 Check the current running LDAP client configuration on the WAE:
Step 4 Register the WAE with the Windows domain:
Step 5 Enable user login authentication on the WAE:
Step 6 Enable user login authorization on the WAE:
Step 7 Check the current configuration for login authentication and authorization on the WAE:
The WAE is now configured to authenticate Active Directory users. Active Directory users can use Telnet, FTP, or SSH to connect to the WAE or they can access the WAE through the WAAS GUIs (WAAS Central Manager GUI or the WAE Device Manager GUI).
Step 8 View statistics that are related to Windows domain user authentication. Statistics increment after each user authentication attempt:
Step 9 Use the clear statistics EXEC command to clear the statistics on the WAE:
- To clear all of the login authentication statistics, enter the clear statistics authentication EXEC command.
- To clear only the statistics that are related to Windows domain authentication, enter the clear statistics windows-domain EXEC command.
- To clear all of the statistics, enter the clear statistics all EXEC command.
Disabling LDAP Server Signing on a Client WAE
To disable LDAP server signing on a WAE, follow these steps:
Step 1 Unregister the WAE from the Windows domain:
Step 2 Disable user login authentication:
Step 3 Disable LDAP signing on the WAE:
Enabling Administrative Login Authentication and Authorization Schemes for WAAS Devices
This section describes how to centrally enable the various administrative login authentication and authorization schemes (the authentication configuration) for a WAAS device or device group.
Caution Make sure that RADIUS, TACACS+, or Windows domain authentication is configured and operating correctly before disabling local authentication and authorization. If you disable local authentication and if RADIUS, TACACS+, or Windows domain authentication is not configured correctly, or if the RADIUS, TACACS+, or Windows domain server is not online, you may be unable to log in to the WAAS device.
By default, a WAAS device uses the local database to authenticate and authorize administrative login requests. The WAAS device verifies whether all authentication databases are disabled and if so, sets the system to the default state. For information on this default state, see the “Default Administrative Login Authentication and Authorization Configuration” section.
Note You must configure the TACACS+, or RADIUS, or Windows server settings for the WAAS device (or device group) before you configure and submit these settings. See the “Configuring TACACS+ Server Authentication Settings” section, the “Configuring RADIUS Server Authentication Settings” section, and the “Configuring Windows Domain Server Authentication Settings” section for information on how to configure these server settings on a WAAS device or device group.
By default, WAAS devices fail over to the secondary method of administrative login authentication whenever the primary administrative login authentication method fails. You change this default login authentication failover method through the WAAS Central Manager GUI, as follows:
- To change the default for a WAAS device, choose My WAN > Manage Devices. Click the Edit icon next to the name of the WAAS device for which you want to change the default login authentication failover method, and then choose Admin > Authentication > Authentication Methods from the navigation pane. Check the Failover to next available authentication method box in the displayed window and click Submit .
- To change the default for a device group, choose My WAN > Manage Device Groups. Click the Edit icon next to the name of the device group for which you want to change the default login authentication failover method, and then choose Admin > Authentication > Authentication Methods from the navigation pane. Check the Failover to next available authentication method box in the displayed window and click Submit .
After you enable the failover to next available authentication method option, the WAAS device (or the devices in the device group) queries the next authentication method only if the administrative login authentication server is unreachable, not if authentication fails for some other reason.
Note To use the login authentication failover feature, you must set TACACS+, RADIUS, or Windows domain as the primary login authentication method, and local as the secondary login authentication method.
If the failover to next available authentication method option is enabled , follow these guidelines:
- You can configure only two login authentication schemes (a primary and secondary scheme) on the WAAS device.
- Note that the WAAS device (or the devices in the device group) fails over from the primary authentication scheme to the secondary authentication scheme only if the specified authentication server is unreachable.
- Configure the local database scheme as the secondary scheme for both authentication and authorization (configuration).
For example, if the failover to next available authentication method option is enabled and RADIUS is set as the primary login authentication scheme and local is set as the secondary login authentication scheme, the following events occur:
1. When the WAAS device (or the devices in the device group) receives an administrative login request, it queries the external RADIUS authentication server.
2. One of the following occurs:
a. If the RADIUS server is reachable, the WAAS device (or the devices in the device group) uses this RADIUS database to authenticate the administrator.
b. If the RADIUS server is not reachable, the WAAS device (or the devices in the device group) tries the secondary authentication scheme (that is, it queries its local authentication database) to authenticate the administrator.
Note The local database is contacted for authentication only if this RADIUS server is not available. In any other situation (for example, if the authentication fails in the RADIUS server), the local database is not contacted for authentication.
Conversely, if the failover to next available authentication method option is disabled , then the WAAS device (or the devices in the device group) contacts the secondary authentication database regardless of the reason why the authentication failed with the primary authentication database.
If all the authentication databases are enabled for use, then all the databases are queried in the order of priority selected and based on the failover reason. If no failover reason is specified, then all the databases are queried in the order of their priority. For example, first the primary authentication database is queried, then the secondary authentication database is queried, then the tertiary database is queried, and finally the quaternary authentication database is queried.
To specify the login authentication and authorization scheme for a WAAS device or device group, follow these steps:
Step 1 From the WAAS Central Manager GUI navigation pane, choose My WAN > Manage Devices (or Manage Device Groups ).
Step 2 Click the Edit icon next to the name of the device (or the device group) that you want to configure.
Step 3 From the navigation pane, choose Admin > Authentication > Authentication Methods . The Authentication and Authorization Methods window appears. (See Figure 6-7.)
Figure 6-7 Authentication and Authorization Methods Window
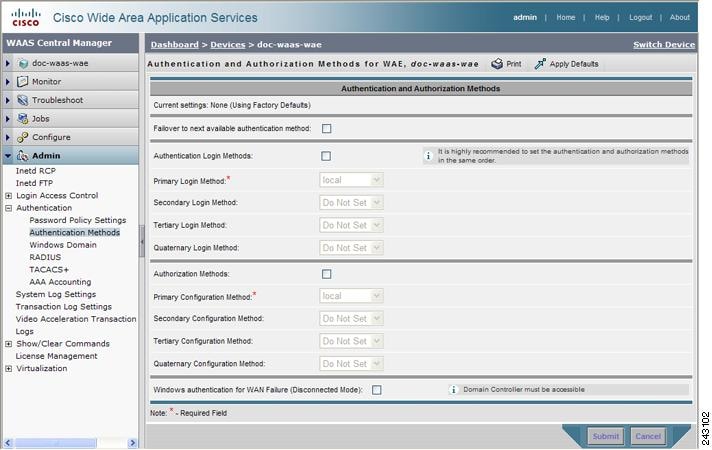
Step 4 Check the Failover to next available authentication method check box to query the secondary authentication database only if the primary authentication server is unreachable.
To use this feature, you must set TACACS+, RADIUS, or Windows domain as the primary authentication method and local as a secondary authentication method. Make sure that you configure the local method as a secondary scheme for both authentication and authorization (configuration).
Step 5 Check the Authentication Login Methods check box to enable authentication privileges using the local, TACACS+, RADIUS, or WINDOWS databases.
Step 6 Specify the order of the login authentication methods that the chosen device or device group are to use:
a. From the Primary Login Method drop-down list, choose local , TACACS+ , RADIUS , or WINDOWS . This option specifies the first method that the chosen device (or the device group) should use for administrative login authentication.
b. From the Secondary Login Method drop-down list, choose local , TACACS+ , RADIUS , or WINDOWS . This option specifies the method that the chosen device (or the device group) should use for administrative login authentication if the primary method fails.
c. From the Tertiary Login Method drop-down list, choose local , TACACS+ , RADIUS , or WINDOWS . This option specifies the method that the chosen device (or the device group) should use for administrative login authentication if both the primary and the secondary methods fail.
d. From the Quaternary Login Method drop-down list, choose local , TACACS+ , RADIUS , or WINDOWS . This option specifies the method that the chosen device (or device group) should use for administrative login authentication if the primary, secondary, and tertiary methods all fail.
Note We strongly recommend that you specify the local method as the last method in your prioritized list of login authentication and authorization methods. By adhering to this practice, the WAAS administrator will be able to still log in to a WAAS device (or the devices in the device groups) through the local authentication and authorization method if the specified external third-party servers (TACACS+, RADIUS, or Windows domain servers) are not reachable.
Step 7 Check the Authorization Methods check box to enable authorization privileges using the local, TACACS+, RADIUS, or WINDOWS databases.
Note Authorization privileges apply to console and Telnet connection attempts, secure FTP (SFTP) sessions, and Secure Shell (SSH, Version 1 and Version 2) sessions.
Step 8 Specify the order of the login authorization (configuration) methods that the chosen device (or the device group) should use:
Note We strongly recommend that you set the administrative login authentication and authorization methods in the same order. For example, configure the WAAS device (or device group) to use RADIUS as the primary login method, TACACS+ as the secondary login method, Windows as the tertiary method, and the local method as the quaternary method for both administrative login authentication and authorization.
a. From the Primary Configuration Method drop-down list, choose local , TACACS+ , RADIUS , or WINDOWS . This option specifies the first method that the chosen device (or the device group) should use to determine authorization privileges.
Note If you have checked the Failover to next available authentication method check box (Step 4), make sure that you choose TACACS+ or RADIUS from the Primary Configuration Method drop-down list to configure either the TACACS+ or RADIUS method as the primary scheme for authorization (configuration).
b. From the Secondary Configuration Method drop-down list, choose local , TACACS+ , RADIUS , or WINDOWS . This option specifies the method that the chosen device (or the device group) should use to determine authorization privileges if the primary method fails.
Note If you have checked the Failover to next available authentication method check box (Step 4), make sure that you choose local from the Secondary Configuration Method drop-down list to configure the local method as the secondary scheme for authorization (configuration).
c. From the Tertiary Configuration Method drop-down list, choose local , TACACS+ , RADIUS , or WINDOWS . This option specifies the method that the chosen device (or the device group) should use to determine authorization privileges if both the primary and secondary methods fail.
d. From the Quaternary Configuration Method drop-down list, choose local , TACACS+ , RADIUS , or WINDOWS . This option specifies the method that the chosen device (or device group) should use to determine authorization privileges if the primary, secondary, and tertiary methods all fail.
Step 9 Check the Windows authentication for WAN Failure (Disconnected Mode) check box to enable content request authentication in disconnected mode. Disconnected mode is available only if you are using WAFS legacy mode.
When this feature is enabled, the Windows domain server authenticates the content request in disconnected mode. By default, this feature is disabled on a WAE.
If you enable this feature, we recommend that you also disable automatic account password changes for the WAE. For more information, see the “Disabling the Automatic Machine Account Password Changes for the Edge WAE” section.
Note Windows authentication for disconnected mode operates only if you select NTLM as the shared secure authentication method in the Windows Domain settings window, as described in the “Configuring Windows Domain Server Authentication Settings” section.
Step 10 Click Submit to save the settings.
Note If you have enabled the Windows authentication method, it takes about 15 seconds to activate it. Wait at least 15 seconds before checking Windows authentication status or performing any operation that requires Windows authentication.
To configure the login authentication and authorization scheme from the CLI, you can use the authentication global configuration command. Before you can enable Windows domain authentication or authorization for a device, the device must be registered with the Windows domain controller.
Configuring AAA Accounting for WAAS Devices
Accounting tracks all user actions and when the actions occurred. It can be used for an audit trail or for billing for connection time or resources used (bytes transferred). Accounting is disabled by default.
The WAAS accounting feature uses TACACS+ server logging. Accounting information is sent to the TACACS+ server only, not to the console or any other device. The syslog file on the WAAS device logs accounting events locally. The format of events stored in the syslog is different from the format of accounting messages.
The TACACS+ protocol allows effective communication of AAA information between WAAS devices and a central server. It uses TCP for reliable connections between clients and servers. WAAS devices send authentication and authorization requests, as well as accounting information to the TACACS+ server.
Note Before you can configure the AAA accounting settings for a WAAS device, you must first configure the TACACS+ server settings for the WAAS device. (See the “Configuring TACACS+ Server Authentication Settings” section.)
To centrally configure AAA accounting settings for a WAAS device or device group, follow these steps:
Step 1 From the WAAS Central Manager GUI navigation pane, choose My WAN > Manage Devices (or Manage Device Groups ).
Step 2 Click the Edit icon next to the name of the device (or the device group) that you want to configure.
Step 3 In the navigation pane, choose Admin > Authentication > AAA Accounting . The AAA Accounting Settings window appears. (See Figure 6-8.)
Figure 6-8 AAA Accounting Settings Window
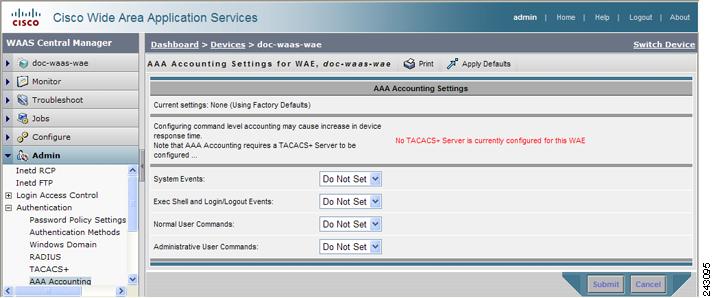
Step 4 From the System Events drop-down list, choose a keyword to specify when the chosen device (or the device group) should track system-level events that are not associated with users, such as reloads, and to activate accounting for system events.
Step 5 From the Exec Shell and Login/Logout Events drop-down list, choose a keyword to specify when the chosen device (or the device group) should track EXEC shell and user login and logout events and to activate accounting for EXEC mode processes. Reports include username, date, start and stop times, and the WAAS device IP address.
Step 6 From the Normal User Commands drop-down list, choose a keyword to specify when the chosen device (or the device group) should track all the commands at the normal user privilege level (privilege level 0) and to activate accounting for all commands at the non-superuser administrative (normal user) level.
Step 7 From the Administrative User Commands drop-down list, choose a keyword to specify when the chosen device (or the device group) should track all commands at the superuser privilege level (privilege level 15) and to activate accounting for all commands at the superuser administrative user level.
Caution Before using the wait-start option, ensure that the WAAS device is configured with the TACACS+ server and is able to successfully contact the server. If the WAAS device cannot contact a configured TACACS+ server, it might become unresponsive.
Table 6-2 describes the event type options.
Step 8 Click Submit to save the settings.
To configure AAA accounting settings from the CLI, you can use the aaa accounting global configuration command.
Viewing Audit Trail Logs
The WAAS Central Manager device logs user activity in the system. The only activities that are logged are those activities that change the WAAS network. For more information on viewing a record of user activity on your WAAS system, see the “Viewing the Audit Trail Log” section.
 Feedback