Cisco StadiumVision Mobile Reporter and Cisco StadiumVision Mobile Streamer Installation and Upgrade Guide, Release 1.3
Bias-Free Language
The documentation set for this product strives to use bias-free language. For the purposes of this documentation set, bias-free is defined as language that does not imply discrimination based on age, disability, gender, racial identity, ethnic identity, sexual orientation, socioeconomic status, and intersectionality. Exceptions may be present in the documentation due to language that is hardcoded in the user interfaces of the product software, language used based on RFP documentation, or language that is used by a referenced third-party product. Learn more about how Cisco is using Inclusive Language.
- Updated:
- October 31, 2013
Chapter: Installing Cisco StadiumVision Mobile Software
Installing Cisco StadiumVision Mobile Software
This module provides instructions for installing Cisco StadiumVision Mobile Reporter or Cisco StadiumVision Mobile Streamer software on both the Cisco UCS C220 and Cisco UCS C200 servers, and contains the following sections:
•![]() Performing the Installation—Network Configuration
Performing the Installation—Network Configuration
•![]() What To Do Next—Post-Installation Steps
What To Do Next—Post-Installation Steps
Before You Begin
Be sure that you understand and have met the following prerequisites before you begin to install Cisco StadiumVision Mobile hardware.
Supported Servers
Cisco StadiumVision Mobile Reporter and Cisco StadiumVision Mobile Streamer are supported on the following platforms:
•![]() Cisco UCS C220—uses Cisco Integrated Management Controller (CIMC) to perform the installation
Cisco UCS C220—uses Cisco Integrated Management Controller (CIMC) to perform the installation
•![]() Cisco UCS C200—uses a DVD to perform the installation
Cisco UCS C200—uses a DVD to perform the installation
Preparing for Installation
This section describes the prerequisite actions before performing an installation. Perform the following action prior to installation:
•![]() Contact stadiumvision-pm@cisco.com if you need the full install ISO file for a fresh install.
Contact stadiumvision-pm@cisco.com if you need the full install ISO file for a fresh install.
Have the following information available before installation:
•![]() IPv4 Internet address
IPv4 Internet address
•![]() Netmask
Netmask
•![]() Gateway
Gateway
•![]() DNS name server
DNS name server
•![]() NTP server
NTP server
•![]() Hostname
Hostname
•![]() Proxy if direct internet access is not available
Proxy if direct internet access is not available

Note ![]() Static network addressing should always be used.
Static network addressing should always be used.
Set up hardware and connect cabling
•![]() Set up the server hardware
Set up the server hardware
See the Cisco UCS C200 Server Installation and Service Guide or Cisco UCS C220 Server Installation and Service Guide for additional installation information.
•![]() Connect a monitor, keyboard, and mouse to the Cisco UCS C220 or Cisco UCS C200.
Connect a monitor, keyboard, and mouse to the Cisco UCS C220 or Cisco UCS C200.
•![]() Connect the Cisco UCS C220 or Cisco UCS C200 to the network using the eth0 Ethernet port on the rear panel.
Connect the Cisco UCS C220 or Cisco UCS C200 to the network using the eth0 Ethernet port on the rear panel.
•![]() Connect the power cord.
Connect the power cord.
Prepare the Install Media
This section provides a high-level overview of the installation process, with links to platform-specific procedures in the subsections that follow. lists the platform, type of media, and file to use to perform a fresh installation.
Installation Guidelines
When using a Cisco UCS C220 server, observe the following guidelines before starting the installation:
•![]() Do **not** alter the RAID configuration prior to installation
Do **not** alter the RAID configuration prior to installation
•![]() Verify the boot order in the BIOS (by pressing F2 while booting) prior to installation
Verify the boot order in the BIOS (by pressing F2 while booting) prior to installation
Note ![]() If Cisco StadiumVision Mobile Streamer Release 1.1 was previously installed and upgraded to Release 1.2 (using a Release 1.2 upgrade RPM), you will need to install a full ISO to upgrade to Release 1.3.
If Cisco StadiumVision Mobile Streamer Release 1.1 was previously installed and upgraded to Release 1.2 (using a Release 1.2 upgrade RPM), you will need to install a full ISO to upgrade to Release 1.3.
Possible pseudo file corruption may result if a Cisco StadiumVision Mobile Streamer Release 1.3 upgrade ISO is used.

A. Install from the hard drive—UCS C220 Only
Use the following steps to perform the installation from the hard drive:
Step 1 ![]() Be sure the CIMC firmware is up to date; configure CIMC (see "Appendix A: CIMC Configuration and Firmware Upgrade Guidelines on the Cisco UCS C220 Server").
Be sure the CIMC firmware is up to date; configure CIMC (see "Appendix A: CIMC Configuration and Firmware Upgrade Guidelines on the Cisco UCS C220 Server").
Step 2 ![]() Power on the server.
Power on the server.
Step 3 ![]() When the server console shows a login prompt proceed to the "Performing the Installation—Network Configuration" section.
When the server console shows a login prompt proceed to the "Performing the Installation—Network Configuration" section.
Note ![]() Cisco StadiumVision Mobile Reporter and Cisco StadiumVision Mobile Streamer come preinstalled with a released image of Cisco StadiumVision Mobile software. Depending on the timing of your hardware shipment with available software releases, this image might not be the latest released version. Therefore, after you install your hardware, it is important that you power on and access the Cisco StadiumVision Mobile software to verify the software version. As necessary, you can upgrade the software following the guidelines in this guide and in the Cisco StadiumVision Mobile Release Notes.
Cisco StadiumVision Mobile Reporter and Cisco StadiumVision Mobile Streamer come preinstalled with a released image of Cisco StadiumVision Mobile software. Depending on the timing of your hardware shipment with available software releases, this image might not be the latest released version. Therefore, after you install your hardware, it is important that you power on and access the Cisco StadiumVision Mobile software to verify the software version. As necessary, you can upgrade the software following the guidelines in this guide and in the Cisco StadiumVision Mobile Release Notes.
B. Installing via CIMC—UCS C220 Only
Use this method if method A is unavailable.
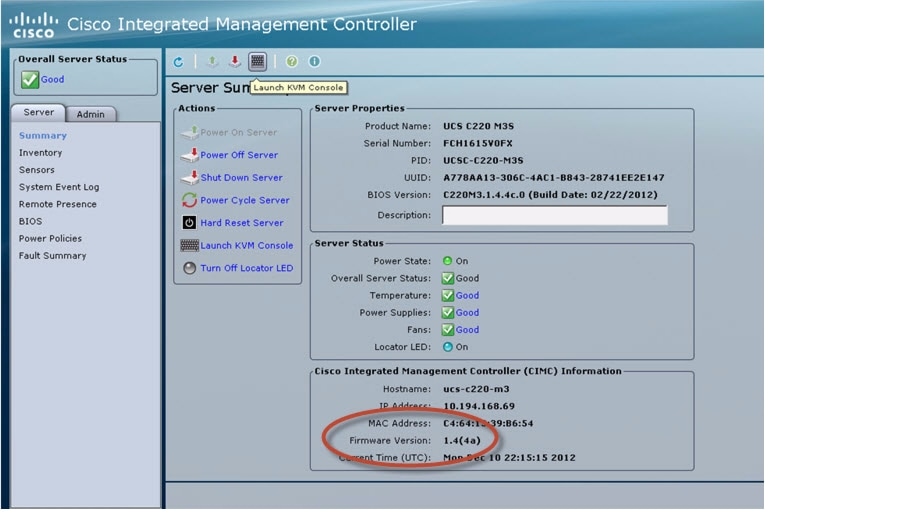
Step 1 ![]() Verify that CIMC firmware and BIOS are up to date; configure CIMC (see "Appendix A: CIMC Configuration and Firmware Upgrade Guidelines on the Cisco UCS C220 Server").
Verify that CIMC firmware and BIOS are up to date; configure CIMC (see "Appendix A: CIMC Configuration and Firmware Upgrade Guidelines on the Cisco UCS C220 Server").
Note ![]() At this release, 1.5.1 firmware version is the minimum tested version.
At this release, 1.5.1 firmware version is the minimum tested version.
Step 2 ![]() Connect a second ethernet cable to the CIMC ethernet port marked M.
Connect a second ethernet cable to the CIMC ethernet port marked M.
Step 3 ![]() Power on the server.
Power on the server.
Step 4 ![]() Start CIMC and perform a virtual DVD mount:
Start CIMC and perform a virtual DVD mount:
a. ![]() Access CIMC from a web browser:
Access CIMC from a web browser:
https://ip address/login.html
b. ![]() Click the Add Exception button.
Click the Add Exception button.

c. ![]() Click Confirm Security Exception to get to the CIMC login page. The default login credentials are:
Click Confirm Security Exception to get to the CIMC login page. The default login credentials are:
user: admin
password: password
d. ![]() Click on the Launch KVM Console at the top of the CIMC interface to launch the KVM console.
Click on the Launch KVM Console at the top of the CIMC interface to launch the KVM console.
The KVM tab provides a view of the system diagnostics or command prompt execution. The Virtual Media tab provides the virtual CD/DVD setup for ISO installation.
e. ![]() Click on Add Image tab under the KVM Console Virtual Media tab.
Click on Add Image tab under the KVM Console Virtual Media tab.
f. ![]() Navigate to the ISO file.
Navigate to the ISO file.
Note ![]() CIMC can experience slow performance. If slow performance occurs, clear the browser cache.
CIMC can experience slow performance. If slow performance occurs, clear the browser cache.
Note ![]() If the installation seems to hang on a Cisco UCS C220, you may need to restart the installation by remapping the ISO image, and power cycling the Cisco UCS C220 server.
If the installation seems to hang on a Cisco UCS C220, you may need to restart the installation by remapping the ISO image, and power cycling the Cisco UCS C220 server.
g. ![]() Click the check box for the Mapped option under Client View to select the ISO source.
Click the check box for the Mapped option under Client View to select the ISO source.
h. ![]() Confirm that the Virtual CD/DVD has been added under the Virtual Media tab, Virtual CD/DVD.
Confirm that the Virtual CD/DVD has been added under the Virtual Media tab, Virtual CD/DVD.
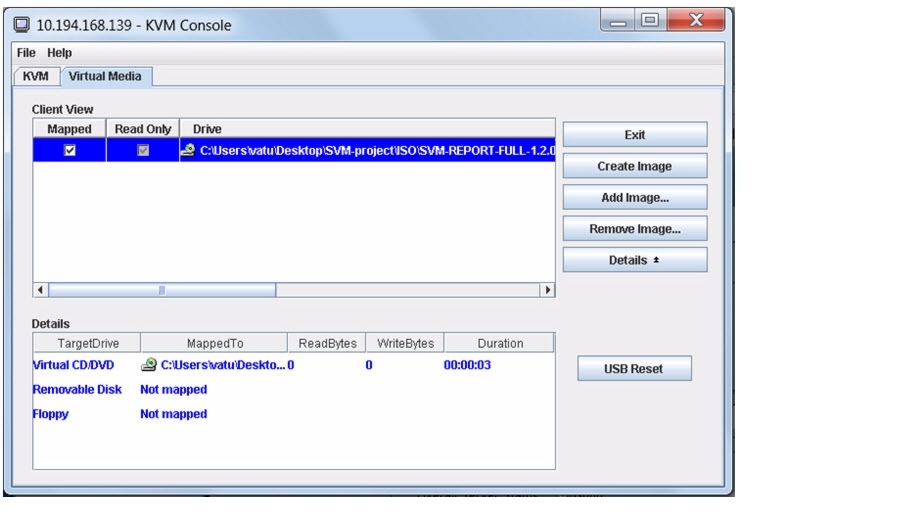
i. ![]() Double click on Virtual CD/DVD and observe the read bytes counter increasing (this refreshes the read bytes).
Double click on Virtual CD/DVD and observe the read bytes counter increasing (this refreshes the read bytes).
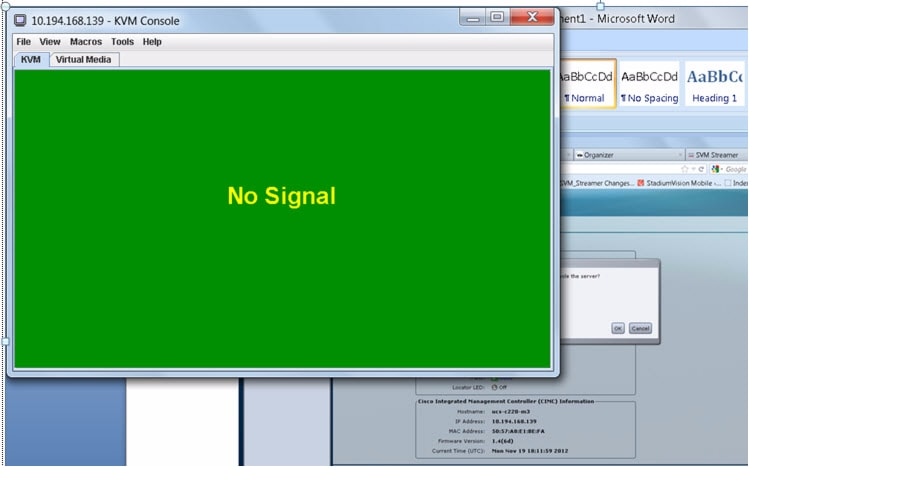
j. ![]() Close the KVM tab to start viewing the installation process.
Close the KVM tab to start viewing the installation process.
k. ![]() On the CIMC interface under Server Summary, click Power Cycle Server to start the installation process.
On the CIMC interface under Server Summary, click Power Cycle Server to start the installation process.
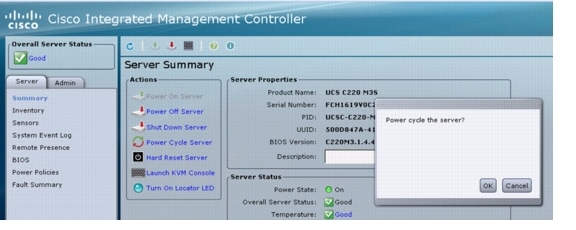
l. ![]() On the KVM Console/KVM terminal, confirm that the system is restarting and booting up from the Virtual CD/DVD.
On the KVM Console/KVM terminal, confirm that the system is restarting and booting up from the Virtual CD/DVD.
Step 5 ![]() When the server console shows a login prompt proceed to the "Performing the Installation—Network Configuration" section.
When the server console shows a login prompt proceed to the "Performing the Installation—Network Configuration" section.
C. Installing from DVD—UCS C200 Only
Use this method if your server is a Cisco UCS C200.
Step 1 ![]() Obtain the full ISO image from TAC, or by emailing stadiumvision-pm@cisco.com, and burn it to a DVD.
Obtain the full ISO image from TAC, or by emailing stadiumvision-pm@cisco.com, and burn it to a DVD.
Step 2 ![]() Insert a DVD into the drive and power on the server.
Insert a DVD into the drive and power on the server.
a. ![]() After the server boots from the DVD, follow the prompts.
After the server boots from the DVD, follow the prompts.
b. ![]() The installation process begins. When the installation is complete. the Cisco logo appears.
The installation process begins. When the installation is complete. the Cisco logo appears.
c. ![]() Press F6 to continue booting
Press F6 to continue booting
Step 3 ![]() When the server console shows a login prompt proceed to the "Performing the Installation—Network Configuration" section.
When the server console shows a login prompt proceed to the "Performing the Installation—Network Configuration" section.
Performing the Installation—Network Configuration
This part of the installation process is common to all platforms and all Cisco StadiumVision Mobile software. Use the following procedure after performing the steps in any of the preceding sections:
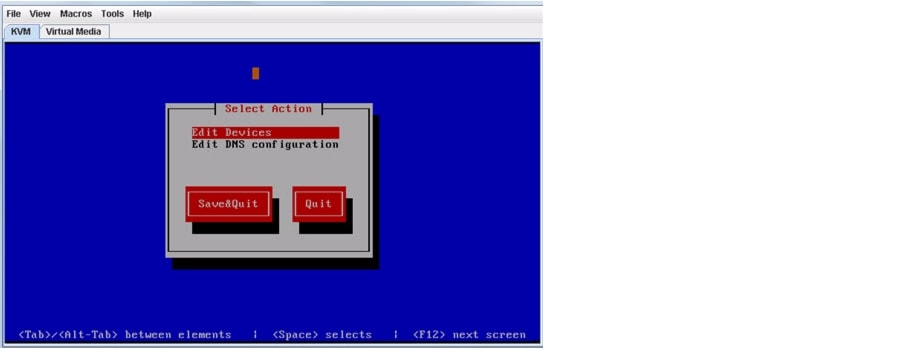
Step 1 ![]() Select Network Configuration from the menu.
Select Network Configuration from the menu.
Note ![]() The network configuration window displays for approximately sixty minutes. If the window disappears, continue the network configuration via the TUI.
The network configuration window displays for approximately sixty minutes. If the window disappears, continue the network configuration via the TUI.
Step 2 ![]() Select Edit Devices and press the Enter key.
Select Edit Devices and press the Enter key.
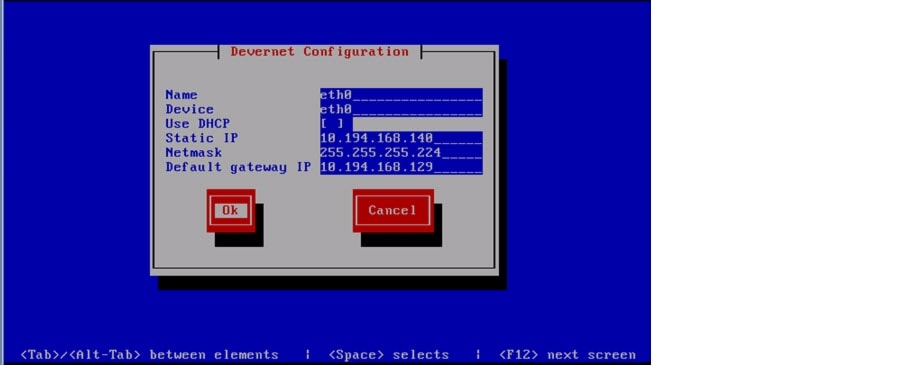
Step 3 ![]() Select eth0 and press the Enter key.
Select eth0 and press the Enter key.
Step 4 ![]() In the Ethernet Configuration, enter the network information. When done, select OK and press Enter.
In the Ethernet Configuration, enter the network information. When done, select OK and press Enter.
Note ![]() The Linux screen is mislabeled "Devernet Configuration."
The Linux screen is mislabeled "Devernet Configuration."
Note ![]() The Cisco StadiumVision Mobile Streamer or Cisco StadiumVision Mobile Reporter must use a static IP address.
The Cisco StadiumVision Mobile Streamer or Cisco StadiumVision Mobile Reporter must use a static IP address.
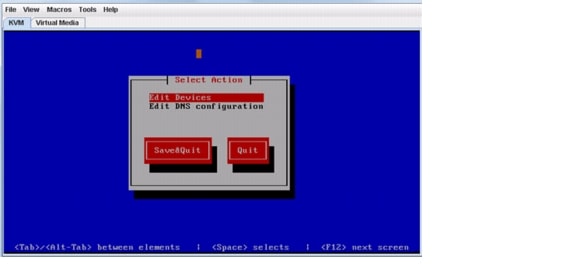
Step 5 ![]() Select OK and press the Enter key.
Select OK and press the Enter key.
Step 6 ![]() Select Edit DNS configuration and press Enter.
Select Edit DNS configuration and press Enter.
Step 7 ![]() Enter DNS information. When done, select OK, and press Enter.
Enter DNS information. When done, select OK, and press Enter.
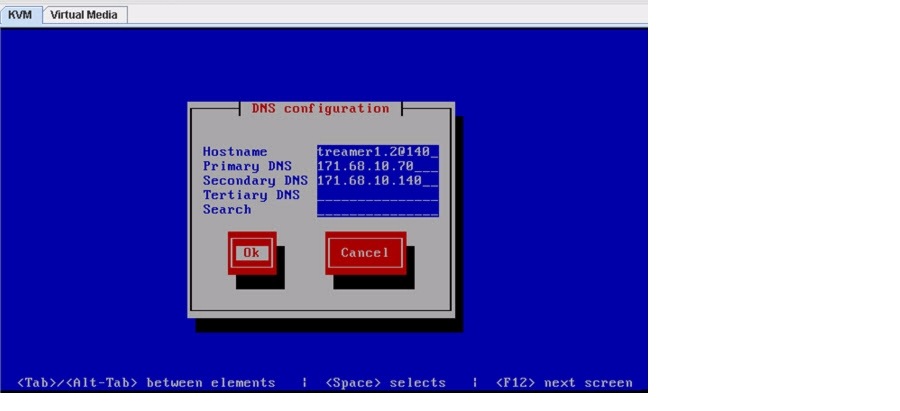
Note ![]() Do not use a period ('.') as part of the hostname.
Do not use a period ('.') as part of the hostname.
Step 8 ![]() Select Save & Quit and press the Enter key.
Select Save & Quit and press the Enter key.
Step 9 ![]() Select Exit and press the Enter key.
Select Exit and press the Enter key.
After this step, the Cisco StadiumVision Mobile software installs and the system reboots. This process takes up to 30 minutes. The installation should be completed. Validate the installation by logging into the StadiumVision Mobile Streamer or StadiumVision Mobile Reporter using the credentials listed in Table 1.
What To Do Next—Post-Installation Steps
This section describes procedures to perform after successfully installing Cisco StadiumVision Mobile software, and contains the following topics:
Table 1 lists the login credentials for the various Cisco StadiumVision Mobile components.
Log into the TUI
To access the TUI, you need either physical console access or an SSH client such as PUTTY. Log in from the console or over SSH with the following credentials, using the IP address of the Cisco StadiumVision Mobile Reporter or Cisco StadiumVision Mobile Streamer:
username = installer
password = cisco!123
Set the time zone
Note ![]() Set the time zone for both the Cisco StadiumVision Mobile Reporter and the Cisco StadiumVision Mobile Streamer.
Set the time zone for both the Cisco StadiumVision Mobile Reporter and the Cisco StadiumVision Mobile Streamer.
Step 1 ![]() Log into the TUI using the procedure in the "Log into the TUI" section.
Log into the TUI using the procedure in the "Log into the TUI" section.
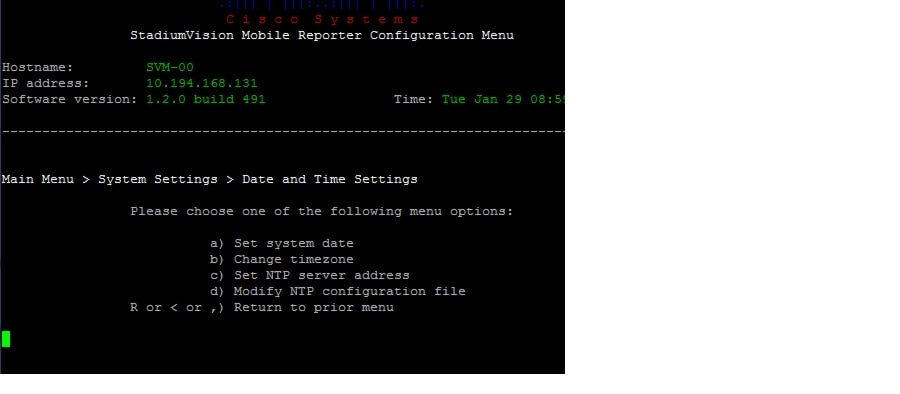
Step 2 ![]() In the TUI, go to System Settings, Date and Time Settings, and Change timezone.
In the TUI, go to System Settings, Date and Time Settings, and Change timezone.
Step 3 ![]() Choose the appropriate timezone from the list and enter the corresponding number.
Choose the appropriate timezone from the list and enter the corresponding number.
Set the server date and time
Note ![]() Set the server date and time for both the Cisco StadiumVision Mobile Reporter and the Cisco StadiumVision Mobile Streamer.
Set the server date and time for both the Cisco StadiumVision Mobile Reporter and the Cisco StadiumVision Mobile Streamer.
Step 1 ![]() Log into the TUI using the procedure in the "Log into the TUI" section.
Log into the TUI using the procedure in the "Log into the TUI" section.
Step 2 ![]() In the TUI, go to System Settings, Date and Time Settings, and Set System date.
In the TUI, go to System Settings, Date and Time Settings, and Set System date.
Step 3 ![]() Enter the date using the following format:
Enter the date using the following format:
MMDDHHMIYYYY for Month Day Hour Minute Year
Configure NTP
Note ![]() Configure NTP for both the Cisco StadiumVision Mobile Reporter and the Cisco StadiumVision Mobile Streamer.
Configure NTP for both the Cisco StadiumVision Mobile Reporter and the Cisco StadiumVision Mobile Streamer.
Step 1 ![]() Log into the TUI using the procedure in the "Log into the TUI" section with the following credentials:
Log into the TUI using the procedure in the "Log into the TUI" section with the following credentials:
User: installer
Password: cisco!123
Step 2 ![]() The TUI (Text User Interface) will appear on the screen.
The TUI (Text User Interface) will appear on the screen.
Step 3 ![]() Select Configure NTP from the System Settings/Date and Time Settings menu:
Select Configure NTP from the System Settings/Date and Time Settings menu:
Note ![]() The default time zone is Eastern Standard Time (EST).
The default time zone is Eastern Standard Time (EST).
Step 4 ![]() Set the NTP server address.
Set the NTP server address.
Note ![]() For the Cisco StadiumVision Mobile Reporter, it is critical that NTP be properly configured in order to provide accurate reports.
For the Cisco StadiumVision Mobile Reporter, it is critical that NTP be properly configured in order to provide accurate reports.
 Feedback