Release 2.0: Cisco StadiumVision Mobile Reporter Administration Guide
Bias-Free Language
The documentation set for this product strives to use bias-free language. For the purposes of this documentation set, bias-free is defined as language that does not imply discrimination based on age, disability, gender, racial identity, ethnic identity, sexual orientation, socioeconomic status, and intersectionality. Exceptions may be present in the documentation due to language that is hardcoded in the user interfaces of the product software, language used based on RFP documentation, or language that is used by a referenced third-party product. Learn more about how Cisco is using Inclusive Language.
- Updated:
- October 17, 2014
Chapter: Cisco StadiumVision Mobile Reporter Data Management
Cisco StadiumVision Mobile Reporter Data Management
First Published: October 17, 2014
This module describes the information that you should know about managing Cisco StadiumVision Mobile Reporter data and disk utilization on the server.
Information About Cisco StadiumVision Mobile Reporter System Data
This section includes the following topics;
Reporter Databases
There are two databases in Cisco StadiumVision Mobile Reporter:
The system automatically runs a daily backup of both databases at about 4:00 a.m. Both of these backup files are retained in the system for 20 days. You should get a copy of these files periodically and store them outside of the server to be sure that you can restore data from any unexpected failure.
The raw data can potentially use up all of the available system disk space, so the raw data is periodically purged from the system. The purge process removes all data from the raw database and stores it in an archive file. That archive file is retained for 20 days. By default, the system automatically removes all of the raw data in the reporter every 6 months—on June 1 and December 1—at 5:30 a.m. However, you can change this purge schedule using the Text Utility Interface (TUI).
Other System Data
The Cisco StadiumVision Mobile Reporter server also stores other system data that can impact overall disk utilization, including System State Reports and ISO upgrade files. In addition to backup files, these files can be removed collectively from the system using the TUI Troubleshooting menu.
How to Manage System Data
This topic includes the following tasks:
- Monitoring Disk Utilization (required)
- Performing a Restore of System Data (required)
- Changing the Raw Data Purge Schedule (as required)
- Deleting Files From the System (as required)
- Performing a Restore of System Data (as required)
Monitoring Disk Utilization
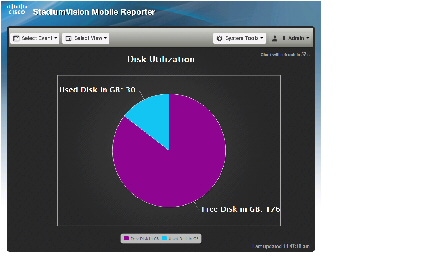
The Admin role can obtain a chart of the current disk utilization from the System Tools menu, as shown in Figure 1.

Note![]() If the disk utilization is too high, you can use the TUI to delete files by going to Troubleshooting > Disk Monitoring > Delete Files menu. For more information, see the “Deleting Files From the System” section.
If the disk utilization is too high, you can use the TUI to delete files by going to Troubleshooting > Disk Monitoring > Delete Files menu. For more information, see the “Deleting Files From the System” section.
Figure 1 Disk Utilization Report
Viewing and Obtaining a Copy of Backup Data
The Cisco StadiumVision Mobile Reporter system automatically runs daily backups of the system databases and stores them for 20 days.
Note![]() As a best practice, you should view the data archives and save a copy to an external storage device on a regular basis to maintain a copy of the files in the event that the reporter system becomes unusable or a hard drive failure occurs. If you want to support a redundant server environment and have the ability to failover to a backup server quickly and without any loss of data, it will be necessary to have these backup files available. For more information, see the “Cisco StadiumVision Mobile Reporter Failover” module.
As a best practice, you should view the data archives and save a copy to an external storage device on a regular basis to maintain a copy of the files in the event that the reporter system becomes unusable or a hard drive failure occurs. If you want to support a redundant server environment and have the ability to failover to a backup server quickly and without any loss of data, it will be necessary to have these backup files available. For more information, see the “Cisco StadiumVision Mobile Reporter Failover” module.
To view and copy the data archive files, complete the following steps:
Step 1![]() Log into the Cisco StadiumVision Mobile Reporter server as admin.
Log into the Cisco StadiumVision Mobile Reporter server as admin.
Step 2![]() From the System
From the System![]() Tools menu, select Download Data Archive.
Tools menu, select Download Data Archive.
Note![]() After a fresh install, no backup files will exist.
After a fresh install, no backup files will exist.
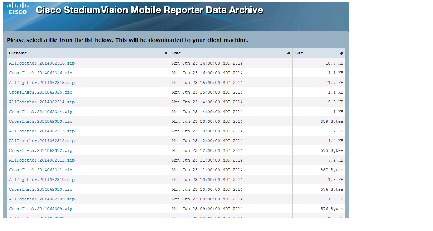
A list of files will appear, as shown below:

Tip Click the column heading to sort the reports.
Figure 2 Cisco StadiumVision Mobile Reporter Download Data Archive File List
Note![]() The CrossCheck report is intended for internal, non-production use only.
The CrossCheck report is intended for internal, non-production use only.
Step 3![]() Locate the following backup files:
Locate the following backup files:
Chart and Configuration data backup file:
- MonitorEvent.YYYYMMDDHHMI.bson.gz
- CepResults.YYYYMMDDHHMIbson.gz
- StreamerEvent.YYYYMMDDHHMI.bson.gz
- SvmMobileMapEvent.YYYYMMDDHHMI.bson.gz
- AllTogether.YYYYMMDDHHMI.zip'. This file contains all of the download-able reports after an event has finished. It is equivalent to selecting 'Z: All Available Reports' on the Admin page.
Step 4![]() Select and save the files onto a backup drive.
Select and save the files onto a backup drive.
Changing the Raw Data Purge Schedule
By default, the raw data database is cleared and stored in an archive file every 6 months at 5:30 a.m. You can change the data purge to occur once every 3 months, monthly, weekly, or daily. The archive file will be retained for 20 days.
To change the purge schedule, complete the following steps:
For more information, see the “Logging Into the TUI” section.
Step 2![]() From the Main Menu, go to Server Administration > Change reporter data purge schedule menu.
From the Main Menu, go to Server Administration > Change reporter data purge schedule menu.
Step 3![]() Type the number that corresponds to the purge scheduling period and press Enter, where:
Type the number that corresponds to the purge scheduling period and press Enter, where:
- 1—Specifies that the raw database purge occurs daily.
- 2—Specifies that the raw database purge occurs weekly.
- 3—Specifies that the raw database purge occurs monthly.
- 4—Specifies that the raw database purge occurs every 3 months.
- 5—(Default) Specifies that the raw database purge occurs every 6 months (June 1 and December 1 at 5:30 am
Step 4![]() Return to the Main Menu and exit the TUI.
Return to the Main Menu and exit the TUI.
Deleting Files From the System
If you need to free disk space on the Cisco StadiumVision Mobile Reporter, you can delete the following types of files:
Tip![]() If you want to retain any System State Reports or backup files, be sure to download and store them outside of the Cisco StadiumVision Mobile Reporter server before you delete.
If you want to retain any System State Reports or backup files, be sure to download and store them outside of the Cisco StadiumVision Mobile Reporter server before you delete.
To delete files from the system., complete the following steps:
Step 2![]() From the Main Menu, go to Troubleshooting > Disk Monitoring > Delete Files.
From the Main Menu, go to Troubleshooting > Disk Monitoring > Delete Files.
Step 3![]() Type the menu letter option that corresponds to the file type that you want to delete from the system and press Enter.
Type the menu letter option that corresponds to the file type that you want to delete from the system and press Enter.
Step 4![]() At the prompt, type the letter to confirm the delete or cancel.
At the prompt, type the letter to confirm the delete or cancel.
Step 5![]() Return to the Main Menu and exit the TUI.
Return to the Main Menu and exit the TUI.
Performing a Restore of System Data
Prerequisites
Before you perform a restore from a catastrophic failure, be sure that the following conditions are met:
- The Cisco StadiumVision Mobile Reporter software is reinstalled. For more information, see the Cisco StadiumVision Mobile Reporter and Cisco StadiumVision Mobile Streamer Installation and Upgrade Guide.
- The DNS and NTP servers, and time zone are reconfigured (these settings are not included in the restore process).
- You have downloaded and have access to the most recent backup files external to the server. For more information, see the “Viewing and Obtaining a Copy of Backup Data” section.
Procedure
Note![]() If you still have access to Cisco StadiumVision Mobile Reporter and are attempting to recover some data loss or possible corruption from a non-catastrophic system failure, then you can perform a restore from the most recent backup files that are already available on the system. You do not need to perform the steps associated with uploading a data archive, and can begin the following procedure from Step 5.
If you still have access to Cisco StadiumVision Mobile Reporter and are attempting to recover some data loss or possible corruption from a non-catastrophic system failure, then you can perform a restore from the most recent backup files that are already available on the system. You do not need to perform the steps associated with uploading a data archive, and can begin the following procedure from Step 5.
To perform a restore, complete the following steps:
Step 1![]() Log into Cisco StadiumVision Mobile Reporter as admin.
Log into Cisco StadiumVision Mobile Reporter as admin.
Step 2![]() Go to System
Go to System![]() Tools > Upload Data Archive.
Tools > Upload Data Archive.
Step 3![]() Click Browse to select a file to upload and select the backup that you want to restore.
Click Browse to select a file to upload and select the backup that you want to restore.
Figure 3 Cisco StadiumVision Mobile Reporter Restore File Dialog
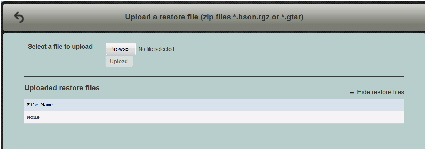
Step 4![]() Click Upload to copy the file to the server.
Click Upload to copy the file to the server.
Step 5![]() To restore the backup database file, log into the TUI and select Server Administration > Restore databases.
To restore the backup database file, log into the TUI and select Server Administration > Restore databases.
Depending on the nature of the failure, restore either or both of the Chart and Config and Raw databases.
Step 6![]() Once the script has completed verify that the restore was successful as follows:
Once the script has completed verify that the restore was successful as follows:
a.![]() Verify that the PI connection is operational. See the “External Systems” section for more information.
Verify that the PI connection is operational. See the “External Systems” section for more information.
b.![]() Log in as admin user and verify that the expected event schedule appears, and that CSV files for all past events are present.
Log in as admin user and verify that the expected event schedule appears, and that CSV files for all past events are present.
c.![]() Log in as marketing user and verify that all historical events and season charts are present.
Log in as marketing user and verify that all historical events and season charts are present.
 Feedback