Downloads |
 Feedback Feedback
|
Table Of Contents
Network Administrator and End User Experience
Creating a New Configuration File
Configuring Authentication Policy
Configuring Wired Network Settings
Configuring WiFi Network Settings
Configuring the Network Connection Type
Configuring EAP Authentication
Configuring Trusted Server Validation Rules
Configuring Trusted Certificate Authority
Configuring Machine Credentials
Validating the Configuration File
Creating the Pre-Configured Client Destination Package File
Using the Management Utility GUI
Setting Up Cisco SSC
This chapter provides an overview of the Cisco Secure Services Client and provides instructions for adding, configuring, and testing the user profiles. This chapter contains these sections:
•
Network Administrator and End User Experience
•
Introduction
The Cisco Secure Services Client (SSC) is client software that provides 802.1X (Layer 2) and device authentication for access to both wired and wireless networks. SSC manages user and device identity and the network access protocols required for secure access. It works intelligently to make it simple for employees and guests to connect to an enterprise wired or wireless network.
SSC supports these main features:
•
•
•
•
•
•
–
LEAP (EAP-MD5, EAP-GTC and EAP-MSCHAPv2 for 802.3 wired only).•
–
–
–
(also legacy protocols—PAP, CHAP, MSCHAP, and MSCHAPv2)•
–
•
–
•
•
Supported Operating Systems
The supported 32-bit operating systems are:
•
•
•
Note
Obtaining SSC Software
SSC 5.1.0 software is available from the Cisco Software Center:
•
•
•
The SSC software can be obtained from the Cisco Software Center at this URL
http://www.cisco.com/public/sw-center/index.shtml
Click Wireless Software > Client Adapters and Client Software > Cisco Secure Services Client and follow the prompts to 5.1.0 under Latest Releases.
Note
SSC License Information
The SSC software obtained from the Cisco Software Center on Cisco.com contains two special licenses and their associated limitations:
•
•
To obtain additional information on the features supported in these special licenses, refer to the Cisco Secure Services Client Version 5.1 Bulletin available on Cisco.com an this URL:
http://www.cisco.com/en/US/products/ps7034/prod_bulletins_list.html
Note
The SSC 5.1 non-expiring license can be ordered from Cisco using this product number:
•
Network Administrator and End User Experience
A typical enterprise user does not know about 802.1X or EAP methods. The user's primary concern is to get easily connected to wired and wireless connections using simple mouse clicks. SSC is designed to provide a simple user experience by hiding as much complexity as possible.
As the network administrator, you need the flexibility to configure and customize SSC for the enterprise deployment requirements. The SSC management utility is designed to support your configuration needs. The following sections describe how to use the SSC management utility.
SSC Management Utility
The SSC management utility is designed for system administrators as a standalone application enabling you to create and edit SSC configuration profiles and create pre-configured client packages. The pre-configured client packages are deployed to end user PCs.
The management utility has two modes of operation: A graphical user interface (GUI) and a command-line interface (CLI) that allows system administrators to perform certain operations through the command line.
Command-Line Operation
The syntax of the command-line version of the management utility (sscManagementUtility) is described below:
sscManagementUtility { validate | sign | help | package } [command specific options]
sscManagementUtility help
sscManagementUtility validate {-i input-file | --in=input-file}
sscManagementUtility sign {-i input-file | --in=input-file} {-o output-file | --out=output-file}
sscManagementUtility package {-p srcMsi-file | --package=srcMsi-file}
{-i xml-file | --in=xml-file} {-o dstMsi-file | --out=dstMsi-file}Table 2-1 lists the sscManagementUtility CLI commands and command-line options.
Return codes sent to the standard error output (stderr) include:
•
•
•
•
•
•
•
Note
GUI Operation
The management utility GUI guides the administrator through a series of windows and menu options to specify and configure the wired and wireless network security profiles.
Points to remember when using the management utility GUI:
•
•
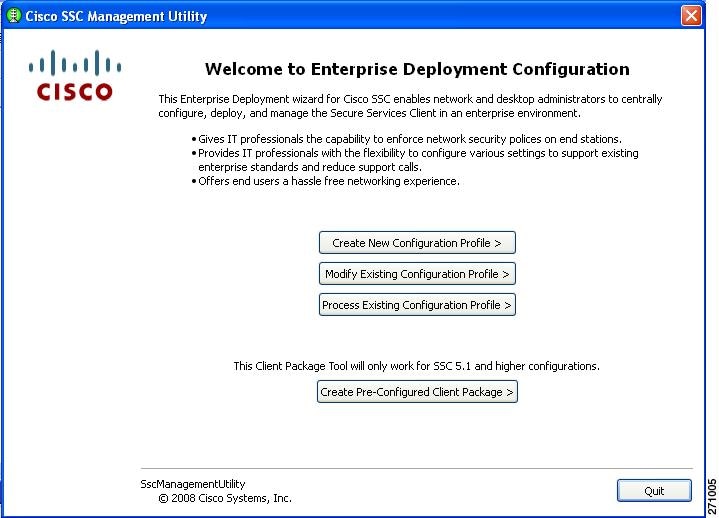
To activate the SSC management utility GUI, double-click sscManagementUtility.exe. The welcome window appears (see Figure 2-1).
Figure 2-1 Cisco SSC Management Utility Welcome Window
There are four choices on this window:
•
•
•
–
–
–
–
•
Note
Creating a New Configuration File
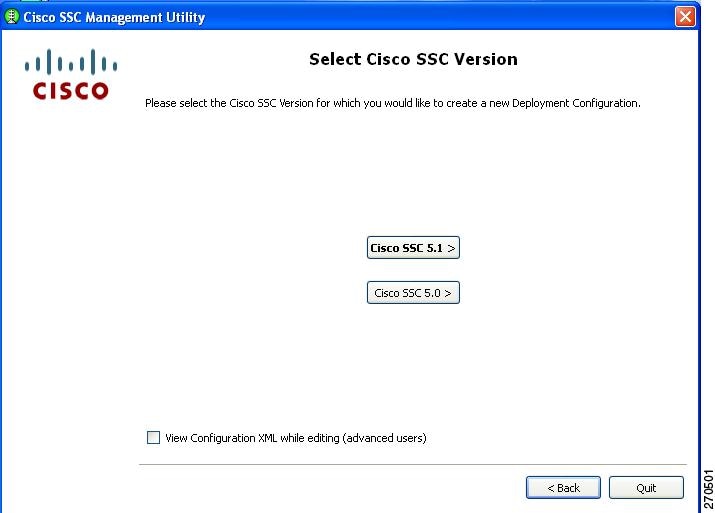
To create a new configuration file, click Create New Configuration Profile and the window shown in Figure 2-2 appears.
Figure 2-2 Select Cisco SCS Version Window
The SSC management utility enables you to create a configuration file for SSC 5.1 or 5.0.
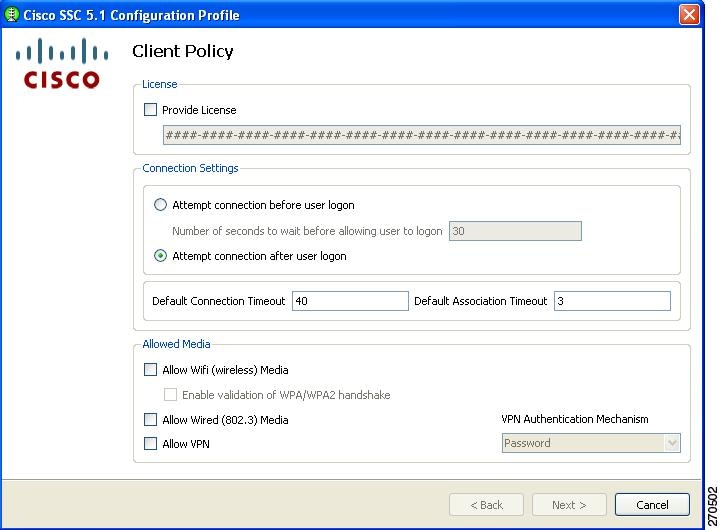
When you click Cisco SSC 5.1, the Client Policy window appears (Figure 2-3).
Configuring Client Policy
The Client Policy window enables you to configure the client policy options (Figure 2-3).
Figure 2-3 Client Policy Window
Note
There are three sections on this window:
•
Note
•
•
Note
If you enable VPN for a wireless connection, you can specify the authentication mechanism VPN will use:
•
•
•
When you complete your selections and click Next, the Authentication Policy window appears (Figure 2-4).
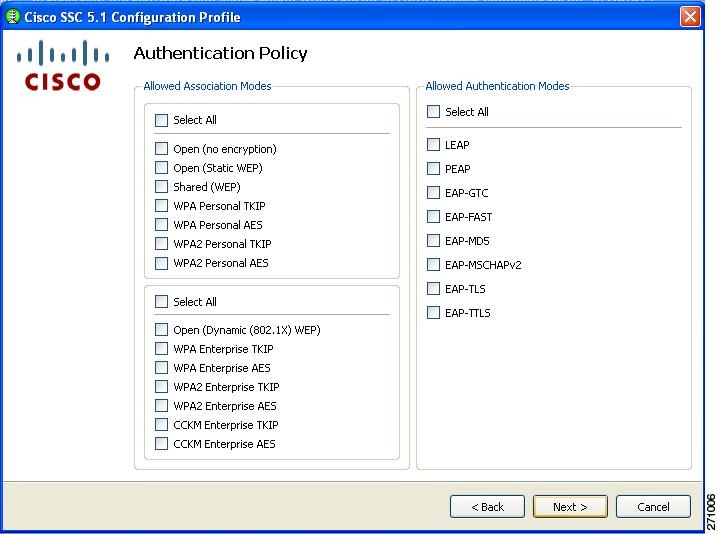
Configuring Authentication Policy
This window allows you to define global association and authentication network policies. Global policies apply to all networks that you, the administrator, or the user can create.
Figure 2-4 Authentication Policy Window
When you complete your selections and click Next, the Networks window appears (Figure 2-5).
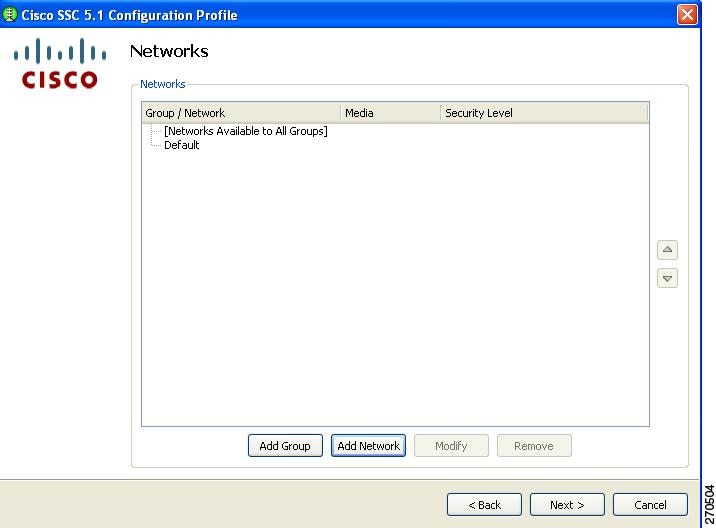
Configuring Networks
The Networks window allows you to configure networks that are pre-defined for your enterprise user. You can either configure networks that are available to all groups or create groups with specific networks. For additional information on groups, see the "Groups in SSC" section.
Figure 2-5 Networks Window
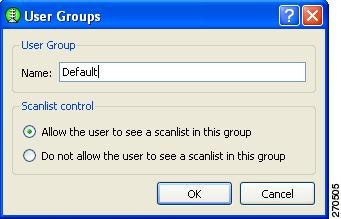
When you click Add Group, the User Groups window appears (Figure 2-6).
Figure 2-6 User Groups Window
The Scanlist control section enables you to control whether users can see the scanlist when this group is active. It may be necessary to restrict viewing of the scanlist; for example, in order to prevent users from accidentally connecting to nearby devices.
Note
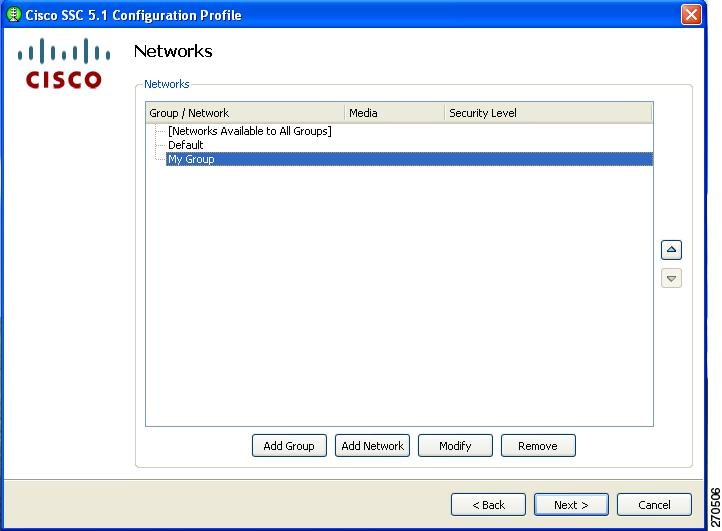
Click OK. The Networks window reappears with the new group just created visible (My Group in Figure 2-7).
Figure 2-7 Networks Window with New Group Visible
Network groups contain single or multiple network profile descriptions. A network profile defines the specific properties and operational behavior of a single network. The profile includes the following characteristics:
•
•
•
•
•
•
•
•
•
Networks defined as part of the distribution package are locked; therefore, the end user is not able to edit the configuration settings or delete the profiles.
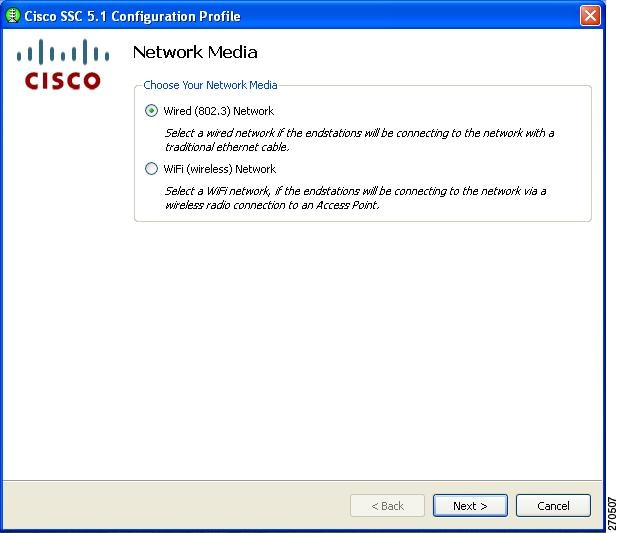
On the Networks window (Figure 2-7), you can add a network to a newly created group, such as My Group, by highlighting it and clicking Add Network. The Network Media window appears (Figure 2-8).
Figure 2-8 Network Media Window
This window enables you to choose a wired or a wireless network.
If you choose Wired (803.3) Network and then click Next, the Wired Network Setting window appears (Figure 2-9).
If you choose Wifi (wireless) Network and then click Next, the WiFi Network Setting window appears (Figure 2-11).
When you have finished adding all your groups and networks, click the Next button and Figure 2-24 appears (see the "Validating the Configuration File" section).
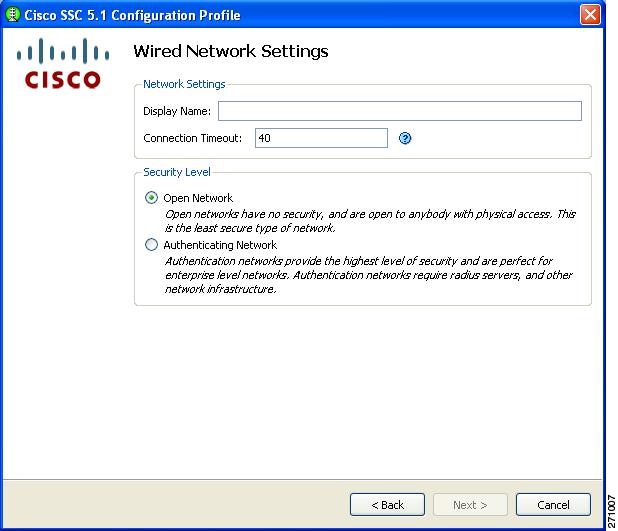
Configuring Wired Network Settings
The Wired Network Settings window enables you to create an open (non-secure) network or an 802.1X authentication wired network (Figure 2-9).
Figure 2-9 Wired Network Settings Window
In the Display Name field, you can enter the name that is displayed for this wired network.
The Connection Timeout value is the length of time that SSC waits for a network connection to be established before it tries another network.
Note
In the Security Level area, choose the desired network type:
•
•
When you choose Open Network and click Next, the 802.1X Connection Setting window appears (Figure 2-12).
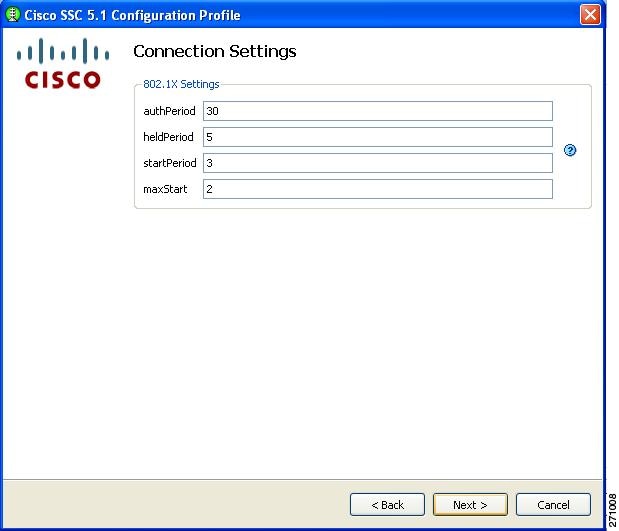
When you choose Authenticating Network and click Next, the 802.1X Connection Settings window appears (Figure 2-10). This window enables you to enter your 802.1X timer values. The default values should work for most wired networks; however, you have the option to configure the settings to suit your environment.
Figure 2-10 Connection Settings Window for a Wired Network
When complete and you can click Next, the Network Connection Type window appears (Figure 2-13).
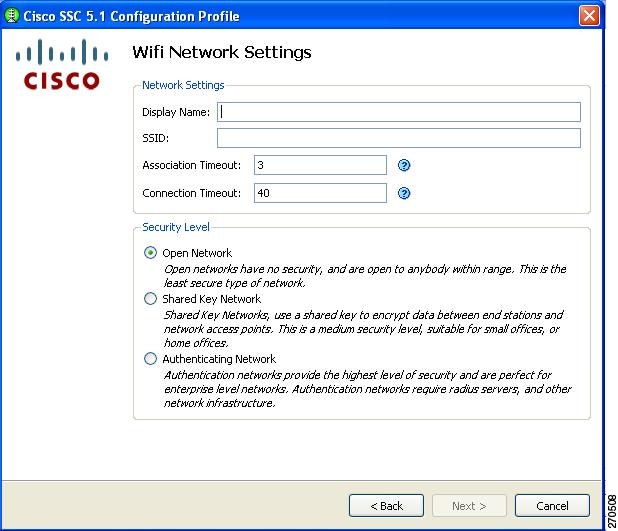
Configuring WiFi Network Settings
The WiFi Network Settings window enables you to create an open (non-secure) network, a shared key network, or an 802.1X authentication wireless network (Figure 2-11).
Figure 2-11 WiFi Network Settings Window
In the Display Name field, you can enter the name that is displayed for this wireless network.
In the SSID field, you should enter the SSID (or network name) for this wireless network.
The Association Timeout value is the length of time that the SSC waits for association to the SSID before it tries another network.
The Connection Timeout value is the length of time that the SSC waits for a network connection to be established, before it tries another network.
Note
In the Security Level area, choose the desired network type:
•
•
•
When you complete your selections and click Next, the CCX Settings window appears.
Note
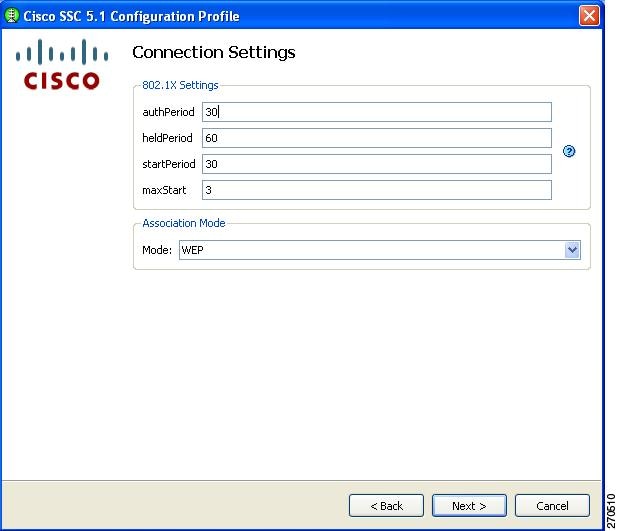
When using Windows XP or Windows 2000, ignore the CCX settings window and click Next. The 802.1X Connection Settings window appears (Figure 2-12).
This window enables you to enter your 802.1X timer values. The default values should work for most networks; however, you may set it to suit your environment.
Figure 2-12 802.1X Connection Settings Window for a Wireless Network
In the Association Mode field, click the drop-down arrow to select the association mode for this network:
•
•
•
•
•
•
•
Note
When finished, click Next and the Network Connection Type window appears (Figure 2-13).
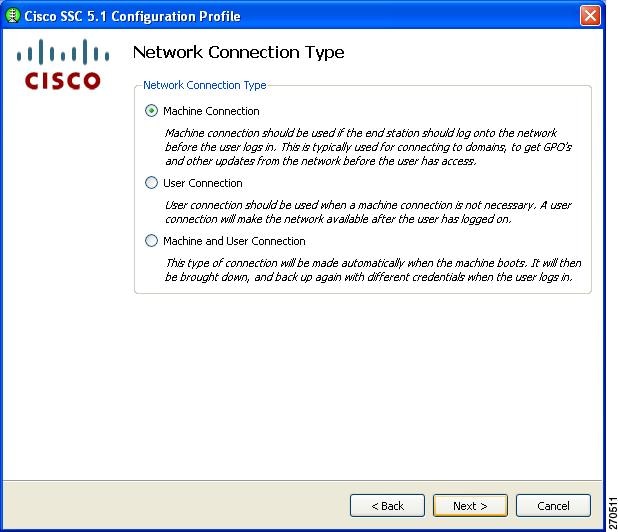
Configuring the Network Connection Type
Figure 2-13 Network Connection Type Window
This window enables you to choose the type of network connection. SSC defaults to Machine Connection. The User Connection option defines the connection as a user connection type. User connections are attempted after the user has logged onto the PC.
A machine and user network contains a machine part and a user part. The SSID is the same for the two parts, but the credential type for machine connection can be different from the credential type for user connection.
Note
When finished, click Next and the Machine Authentication (EAP) Method window appears (Figure 2-14).
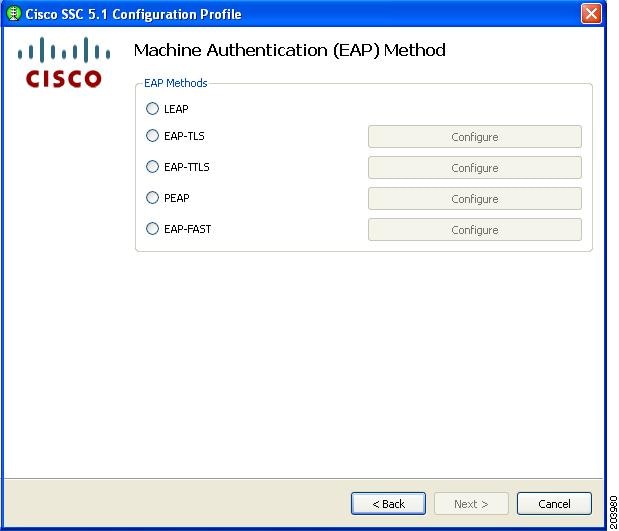
Configuring EAP Authentication
The Machine Authentication (EAP) Method and the User Authentication (EAP) Method windows enable you to choose the authentication method for the machine and the user, respectively. Both windows contain the same authentication method options.
Figure 2-14 lists the EAP methods for a wireless network connection.
Figure 2-14 Machine Authentication (EAP) Method Window for a Wireless Network Connection
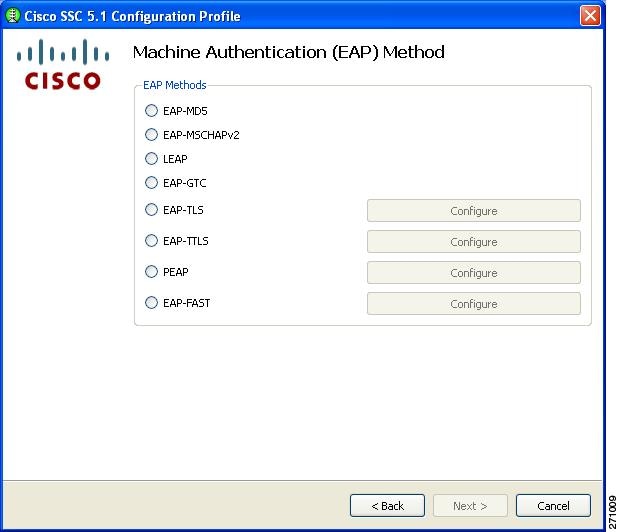
Figure 2-15 lists the EAP methods for a wired network connection.
Figure 2-15 Machine Authentication Method Window for a Wired Network Connection
Note
If you choose any of the EAP options with a configure button, you must click the corresponding Configure button to configure the EAP method:
•
•
•
•
If you choose the Validate Server Identity option on the EAP TLS, EAP TTLS, PEAP, or EAP Fast settings window, the window in Figure 2-20 appears after you click Next (see the "Configuring Trusted Server Validation Rules" section).
If you do not choose the Validate Server Identity option, Figure 2-22 appears when you click Next (see the "Configuring Trusted Certificate Authority" section).
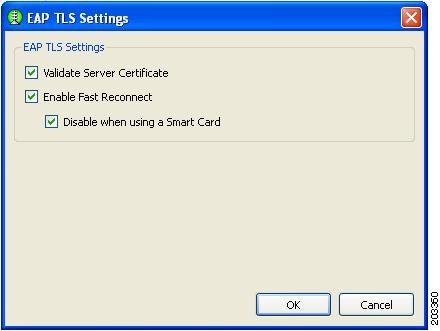
Configuring EAP TLS
The EAP TLS Settings window contains two options (Figure 2-16):
•
•
Note
Figure 2-16 EAP-TLS Settings Window
When you click OK, the Machine or User Authentication (EAP) Method window reappears (see the "Configuring EAP Authentication" section).
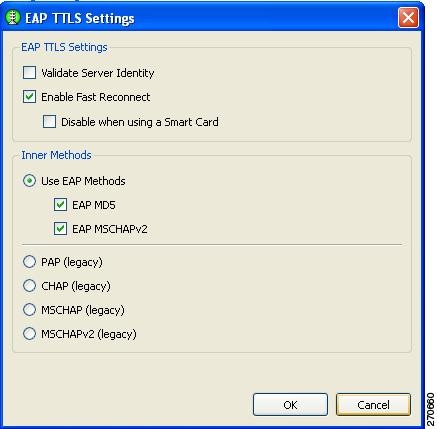
Configuring EAP TTLS
The EAP TTLS Settings window enables you to configure EAP TTLS settings (Figure 2-17).
Figure 2-17 EAP TTLS Settings Window
The EAP TTLS Settings window contains two sections:
•
–
–
Note
•
Note
When you are finished, click OK. The Machine or User Authentication (EAP) Method window reappears (see the "Configuring EAP Authentication" section).
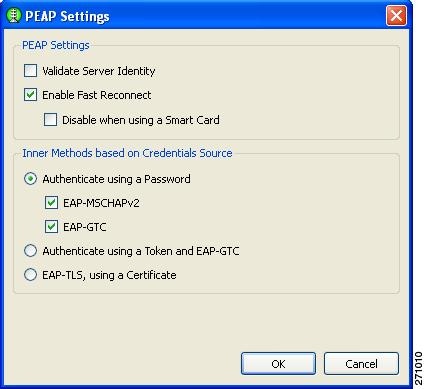
Configuring PEAP Options
The PEAP Settings window enables you to configure PEAP settings (Figure 2-18).
Figure 2-18 PEAP Setting Window
There are two sections on this window:
•
–
–
Note
•
Note
When you complete your selections and click OK, the Machine or User Authentication Method window reappears (see the "Configuring EAP Authentication" section).
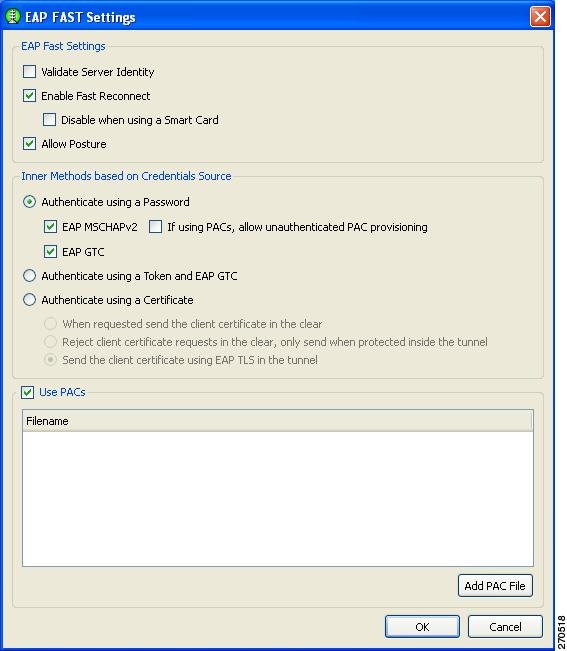
Configuring EAP Fast Settings
The EAP FAST Settings window enables you to configure the EAP Fast settings (Figure 2-19):
Figure 2-19 EAP FAST Settings Window
This window contains three sections:
•
–
–
Note
–
Validating or assessing posture applies to a set of rules for the posture data to assess the level of trust that can be placed in that endpoint. The assessment, or posture token, can be used as one of the conditions for authorizing network access. Posture validation, together with the traditional user authentication, provide a complete security assessment of the endpoint device and the user.
Note
•
Note
•
Note
On this window, you can manually provide one or more specific PAC files or authentication by clicking Add PAC File.
When you complete your selections and click OK, the Machine or User Authentication (EAP) Method window reappears (see the "Configuring EAP Authentication" section).
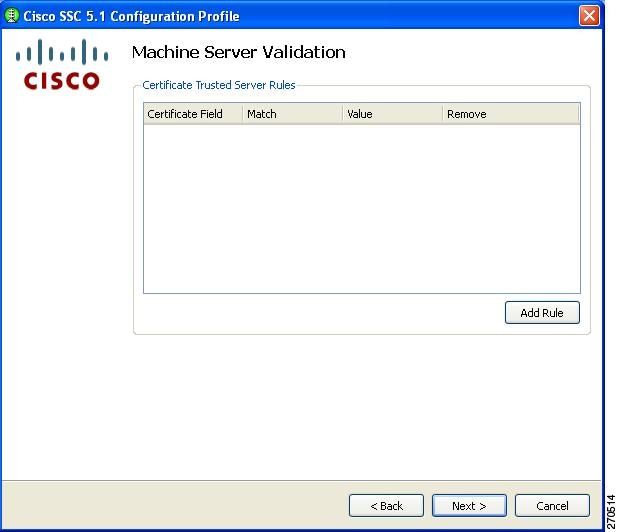
Configuring Trusted Server Validation Rules
When the Validate Server Identity option is configured for the EAP method, the Machine Server Validation window enables you to configure certificate trusted server rules (Figure 2-20).
Figure 2-20 Certificate Trusted Server Validation Rules Window
To define server validation rules, follow these steps:
a.
b.
c.
Note
When finished, click Next and Figure 2-21 appears.
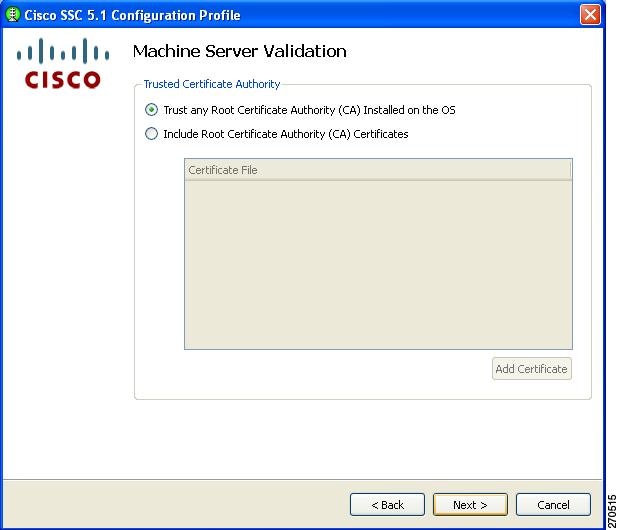
Configuring Trusted Certificate Authority
The Trusted Certificate Authority window enables you to configure authority options.
Figure 2-21 Trusted Certificate Authority Window
When you check the Include Root Certificate Authority (CA) Certificate option, you must click Add Certificate to add a certificate file.
When you are finished, click Next. The Machine Credentials window appears (Figure 2-22).
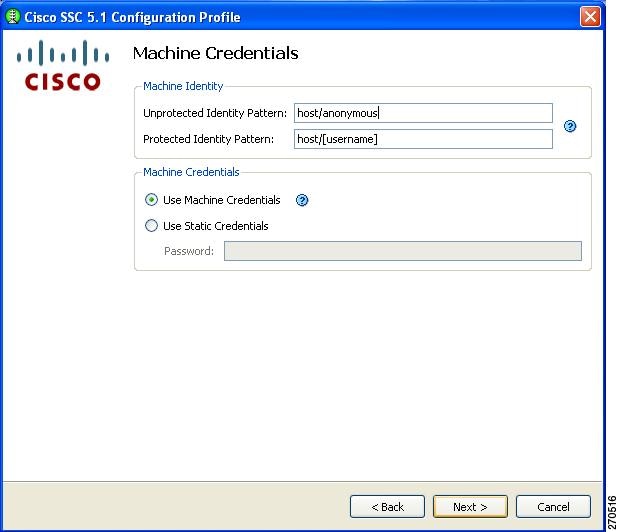
Configuring Machine Credentials
The Machine Credentials window enables you to specify the machine credentials (Figure 2-22).
Figure 2-22 Machine Credentials Window
Note
SSC releases 5.0 and later support these placeholder patterns when you specify identities:
•
•
When the [username] and [domain] placeholders are used, one of these conditions applies:
•
•
A typical pattern for machine unprotected identity is host/anonymous.[domain].
–
A typical pattern for machine protected identity is host/[username].[domain].
–
When finished, click Finish and the Networks window reappears (Figure 2-7).
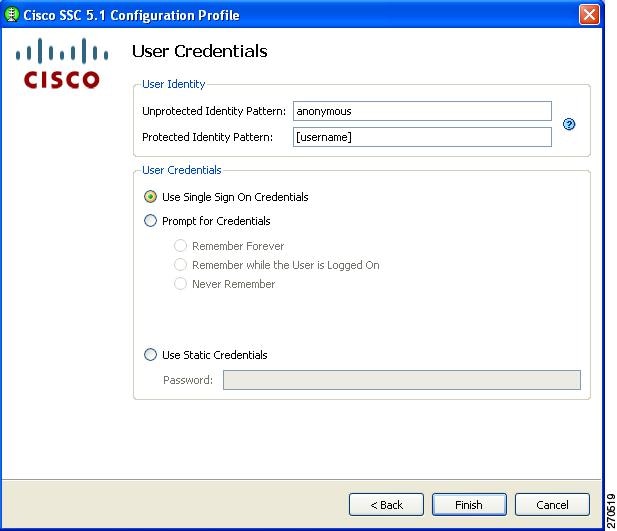
Configuring User Credentials
When you have configured a user connection, the User Credentials window enables you to configure the user credentials (Figure 2-23).
Figure 2-23 User Credentials Window
Note
SSC releases 5.0 and later support these placeholder patterns when you specify user identities:
•
•
When the [username] and [domain] placeholders are used, these conditions apply:
•
–
–
A typical pattern for user unprotected identity is anonymous@[domain] for tunneled methods or [username]@[domain] for non-tunneled methods.
If a client certificate is not used, the user identity pattern would be the actual string to send as the username (no placeholders). A typical pattern for user protected identity is [username]@[domain].
If the password source is this profile, the pattern would be the actual string to send as the password (no placeholders).
You can specify the user credentials by choosing to use single signon credentials (SSC obtains the credentials from the operating system), prompting the user for credentials, or specifying an actual static password credential to be sent in the deployment file.
When finished, click Finish and the window in Figure 2-7 reappears with the group and network configurations you have specified. When you click Next, the Validation window appears.
Validating the Configuration File
At this point, the management utility validates the networks you have defined against your policy settings. Any policy violations are displayed. You must correct any errors before you save the file. For example, errors might appear in the Validation window (Figure 2-24).
Figure 2-24 Validation Window with Validation Errors
When there are no validation errors, you can save the deployment file in any location you choose or accept the default location. The processed file (signed with encrypted credentials, PACs, and CA certificates) is stored by default in this file location:
C:\Documents and Settings\All Users\Application Data\Cisco\Cisco Secure ServicesClient
\newConfigFiles\configuration.xmlThe Cisco SSC client looks in this location for any new destination package. If you have the client installed on your system, you can automatically test and verify the configuration that you just created before deploying it.
Click Finish to save the configuration file.
If you need to make changes to the deployment package you just created, you can reopen the management utility, click Modify Existing Configuration on the welcome window (Figure 2-1), and choose the configuration file that you just saved.
Creating the Pre-Configured Client Destination Package File
The sscManagement Utility can be used to create the client destination packages with network administrator configured profiles.
Note
Using the Management Utility GUI
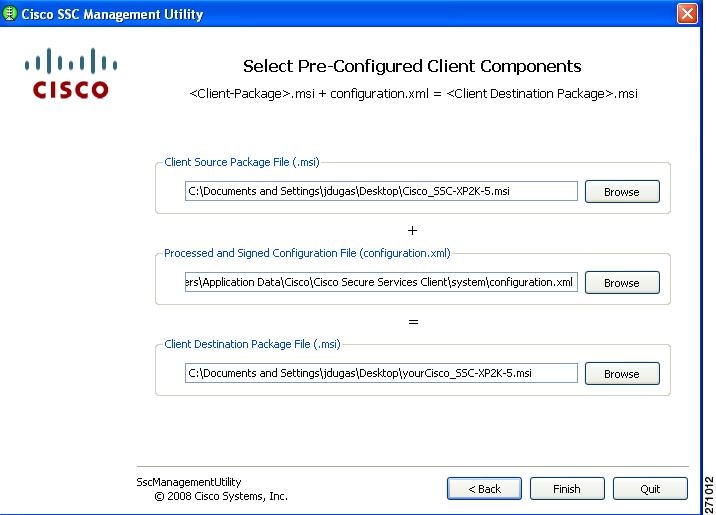
To create a pre-configured client package, the administrator clicks the Create Pre-Configured Client Package button on the management utility GUI window (Figure 2-25).
Figure 2-25 Select Pre-Configured Client Components Window
The management utility combines the client source package file (Cisco_SSC-SP2K-5.msi) with the processed and signed configuration file (configuration.xml) to produce the final client destination package file (yourCisco_SSC-XP2K-5.msi).
Accept the default file locations or click Browse to locate the files. Click Finish.
You can distribute the pre-configured client destination file (yourCisco_SSC-SP2K-5.msi) to the desired user PCs using your preferred distribution methods.
Groups in SSC
A group, fundamentally, is a collection of configured connections (networks). Every configured connection must belong to some group or be defined under the globalNetworks section in the distribution package.
Note
Classifying connections into groups provides multiple benefits:
•
For example, an enterprise end user who often travels outside the business campus might configure connections for public WiFi networks or hotspots. Without groups, a newly configured home network is added to the end of this list, which could be quite large. The client works through the list from the beginning, including all the public networks, before establishing a connection to the home network. This greatly increases the time to get connected to the last added network.
•
A group may be created by an administrator or an end user. At least one group must be defined in the configuration. If there are multiple groups, one group must be chosen as the active group. The client attempts to make a network connection using the connections defined in the active group. End users can add or delete networks only from the active group. Groups can be added or deleted by clicking on the Configure Groups button on the main window of the client GUI.
Networks that are defined in the globalNetworks section of the distribution package are available in every group at the top of the list. Because only enterprise administrators can create globalNetworks, administrators can control the enterprise networks that an end user can connect to, even in the presence of user-defined networks. An end user cannot delete administrator-configured networks.
It is important to note that a typical end user of an enterprise network does not need knowledge of groups in order to use this client. It is the responsibility of the administrator to always specify a default group in the created distribution package. If there is just one group available, the client selects that as the active group. The end user can add or delete their own networks without using groups.
Note
VPN Integration
SSC 5.1 integrates an automatic VPN connection feature but requires the Cisco IPSec VPN client (4.8 or later) to be installed on the user's PC. SSC minimizes user intervention when establishing a VPN connection. SSC supports these IPSec VPN authentication options:
•
•
•
If the VPN concentrator does not require user authentication, such as in group authentication, SSC does not prompt the user for information.
When authentication is required by the VPN concentrator, SSC prompts the user for VPN logon information:
•
•
•
When the VPN connection is successful, SSC maintains the user-entered information for possible future VPN connection attempts while the user is logged on to the PC. If the VPN connection fails, SSC re-prompts the user for VPN logon information.
SSC deletes the user's VPN information when the user logs off, shuts down the PC, or repairs SSC.
Supported VPN Features
SSC supports these VPN features:
•
•
•
•
•
–
•
Unsupported VPN Features
SSC does not support these VPN features:
•
•
•
•