Feedback
Table Of Contents
Entitlement Management by Users
Set attributes to be returned as obligation
Dynamic generation of policy attributes
Entitlement Management by Groups
Policy Combining Algorithm for a Resource
Add attributes to be returned as Obligation
Entitlement Management by Roles
Policy Combining Algorithm for a Resource
Add attributes to be returned as Obligation
Entitlement Management by Resources
Create Policies for a Resource
Policy Combining Algorithm for a Resource
Add attributes to be returned as Obligation
Creating Multiple Policies for a Role Using Map Expression
Importing Policies into PAP from XML File
Exporting Policies from the PAP to XML File
Entitlement Management by Policies
Create Policies by Entity (User, Group, and Role)
Policy Combining Algorithm for a Resource
Add Attributes to be returned as Obligation
Create Multiple Policies for a Role
Policy Combining Algorithm for a Resource
Add attributes to be returned as Obligation
Manage Entitlements
This chapter explains the various operations that you can perform on the Manage Entitlements section in the PAP administration console. You can perform the following activities under this section:
•
Entitlement Management by Users—Create user-based entitlement policies.
•
•
•
•
•
•
Apart from creating policies you can also perform the following operations in each of the above selection:
•
•
•
•
Entitlement Management by Users
This section allows the policy administrator to create user-based entitlements. You can configure exclusive permit or deny policies for a user. For example, if you wish to allow Mary to Account no:0011 exclusively, you can do so by using this feature. Furthermore, to avoid any duplicate user conflict, a rule can be configured on this policy using the available attributes, such as user attributes and resource attributes.
Create Policies for a User
To create policies for a user, you must:
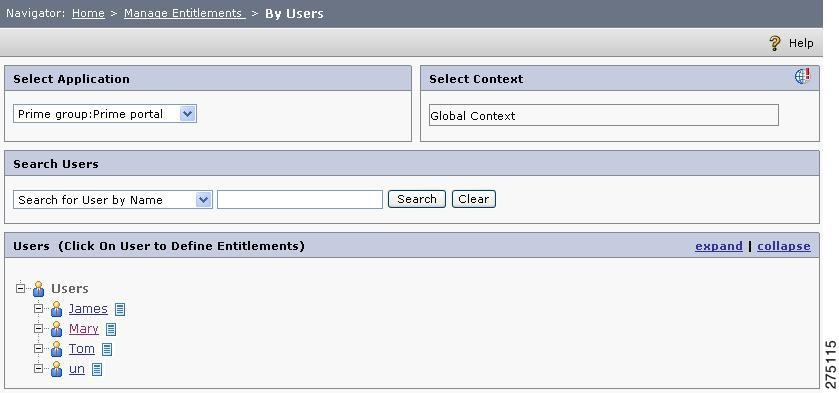
Step 1
The Policy Management By User page is displayed.
Figure 5-1 Manage Entitlement by Users
Step 2
The list of users associated with the selected application, application group, or Global is displayed in the List Users section.
Step 3
Figure 5-2 Search User
This section allows you to search for specific users depending upon the search criteria selected from the list box and the search value entered in the text box. The various search criteria are as follows:
•
•
•
•
•
•
Enter the value to search in the text box that is next to the search criteria list. You can also use the asterisk wild card character (*), as part of the search value.
For example, to get a list of all the users having M as the first character in their first name, select the search criteria of Search for User by First Name, enter a search value of M*, and click Search button. The list of users who match the search criteria and search value is displayed in the List Users section.
Click the Clear button to clear the value entered in the search value text box.
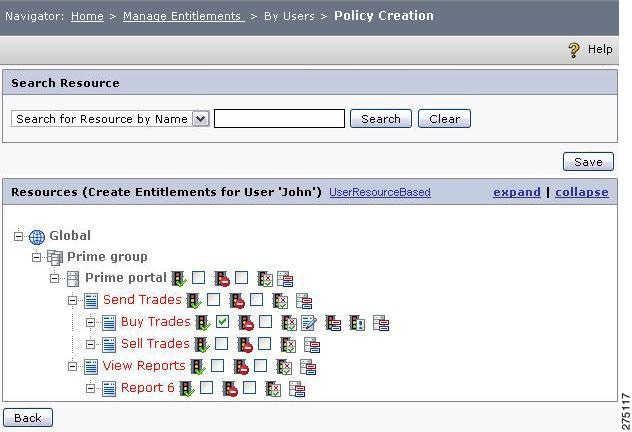
Step 4
A page containing the list of all the resources under the selected application is displayed. You can click the expand link to view all the resources that are in the list.
Figure 5-3 Policy Creation
While creating policies, when you expand a tree node and assign few policies by selecting the resource check boxes, ensure that you save the policy creation before expanding the next tree node. Otherwise, you might not find the policy configuration done on the previous node.
You can click the following icons on the Policy Creation page to perform the operations described here:
Note
Check the check box near the Allow Policy icon for the resource, to assign the Allow policy to the selected user for that resource.
Check the check box near the Deny Policy icon for the resource, to assign the Deny policy to the selected user for that resource.
Click the Policy Combining Algorithm icon to set the policy.
Click the Attributes icon to configure the resource attributes to return.
Click the Edit Policy icon to edit the policy.
Click the Set Policy Attributes on resource icon to configure policy attributes.
Click the Add Rules icon to set rules for this policy.
UserResourceBased
Click this button to go to the Policy Creation page, which is the same as Home > Manage Entities > Users > Assign Resources page. For more information, refer to Assigning Resources to a User, page 4-10.
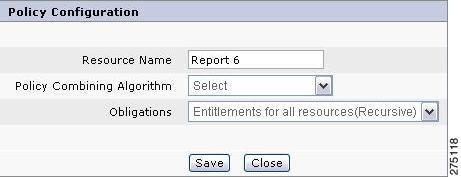
Policy Combining Algorithm
Refer to Appendix A, "Policy Combining Algorithm and Obligation" for more details about Policy Combining Algorithm (PCA), Resource Group Policy Combining Algorithm and obligation. This is inherited by the child resources unless overridden.
Note
To define the PCA and Obligations, you must:
Step 1
Step 2
Figure 5-4 Policy Combining Algorithm
Step 3
Step 4
Set attributes to be returned as obligation
You can set attributes for an application and for a resource, the values of which can be returned as obligations by the PDP in XACML response after evaluation of the policy. You can select:
•
•
The PDP will return all the attributes based on the decision type (allow/deny).
To add attributes for an to be returned for a resource, you must:
Step 1
Figure 5-5 Set attributes to be returned as obligation
The list box on the left contains all entity type attributes that you can select to return as part of the PDP response. Based on the decision type, the PDP returns the specified list of attributes as identified in the list boxes (Allow or Deny) on the right. You can add same attributes in both Allow and Deny list box. This means an attribute can be a part of either Allowed response or Denied response or both.
Note
Step 2
Step 3
Step 4
Step 5
Note
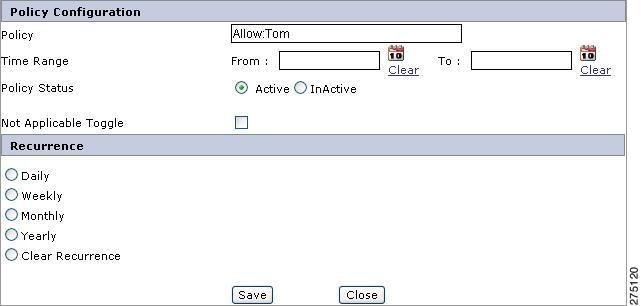
Edit Policy Configurations
You can define a time range with or without modelling a recurring event for the policy by using the Edit Policy button. The policy would be applicable on the resource accordingly. Apart from this, you can also apply `Not Applicable Toggle' on the policy. To edit the policy configurations, follow these steps:
Step 1
Figure 5-6 Edit Policy Configuration
•
•
•
Similarly, if Role2 has Deny policy on View Reports and the rule returns false, applying the toggle effect, the resultant decision will be "Not Applicable" only if "Not Applicable Toggle" is checked in the "Edit Policy" pop-up window. If this option is unchecked, the decision will be Permit.
•
Note
The following recurrence period can be defined for this purpose:
•
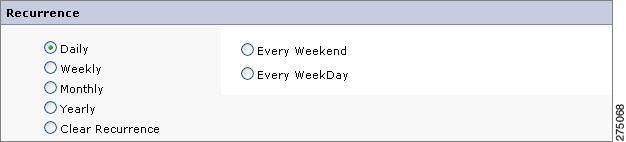
Figure 5-7 Recurrence-Daily
•
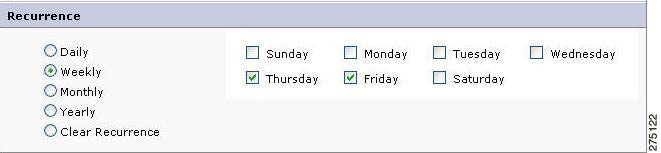
Figure 5-8 Recurrence-Weekly
You can select multiple days of a week on which the copied user can utilize your entitlements.
•
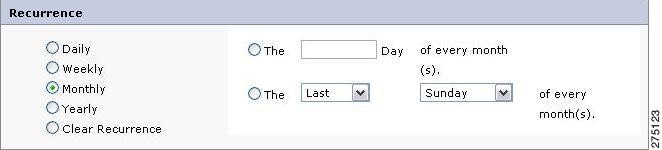
Figure 5-9 Recurrence-Monthly
–
–
•
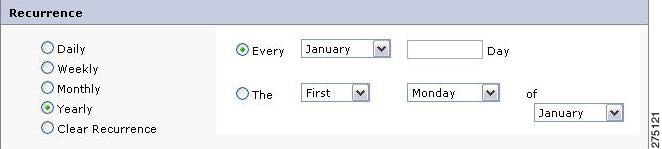
Figure 5-10 Recurrence-Yearly
This is similar to the monthly recurrence period with an additional option of selecting the month so that the copied entitlements is in force on the specified days of the every month.
•
Note
Step 2
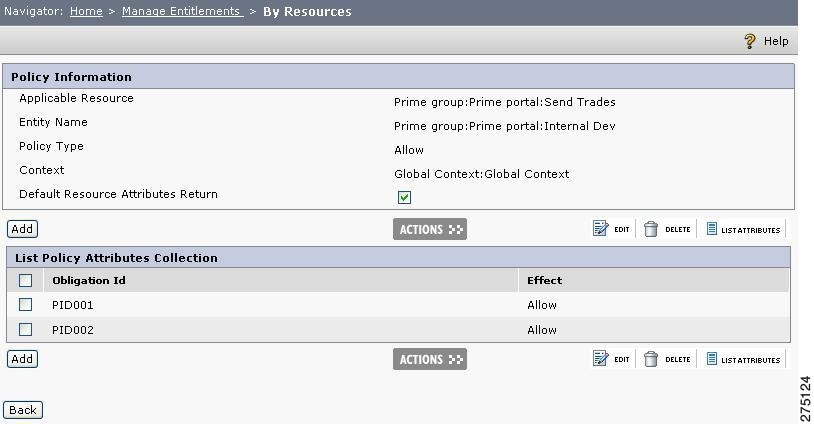
Set Policy Attributes
After a policy is created, you can set attributes on the policy by clicking the `Set Policy Attributes' icon of the selected policy. These attribute values are returned by the PDP in XACML response after evaluating the policy. You also have an option to select or deselect default attributes to be returned on the specified resource along with these policy attributes. In addition to this, you can also set rule for conditional return of these attributes. The PDP will return these attributes only if the rules configured evaluates to true.
Note
To create policy attributes, follow these steps:
Step 1
Figure 5-11 Set Policy Attributes By Resources
Resource page contains policy information, such as applicable resource, entity name, policy type, and context. The `Default Resource Attributes Return' option is checked by default. This means the resource type attributes created on the specified resource are returned along with the attributes created on the policy. If unchecked, only the policy attributes are returned.
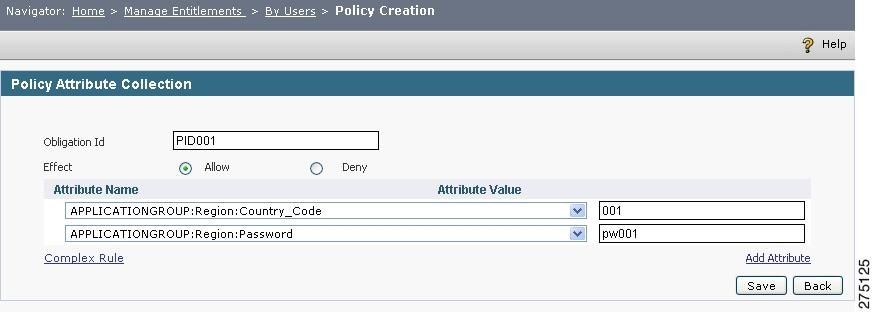
You can also add one or more policy attributes collections. To add a policy attribute collection:
Step 1
Figure 5-12 Policy Attribute Collection
Step 2
Step 3
Step 4
Step 5
Step 6
Step 7
Dynamic generation of policy attributes
Policy attributes can be dynamically generated and CEPM allows specific syntax for the definition of a policy attribute that is dynamically generated. A policy attribute value might contain strings of the form {s} - note '{' and '}', where 's' is one of the following -
1.
2.
For example, policy attribute value can be "{subject-attribute=urn:cisco:uc:1.0:employee-record xpath=//Employee/Name/text()}". In this case, 'urn:cisco:uc:1.0:employee-record' is an attribute with XML attribute value in the XACML request shown below -
<Request>...<Subject..><Attribute AttributeId="urn:cisco:uc:1.0:employee-record" Datatype="..#string"><AttributeValue><Employee><Name>Sam</Name></Employee></AttributeValue></Attribute>...</Subject>...</Request>The key-value pair, "xpath=//Employee/Name/text()", qualifies the policy attribute further to be the value "Sam".
3.
For example, a policy attribute value can be "{JavaPIP.beginsWith {subject-attribute=urn:cisco:uc:1.0:employee-record xpath=//Employee/Name/text()} Sa}"
In this case, a Java PIP attribute, namely 'JavaPIP.beginsWith', is passed the parameters '{subject-attribute=urn:cisco:uc:1.0:employee-record xpath=//Employee/Name/text()}' and 'Sa'. The return value of the Java PIP is the policy attribute value.
Example of a policy attribute:
<cixml version="1.0"><example>{JavaPIP.beginsWith
{subject-attribute=urn:cisco:uc:1.0:employee-record xpath=//Employee/Name/text()}
Sa}</example></cixml>
- which evaluates to
<cixml version="1.0"><example>true</example></cixml>- where the Java PIP returns "true" for the example in clause (3) above.
Add Rules to a Policy
Rules provide a finer level of authorization while evaluating a policy. A policy can be configured for executing more than one rule. In CEPM, rules are of two types, simple and complex.
A simple rule comprises one or more conditions that are composed by LHS (Left Hand Side) and RHS (Right Hand Side) expressions using—in, not in, equal to, not equal to, greater than, less than, greater than or equal to, lesser than or equal to functions and match operators. LHS and RHS contain attributes from the XACML request context, PIP attributes, and XPath references over request context.
Regular expression comparison can be done in a rule definition. For example, if the UserID of Mary is US 009, you can configure a rule, such as "User-ID"—"matches"—[a-z]* [0-9]*.
A complex does multiple simple rules built together into one by the conjunctions - AND and OR. The simple rule does not get evaluated unless and otherwise it is associated with a complex rule. Irrespective of the number of complex rules configured for a policy, the evaluation is done on the basis of only one complex rule validation that is selected as the simple association in the Rules Creation page.
To add rules to a policy:
Step 1
Step 2
Step 3
Step 4
Note
Example of a simple rule:
LHS value = Subject_attribute, Operator = equals to, RHS = ConstantMultiple simple rules can be configured and joined together using AND and OR operators.
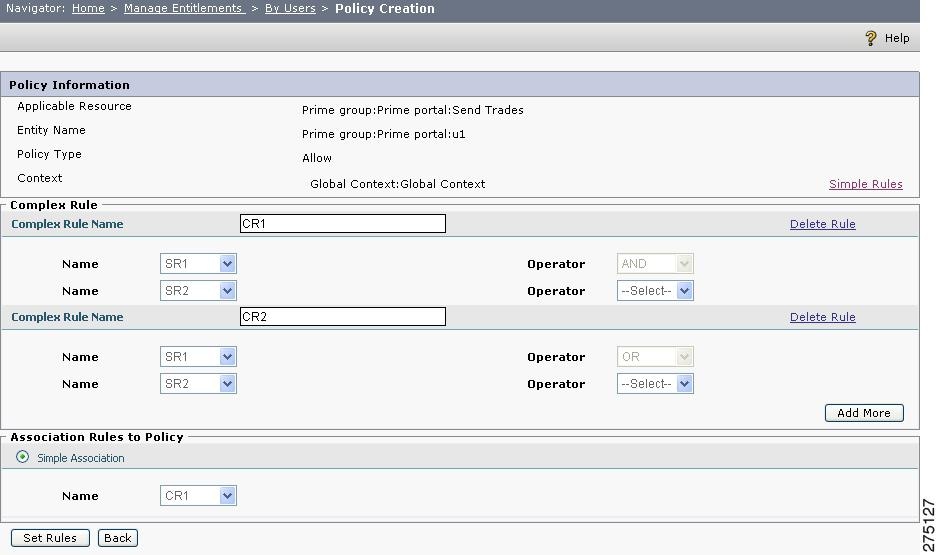
The Figure 5-13Add Rules to Policy describes a simple rule configuration in the PAP.
Figure 5-13 Add Rules to Policy
Step 5
Step 6
While creating a complex rule, the Name list box contains all simple rules and complex rules existing under the selected application. These include simple and complex rules configured while creating dynamic roles (groups), rules configured for conditional return of attributes, and rules created on any other policies under the application.
Note
Step 7
See Figure 5-14Complex Rule or a sample complex rule:
Figure 5-14 Complex Rule
I
InFigure 5-14Complex Rule the complex rule CR1 is selected as the final rule to be associated with the policy and the condition becomes, in the PEP request, check if the `Subject_attribute is equal to Constant' and `Resourcetype is not equal to Action'. If both the conditions are satisfied, then Allow access to this resource to the requesting user. If not, then Deny access to this resource to the requesting user.
Rules can be Shared or Reused
Rules are reusable and can be referenced by more than one policy. You can create generic or shared rules that can be used in multiple policies. This feature restrains the policy administrator from creating duplicate rules manually in each policy and keeps them in sync if the rules are changed. Any change in the base rule will updates all the associated policies.
For example, if a rule called R1 is created in a policy called P1 and reused in another policy P2, any change in R1 updates both P1 and P2.
Similarly, any existing rule can be referenced by another rule, and again that rule is referenced by another. For example, a rule R1 is created in policy P1. In policy P2 a rule called R2 is created which references R1. Furthermore, in another policy P3, a rule R3 is created which references R2.
P1 --> R1
P2 --> R2 --> references R1
P3 --> R3 --> references R2
Any change in R1 updates P1, P2, and P3.
Rule Deletion:
Deletion of a rule has a cascading effect on all complex rules and referenced rules where the deleted rule has been reused or shared. If any of the rules, whether it is a simple rule or a complex rule is deleted, a warning message is displayed that cautions you about its impact over the reused and referenced rules.
For example, if there are two simple rules SR1 and SR2 and two complex rules CR1 and CR2 are configured using these simple rules in the following manner:
CR1 --> SR1 AND SR2
CR2 --> CR1 OR SR2
- If SR1 is deleted, it has a cascading effect, and both CR1 and CR2 are deleted.
- If SR2 is deleted, both CR1 and CR2 are deleted.
- If CR1 is deleted, only CR2 is deleted, but not SR1 and SR2.
- If CR2 is deleted, it has no impact on the remaining rules.
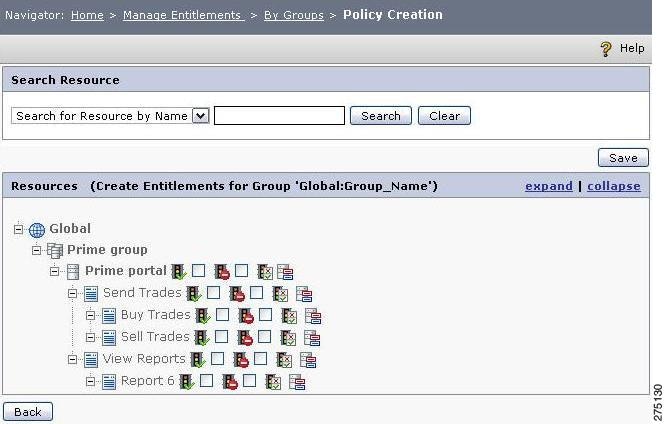
Entitlement Management by Groups
This section is used to create policies for groups, edit policies, configure Policy Combining Algorithm and obligations, add attributes to return, add policy attributes, and configure rules for policies.
Create Policies for a Group
To create entitlements for a group, you must:
Step 1
The Policy Management By Group page is displayed.
Figure 5-15 Manage Entitlement by Group
Step 2
The list of groups associated with the selected application, application group, or Global is displayed in the List Groups section in the same page. You can click the expand link to view all the groups that are in the list.
Step 3
Figure 5-16 Search Group
Enter the value to search in the text box. You can also use the asterisk wild card character (*), as part of the search value.
For example, to get a list of all the groups having M as the first character in their name, enter a search value of M*, and click Search. The list of groups that have M as the first character in their names are displayed in the List Groups section. Click Clear to clear the value entered in the search value field.
Step 4
A page that contains a list of all the resources under the selected application, application group, or Global is displayed. You can click the expand link to view all the resources that are in the list.
Figure 5-17 Policy creation by groups
Step 5
The policy for the selected group and selected resources gets created.
You can click the icons described in NoteThe icons appear next to the resource name only after you select one of the check boxes, Allow or Deny, that are next to that resource name and click Save. to perform the operations described here:
Note
Policy Combining Algorithm for a Resource
Refer to Policy Combining Algorithm, page 5-4.
Add attributes to be returned as Obligation
Refer to Set attributes to be returned as obligation, page 5-5.
Edit Policy Configurations
Refer to Edit Policy Configurations, page 5-7.
Set Policy Attributes
Refer to Set Policy Attributes, page 5-9.
Add Rules to a Policy
Refer to Add Rules to a Policy, page 5-12.
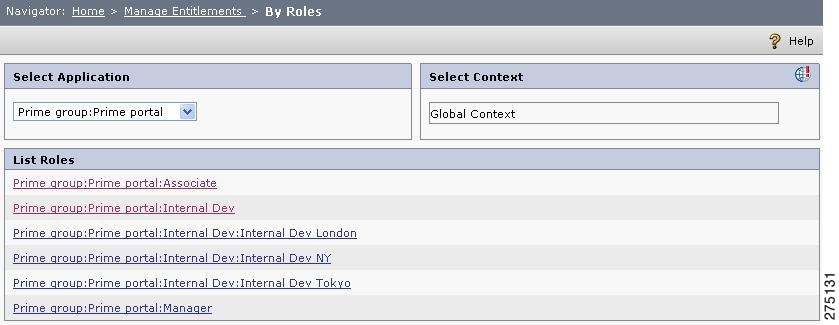
Entitlement Management by Roles
This section describes the following functionalities provided by the PAP.
•
•
•
•
•
•
Create Policies for a Role
To create entitlements for a role, you must:
Step 1
The Policy Management By Role page is displayed.
Figure 5-18 Manage Entitlement by Roles
Step 2
Step 3
The list of roles associated with the selected application, application group, or Global is displayed in the List Roles section.
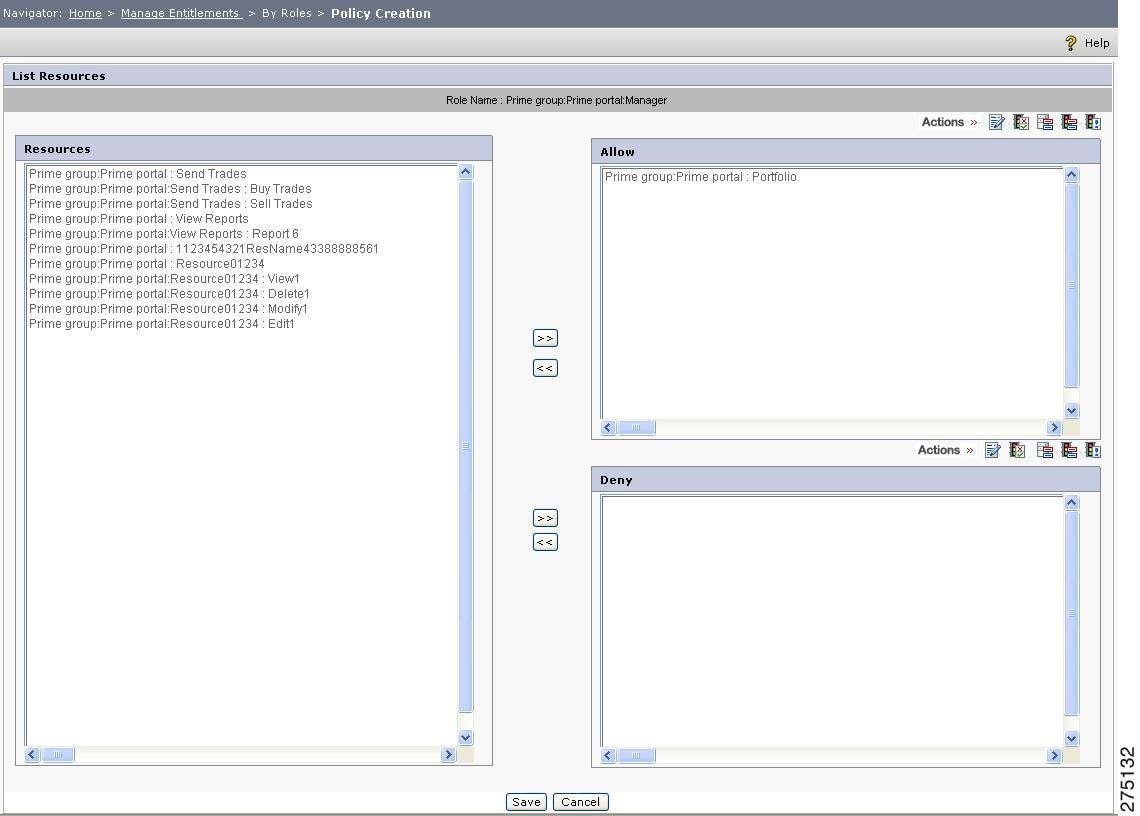
Step 4
A page that contains a list of all the resources under the selected application, application group, or Global is displayed in the resources list.
Figure 5-19 Assign Roles
The page contains three list boxes. The Resources list box contains the resources that are not assigned to the role. On the right side, the Allow and Deny list boxes contain the resources that are assigned to the role, with the Allowed permission and Denied permission respectively.
Step 5
Step 6
Step 7
Step 8
Select the assigned resource and click the appropriate icon next to the action label as described in Table 5-2Resource Icons:
Step 9
Policy Combining Algorithm for a Resource
Refer to Policy Combining Algorithm, page 5-4.
Add attributes to be returned as Obligation
Refer to Set attributes to be returned as obligation, page 5-5.
Edit Policy Configurations
Refer to Edit Policy Configurations, page 5-7.
Set Policy Attributes
Refer to Set Policy Attributes, page 5-9.
Add Rules to a Policy
Refer to Add Rules to a Policy, page 5-12.
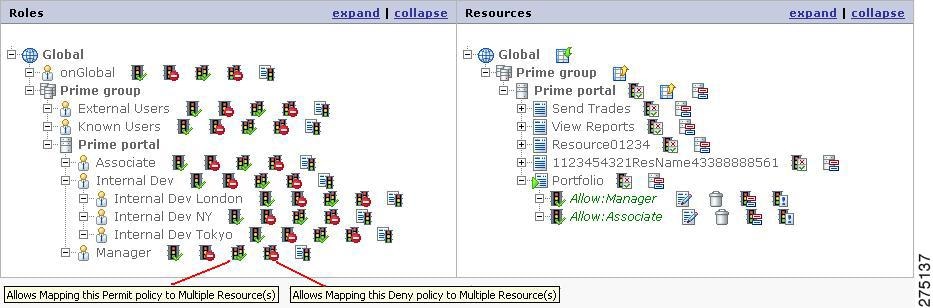
Entitlement Management by Resources
This section describes the following functionalities provided by PAP.
•
•
•
•
•
•
Create Policies for a Resource
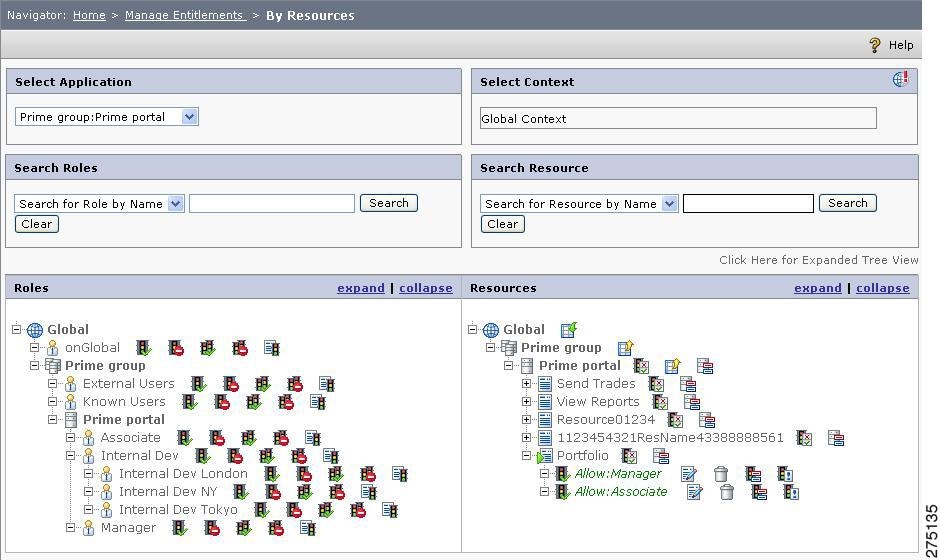
To create entitlements by resource (basically it is a role-based policy creation), you must:
Step 1
The Policy Management by Resource page is displayed.
Figure 5-20 Manage Entitlement by Resources
Step 2
Step 3
A list of roles and resources is displayed side-by-side. You can click the expand link in the upper right corner of the list boxes to view all the roles and resources pertaining to the selected application group/application.
Step 4
Figure 5-21 Search Resources
The Table 5-3Expected outcomes for search option lists the sample search parameters and the expected outcomes of the search options
Table 5-3 Expected outcomes for search option
Step 5
is displayed next to the cursor and moves with the cursor.
To create Deny policy, double-click the Map Deny Policy button next to the role name for which you want to create the Deny policy for a particular resource. A blue label
is displayed next to the cursor and moves with the cursor.
Step 6
For Allow policy: Allow:[Role for which this policy is created]
For Deny policy: Deny:[Role for which this policy is created]
Figure 5-22Role-Resource mapping shows the sample Allow policy created by the Internal Dev role over the Report 6 resource.
Figure 5-22 Role-Resource mapping
Step 7
To do this, you must select the appropriate icon next to the resource name for which the policy is created or select the icons next to the policy name, as explained .
Policy Combining Algorithm for a Resource
Refer to Policy Combining Algorithm, page 5-4.
Add attributes to be returned as Obligation
Refer to Set attributes to be returned as obligation, page 5-5.
Edit Policy Configurations
Refer to Edit Policy Configurations, page 5-7.
Set Policy Attributes
Refer to Set Policy Attributes, page 5-9.
Add Rules to a Policy
Refer to Add Rules to a Policy, page 5-12.
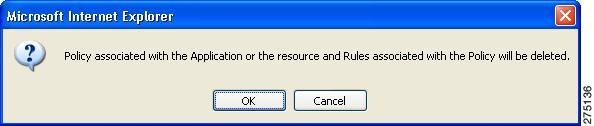
Revoke a Policy
To revoke a policy, you must:
Step 1
Figure 5-23 Revoke Policy
Step 2
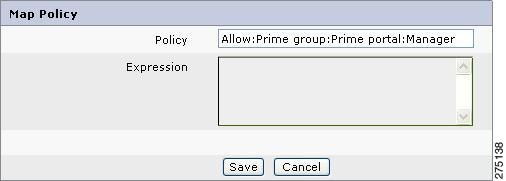
Creating Multiple Policies for a Role Using Map Expression
You can create multiple policies (Allow or Deny) for a role by executing a single map expression. This eliminates the need to create policies repeatedly for a single role for multiple resources in the resource hierarchy.
To create policies using the map expression for a role, you must:
Step 1
Figure 5-24 Multiple policies for a role using map expression
Step 2
A pop-up page is displayed where you can enter the policy creation expression. Figure 5-25Map Policy shows the sample Allow Policy Map Expression page.
Figure 5-25 Map Policy
Examples of a map expressions:
Example 5-2 Consider the Allow Expression value, Prime group:Prime portal:*, configured for Role1. This results in the creation of Allow: Role1 policies for all the resources and their child resources under the Prime portal application.
Example 5-3 Consider the Allow Expression value, Prime group:Prime portal:*:Report 6, configured for Role1. This results in the creation of Allow: Role1 policies for all the resources having the name Report 6. Here, * refer to all resources.
Example 5-4 Consider the Allow Expression value, Send Trades:#:Report 1, configured for Role1. Note that only resource names can be mentioned before and after #. This results in the creation of Allow: Role1 policies for the immediate level of the given resources, that is, all child resources with the name Report 1 under the resource Send Trades.
Step 3
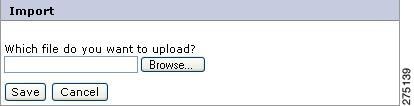
Importing Policies into PAP from XML File
The PAP provides the functionality to import policies from an XML file into an application in the PAP. If the PAP and PDP are the non-shared mode and communicate via JMS, the imported data is not synchronized unless and until a PDP is associated with that application.
To import the policies into the PAP, you must:
Step 1
A pop-up page is displayed where you can select the XML file that contains the policies to be imported.
Figure 5-26 Import using XML file
Step 2
Exporting Policies from the PAP to XML File
The PAP provides the functionality to export policies from the PAP application or application group to an XML file.
To export the policies from the PAP, you must:
Step 1
A pop-up page is displayed where you can click any of the following links to save the appropriate information in the XML file.
Figure 5-27 Export using XML file
•
•
Step 2
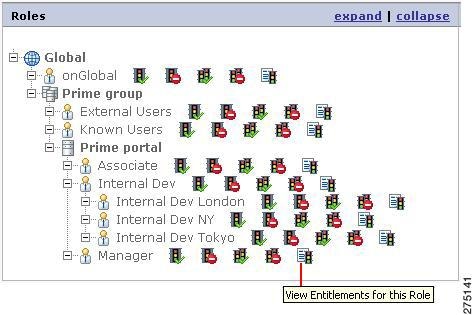
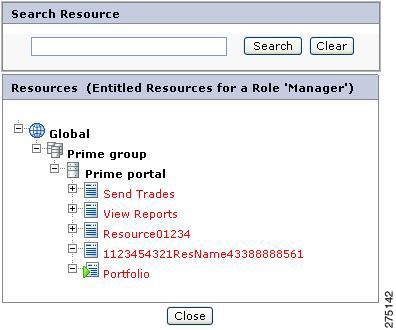
View Entitlements for a Role
The PAP provides the functionality to display the entitlements for a role.
To view all the entitlements for a role, you must:
Step 1
Step 2
Figure 5-28 View Entitlement for Role
The Allowed Resource page is displayed, which contains a list of all the resources in the selected application group, or application.
Figure 5-29 Allowed Resource
All permissible resources (having Allowed permission) within the Resource list are shown in green while the remaining resources (having Denied permission) are shown in red.
Entitlement Management by Policies
This section describes the following functionalities provided by the PAP:
•
•
•
•
•
•
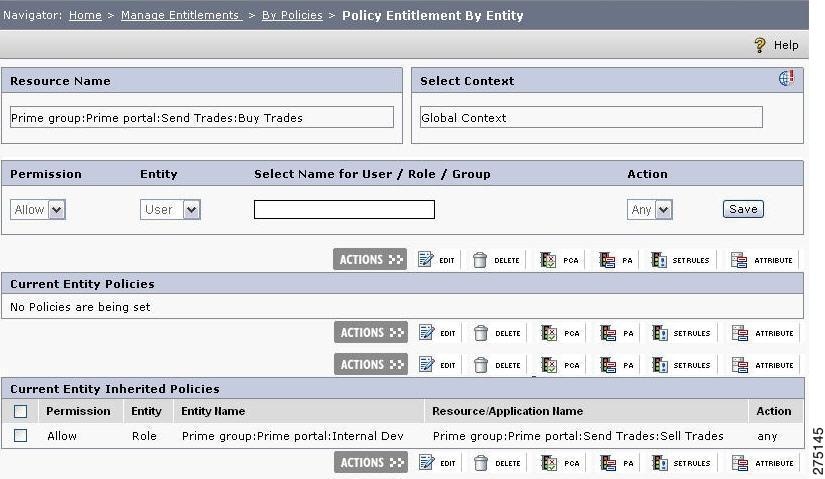
Create Policies by Entity (User, Group, and Role)
The PAP provides the functionality to create policies for users, groups, and roles in a single place.
To create a policy for any of these entities (users, groups, and roles) in a single place, you must:
Step 1
The Policy Management By Policies page is displayed.
Figure 5-30 Manage Entitlement by Policies
Step 2
The list of resources associated with the above selected application/application group is displayed in the List Resources section. You can click the expand link to view all the resources that are in the list.
Step 3
Figure 5-31 Search Resources
Enter the value to search in the text box. You can also use the asterisk (*) wild card character, as part of the search value.
For example, to get the list of all the resources having M as the first character in their name, enter a search value of M*, and click Search. A list of resources that have M as the first character in their name is displayed in the List Resources section.
Click Clear to clear the value entered in the search value field.
Step 4
Figure 5-32 Policy Entitlement by Entity
Step 5
Step 6
Figure 5-33 New Policy
a.
b.
c.
d.
e.
f.
Policy Combining Algorithm for a Resource
Refer to Policy Combining Algorithm, page 5-4.
Add Attributes to be returned as Obligation
Refer to Set attributes to be returned as obligation, page 5-5.
Edit Policy Configurations
Refer to Edit Policy Configurations, page 5-7.
Set Policy Attributes
Refer to Set Policy Attributes, page 5-9.
Add Rules to a Policy
Refer to Add Rules to a Policy, page 5-12.
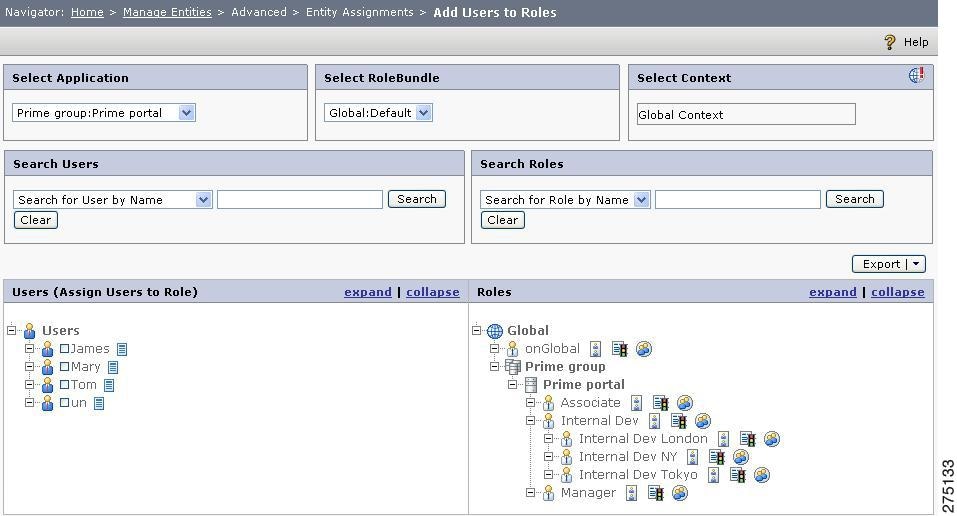
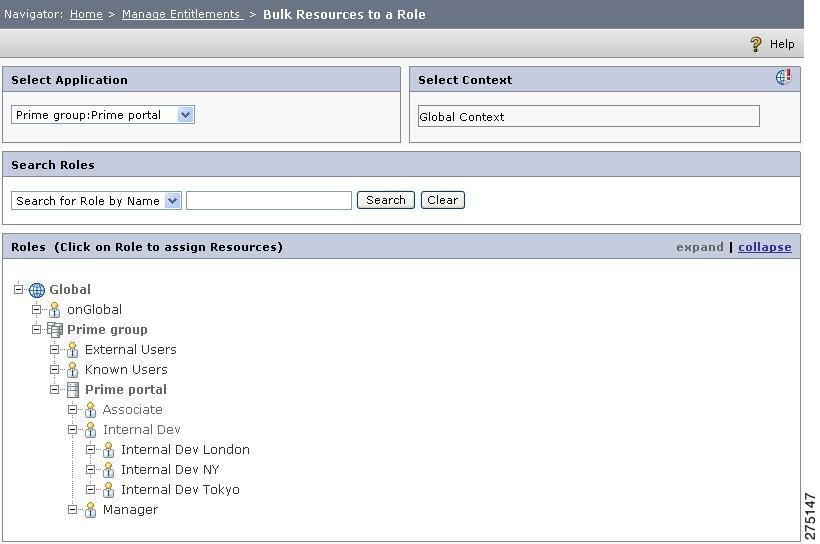
Add Bulk Resources to a Role
This section describes the following functionalities provided by the PAP.
•
•
•
•
•
•
Create Multiple Policies for a Role
To create multiple policies for a role on a single page in the PAP, follow these steps:
Step 1
The Policy Management by Role page is displayed.
Figure 5-34 Bulk Resources to a Role
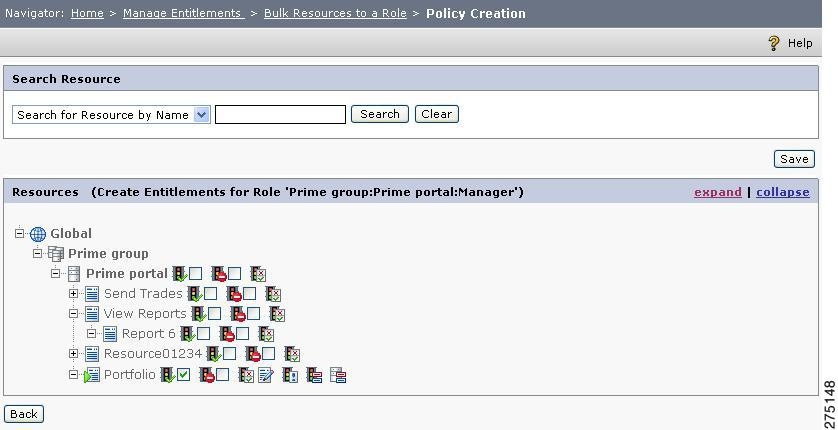
Step 2
Step 3
The Policy Management By Role page is displayed, which contains a list of all the resources under the selected application, application group, or Global.
Figure 5-35 Policy Creation by Role
Step 4
The policy for the selected role and selected resources gets created.
You can click the icons described in Table 5-5Role icons to perform various operations.
Note
Policy Combining Algorithm for a Resource
Refer to Policy Combining Algorithm, page 5-4.
Add attributes to be returned as Obligation
Refer to Set attributes to be returned as obligation, page 5-5.
Edit Policy Configurations
Refer to Edit Policy Configurations, page 5-7.
Set Policy Attributes
Refer to Set Policy Attributes, page 5-9.
Add Rules to a Policy
Refer to Add Rules to a Policy, page 5-12.
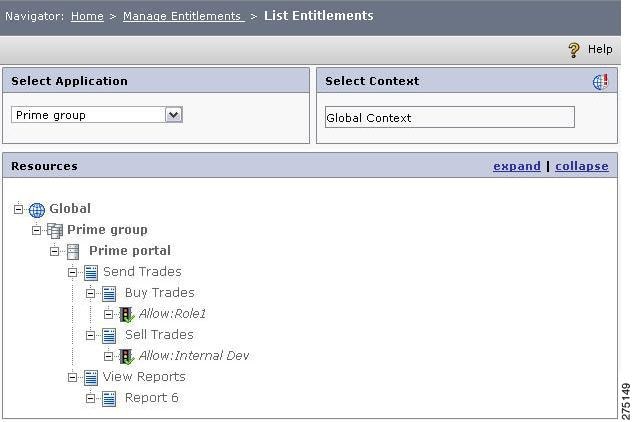
List Entitlements
The PAP provides the functionality to view a list of all the entitlements for all the resources in an application or application group.
To view a list of entitlements, you must:
Step 1
The List Entitlements page is displayed.
Step 2
Step 3
Step 4
Figure 5-36 List Entitlement