Downloads |
 Feedback Feedback
|
Table Of Contents
System Administration and Log Management
Creating New Permissions Groups
System Administration and Log Management
System Overview
Users must have sufficient access rights, or permission levels, to perform any operations on network elements (the devices, such as routers, that make up the network) or system-level resources (such as templates or log messages). In the GUI application developed by Cisco, these access rights are administered through the System Control Panel, which is started from the Services control panel.
Permissions are granted to user groups, not individual users. Permission groups are created and managed by the SuperUser (login name: admin), using the AAS Manager (Authorization and Access Server) window. This window is opened when you click on the AAS Manager button in the System Control Panel. While any user can use this window to review current permissions for the group to which he or she belongs, only the SuperUser can create, delete, or modify a permissions group. A user cannot belong to more than one permissions group at a time.
Users are added to the system (as well as removed, and their data managed) in the User Authentication Manager window, which opens when you click on the User Manager button in the System Control Panel. Only the SuperUser can add a user to the system.
Log messages are generated periodically by the various servers that make up the Cisco IP Manager software. These messages are stored in the database; access to them is through the Log Server window. To open this window, click on the Log Viewer button in the Services control panel.
Root Domain
The administrator (SuperUser) should create a user root domain to be the parent of all of your Cisco IP Manager activities. This should be the only subdomain at the root level.
If you create all of your working domains as subdomains to this user root, templates stored at the user root level can be shared across your working domains.
Note
The root domain is reserved for system use. Do not create elements, templates, or subdomains that contain these things in the root. If you do so, your database may be incompatible with future releases of the Cisco IP Manager software.
System Control Panel
When you log into the Cisco IP Manager software, the first window to open is the Services window. For access to user and permissions group management functions, click on the System Control Panel button at the bottom of this window.
The System Control Panel provides access to the AAS Manager and the User Authentication Manager windows.
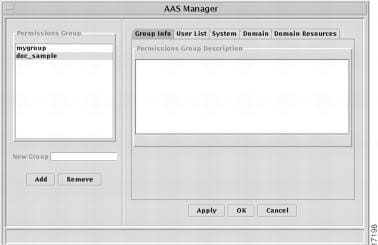
AAS Manager
Use the AAS Manager window to create and delete permissions groups and grant permission levels for various system resources. To open this window, click on the AAS Manager button on the System Control Panel.
Figure 6-1 AAS Manager window
Permissions groups are displayed in the pane on the left side of the window. The SuperUser (login: admin) can see all permissions groups; individual users can see only the group to which they belong. Only the SuperUser can make changes to groups.
Creating New Permissions Groups
Only the SuperUser can add a new permissions group.
Open the AAS Manager window and enter a name for the new permissions group in the New Group field in the pane on the left side of the window.
See the section "Name Restrictions" in the chapter "" for limitations on characters in names.
Click the Add button to add the new group to the bottom of the Permissions Group list.
You must add the group before you can add users or define permissions.
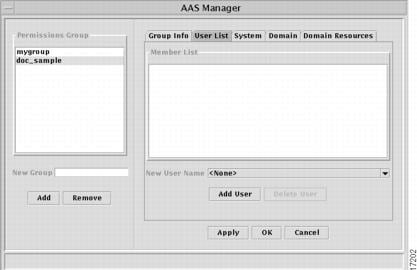
Setting Permissions
Select a group from the Permissions Group list in the pane on the left side of the AAS Manager window.
Use the tabs at the top of the pane on the right side of the window to add users and set permissions. Permissions are set per group, not per individual. All members in the group receive the same access rights.
Tabs are:
•
•
Figure 6-2 AAS Manager window, User List tab
•
•
Figure 6-3 AAS Manager window, System tab
•
Figure 6-4 AAS Manager window, Domain tab
Addition of a domain to the Domain tab does not grant the right to work with elements that are in the domain. Those rights are granted on the Domain Resources tab. However, users must have Read permission for a domain in order to exercise Domain Resources rights in that domain.
•
Figure 6-5 AAS Manager window, Domain Resources tab
You must add a domain, then select it to set permissions to work within that domain. Click the Add button and select a domain in the window that opens, then set the permissions for the following resources:
•
•
Note
When you have set permissions, click the Apply button to save the permissions and keep the AAS Manager window open, or the OK button to save the permissions and close the AAS Manager window. Click the Cancel button to close the AAS Manager window without setting any permissions.
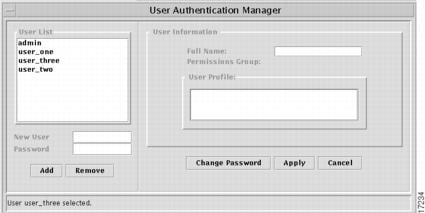
User Manager
Click the User Manager button on the System Control Panel to open the User Authentication Manager. Use this window to add and remove individual users and modify their user profiles.
Figure 6-6 User Authentication Manager
Adding Users
To add a new user to the database, enter a username in the New User field and a password in the Password field beneath the User List in the left pane of the window and click the Add button.
See the section "Name Restrictions" in the chapter "" for limitations on characters in names.
After a user has been added to the database, you can use the User Information pane on the right side of the window to provide additional information, including Full Name and Profile, about this user. The Permissions Group information will be filled in when the user is added to a Permissions Group in the AAS Manager.
If you enter a user name and then enter the additional information prior to clicking the Add button, the user information will not be retained. You must use the Add button first, then enter the name and profile.
Editing User Information
Open the User Authentication Manager window and select a user from the User List. (The administrator can see all users in this list; an individual users will see only his or her own name.)
Enter the user's Full Name and User Profile in the User Information fields on the right side of the window. All fields are optional (the password displays asterisks and is set to the password assigned when the user object was created).
Data limits are:
•
•
Characters in excess of these limits will be dropped.
When you have entered the user information, click the Apply button to save the data to the database and keep the User Authentication Window open. Click the button to save the data to the database and close the window. Click the Cancel button to close the window without saving the data into the database (but data entered into the edit box will be retained in memory until the application is closed and restarted.)
Changing Passwords
The SuperUser (login: admin) can modify all data for all users, including passwords.
Individual users can see and modify only their own information.
To change passwords, click on the System Control Panel button in the Services control panel, then choose the User Manager button.
This will open the User Authentication Manager, with your data displayed unless you are logged in as admin. (If you are the SuperUser, select a user from the list to see his or her information.)
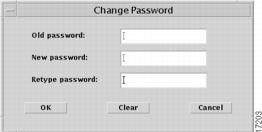
Click the Change Password button to open the Change Password window. Enter your old password in the Old Password field, then enter the new password twice, once in the New Password field and again in the Retype password field. Maximum length for a password is 64 characters.
Figure 6-7 Change Password window
Click the OK button to accept the change and close the Change Password window. Click the Clear button to clear the fields and keep the window open. Click Cancel to close the window without changing the password.
Note
When you are finished, click either the Apply button to save the data without closing the window or the Close button to save the data and close the window. The Cancel button closes the window without saving the data (except that any password changes have already been implemented).
Log Viewer
Users with log permissions can view or delete messages generated by the various servers that make up the Cisco IP Manager software, by clicking on the Log Viewer button in the Services control panel.
Log Server Window
The Log Server window opens.
Figure 6-8 Log Server window
The Log Server window will display all messages currently in the log when it opens. To view specific log messages, you can search the database for messages that meet criteria you specify, using the View menu options.
The time shown for each message is GMT.
The window will not be refreshed automatically. Messages generated while the window is open will not be displayed (nor will messages be cleared when you purge the database) until you close and reopen the window or submit a new query.
Log Server Menus
The Log Server window has the following menus:
File
The File menu has the following commands:
Import
Returns previously exported data to the database. You can use this command to review information that was previously exported and then purged from the database (perhaps as a housekeeping measure).
Export
Writes to a file the data currently displayed in the Log Server window.
Export All
Writes to a file all log messages currently in the database.
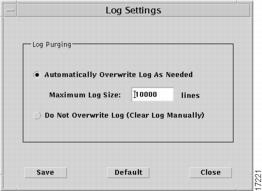
Log Settings
Sets a limit on how many messages can be stored in the database. When you select this command, the Log Settings window opens.
Figure 6-9 Log Settings window
Select the Automatically Overwrite Log As Needed button, then enter the number of lines the log can contain (maximum size is 2,147,483,647).
Or, choose the Do Not Overwrite Log (Clear Log Manually) button if you do not want to set a limit.
When you have entered your choices, click the Save button to save your settings, or click Close to dismiss the window without saving your changes.
The Default button will reset the limit to 10,000 lines and select the Automatically Overwrite... button.
The Log Server will automatically remove older messages from the database whenever this limit is reached. However, in order to enhance performance, the limit is checked only once for every 100 messages generated. So it is possible that the database could be 99 messages over the limit at any given time.
Purge By Date
Purges the database of messages that fall within a specified date range. When you select the Purge By Date menu option, a message box will ask if you want to save the log messages first. If you click the No button, the messages in the specified date range will be purged from the database immediately. If you click the Yes button, a file-management window will open, in which you can specify a directory and file name for the saved log. When you click the OK button in this file-management window, all messages in the specified date range will be written to the specified file and then immediately be removed from the database.
Purge All
Purges the database of all log messages. When you select the Purge All menu option, a message box will ask if you want to save the log messages first. If you click the No button, all messages in the database will be purged immediately. If you click the Yes button, a file-management window will open, in which you can specify a directory and file name for the saved log. When you click the OK button in this file-management window, all messages in the database will be written to the specified file and then immediately be removed from the database.
Check Log Size
Counts the number of messages currently in the database and displays the result in a message box.
Close
Closes the Log Server window.
Exit
Closes all open Cisco IP Manager windows and exits the software.
View
The View menu has the following commands:
Search
Lets you specify criteria for messages, in the Search window. This window allows you to specify a range of dates, a specific server, message category, and specific message contents.
Figure 6-10 Search window
The Source field identifies the location within the server software that caused the log message to be generated.
Use the Message field to specify a string of characters; if that string is contained in a message that also meets the other criteria, the message will be displayed in the Log Server window.
You can enter data into any combination of these fields; messages meeting your specified criteria will be displayed when you click the OK button. (Only the administrator can view messages generated by all users; a non-administrator user can only view his or her own messages.)
Click the Cancel button to dismiss the Search window without generating a log request. Click the Clear button to remove text from all fields in the Search window.
More Search
Lets you specify criteria for log messages—date range, domain, or network element, in the More Search window.
Figure 6-11 More Search window
Enter data into any or all of the fields; messages that match the criteria specified will be displayed in the Log Server window when you click the OK button.
If you enter only a Starting Date, all messages currently stored in the database that have been generated since the beginning of that day will be displayed; if you enter only an End Date, all messages currently stored in the database that were generated before the end of the specified date will be displayed. The same behavior is true for each of the other fields.
Click the Cancel button to close the window without generating a log request. Click the Clear button to clear text from all of the fields in the window.
Clear
Clears the Log Server window of all messages.
Help
The Help menu has the following commands:
Sorting
Displays a message window that defines sorting order (click in a column header to sort log messages by that column in ascending order; hold the shift key down and click in a column header to sort messages by that column in descending order).
About
Displays information about the Cisco IP Manager software.