Template Manager
Available Languages
Table Of Contents
Understanding the Template Manager Window
Using the Template Config Builder
Conditionally Including a Block
Using Expressions in a Template Body
Supported Service Related Variables
Using the Template Manager
The Template Manager helps you manage the configuration templates, that is, boilerplate forms, that contain text, Cisco IOS commands, and variables for provisioning devices. Templates can be either predefined system templates provided by Cisco, or user-defined templates. User-defined templates are modified system templates or new templates not based on an existing system template.
You can use the Template Manager to do the following:
•
modify predefined system templates
•
•
•
Use the Network Inventory Manager to add devices and to download the configurations to devices (provision devices).
For information about using the Network Inventory Manager to add and provision devices, see "Using the Network Inventory Manager."
Accessing Default Templates
The Template Manager provides several default templates for T1 CPE devices. These default templates are stored at the following location:
$CCNSC_HOME/common/templates/IAD2421

Note
If while using the Template Manager, you corrupt the default templates, you can import the default templates from the above location. You can import the templates using the Template Config Builder.
Note
Understanding the Template Manager Window
The CCNSC Subscriber Provisioning Template Manager window displays a hierarchical view of the available templates. When you first bring up the Template Manager, the Tree View contains only the predefined system templates. However, as you add new templates, this list will grow.
Note
The Tree View allows you to select the template for the various devices you will be provisioning. Figure 4-1 shows an expanded Tree View of the CCNSC Subscriber Provisioning Template Manager window.
Figure 4-1 CCNSC Subscriber ProvisioningTemplate Manager Window—Expanded
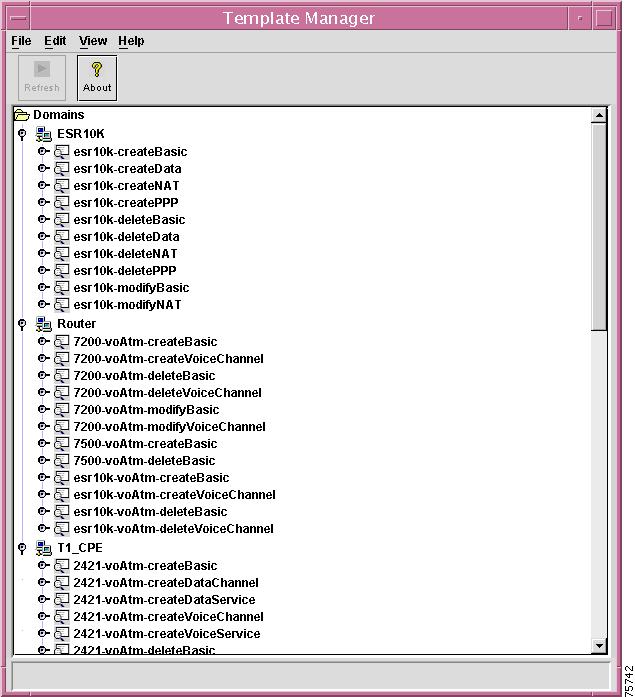
The Tree View displays a data tree that shows all of the domains to which you have been given access. Unlike the Network Inventory Manager data structure, the tree displayed in the Template Manager shows templates and template data objects, not network objects.
If you do not see the template in the data tree immediately beneath the domain to which it belongs, click on the ball to the left of the domain icon (or double-click on the icon itself) to expand the domain listing in the data tree.
The Tree View menu bar allows you to select various operations to perform from several drop-down menus. However, the operations that are enabled within these menus depend upon the template you have selected in the Template Tree. The Tree View winodw provides the menu options shown in Table 4-1.
The Tree View shows all of the objects that are currently defined in the Cisco Convergent Network Solution Center: Subscriber Provisioning NMS. The Network Tree uses the following conventions:
•
icon to indicate that the tree can be expanded. Click the icon to expand to the next level of the hierarchy.
The
icon indicates that you have reached the lowest level in the hierarchy for that network object. You can click the icon to collapse to the previous level of the hierarchy.
•
icon. The root is the highest level template folder and can be made up of any number of templates and complexes.
•
icon. A domain is a logical organization of your templates and can optionally be made up of any number of other templates. Default domains are provided for you, however, you can arbitrarily define other domains in order to provide a multilevel hierarchical structure.
•
icon. A Template, like the Service, is a logical organization of your templates. Default templates are provided for you, however, you can create other templates in order to provide a multilevel hierarchical structure.
•
icon. Template data indicates the specific configuration that has been defined for a specific device.
To be managed by the Template Manager, a template must be listed in the Tree View. If the template is not listed, try expanding the hierarchy. If it is still not listed, it has not been defined in CCNSC Subscriber Provisioning.
Using the Context Menus
You can use the Service Type context menu to create new templates. To create a new template, you must right-click on a Domain icon and select New Template. The Enter Template Name window appears. You must enter a template name and click OK to add the new template or Cancel if you do not want to create the new template. Once created, it is added to the list of templates displayed in the Template Manager window.
You can use the Template context menu to do the following:
•
•
•
You can use the Template Data context menu to do the following:
•
•
Using the Template Config Builder
The Template Config Builder is where you construct templates, specifically, create the template body, identify the device for which you want to generate configuration files, and define values that are used for individual devices. You also use the Template Config Builder to preview device configurations.
The Template Config Builder provides two separate panes for constructing templates. The panes are as follows:
•
•
Figure 4-2 shows Template Config Builder window.
Figure 4-2 Template Config Builder Window

Once you create a template, you specify a template body as described in "Specifying a Template Body" and define template data as described in the "Specifying Template Data" section.
Specifying a Template Body
Once you have created a template or have opened a template, the template body contains the text that does not change from device to device, plus placeholders for the data that can change for each device.
Enter the text for the body in the editable text box that occupies the left pane of the Template Config Builder window.
The following tasks relate to the template body portion of the Template Config Builder:
•
Importing Text
To import the template body from some other source (either a router configuration file or a text-only file created in some other application), select the Import option from the File menu in the Template Config Builder window. Select the Template Body option from the submenu. Respond to an alert that warns that the imported template may not match existing data.
When you have located the file in the Import Template Body window, click OK. The selected file is imported into the Template Config Builder.
Specifying Attribute Names
Placeholders, or attribute names, must adhere to the following syntax:
•
${mandatory_attribute}$[optional_attribute]$<global_attribute>•
# >•
•
•
Note
Following is a sample template body:
hostname ${host_name}router ospf ${process_id}redistribute static metric ${metric_val}network ${ip_subnet} ${ip_mask} area ${area_id}When you have entered the template body text, save the template. This causes all attribute names (anything preceded by a dollar sign ($) and enclosed in braces or brackets) to be displayed as blue text.
It also causes numbered pages in the right-hand pane (the template data region of the Template Config Builder window) to be divided into as many columns as there are mandatory and optional attributes, plus one (for the device name). Each column is headed by a different attribute name.
The number of attributes that a single template can hold is dependent upon both the capacity of the Java Runtime Environment and your system's resources. You should be able to add several hundred attributes, however, more than 1000 attributes may cause excessive delays in calculating the spreadsheet.
The global page (which precedes Page 1) is divided into as many columns as there are global attributes (plus one for the device name).
The first column heading, on both numbered and global pages, is Device.
Specifying Subtemplates
You can define sub templates, however, CCNSC Subscriber Provisioning does not support subtemplates at this time.
Conditionally Including a Block
A block of template body can be conditionally included. Conditional inclusion is specified in the template body text by the reserved words #if, #elseif and #else as follows:
#if {test1} {body1#} elseif {test2} {body2#} elseif {test3} {...#} else {bodyN#}The #if command evaluates test1 as an expression. The value of the expression must be a boolean value (either numeric, where 0 is false and anything else is true, or a string such as true or yes for true and false or no for false). If the expression is true, then body1 is included in the template. If the test1 expression is false, then test2 is evaluated as an expression and, if it is true, then body2 is included, and so on. If none of the expressions are true, then bodyN is included. There can be zero or more #elseif clauses. The bodyN option may also be omitted, as long as #else is omitted, too.
An expression consists of a combination of operands, operators, and parentheses. White space may be used between the operands, operators and parentheses. Operands may be specified in any of the following ways:
•
•
•
The valid operators are listed below, grouped in decreasing order of precedence:
Boolean:
< less than
> greater than
<= less than or equal
>= greater than or equal
== equal
!= not equal.
Each operator produces 1 if the condition is true, 0 otherwise. These operators may be applied to strings as well as numeric operands, in which case string comparison is used.
Each operator produces a zero/one result.
&& Logical AND. Produces 1 if both operands are non-zero, otherwise 0.
|| Logical OR. Produces 0 if both operands are zero, otherwise 1.
The following is an example of conditional inclusion in a template:
hostname myhostinterface $<interf1>#if {$<interf1> == "s1"} {bandwidth 56000#} elseif {$<interf1> == "e1"} {bandwidth 10000000#} else {bandwidth ${default}#}The syntax of conditional inclusion strictly follows Tcl if commands and general Tcl expression syntax. CCNSC Subscriber Provisioning utilizes an embedded Tcl interpreter to parse, filter, and process these conditional control commands and expressions.
Using Expressions in a Template Body
You can use expressions in a template body. An expression combines operands with operators to produce a new value. For example, the expression 4 + 2 contains two operands, 4 and 2, and one operator, +; it evaluates to 6. The format of an expression in a template body is:
[expr arg1 arg2 ... argN]where arg1 arg2... argN consists of a combination of operands, operators, and parentheses. White space are needed between the operands and operators and parentheses. Where possible, operands are interpreted as integer values. Integer values may be specified in decimal (the normal case), octal (if the first character of the operand is 0), or hexadecimal (if the first two characters of the operand are 0x).If an operand does not have one of the integer formats given above, it is treated as a floating-point number if that is possible. Floating-point numbers may be specified as the following examples: 2.1, 3., 6e4, 7.91e+16.
Operands:
Operands may be specified in any of the following ways:
[1] As an numeric value, either integer or floating-point.
[2] As a global template variable, using standard $<var> notation. The variable's value will be used as the operand.
For some examples of simple expressions, suppose the variable $<a> has the value 3 and the variable $<b> has the value 6. Then the command on the left side of each of the lines below will produce the value on the right side of the line:
[expr 3 + $<a>] -> 6
[expr 2.1 + $<a>] -> 8.1
[expr ($<a> + $<b>) * 5] -> 45
Operators:
The valid operators are listed below, grouped in decreasing order of precedence:
- + ~ ! Unary minus, unary plus, bit-wise NOT, logical NOT.
* / % Multiply, divide, remainder.
+ - Add and subtract.
< > <= >= Boolean less, greater, less than or equal, and greater than or equal. Each operator produces 1 if the condition is true, 0 otherwise.
== != Boolean equal and not equal. Each operator produces a zero/one result.
&& Logical AND. Produces a 1 result if both operands are non-zero, 0 otherwise.
|| Logical OR. Produces a 0 result if both operands are zero, 1 otherwise.
Specifying Template Data
Once you have saved your template, the right side of the Template Config Builder displays columns with attribute names for titles. These columns hold the data to be used for individual devices.
Each row configures a different device. You can have a maximum of 200 rows in a data object (but a single template body can be associated with multiple data objects).
Note
List each network element in the Device column by its name as defined in the Network Inventory window. This name is an arbitrary value that you define within the CCNSC Subscriber Provisioning software; it may or may not be the device's actual host name.
You can add any element in any domain to which you have access, using the following syntax:
domain:element
There can be no spaces surrounding the colon. Do not specify more than one domain (or subdomain). The entry domainA:subdomainB:element would be interpreted as a device named subdomainB:element in the domain domainA. The device named element resides in subdomainB; there is no device named subdomainB:element. Specifying subdomainB:element is sufficient, even though they are nested in domainA. (Domain names must be unique throughout the system.)
The data portion of the Template Config Builder window has three dimensions:
•
•
•
For each mandatory or optional attribute name in the template body, enter a data value in the appropriate cell on Page 1 in the data pane. Enter a data value for each unique global attribute, on the global page.
If you want the configuration file to contain multiple iterations of a line that is specified once in the template body, enter one complete set of data (one value for each of the attribute names on that line) for each iteration, with each data set on a different numbered data page. Do not repeat data for non-iterative lines.
To repeat the network line contained in the body of the template shown previously, for example, add one set of data for the attribute names ${ip_subnet}, ${ip_mask}, and ${area_id} for each repetition desired, one set per page. The first set could be included on the first page along with the data for hostname and the other lines that won't be repeated. However, data for these nonrecurring lines should appear only once, on the first page.
Use the page forward button at the bottom of the window to advance to the next page. There can be an infinite number of pages.
Note
The following tasks relate to the template data portion of the Template Config Builder:
Importing Data
To import template data from a text file, select the Import option from the File menu in the Template Config Builder window, then select the Template Data option from the submenu.
Data should be saved in a text file, one device per line. To supply values for fields, separate them by tabs or commas. (Do not mix separators within a file—use one or the other, or data will be lost.)
You must first create the columns in the data portion of the Template Config Builder window by saving the template before importing the data. If your data file specifies a value for a column that does not exist in the Template Config Builder window, that value is ignored.
Multiple data pages cannot be specified from a single text file.
It is possible to import data to one page from one text file, then advance to another page and import data from a second text file. However, data is always imported into the page beginning at the top left cell, regardless of device specification, and device names in the second text file are ignored.
For example, if you create a template that has data fields ${A} and ${B} in addition to the device column and you import the following data from a file:
deviceOne,dataA-1,dataB-1deviceTwo,dataA-2,dataB-2deviceThree,dataA-3,dataB-3then advance to Page 2 and import the following text from a second file:
deviceTwo,dataA-2.2,dataB-2.2the data in the second file is imported into the first row of page two and the device specification is ignored. This assigns the data to deviceOne, not deviceTwo, even though the Template Config Builder window shows deviceTwo. When you exit this page and return, there is no data assigned to deviceTwo on this second page.
To make the data match the device, you should duplicate the device names from the first file, even if some of the devices have no second page data.
The example would work if the second file contained the following lines:
deviceOnedeviceTwo,dataA-2.2,dataB-2.2deviceThreeMissing Values
If a configuration line in the template body contains multiple mandatory attribute names and you provide data for some, but not all of them, an error message is sent to the message console:" Some attribute values are missing in the spreadsheet." The configuration is not generated.
If no values are given for any of the attribute names on a template body line, the corresponding line in the configuration file is not generated.
If there is no value assigned to a global attribute, the configuration is not generated and an error message is sent to the message console (however, see the discussion of subtemplates.)
If there is no value in the template data object for an optional attribute, an empty string is generated for that value.
If you change the name of an attribute, data associated with the attribute is lost when you save the template. You should copy the entire data column for that attribute name before you change the attribute's name. After saving the edited template, paste the data back into the column.
Previewing Configurations
When you have entered data for a device, you can preview the configuration that is generated. On
Page 1 in the data pane of the Template Config Builder window, select a device and select the Preview option from the Config menu.
Note
A preview window is opened for each selected device, displaying the text of the configuration that will be generated. You can export the text from any of these windows by right-clicking anywhere inside the window and selecting one of the options from the floating menu that opens. The Save All option saves all text in the preview window to an ASCII file; the Save option saves only the text you have selected (prior to opening the Options menu). The Find option finds the next instance of text you specify. The text to find must appear below the current cursor position; when the find mechanism finds the last instance of specified text, that text remains highlighted. The Copy option copies text into the clipboard; you can then paste that text anywhere else that permits such an operation (such as into the left pane of the Template Config Builder window, or into any other window that has a Paste button).
When you close the Preview window, you must then select the Commit option from the Config menu to generate a working config that is retained in the database. If you do not commit the configuration, an Object not found error message is generated when you choose an operation that requires the device's working configuration. Select multiple devices to generate and commit configurations for a group of network elements.
Finding Data and Body Text
You can use the Find window to search for text in either the body or the data portion of your template. First click in either the body or data side of the Template Config Builder window, then select the Find option from the Edit menu. Enter the text you want to locate in the Find What field, select the Match Case check box if you want the search to be case sensitive, then click Find Next. When text is located in the data pane, the corresponding attribute in the body pane is highlighted.
Changing Variables
You can change a variable in the Configuration Template Builder in two ways:
•
•
If you change a variable with the Rename Variable option, its value is retained. However, if you change the variable with the Template Configuration Editor, the value is lost, as described in the following example.
Step 1
Step 2
Step 3
Step 4
$[num1] $[num2]Step 5
Add arbitrary data to the columns. For example, in the column with the heading $[num1], enter a 1 and in the column with the heading $[num2], enter a 2.
Step 6
Step 7
Click Save, and notice that the 1 remains in the column.
Step 8
Click Save, and notice that the 2 disappears from the column.
Supported Service Related Variables
CCNSC Subscriber Provisioning supports service related variables for each CCNSC Subscriber Provisioningconfigurable device and service type (voice and data, voice, and data). CCNSC Subscriber Provisioning generates their value or derives their value from a service request. However, a template can also contain non-service related variables required for configuring the device, for example an SNMP trap destination IP address.
Note
CCNSC Subscriber Provisioning has reserved global variable names for configuration required for voice and data service. In addition, CCNSC Subscriber Provisioning prohibits the use of any variable that starts with System followed by an underscore "System_"; this usage is reserved for future global variable names.
Note
Table 4-2 lists and describes the supported VoIPoATM service related variables. Table 4-3 lists and describes the supported VoIPoPPP service related variables.
Generating Configurations
When you are satisfied that the template will generate the configurations you want, select the devices you want to configure in the Template Config Builder window, then select the Preview option from the Config menu. The generated configuration file is displayed. To save the generated configuration file, you must select all of the text displayed in the Result Config: <device name> window, then click the right mouse button. Options allowing you to copy, find, save all, and save are available. Select the
Save All or Save option to save selected information to the configuration file.To download configurations to devices, use the Network Inventory Manager. See "Using the Network Inventory Manager."
 Feedback