Downloads |
 Feedback Feedback
|
Table Of Contents
Viewing a List of Configured Source Routers
Viewing Source Router Properties
Adding Source Routers Using a Seed File
Source Router Seed File Format
Creating a Source Router Seed File
Loading Source Routers from a Source Router Seed File into IPM
Viewing a List of Defined Targets
Adding Targets Using a Seed File
Loading Targets from a Target Seed File into IPM
Viewing a List of Defined Operations
Setting Thresholds and Generating Alerts
Viewing a List of Defined Collectors
Adding Collectors Using a Seed File
Creating a Collector Seed File
Loading Collectors from a Collector Seed File into IPM
Setting IPM Database Preferences
Displaying the Current Database Preferences
Changing the Database Preferences
Database Preferences File Format
Backing Up or Restoring the IPM Database
Modifying IPM Components
This chapter provides information on modifying IPM components. IPM components include collectors, source routers, target devices, and operations. Information is provided on viewing, updating, and deleting these components.
This chapter contains the following major sections:
•
Setting IPM Database Preferences
•
Working with Source Routers
IPM source routers are the routers from which you want to initiate operations for measuring network performance statistics. Each source router must contain the Cisco IOS SAA feature and an SNMP agent.
Information on working with source routers is provided in the following subsections:
•
•
•
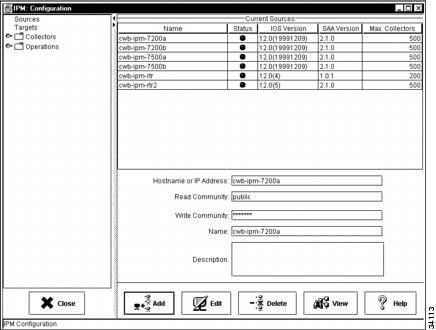
Viewing a List of Configured Source Routers
To view a list of configured source routers:
Step 1
Figure 4-1 Configuration Window
Step 2
Figure 4-2 Source Configuration Window
Note
The Source Configuration window displays source routers that you have already configured. From this window, you can add a new source router, change the configuration of an existing source, or delete an existing source.
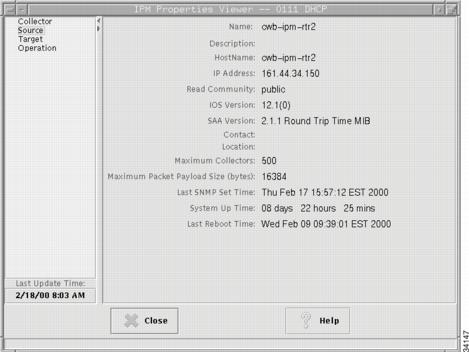
Viewing Source Router Properties
The Source Properties window allows you to view the properties of a defined source router.
To view source router properties:
Step 1
Step 2
Figure 4-3 Properties Viewer Window
Step 3
Figure 4-4 Source Properties Window
For information on these fields, refer to the "Source Properties Window" topic in the online help.
Adding a New Source Router
Before you can use a router as a source for a collector, you must define the router as an IPM source router.
To add a new source router:
Step 1
For information on configuring SNMP on the source router, see the "Configuring Your Routers to Send SAA-Related Traps" section in the "Preparing to Install" chapter of the Cisco Internetwork Performance Monitor Installation Guide.
Step 2
Step 3
Step 4
Step 5
Step 6
Step 7
Step 8
Note
Step 9
For information on using a seed file to add source routers to IPM, see the "Adding Source Routers Using a Seed File" section. For information on modifying or deleting source routers, see the "Working with Source Routers" section.
Adding Source Routers Using a Seed File
In addition to defining source routers from the Source Configuration window, you can also define source routers by creating a source router seed file. A source router seed file is a text file that contains the information required to define a source router or group of source routers.
The following sections provide information on creating a source router seed file:
•
•
•
Source Router Seed File Format
The source router seed file contains a comments section at the top for any information that you want to note about the file, followed by each source router definition contained on a separate line. For each source router, you must provide a command, host name, read community string, and write community string. Each of the components must be separated by a delimiter. The delimiter can be a space or any of the following characters:
•
•
•
Note
A sample source router seed file is shown below:
################################################################################# This file has example definitions for source routers.## Comments starts with the "#" character## The format of the file is as follows:## <command><delim><hostname[|aliasname]><delim><read community><delim><write community>## <delim> characters are " ;,\t" "space,semicolon,comma,tab"## <hostname[|aliasname]> : Hostname followed by optional aliasName# separated with a `|' ("vertical bar")## The valid commands are 'a|A' for add; 'd|D' for delete; 'u|U' for update;## WARNING: Please assure the permissions on these files# do not allow read access to all users due to# the inclusions of SNMP community names.#################################################################################a router1 public private#a router2 santa claus#a router3.foobar.com open secretTable 4-1 provides information about each of the components required for defining source routers in a source router seed file.
Creating a Source Router Seed File
To create a source router seed file:
Step 1
Step 2
Loading Source Routers from a Source Router Seed File into IPM
To load source routers from a source router seed file into IPM:
Step 1
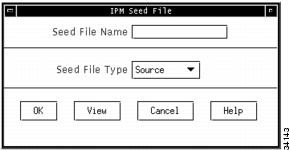
Figure 4-5 Seed File Window
Step 2
Step 3
Step 4
Tips
For information on listing, viewing, editing, or loading seed files from the command line, see the "IPM Command Reference" appendix.
Deleting Source Routers
You can delete source routers that you no longer need. You can delete more than one source router at a time.
Note
To delete a source:
Step 1
Step 2
Step 3
Working with Target Devices
IPM targets are destination devices for which you want to gather network performance statistics. A target can be any IP-addressable device, a Cisco router running the SAA responder, or an SNA host.
Note
Information on working with target devices is provided in the following subsections:
•
•
Viewing a List of Defined Targets
After you have defined a device as an IPM target, it appears in the list of defined targets in the Target Configuration window.
To view a list of defined targets:
Step 1
Step 2
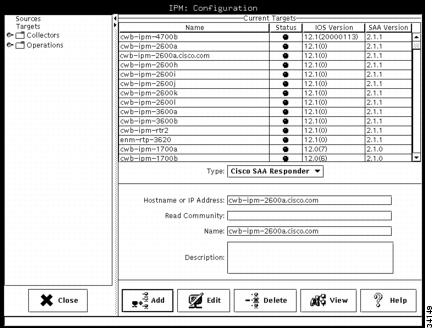
Figure 4-6 Target Configuration Window
The Target Configuration window displays a list of all devices defined as IPM targets. From this window, you can define a new target, modify an existing target, or delete a target.
Viewing Target Properties
The Target Properties window allows you to view the properties of a defined target.
To view target properties:
Step 1
Step 2
Step 3
Figure 4-7 Target Properties Window
For information on these fields, refer to the "Target Properties Window" topic in the online help.
Adding a New Target
IPM targets are destination devices for which you want to gather data. A target can be any IP-addressable device, a Cisco SAA responder, or an SNA host.
To add a new target:
Step 1
Step 2
Step 3
•
•
•
NSPECHO must be installed on the VTAM mainframe to used as the target. The NSPECHO application is provided on the IPM product CD. For information on installing NSPECHO, see the "Installing NSPECHO to Measure SNA Response Times" chapter in the Cisco Internetwork Performance Monitor Installation Guide.
Step 4
Step 5
Step 6
Step 7
Step 8
Step 9
Note
Step 10
For information on using a seed file to add targets to IPM, see the "Adding Targets Using a Seed File" section. For information on modifying or deleting targets, see the "Working with Target Devices" section.
Adding Targets Using a Seed File
In addition to defining targets from the Target Configuration window, you can also define targets by creating a target seed file. A target seed file is a text file that contains the information required to define a target or group of targets.
The following sections provide information on creating a target seed file:
•
Target Seed File Format
The target seed file contains a comments section at the top for any information that you want to note about the file, followed by each source router definition contained on a separate line. For each target, you must provide a command, target type, host name, and for IP or Cisco SAA Responder targets, a read community string. Each of the components must be separated by a delimiter. The delimiter can be a space or any of the following characters:
•
•
•
Note
A sample target seed file is shown below:
################################################################################# This file has example definitions for target devices## Comments starts with the "#" character## The format of the file is as follows:## <command><delim><target type><delim><hostname [<aliasname.]><delim><read community>## <delim> characters are " ;,\t" "space,semicolon,comma,tab"## <hostname[|aliasname]> : Hostname followed by optional aliasName# separated with a `|' ("vertical bar")## The valid commands are 'a|A' for add; 'd|D' for delete; 'u|U' for update;## The <target type> is 1 for IP; 2 for CISCO_SAA_RESPONDER; 3 for SNA## For CISCO_SAA_RESPONDER target type, read community string is required.# and the IOS RTR(SAA) responder must be enabled## WARNING: Please assure the permissions on these files# do not allow read access to all users due to# the inclusions of SNMP community names.#################################################################################a 1 www.foobar.com#a 2 ios_router.foobar.com public#a 3 sna_target.foobar.com#a 1 server1#a 2 router1 publicTable 4-2 provides information about each of the components required for defining targets in a target seed file.
Creating a Target Seed File
To create a target seed file:
Step 1
Step 2
Loading Targets from a Target Seed File into IPM
To load targets from a target seed file into IPM:
Step 1
Step 2
Step 3
Step 4
Tips
For information on listing, viewing, editing, or loading seed files from the command line, see the "IPM Command Reference" appendix.
Deleting Targets
You can delete targets that you no longer need. You can delete more than one target at a time.
Note
To delete a target:
Step 1
Step 2
Step 3
Working with Operations
An IPM operation is an alias for a set of parameters used in measuring performance. Information on working with operations is provided in the following subsections:
•
•
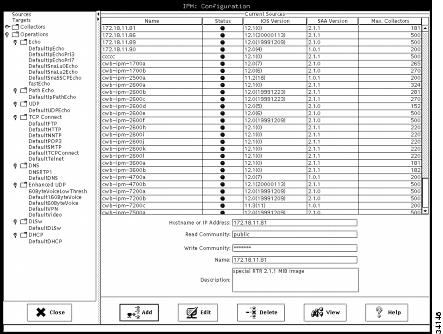
Viewing a List of Defined Operations
To view a list of defined operations:
Step 1
Step 2
Step 3
Figure 4-8 Operation Configuration Window
The Operation Configuration window displays a list of all defined operations. From this window, you can define a new operation, modify an existing operation, or delete an existing operation.
Note
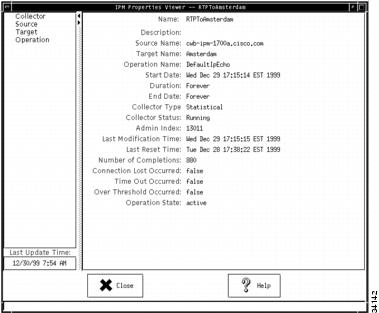
Viewing Operation Properties
The Operation Properties window allows you to view the properties of a defined operation.
To view operation properties:
Step 1
Step 2
Step 3
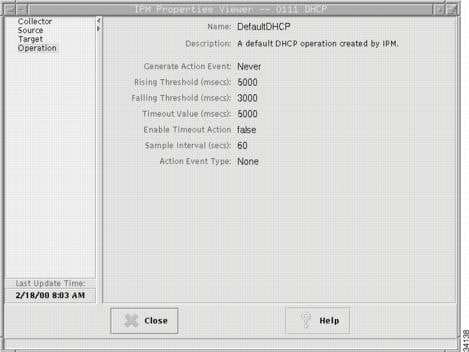
Figure 4-9 Operation Properties Window
For information on these fields, refer to the "Operation Properties Window" topic in the online help.
Adding a New Operation
An IPM operation is an alias for a set of parameters used for measuring performance between source router and a target device.
To define an operation:
Step 1
Step 2
Step 3
Step 4
Step 5
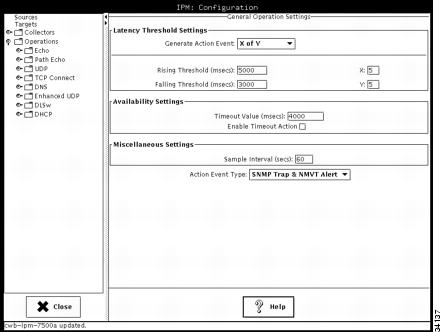
Setting Thresholds and Generating Alerts
From the Operation Configuration window, you can configure thresholds and event notifications on the source router.
To set thresholds and generate alerts using an operation:
Step 1
Step 2
•
•
•
•
•
Step 3
Step 4
Step 5
Step 6
Step 7
Step 8
Step 9
Step 10
•
•
•
•
Traps and Alerts are sent from the source router to any network management stations that have been defined in the source router to receive SAA traps or alerts.
Step 11
Deleting Operations
You can delete operations that you no longer need.You can delete more than one operation at a time.
Note
To delete an operation:
Step 1
Step 2
Step 3
Working with Collectors
A collector is a definition of the source router, the target device, an operation, and the collector schedule. To collect network performance statistics using IPM, you must define a collector.
Information on working with collectors is provided in the following subsections:
•
•
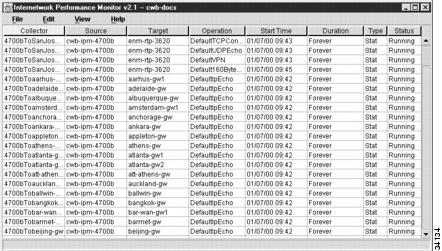
Viewing a List of Defined Collectors
All of the collectors that you have defined are listed in the IPM Main window (Figure 4-10). Any collectors that have start dates and times earlier than the current date and time and end dates and times later than the current date and time are considered active collectors.
Figure 4-10 IPM Main Window
The following status information is displayed about each collector in the IPM Main window:
•
•
•
•
•
•
•
•
Tips
Viewing Collector Properties
To view detailed information about a defined collectors:
Step 1
Step 2
Note
For information on these fields, refer to the "Collector Properties Window" topic in the online help.
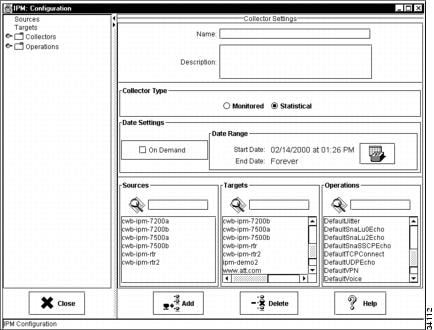
Adding a New Collector
Defining a new collector involves selecting a source router, a target, an operation, and a collector schedule.
Note
To define a new collector:
Step 1
Step 2
Figure 4-11 Collector Configuration Window
Step 3
Step 4
Step 5
Step 6
•
•
For additional information on setting the start time and end time, see the "Set Date Range Window" topic in the online help.
Step 7
Step 8
Note
Step 9
For a brief description of the predefined operations provided with IPM, see Table 2-1.
Step 10
Adding Collectors Using a Seed File
In addition to defining collectors from the Collector Configuration window, you can also define collectors by creating a collector seed file. A collector seed file is a text file that contains the information required to define a collector or group of collectors.
The following sections provide information on creating a collector seed file:
•
•
Collector Seed File Format
The collector seed file contains a comments section at the top for any information that you want to note about the file, followed by each collector definition contained on a separate line. For each collector, you must provide a command, collector name, source router, target device, operation name, start time, duration, and collector type. Each of the components must be separated by a delimiter. The delimiter can be a space or any of the following characters:
•
•
•
Note
A sample collector seed file is shown below:
################################################################################# This file has example definitions for collectors## Comments starts with the "#" character## The format of the file is as follows:## <command><delim><collName><delim><source><delim><target><delim># <operation><delim><startTime><delim><duration><delim><collType>## <delim> characters are " ;,\t" "space,semicolon,comma,tab"## The valid commands are 'a|A' for add, 'd|D' for delete, 'u|U' for update;## <collType> is M for Monitored, S for Statistical## <startTime> is in the format MM:DD:YYYY:hh:mm:ss## <startTime> = 1 -> start time will be now## <duration> is in number of hours## <duration> = 0 -> Forever## <startTime> = zero and <duration> = zero -> ON_DEMAND collector#################################################################################a coll1 router1.cisco.com target1 DefaultIpEcho 1 12 M#a coll2 router1.cisco.com target2 DefaultUDPEcho 1 0 S#a coll3 router1.cisco.com target3 DefaultJitter 1 24 M#a coll4 router1.cisco.com target4 DefaultDLSw 0 36 S#a coll5 router2.cisco.com target1 DefaultSnaLu0Echo 1 6 M#a coll6 router2.cisco.com target2 DefaultSnaLu2Echo 1 12 M#a coll7 router2.cisco.com target3 DefaultSnaRuEcho 1 24 S#a coll8 router2.cisco.com target2 DefaultIpPathEcho 10:20:1999:01:00:00 36 MTable 4-3 provides information about each of the components required for defining collectors in a collector seed file.
Creating a Collector Seed File
To create a collector seed file:
Step 1
Step 2
Loading Collectors from a Collector Seed File into IPM
To load collectors from a collector seed file into IPM:
Step 1
Step 2
Step 3
Step 4
Tips
For information on listing, viewing, editing, or loading seed files from the command line, see the "IPM Command Reference" appendix.
Deleting Collectors
You can delete collectors that you no longer need. When you delete a collector, all data related to that collector is removed from the database and the collector is removed from the source router. If the selected collector is active, IPM first stops the collector, and then deletes it. You can delete more than one collector at a time.
Note
To delete an IPM collector:
Step 1
Step 2
Step 3
Setting IPM Database Preferences
For collectors that are using a statistical operation, IPM gathers network performance and error statistics from the source router once every hour and stores the data in the IPM database. The collected hourly data is used to calculate daily, weekly, and monthly data. By default, IPM stores the collected data for the following periods of time:
•
•
•
•
IPM provides a database preferences file that allows you to define the business hours and days. Defined business hours are used in determining the daily, weekly, and monthly averages while business days are used in determining the weekly and monthly averages. The database preferences file also allows you to set the length of time that daily data is retained in the database.
Information about viewing and changing the database preferences is provided in the following sections:
•
•
•
Displaying the Current Database Preferences
To display the values currently set in the database preferences file, enter the following commands:
# cd /opt/CSCOipm/bin# ./ipmDbPref.shChanging the Database Preferences
To change the IPM database preferences:
Note
Step 1
Step 2
ipm_daily_stats_life=180Step 3
For example, to store collected statistics over a business day that runs from 8:00 a.m. to 5:00 p.m., you would use the following setting:
ipm_business_hour_0=0ipm_business_hour_1=0ipm_business_hour_2=0ipm_business_hour_3=0ipm_business_hour_4=0ipm_business_hour_5=0ipm_business_hour_6=0ipm_business_hour_7=0ipm_business_hour_8=1ipm_business_hour_9=1ipm_business_hour_10=1ipm_business_hour_11=1ipm_business_hour_12=1ipm_business_hour_13=1ipm_business_hour_14=1ipm_business_hour_15=1ipm_business_hour_16=1ipm_business_hour_17=0ipm_business_hour_18=0ipm_business_hour_19=0ipm_business_hour_20=0ipm_business_hour_21=0ipm_business_hour_22=0ipm_business_hour_23=0Step 4
•
•
•
•
•
•
•
For the days that you want set as business days, set the day to a value of 1. Days with a value of 0 are not counted as business days.
For example, to set the business days to Monday through Friday, you would use the following setting (the default setting):
ipm_business_day_0=0ipm_business_day_1=1ipm_business_day_2=1ipm_business_day_3=1ipm_business_day_4=1ipm_business_day_5=1ipm_business_day_6=0Step 5
Step 6
# cd /opt/CSCOipm/bin# ./ipmDbPref.sh -s
Database Preferences File Format
The contents of the default IPM database preferences file (ipmDbPref.conf) are shown in the following example. This file is stored in the /opt/CSCOipm/etc directory.
## (C) Copyright 1998 Cisco Systems, Inc.# All Rights Reserved## IPM Database Preferences## This file contains the IPM Database Preferences used for# data aging and reduction.## To change these values, update the values below and run the command:# ipmDbPref.sh -s## To display the values currently set in the database, run the command:# ipmDbPref.sh## NOTE: Changing these parameters has no effect on daily, weekly and# monthly data that has already been calculated. Only new daily, weekly# and monthly data will use these new settings.## The hourly data within IPM is always kept for 32 days.# The weekly and monthly data is always kept forever.## The ipm_response_life setting determines the number of days that IPM stores# daily latency data. You can change this to any number of days.ipm_response_life=180### The ipm_error_life setting determines the number of days that IPM stores# daily error data. You can change this to any number of days.ipm_error_life=180### The ipm_business_hour_x settings describe which hours of the day IPM will use# when generating daily, weekly and monthly reports. Each hour of the day,# starting with 0 (midnight) and going through 23 (11 PM) may be included in# the reports. However, you will probably want to restrict the hours included# in the reports to normal business hours.## The hours are defined as starting at 0 minutes past the hour, and going through# 59 minutes and 59 seconds past the hour.## Set the value of each ipm_business_hour_x parameter to either 0 or 1.# A value of 1 indicates that IPM will use this hour of the day when generating# daily, weekly and monthly reports. A value of 0 indicates that IPM will ignore# this hour of the day when generating daily, weekly and monthly reports.# For example, setting 'ipm_business_hour_9=1' will cause all data collected between# 9:00AM and 9:59AM on business days to be included in reports.#ipm_business_hour_0=0ipm_business_hour_1=0ipm_business_hour_2=0ipm_business_hour_3=0ipm_business_hour_4=0ipm_business_hour_5=0ipm_business_hour_6=0ipm_business_hour_7=0ipm_business_hour_8=1ipm_business_hour_9=1ipm_business_hour_10=1ipm_business_hour_11=1ipm_business_hour_12=1ipm_business_hour_13=1ipm_business_hour_14=1ipm_business_hour_15=1ipm_business_hour_16=1ipm_business_hour_17=1ipm_business_hour_18=1ipm_business_hour_19=1ipm_business_hour_20=0ipm_business_hour_21=0ipm_business_hour_22=0ipm_business_hour_23=0### The ipm_business_day settings describe which days of the week IPM will use# when generating weekly and monthly reports. Each day of the week is represented# by a number:## Sunday is 0# Monday is 1# Tuesday is 2# Wednesday is 3# Thursday is 4# Friday is 5# Saturday is 6## Set the value of each ipm_business_day_x parameter to either 0 or 1.# A value of 1 indicates that IPM will use this day of the week when generating# weekly and monthly reports. A value of 0 indicates that IPM will ignore this# day of the week when generating weekly and monthly reports.# For example, setting 'ipm_business_day_2=1' will cause all data collected on# Tuesday during business hours to be included in reports.#ipm_business_day_0=0ipm_business_day_1=1ipm_business_day_2=1ipm_business_day_3=1ipm_business_day_4=1ipm_business_day_5=1ipm_business_day_6=0Backing Up or Restoring the IPM Database
The IPM database is automatically backed up every morning at 1:00 a.m. If your database file is corrupted, you can restore the data in the IPM database from the previous day's backed-up data.
To restore the IPM database from a previous back up, enter the following commands:
# cd /opt/CSCOipm/bin# ./ipm dbrestore