統一無線網路本地EAP伺服器配置示例
目錄
簡介
本檔案介紹在思科無線LAN控制器(WLC)中設定本機可擴充驗證通訊協定(EAP)伺服器,以進行無線使用者驗證。
本地EAP是一種允許使用者和無線客戶端在本地進行身份驗證的身份驗證方法。它專用於想要在後端系統中斷或外部身份驗證伺服器關閉時保持與無線客戶端連線的遠端辦公室。啟用本地EAP時,控制器用作身份驗證伺服器和本地使用者資料庫,從而消除對外部身份驗證伺服器的依賴。本地EAP從本地使用者資料庫或輕量目錄訪問協定(LDAP)後端資料庫中檢索使用者憑證以驗證使用者。本地EAP支援在控制器和無線客戶端之間使用輕量EAP(LEAP)、通過安全隧道的EAP-Flexible身份驗證(EAP-FAST)和EAP — 傳輸層安全(EAP-TLS)身份驗證。
請注意,如果WLC中存在全域性外部RADIUS伺服器配置,則本地EAP伺服器不可用。所有身份驗證請求都轉發到全域性外部RADIUS,直到本地EAP伺服器可用。如果WLC失去與外部RADIUS伺服器的連線,則本地EAP伺服器變為活動狀態。如果沒有全域性RADIUS伺服器配置,本地EAP伺服器會立即變為活動狀態。本地EAP伺服器不能用於驗證連線到其他WLC的客戶端。換句話說,一個WLC無法將其的EAP要求轉送到另一個WLC進行驗證。每個WLC都應該有自己的本地EAP伺服器和單獨的資料庫。
注意:使用這些命令可停止WLC向外部radius伺服器傳送請求。
config wlan disable
        config wlan radius_server auth disable
        config wlan enable
本地EAP伺服器在4.1.171.0軟體版本及更高版本中支援以下協定:
-
LEAP
-
EAP-FAST(使用者名稱/密碼和證書)
-
EAP-TLS
必要條件
需求
思科建議您瞭解以下主題:
-
瞭解如何配置WLC和輕量型存取點(LAP)以進行基本操作
-
輕量型存取點通訊協定(LWAPP)和無線安全方法知識
-
本地EAP身份驗證的基本知識。
採用元件
本文中的資訊係根據以下軟體和硬體版本:
-
Windows XP,帶CB21AG介面卡卡和思科安全服務客戶端版本4.05
-
Cisco 4400無線LAN控制器4.1.171.0
-
Windows 2000伺服器上的Microsoft證書頒發機構
慣例
如需文件慣例的詳細資訊,請參閱思科技術提示慣例。
在思科無線LAN控制器上配置本地EAP
本檔案假設WLC的基本組態已完成。
本地EAP配置
完成以下步驟以配置本地EAP:
-
新增本地網路使用者:
在GUI中,選擇Security > Local Net Users > New,輸入使用者名稱、密碼、訪客使用者、WLAN ID和說明,然後按一下Apply。
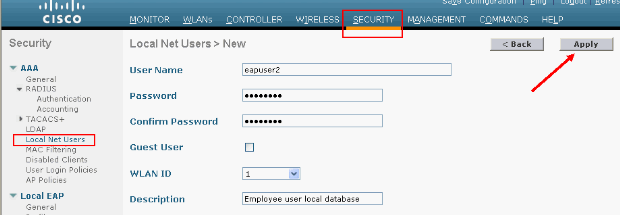
您可以在CLI中使用config netuser add <username> <password> <WLAN id> <description> 命令:
注意:由於空間原因,此命令已降為第二行。
(Cisco Controller) >config netuser add eapuser2 cisco123 1 Employee user local database -
指定使用者憑據檢索順序。
在GUI中選擇Security > Local EAP > Authentication Priority。然後選擇LDAP,按一下「<」按鈕,然後按一下Apply。這會將使用者憑證放在本地資料庫中的第一位。
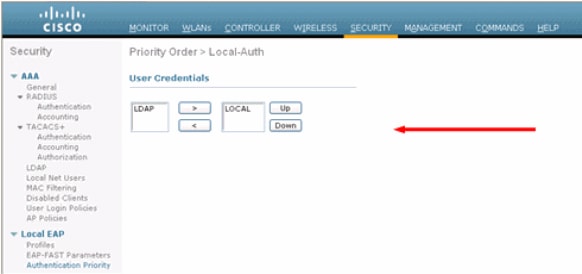
在CLI上:
(Cisco Controller) >config local-auth user-credentials local
-
新增EAP配置檔案:
若要從GUI執行此操作,請選擇Security > Local EAP > Profiles,然後按一下New。當出現新視窗時,鍵入配置檔名稱並按一下Apply。
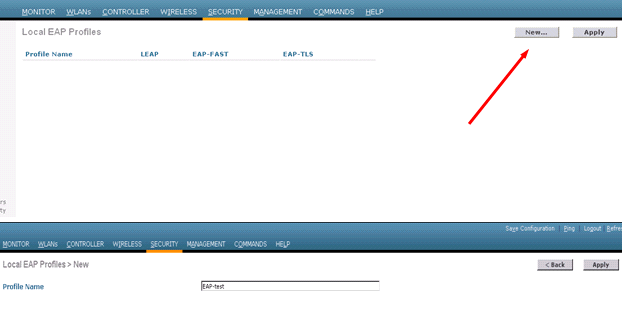
您也可以使用CLI命令config local-auth eap-profile add <profile-name>執行此操作。 在我們的示例中,配置檔名稱為EAP-test。
(Cisco Controller) >config local-auth eap-profile add EAP-test -
向EAP配置檔案新增方法。
在GUI中選擇Security > Local EAP > Profiles,然後點選要新增身份驗證方法的配置檔名稱。此示例使用LEAP、EAP-FAST和EAP-TLS。按一下Apply以設定方法。
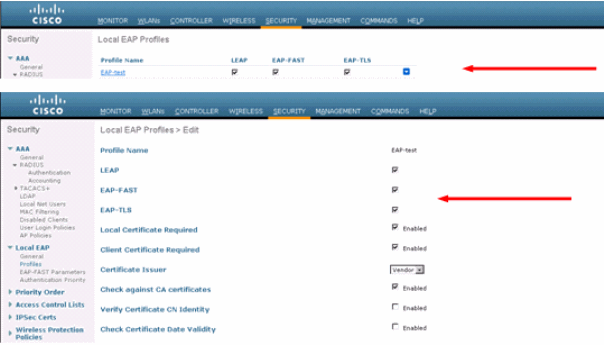
您還可以使用CLI命令config local-auth eap-profile method add <method-name> <profile-name> 。在我們的示例配置中,我們將三種方法新增到配置檔案EAP-test。方法名稱為LEAP、EAP-FAST和EAP-TLS,方法名分別為leap、fast和tls。以下輸出顯示了CLI配置命令:
(Cisco Controller) >config local-auth eap-profile method add leap EAP-test
(Cisco Controller) >config local-auth eap-profile method add fast EAP-test
(Cisco Controller) >config local-auth eap-profile method add tls EAP-test
-
配置EAP方法的引數。這僅用於EAP-FAST。要配置的引數包括:
-
Server Key(server-key) — 用於加密/解密受保護訪問憑證(PAC)的伺服器金鑰(十六進位制)。
-
PAC的生存時間(pac-ttl) — 設定PAC的生存時間。
-
Authority ID(authority-id) — 設定授權識別符號。
-
匿名設定(匿名) — 配置是否允許匿名設定。預設情況下啟用。
對於通過GUI進行的配置,請選擇Security > Local EAP > EAP-FAST Parameters,然後輸入Server key、PAC的生存時間、授權ID(十六進位制)和授權ID資訊值。
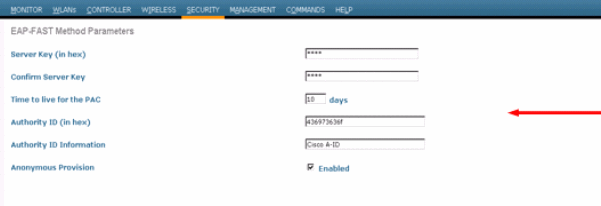
以下是用於為EAP-FAST設定這些引數的CLI配置命令:
(Cisco Controller) >config local-auth method fast server-key 12345678
(Cisco Controller) >config local-auth method fast authority-id 43697369f1 CiscoA-ID
(Cisco Controller) >config local-auth method fast pac-ttl 10
-
-
啟用每個WLAN的本地身份驗證:
在GUI中,在頂部選單中選擇WLANs,然後選擇要為其配置本地身份驗證的WLAN。出現一個新視窗。按一下Security > AAA頁籤。選中Local EAP authentication,然後從下拉選單中選擇正確的EAP配置檔名稱,如以下示例所示:
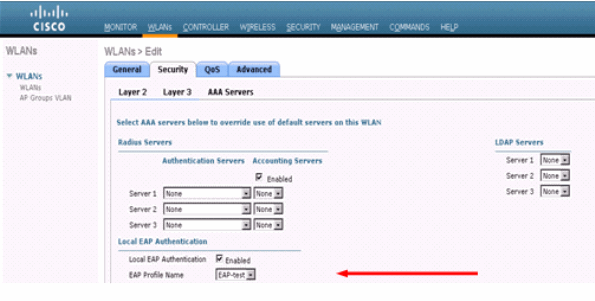
您也可以發出CLI config wlan local-auth enable <profile-name> <wlan-id> 組態指令,如下所示:
(Cisco Controller) >config wlan local-auth enable EAP-test 1
-
設定第2層安全引數。
在GUI介面中,在WLAN Edit視窗中,轉到Security > Layer 2頁籤,然後從Layer 2 Security下拉選單中選擇WPA+WPA2。在「WPA+WPA2引數」部分下,將「WPA加密」設定為TKIP和「WPA2加密AES」。然後按一下「Apply」。
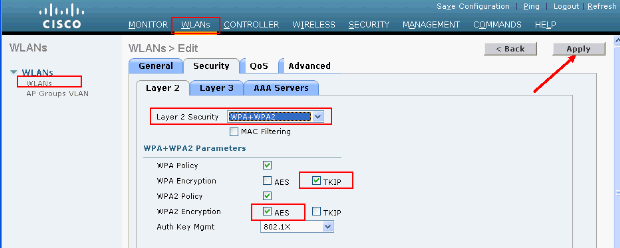
在CLI中,使用以下命令:
(Cisco Controller) >config wlan security wpa enable 1
(Cisco Controller) >config wlan security wpa wpa1 ciphers tkip enable 1
(Cisco Controller) >config wlan security wpa wpa2 ciphers aes enable 1
-
驗證設定:
(Cisco Controller) >show local-auth config User credentials database search order: Primary ..................................... Local DB Timer: Active timeout .............................. Undefined Configured EAP profiles: Name ........................................ EAP-test Certificate issuer ........................ cisco Peer verification options: Check against CA certificates ........... Enabled Verify certificate CN identity .......... Disabled Check certificate date validity ......... Enabled EAP-FAST configuration: Local certificate required .............. No Client certificate required ............. No Enabled methods ........................... leap fast tls Configured on WLANs ....................... 1 EAP Method configuration: EAP-FAST: --More-- or (q)uit Server key ................................ <hidden> TTL for the PAC ........................... 10 Anonymous provision allowed ............... Yes Authority ID .............................. 43697369f10000000000000000000 Authority Information ..................... CiscoA-ID您可以使用show wlan <wlan id>指令看到wlan 1的特定引數:
(Cisco Controller) >show wlan 1


WLAN Identifier.................................. 1
Profile Name..................................... austinlab
Network Name (SSID).............................. austinlab
Status........................................... Disabled
MAC Filtering.................................... Disabled
Broadcast SSID................................... Enabled
AAA Policy Override.............................. Disabled
Number of Active Clients......................... 0
Exclusionlist Timeout............................ 60 seconds
Session Timeout.................................. 1800 seconds
Interface........................................ management
WLAN ACL......................................... unconfigured
DHCP Server...................................... Default
DHCP Address Assignment Required................. Disabled
Quality of Service............................... Silver (best effort)
WMM.............................................. Disabled
CCX - AironetIe Support.......................... Enabled
CCX - Gratuitous ProbeResponse (GPR)............. Disabled
Dot11-Phone Mode (7920).......................... Disabled
Wired Protocol................................... None
--More-- or (q)uit
IPv6 Support..................................... Disabled
Radio Policy..................................... All
Local EAP Authentication......................... Enabled (Profile 'EAP-test')
Security

   802.11 Authentication:........................ Open System
   Static WEP Keys............................... Disabled
   802.1X........................................ Disabled
   Wi-Fi Protected Access (WPA/WPA2)............. Enabled
      WPA (SSN IE)............................... Enabled
         TKIP Cipher............................. Enabled
         AES Cipher.............................. Disabled
      WPA2 (RSN IE).............................. Enabled
         TKIP Cipher............................. Disabled
         AES Cipher.............................. Enabled
                                                            Auth Key Management
         802.1x.................................. Enabled
         PSK..................................... Disabled
         CCKM.................................... Disabled
   CKIP ......................................... Disabled
   IP Security................................... Disabled
   IP Security Passthru.......................... Disabled
   Web Based Authentication...................... Disabled
--More-- or (q)uit
   Web-Passthrough............................... Disabled
   Conditional Web Redirect...................... Disabled
   Auto Anchor................................... Disabled
   Cranite Passthru.............................. Disabled
   Fortress Passthru............................. Disabled
   H-REAP Local Switching........................ Disabled
   Infrastructure MFP protection................. Enabled
                                          (Global Infrastructure MFP Disabled)
   Client MFP.................................... Optional
   Tkip MIC Countermeasure Hold-down Timer....... 60

 Mobility Anchor List
 WLAN ID     IP Address       Status
還可以配置其他本地身份驗證引數,特別是活動超時計時器。此計時器配置所有RADIUS伺服器出現故障後使用本地EAP的時間段。
在GUI中選擇Security > Local EAP > General並設定時間值。然後按一下「Apply」。
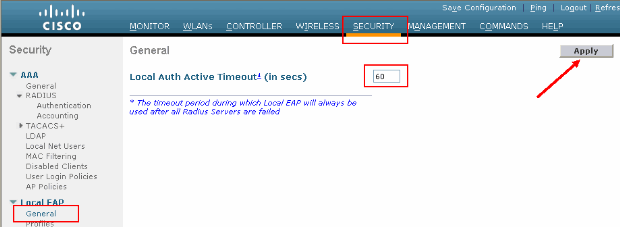
在CLI上,發出以下命令:
(Cisco Controller) >config local-auth active-timeout ?
<1 to 3600> Enter the timeout period for the Local EAP to remain active,
in seconds.
(Cisco Controller) >config local-auth active-timeout 60
發出show local-auth config指令時,您可以驗證此計時器設定到的值。
(Cisco Controller) >show local-auth config User credentials database search order: Primary ..................................... Local DB Timer: Active timeout .............................. 60 Configured EAP profiles: Name ........................................ EAP-test ... Skip -
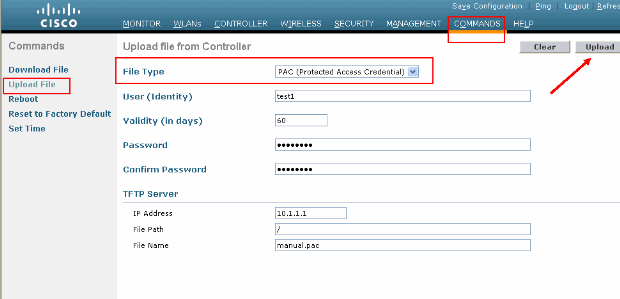
如果需要生成和載入手動PAC,可以使用GUI或CLI。
在GUI中,從頂部選單中選擇COMMANDS,然後從右側清單中選擇Upload File。從「File Type」下拉選單中選擇PAC(Protected Access Credential)。輸入所有引數並按一下Upload。
在CLI中輸入以下命令:
(Cisco Controller) >transfer upload datatype pac
(Cisco Controller) >transfer upload pac ?

username     Enter the user (identity) of the PAC

 (Cisco Controller) >transfer upload pac test1 ?

<validity>     Enter the PAC validity period (days)

(Cisco Controller) >transfer upload pac test1 60 ?

<password>     Enter a password to protect the PAC

 (Cisco Controller) >transfer upload pac test1 60 cisco123

(Cisco Controller) >transfer upload serverip 10.1.1.1

(Cisco Controller) >transfer upload filename manual.pac

(Cisco Controller) >transfer upload start

Mode............................................. TFTP
TFTP Server IP................................... 10.1.1.1
TFTP Path........................................ /
TFTP Filename.................................... manual.pac
Data Type........................................ PAC
PAC User......................................... test1
PAC Validity..................................... 60 days
PAC Password..................................... cisco123

Are you sure you want to start? (y/N) y
PAC transfer starting.
File transfer operation completed successfully.
Microsoft證書頒發機構
要使用EAP-FAST版本2和EAP-TLS身份驗證,WLC和所有客戶端裝置必須擁有有效的證書,並且還必須知道證書頒發機構的公共證書。
安裝
如果Windows 2000 Server尚未安裝證書頒發機構服務,則需要安裝。
完成以下步驟,以便在Windows 2000 Server上啟用Microsoft證書頒發機構:
-
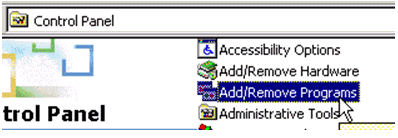
在「控制面板」中選擇「新增/刪除程式」。:
-
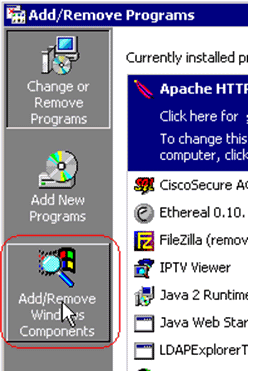
選擇左側的新增/刪除Windows元件。
-
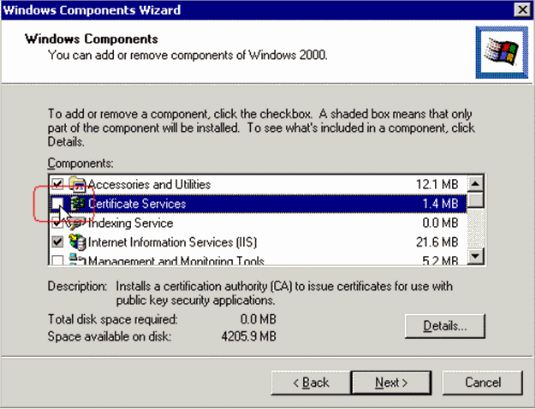
檢查證書服務。
繼續操作之前,請檢視以下警告:

-
選擇要安裝的證書頒發機構型別。要建立簡單獨立授權,請選擇獨立根CA。
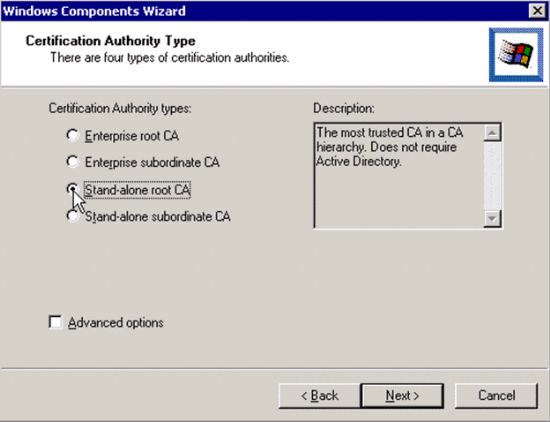
-
輸入有關證書頒發機構的必要資訊。此資訊為證書頒發機構建立自簽名證書。記住您使用的CA名稱。
證書頒發機構將證書儲存在資料庫中。此示例使用Microsoft建議的預設設定:
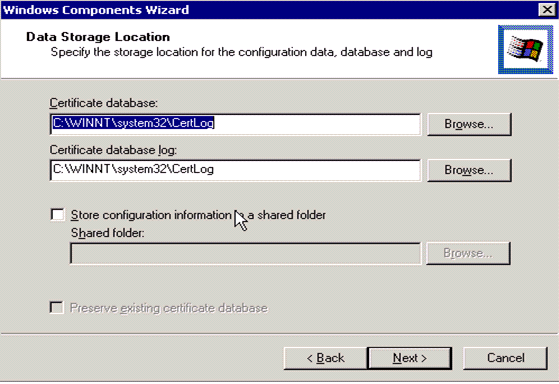
-
Microsoft證書頒發機構服務使用IIS Microsoft Web伺服器來建立和管理客戶端和伺服器證書。它需要重新啟動此IIS服務:

Microsoft Windows 2000 Server現在會安裝新服務。您需要有Windows 2000 Server安裝光碟才能安裝新的Windows元件。
現在已安裝證書頒發機構。
在思科無線LAN控制器中安裝憑證
要在Cisco無線LAN控制器的本地EAP伺服器上使用EAP-FAST版本2和EAP-TLS,請遵循以下三個步驟:
請注意,在本文檔中顯示的示例中,訪問控制伺服器(ACS)與Microsoft Active Directory和Microsoft證書頒發機構安裝在同一主機上,但如果ACS伺服器位於不同的伺服器上,則配置應該相同。
在無線LAN控制器上安裝裝置證書
請完成以下步驟:
-
.完成以下步驟,以便產生將匯入到WLC的憑證:
-
轉到http://<serverIpAddr>/certsrv。
-
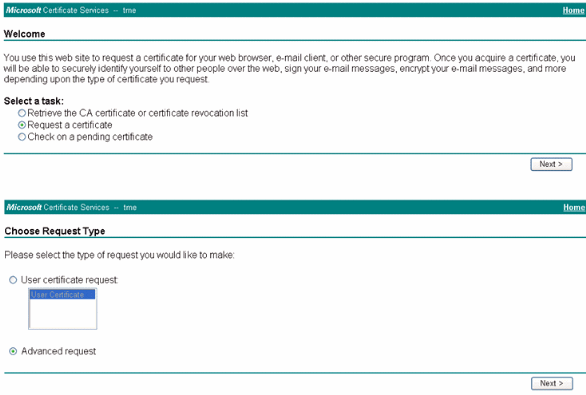
選擇Request a Certificate,然後按一下Next。
-
選擇Advanced Request,然後按一下Next。
-
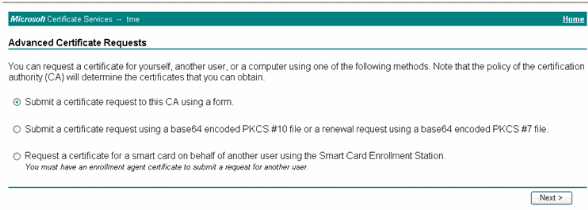
選擇Submit a certificate request to this CA using a form,然後按一下Next。
-
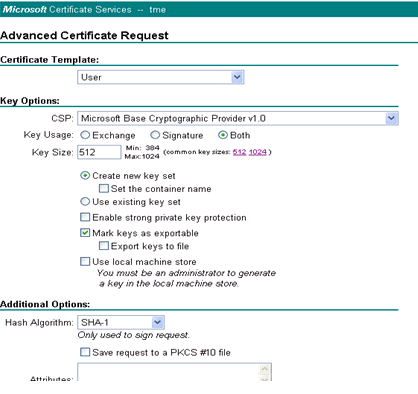
為「Certificate Template」選擇「Web server」,然後輸入相關資訊。然後將金鑰標籤為可匯出。
-
現在,您會收到需要在機器中安裝的證書。
-
-
完成以下步驟,以便從PC檢索證書:
-
開啟Internet Explorer瀏覽器,然後選擇「工具」>「Internet選項」>「內容」。
-
按一下「Certificates」。
-
從下拉選單中選擇新安裝的證書。
-
按一下「Export」。
-
按兩下Next並選擇Yes export the private key。此格式為PKCS#12(.PFX格式)。
-
選擇Enable strong protection。
-
鍵入密碼。
-
將其儲存在檔案<tme2.pfx>中。
-
-
將PKCS#12格式的證書複製到已安裝Openssl的任何電腦上,以便將其轉換為PEM格式。
openssl pkcs12 -in tme2.pfx -out tme2.pem !--- The command to be given, -in. Enter Import Password: !--- Enter the password given previously, from step 2g. MAC verified OK Enter PEM pass phrase: !--- Enter a phrase. Verifying - Enter PEM pass phrase: -
將轉換後的PEM格式裝置證書下載到WLC。
(Cisco Controller) >transfer download datatype eapdevcert

(Cisco Controller) >transfer download certpassword password

!--- From step 3.

Setting password to <cisco123>

(Cisco Controller) >transfer download filename tme2.pem

(Cisco Controller) >transfer download start

Mode............................................. TFTP
Data Type........................................ Vendor Dev Cert
TFTP Server IP................................... 10.1.1.12
TFTP Packet Timeout.............................. 6
TFTP Max Retries................................. 10
TFTP Path........................................ /
TFTP Filename.................................... tme2.pem

This may take some time.
Are you sure you want to start? (y/N) y

TFTP EAP Dev cert transfer starting.

Certificate installed.
  Reboot the switch to use new certificate.
-
重新開機後,請檢查憑證。
(Cisco Controller) >show local-auth certificates

Certificates available for Local EAP authentication:

Certificate issuer .............................. vendor
  CA certificate:
    Subject: C=US, ST=ca, L=san jose, O=cisco, OU=wnbu, CN=tme
     Issuer: C=US, ST=ca, L=san jose, O=cisco, OU=wnbu, CN=tme
      Valid: 2007 Feb 28th, 19:35:21 GMT to 2012 Feb 28th, 19:44:44 GMT
  Device certificate:
    Subject: C=US, ST=ca, L=san jose, O=cisco, OU=wnbu, CN=tme2
     Issuer: C=US, ST=ca, L=san jose, O=cisco, OU=wnbu, CN=tme
      Valid: 2007 Mar 28th, 23:08:39 GMT to 2009 Mar 27th, 23:08:39 GMT
將供應商CA憑證下載到無線LAN控制器
請完成以下步驟:
-
完成以下步驟以擷取供應商CA憑證:
-
轉到http://<serverIpAddr>/certsrv。
-
選擇Retrieve the CA Certificate,然後按一下Next。
-
選擇CA證書。
-
按一下「DER encoded」。
-
按一下「Download CA certificate」,將憑證另存為rootca.cer。
-
-
使用openssl x509 -in rootca.cer -inform DER -out rootca.pem -outform PEM命令,將供應商CA從DER格式轉換為PEM格式。
輸出檔案是PEM格式的rootca.pem。
-
下載供應商CA證書:
(Cisco Controller) >transfer download datatype eapcacert

(Cisco Controller) >transfer download filename ?

<filename>     Enter filename up to 16 alphanumeric characters.

(Cisco Controller) >transfer download filename rootca.pem

(Cisco Controller) >transfer download start ?

(Cisco Controller) >transfer download start

Mode............................................. TFTP
Data Type........................................ Vendor CA Cert
TFTP Server IP................................... 10.1.1.12
TFTP Packet Timeout.............................. 6
TFTP Max Retries................................. 10
TFTP Path........................................ /
TFTP Filename.................................... rootca.pem

This may take some time.
Are you sure you want to start? (y/N) y

TFTP EAP CA cert transfer starting.

Certificate installed.
  Reboot the switch to use new certificate.
將無線區域網控制器配置為使用EAP-TLS
請完成以下步驟:
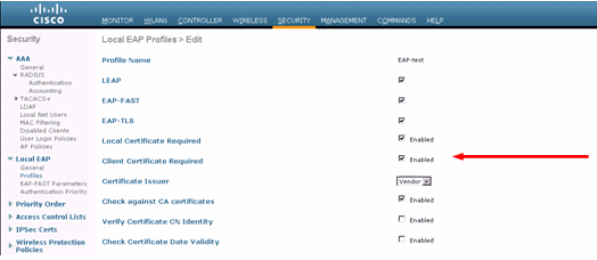
在GUI中選擇Security > Local EAP > Profiles,選擇配置檔案並檢查這些設定:
-
已啟用要求本地證書。
-
已啟用要求客戶端證書。
-
證書頒發者為供應商。
-
已啟用CA憑證檢查。
在客戶端裝置上安裝證書頒發機構證書
下載並安裝客戶端的根CA證書
客戶端必須從證書頒發機構伺服器獲取根CA證書。可以使用多種方法獲取客戶端證書並將其安裝在Windows XP電腦上。要獲取有效證書,Windows XP使用者必須使用其使用者ID登入,並且必須具有網路連線。
Windows XP客戶端上的Web瀏覽器以及與網路的有線連線用於從私有根證書頒發機構伺服器獲取客戶端證書。此過程用於從Microsoft證書頒發機構伺服器獲取客戶端證書:
-
在客戶端上使用Web瀏覽器,並將瀏覽器指向證書頒發機構伺服器。若要執行此操作,請輸入http://IP-address-of-Root-CA/certsrv。
-
使用Domain_Name\user_name登入。您必須使用使用XP客戶端個人的使用者名稱登入。
-
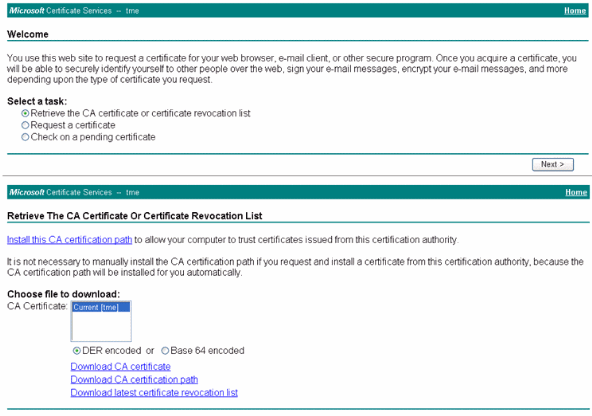
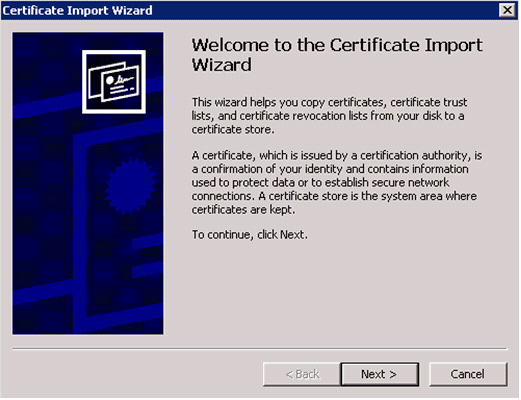
在「歡迎」視窗中,選擇檢索CA證書,然後按一下下一步。
-
選擇Base64 Encoding和Download CA certificate。
-
在「Certificate Issued(已核發證書)」視窗中,按一下Install this certificate,然後按一下Next。
-
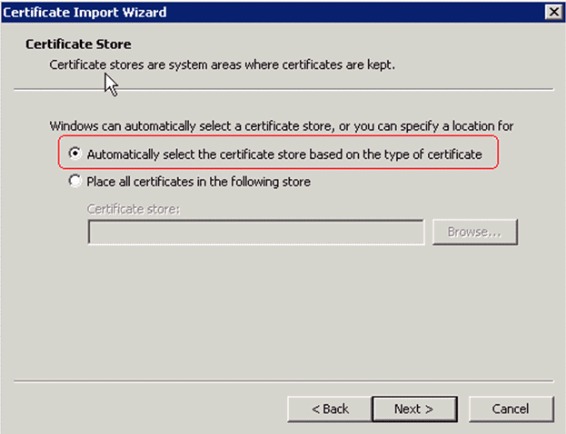
選擇Automatically select the certificate store,然後按一下Next以獲得成功的Import消息。
-
連線到證書頒發機構以檢索證書頒發機構證書:
-
按一下「Download CA certificate」。

-
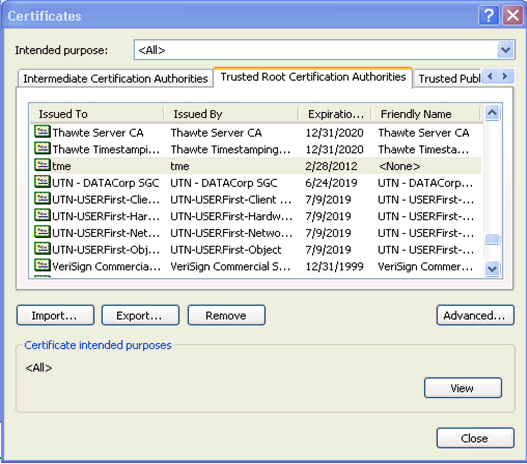
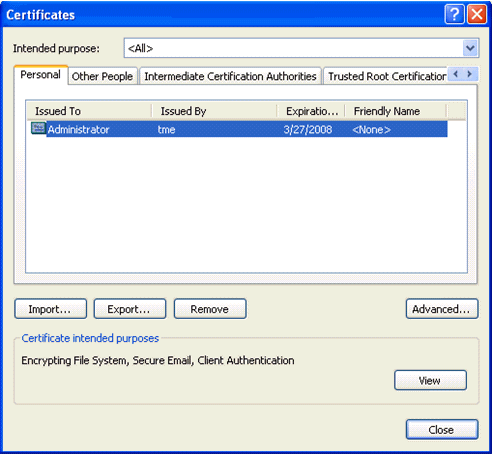
若要檢查證書頒發機構證書是否正確安裝,請開啟Internet Explorer並選擇「工具」>「Internet選項」>「內容」>「證書」。
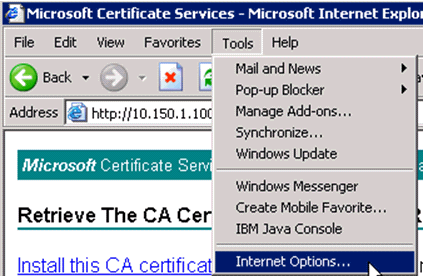

在受信任的根憑證授權單位中,您應該看到新安裝的憑證授權單位:
生成客戶端裝置的客戶端證書
客戶端必須從證書頒發機構伺服器獲取證書,WLC才能對WLAN EAP-TLS客戶端進行身份驗證。有幾種方法可用於獲取客戶端證書並將其安裝在Windows XP電腦上。要獲取有效證書,Windows XP使用者必須使用其使用者ID登入,並且必須具有網路連線(有線連線或禁用具有802.1x安全性的WLAN連線)。
Windows XP客戶端上的Web瀏覽器以及與網路的有線連線用於從專用根證書頒發機構伺服器獲取客戶端證書。此過程用於從Microsoft證書頒發機構伺服器獲取客戶端證書:
-
在客戶端上使用Web瀏覽器,並將瀏覽器指向證書頒發機構伺服器。若要執行此操作,請輸入http://IP-address-of-Root-CA/certsrv。
-
使用Domain_Name\user_name登入。您必須使用使用XP客戶端的個人的使用者名稱登入。(使用者名稱嵌入客戶端證書。)
-
在「歡迎」視窗中,選擇Request a certificate,然後按一下Next。
-
選擇Advanced request,然後按一下Next。
-
選擇Submit a certificate request to this CA using a form,然後按一下Next。
-
在「Advanced Certificate Request」表單上,選擇「Certificate Template as User」,將「Key Size」指定為1024,然後按一下Submit。
-
在「Certificate Issued」視窗中,按一下「Install this certificate」。這會導致在Windows XP客戶端上成功安裝客戶端證書。
-
選擇Client Authentication Certificate。
現在已建立客戶端證書。
-
若要檢查是否已安裝證書,請轉到Internet Explorer並選擇「工具」>「Internet選項」>「內容」>「證書」。在「個人」頁籤中,您應該看到證書。
在客戶端裝置上使用思科安全服務客戶端的EAP-TLS
請完成以下步驟:
-
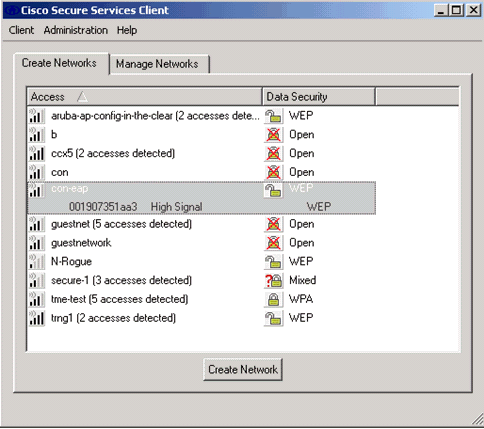
預設情況下,WLC會廣播SSID,因此它在掃描的SSID的「建立網路」清單中顯示。要建立網路配置檔案,可以按一下清單(Enterprise)中的SSID,然後按一下Create Network。
如果WLAN基礎設施配置為禁用廣播SSID,則必須手動新增SSID。為此,請在Access Devices下按一下Add,然後手動輸入適當的SSID(例如,Enterprise)。 配置客戶端的活動探測行為。也就是說,客戶端主動探測其配置的SSID。在Add Access Device視窗中輸入SSID後,請指定主動搜尋此接入裝置。
註:如果沒有首先為配置檔案配置EAP身份驗證設定,則埠設定不允許企業模式(802.1X)。
-
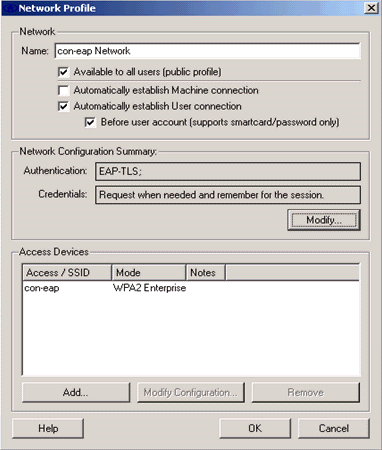
按一下Create Network以啟動Network Profile視窗,該視窗允許您將所選(或已配置的)SSID與身份驗證機制相關聯。為配置檔案分配描述性名稱。
注意:可在此身份驗證配置檔案下關聯多個WLAN安全型別和/或SSID。
-
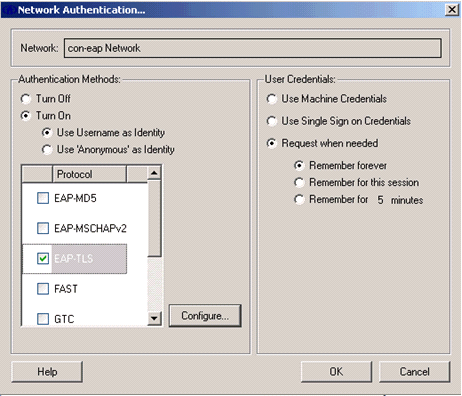
開啟身份驗證並檢查EAP-TLS方法。然後按一下Configure以配置EAP-TLS屬性。
-
在Network Configuration Summary下,按一下Modify以配置EAP/憑據設定。
-
指定Turn On Authentication,在Protocol下選擇EAP-TLS,然後選擇Username作為身份。
-
指定使用單一登入憑據以使用登入憑據進行網路身份驗證。按一下Configure以設定EAP-TLS引數。
-
為了具有安全的EAP-TLS配置,您需要檢查RADIUS伺服器證書。若要執行此操作,請選中Validate Server Certificate。
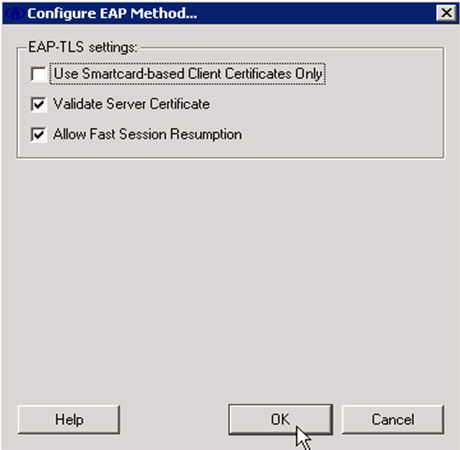
-
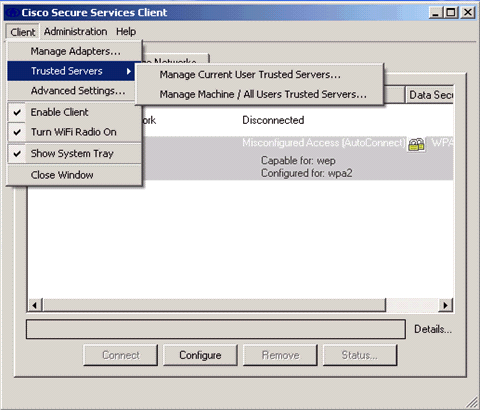
若要驗證RADIUS伺服器憑證,您需要提供思科安全服務使用者端資訊,以便僅接受正確的憑證。選擇Client > Trusted Servers > Manage Current User Trusted Servers。
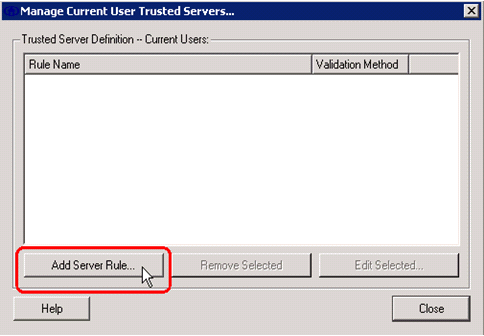
-
為規則指定一個名稱,並檢查伺服器證書的名稱。
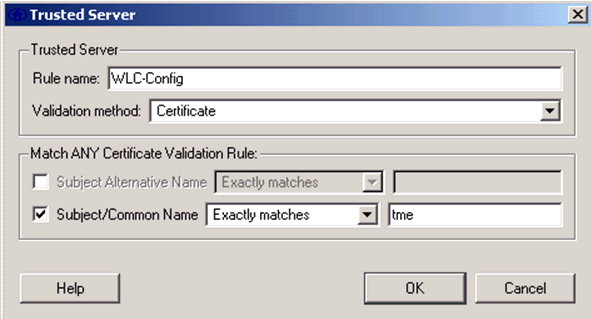
EAP-TLS配置完成。
-
連線到無線網路配置檔案。思科安全服務客戶端要求使用者登入:
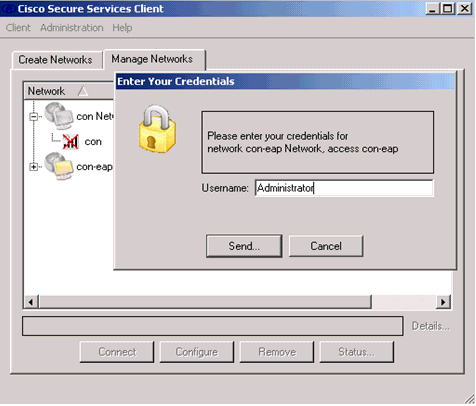
思科安全服務客戶端接收伺服器證書並對其進行檢查(已配置規則並安裝了證書頒發機構)。 然後會要求使用者使用該證書。
-
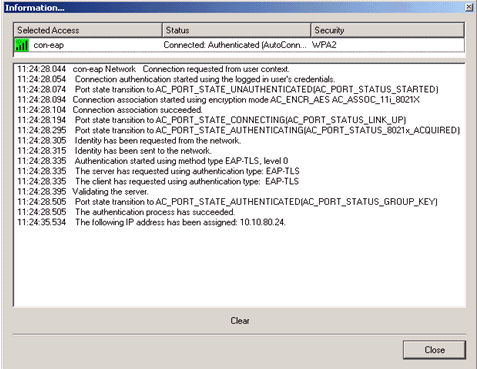
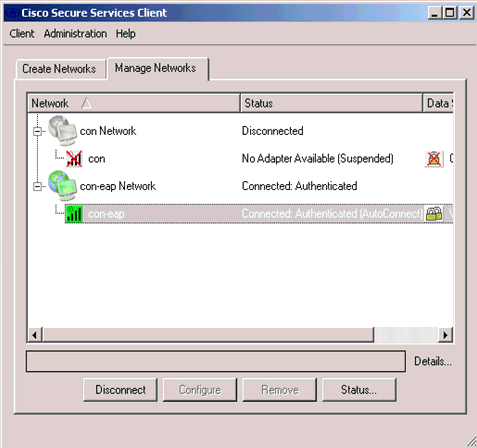
客戶端進行身份驗證後,在Manage Networks頁籤的Profile下選擇SSID,然後按一下Status查詢連線詳細資訊。
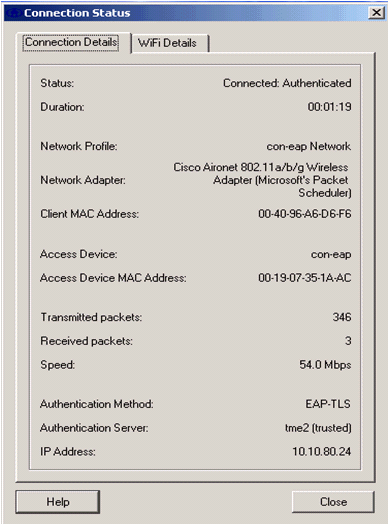
Connection Details視窗提供有關客戶端裝置、連線狀態和統計資訊以及身份驗證方法的資訊。WiFi Details(WiFi詳細資訊)頁籤提供有關802.11連線狀態的詳細資訊,包括RSSI、802.11通道和身份驗證/加密。
Debug指令
輸出直譯器工具(僅供已註冊客戶使用)(OIT)支援某些show命令。使用OIT檢視show命令輸出的分析。
附註:使用 debug 指令之前,請先參閱有關 Debug 指令的重要資訊。
WLC上可以使用以下debug指令來監控驗證交換的進度:
-
debug aaa events enable
-
debug aaa detail enable
-
debug dot1x events enable
-
debug dot1x states enable
-
debug aaa local-auth eap events enable
或
-
debug aaa all enable
相關資訊
修訂記錄
| 修訂 | 發佈日期 | 意見 |
|---|---|---|
1.0 |
01-Dec-2013 |
初始版本 |
 意見
意見