Catalyst 9K平台上的GuestShell故障排除
下載選項
無偏見用語
本產品的文件集力求使用無偏見用語。針對本文件集的目的,無偏見係定義為未根據年齡、身心障礙、性別、種族身分、民族身分、性別傾向、社會經濟地位及交織性表示歧視的用語。由於本產品軟體使用者介面中硬式編碼的語言、根據 RFP 文件使用的語言,或引用第三方產品的語言,因此本文件中可能會出現例外狀況。深入瞭解思科如何使用包容性用語。
關於此翻譯
思科已使用電腦和人工技術翻譯本文件,讓全世界的使用者能夠以自己的語言理解支援內容。請注意,即使是最佳機器翻譯,也不如專業譯者翻譯的內容準確。Cisco Systems, Inc. 對這些翻譯的準確度概不負責,並建議一律查看原始英文文件(提供連結)。
簡介
本文檔介紹如何對Cat9K交換機上的訪客外殼問題進行故障排除。
必要條件
需求
- 對Cisco IOS® XE軟體的基本瞭解
- Linux檔案系統
- Linux命令
採用元件
本文中的資訊係根據以下軟體和硬體版本:
- Catalyst 9200
- Catalyst 9300
- Catalyst 9400
- Catalyst 9500
- Catalyst 9600
- Cisco IOS XE 17.9.1及更高版本
本文中的資訊是根據特定實驗室環境內的裝置所建立。文中使用到的所有裝置皆從已清除(預設)的組態來啟動。如果您的網路運作中,請確保您瞭解任何指令可能造成的影響。
背景資訊
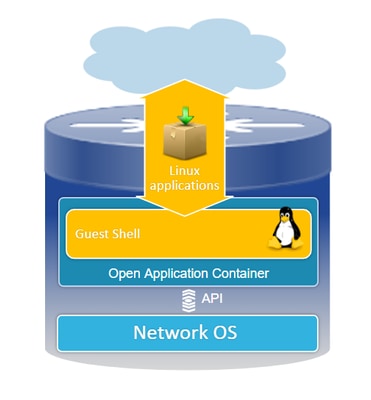
Guest Shell概述
- Guest Shell提供在Linux Container(LXC)中運行的隔離執行環境。
- 網路訪問:管理員可以通過Linux網路介面連線到網路,從而實現強大的連線和管理。
- Bootflash訪問:可以直接訪問bootflash儲存,有助於高效的檔案管理和系統操作。
- Cisco IOS CLI訪問:管理員能夠直接與Cisco IOS命令列介面互動,從而實現了無縫整合和控制。
- 指令碼執行:該環境支援安裝和執行Python指令碼,從而實現自動化和自定義。
- 應用程式支援:32位和64位Linux應用程式都可以安裝和運行,提供靈活性和各種功能可能性。
疑難排解
.
組態
1.啟用IOX。
Switch#conf terminal
Switch(config)#iox
Switch(config)#
等待1-5分鐘,等待IOX初始化。確保IOX正常運行。您可以通過檢視show命令的輸出來檢查CLI會話期間顯示的消息。
*Mar 10 15:35:40.206: %UICFGEXP-6-SERVER_NOTIFIED_START: Switch 1 R0/0: psd: Server iox has been notified to start
*Mar 10 15:35:51.186: %IOX-3-PD_PARTITION_CREATE: Switch 1 R0/0: run_ioxn_caf: IOX may take upto 5 mins to be ready. Wait for iox to be ready before installing the apps
*Mar 10 15:37:56.643: %IOX-3-IOX_RESTARTABITLITY: Switch 1 R0/0: run_ioxn_caf: Stack is in N+1 mode, disabling sync for IOx restartability
*Mar 10 15:38:05.835: %IM-6-IOX_ENABLEMENT: Switch 1 R0/0: ioxman: IOX is ready.
Switch#show iox-service

IOx Infrastructure Summary:
---------------------------
IOx service (CAF)              : Running
IOx service (HA)               : Running
IOx service (IOxman)           : Running
IOx service (Sec storage)      : Running
Libvirtd 5.5.0                 : Running
Dockerd v19.03.13-ce           : Running
Sync Status                    : Disabled
2.網路配置。
此示例使用AppGigabitEthernet介面提供網路訪問。
!
interface AppGigabitEthernet1/0/1
 switchport trunk allowed vlan 50
 switchport mode trunk
!
app-hosting appid guestshell
 app-vnic AppGigabitEthernet trunk
  vlan 50 guest-interface 0
   guest-ipaddress 192.168.10.10 netmask 255.255.255.0
 name-server0 192.168.10.254
end
!

附註:GuestShell使用靜態IP地址,因為預設情況下它不包括DHCP客戶端服務。可以安裝DHCP客戶端服務以動態獲取IP地址。
此示例使用管理介面(Gi0/0)提供網路訪問。在管理模式下,GuestShell使用網路管理埠Cisco IOS配置的管理埠IP地址充當網關。
!
app-hosting appid guestshell
 app-vnic management guest-interface 0
 name-server0 8.8.8.8
!
附註:使用管理介面時,外殼eth0介面的預設配置硬編碼為IP地址192.168.30.2。
您可以配置虛擬埠組介面:
- 虛擬埠組配置:使用靜態IP地址建立虛擬埠組。
- Internet連線:確保前埠介面連線到Internet以允許外部訪問。
- NAT配置:在虛擬埠組和前埠之間設定NAT,以促進網路地址轉換。
- GuestShell IP分配:將IP地址分配給虛擬埠組介面所在子網內的GuestShell。
!
interface VirtualPortGroup0
 ip address 192.168.35.1 255.255.255.0
 ip nat inside
!
interface GigabitEthernet1/0/3
 no switchport
 ip address 192.168.100.10 255.255.255.0
 ip nat outside
!
ip route 0.0.0.0 0.0.0.0 192.168.100.254
ip route vrf Mgmt-vrf 0.0.0.0 0.0.0.0 192.168.10.254
ip nat inside source static tcp 192.168.35.2 7023 192.168.100.10 7023 extendable
!
!
ip access-list standard NAT_ACL
 10 permit 192.168.0.0 0.0.255.255
!
app-hosting appid guestshell
 app-vnic gateway1 virtualportgroup 0 guest-interface 0
  guest-ipaddress 192.168.35.2 netmask 255.255.255.0
 app-default-gateway 192.168.35.1 guest-interface 0
 name-server0 8.8.8.8
end
3.啟用guestshell。
Switch#guestshell enable
Interface will be selected if configured in app-hosting
Please wait for completion
guestshell installed successfully
Current state is: DEPLOYED
guestshell activated successfully
Current state is: ACTIVATED
guestshell started successfully
Current state is: RUNNING
Guestshell enabled successfully
附註:guestshell enable命令是安裝guestshell的唯一方式。使用應用託管CLI啟用/連線/停用可用於控制guestshell。建議您改用guestshell exec CLI。
Guest Shell生命週期
GuestShell禁用:禁用GuestShell將刪除對GuestShell的訪問並終止當前會話。檔案/資料被保留,可以使用guestshell enable恢復訪問。
Switch#guestshell disable
Guestshell disabled successfully
GuestShell destroy:這將以不可逆的方式刪除來賓外殼檔案系統。所有檔案/資料/指令碼/settingguestshell/已安裝的軟體包和模組。
Switch#guestshell destroy
Guestshell destroyed successfully
注意:運行此命令時,所有資料都將不可逆轉地丟失。
Guestshell運行:Guestshell運行命令guestshell run bash在Guest Shell中建立shell,允許您使用/bin和/sbin下的任何Linux二進位制檔案。
Switch#guestshell run bash
[guestshell@guestshell ~]$ ping 192.168.10.1
PING 192.168.10.1 (192.168.10.1) 56(84) bytes of data.
64 bytes from 192.168.10.1: icmp_seq=2 ttl=254 time=0.517 ms
64 bytes from 192.168.10.1: icmp_seq=3 ttl=254 time=0.552 ms
64 bytes from 192.168.10.1: icmp_seq=4 ttl=254 time=0.447 ms
64 bytes from 192.168.10.1: icmp_seq=5 ttl=254 time=0.549 ms
GuestShell運行python:使用此命令啟動互動式python解釋程式。
Switch#guestshell run python3
Python 3.6.8 (default, Dec 22 2020, 19:04:08)
[GCC 8.4.1 20200928 (Red Hat 8.4.1-1)] on linux
Type "help", "copyright", "credits" or "license" for more information.
>>>
驗證
可以使用以下命令驗證GuestShell:
Switch#show app-hosting detail appid guestshell
App id                 : guestshell
Owner                  : iox
State                  : RUNNING
Application
  Type                 : lxc
  Name                 : GuestShell
  Version              : 3.3.0
  Description          : Cisco Systems Guest Shell XE for x86_64
  Author               : Cisco Systems
  Path                 : /guestshell/:guestshell.tar
  URL Path             :
  Multicast            : yes
Activated profile name : custom

Resource reservation
  Memory               : 256 MB
  Disk                 : 1 MB
  CPU                  : 800 units
  CPU-percent          : 11 %
  VCPU                 : 1

Platform resource profiles
  Profile Name                  CPU(unit)  Memory(MB)  Disk(MB)
  --------------------------------------------------------------

Attached devices
  Type              Name               Alias
  ---------------------------------------------
  serial/shell     iox_console_shell   serial0
  serial/aux       iox_console_aux     serial1
  serial/syslog    iox_syslog          serial2
  serial/trace     iox_trace           serial3

Network interfaces
   ---------------------------------------
eth0:
   MAC address         : 52:54:dd:5b:c4:b8
   IPv4 address        : 192.168.30.2
   IPv6 address        : ::
   Network name        : mgmt-bridge200

Port forwarding
  Table-entry  Service  Source-port  Destination-port
  ---------------------------------------------------
  Switch#show app-hosting list
App id                                   State
---------------------------------------------------------
guestshell                               RUNNING
Switch#guestshell run sudo ifconfig
eth0: flaguestshell=4163<UP,BROADCAST,RUNNING,MULTICAST>  mtu 1500
        inet 192.168.10.10  netmask 255.255.255.0  broadcast 192.168.10.255
        inet6 fe80::5054:ddff:fece:a7c9  prefixlen 64  scopeid 0x20
        ether 52:54:dd:ce:a7:c9  txqueuelen 1000  (Ethernet)
        RX packets 3  bytes 266 (266.0 B)
        RX errors 0  dropped 0  overruns 0  frame 0
        TX packets 9  bytes 726 (726.0 B)
        TX errors 0  dropped 0 overruns 0  carrier 0  collisions 0

lo: flaguestshell=73<UP,LOOPBACK,RUNNING>  mtu 65536
        inet 127.0.0.1  netmask 255.0.0.0
        inet6 ::1  prefixlen 128  scopeid 0x10
        loop  txqueuelen 1000  (Local Loopback)
        RX packets 338  bytes 74910 (73.1 KiB)
        RX errors 0  dropped 0  overruns 0  frame 0
        TX packets 338  bytes 74910 (73.1 KiB)
        TX errors 0  dropped 0 overruns 0  carrier 0  collisions 0
調整資源大小
!
app-hosting appid guestshell
 app-vnic management guest-interface 0
 app-resource profile custom
  cpu 1000
  memory 512
  persist-disk 200
!
您需要禁用並啟用客機Shell才能使更改生效。
Switch#guestshell disable
Guestshell disabled successfully
Switch#guestshell enable
*Mar 11 01:17:46.841: %SYS-5-CONFIG_I: Configured from console by coguestshell enable
Interface will be selected if configured in app-hosting
Please wait for completion
guestshell activated successfully
Current state is: ACTIVATED
guestshell started successfully
Current state is: RUNNING
Guestshell enabled successfully
Switch#show app-hosting detail appid guestshell | sec Resource reservation
Resource reservation
  Memory               : 512 MB
  Disk                 : 200 MB
  CPU                  : 1110 units
  CPU-percent          : 15 %
  VCPU                 : 1
附註:在交換機上,資源大小調整最多允許達到平台的最大限制,請參閱Cisco Catalyst 9000平台硬體資源用於應用。
常見方案
DHCP配置
問題:DHCP使用者端二進位(DHCLIENT)不存在。
解決方案
可以使用Yum實用程式和sudo yum install dhcp-client命令來安裝DHCP客戶端。但是,請注意,CentOS Stream 8的儲存庫不再可用。
1.必須避免在應用託管中設定IP地址以允許DHCP正常工作。
!
interface AppGigabitEthernet1/0/1
 switchport trunk allowed vlan 50
 switchport mode trunk
!
app-hosting appid guestshell
 app-vnic AppGigabitEthernet trunk
  vlan 50 guest-interface 0
name-server0 8.8.8.8
!
2.將mirrorlist更改為Yum回購中的baseurl vault。
Switch#guestshell run bash
[guestshell@guestshell ~]$ sudo find /etc/yum.repos.d/ -type f -exec sed -i 's/mirrorlist=/#mirrorlist=/g' {} +
[guestshell@guestshell ~]$ sudo find /etc/yum.repos.d/ -type f -exec sed -i 's/#baseurl=/baseurl=/g' {} +
[guestshell@guestshell ~]$ sudo find /etc/yum.repos.d/ -type f -exec sed -i 's/mirror.centos.org//g' {} +
[guestshell@guestshell ~]$ cat /etc/yum.repos.d/CentOS-Stream-RealTime.reporepo
# CentOS-Stream-RealTime.repo
# The mirrorlist system uses the connecting IP address of the client and the
# update status of each mirror to pick current mirrors that are geographically
# close to the client.  You should use this for CentOS updates unless you are
# manually picking other mirrors.
#
# If the mirrorlist does not work for you, you can try the commented out
# baseurl line instead.

[rt]
name=CentOS Stream $releasever - RealTime
#mirrorlist=http://mirrorlist.centos.org/?release=$stream&arch=$basearch&repo=RT&infra=$infra
baseurl=http:///$contentdir/$stream/RT/$basearch/os/
gpgcheck=1
enabled=0
gpgkey=file:///etc/pki/rpm-gpg/RPM-GPG-KEY-centosofficial
3.安裝軟體包。
guestshell@guestshell ~]$ sudo yum install dhcp-client
ast metadata expiration check: 0:50:34 ago on Wed Mar 12 17:44:46 2025.
Dependencies resolved.
================================================================================
 Package                Architecture Version                 Repository    Size
================================================================================
Installing:
 dhcp-client            x86_64       12:4.3.6-50.el8         baseos       319 k
Installing dependencies:
 bind-export-libs       x86_64       32:9.11.36-13.el8       baseos       1.1 M
 dhcp-common            noarch       12:4.3.6-50.el8         baseos       208 k
 dhcp-libs              x86_64       12:4.3.6-50.el8         baseos       148 k

Transaction Summary
================================================================================
Install  4 Packages

Total download size: 1.8 M
Installed size: 3.9 M
Is this ok [y/N]: y
Downloading Packages:
(1/4): dhcp-client-4.3.6-50.el8.x86_64.rpm      284 kB/s | 319 kB     00:01
(2/4): dhcp-common-4.3.6-50.el8.noarch.rpm      171 kB/s | 208 kB     00:01
(3/4): dhcp-libs-4.3.6-50.el8.x86_64.rpm        572 kB/s | 148 kB     00:00
(4/4): bind-export-libs-9.11.36-13.el8.x86_64.r 577 kB/s | 1.1 MB     00:02
--------------------------------------------------------------------------------
Total                                           908 kB/s | 1.8 MB     00:02
CentOS Stream 8 - BaseOS                        1.6 MB/s | 1.6 kB     00:00
Importing GPG key 0x8483C65D:
 Userid     : "CentOS (CentOS Official Signing Key) <CentOS Official Signing Key>"
 Fingerprint: 99DB 70FA E1D7 CE22 7FB6 4882 05B5 55B3 8483 C65D
 From       : /etc/pki/rpm-gpg/RPM-GPG-KEY-centosofficial
Is this ok [y/N]: y
Key imported successfully
Running transaction check
Transaction check succeeded.
Running transaction test
Transaction test succeeded.
Running transaction
  Preparing        :                                                        1/1
  Installing       : dhcp-libs-12:4.3.6-50.el8.x86_64                       1/4
  Installing       : dhcp-common-12:4.3.6-50.el8.noarch                     2/4
  Installing       : bind-export-libs-32:9.11.36-13.el8.x86_64              3/4
  Running scriptlet: bind-export-libs-32:9.11.36-13.el8.x86_64              3/4
  Installing       : dhcp-client-12:4.3.6-50.el8.x86_64                     4/4
  Running scriptlet: dhcp-client-12:4.3.6-50.el8.x86_64                     4/4
  Verifying        : bind-export-libs-32:9.11.36-13.el8.x86_64              1/4
  Verifying        : dhcp-client-12:4.3.6-50.el8.x86_64                     2/4
  Verifying        : dhcp-common-12:4.3.6-50.el8.noarch                     3/4
  Verifying        : dhcp-libs-12:4.3.6-50.el8.x86_64                       4/4

Installed:
  bind-export-libs-32:9.11.36-13.el8.x86_64  dhcp-client-12:4.3.6-50.el8.x86_64
  dhcp-common-12:4.3.6-50.el8.noarch         dhcp-libs-12:4.3.6-50.el8.x86_64

Complete!
附註:(對於CALO)可以為Yum配置Proxy。這允許Yum透過代理伺服器連線以進行封包下載:
[guestshell@guestshell ~] $ echo "proxy=http://<IP_address:port>/" | sudo tee -a /etc/yum.conf > /dev/null
4.請求eth0的DHCP IP地址。
[guestshell@guestshell ~]$ sudo dhclient eth0
5.通過檢查IP地址分配來驗證DHCP客戶端是否工作正常。
Switch#guestshell run ifconfig
eth0: flags=4163<UP,BROADCAST,RUNNING,MULTICAST>  mtu 1500
        inet 192.168.10.2  netmask 255.255.255.0  broadcast 192.168.10.255
        inet6 fe80::5054:ddff:fea0:4aef  prefixlen 64  scopeid 0x20
        ether 52:54:dd:a0:4a:ef  txqueuelen 1000  (Ethernet)
        RX packets 1516  bytes 2009470 (1.9 MiB)
        RX errors 0  dropped 0  overruns 0  frame 0
        TX packets 687  bytes 54603 (53.3 KiB)
        TX errors 0  dropped 0 overruns 0  carrier 0  collisions 0

lo: flags=73<UP,LOOPBACK,RUNNING>  mtu 65536
        inet 127.0.0.1  netmask 255.0.0.0
        inet6 ::1  prefixlen 128  scopeid 0x10
        loop  txqueuelen 1000  (Local Loopback)
        RX packets 773  bytes 90658 (88.5 KiB)
        RX errors 0  dropped 0  overruns 0  frame 0
        TX packets 773  bytes 90658 (88.5 KiB)
        TX errors 0  dropped 0 overruns 0  carrier 0  collisions 0
DNF資料包管理器更新失敗
問題:由於以下錯誤,無法在Guestshell上完成sudo dnf update -y:
[guestshell@guestshell ~]$ sudo dnf upgrade --refresh
Warning: failed loading '/etc/yum.repos.d/CentOS-Base.repo', skipping.
解決方案
1.重新安裝並升級RPM軟體包。
! Clean packages

[guestshell@guestshell ~]$ sudo dnf clean all

! Reinstall and update the tpm2-tss package:

[guestshell@guestshell ~]$ sudo dnf install tpm2-tss-2.3.2-3.el8
[guestshell@guestshell ~]$ sudo dnf upgrade rpm
2.單獨安裝git包。
[guestshell@guestshell ~]$ sudo dnf install git -y
升級後丟失的Guestshell訪問
問題:升級到版本17.08.01或更高版本後,Guest Shell變得不可訪問,從而導致無法執行指令碼。
Switch#guestshell run bash
Switch#
解決方案
此問題與思科錯誤ID CSCwi63075相關  ,在交換機上啟用FIPS時,在升級期間觸發。
1.禁用FIPS。
Switch#configure terminal
Switch(config)#no fips authorization-key
FIPS: Authorization-key erased ONLY from the  Flash.
But the authorization-key is still operational. Use "reload" command for complete removal of key and to enter into non fips-mode.
Make sure to remove fips key from all the members of the stack individually
2.您可以升級到包含修補程式、版本17.12.04或任何更高版本的版本之一。
限制IPv6編址
問題:此問題涉及出現在思科GuestShell環境中的介面上的意外IPv6地址。但是,並非有意配置。
在使用IPV4的交換器上觀察到的組態如下:
!
app-hosting appid guestshell
 app-vnic AppGigabitEthernet trunk
  vlan 50 guest-interface 0
   guest-ipaddress 192.168.20.10 netmask 255.255.255.0  <-- IPv4 address configured
 app-default-gateway 192.168.20.1 guest-interface 0
 app-resource profile custom
 name-server1 192.168.20.1
 !
在GuestShell環境中運行ifconfig命令時,IPv4和IPv6地址均可見。
lat1-2-ssw01.gts#guestshell run bash
[guestshell@guestshell ~]$ sudo ifconfig
eth0: flags=4163  mtu 1500
        inet 192.168.20.10  netmask 255.255.255.0 broadcast 192.168.20.255
        inet6 2620:119:5022:515:5054:ddff:fe41:c643  prefixlen 64  scopeid 0x0
        inet6 fe80::5054:ddff:fe41:c643  prefixlen 64  scopeid 0x20
        ether 52:54:dd:41:c6:43  txqueuelen 1000  (Ethernet)
        RX packets 7829  bytes 1750981 (1.6 MiB)
        RX errors 0  dropped 0  overruns 0  frame 0
        TX packets 5551  bytes 744320 (726.8 KiB)
        TX errors 0  dropped 0 overruns 0  carrier 0  collisions 0

lo: flags=73  mtu 65536
        inet 127.0.0.1  netmask 255.0.0.0
        inet6 ::1  prefixlen 128  scopeid 0x10
        loop  txqueuelen 1000  (Local Loopback)
        RX packets 292  bytes 63812 (62.3 KiB)
        RX errors 0  dropped 0  overruns 0  frame 0
        TX packets 292  bytes 63812 (62.3 KiB)
        TX errors 0  dropped 0 overruns 0  carrier 0  collisions 0
解決方案
步驟 1:在Guestshell中禁用IPv6路由和定址。
lat1-2-ssw01.gts#guestshell run bash
[guestshell@guestshell ~]$ sudo sysctl -w net.ipv6.conf.all.disable_ipv6=1
[guestshell@guestshell ~]$ sudo sysctl -w net.ipv6.conf.default.disable_ipv6=1
[guestshell@guestshell ~]$ sudo sysctl -w net.ipv6.conf.lo.disable_ipv6=1
步驟 2:檢驗IPv6是否已禁用。
[guestshell@guestshell ~]$ /sbin/ifconfig
eth0: flags=4163  mtu 1500
        inet 192.168.20.10  netmask 255.255.255.0 broadcast 192.168.20.255
        ether 52:54:dd:41:c6:43  txqueuelen 1000  (Ethernet)
        RX packets 7829  bytes 1750981 (1.6 MiB)
        RX errors 0  dropped 0  overruns 0  frame 0
        TX packets 5551  bytes 744320 (726.8 KiB)
        TX errors 0  dropped 0 overruns 0  carrier 0  collisions 0

lo: flags=73  mtu 65536
        inet 127.0.0.1  netmask 255.0.0.0
        loop  txqueuelen 1000  (Local Loopback)
        RX packets 292  bytes 63812 (62.3 KiB)
        RX errors 0  dropped 0  overruns 0  frame 0
        TX packets 292  bytes 63812 (62.3 KiB)
        TX errors 0  dropped 0 overruns 0  carrier 0  collisions 0
運行Python指令碼時出現磁碟空間錯誤
問題:此問題涉及在GuestShell中的嵌入式事件管理器(EEM)上運行的Python指令碼。由於磁碟空間不足,指令碼失敗,錯誤為:
guestshell run python3 /flash/guest-share/monitoring.py -rt True -bgp True
---- pushing bgp status ----
OSError: [Errno 28] No space left on device

During handling of the above exception, another exception occurred:

Traceback (most recent call last):
  File "/flash/guest-share/monitoring_periodic_tasks.py", line 18, in
    print(bgp_status())
  File "/bootflash/guest-share/monitoring_bgp_status.py", line 15, in bgp_status
    vrf = cli.cli('show vrf')
  File "/usr/lib/python3.6/site-packages/cli/__init__.py", line 311, in cli
    _log_to_file("CLI execution invoked for '" + command + "'")
  File "/usr/lib/python3.6/site-packages/cli/__init__.py", line 87, in _log_to_file
    logfile.close()
OSError: [Errno 28] No space left on device
! This error indicates that the disk space allocated for logging command executions within the Guestshell environment has been exhausted.
解決方案
要解決磁碟空間不足的問題,您需要增加Guestshell環境的持久磁碟大小:
1.修改應用程序資源配置檔案,以增加持久磁碟的大小。
Switch(config-app-hosting)# app-resource profile custom
Switch(config-app-hosting-profile)# persist-disk 100
Switch(config-app-hosting-profile)# cpu 800
Switch(config-app-hosting-profile)# memory 256
Switch(config-app-hosting-profile)# end
2.儲存配置並啟用/禁用GuestShell。
Switch# write memory
Switch#guestshell disable
Guestshell disabled successfully
Switch#guestshell enable
Interface will be selected if configured in app-hosting
Please wait for completion
guestshell installed successfully
Current state is: DEPLOYED
guestshell activated successfully
Current state is: ACTIVATED
guestshell started successfully
Current state is: RUNNING
Guestshell enabled successfully
日誌記錄Syslog
您可以在guestshell中運行這些命令以顯示系統日誌消息:
[guestshell@guestshell ~]$ sudo logger -p 1 "Priority 1"
[guestshell@guestshell ~]$ sudo cat /var/log/messages
Mar 11 02:05:24 localhost systemd[248]: user@0.service: Failed at step PAM spawning /usr/lib/systemd/systemd: Operation not permitted
Mar 11 02:05:24 localhost systemd[1]: user@0.service: Failed with result 'protocol'.
Mar 11 02:05:24 localhost systemd[1]: Failed to start User Manager for UID 0.
Mar 11 02:05:24 localhost systemd[1]: Stopping /run/user/0 mount wrapper...
Mar 11 02:05:24 localhost systemd[1]: run-user-0.mount: Succeeded.
Mar 11 02:05:24 localhost systemd[1]: user-runtime-dir@0.service: Succeeded.
Mar 11 02:05:24 localhost systemd[1]: Stopped /run/user/0 mount wrapper.
Mar 11 02:05:24 localhost root[250]: Priority 1
[guestshell@guestshell ~]$ sudo cat /var/log/secure
Mar 11 02:05:24 localhost systemd[248]: pam_unix(systemd-user:account): expired password for user root (root enforced)
Mar 11 02:05:24 localhost sudo[246]: pam_systemd(sudo:session): Failed to create session: Start job for unit user@0.service failed with 'failed'
Mar 11 02:05:24 localhost sudo[246]: pam_unix(sudo:session): session opened for user root by (uid=0)
跟蹤日誌
可以使用app-hosting move appid guestshell log to bootflash:folder_name來旋轉檔案。這可用於旋轉到目標目錄,但也會旋轉到traceloguestshell目錄。
Switch#app-hosting move appid guestshell log to bootflash:
Successfully moved tracelog to flash:/ioxapploguestshell/iox_R0-0_R0-0.14195_0.20250311023831.bin.gz
附註:IOX guestshell.log始終是/tmp/rp/trace ·下的活動tracelog文件。當此檔案達到1MB時,會自動將其旋轉為帶有時間戳的bootflash:traceloguestshell/,並啟動一個新檔案。
相關資訊
- Cisco Catalyst 9000系列交換機上的應用託管白皮書
- Cisco Catalyst 9300系列交換機硬體安裝指南
- 可程式設計性配置指南,Cisco IOS XE 17.9.x
- Catalyst 9300 Stackwise 系統架構白皮書
- 思科錯誤ID CSCwi63075 - 在升級到17.08.01或更高版本後,如果啟用FIPS模式,則無法通過CLI訪問Guestshell
- 技術支援與文件 - Cisco Systems
修訂記錄
| 修訂 | 發佈日期 | 意見 |
|---|---|---|
1.0 |
17-Mar-2025
|
初始版本 |
由思科工程師貢獻
- 克里斯托弗·馬丁內斯·巴里奧斯技術諮詢工程師
 意見
意見