简介
本文档介绍如何在Cisco Firepower 4145 NGFW设备中配置主用/主用故障切换。
先决条件
要求
Cisco 建议您了解以下主题:
- 思科自适应安全设备(ASA)中的主用/备用故障切换。
使用的组件
本文档中的信息基于以下软件和硬件版本:
- 思科Firepower 4145 NGFW设备(ASA)9.18(3)56
- Firepower可扩展操作系统(FXOS)2.12(0.498)
- Windows 10
本文档中的信息都是基于特定实验室环境中的设备编写的。本文档中使用的所有设备最初均采用原始(默认)配置。如果您的网络处于活动状态,请确保您了解所有命令的潜在影响。
背景信息
主用/主用故障切换仅适用于在多情景模式下运行的安全设备。在此模式下,ASA被逻辑划分成多个虚拟设备,称为情景。每个情景都作为独立设备运行,具有自己的安全策略、接口和管理员。
主用/主用故障转移是自适应安全设备(ASA)的一项功能,它允许两个Firepower设备同时传递流量。此配置通常用于负载均衡方案,在该方案中,您要在两个设备之间拆分流量以最大限度地提高吞吐量。它还用于冗余目的,因此如果一个ASA发生故障,另一个可以接管而不会导致服务中断。
ASA主用/主用故障转移机制
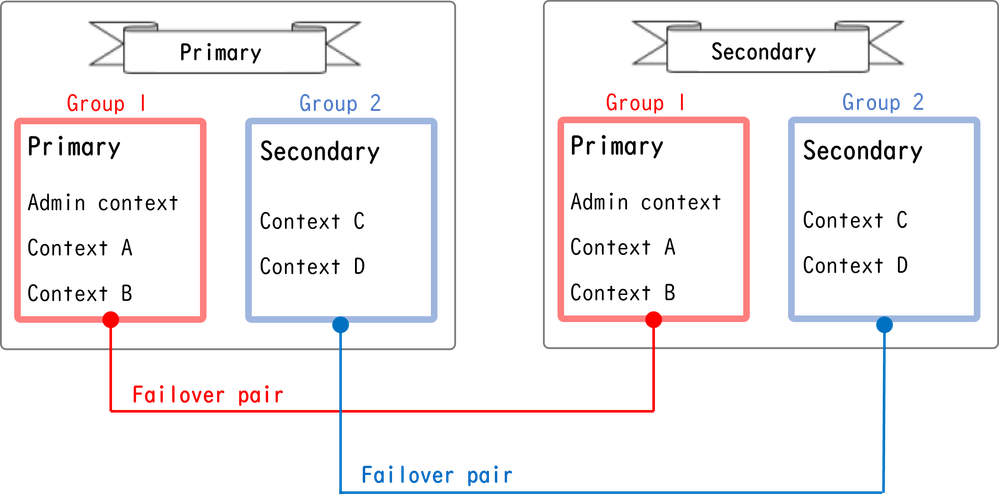
“主用/主用”故障转移中的每个情景都手动分配给以太网组1或组2。默认情况下,将管理情景分配给组1。两个机箱(单元)中的同一组(组1或组2)形成故障切换对,从而实现冗余功能。每个故障切换对的行为与主用/备用故障切换中的行为基本相同。有关主用/备用故障切换的详细信息,请参阅配置主用/备用故障切换。在主用/主用故障转移中,除了每个机箱的角色(主或辅助)外,每个组还具有角色(主或辅助)。 这些角色由用户手动预设置,用于决定每个故障切换组的高可用性(HA)状态(主用或备用)。
管理情景是处理基本机箱管理(如SSH)连接的特殊情景。这是主用/主用故障转移的映像。
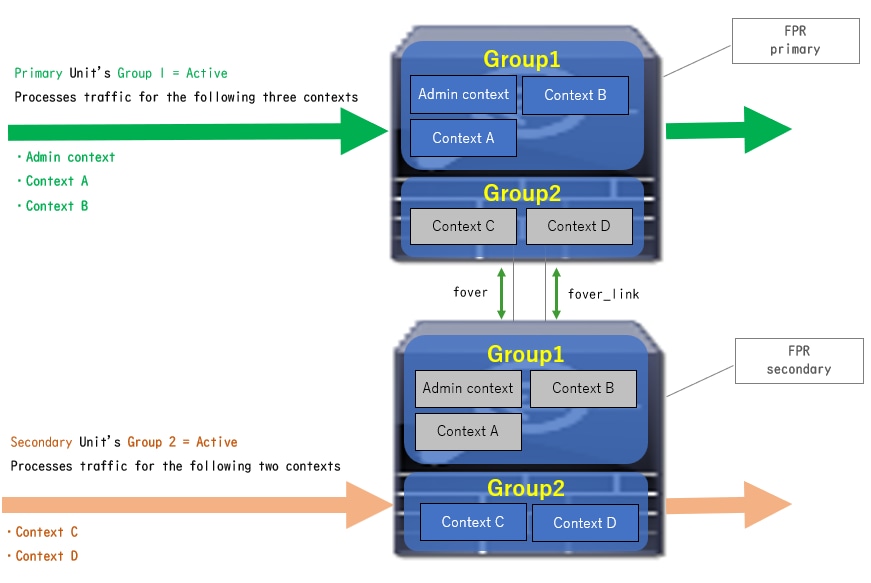
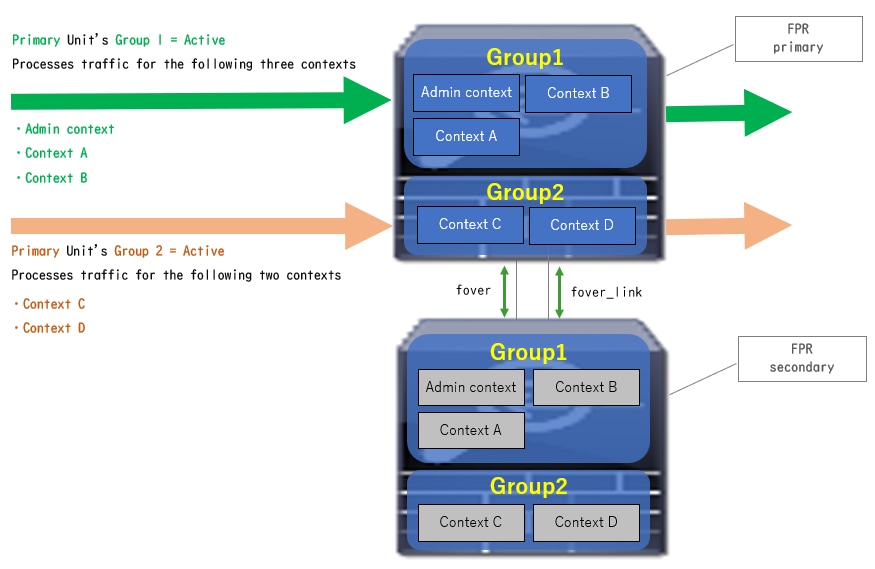
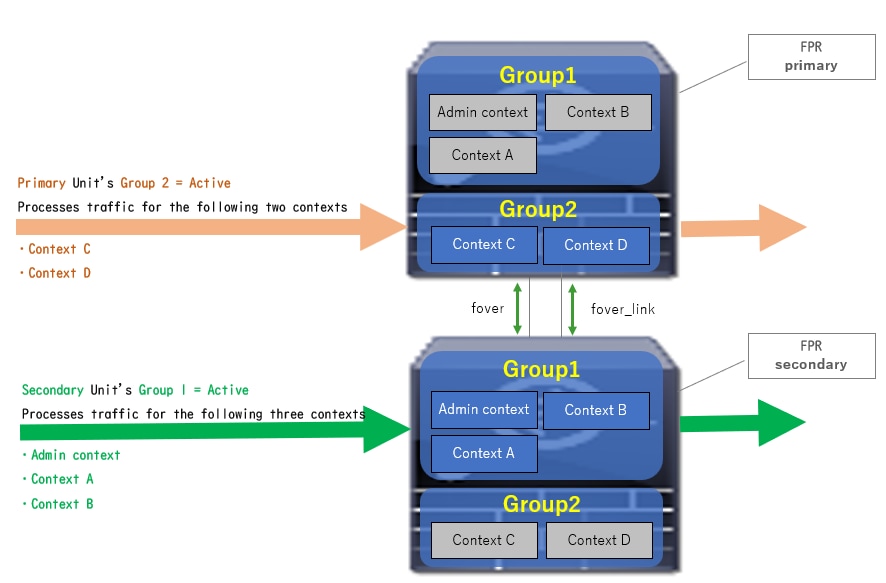
 主用/主用故障转移中的故障转移对
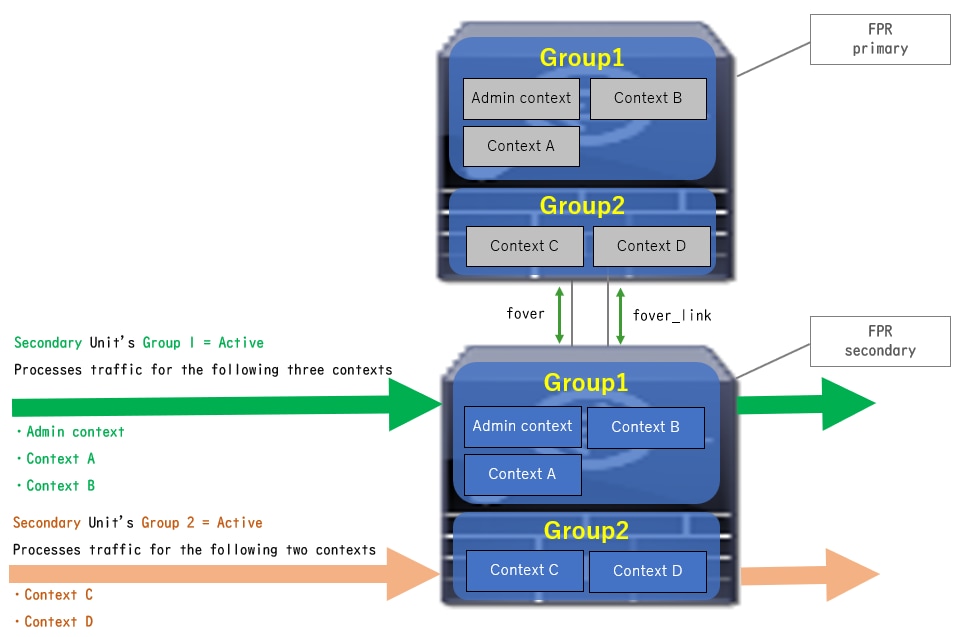
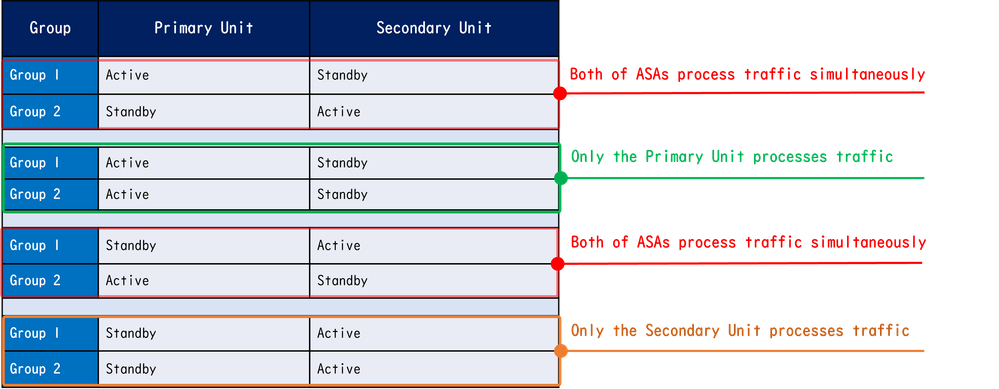
流量条件4
- 主要单元:组1 =备用,组2 =备用
- 辅助单元:组1 =活动,组2 =活动
 流量条件4
流量条件4
主用/备用选择规则
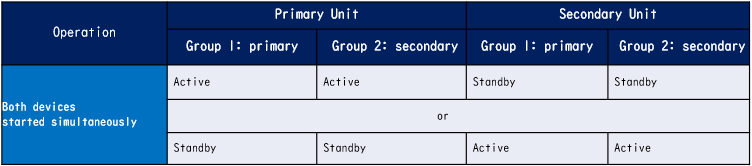
在主用/主用故障转移中,每个组的状态(主用/备用)由以下规则确定:
- 假设两台设备几乎同时启动,则其中一个设备(主设备或辅助设备)将首先变为活动状态。
- 当抢占时间过去时,在机箱和组中拥有相同角色的组将变为活动状态。
- 发生故障切换事件(例如接口关闭)时,组的状态会以与主用/备用故障切换相同的方式更改。
- 执行手动故障切换后,抢占时间不起作用。
这是状态更改的一个示例。
- 两台设备几乎同时启动。状态A →
- 抢占时间已过。状态B →
- 主设备故障(触发故障切换)。 状态C →
- 自主设备从故障中恢复以来经过的抢占时间。状态D →
- 手动触发故障切换。状态E
有关故障切换触发器和运行状况监控的详细信息,请参阅故障切换事件。
1.两台设备几乎同时启动。
 状态A
状态A
2.抢占时间(本文档中为30秒)已过。
 状态B
状态B
3.主设备的组1中发生故障(例如接口关闭)。
 状态C
状态C
4.自组1的主设备从故障中恢复以来经过的抢占时间(本文档中为30)。
 状态D
状态D
5.手动将主设备的组2设置为活动。
 状态E
状态E
网络图
本文档介绍基于此图的主用/主用故障转移的配置和验证。
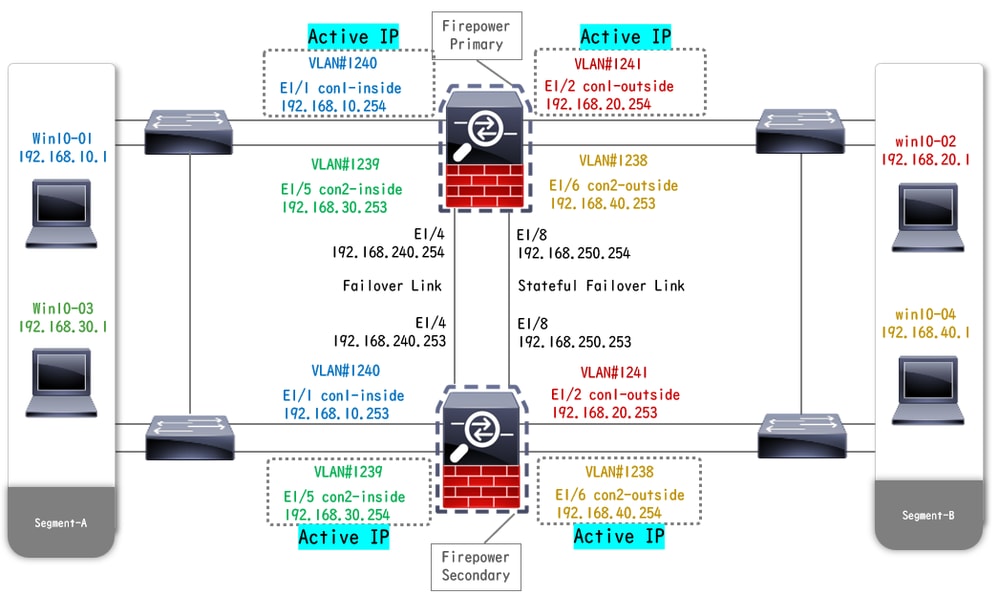
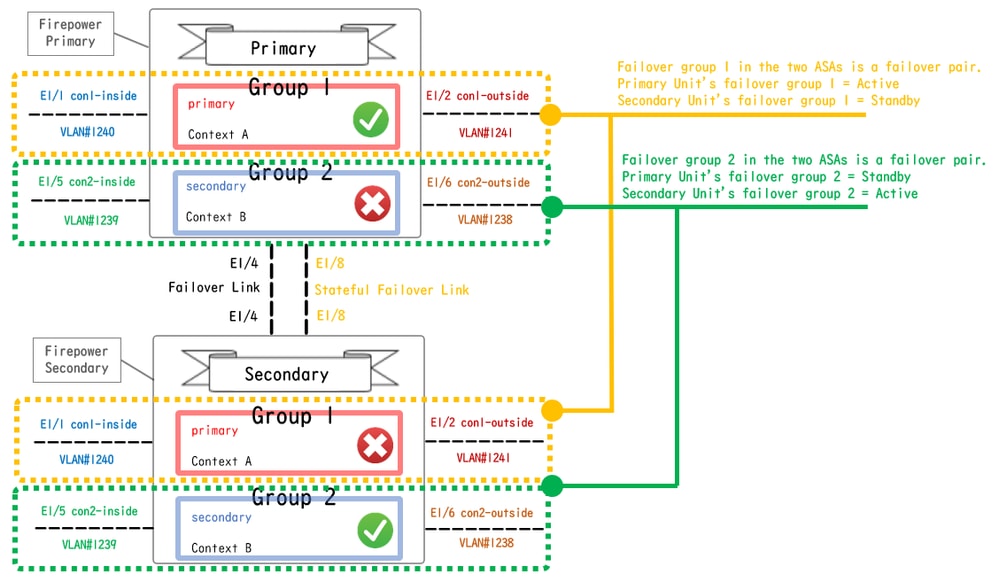 逻辑配置图
逻辑配置图
 物理配置图
物理配置图
配置
步骤1.预配置接口
对于两个Firepower,请登录FCM GUI。导航到逻辑设备 > 编辑。如图所示,向ASA添加数据接口。
 预配置接口
预配置接口
步骤2.主设备上的配置
通过SSH或控制台连接到主FXOS CLI。运 connect module 1 console行 connect asa和命令以进入ASA CLI。
a.在主设备上配置故障切换(在主设备的系统上下文中运行命令)。
failover lan unit primary
failover lan interface fover E1/4
failover link fover_link E1/8
failover interface ip fover 192.168.240.254 255.255.255.0 standby 192.168.240.253
failover interface ip fover_link 192.168.250.254 255.255.255.0 standby 192.168.250.253
failover group 1   <--- group 1 is assigned to primary by default
preempt 30
failover group 2
secondary
preempt 30
failover
prompt hostname state priority context
b.配置情景的故障切换组(在主设备的系统情景中运行命令)。
admin-context admin
context admin         <--- admin context is assigned to group 1 by default
allocate-interface E1/3
config-url disk0:/admin.cfg

context con1
allocate-interface E1/1
allocate-interface E1/2
config-url disk0:/con1.cfg
join-failover-group 1 <--- add con1 context to group 1
!
context con2
allocate-interface E1/5
allocate-interface E1/6
config-url disk0:/con2.cfg
join-failover-group 2 <--- add con2 context to group 2
c.运行 changeto context con1,从系统情景连接con1情景。为con1情景的接口配置IP(在主设备的con1情景中运行命令)。
interface E1/1
nameif con1-inside
ip address 192.168.10.254 255.255.255.0 standby 192.168.10.253
security-level 100
no shutdown
interface E1/2
nameif con1-outside
ip address 192.168.20.254 255.255.255.0 standby 192.168.20.253
no shutdown
d.运行 changeto context con2,从系统情景连接con2情景。为con2情景的接口配置IP(在主设备的con2情景中运行命令)。
interface E1/5
nameif con2-inside
ip address 192.168.30.254 255.255.255.0 standby 192.168.30.253
security-level 100
no shutdown
interface E1/6
nameif con2-outside
ip address 192.168.40.254 255.255.255.0 standby 192.168.40.253
no shutdown
步骤3.辅助设备上的配置
a.通过SSH或控制台连接到辅助FXOS CLI。在辅助设备上配置故障切换(在辅助设备的系统上下文中运行命令)。
failover lan unit secondary
failover lan interface fover E1/4
failover link fover_link E1/8
failover interface ip fover 192.168.240.254 255.255.255.0 standby 192.168.240.253
failover interface ip fover_link 192.168.250.254 255.255.255.0 standby 192.168.250.253
b.运行命 failover令(在辅助设备的系统上下文中运行)。
failover
步骤4.成功完成同步后确认故障切换状态
a.在辅助设备的系统上下文中运行show failover。
asa# show failover
Failover On
Failover unit Secondary
Failover LAN Interface: fover Ethernet1/4 (up)
Version: Ours 9.18(3)56, Mate 9.18(3)56
Serial Number: Ours FCH23157YFY, Mate FCH23037U8R
Group 1 last failover at: 17:00:56 JST Jan 11 2024
Group 2 last failover at: 17:00:56 JST Jan 11 2024

This host: Secondary    <--- group 1 and group 2 are Standby status in Secondary Unit
Group 1 State: Standby Ready
Active time: 0 (sec)
Group 2 State: Standby Ready
Active time: 945 (sec)

con1 Interface con1-inside (192.168.10.253): Unknown (Waiting)
con1 Interface con1-outside (192.168.20.253): Unknown (Waiting)
con2 Interface con2-inside (192.168.30.253): Unknown (Waiting)
con2 Interface con2-outside (192.168.40.253): Normal (Waiting)

Other host: Primary    <--- group 1 and group 2 are Active status in Primary Unit
Group 1 State: Active
Active time: 1637 (sec)
Group 2 State: Active
Active time: 93 (sec)

con1 Interface con1-inside (192.168.10.254): Normal (Monitored)
con1 Interface con1-outside (192.168.20.254): Normal (Monitored)
con2 Interface con2-inside (192.168.30.254): Normal (Waiting)
con2 Interface con2-outside (192.168.40.254): Normal (Waiting)

Stateful Failover Logical Update Statistics
Link : fover_link Ethernet1/8 (up)
b.(可选)运行命 no failover active group 2令,将主设备的组2手动切换到备用状态(在主设备的系统上下文中运行)。 这样可以平衡通过防火墙的流量负载。
no failover active group 2

注意:如果运行此命令,则故障切换状态与流量条件1匹配。
验证
当E1/1关闭时,会触发组1的故障切换,备用端(辅助设备)的数据接口会接管原始主用接口的IP和MAC地址,确保流量(本文档中的FTP连接)由ASA持续通过。
 链路断开前
链路断开前 链路断开期间
 故障切换已触发
步骤1.启动从Win10-01到Win10-02的FTP连接
步骤2.在故障切换之前确认FTP连接
运行 changeto context con1,从系统情景连接con1情景。确认已在两个ASA设备中建立FTP连接。
asa/act/pri/con1# show conn
5 in use, 11 most used

! --- Confirm the connection in Primary Unit
TCP con1-outside 192.168.20.1:21 con1-inside 192.168.10.1:49703, idle 0:00:11, bytes 528, flags UIO

asa/stby/sec/con1# show conn
5 in use, 11 most used

! --- Confirm the connection in Secondary Unit
TCP con1-outside 192.168.20.1:21 con1-inside 192.168.10.1:49703, idle 0:00:14, bytes 528, flags UIO
步骤3.主设备的E1/1链路断开
步骤4.确认故障切换状态
在系统情景中,确认故障切换发生在组1中。
asa/act/sec# show failover
Failover On
Failover unit Secondary
Failover LAN Interface: fover Ethernet1/4 (up)
......
Group 1 last failover at: 20:00:16 JST Jan 11 2024
Group 2 last failover at: 17:02:33 JST Jan 11 2024

This host: Secondary
Group 1 State: Active  <--- group 1 of Secondary Unit is Switching to Active
Active time: 5 (sec)
Group 2 State: Active
Active time: 10663 (sec)

con1 Interface con1-inside (192.168.10.254): Normal (Waiting)
con1 Interface con1-outside (192.168.20.254): Normal (Waiting)
con2 Interface con2-inside (192.168.30.254): Normal (Monitored)
con2 Interface con2-outside (192.168.40.254): Normal (Monitored)

Other host: Primary
Group 1 State: Failed  <--- group 1 of Primary Unit is Switching to Failed status
Active time: 434 (sec)
Group 2 State: Standby Ready
Active time: 117 (sec)

con1 Interface con1-inside (192.168.10.253): Failed (Waiting)
con1 Interface con1-outside (192.168.20.253): Normal (Waiting)
con2 Interface con2-inside (192.168.30.253): Normal (Monitored)
con2 Interface con2-outside (192.168.40.253): Normal (Monitored)
步骤5.确认故障转移后的FTP连接
运行 changeto context con1,从系统情景连接con1情景,确认FTP连接未中断。
asa/act/sec# changeto context con1
asa/act/sec/con1# show conn
11 in use, 11 most used

! --- Confirm the target FTP connection exists in group 1 of the Secondary Unit
TCP con1-outside 192.168.20.1:21 con1-inside 192.168.10.1:49703, idle 0:00:09, bytes 529, flags UIO
步骤6.确认抢占时间的行为
LinkUP E1/1(主设备)并等待30秒(抢占时间),故障切换状态返回原始状态(匹配模式1中的流量)。
asa/stby/pri#
Group 1 preempt mate    <--- Failover is triggered automatically, after the preempt time has passed

asa/act/pri# show failover
Failover On
Failover unit Primary
Failover LAN Interface: fover Ethernet1/4 (up)
......
Group 1 last failover at: 11:02:33 UTC Jan 11 2024
Group 2 last failover at: 08:02:45 UTC Jan 11 2024

This host: Primary
Group 1 State: Active  <--- group 1 of Primary Unit is switching to Active status
Active time: 34 (sec)
Group 2 State: Standby Ready
Active time: 117 (sec)

con1 Interface con1-inside (192.168.10.254): Normal (Monitored)
con1 Interface con1-outside (192.168.20.254): Normal (Monitored)
con2 Interface con2-inside (192.168.30.253): Normal (Monitored)
con2 Interface con2-outside (192.168.40.253): Normal (Monitored)

Other host: Secondary
Group 1 State: Standby Ready  <---- group 1 of Secondary Unit is switching to Standby status
Active time: 125 (sec)
Group 2 State: Active
Active time: 10816 (sec)

con1 Interface con1-inside (192.168.10.253): Normal (Monitored)
con1 Interface con1-outside (192.168.20.253): Normal (Monitored)
con2 Interface con2-inside (192.168.30.254): Normal (Monitored)
con2 Interface con2-outside (192.168.40.254): Normal (Monitored)
虚拟MAC地址
在主用/主用故障切换中,始终使用虚拟MAC地址(手动设置值、自动生成的值或默认值)。活动虚拟MAC地址与活动接口关联。
手动设置虚拟MAC地址
为了手动设置物理接口的虚拟MAC地址,可以使用 mac address命令或 mac-address命令(在I/F设置模式下)。这是手动为物理接口E1/1设置虚拟MAC地址的示例。
asa/act/pri(config)# failover group 1
asa/act/pri(config-fover-group)# mac address E1/1 1234.1234.0001 1234.1234.0002

asa/act/pri(config-fover-group)# changeto context con1
asa/act/pri/con1(config)# show interface E1/1 | in MAC
MAC address 1234.1234.0001, MTU 1500 <--- Checking virtual MAC on the Primary Unit(con1) side

asa/stby/sec# changeto context con1
asa/stby/sec/con1# show interface E1/1 | in MAC
MAC address 1234.1234.0002, MTU 1500 <--- Checking virtual MAC on the Secondary Unit(con1) side
或者
asa/act/pri(config)# changeto context con1
asa/act/pri/con1(config)# int E1/1
asa/act/pri/con1(config-if)# mac-addr 1234.1234.0001 standby 1234.1234.0002

asa/act/pri/con1(config)# show interface E1/1 | in MAC
MAC address 1234.1234.0001, MTU 1500 <--- Checking virtual MAC on the Primary Unit(con1) side

asa/stby/sec# changeto context con1
asa/stby/sec/con1# show interface E1/1 | in MAC
MAC address 1234.1234.0002, MTU 1500<--- Checking virtual MAC on the Secondary Unit(con1) side
自动设置虚拟MAC地址
还支持自动生成虚拟MAC地址。这可以通过使用命令来 mac-address auto 实。虚拟MAC地址的格式为A2 xx.yyzz.zzzz,这是自动生成的。
回答:固定值
xx.yy :由命令选项中指定的<prefix prefix>生成(前缀转换为十六进制,然后按逆序插入)。
zz.zzzz :由内部计数器生成
这是通过命令为接口生成虚拟MAC地 mac-address auto址的示例。
asa/act/pri(config)# mac-address auto
INFO: Converted to mac-address auto prefix 31

asa/act/pri(config)# show run all context con1 <--- Checking the virtual MAC addresses generated on con1 context
allocate-interface Ethernet1/1
mac-address auto Ethernet1/1 a21f.0000.0008 a21f.0000.0009
allocate-interface Ethernet1/2
mac-address auto Ethernet1/2 a21f.0000.000a a21f.0000.000b
config-url disk0:/con1.cfg
join-failover-group 1

asa/act/pri(config)# show run all context con2 <--- Checking the virtual MAC addresses generated on con2 context
context con2
allocate-interface Ethernet1/5
mac-address auto Ethernet1/5 a21f.0000.000c a21f.0000.000d
allocate-interface Ethernet1/6
mac-address auto Ethernet1/6 a21f.0000.000e a21f.0000.000f
config-url disk0:/con2.cfg
join-failover-group 2
虚拟MAC地址的默认设置
如果既未设置虚拟MAC地址的自动生成也未手动生成,则使用默认虚拟MAC地址。
有关默认虚拟MAC地址的详细信息,请参阅《思科安全防火墙ASA系列命令参考指南》中的Command Default of mac address。
升级
您可以使用CLI或ASDM实现主用/主用故障切换对零停机时间升级。有关详细信息,请参阅升级主用/主用故障转移对。

 反馈
反馈