升级 Nexus 3524 和 3548 NX-OS 软件

目录
简介
本文档介绍主要软件版本之间Cisco Nexus 3524和3548系列交换机的中断NX-OS软件升级过程。
先决条件
要求
思科建议您了解在Cisco NX-OS中复制文件的基本知识。有关此功能的详细信息,请参阅以下适用文档之一:
- Cisco Nexus 3548交换机NX-OS基础配置指南,版本9.3(x)
- Cisco Nexus 3548交换机NX-OS基础配置指南,版本9.2(x)
- Cisco Nexus 3548交换机NX-OS基础配置指南,版本7.x
- Cisco Nexus 3548交换机NX-OS基础配置指南,版本6.x
思科建议您了解在Cisco Nexus 3524和3548系列交换机上升级NX-OS软件的基础知识。有关此过程的详细信息,请参阅以下适用文档之一:
- Cisco Nexus 3500系列NX-OS软件升级和降级指南,版本9.3(x)
- Cisco Nexus 3500系列NX-OS软件升级和降级指南,版本9.2(x)
- Cisco Nexus 3500系列NX-OS软件升级和降级指南,版本7.x
- Cisco Nexus 3500系列NX-OS软件升级和降级指南,版本6.x
使用的组件
本文档中的信息基于本文档适用硬件部分中列出的Cisco Nexus 3524和3548系列交换机。本文档中的设备输出来自运行各种NX-OS软件版本的Nexus 3548(型号N3K-C3548-10G)。
本文档中的信息都是基于特定实验室环境中的设备编写的。本文档中使用的所有设备最初均采用原始(默认)配置。如果您的网络处于活动状态,请确保您了解所有命令的潜在影响。
背景信息
本文档介绍使用支持的中断性升级路径将Cisco Nexus 3524和3548系列交换机上的Cisco NX-OS软件从各种NX-OS软件版本升级至这些版本的步骤。本文档旨在提供在常见次要NX-OS软件版本和主要软件版本之间执行受支持的NX-OS软件升级的分步说明。
本文档不介绍在Cisco Nexus 3524和3548系列交换机上对Cisco NX-OS软件执行任何无中断升级的步骤。ISSU软件升级不在本文档的讨论范围之内。
NX-OS软件版本分类
Cisco NX-OS软件版本名称包含本文档中经常引用的多个组件。这些组件的名称在Cisco IOS®和Cisco NX-OS软件版本参考指南的Cisco NX-OS软件版本命名部分中定义。具体来说,请注意以下术语:
- 主版本号
- 次要版本号
- 维护版本号
- 平台标志符
- 平台次要版本号
- 平台维护版本号
- 平台重建标识符
NX-OS软件版本7.0(3)I7(5a)具有以下组件:
| 组件名称 | 组件值 |
|---|---|
| 主版本号 | 7 |
| 次要版本号 | 0 |
| 维护版本号 | 3 |
| 平台标志符 | I |
| 平台次要版本号 | 7 |
| 平台维护版本号 | 5 |
| 平台重建标识符 | a |
另一个示例是,NX-OS软件版本9.3(5)具有以下组件:
| 组件名称 | 组件值 |
|---|---|
| 主版本号 | 9 |
| 次要版本号 | 3 |
| 维护版本号 | 5 |
Cisco Nexus配置指南通常按NX-OS主版本号分组。在这些配置指南的标题中,NX-OS主版本号通常按主版本号显示,并附加一个变量x,该变量指的是次版本(例如6.x、7.x等)。 例如,Cisco Nexus 9000系列NX-OS基础配置指南版本7.x适用于所有NX-OS 7主要版本(尽管特定警告、限制和配置示例可能特定于某些次要或维护版本号)。
此规则的例外是NX-OS 9主版本。对于NX-OS 9主要版本,Cisco Nexus配置指南按NX-OS次要版本号和主要版本号分组,并附加一个参考维护版本的变量x(例如9.2(x)和9.3(x))。
本文档使用Cisco Nexus配置指南(6.x、7.x、9.2(x)、9.3(x)等)标题的格式来描述两个NX-OS软件版本之间的标准中断NX-OS软件升级。
NX-OS软件升级术语
源版本、目标版本和中间版本
NX-OS软件升级通常在两个版本之间执行,即源版本(您要升级的NX-OS软件版本)和目标版本(您要升级的NX-OS软件版本)。 例如,如果您将Nexus 3548交换机从NX-OS软件版本7.0(3)I7(8)升级到NX-OS软件版本9.3(5),则7.0(3)I7(8)将是您的源版本,而9.3(5)将是您的目标版本。
要从特定源版本升级到特定目标版本,升级路径可能需要升级到一个或多个中间版本。例如,如果您将Nexus 3548交换机从NX-OS软件版本7.0(3)I7(5a)升级到NX-OS软件版本9.3(5),则必须升级到中间版本7.0(3)I7(8)或9.2(4),然后才能成功升级到NX-OS软件版本9.3(5)。
NX-OS软件升级类型
NX-OS软件升级可分为两类:
- 中断性升级 — 在源版本和目标版本之间进行的中断性升级,Nexus交换机会在升级过程结束时重新加载。重新加载会导致Nexus交换机的数据平面、控制平面和管理平面在短时间内脱机。
- 服务中软件升级(ISSU) — 源版本和目标版本之间的无中断升级,其中Nexus交换机的数据平面保持联机,并且由于不间断转发(NSF)而转发流量。
无中断ISSU NX-OS软件升级过程不在本文档的讨论范围之内。本文档仅介绍标准的中断NX-OS软件升级。
适用硬件
本文档中的过程适用于此列表中的硬件:
- N3K-C3524P-10G
- N3K-C3524P-10GX
- N3K-C3524P-XL
- N3K-C3548P-10G
- N3K-C3548P-10GX
- N3K-C3548P-XL
NX-OS软件升级过程
本节介绍如何执行从各种源版本到各种目标版本的标准中断NX-OS软件升级。
从NX-OS 6.x升级到NX-OS 6.x
本节介绍如何执行标准中断NX-OS软件从NX-OS 6.x主版本中的源版本升级到NX-OS 6.x主版本中的目标版本。
在Cisco Nexus 3548交换机上,从6.0(2)A4(5)源版本升级到6.0(2)A8(11b)目标版本执行标准中断NX-OS软件升级的示例:
N3K-C3548# show module
Mod Ports Module-Type                         Model                  Status
--- ----- ----------------------------------- ---------------------- ------------
1   48    48x10GE Supervisor                  N3K-C3548P-10G-SUP     active *

Mod  Sw              Hw      World-Wide-Name(s) (WWN)
---  --------------  ------  ----------------------------------------------------
1    6.0(2)A4(5)     1.0     --
升级路径摘要
从NX-OS 6.x主版本中的源版本到NX-OS 6.x主版本中的目标版本的升级路径摘要:
6.x -> 6.x
步骤1.从思科软件下载下载目标版本
NX-OS 6.x软件总共需要两个NX-OS二进制映像文件:系统映像和启动映像。您必须从Cisco Software Download Website将这些映像下载到本地计算机。从Cisco软件下载网站下载软件所需执行的具体步骤不在本文档的讨论范围之内。
步骤2.将目标版本复制到Cisco Nexus交换机
将NX-OS 6.x启动和系统二进制映像文件复制到您想要使用所选文件传输协议进行中断升级的Nexus 3524或3548系列交换机。此示例演示如何从通过管理VRF可访问的FTP服务器192.0.2.100复制用于NX-OS 6.0(2)A8(11b)软件版本的启动和系统二进制映像文件(FTP)。
N3K-C3548# dir | include bin
   36742656    Nov 19 14:24:14 2020  n3500-uk9-kickstart.6.0.2.A4.5.bin
  166878338    Nov 19 14:22:40 2020  n3500-uk9.6.0.2.A4.5.bin
N3K-C3548# copy ftp://username@192.0.2.100/n3500-uk9-kickstart.6.0.2.A8.11b.bin bootflash: vrf management
Password:
Copy complete, now saving to disk (wait)...
Copy complete.
N3K-C3548# copy ftp://username@192.0.2.100/n3500-uk9.6.0.2.A8.11b.bin bootflash: vrf management
Password:
Copy complete, now saving to disk (wait)...
Copy complete.
N3K-C3548# dir | include bin
   36742656    Nov 19 14:24:14 2020  n3500-uk9-kickstart.6.0.2.A4.5.bin
   37739008    Nov 19 18:13:12 2020  n3500-uk9-kickstart.6.0.2.A8.11b.bin
  166878338    Nov 19 14:22:40 2020  n3500-uk9.6.0.2.A4.5.bin
  197055713    Nov 19 18:14:46 2020  n3500-uk9.6.0.2.A8.11b.bin
步骤3.验证目标版本的MD5或SHA512校验和
将NX-OS 6.x启动和系统二进制映像文件复制到Nexus 3524或3548系列交换机后,您希望使用所选文件传输协议进行中断性升级,通过确保MD5或SHA512校验和与Cisco软件下载网站上发布的内容匹配,验证二进制映像文件在传输过程中未损坏。
通过将光标悬停在网站上的映像上,可以通过Cisco软件下载网站识别NX-OS二进制映像文件的MD5和SHA512校验和。请参阅以下示例:
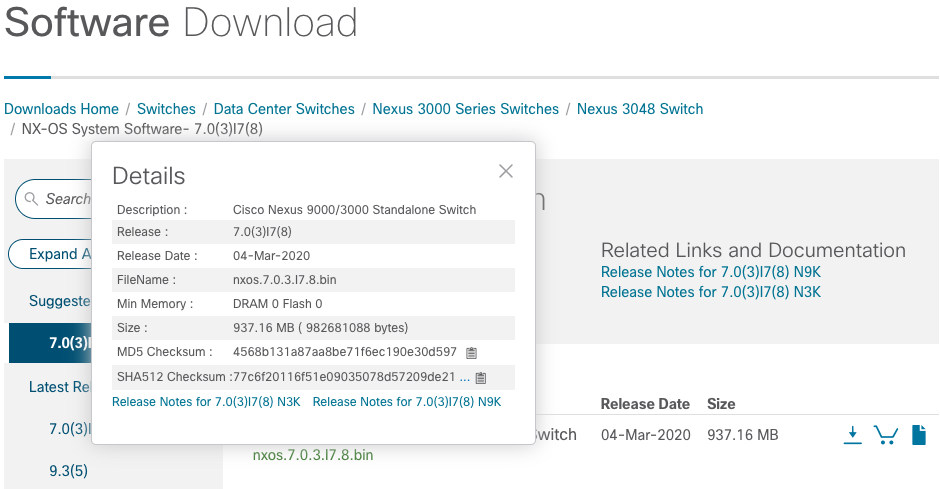
本示例演示如何通过show file bootflash:{filename} md5sum命令验证NX-OS 6.0(2)A8(11b)软件版本的启动和系统二进制映像文件的MD5校验和。NX-OS6.0(2)A8(11b)kickstart二进制映像文件的预期MD5校验和为1b025734ed34aeb7a0ea48f55897b09a,而NX-OS 6.0(2)A8(11b)系统二进制映像文件的预期MD5校验和为1f8bfb0b3d59049d5bf385ed7866ee25。
N3K-C3548# show file bootflash:n3500-uk9-kickstart.6.0.2.A8.11b.bin md5sum
1b025734ed34aeb7a0ea48f55897b09a
N3K-C3548# show file bootflash:n3500-uk9.6.0.2.A8.11b.bin md5sum
1f8bfb0b3d59049d5bf385ed7866ee25
步骤4.通过Install All命令升级NX-OS软件
通过install all命令开始标准的中断NX-OS软件升级。此命令要求将启动和系统参数与NX-OS启动和系统二进制映像文件的绝对文件路径一起传入,这些文件与目标版本相对应。
此示例显示install all命令,其中kickstart参数指向NX-OS kickstart二进制映像文件(bootflash:n3500-uk9-kickstart.6.0.2.A8.11b.bin)的绝对文件路径,系统参数指向NX-OS系统二进制映像文件(bootflash:n3500-uk9.6.0.2.A8.11b.bin)的绝对文件路径。
N3K-C3548# install all kickstart bootflash:n3500-uk9-kickstart.6.0.2.A8.11b.bin system bootflash:n3500-uk9.6.0.2.A8.11b.bin
Installer is forced disruptive

Verifying image bootflash:/n3500-uk9-kickstart.6.0.2.A8.11b.bin for boot variable "kickstart".
[########################################] 100% -- SUCCESS

Verifying image bootflash:/n3500-uk9.6.0.2.A8.11b.bin for boot variable "system".
[########################################] 100% -- SUCCESS

Verifying image type.
[########################################] 100% -- SUCCESS

Extracting "system" version from image bootflash:/n3500-uk9.6.0.2.A8.11b.bin.
[########################################] 100% -- SUCCESS

Extracting "kickstart" version from image bootflash:/n3500-uk9-kickstart.6.0.2.A8.11b.bin.
[########################################] 100% -- SUCCESS

Extracting "bios" version from image bootflash:/n3500-uk9.6.0.2.A8.11b.bin.
[########################################] 100% -- SUCCESS

Performing module support checks.
[########################################] 100% -- SUCCESS

Notifying services about system upgrade.
[########################################] 100% -- SUCCESS


Compatibility check is done:
Module  bootable          Impact  Install-type  Reason
------  --------  --------------  ------------  ------
     1       yes      disruptive         reset  Forced by the user


Images will be upgraded according to this table:
Module             Image         Running-Version             New-Version  Upg-Required
------  ----------------  ----------------------  ----------------------  ------------
     1            system             6.0(2)A4(5)           6.0(2)A8(11b)           yes
     1         kickstart             6.0(2)A4(5)           6.0(2)A8(11b)           yes
     1              bios      v1.9.0(10/13/2012)      v1.9.0(10/13/2012)            no
     1         power-seq                    v2.1                    v2.1            no


Switch will be reloaded for disruptive upgrade.
Do you want to continue with the installation (y/n)?  [n] y
Time Stamp: Thu Nov 19 18:32:15 2020


Install is in progress, please wait.

Performing runtime checks.
[########################################] 100% -- SUCCESS

Setting boot variables.
[########################################] 100% -- SUCCESS

Performing configuration copy.
[########################################] 100% -- SUCCESS
Time Stamp: Thu Nov 19 18:32:39 2020


Finishing the upgrade, switch will reboot in 10 seconds.
步骤5.检验NX-OS软件升级是否成功
在Nexus 3524或3548交换机重新加载后,通过show module命令验证升级是否成功。此命令的输出显示了所需的目标版本。请参阅此示例,其中交换机已成功升级到NX-OS软件版本6.0(2)A8(11b)。
N3K-C3548# show module
Mod Ports Module-Type                         Model                  Status
--- ----- ----------------------------------- ---------------------- ------------
1   48    48x10GE Supervisor                  N3K-C3548P-10G-SUP     active *

Mod  Sw              Hw      World-Wide-Name(s) (WWN)
---  --------------  ------  ----------------------------------------------------
1    6.0(2)A8(11b)   1.0     --
步骤6.从Cisco Nexus交换机删除源版本的二进制映像文件
验证从源版本到目标版本的NX-OS软件升级成功后,请从设备的bootflash中删除源版本的kickstart和系统二进制映像文件,从而在bootflash交换机上保留可用空间。可以使用delete bootflash:{filename}命令完成此操作。
请参阅此示例,其中NX-OS 6.0(2)A4(5)启动和系统二进制映像文件从bootflash交换机中删除。
N3K-C3548# dir | include bin
   36742656    Nov 19 14:24:14 2020  n3500-uk9-kickstart.6.0.2.A4.5.bin
   37739008    Nov 19 18:13:12 2020  n3500-uk9-kickstart.6.0.2.A8.11b.bin
  166878338    Nov 19 14:22:40 2020  n3500-uk9.6.0.2.A4.5.bin
  197055713    Nov 19 18:14:46 2020  n3500-uk9.6.0.2.A8.11b.bin
N3K-C3548# delete bootflash:n3500-uk9-kickstart.6.0.2.A4.5.bin
N3K-C3548# delete bootflash:n3500-uk9.6.0.2.A4.5.bin
N3K-C3548# dir | include bin
   37739008    Nov 19 18:13:12 2020  n3500-uk9-kickstart.6.0.2.A8.11b.bin
  197055713    Nov 19 18:14:46 2020  n3500-uk9.6.0.2.A8.11b.bin
步骤7.运行初始设置脚本以重新应用CoPP策略
使用setup命令运行初始设置脚本。输入yes进入基本配置对话框,然后重复按Enter键接受所有默认选项,直到返回NX-OS CLI提示符。
参阅以下示例:
N3K-C3548# setup


         ---- Basic System Configuration Dialog ----

This setup utility will guide you through the basic configuration of
the system. Setup configures only enough connectivity for management
of the system.

*Note: setup is mainly used for configuring the system initially,
when no configuration is present. So setup always assumes system
defaults and not the current system configuration values.

Press Enter at anytime to skip a dialog. Use ctrl-c at anytime
to skip the remaining dialogs.

Would you like to enter the basic configuration dialog (yes/no): yes


  Create another login account (yes/no) [n]:

  Configure read-only SNMP community string (yes/no) [n]:

  Configure read-write SNMP community string (yes/no) [n]:

  Enter the switch name :

  Continue with Out-of-band (mgmt0) management configuration? (yes/no) [y]:

    Mgmt0 IPv4 address :

  Configure the default gateway? (yes/no) [y]:

    IPv4 address of the default gateway :

  Enable the telnet service? (yes/no) [n]:

  Enable the ssh service? (yes/no) [y]:

    Type of ssh key you would like to generate (dsa/rsa) :

  Configure the ntp server? (yes/no) [n]:

  Configure default interface layer (L3/L2) [L2]:

  Configure default switchport interface state (shut/noshut) [noshut]:

  Configure CoPP System Policy Profile ( default / l2 / l3 ) [default]:

This configuration will be applied:
  no telnet server enable
  system default switchport
  no system default switchport shutdown
  policy-map type control-plane copp-system-policy ( default )

Would you like to edit the configuration? (yes/no) [n]:

Use this configuration and save it? (yes/no) [y]:

[########################################] 100%
Copy complete, now saving to disk (wait)...
Copy complete.
从NX-OS 6.x升级到NX-OS 7.x
本节介绍如何执行标准中断NX-OS软件从NX-OS 6.x主版本中的源版本升级到NX-OS 7.x主版本中的目标版本。
在Cisco Nexus 3548交换机上执行标准中断NX-OS软件升级的示例,从源版本6.0(2)A4(5)升级到目标版本7.0(3)I7(9):
N3K-C3548# show module
Mod Ports Module-Type                         Model                  Status
--- ----- ----------------------------------- ---------------------- ------------
1   48    48x10GE Supervisor                  N3K-C3548P-10G-SUP     active *

Mod  Sw              Hw      World-Wide-Name(s) (WWN)
---  --------------  ------  ----------------------------------------------------
1    6.0(2)A4(5)     1.0     --
升级路径摘要
从NX-OS 6.x主版本中的源版本到NX-OS 7.x主版本中到6.0(2)A8(11b)中间版本的升级路径摘要:
6.x -> 6.0(2)A8(11b) -> 7.x
步骤1.从NX-OS 6.x升级到NX-OS 6.0(2)A8(11b)
使用本文档的从NX-OS 6.x升级到NX-OS 6.x部分执行从源版本到NX-OS软件版本6.0(2)A8(11b)中间版本的标准中断NX-OS软件升级。 要成功升级到NX-OS 7.x主版本中的目标版本,必须执行此操作。
步骤2.从思科软件下载下载目标版本
NX-OS 7.x软件使用单个NX-OS二进制映像文件(有时称为统一映像文件)。 您必须从Cisco Software Download Website将此映像下载到本地计算机。从Cisco软件下载网站下载软件所需执行的具体步骤不在本文档的讨论范围之内。
步骤3.通过SCP通过精简映像程序将目标版本复制到Cisco Nexus交换机
通过SCP执行NX-OS精简映像程序,将目标版本的统一二进制映像文件复制到要中断升级的Nexus 3524或3548系列交换机。
有关此过程的详细信息,请参阅Nexus 3000、3100和3500 NX-OS精简映像过程文档。
此示例演示如何从SCP服务器192.0.2.100(可通过管理VRF访问)通过Compact Image Procedure(以compact关键字表示)从SCP复制NX-OS 7.0(3)I7(9)软件版本的统一二进制映像文件。
N3K-C3548# dir | include bin
   37739008    Nov 19 18:13:12 2020  n3500-uk9-kickstart.6.0.2.A8.11b.bin
  197055713    Nov 19 18:14:46 2020  n3500-uk9.6.0.2.A8.11b.bin
N3K-C3548# copy scp://username@192.0.2.100/nxos.7.0.3.I7.9.bin bootflash: compact vrf management
The authenticity of host '192.0.2.100 (192.0.2.100)' can't be established.
ECDSA key fingerprint is SHA1:00:11:06:bf:16:10:7b:e4:95:41:f3:75:4d:cb:41:d7:c7:8a:63:d1.
Are you sure you want to continue connecting (yes/no)? yes
Warning: Permanently added '192.0.2.100' (ECDSA) to the list of known hosts.
username@192.0.2.100's password:
nxos.7.0.3.I7.9.bin                                100%  937MB   2.6MB/s   06:06
Copy complete, now saving to disk (wait)...
Copy complete.
N3K-C3548# dir | include bin
   37739008    Nov 19 18:13:12 2020  n3500-uk9-kickstart.6.0.2.A8.11b.bin
  197055713    Nov 19 18:14:46 2020  n3500-uk9.6.0.2.A8.11b.bin
  459209441    Nov 19 20:28:50 2020  nxos.7.0.3.I7.9.bin
第 3a 步:验证目标版本的兼容性(可选)
执行升级时,请检查以确定运行此命令的影响:
nexus-3500# show install all impact kickstart bootflash:system bootflash:
此命令不适用于7.x版本系列中的统一映像,因为只有一个文件。如果尝试修改之前的命令以仅包含系统映像,则可能会失败,并显示以下消息:
nexus-3500# show install all impact system bootflash:nxos.7.0.3.I7.8.bin
Installer is forced disruptive

Verifying image bootflash:/n3500-uk9-kickstart.6.0.2.A8.11b.bin for boot variable "kickstart".
[########################################] 100% -- SUCCESS

Verifying image bootflash:/nxos.7.0.3.I7.8.bin for boot variable "system".
[########################################] 100% -- SUCCESS

Verifying image type.
[########################################] 100% -- SUCCESS

Extracting "system" version from image bootflash:/nxos.7.0.3.I7.8.bin.
[# ] 0% -- FAIL. Return code 0x404F0003 (SRG file not present/cannot be opened).
Pre-upgrade check failed. Return code 0x40930012 (SRG extraction failed).
要在Nexus 3500交换机上成功运行升级兼容性检查,必须仅使用该命令的kickstart部分和紧凑型映像运行该命令。在运行该命令的kickstart版本时未能使用压缩映像也会生成错误:
nexus-3500# show install all impact kickstart bootflash:nxos.7.0.3.I7.8.bin
Verifying image bootflash:/nxos.7.0.3.I7.8.bin for boot variable "kickstart".
[# ] 2% -- FAIL. Return code 0x40930084 (Upgrade cannot be continued with non-compact image!. Please use scp compacting for a compact image and retry ISSU.).
Pre-upgrade check failed. Return code 0x40930011 (Image verification failed).

nexus-3500#
nexus-3500# show install all impact kickstart bootflash:n3500-compact.7.0.3.I7.8.bin
Installer is forced disruptive

Verifying image bootflash:/nxos.7.0.3.I7.8.bin for boot variable "kickstart".
[########################################] 100% -- SUCCESS

Verifying image bootflash:/n3500-uk9-kickstart.6.0.2.A8.11b.bin for boot variable "system".
[########################################] 100% -- SUCCESS

Verifying image type.
[########################################] 100% -- SUCCESS

Extracting "system" version from image bootflash:/n3500-uk9-kickstart.6.0.2.A8.11b.bin
[########################################] 100% -- SUCCESS

Extracting "kickstart" version from image bootflash:/nxos.7.0.3.I7.8.bin.
[########################################] 100% -- SUCCESS

Extracting "bios" version from image bootflash:/n3500-uk9-kickstart.6.0.2.A8.11b.bin
[########################################] 100% -- SUCCESS

Collecting "running" plugin(s) information.
[########################################] 100% -- SUCCESS

Collecting plugin(s) information from "new" image.
[########################################] 100% -- SUCCESS

Performing runtime checks.
[########################################] 100% -- SUCCESS

Performing module support checks.
[########################################] 100% -- SUCCESS

Notifying services about system upgrade.
[########################################] 100% -- SUCCESS


Compatibility check is done:
Module bootable Impact Install-type Reason
------ -------- -------------- ------------ ------
1 no n/a n/a Wrong image


Module Image Running-Version New-Version Upg-Required
------ ---------------- ---------------------- ---------------------- ------------
1 system 6.0(2)A8(11b) 6.0(2)A8(11b) no
1 kickstart 6.0(2)A8(11b) 7.0(3)I5(2) no
1 bios v4.0.0(12/05/2016) v2.8.0(12/22/2015) no
1 SFP-uC v2.12 v2.12 no


Additional info for this installation:
--------------------------------------

Service "stp" : Port: Ethernet1/1 in VLAN0001 is Designated. Topology change could occur during upgrade.
Upgrade will be disruptive!!!
步骤4.通过Install All命令升级NX-OS软件
通过install all命令开始标准的中断NX-OS软件升级。此命令要求将nxos参数与目标版本对应的NX-OS统一二进制映像文件的绝对文件路径一起传入。
此示例显示install all命令,其中nxos参数指向NX-OS 7.0(3)I7(9)统一二进制映像文件(bootflash:nxos.7.0.3.I7.9.bin)的绝对文件路径。
N3K-C3548# install all nxos bootflash:nxos.7.0.3.I7.9.bin
Installer is forced disruptive

Verifying image bootflash:/nxos.7.0.3.I7.9.bin for boot variable "nxos".
[########################################] 100% -- SUCCESS

Verifying image type.
[########################################] 100% -- SUCCESS

Extracting "nxos" version from image bootflash:/nxos.7.0.3.I7.9.bin.
[########################################] 100% -- SUCCESS

Extracting "bios" version from image bootflash:/nxos.7.0.3.I7.9.bin.
[########################################] 100% -- SUCCESS

Performing runtime checks.
[########################################] 100% -- SUCCESS

Performing module support checks.
[########################################] 100% -- SUCCESS

Notifying services about system upgrade.
[########################################] 100% -- SUCCESS


Compatibility check is done:
Module  bootable          Impact  Install-type  Reason
------  --------  --------------  ------------  ------
     1       yes      disruptive         reset  Unsupported in new image, module needs to be powered off


Images will be upgraded according to this table:
Module             Image         Running-Version             New-Version  Upg-Required
------  ----------------  ----------------------  ----------------------  ------------
     1         kickstart           6.0(2)A8(11b)             7.0(3)I7(9)           yes
     1              bios      v1.9.0(10/13/2012)      v5.4.0(10/23/2019)           yes
     1         power-seq                    v2.1                    v2.1            no


Switch will be reloaded for disruptive upgrade.
Do you want to continue with the installation (y/n)?  [n] y

Time Stamp: Thu Nov 19 21:41:54 2020


Install is in progress, please wait.

Performing runtime checks.
[########################################] 100% -- SUCCESS

Setting boot variables.
[########################################] 100% -- SUCCESS

Performing configuration copy.
[########################################] 100% -- SUCCESS

Module 1: Refreshing compact flash and upgrading bios/loader/bootrom/power-seq.
Warning: please do not remove or power off the module at this time.
Note: Power-seq upgrade needs a power-cycle to take into effect.
On success of power-seq upgrade, SWITCH OFF THE POWER to the system and then, power it up.
[#                                       ]   0%
Time Stamp: Thu Nov 19 21:46:02 2020


Finishing the upgrade, switch will reboot in 10 seconds.
步骤5.检验NX-OS软件升级是否成功
在Nexus 3524或3548交换机重新加载后,通过show module命令验证升级是否成功。此命令的输出显示了所需的目标版本。请参阅此示例,其中交换机已成功升级到NX-OS软件版本7.0(3)I7(9)。
N3K-C3548# show module
Mod Ports             Module-Type                       Model          Status
--- ----- ------------------------------------- --------------------- ---------
1    48   48x10GE Supervisor                    N3K-C3548P-10G        active *

Mod  Sw                Hw     Slot
---  ----------------  ------ ----
1    7.0(3)I7(9)       1.0    NA
步骤6.从Cisco Nexus交换机删除中间版本的二进制映像文件
验证从中间版本到目标版本的NX-OS软件升级成功后,请从设备的bootflash中删除中间版本的kickstart和系统二进制映像文件,从而保留bootflash交换机上的可用空间。这可以通过delete bootflash:{filename}命令完成。
请参阅此示例,其中NX-OS 6.0(2)A8(11b)启动和系统二进制映像文件从bootflash交换机中删除。
N3K-C3548# dir | include bin
   37739008    Nov 19 18:13:12 2020  n3500-uk9-kickstart.6.0.2.A8.11b.bin
  197055713    Nov 19 18:14:46 2020  n3500-uk9.6.0.2.A8.11b.bin
  459209441    Nov 19 20:28:50 2020  nxos.7.0.3.I7.9.bin
N3K-C3548# delete bootflash:n3500-uk9-kickstart.6.0.2.A8.11b.bin
Do you want to delete "/n3500-uk9-kickstart.6.0.2.A8.11b.bin" ? (yes/no/abort)   [y]
N3K-C3548# delete bootflash:n3500-uk9.6.0.2.A8.11b.bin
Do you want to delete "/n3500-uk9.6.0.2.A8.11b.bin" ? (yes/no/abort)   [y]
N3K-C3548# dir | include bin
  459209441    Nov 19 20:28:50 2020  nxos.7.0.3.I7.9.bin
步骤7.运行初始设置脚本以重新应用CoPP策略
使用setup命令运行初始设置脚本。输入yes进入基本配置对话框,然后重复按Enter键接受所有默认选项,直到返回NX-OS CLI提示符。
参阅以下示例:
N3K-C3548# setup


         ---- Basic System Configuration Dialog ----

This setup utility will guide you through the basic configuration of
the system. Setup configures only enough connectivity for management
of the system.

*Note: setup is mainly used for configuring the system initially,
when no configuration is present. So setup always assumes system
defaults and not the current system configuration values.

Press Enter at anytime to skip a dialog. Use ctrl-c at anytime
to skip the remaining dialogs.

Would you like to enter the basic configuration dialog (yes/no): yes


  Create another login account (yes/no) [n]:

  Configure read-only SNMP community string (yes/no) [n]:

  Configure read-write SNMP community string (yes/no) [n]:

  Enter the switch name :

  Continue with Out-of-band (mgmt0) management configuration? (yes/no) [y]:

    Mgmt0 IPv4 address :

  Configure the default gateway? (yes/no) [y]:

    IPv4 address of the default gateway :

  Enable the telnet service? (yes/no) [n]:


  Enable the ssh service? (yes/no) [y]:


    Type of ssh key you would like to generate (dsa/rsa) :

  Configure the ntp server? (yes/no) [n]:

  Configure default interface layer (L3/L2) [L2]:


  Configure default switchport interface state (shut/noshut) [noshut]:

  Configure CoPP System Policy Profile ( default / l2 / l3 ) [default]:

This configuration will be applied:
  no telnet server enable
  system default switchport
  no system default switchport shutdown
  policy-map type control-plane copp-system-policy ( default )

Would you like to edit the configuration? (yes/no) [n]:


Use this configuration and save it? (yes/no) [y]:

MTC:Executing copp config


[########################################] 100%
Copy complete, now saving to disk (wait)...
Copy complete.
从NX-OS 6.x升级到NX-OS 9.2(x)
本节介绍如何执行标准中断NX-OS软件从NX-OS 6.x主版本中的源版本升级到NX-OS 9.2(x)次版本中的目标版本。
在Cisco Nexus 3548交换机上执行标准中断NX-OS软件升级的示例,从源版本6.0(2)A4(5)升级到目标版本9.2(4):
N3K-C3548# show module
Mod Ports Module-Type                         Model                  Status
--- ----- ----------------------------------- ---------------------- ------------
1   48    48x10GE Supervisor                  N3K-C3548P-10G-SUP     active *

Mod  Sw              Hw      World-Wide-Name(s) (WWN)
---  --------------  ------  ----------------------------------------------------
1    6.0(2)A4(5)     1.0     --
升级路径摘要
从NX-OS 6.x主版本到从NX-OS 9.2(x)次版本到中间版本6.0(2)A8(11b)的目标版本的升级路径摘要:
6.x -> 6.0(2)A8(11b) -> 9.2(x)
步骤1.从NX-OS 6.x升级到NX-OS 6.0(2)A8(11b)
使用本文档的从NX-OS 6.x升级到NX-OS 6.x部分执行从源版本到NX-OS软件版本6.0(2)A8(11b)中间版本的标准中断NX-OS软件升级。 要成功升级到NX-OS 9.2(x)次要版本中的目标版本,必须执行此操作。
步骤2.从思科软件下载下载目标版本
NX-OS 9.2(x)软件使用单个NX-OS二进制映像文件(有时称为统一映像文件)。 您必须从Cisco Software Download Website将此映像下载到本地计算机。从Cisco软件下载网站下载软件所需执行的具体步骤不在本文档的讨论范围之内。
步骤3.通过SCP通过精简映像程序将目标版本复制到Cisco Nexus交换机
通过SCP执行NX-OS精简映像程序,将目标版本的统一二进制映像文件复制到要中断升级的Nexus 3524或3548系列交换机。
有关此过程的详细信息,请参阅Nexus 3000、3100和3500 NX-OS精简映像过程文档
此示例演示如何从SCP服务器192.0.2.100(可通过管理VRF访问)通过Compact Image Procedure(由compact关键字表示)从SCP复制NX-OS 9.2(4)软件版本的统一二进制映像文件。
N3K-C3548# dir | include bin
   37739008    Nov 19 22:06:28 2020  n3500-uk9-kickstart.6.0.2.A8.11b.bin
  197055713    Nov 19 22:15:20 2020  n3500-uk9.6.0.2.A8.11b.bin
N3K-C3548# copy scp://username@192.0.2.100/nxos.9.2.4.bin bootflash: compact vrf management
The authenticity of host '192.0.2.100 (192.0.2.100)' can't be established.
ECDSA key fingerprint is SHA1:00:11:06:bf:16:10:7b:e4:95:41:f3:75:4d:cb:41:d7:c7:8a:63:d1.
Are you sure you want to continue connecting (yes/no)? yes
Warning: Permanently added '192.0.2.100' (ECDSA) to the list of known hosts.
username@192.0.2.100's password:
nxos.9.2.4.bin                                100% 1278MB   2.4MB/s   08:45
Copy complete, now saving to disk (wait)...
Copy complete.
N3K-C3548# dir | include bin
   37739008    Nov 19 22:06:28 2020  n3500-uk9-kickstart.6.0.2.A8.11b.bin
  197055713    Nov 19 22:15:20 2020  n3500-uk9.6.0.2.A8.11b.bin
  530509806    Nov 19 22:41:28 2020  nxos.9.2.4.bin
步骤4.通过Install All命令升级NX-OS软件
通过install all命令开始标准的中断NX-OS软件升级。此命令要求将nxos参数与目标版本对应的NX-OS统一二进制映像文件的绝对文件路径一起传入。
此示例显示install all命令,其中nxos参数指向NX-OS 9.2(4)统一二进制映像文件(bootflash:nxos.9.2.4.bin)的绝对文件路径。
N3K-C3548# install all nxos bootflash:nxos.9.2.4.bin
Installer is forced disruptive

Verifying image bootflash:/nxos.9.2.4.bin for boot variable "nxos".
[########################################] 100% -- SUCCESS

Verifying image type.
[########################################] 100% -- SUCCESS

Extracting "nxos" version from image bootflash:/nxos.9.2.4.bin.
[########################################] 100% -- SUCCESS

Extracting "bios" version from image bootflash:/nxos.9.2.4.bin.
[########################################] 100% -- SUCCESS

Performing runtime checks.
[########################################] 100% -- SUCCESS

Performing module support checks.
[########################################] 100% -- SUCCESS

Notifying services about system upgrade.
[########################################] 100% -- SUCCESS


Compatibility check is done:
Module  bootable          Impact  Install-type  Reason
------  --------  --------------  ------------  ------
     1       yes      disruptive         reset  Unsupported in new image, module needs to be powered off


Images will be upgraded according to this table:
Module             Image         Running-Version             New-Version  Upg-Required
------  ----------------  ----------------------  ----------------------  ------------
     1         kickstart           6.0(2)A8(11b)             9.2(4)I9(1)           yes
     1              bios      v1.9.0(10/13/2012)      v5.3.0(06/08/2019)           yes
     1         power-seq                    v2.1                    v2.1            no


Switch will be reloaded for disruptive upgrade.
Do you want to continue with the installation (y/n)?  [n] y

Time Stamp: Thu Nov 19 22:56:09 2020


Install is in progress, please wait.

Performing runtime checks.
[########################################] 100% -- SUCCESS

Setting boot variables.
[########################################] 100% -- SUCCESS

Performing configuration copy.
[########################################] 100% -- SUCCESS

Module 1: Refreshing compact flash and upgrading bios/loader/bootrom/power-seq.
Warning: please do not remove or power off the module at this time.
Note: Power-seq upgrade needs a power-cycle to take into effect.
On success of power-seq upgrade, SWITCH OFF THE POWER to the system and then, power it up.
[#                                       ]   0%
Time Stamp: Thu Nov 19 23:00:22 2020


Finishing the upgrade, switch will reboot in 10 seconds.
步骤5.检验NX-OS软件升级是否成功
在Nexus 3524或3548交换机重新加载后,通过show module命令验证升级是否成功。此命令的输出显示了所需的目标版本。请参阅此示例,其中交换机已成功升级到NX-OS软件版本9.2(4)。
N3K-C3548# show module
Mod Ports             Module-Type                       Model          Status
--- ----- ------------------------------------- --------------------- ---------
1    48   48x10GE Supervisor                    N3K-C3548P-10G        active *

Mod  Sw                       Hw    Slot
---  ----------------------- ------ ----
1    9.2(4)                   1.0    NA
步骤6.从Cisco Nexus交换机删除中间版本的二进制映像文件
验证从中间版本到目标版本的NX-OS软件升级成功后,请从设备的bootflash中删除中间版本的kickstart和系统二进制映像文件,从而保留bootflash交换机上的可用空间。这可以通过delete bootflash:{filename}命令完成。请参阅此示例,其中NX-OS 6.0(2)A8(11b)启动和系统二进制映像文件从bootflash交换机中删除。
N3K-C3548# dir | include bin
   37739008    Nov 19 22:06:28 2020  n3500-uk9-kickstart.6.0.2.A8.11b.bin
  197055713    Nov 19 22:15:20 2020  n3500-uk9.6.0.2.A8.11b.bin
  530509806    Nov 19 22:41:28 2020  nxos.9.2.4.bin
N3K-C3548# delete bootflash:n3500-uk9-kickstart.6.0.2.A8.11b.bin
Do you want to delete "/n3500-uk9-kickstart.6.0.2.A8.11b.bin" ? (yes/no/abort)   [y]
N3K-C3548# delete bootflash:n3500-uk9.6.0.2.A8.11b.bin
Do you want to delete "/n3500-uk9.6.0.2.A8.11b.bin" ? (yes/no/abort)   [y]
N3K-C3548# dir | include bin
  530509806    Nov 19 22:41:28 2020  nxos.9.2.4.bin
步骤7.运行初始设置脚本以重新应用CoPP策略
使用setup命令运行初始设置脚本。输入yes进入基本配置对话框,然后重复按Enter键接受所有默认选项,直到返回NX-OS CLI提示符。
参阅以下示例:
N3K-C3548# setup


         ---- Basic System Configuration Dialog ----

This setup utility will guide you through the basic configuration of
the system. Setup configures only enough connectivity for management
of the system.

*Note: setup is mainly used for configuring the system initially,
when no configuration is present. So setup always assumes system
defaults and not the current system configuration values.

Press Enter at anytime to skip a dialog. Use ctrl-c at anytime
to skip the remaining dialogs.

Would you like to enter the basic configuration dialog (yes/no): yes


  Create another login account (yes/no) [n]:

  Configure read-only SNMP community string (yes/no) [n]:

  Configure read-write SNMP community string (yes/no) [n]:

  Enter the switch name :

  Continue with Out-of-band (mgmt0) management configuration? (yes/no) [y]:

    Mgmt0 IPv4 address :

  Configure the default gateway? (yes/no) [y]:

    IPv4 address of the default gateway :

  Enable the telnet service? (yes/no) [n]:

  Enable the ssh service? (yes/no) [y]:

    Type of ssh key you would like to generate (dsa/rsa) :

  Configure the ntp server? (yes/no) [n]:

  Configure default interface layer (L3/L2) [L2]:

  Configure default switchport interface state (shut/noshut) [noshut]:

  Configure CoPP System Policy Profile ( default / l2 / l3 ) [default]:

This configuration will be applied:
  no telnet server enable
  system default switchport
  no system default switchport shutdown
  policy-map type control-plane copp-system-policy ( default )

Would you like to edit the configuration? (yes/no) [n]:

Use this configuration and save it? (yes/no) [y]:
MTC:Executing copp config

[########################################] 100%
Copy complete, now saving to disk (wait)...
Copy complete.
从NX-OS 6.x升级到NX-OS 9.3(x)
本节介绍如何执行标准中断NX-OS软件从NX-OS 6.x主版本中的源版本升级到NX-OS 9.3(x)次版本中的目标版本。
在Cisco Nexus 3548交换机上执行标准中断NX-OS软件升级的示例,从源版本6.0(2)A4(5)升级到目标版本9.3(6):
N3K-C3548# show module
Mod Ports Module-Type                         Model                  Status
--- ----- ----------------------------------- ---------------------- ------------
1   48    48x10GE Supervisor                  N3K-C3548P-10G-SUP     active *

Mod  Sw              Hw      World-Wide-Name(s) (WWN)
---  --------------  ------  ----------------------------------------------------
1    6.0(2)A4(5)     1.0     --
升级路径摘要
从NX-OS 6.x主版本到NX-OS 9.3(x)次版本从中间版本6.0(2)A8(11b)和7.0(3)I7(9)的升级路径总结:
6.x -> 6.0(2)A8(11b) -> 7.0(3)I7(9) -> 9.3(x)
步骤1.从NX-OS 6.x升级到NX-OS 6.0(2)A8(11b)
使用本文档的从NX-OS 6.x升级到NX-OS 6.x部分执行从源版本到NX-OS软件版本6.0(2)A8(11b)中间版本的标准中断NX-OS软件升级。 要成功升级到7.0(3)I7(9)的中间版本,必须执行此操作。
步骤2.从NX-OS 6.0(2)A8(11b)升级到NX-OS 7.0(3)I7(9)
使用本文档的从NX-OS 6.x升级到NX-OS 7.x部分执行标准的中断NX-OS软件升级,从中间版本6.0(2)A8(11b)升级到中间版本7.0(3)I7(9)。 要成功升级到NX-OS 9.2(x)次要版本中的目标版本,必须执行此操作。
步骤3.从NX-OS 7.0(3)I7(9)升级到NX-OS 9.3(x)
使用本文档的从NX-OS 7.x升级到NX-OS 9.3(x)部分执行从7.0(3)I7(9)中间版本到NX-OS 9.3(x)次要版本中所需目标版本的标准中断NX-OS软件升级。
从NX-OS 7.x升级到NX-OS 7.x
本文档的这一部分介绍如何执行标准的中断NX-OS软件升级,从NX-OS 7.x主版本中的源版本升级到NX-OS 7.x主版本中的目标版本。
在Cisco Nexus 3548交换机上执行标准中断NX-OS软件升级的示例,从7.0(3)I7(2)源版本升级到7.0(3)I7(9)目标版本:
N3K-C3548# show module
Mod Ports             Module-Type                       Model          Status
--- ----- ------------------------------------- --------------------- ---------
1    48   48x10GE Supervisor                    N3K-C3548P-10G        active *

Mod  Sw                Hw     Slot
---  ----------------  ------ ----
1    7.0(3)I7(2)       1.0    NA
升级路径摘要
从NX-OS 7.x主版本中的源版本到NX-OS 7.x主版本中的目标版本的升级路径摘要:
7.x -> 7.x
步骤1.从思科软件下载下载目标版本
NX-OS 7.x软件使用单个NX-OS二进制映像文件(有时称为统一映像文件)。 您必须从Cisco Software Download Website将此映像下载到本地计算机。从Cisco软件下载网站下载软件所需执行的具体步骤不在本文档的讨论范围之内。
步骤2.通过SCP通过精简映像程序将目标版本复制到Cisco Nexus交换机
通过SCP执行NX-OS精简映像程序,将目标版本的统一二进制映像文件复制到要中断升级的Nexus 3524或3548系列交换机。
有关此过程的详细信息,请参阅Nexus 3000、3100和3500 NX-OS精简映像过程文档
此示例演示如何从SCP服务器192.0.2.100(可通过管理VRF访问)通过Compact Image Procedure(以compact关键字表示)从SCP复制NX-OS 7.0(3)I7(9)软件版本的统一二进制映像文件。
N3K-C3548# dir | include bin
  416939523    Nov 20 03:26:37 2020  nxos.7.0.3.I7.2.bin
N3K-C3548# copy scp://username@192.0.2.100/nxos.7.0.3.I7.9.bin bootflash: compact vrf management
The authenticity of host '192.0.2.100 (192.0.2.100)' can't be established.
ECDSA key fingerprint is SHA256:TwkQiylhtFDFPPwqh3U2Oq9ugrDuTQ50bB3boV5DkXM.
Are you sure you want to continue connecting (yes/no)? yes
Warning: Permanently added '192.0.2.100' (ECDSA) to the list of known hosts.
username@192.0.2.100's password:
nxos.7.0.3.I7.9.bin                                100%  937MB   3.6MB/s   04:24
Copy complete, now saving to disk (wait)...
Copy complete.
N3K-C3548# dir | include bin
  416939523    Nov 20 03:26:37 2020  nxos.7.0.3.I7.2.bin
  459209441    Nov 20 03:43:38 2020  nxos.7.0.3.I7.9.bin
步骤3.通过Install All命令升级NX-OS软件
通过install all命令开始标准的中断NX-OS软件升级。此命令要求将nxos参数与目标版本对应的NX-OS统一二进制映像文件的绝对文件路径一起传入。
此示例显示install all命令,其中nxos参数指向NX-OS 7.0(3)I7(9)统一二进制映像文件(bootflash:nxos.7.0.3.I7.9.bin)的绝对文件路径。
N3K-C3548# install all nxos bootflash:nxos.7.0.3.I7.9.bin
Installer will perform compatibility check first. Please wait.
Installer is forced disruptive

Verifying image bootflash:/nxos.7.0.3.I7.9.bin for boot variable "nxos".
[####################] 100% -- SUCCESS

Verifying image type.
[####################] 100% -- SUCCESS

Preparing "nxos" version info using image bootflash:/nxos.7.0.3.I7.9.bin.
[####################] 100% -- SUCCESS

Preparing "bios" version info using image bootflash:/nxos.7.0.3.I7.9.bin.
[####################] 100% -- SUCCESS

Collecting "running" plugin(s) information.
[####################] 100% -- SUCCESS

Collecting plugin(s) information from "new" image.
[####################] 100% -- SUCCESS
[####################] 100% -- SUCCESS

Performing module support checks.
[####################] 100% -- SUCCESS

Notifying services about system upgrade.
[####################] 100% -- SUCCESS


Compatibility check is done:
Module  bootable          Impact  Install-type  Reason
------  --------  --------------  ------------  ------
     1       yes      disruptive         reset  default upgrade is not hitless


Images will be upgraded according to this table:
Module       Image                  Running-Version(pri:alt)           New-Version  Upg-Required
------  ----------  ----------------------------------------  --------------------  ------------
     1        nxos                               7.0(3)I7(2)           7.0(3)I7(9)           yes
     1        bios                        v5.4.0(10/23/2019)    v5.4.0(10/23/2019)            no


Switch will be reloaded for disruptive upgrade.
Do you want to continue with the installation (y/n)?  [n] y


Install is in progress, please wait.

Performing runtime checks.
[####################] 100% -- SUCCESS

Setting boot variables.
[####################] 100% -- SUCCESS

Performing configuration copy.
[####################] 100% -- SUCCESS

Module 1: Refreshing compact flash and upgrading bios/loader/bootrom.
Warning: please do not remove or power off the module at this time.
[####################] 100% -- SUCCESS


Finishing the upgrade, switch will reboot in 10 seconds.
步骤4.检验NX-OS软件升级是否成功
在Nexus 3524或3548交换机重新加载后,通过show module命令验证升级是否成功。此命令的输出显示了所需的目标版本。请参阅此示例,其中交换机已成功升级到NX-OS软件版本7.0(3)I7(9)。
N3K-C3548# show module
Mod Ports             Module-Type                       Model          Status
--- ----- ------------------------------------- --------------------- ---------
1    48   48x10GE Supervisor                    N3K-C3548P-10G        active *

Mod  Sw                Hw     Slot
---  ----------------  ------ ----
1    7.0(3)I7(9)       1.0    NA
步骤5.从Cisco Nexus交换机删除源版本的二进制映像文件
验证从源版本到目标版本的NX-OS软件升级成功后,请从设备的Bootflash中删除源版本的统一二进制映像文件,从而在Bootflash交换机上保留可用空间。这可以通过delete bootflash:{filename}命令完成。请参阅此示例,其中NX-OS 7.0(3)I7(2)统一二进制映像文件从bootflash交换机中删除。
N3K-C3548# dir | include bin
  416939523    Nov 20 03:26:37 2020  nxos.7.0.3.I7.2.bin
  459209441    Nov 20 03:43:38 2020  nxos.7.0.3.I7.9.bin
N3K-C3548# delete bootflash:nxos.7.0.3.I7.2.bin
Do you want to delete "/nxos.7.0.3.I7.2.bin" ? (yes/no/abort)   [y]
N3K-C3548# dir | include bin
  459209441    Nov 20 03:43:38 2020  nxos.7.0.3.I7.9.bin
步骤6.运行初始设置脚本以重新应用CoPP策略
使用setup命令运行初始设置脚本。输入yes进入基本配置对话框,然后重复按Enter键接受所有默认选项,直到返回NX-OS CLI提示符。
参阅以下示例:
N3K-C3548# setup


         ---- Basic System Configuration Dialog ----

This setup utility will guide you through the basic configuration of
the system. Setup configures only enough connectivity for management
of the system.

*Note: setup is mainly used for configuring the system initially,
when no configuration is present. So setup always assumes system
defaults and not the current system configuration values.

Press Enter at anytime to skip a dialog. Use ctrl-c at anytime
to skip the remaining dialogs.

Would you like to enter the basic configuration dialog (yes/no): yes


  Create another login account (yes/no) [n]:

  Configure read-only SNMP community string (yes/no) [n]:

  Configure read-write SNMP community string (yes/no) [n]:

  Enter the switch name :

  Continue with Out-of-band (mgmt0) management configuration? (yes/no) [y]:

    Mgmt0 IPv4 address :

  Configure the default gateway? (yes/no) [y]:

    IPv4 address of the default gateway :

  Enable the telnet service? (yes/no) [n]:

  Enable the ssh service? (yes/no) [y]:

    Type of ssh key you would like to generate (dsa/rsa) :

  Configure the ntp server? (yes/no) [n]:

  Configure default interface layer (L3/L2) [L2]:

  Configure default switchport interface state (shut/noshut) [noshut]:

  Configure CoPP System Policy Profile ( default / l2 / l3 ) [default]:

This configuration will be applied:
  no telnet server enable
  system default switchport
  no system default switchport shutdown
  policy-map type control-plane copp-system-policy ( default )

Would you like to edit the configuration? (yes/no) [n]:

Use this configuration and save it? (yes/no) [y]:
MTC:Executing copp config

[########################################] 100%
Copy complete, now saving to disk (please wait)...
Copy complete.
从NX-OS 7.x升级到NX-OS 9.2(x)
本文档的这一部分介绍如何执行标准的中断NX-OS软件升级,从NX-OS 7.x主版本中的源版本升级到NX-OS 9.2(x)次版本中的目标版本。
在Cisco Nexus 3548交换机上执行标准中断NX-OS软件升级的示例,从源版本7.0(3)I7(2)升级到目标版本9.2(4):
N3K-C3548# show module
Mod Ports             Module-Type                       Model          Status
--- ----- ------------------------------------- --------------------- ---------
1    48   48x10GE Supervisor                    N3K-C3548P-10G        active *

Mod  Sw                Hw     Slot
---  ----------------  ------ ----
1    7.0(3)I7(2)       1.0    NA
升级路径摘要
从NX-OS 7.x主版本到从NX-OS 9.2(x)次版本到中间版本7.0(3)I7(9)的目标版本的升级路径摘要如下所示:
7.x -> 7.0(3)I7(9) -> 9.2(x)
步骤1.从NX-OS 7.x升级到NX-OS 7.0(3)I7(9)
使用本文档的从NX-OS 7.x升级到NX-OS 7.x部分执行从源版本到NX-OS软件版本7.0(3)I7(9)中间版本的标准中断NX-OS软件升级。 要成功升级到NX-OS 9.2(x)次要版本中的目标版本,必须执行此操作。
步骤2.从思科软件下载下载目标版本
NX-OS 9.2(x)软件使用单个NX-OS二进制映像文件(有时称为统一映像文件)。 您必须从Cisco Software Download Website将此映像下载到本地计算机。从Cisco软件下载网站下载软件所需执行的具体步骤不在本文档的讨论范围之内。
步骤3.通过SCP通过精简映像程序将目标版本复制到Cisco Nexus交换机
通过SCP执行NX-OS精简映像程序,将目标版本的统一二进制映像文件复制到要中断升级的Nexus 3524或3548系列交换机。
有关此过程的详细信息,请参阅Nexus 3000、3100和3500 NX-OS精简映像过程文档
此示例演示如何从SCP服务器192.0.2.100(可通过管理VRF访问)通过Compact Image Procedure(由compact关键字表示)从SCP复制NX-OS 9.2(4)软件版本的统一二进制映像文件。
N3K-C3548# dir | include bin
  459209441    Nov 20 03:43:38 2020  nxos.7.0.3.I7.9.bin
N3K-C3548# copy scp://username@192.0.2.100/nxos.9.2.4.bin bootflash: compact vrf management
The authenticity of host '192.0.2.100 (192.0.2.100)' can't be established.
ECDSA key fingerprint is SHA256:TwkQiylhtFDFPPwqh3U2Oq9ugrDuTQ50bB3boV5DkXM.
Are you sure you want to continue connecting (yes/no)? yes
Warning: Permanently added '192.0.2.100' (ECDSA) to the list of known hosts.
username@192.0.2.100's password:
nxos.9.2.4.bin                                100% 1278MB   3.0MB/s   07:09
Copy complete, now saving to disk (please wait)...
Copy complete.
N3K-C3548# dir | include bin
  459209441    Nov 20 03:43:38 2020  nxos.7.0.3.I7.9.bin
  530509806    Nov 20 04:30:47 2020  nxos.9.2.4.bin
步骤4.通过Install All命令升级NX-OS软件
通过install all命令开始标准的中断NX-OS软件升级。此命令要求将nxos参数与目标版本对应的NX-OS统一二进制映像文件的绝对文件路径一起传入。
此示例显示install all命令,其中nxos参数指向NX-OS 9.2(4)统一二进制映像文件(bootflash:nxos.9.2.4.bin)的绝对文件路径。
N3K-C3548# install all nxos bootflash:nxos.9.2.4.bin
Installer will perform compatibility check first. Please wait.
Installer is forced disruptive

Verifying image bootflash:/nxos.9.2.4.bin for boot variable "nxos".
[####################] 100% -- SUCCESS

Verifying image type.
[####################] 100% -- SUCCESS
[##                  ]   5% -- SUCCESS

Preparing "nxos" version info using image bootflash:/nxos.9.2.4.bin.
[####################] 100% -- SUCCESS

Preparing "bios" version info using image bootflash:/nxos.9.2.4.bin.
[####################] 100% -- SUCCESS

Collecting "running" plugin(s) information.
[####################] 100% -- SUCCESS

Collecting plugin(s) information from "new" image.
[####################] 100% -- SUCCESS
[####################] 100% -- SUCCESS

Performing module support checks.
[####################] 100% -- SUCCESS

Notifying services about system upgrade.
[####################] 100% -- SUCCESS


Compatibility check is done:
Module  bootable          Impact  Install-type  Reason
------  --------  --------------  ------------  ------
     1       yes      disruptive         reset  default upgrade is not hitless


Images will be upgraded according to this table:
Module       Image                  Running-Version(pri:alt)           New-Version  Upg-Required
------  ----------  ----------------------------------------  --------------------  ------------
     1        nxos                               7.0(3)I7(9)                9.2(4)           yes
     1        bios                        v5.4.0(10/23/2019)    v5.3.0(06/08/2019)            no


Switch will be reloaded for disruptive upgrade.
Do you want to continue with the installation (y/n)?  [n] y


Install is in progress, please wait.

Performing runtime checks.
[####################] 100% -- SUCCESS

Setting boot variables.
[####################] 100% -- SUCCESS

Performing configuration copy.
[####################] 100% -- SUCCESS

Module 1: Refreshing compact flash and upgrading bios/loader/bootrom.
Warning: please do not remove or power off the module at this time.
[####################] 100% -- SUCCESS


Finishing the upgrade, switch will reboot in 10 seconds.
步骤5.检验NX-OS软件升级是否成功
在Nexus 3524或3548交换机重新加载后,通过show module命令验证升级是否成功。此命令的输出显示了所需的目标版本。请参阅此示例,其中交换机已成功升级到NX-OS软件版本9.2(4)。
N3K-C3548# show module
Mod Ports             Module-Type                       Model          Status
--- ----- ------------------------------------- --------------------- ---------
1    48   48x10GE Supervisor                    N3K-C3548P-10G        active *

Mod  Sw                       Hw    Slot
---  ----------------------- ------ ----
1    9.2(4)                   1.0    NA
步骤6.从Cisco Nexus交换机删除中间版本的二进制映像文件
验证从中间版本到目标版本的NX-OS软件升级成功后,请从设备的bootflash中删除中间版本的统一映像文件,从而在bootflash交换机上保留可用空间。这可以通过delete bootflash:{filename}命令完成。请参阅此示例,其中NX-OS 7.0(3)I7(9)统一二进制映像文件从bootflash交换机中删除。
N3K-C3548# dir | include bin
  459209441    Nov 20 03:43:38 2020  nxos.7.0.3.I7.9.bin
  530509806    Nov 20 04:30:47 2020  nxos.9.2.4.bin
N3K-C3548# delete bootflash:nxos.7.0.3.I7.9.bin
Do you want to delete "/nxos.7.0.3.I7.9.bin" ? (yes/no/abort)   [y]
N3K-C3548# dir | include bin
  530509806    Nov 20 04:30:47 2020  nxos.9.2.4.bin
步骤7.运行初始设置脚本以重新应用CoPP策略
使用setup命令运行初始设置脚本。输入yes进入基本配置对话框,然后重复按Enter键接受所有默认选项,直到返回NX-OS CLI提示符。
参阅以下示例:
N3K-C3548# setup


         ---- Basic System Configuration Dialog ----

This setup utility will guide you through the basic configuration of
the system. Setup configures only enough connectivity for management
of the system.

*Note: setup is mainly used for configuring the system initially,
when no configuration is present. So setup always assumes system
defaults and not the current system configuration values.

Press Enter at anytime to skip a dialog. Use ctrl-c at anytime
to skip the remaining dialogs.

Would you like to enter the basic configuration dialog (yes/no): yes


  Create another login account (yes/no) [n]:

  Configure read-only SNMP community string (yes/no) [n]:

  Configure read-write SNMP community string (yes/no) [n]:

  Enter the switch name :

  Continue with Out-of-band (mgmt0) management configuration? (yes/no) [y]:

    Mgmt0 IPv4 address :

  Configure the default gateway? (yes/no) [y]:

    IPv4 address of the default gateway :

  Enable the telnet service? (yes/no) [n]:

  Enable the ssh service? (yes/no) [y]:

    Type of ssh key you would like to generate (dsa/rsa) :

  Configure the ntp server? (yes/no) [n]:

  Configure default interface layer (L3/L2) [L2]:

  Configure default switchport interface state (shut/noshut) [noshut]:

  Configure CoPP System Policy Profile ( default / l2 / l3 ) [default]:

This configuration will be applied:
  no telnet server enable
  system default switchport
  no system default switchport shutdown
  policy-map type control-plane copp-system-policy ( default )

Would you like to edit the configuration? (yes/no) [n]:

Use this configuration and save it? (yes/no) [y]:
MTC:Executing copp config

[########################################] 100%
Copy complete, now saving to disk (wait)...
Copy complete.
从NX-OS 7.x升级到NX-OS 9.3(x)
本节介绍如何执行标准中断NX-OS软件从NX-OS 7.x主要版本中的源版本升级到NX-OS 9.3(x)次要版本中的目标版本。
在Cisco Nexus 3548交换机上执行标准中断NX-OS软件升级的示例,从源版本7.0(3)I7(2)升级到目标版本9.3(6):
N3K-C3548# show module
Mod Ports             Module-Type                       Model          Status
--- ----- ------------------------------------- --------------------- ---------
1    48   48x10GE Supervisor                    N3K-C3548P-10G        active *

Mod  Sw                Hw     Slot
---  ----------------  ------ ----
1    7.0(3)I7(2)       1.0    NA
升级路径摘要
从NX-OS 7.x主版本到从NX-OS 9.3(x)次版本到中间版本7.0(3)I7(9)的目标版本的升级路径摘要:
7.x -> 7.0(3)I7(9) -> 9.3(x)
步骤1.从NX-OS 7.x升级到NX-OS 7.0(3)I7(9)
使用本文档的从NX-OS 7.x升级到NX-OS 7.x部分执行从源版本到NX-OS软件版本7.0(3)I7(9)中间版本的标准中断NX-OS软件升级。 要成功升级到NX-OS 9.3(x)次要版本中的目标版本,必须执行此操作。
步骤2.从思科软件下载下载目标版本
NX-OS 9.3(x)软件使用单个NX-OS二进制映像文件(有时称为统一映像文件)。 您必须从Cisco Software Download Website将此映像下载到本地计算机。从Cisco软件下载网站下载软件所需执行的具体步骤不在本文档的讨论范围之内。
步骤3.通过SCP通过精简映像程序将目标版本复制到Cisco Nexus交换机
通过SCP执行NX-OS精简映像程序,将目标版本的统一二进制映像文件复制到要中断升级的Nexus 3524或3548系列交换机。
有关此过程的详细信息,请参阅Nexus 3000、3100和3500 NX-OS精简映像过程文档
此示例演示如何从SCP服务器192.0.2.100(可通过管理VRF访问)通过Compact Image Procedure(由compact关键字表示)从SCP复制NX-OS 9.3(6)软件版本的统一二进制映像文件。
N3K-C3548# dir | include bin
  459209441    Nov 19 23:44:19 2020  nxos.7.0.3.I7.9.bin
N3K-C3548# copy scp://username@192.0.2.100/nxos.9.3.6.bin bootflash: compact vrf management
The authenticity of host '192.0.2.100 (192.0.2.100)' can't be established.
ECDSA key fingerprint is SHA256:TwkQiylhtFDFPPwqh3U2Oq9ugrDuTQ50bB3boV5DkXM.
Are you sure you want to continue connecting (yes/no)? yes
Warning: Permanently added '192.0.2.100' (ECDSA) to the list of known hosts.
username@192.0.2.100's password:
nxos.9.3.6.bin                                100% 1882MB   3.1MB/s   10:09
Copy complete, now saving to disk (wait)...
Copy complete.
N3K-C3548# dir | include bin
  459209441    Nov 19 23:44:19 2020  nxos.7.0.3.I7.9.bin
  671643688    Nov 20 00:47:00 2020  nxos.9.3.6.bin
步骤4.通过Install All命令升级NX-OS软件
通过install all命令开始标准的中断NX-OS软件升级。此命令要求将nxos参数与目标版本对应的NX-OS统一二进制映像文件的绝对文件路径一起传入。
此示例显示install all命令,其中nxos参数指向NX-OS 9.3(6)统一二进制映像文件(bootflash:nxos.9.3.6.bin)的绝对文件路径。
N3K-C3548# install all nxos bootflash:nxos.9.3.6.bin
Installer will perform compatibility check first. Please wait.
Installer is forced disruptive

Verifying image bootflash:/nxos.9.3.6.bin for boot variable "nxos".
[####################] 100% -- SUCCESS

Verifying image type.
[####################] 100% -- SUCCESS

Preparing "nxos" version info using image bootflash:/nxos.9.3.6.bin.
[####################] 100% -- SUCCESS

Preparing "bios" version info using image bootflash:/nxos.9.3.6.bin.
[####################] 100% -- SUCCESS

Collecting "running" plugin(s) information.
[####################] 100% -- SUCCESS

Collecting plugin(s) information from "new" image.
[####################] 100% -- SUCCESS

Performing module support checks.
[####################] 100% -- SUCCESS

Notifying services about system upgrade.
[####################] 100% -- SUCCESS


Compatibility check is done:
Module  bootable          Impact  Install-type  Reason
------  --------  --------------  ------------  ------
     1       yes      disruptive         reset  default upgrade is not hitless


Images will be upgraded according to this table:
Module       Image                  Running-Version(pri:alt)           New-Version  Upg-Required
------  ----------  ----------------------------------------  --------------------  ------------
     1        nxos                               7.0(3)I7(9)                9.3(6)           yes
     1        bios                        v5.4.0(10/23/2019)    v5.4.0(10/23/2019)            no


Switch will be reloaded for disruptive upgrade.
Do you want to continue with the installation (y/n)?  [n] y


Install is in progress, please wait.

Performing runtime checks.
[####################] 100% -- SUCCESS

Setting boot variables.
[####################] 100% -- SUCCESS

Performing configuration copy.
[####################] 100% -- SUCCESS

Module 1: Refreshing compact flash and upgrading bios/loader/bootrom.
Warning: please do not remove or power off the module at this time.
[####################] 100% -- SUCCESS


Finishing the upgrade, switch will reboot in 10 seconds.
步骤5.检验NX-OS软件升级是否成功
在Nexus 3524或3548交换机重新加载后,通过show module命令验证升级是否成功。此命令的输出显示了所需的目标版本。请参阅此示例,其中交换机已成功升级到NX-OS软件版本9.3(6)。
N3K-C3548# show module
Mod Ports             Module-Type                      Model           Status
--- ----- ------------------------------------- --------------------- ---------
1    48   48x10GE Supervisor                    N3K-C3548P-10G        active *

Mod  Sw                       Hw    Slot
---  ----------------------- ------ ----
1    9.3(6)                   1.0    NA
步骤6.从Cisco Nexus交换机删除中间版本的二进制映像文件
验证从中间版本到目标版本的NX-OS软件升级成功后,请从设备的bootflash中删除中间版本的统一二进制映像文件,从而保留bootflash交换机上的可用空间。这可以通过delete bootflash:{filename}命令完成。请参阅此示例,其中NX-OS 7.0(3)I7(9)统一二进制映像文件从bootflash交换机中删除。
N3K-C3548# dir | include bin
  459209441    Nov 19 23:44:19 2020  nxos.7.0.3.I7.9.bin
  671643688    Nov 20 00:47:00 2020  nxos.9.3.6.bin
N3K-C3548# delete bootflash:nxos.7.0.3.I7.9.bin
Do you want to delete "/nxos.7.0.3.I7.9.bin" ? (yes/no/abort)   [y]
N3K-C3548# dir | include bin
  671643688    Nov 20 00:47:00 2020  nxos.9.3.6.bin
步骤7.运行初始设置脚本以重新应用CoPP策略
使用setup命令运行初始设置脚本。输入yes进入基本配置对话框,然后重复按Enter键接受所有默认选项,直到返回NX-OS CLI提示符。
参阅以下示例:
N3K-C3548# setup


         ---- Basic System Configuration Dialog ----

This setup utility will guide you through the basic configuration of
the system. Setup configures only enough connectivity for management
of the system.

*Note: setup is mainly used for configuring the system initially,
when no configuration is present. So setup always assumes system
defaults and not the current system configuration values.

Press Enter at anytime to skip a dialog. Use ctrl-c at anytime
to skip the remaining dialogs.

Would you like to enter the basic configuration dialog (yes/no): yes


  Create another login account (yes/no) [n]:

  Configure read-only SNMP community string (yes/no) [n]:

  Configure read-write SNMP community string (yes/no) [n]:

  Enter the switch name :

  Continue with Out-of-band (mgmt0) management configuration? (yes/no) [y]:

    Mgmt0 IPv4 address :

  Configure the default gateway? (yes/no) [y]:

    IPv4 address of the default gateway :

  Enable the telnet service? (yes/no) [n]:

  Enable the ssh service? (yes/no) [y]:

    Type of ssh key you would like to generate (dsa/rsa) :

  Configure the ntp server? (yes/no) [n]:

  Configure default interface layer (L3/L2) [L2]:

  Configure default switchport interface state (shut/noshut) [noshut]:

  Configure CoPP System Policy Profile ( default / l2 / l3 ) [default]:

This configuration will be applied:
  no telnet server enable
  system default switchport
  no system default switchport shutdown
  policy-map type control-plane copp-system-policy ( default )

Would you like to edit the configuration? (yes/no) [n]:

Use this configuration and save it? (yes/no) [y]:
MTC:Executing copp config

[########################################] 100%
Copy complete, now saving to disk (please wait)...
Copy complete.
从NX-OS 9.2(x)升级到NX-OS 9.2(x)
本节介绍如何从NX-OS 9.2(x)次要版本中的源版本到NX-OS 9.2(x)次要版本中的目标版本执行标准的中断NX-OS软件升级。
在Cisco Nexus 3548交换机上执行标准中断NX-OS软件从9.2(1)版本到9.2(4)目标版本的升级示例:
N3K-C3548# show module
Mod Ports             Module-Type                       Model          Status
--- ----- ------------------------------------- --------------------- ---------
1    48   48x10GE Supervisor                    N3K-C3548P-10G        active *

Mod  Sw                       Hw    Slot
---  ----------------------- ------ ----
1    9.2(1)                   1.0    NA
升级路径摘要
从NX-OS 9.2(x)次要版本中的源版本到NX-OS 9.2(x)中的目标版本的升级路径摘要:
9.2(x) -> 9.2(x)
步骤1.从思科软件下载下载目标版本
NX-OS 9.2(x)软件使用单个NX-OS二进制映像文件(有时称为统一映像文件)。 您必须从Cisco Software Download Website将此映像下载到本地计算机。从Cisco软件下载网站下载软件所需执行的具体步骤不在本文档的讨论范围之内。
步骤2.通过SCP通过精简映像程序将目标版本复制到Cisco Nexus交换机
通过SCP执行NX-OS精简映像程序,将目标版本的统一二进制映像文件复制到要中断升级的Nexus 3524或3548系列交换机。
有关此过程的详细信息,请参阅Nexus 3000、3100和3500 NX-OS精简映像过程文档
此示例演示如何从可通过管理VRF访问的SCP服务器192.0.2.100通过Compact Image Procedure(以compact关键字表示)通过SCP(安全复制协议)复制NX-OS 9.2(4)软件版本的统一二进制映像文件。
N3K-C3548# dir | include bin
  512339094    Nov 20 16:58:21 2020  nxos.9.2.1.bin
N3K-C3548# copy scp://username@192.0.2.100/nxos.9.2.4.bin bootflash: compact vrf management
The authenticity of host '192.0.2.100 (192.0.2.100)' can't be established.
ECDSA key fingerprint is SHA256:TwkQiylhtFDFPPwqh3U2Oq9ugrDuTQ50bB3boV5DkXM.
Are you sure you want to continue connecting (yes/no)? yes
Warning: Permanently added '192.0.2.100' (ECDSA) to the list of known hosts.
username@192.0.2.100's password:
nxos.9.2.4.bin                                100% 1278MB   3.9MB/s   05:31
Copy complete, now saving to disk (please wait)...
Copy complete.
N3K-C3548# dir | include bin
  512339094    Nov 20 16:58:21 2020  nxos.9.2.1.bin
  530509806    Nov 23 18:58:45 2020  nxos.9.2.4.bin
步骤3.通过Install All命令升级NX-OS软件
通过install all命令开始标准的中断NX-OS软件升级。此命令要求将nxos参数与目标版本对应的NX-OS统一二进制映像文件的绝对文件路径一起传入。
此示例显示install all命令,其中nxos参数指向NX-OS 9.2(4)统一二进制映像文件(bootflash:nxos.9.2.4.bin)的绝对文件路径。
N3K-C3548# install all nxos bootflash:nxos.9.2.4.bin
Installer will perform compatibility check first. Please wait.
Installer is forced disruptive

Verifying image bootflash:/nxos.9.2.4.bin for boot variable "nxos".
[####################] 100% -- SUCCESS

Verifying image type.
[####################] 100% -- SUCCESS

Preparing "nxos" version info using image bootflash:/nxos.9.2.4.bin.
[####################] 100% -- SUCCESS

Preparing "bios" version info using image bootflash:/nxos.9.2.4.bin.
[####################] 100% -- SUCCESS

Collecting "running" plugin(s) information.
[####################] 100% -- SUCCESS

Collecting plugin(s) information from "new" image.
[####################] 100% -- SUCCESS
[####################] 100% -- SUCCESS

Performing module support checks.
[####################] 100% -- SUCCESS

Notifying services about system upgrade.
[####################] 100% -- SUCCESS


Compatibility check is done:
Module  bootable          Impact  Install-type  Reason
------  --------  --------------  ------------  ------
     1       yes      disruptive         reset  default upgrade is not hitless


Images will be upgraded according to this table:
Module       Image                  Running-Version(pri:alt)           New-Version  Upg-Required
------  ----------  ----------------------------------------  --------------------  ------------
     1        nxos                                    9.2(1)                9.2(4)           yes
     1        bios                        v5.4.0(10/23/2019)    v5.3.0(06/08/2019)            no


Switch will be reloaded for disruptive upgrade.
Do you want to continue with the installation (y/n)?  [n] y


Install is in progress, please wait.

Performing runtime checks.
[####################] 100% -- SUCCESS

Setting boot variables.
[####################] 100% -- SUCCESS

Performing configuration copy.
[####################] 100% -- SUCCESS

Module 1: Refreshing compact flash and upgrading bios/loader/bootrom.
Warning: please do not remove or power off the module at this time.
[####################] 100% -- SUCCESS


Finishing the upgrade, switch will reboot in 10 seconds.
步骤4.检验NX-OS软件升级是否成功
在Nexus 3524或3548交换机重新加载后,通过show module命令验证升级是否成功。此命令的输出显示了所需的目标版本。请参阅此示例,其中交换机已成功升级到NX-OS软件版本9.2(4)。
N3K-C3548# show module
Mod Ports             Module-Type                       Model          Status
--- ----- ------------------------------------- --------------------- ---------
1    48   48x10GE Supervisor                    N3K-C3548P-10G        active *

Mod  Sw                       Hw    Slot
---  ----------------------- ------ ----
1    9.2(4)                   1.0    NA
步骤5.从Cisco Nexus交换机删除源版本的二进制映像文件
验证从源版本到目标版本的NX-OS软件升级成功后,请从设备的Bootflash中删除源版本的统一二进制映像文件,从而在Bootflash交换机上保留可用空间。这可以通过delete bootflash:{filename}命令完成。请参阅此示例,其中NX-OS 9.2(1)统一二进制映像文件从bootflash交换机中删除。
N3K-C3548# dir | include bin
  512339094    Nov 20 16:58:21 2020  nxos.9.2.1.bin
  530509806    Nov 23 18:58:45 2020  nxos.9.2.4.bin
N3K-C3548# delete bootflash:nxos.9.2.1.bin
Do you want to delete "/nxos.9.2.1.bin" ? (yes/no/abort)   [y]
N3K-C3548# dir | include bin
  530509806    Nov 23 18:58:45 2020  nxos.9.2.4.bin
步骤6.运行初始设置脚本以重新应用CoPP策略
使用setup命令运行初始设置脚本。输入yes进入基本配置对话框,然后重复按Enter键接受所有默认选项,直到返回NX-OS CLI提示符。
参阅以下示例:
N3K-C3548# setup


         ---- Basic System Configuration Dialog ----

This setup utility will guide you through the basic configuration of
the system. Setup configures only enough connectivity for management
of the system.

*Note: setup is mainly used for configuring the system initially,
when no configuration is present. So setup always assumes system
defaults and not the current system configuration values.

Press Enter at anytime to skip a dialog. Use ctrl-c at anytime
to skip the remaining dialogs.

Would you like to enter the basic configuration dialog (yes/no): yes


  Create another login account (yes/no) [n]:

  Configure read-only SNMP community string (yes/no) [n]:

  Configure read-write SNMP community string (yes/no) [n]:

  Enter the switch name :

  Continue with Out-of-band (mgmt0) management configuration? (yes/no) [y]:

    Mgmt0 IPv4 address :

  Configure the default gateway? (yes/no) [y]:

    IPv4 address of the default gateway :

  Enable the telnet service? (yes/no) [n]:

  Enable the ssh service? (yes/no) [y]:

    Type of ssh key you would like to generate (dsa/rsa) :

  Configure the ntp server? (yes/no) [n]:

  Configure default interface layer (L3/L2) [L2]:

  Configure default switchport interface state (shut/noshut) [noshut]:

  Configure CoPP System Policy Profile ( default / l2 / l3 ) [default]:

This configuration will be applied:
  no telnet server enable
  system default switchport
  no system default switchport shutdown
  policy-map type control-plane copp-system-policy ( default )

Would you like to edit the configuration? (yes/no) [n]:

Use this configuration and save it? (yes/no) [y]:
MTC:Executing copp config

[########################################] 100%
Copy complete, now saving to disk (please wait)...
Copy complete.
从NX-OS 9.2(x)升级到NX-OS 9.3(x)
本节介绍如何从NX-OS 9.2(x)次要版本中的源版本到NX-OS 9.3(x)次要版本中的目标版本执行标准的中断NX-OS软件升级。
在Cisco Nexus 3548交换机上执行标准中断NX-OS软件升级示例,从源版本9.2(1)升级到目标版本9.3(6):
N3K-C3548# show module
Mod Ports             Module-Type                       Model          Status
--- ----- ------------------------------------- --------------------- ---------
1    48   48x10GE Supervisor                    N3K-C3548P-10G        active *

Mod  Sw                       Hw    Slot
---  ----------------------- ------ ----
1    9.2(1)                   1.0    NA
升级路径摘要
从NX-OS 9.2(x)次要版本中的源版本到NX-OS 9.3(x)次要版本中的目标版本的升级路径摘要:
9.2(x)-> 9.2(4)-> 9.3(x)
步骤1.从NX-OS 9.2(x)升级到NX-OS 9.2(4)
使用本文档的从NX-OS 9.2(x)升级到NX-OS 9.2(x)部分执行从源版本到NX-OS软件版本9.2(4)中间版本的标准中断NX-OS软件升级。 要成功升级到NX-OS 9.3(x)次要版本中的目标版本,必须执行此操作。
步骤2.从思科软件下载下载目标版本
NX-OS 9.3(x)软件使用单个NX-OS二进制映像文件(有时称为统一映像文件)。 您必须从Cisco Software Download Website将此映像下载到本地计算机。从Cisco软件下载网站下载软件所需执行的具体步骤不在本文档的讨论范围之内。
步骤3.通过SCP通过精简映像程序将目标版本复制到Cisco Nexus交换机
通过SCP执行NX-OS精简映像程序,将目标版本的统一二进制映像文件复制到要中断升级的Nexus 3524或3548系列交换机。
有关此过程的详细信息,请参阅Nexus 3000、3100和3500 NX-OS精简映像过程文档
此示例演示如何从SCP服务器192.0.2.100(可通过管理VRF访问)通过Compact Image Procedure(由compact关键字表示)从SCP复制NX-OS 9.3(6)软件版本的统一二进制映像文件。
N3K-C3548# dir | include bin
  530509806    Nov 23 18:58:45 2020  nxos.9.2.4.bin
N3K-C3548# copy scp://username@192.0.2.100/nxos.9.3.6.bin bootflash: compact vrf management
The authenticity of host '192.0.2.100 (192.0.2.100)' can't be established.
ECDSA key fingerprint is SHA256:TwkQiylhtFDFPPwqh3U2Oq9ugrDuTQ50bB3boV5DkXM.
Are you sure you want to continue connecting (yes/no)? yes
Warning: Permanently added '192.0.2.100' (ECDSA) to the list of known hosts.
username@192.0.2.100's password:
nxos.9.3.6.bin                                100% 1882MB   3.9MB/s   08:09
Copy complete, now saving to disk (please wait)...
Copy complete.
N3K-C3548# dir | include bin
  530509806    Nov 23 18:58:45 2020  nxos.9.2.4.bin
  671643688    Nov 23 19:51:21 2020  nxos.9.3.6.bin
步骤4.通过Install All命令升级NX-OS软件。
通过install all命令开始标准的中断NX-OS软件升级。此命令要求将nxos参数与目标版本对应的NX-OS统一二进制映像文件的绝对文件路径一起传入。
此示例显示install all命令,其中nxos参数指向NX-OS 9.3(6)统一二进制映像文件(bootflash:nxos.9.3.6.bin)的绝对文件路径。
N3K-C3548# install all nxos bootflash:nxos.9.3.6.bin
Installer will perform compatibility check first. Please wait.
Installer is forced disruptive

Verifying image bootflash:/nxos.9.3.6.bin for boot variable "nxos".
[####################] 100% -- SUCCESS

Verifying image type.
[####################] 100% -- SUCCESS
[##                  ]   5% -- SUCCESS

Preparing "nxos" version info using image bootflash:/nxos.9.3.6.bin.
[####################] 100% -- SUCCESS

Preparing "bios" version info using image bootflash:/nxos.9.3.6.bin.
[####################] 100% -- SUCCESS

Collecting "running" plugin(s) information.
[####################] 100% -- SUCCESS

Collecting plugin(s) information from "new" image.
[####################] 100% -- SUCCESS
[####################] 100% -- SUCCESS

Performing module support checks.
[####################] 100% -- SUCCESS

Notifying services about system upgrade.
[####################] 100% -- SUCCESS


Compatibility check is done:
Module  bootable          Impact  Install-type  Reason
------  --------  --------------  ------------  ------
     1       yes      disruptive         reset  default upgrade is not hitless


Images will be upgraded according to this table:
Module       Image                  Running-Version(pri:alt)           New-Version  Upg-Required
------  ----------  ----------------------------------------  --------------------  ------------
     1        nxos                                    9.2(4)                9.3(6)           yes
     1        bios                        v5.4.0(10/23/2019)    v5.4.0(10/23/2019)            no


Switch will be reloaded for disruptive upgrade.
Do you want to continue with the installation (y/n)?  [n] y


Install is in progress, please wait.

Performing runtime checks.
[####################] 100% -- SUCCESS

Setting boot variables.
[####################] 100% -- SUCCESS

Performing configuration copy.
[####################] 100% -- SUCCESS

Module 1: Refreshing compact flash and upgrading bios/loader/bootrom.
Warning: please do not remove or power off the module at this time.
[####################] 100% -- SUCCESS


Finishing the upgrade, switch will reboot in 10 seconds.
步骤5.检验NX-OS软件升级是否成功
在Nexus 3524或3548交换机重新加载后,通过show module命令验证升级是否成功。此命令的输出显示了所需的目标版本。请参阅此示例,其中交换机已成功升级到NX-OS软件版本9.3(6)。
N3K-C3548# show module
Mod Ports             Module-Type                      Model           Status
--- ----- ------------------------------------- --------------------- ---------
1    48   48x10GE Supervisor                    N3K-C3548P-10G        active *

Mod  Sw                       Hw    Slot
---  ----------------------- ------ ----
1    9.3(6)                   1.0    NA
步骤6.从Cisco Nexus交换机删除中间版本的二进制映像文件
验证从源版本到目标版本的NX-OS软件升级成功后,请从设备的Bootflash中删除源版本的统一二进制映像文件,从而在Bootflash交换机上保留可用空间。这可以通过delete bootflash:{filename}命令完成。请参阅此示例,其中NX-OS 9.2(4)统一二进制映像文件从bootflash交换机中删除。
N3K-C3548# dir | include bin
  530509806    Nov 23 18:58:45 2020  nxos.9.2.4.bin
  671643688    Nov 23 19:51:21 2020  nxos.9.3.6.bin
N3K-C3548# delete bootflash:nxos.9.2.4.bin
Do you want to delete "/nxos.9.2.4.bin" ? (yes/no/abort)   [y]
N3K-C3548# dir | include bin
  671643688    Nov 23 19:51:21 2020  nxos.9.3.6.bin
步骤7.运行初始设置脚本以重新应用CoPP策略
使用setup命令运行初始设置脚本。输入yes进入基本配置对话框,然后重复按Enter键接受所有默认选项,直到返回NX-OS CLI提示符。
参阅以下示例:
N3K-C3548# setup


         ---- Basic System Configuration Dialog ----

This setup utility will guide you through the basic configuration of
the system. Setup configures only enough connectivity for management
of the system.

*Note: setup is mainly used for configuring the system initially,
when no configuration is present. So setup always assumes system
defaults and not the current system configuration values.

Press Enter at anytime to skip a dialog. Use ctrl-c at anytime
to skip the remaining dialogs.

Would you like to enter the basic configuration dialog (yes/no): yes


  Create another login account (yes/no) [n]:

  Configure read-only SNMP community string (yes/no) [n]:

  Configure read-write SNMP community string (yes/no) [n]:

  Enter the switch name :

  Continue with Out-of-band (mgmt0) management configuration? (yes/no) [y]:

    Mgmt0 IPv4 address :

  Configure the default gateway? (yes/no) [y]:

    IPv4 address of the default gateway :

  Enable the telnet service? (yes/no) [n]:

  Enable the ssh service? (yes/no) [y]:


    Type of ssh key you would like to generate (dsa/rsa) :

  Configure the ntp server? (yes/no) [n]:

  Configure default interface layer (L3/L2) [L2]:

  Configure default switchport interface state (shut/noshut) [noshut]:

  Configure CoPP System Policy Profile ( default / l2 / l3 ) [default]:

This configuration will be applied:
  no telnet server enable
  system default switchport
  no system default switchport shutdown
  policy-map type control-plane copp-system-policy ( default )

Would you like to edit the configuration? (yes/no) [n]:

Use this configuration and save it? (yes/no) [y]:
MTC:Executing copp config

[########################################] 100%
Copy complete, now saving to disk (please wait)...
Copy complete.
从NX-OS 9.3(x)升级到NX-OS 9.3(x)
本节介绍如何从NX-OS 9.3(x)次要版本中的源版本到NX-OS 9.3(x)次要版本中的目标版本执行标准的中断NX-OS软件升级。
在Cisco Nexus 3548交换机上执行标准中断NX-OS软件升级示例,从源版本9.3(1)升级到目标版本9.3(6):
N3K-C3548# show module
Mod Ports             Module-Type                       Model          Status
--- ----- ------------------------------------- --------------------- ---------
1    48   48x10GE Supervisor                    N3K-C3548P-10G        active *

Mod  Sw                       Hw    Slot
---  ----------------------- ------ ----
1    9.3(1)                   1.0    NA
升级路径摘要
从NX-OS 9.3(x)次要版本中的源版本到NX-OS 9.3(x)次要版本中的目标版本的升级路径摘要:
9.3(x) -> 9.3(x)
步骤1.从思科软件下载下载目标版本
NX-OS 9.3(x)软件使用单个NX-OS二进制映像文件(有时称为统一映像文件)。 您必须从Cisco Software Download Website将此映像下载到本地计算机。从Cisco软件下载网站下载软件必须采取的具体步骤不属于本文档的范围。
步骤2.通过SCP通过精简映像程序将目标版本复制到Cisco Nexus交换机
通过SCP执行NX-OS精简映像程序,将目标版本的统一二进制映像文件复制到要中断升级的Nexus 3524或3548系列交换机。
有关此过程的详细信息,请参阅Nexus 3000、3100和3500 NX-OS精简映像过程文档
此示例演示如何从SCP服务器192.0.2.100(可通过管理VRF访问)通过Compact Image Procedure(由compact关键字表示)从SCP复制NX-OS 9.3(6)软件版本的统一二进制映像文件。
N3K-C3548# dir | include bin
  511694599    Nov 23 20:34:22 2020  nxos.9.3.1.bin
N3K-C3548# copy scp://username@192.0.2.100/nxos.9.3.6.bin bootflash: compact vrf management
The authenticity of host '192.0.2.100 (192.0.2.100)' can't be established.
ECDSA key fingerprint is SHA256:TwkQiylhtFDFPPwqh3U2Oq9ugrDuTQ50bB3boV5DkXM.
Are you sure you want to continue connecting (yes/no)? yes
Warning: Permanently added '192.0.2.100' (ECDSA) to the list of known hosts.
username@192.0.2.100's password:
nxos.9.3.6.bin                                100% 1882MB   4.4MB/s   07:09
Copy complete, now saving to disk (please wait)...
Copy complete.
N3K-C3548# dir | include bin
  511694599    Nov 23 20:34:22 2020  nxos.9.3.1.bin
  671643688    Nov 23 20:52:16 2020  nxos.9.3.6.bin
步骤3.通过Install All命令升级NX-OS软件
通过install all命令开始标准的中断NX-OS软件升级。此命令要求将nxos参数与目标版本对应的NX-OS统一二进制映像文件的绝对文件路径一起传入。
此示例显示install all命令,其中nxos参数指向NX-OS 9.3(6)统一二进制映像文件(bootflash:nxos.9.3.6.bin)的绝对文件路径。
N3K-C3548# install all nxos bootflash:nxos.9.3.6.bin
Installer will perform compatibility check first. Please wait.
Installer is forced disruptive

Verifying image bootflash:/nxos.9.3.6.bin for boot variable "nxos".
[####################] 100% -- SUCCESS

Verifying image type.
[####################] 100% -- SUCCESS

Preparing "nxos" version info using image bootflash:/nxos.9.3.6.bin.
[####################] 100% -- SUCCESS

Preparing "bios" version info using image bootflash:/nxos.9.3.6.bin.
[####################] 100% -- SUCCESS

Collecting "running" plugin(s) information.
[####################] 100% -- SUCCESS

Collecting plugin(s) information from "new" image.
[####################] 100% -- SUCCESS
[####################] 100% -- SUCCESS

Performing module support checks.
[####################] 100% -- SUCCESS

Notifying services about system upgrade.
[####################] 100% -- SUCCESS


Compatibility check is done:
Module  bootable          Impact  Install-type  Reason
------  --------  --------------  ------------  ------
     1       yes      disruptive         reset  default upgrade is not hitless


Images will be upgraded according to this table:
Module       Image                  Running-Version(pri:alt)           New-Version  Upg-Required
------  ----------  ----------------------------------------  --------------------  ------------
     1        nxos                                    9.3(1)                9.3(6)           yes
     1        bios                        v5.4.0(10/23/2019)    v5.4.0(10/23/2019)            no


Switch will be reloaded for disruptive upgrade.
Do you want to continue with the installation (y/n)?  [n] y


Install is in progress, please wait.

Performing runtime checks.
[####################] 100% -- SUCCESS

Setting boot variables.
[####################] 100% -- SUCCESS

Performing configuration copy.
[####################] 100% -- SUCCESS

Module 1: Refreshing compact flash and upgrading bios/loader/bootrom.
Warning: please do not remove or power off the module at this time.
[####################] 100% -- SUCCESS


Finishing the upgrade, switch will reboot in 10 seconds.
步骤4.检验NX-OS软件升级是否成功
在Nexus 3524或3548交换机重新加载后,通过show module命令验证升级是否成功。此命令的输出显示了所需的目标版本。请参阅此示例,其中交换机已成功升级到NX-OS软件版本9.3(6)。
N3K-C3548# show module
Mod Ports             Module-Type                      Model           Status
--- ----- ------------------------------------- --------------------- ---------
1    48   48x10GE Supervisor                    N3K-C3548P-10G        active *

Mod  Sw                       Hw    Slot
---  ----------------------- ------ ----
1    9.3(6)                   1.0    NA
步骤5.从Cisco Nexus交换机删除源版本的二进制映像文件
验证从源版本到目标版本的NX-OS软件升级成功后,请从设备的Bootflash中删除源版本的统一二进制映像文件,从而在Bootflash交换机上保留可用空间。这可以通过delete bootflash:{filename}命令完成。请参阅此示例,其中NX-OS 9.3(1)统一二进制映像文件从bootflash交换机中删除。
N3K-C3548# dir | include bin
  511694599    Nov 23 20:34:22 2020  nxos.9.3.1.bin
  671643688    Nov 23 20:52:16 2020  nxos.9.3.6.bin
N3K-C3548# delete bootflash:nxos.9.3.1.bin
Do you want to delete "/nxos.9.3.1.bin" ? (yes/no/abort)   [y]
N3K-C3548# dir | include bin
  671643688    Nov 23 20:52:16 2020  nxos.9.3.6.bin
步骤6.运行初始设置脚本以重新应用CoPP策略
使用setup命令运行初始设置脚本。输入yes进入基本配置对话框,然后重复按Enter键接受所有默认选项,直到返回NX-OS CLI提示符。
参阅以下示例:
N3K-C3548# setup


         ---- Basic System Configuration Dialog ----

This setup utility will guide you through the basic configuration of
the system. Setup configures only enough connectivity for management
of the system.

*Note: setup is mainly used for configuring the system initially,
when no configuration is present. So setup always assumes system
defaults and not the current system configuration values.

Press Enter at anytime to skip a dialog. Use ctrl-c at anytime
to skip the remaining dialogs.

Would you like to enter the basic configuration dialog (yes/no): yes


  Create another login account (yes/no) [n]:

  Configure read-only SNMP community string (yes/no) [n]:

  Configure read-write SNMP community string (yes/no) [n]:

  Enter the switch name :

  Continue with Out-of-band (mgmt0) management configuration? (yes/no) [y]:

    Mgmt0 IPv4 address :

  Configure the default gateway? (yes/no) [y]:

    IPv4 address of the default gateway :

  Enable the telnet service? (yes/no) [n]:

  Enable the ssh service? (yes/no) [y]:

    Type of ssh key you would like to generate (dsa/rsa) :

  Configure the ntp server? (yes/no) [n]:

  Configure default interface layer (L3/L2) [L2]:

  Configure default switchport interface state (shut/noshut) [noshut]:

  Configure CoPP System Policy Profile ( default / l2 / l3 ) [default]:

This configuration will be applied:
  no telnet server enable
  system default switchport
  no system default switchport shutdown
  policy-map type control-plane copp-system-policy ( default )

Would you like to edit the configuration? (yes/no) [n]:

Use this configuration and save it? (yes/no) [y]:
MTC:Executing copp config

[########################################] 100%
Copy complete, now saving to disk (please wait)...
Copy complete.
相关信息
- NX-OS软件升级前需审阅的文档
- NX-OS软件从NX-OS 7.x升级到NX-OS 7.x的示例
- 从NX-OS 6.x升级到NX-OS 7.x的NX-OS软件示例
- Cisco Nexus 3000系列交换机安装和升级指南
- Cisco Nexus 3500系列NX-OS软件升级和降级指南,版本9.3(x)
- Cisco Nexus 3500系列NX-OS软件升级和降级指南,版本9.2(x)
- Cisco Nexus 3500系列NX-OS软件升级和降级指南,版本7.x
- Cisco Nexus 3500系列NX-OS软件升级和降级指南,版本6.x
- Cisco Nexus 3000系列交换机版本说明
- Nexus 3000、3100和3500 NX-OS紧凑型映像程序
- 技术支持和文档 - Cisco Systems
修订历史记录
| 版本 | 发布日期 | 备注 |
|---|---|---|
4.0 |
12-Jun-2026
|
更新的拼写、间距、语法、句子结构和所有CCW建议。 |
3.0 |
06-Jan-2025
|
格式、样式和机器翻译更改。 |
2.0 |
25-Jul-2023
|
技术更新。更新的PII、品牌要求、机器翻译、风格要求、语法和格式。 |
1.0 |
26-Nov-2020
|
初始版本 |
 反馈
反馈