Identificar e Solucionar Problemas do GuestShell em Plataformas Catalyst 9K
Opções de download
Linguagem imparcial
O conjunto de documentação deste produto faz o possível para usar uma linguagem imparcial. Para os fins deste conjunto de documentação, a imparcialidade é definida como uma linguagem que não implica em discriminação baseada em idade, deficiência, gênero, identidade racial, identidade étnica, orientação sexual, status socioeconômico e interseccionalidade. Pode haver exceções na documentação devido à linguagem codificada nas interfaces de usuário do software do produto, linguagem usada com base na documentação de RFP ou linguagem usada por um produto de terceiros referenciado. Saiba mais sobre como a Cisco está usando a linguagem inclusiva.
Sobre esta tradução
A Cisco traduziu este documento com a ajuda de tecnologias de tradução automática e humana para oferecer conteúdo de suporte aos seus usuários no seu próprio idioma, independentemente da localização. Observe que mesmo a melhor tradução automática não será tão precisa quanto as realizadas por um tradutor profissional. A Cisco Systems, Inc. não se responsabiliza pela precisão destas traduções e recomenda que o documento original em inglês (link fornecido) seja sempre consultado.
Contents
Introdução
Este documento descreve como solucionar problemas com o Guest Shell em switches Cat9K.
Pré-requisitos
Requisitos
- Compreensão básica do software Cisco IOS® XE
- Sistemas de arquivos Linux
- Comandos do Linux
Componentes Utilizados
As informações neste documento são baseadas nestas versões de software e hardware:
- Catalyst 9200
- Catalyst 9300
- Catalyst 9400
- Catalyst 9500
- Catalyst 9600
- Cisco IOS XE 17.9.1 e versões posteriores
As informações neste documento foram criadas a partir de dispositivos em um ambiente de laboratório específico. Todos os dispositivos utilizados neste documento foram iniciados com uma configuração (padrão) inicial. Se a rede estiver ativa, certifique-se de que você entenda o impacto potencial de qualquer comando.
Informações de Apoio
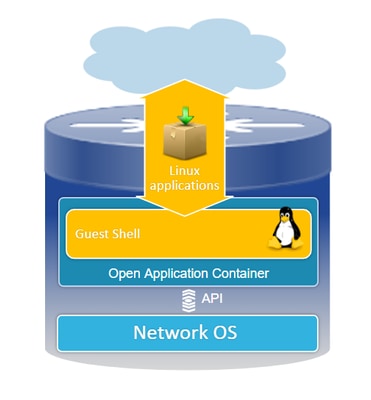
Visão geral do Guest Shell
- O Guest Shell oferece um ambiente de execução isolado que opera em um Linux Container (LXC).
- Acesso à rede: Os administradores podem se conectar à rede através de interfaces de rede Linux, permitindo conectividade e gerenciamento robustos.
- Acesso ao flash de inicialização: O acesso direto ao armazenamento em flash de inicialização está disponível, facilitando o gerenciamento eficiente de arquivos e as operações do sistema.
- Acesso CLI do Cisco IOS: Os administradores têm a capacidade de interagir diretamente com a interface de linha de comando do Cisco IOS, permitindo integração e controle perfeitos.
- Execução do script: O ambiente suporta a instalação e a execução de scripts Python, permitindo a automação e a personalização.
- Suporte a aplicativos: Os aplicativos Linux de 32 e 64 bits podem ser instalados e executados, oferecendo flexibilidade e uma grande variedade de possibilidades funcionais.
Troubleshooting
.
Configuração
1. Ative o IOX.
Switch#conf terminal
Switch(config)#iox
Switch(config)#
Espere de 1 a 5 minutos para que o IOX seja inicializado. Certifique-se de que o IOX esteja operacional. Você pode verificar as mensagens exibidas durante a sessão CLI ou revisando a saída do comando show.
*Mar 10 15:35:40.206: %UICFGEXP-6-SERVER_NOTIFIED_START: Switch 1 R0/0: psd: Server iox has been notified to start
*Mar 10 15:35:51.186: %IOX-3-PD_PARTITION_CREATE: Switch 1 R0/0: run_ioxn_caf: IOX may take upto 5 mins to be ready. Wait for iox to be ready before installing the apps
*Mar 10 15:37:56.643: %IOX-3-IOX_RESTARTABITLITY: Switch 1 R0/0: run_ioxn_caf: Stack is in N+1 mode, disabling sync for IOx restartability
*Mar 10 15:38:05.835: %IM-6-IOX_ENABLEMENT: Switch 1 R0/0: ioxman: IOX is ready.
Switch#show iox-service

IOx Infrastructure Summary:
---------------------------
IOx service (CAF)              : Running
IOx service (HA)               : Running
IOx service (IOxman)           : Running
IOx service (Sec storage)      : Running
Libvirtd 5.5.0                 : Running
Dockerd v19.03.13-ce           : Running
Sync Status                    : Disabled
2. Configuração de rede.
Este exemplo usa a interface AppGigabitEthernet para fornecer acesso à rede.
!
interface AppGigabitEthernet1/0/1
 switchport trunk allowed vlan 50
 switchport mode trunk
!
app-hosting appid guestshell
 app-vnic AppGigabitEthernet trunk
  vlan 50 guest-interface 0
   guest-ipaddress 192.168.10.10 netmask 255.255.255.0
 name-server0 192.168.10.254
end
!

Note: O GuestShell usa um endereço IP estático, pois não inclui o serviço de cliente DHCP por padrão. Você pode instalar o serviço do cliente DHCP para obter um endereço IP dinamicamente.
Este exemplo usa a interface de gerenciamento (Gi0/0) para fornecer acesso à rede. No modo de gerenciamento, o guestshell usa a porta de gerenciamento para o endereço IP da porta de gerenciamento configurada do Cisco IOS que funciona como gateway.
!
app-hosting appid guestshell
 app-vnic management guest-interface 0
 name-server0 8.8.8.8
!
Note: Quando você usa a interface de gerenciamento, a configuração padrão para a interface eth0 de Guestshell é codificada para o endereço IP 192.168.30.2.
Você pode configurar a interface do Grupo de Portas Virtuais:
- Configuração do Grupo de Portas Virtuais: Estabeleça um Grupo de Portas Virtuais com um endereço IP estático.
- Conectividade com a Internet: Verifique se a interface da porta frontal está conectada à Internet para permitir acesso externo.
- Configuração de NAT: Configure o NAT entre o grupo de portas virtuais e a porta frontal para facilitar a conversão de endereços de rede.
- Atribuição de IP GuestShell: Atribua um endereço IP ao GuestShell dentro da mesma sub-rede da interface do Grupo de Portas Virtuais.
!
interface VirtualPortGroup0
 ip address 192.168.35.1 255.255.255.0
 ip nat inside
!
interface GigabitEthernet1/0/3
 no switchport
 ip address 192.168.100.10 255.255.255.0
 ip nat outside
!
ip route 0.0.0.0 0.0.0.0 192.168.100.254
ip route vrf Mgmt-vrf 0.0.0.0 0.0.0.0 192.168.10.254
ip nat inside source static tcp 192.168.35.2 7023 192.168.100.10 7023 extendable
!
!
ip access-list standard NAT_ACL
 10 permit 192.168.0.0 0.0.255.255
!
app-hosting appid guestshell
 app-vnic gateway1 virtualportgroup 0 guest-interface 0
  guest-ipaddress 192.168.35.2 netmask 255.255.255.0
 app-default-gateway 192.168.35.1 guest-interface 0
 name-server0 8.8.8.8
end
3. Habilite o guestshell.
Switch#guestshell enable
Interface will be selected if configured in app-hosting
Please wait for completion
guestshell installed successfully
Current state is: DEPLOYED
guestshell activated successfully
Current state is: ACTIVATED
guestshell started successfully
Current state is: RUNNING
Guestshell enabled successfully
Note: O comando guestshell enable é a única maneira de instalar o guestshell. A ativação/conexão/desativação da CLI de hospedagem de aplicativos pode ser usada para controlar o guestshell. É recomendável que você use o guestshell exec CLI.
Ciclo de Vida de Convidado
Desabilitar Convidado: Desabilitar guesthell remove o acesso a guestshell e elimina as sessões atuais. Os arquivos/dados são preservados, você pode usar guestshell enable para restaurar o acesso.
Switch#guestshell disable
Guestshell disabled successfully
Destruição da casca do convidado: Isso exclui o sistema de arquivos do shell convidado de forma irreversível. Todos os arquivos/dados/scripts/configuraçãoustshell/ pacotes e módulos instalados.
Switch#guestshell destroy
Guestshell destroyed successfully
Observação: quando você executa esse comando, todos os dados são irreversivelmente perdidos.
Execução de Convidado: O Guestshell executa o comando guestshell run bash para criar um shell dentro do Guest Shell, permitindo que você use qualquer binário Linux em /bin e /sbin.
Switch#guestshell run bash
[guestshell@guestshell ~]$ ping 192.168.10.1
PING 192.168.10.1 (192.168.10.1) 56(84) bytes of data.
64 bytes from 192.168.10.1: icmp_seq=2 ttl=254 time=0.517 ms
64 bytes from 192.168.10.1: icmp_seq=3 ttl=254 time=0.552 ms
64 bytes from 192.168.10.1: icmp_seq=4 ttl=254 time=0.447 ms
64 bytes from 192.168.10.1: icmp_seq=5 ttl=254 time=0.549 ms
Execução do 'python' do 'Guestshell': Use este comando para iniciar o interpretador python interativo.
Switch#guestshell run python3
Python 3.6.8 (default, Dec 22 2020, 19:04:08)
[GCC 8.4.1 20200928 (Red Hat 8.4.1-1)] on linux
Type "help", "copyright", "credits" or "license" for more information.
>>>
Validações
Você pode usar estes comandos para validar o Guestshell:
Switch#show app-hosting detail appid guestshell
App id                 : guestshell
Owner                  : iox
State                  : RUNNING
Application
  Type                 : lxc
  Name                 : GuestShell
  Version              : 3.3.0
  Description          : Cisco Systems Guest Shell XE for x86_64
  Author               : Cisco Systems
  Path                 : /guestshell/:guestshell.tar
  URL Path             :
  Multicast            : yes
Activated profile name : custom

Resource reservation
  Memory               : 256 MB
  Disk                 : 1 MB
  CPU                  : 800 units
  CPU-percent          : 11 %
  VCPU                 : 1

Platform resource profiles
  Profile Name                  CPU(unit)  Memory(MB)  Disk(MB)
  --------------------------------------------------------------

Attached devices
  Type              Name               Alias
  ---------------------------------------------
  serial/shell     iox_console_shell   serial0
  serial/aux       iox_console_aux     serial1
  serial/syslog    iox_syslog          serial2
  serial/trace     iox_trace           serial3

Network interfaces
   ---------------------------------------
eth0:
   MAC address         : 52:54:dd:5b:c4:b8
   IPv4 address        : 192.168.30.2
   IPv6 address        : ::
   Network name        : mgmt-bridge200

Port forwarding
  Table-entry  Service  Source-port  Destination-port
  ---------------------------------------------------
  Switch#show app-hosting list
App id                                   State
---------------------------------------------------------
guestshell                               RUNNING
Switch#guestshell run sudo ifconfig
eth0: flaguestshell=4163<UP,BROADCAST,RUNNING,MULTICAST>  mtu 1500
        inet 192.168.10.10  netmask 255.255.255.0  broadcast 192.168.10.255
        inet6 fe80::5054:ddff:fece:a7c9  prefixlen 64  scopeid 0x20
        ether 52:54:dd:ce:a7:c9  txqueuelen 1000  (Ethernet)
        RX packets 3  bytes 266 (266.0 B)
        RX errors 0  dropped 0  overruns 0  frame 0
        TX packets 9  bytes 726 (726.0 B)
        TX errors 0  dropped 0 overruns 0  carrier 0  collisions 0

lo: flaguestshell=73<UP,LOOPBACK,RUNNING>  mtu 65536
        inet 127.0.0.1  netmask 255.0.0.0
        inet6 ::1  prefixlen 128  scopeid 0x10
        loop  txqueuelen 1000  (Local Loopback)
        RX packets 338  bytes 74910 (73.1 KiB)
        RX errors 0  dropped 0  overruns 0  frame 0
        TX packets 338  bytes 74910 (73.1 KiB)
        TX errors 0  dropped 0 overruns 0  carrier 0  collisions 0
Redimensionamento de recursos
!
app-hosting appid guestshell
 app-vnic management guest-interface 0
 app-resource profile custom
  cpu 1000
  memory 512
  persist-disk 200
!
Você precisa desativar e depois ativar o Guest Shell para que as alterações tenham efeito.
Switch#guestshell disable
Guestshell disabled successfully
Switch#guestshell enable
*Mar 11 01:17:46.841: %SYS-5-CONFIG_I: Configured from console by coguestshell enable
Interface will be selected if configured in app-hosting
Please wait for completion
guestshell activated successfully
Current state is: ACTIVATED
guestshell started successfully
Current state is: RUNNING
Guestshell enabled successfully
Switch#show app-hosting detail appid guestshell | sec Resource reservation
Resource reservation
  Memory               : 512 MB
  Disk                 : 200 MB
  CPU                  : 1110 units
  CPU-percent          : 15 %
  VCPU                 : 1
Note: Em switches, o redimensionamento de recursos é permitido até o máximo de limitações pela plataforma. Consulte Recursos de Hardware da Plataforma Cisco Catalyst 9000 para Aplicativos.
Cenários comuns
Configuração DHCP
Problema: O binário do cliente DHCP (DHCLIENT) não está presente.
Solução
Você pode instalar o cliente DHCP usando o utilitário Yum com o comando sudo yum install dhcp-client. No entanto, observe que os repositórios para o CentOS Stream 8 não estão mais disponíveis.
1. Você deve evitar configurar o endereço IP na hospedagem de aplicativos para permitir que o DHCP funcione.
!
interface AppGigabitEthernet1/0/1
 switchport trunk allowed vlan 50
 switchport mode trunk
!
app-hosting appid guestshell
 app-vnic AppGigabitEthernet trunk
  vlan 50 guest-interface 0
name-server0 8.8.8.8
!
2. Altere mirrorlist para baseurl vault no yum repo.
Switch#guestshell run bash
[guestshell@guestshell ~]$ sudo find /etc/yum.repos.d/ -type f -exec sed -i 's/mirrorlist=/#mirrorlist=/g' {} +
[guestshell@guestshell ~]$ sudo find /etc/yum.repos.d/ -type f -exec sed -i 's/#baseurl=/baseurl=/g' {} +
[guestshell@guestshell ~]$ sudo find /etc/yum.repos.d/ -type f -exec sed -i 's/mirror.centos.org//g' {} +
[guestshell@guestshell ~]$ cat /etc/yum.repos.d/CentOS-Stream-RealTime.reporepo
# CentOS-Stream-RealTime.repo
# The mirrorlist system uses the connecting IP address of the client and the
# update status of each mirror to pick current mirrors that are geographically
# close to the client.  You should use this for CentOS updates unless you are
# manually picking other mirrors.
#
# If the mirrorlist does not work for you, you can try the commented out
# baseurl line instead.

[rt]
name=CentOS Stream $releasever - RealTime
#mirrorlist=http://mirrorlist.centos.org/?release=$stream&arch=$basearch&repo=RT&infra=$infra
baseurl=http:///$contentdir/$stream/RT/$basearch/os/
gpgcheck=1
enabled=0
gpgkey=file:///etc/pki/rpm-gpg/RPM-GPG-KEY-centosofficial
3. Instale os pacotes.
guestshell@guestshell ~]$ sudo yum install dhcp-client
ast metadata expiration check: 0:50:34 ago on Wed Mar 12 17:44:46 2025.
Dependencies resolved.
================================================================================
 Package                Architecture Version                 Repository    Size
================================================================================
Installing:
 dhcp-client            x86_64       12:4.3.6-50.el8         baseos       319 k
Installing dependencies:
 bind-export-libs       x86_64       32:9.11.36-13.el8       baseos       1.1 M
 dhcp-common            noarch       12:4.3.6-50.el8         baseos       208 k
 dhcp-libs              x86_64       12:4.3.6-50.el8         baseos       148 k

Transaction Summary
================================================================================
Install  4 Packages

Total download size: 1.8 M
Installed size: 3.9 M
Is this ok [y/N]: y
Downloading Packages:
(1/4): dhcp-client-4.3.6-50.el8.x86_64.rpm      284 kB/s | 319 kB     00:01
(2/4): dhcp-common-4.3.6-50.el8.noarch.rpm      171 kB/s | 208 kB     00:01
(3/4): dhcp-libs-4.3.6-50.el8.x86_64.rpm        572 kB/s | 148 kB     00:00
(4/4): bind-export-libs-9.11.36-13.el8.x86_64.r 577 kB/s | 1.1 MB     00:02
--------------------------------------------------------------------------------
Total                                           908 kB/s | 1.8 MB     00:02
CentOS Stream 8 - BaseOS                        1.6 MB/s | 1.6 kB     00:00
Importing GPG key 0x8483C65D:
 Userid     : "CentOS (CentOS Official Signing Key) <CentOS Official Signing Key>"
 Fingerprint: 99DB 70FA E1D7 CE22 7FB6 4882 05B5 55B3 8483 C65D
 From       : /etc/pki/rpm-gpg/RPM-GPG-KEY-centosofficial
Is this ok [y/N]: y
Key imported successfully
Running transaction check
Transaction check succeeded.
Running transaction test
Transaction test succeeded.
Running transaction
  Preparing        :                                                        1/1
  Installing       : dhcp-libs-12:4.3.6-50.el8.x86_64                       1/4
  Installing       : dhcp-common-12:4.3.6-50.el8.noarch                     2/4
  Installing       : bind-export-libs-32:9.11.36-13.el8.x86_64              3/4
  Running scriptlet: bind-export-libs-32:9.11.36-13.el8.x86_64              3/4
  Installing       : dhcp-client-12:4.3.6-50.el8.x86_64                     4/4
  Running scriptlet: dhcp-client-12:4.3.6-50.el8.x86_64                     4/4
  Verifying        : bind-export-libs-32:9.11.36-13.el8.x86_64              1/4
  Verifying        : dhcp-client-12:4.3.6-50.el8.x86_64                     2/4
  Verifying        : dhcp-common-12:4.3.6-50.el8.noarch                     3/4
  Verifying        : dhcp-libs-12:4.3.6-50.el8.x86_64                       4/4

Installed:
  bind-export-libs-32:9.11.36-13.el8.x86_64  dhcp-client-12:4.3.6-50.el8.x86_64
  dhcp-common-12:4.3.6-50.el8.noarch         dhcp-libs-12:4.3.6-50.el8.x86_64

Complete!
Note: (PARA CALO) É possível configurar um proxy para Yum. Isso permite que Yum se conecte através de um servidor proxy para downloads de pacotes:
[guestshell@guestshell ~]$ echo "proxy=http://<endereço_IP:porta>/" | sudo tee -a /etc/yum.conf > /dev/null
4. .Solicite um endereço IP DHCP para eth0.
[guestshell@guestshell ~]$ sudo dhclient eth0
5. Verifique se o cliente DHCP está funcionando, examinando a atribuição de endereço IP.
Switch#guestshell run ifconfig
eth0: flags=4163<UP,BROADCAST,RUNNING,MULTICAST>  mtu 1500
        inet 192.168.10.2  netmask 255.255.255.0  broadcast 192.168.10.255
        inet6 fe80::5054:ddff:fea0:4aef  prefixlen 64  scopeid 0x20
        ether 52:54:dd:a0:4a:ef  txqueuelen 1000  (Ethernet)
        RX packets 1516  bytes 2009470 (1.9 MiB)
        RX errors 0  dropped 0  overruns 0  frame 0
        TX packets 687  bytes 54603 (53.3 KiB)
        TX errors 0  dropped 0 overruns 0  carrier 0  collisions 0

lo: flags=73<UP,LOOPBACK,RUNNING>  mtu 65536
        inet 127.0.0.1  netmask 255.0.0.0
        inet6 ::1  prefixlen 128  scopeid 0x10
        loop  txqueuelen 1000  (Local Loopback)
        RX packets 773  bytes 90658 (88.5 KiB)
        RX errors 0  dropped 0  overruns 0  frame 0
        TX packets 773  bytes 90658 (88.5 KiB)
        TX errors 0  dropped 0 overruns 0  carrier 0  collisions 0
Falha na atualização do Gerenciador de Pacotes DNF
Problema: Não é possível concluir a atualização -y do sudo dnf no Guestshell devido ao erro:
[guestshell@guestshell ~]$ sudo dnf upgrade --refresh
Warning: failed loading '/etc/yum.repos.d/CentOS-Base.repo', skipping.
Solução
1. Reinstale e atualize os pacotes RPM.
! Clean packages

[guestshell@guestshell ~]$ sudo dnf clean all

! Reinstall and update the tpm2-tss package:

[guestshell@guestshell ~]$ sudo dnf install tpm2-tss-2.3.2-3.el8
[guestshell@guestshell ~]$ sudo dnf upgrade rpm
2. Instale o pacote git separadamente.
[guestshell@guestshell ~]$ sudo dnf install git -y
Perda de acesso ao Convidado após a atualização
Problema: Após a atualização para a versão 17.08.01 ou superior, o Guest Shell torna-se inacessível, resultando na incapacidade de executar scripts.
Switch#guestshell run bash
Switch#
Solução
O problema está relacionado ao bug da Cisco ID CSCwi63075  , que é acionado durante uma atualização quando o FIPS está habilitado no switch.
1. Desative o FIPS.
Switch#configure terminal
Switch(config)#no fips authorization-key
FIPS: Authorization-key erased ONLY from the  Flash.
But the authorization-key is still operational. Use "reload" command for complete removal of key and to enter into non fips-mode.
Make sure to remove fips key from all the members of the stack individually
2. Você pode atualizar para uma das versões que inclui a correção, a versão 17.12.04 ou qualquer versão posterior.
Restringir Endereçamento IPv6
Problema: O problema envolve endereços IPv6 não intencionais que aparecem em interfaces dentro do ambiente Cisco Guestshell. Embora, não configurado intencionalmente.
A configuração observada no Switch com IPV4 é:
!
app-hosting appid guestshell
 app-vnic AppGigabitEthernet trunk
  vlan 50 guest-interface 0
   guest-ipaddress 192.168.20.10 netmask 255.255.255.0  <-- IPv4 address configured
 app-default-gateway 192.168.20.1 guest-interface 0
 app-resource profile custom
 name-server1 192.168.20.1
 !
Ao executar o comando ifconfig dentro do ambiente Guestshell, os endereços IPv4 e IPv6 tornam-se visíveis.
lat1-2-ssw01.gts#guestshell run bash
[guestshell@guestshell ~]$ sudo ifconfig
eth0: flags=4163  mtu 1500
        inet 192.168.20.10  netmask 255.255.255.0 broadcast 192.168.20.255
        inet6 2620:119:5022:515:5054:ddff:fe41:c643  prefixlen 64  scopeid 0x0
        inet6 fe80::5054:ddff:fe41:c643  prefixlen 64  scopeid 0x20
        ether 52:54:dd:41:c6:43  txqueuelen 1000  (Ethernet)
        RX packets 7829  bytes 1750981 (1.6 MiB)
        RX errors 0  dropped 0  overruns 0  frame 0
        TX packets 5551  bytes 744320 (726.8 KiB)
        TX errors 0  dropped 0 overruns 0  carrier 0  collisions 0

lo: flags=73  mtu 65536
        inet 127.0.0.1  netmask 255.0.0.0
        inet6 ::1  prefixlen 128  scopeid 0x10
        loop  txqueuelen 1000  (Local Loopback)
        RX packets 292  bytes 63812 (62.3 KiB)
        RX errors 0  dropped 0  overruns 0  frame 0
        TX packets 292  bytes 63812 (62.3 KiB)
        TX errors 0  dropped 0 overruns 0  carrier 0  collisions 0
Solução
Passo 1: Desabilite o roteamento e o endereçamento IPv6 em Guestshell.
lat1-2-ssw01.gts#guestshell run bash
[guestshell@guestshell ~]$ sudo sysctl -w net.ipv6.conf.all.disable_ipv6=1
[guestshell@guestshell ~]$ sudo sysctl -w net.ipv6.conf.default.disable_ipv6=1
[guestshell@guestshell ~]$ sudo sysctl -w net.ipv6.conf.lo.disable_ipv6=1
Passo 2: Verifique se o IPv6 está desabilitado.
[guestshell@guestshell ~]$ /sbin/ifconfig
eth0: flags=4163  mtu 1500
        inet 192.168.20.10  netmask 255.255.255.0 broadcast 192.168.20.255
        ether 52:54:dd:41:c6:43  txqueuelen 1000  (Ethernet)
        RX packets 7829  bytes 1750981 (1.6 MiB)
        RX errors 0  dropped 0  overruns 0  frame 0
        TX packets 5551  bytes 744320 (726.8 KiB)
        TX errors 0  dropped 0 overruns 0  carrier 0  collisions 0

lo: flags=73  mtu 65536
        inet 127.0.0.1  netmask 255.0.0.0
        loop  txqueuelen 1000  (Local Loopback)
        RX packets 292  bytes 63812 (62.3 KiB)
        RX errors 0  dropped 0  overruns 0  frame 0
        TX packets 292  bytes 63812 (62.3 KiB)
        TX errors 0  dropped 0 overruns 0  carrier 0  collisions 0
Erros de Espaço em Disco ao Executar Scripts Python
Problema: O problema envolve um script Python executado em um Embedded Event Manager (EEM) dentro do Guestshell. O script falha devido à falta de espaço em disco com o erro:
guestshell run python3 /flash/guest-share/monitoring.py -rt True -bgp True
---- pushing bgp status ----
OSError: [Errno 28] No space left on device

During handling of the above exception, another exception occurred:

Traceback (most recent call last):
  File "/flash/guest-share/monitoring_periodic_tasks.py", line 18, in
    print(bgp_status())
  File "/bootflash/guest-share/monitoring_bgp_status.py", line 15, in bgp_status
    vrf = cli.cli('show vrf')
  File "/usr/lib/python3.6/site-packages/cli/__init__.py", line 311, in cli
    _log_to_file("CLI execution invoked for '" + command + "'")
  File "/usr/lib/python3.6/site-packages/cli/__init__.py", line 87, in _log_to_file
    logfile.close()
OSError: [Errno 28] No space left on device
! This error indicates that the disk space allocated for logging command executions within the Guestshell environment has been exhausted.
Solução
Para resolver o problema de ficar sem espaço em disco, você precisa aumentar o tamanho do disco de persistência para o ambiente do Guestshell:
1. Modifique o perfil de recurso do aplicativo para aumentar o tamanho do disco de persistência.
Switch(config-app-hosting)# app-resource profile custom
Switch(config-app-hosting-profile)# persist-disk 100
Switch(config-app-hosting-profile)# cpu 800
Switch(config-app-hosting-profile)# memory 256
Switch(config-app-hosting-profile)# end
2. Salve a configuração e habilite/desabilite o guestshell.
Switch# write memory
Switch#guestshell disable
Guestshell disabled successfully
Switch#guestshell enable
Interface will be selected if configured in app-hosting
Please wait for completion
guestshell installed successfully
Current state is: DEPLOYED
guestshell activated successfully
Current state is: ACTIVATED
guestshell started successfully
Current state is: RUNNING
Guestshell enabled successfully
Registrando Syslog
Você pode executar esses comandos em guestshell para exibir as mensagens de syslog :
[guestshell@guestshell ~]$ sudo logger -p 1 "Priority 1"
[guestshell@guestshell ~]$ sudo cat /var/log/messages
Mar 11 02:05:24 localhost systemd[248]: user@0.service: Failed at step PAM spawning /usr/lib/systemd/systemd: Operation not permitted
Mar 11 02:05:24 localhost systemd[1]: user@0.service: Failed with result 'protocol'.
Mar 11 02:05:24 localhost systemd[1]: Failed to start User Manager for UID 0.
Mar 11 02:05:24 localhost systemd[1]: Stopping /run/user/0 mount wrapper...
Mar 11 02:05:24 localhost systemd[1]: run-user-0.mount: Succeeded.
Mar 11 02:05:24 localhost systemd[1]: user-runtime-dir@0.service: Succeeded.
Mar 11 02:05:24 localhost systemd[1]: Stopped /run/user/0 mount wrapper.
Mar 11 02:05:24 localhost root[250]: Priority 1
[guestshell@guestshell ~]$ sudo cat /var/log/secure
Mar 11 02:05:24 localhost systemd[248]: pam_unix(systemd-user:account): expired password for user root (root enforced)
Mar 11 02:05:24 localhost sudo[246]: pam_systemd(sudo:session): Failed to create session: Start job for unit user@0.service failed with 'failed'
Mar 11 02:05:24 localhost sudo[246]: pam_unix(sudo:session): session opened for user root by (uid=0)
Log de rastreamento
Você pode usar app-hosting move appid guestshell log para bootflash:folder_name para girar o arquivo. Isso pode ser usado para girar para um diretório de destino, mas também gira para o diretório traceloguestshell.
Switch#app-hosting move appid guestshell log to bootflash:
Successfully moved tracelog to flash:/ioxapploguestshell/iox_R0-0_R0-0.14195_0.20250311023831.bin.gz
Note: IOX guestshell.log é sempre o arquivo de log de rastreamento ativo em /tmp/rp/trace · Quando esse arquivo atinge 1MB, ele é automaticamente girado para bootflash:traceloguestshell/ com um carimbo de data/hora e um novo é iniciado.
Informações Relacionadas
- Documentação de hospedagem de aplicativos no Cisco Catalyst 9000 Series Switches
- Guia de instalação de hardware dos switches Cisco Catalyst 9300 Series
- Guia de configuração de programabilidade, Cisco IOS XE 17.9.x
- White paper sobre a arquitetura de sistema Stackwise do Catalyst 9300
- ID de bug da Cisco CSCwi63075 - Guestshell não está acessível via CLI após uma atualização para 17.08.01 ou posterior se o modo FIPS estiver habilitado
- Suporte Técnico e Documentação - Cisco Systems
Histórico de revisões
| Revisão | Data de publicação | Comentários |
|---|---|---|
1.0 |
17-Mar-2025
|
Versão inicial |
Colaborado por engenheiros da Cisco
- Christopher Martinez BarriosEngenheiro de consultoria técnica
 Feedback
Contate a Cisco
- Abrir um caso de suporte

- (É necessário um Contrato de Serviço da Cisco)