Procedure voor het opnieuw weergeven van Cisco Nexus Dashboard Nodes met behulp van een HTTP-server
Downloadopties
Inclusief taalgebruik
De documentatie van dit product is waar mogelijk geschreven met inclusief taalgebruik. Inclusief taalgebruik wordt in deze documentatie gedefinieerd als taal die geen discriminatie op basis van leeftijd, handicap, gender, etniciteit, seksuele oriëntatie, sociaaleconomische status of combinaties hiervan weerspiegelt. In deze documentatie kunnen uitzonderingen voorkomen vanwege bewoordingen die in de gebruikersinterfaces van de productsoftware zijn gecodeerd, die op het taalgebruik in de RFP-documentatie zijn gebaseerd of die worden gebruikt in een product van een externe partij waarnaar wordt verwezen. Lees meer over hoe Cisco gebruikmaakt van inclusief taalgebruik.
Over deze vertaling
Cisco heeft dit document vertaald via een combinatie van machine- en menselijke technologie om onze gebruikers wereldwijd ondersteuningscontent te bieden in hun eigen taal. Houd er rekening mee dat zelfs de beste machinevertaling niet net zo nauwkeurig is als die van een professionele vertaler. Cisco Systems, Inc. is niet aansprakelijk voor de nauwkeurigheid van deze vertalingen en raadt aan altijd het oorspronkelijke Engelstalige document (link) te raadplegen.
Inleiding
Dit document beschrijft de procedure voor het opnieuw in beeld brengen van Cisco Nexus Dashboard-knooppunten met behulp van een HTTP-server en biedt duidelijke, stapsgewijze richtlijnen om gestandaardiseerde en efficiënte node-re-imaging te garanderen via externe HTTP-gehoste image-implementatie.
Voorwaarden
- Cisco Integrated Management Controller (CIMC) moet worden geconfigureerd met het OOB IP-adres.
- Controleer de Nexus Dashboard Release-notities en bevestig aan welke Nexus Dashboard-software-afbeelding u opnieuw moet afbeelden.
- Software-image verkrijgen van software.cisco.com.
- Bevestig dat de MD5-controlesom van de afbeelding overeenkomt met de controlesom die op Cisco.com is gepubliceerd.
- Upload de Nexus Dashboard afbeelding op de HTTP server.
- De HTTP-server moet bereikbaar zijn via de CIMC-beheerinterface. Deze bereikbaarheid kan worden geverifieerd met behulp van de CIMC GUI of CLI.
Gebruikte componenten
Dit document is niet beperkt tot specifieke software- en hardware-versies.
De informatie in dit document is gebaseerd op de apparaten in een specifieke laboratoriumomgeving. Alle apparaten die in dit document worden beschreven, hadden een opgeschoonde (standaard)configuratie. Als uw netwerk live is, moet u zorgen dat u de potentiële impact van elke opdracht begrijpt.
Achtergrondinformatie
Wanneer een Cisco Nexus Dashboard-node mislukt vanwege systeembeschadiging, niet-ondersteunde updates of ontoegankelijke GUI, kunnen beheerders de node opnieuw image maken met behulp van een ISO die op een HTTP-server wordt gehost. Het proces omvat het downloaden van het Nexus Dashboard ISO, het hosten op een webserver en het gebruik van CIMC (Cisco Integrated Management Controller) om de ISO via HTTP in kaart te brengen en op te starten. Dit maakt efficiënte, externe node recovery of herinstallatie mogelijk als onderdeel van clusterherstel.
Oplossing
Om ND re-imaging uit te voeren via een HTTP-server, zijn de volgende stappen vereist:
Stap 1. Download de firmware van de Cisco-website.
Open software.cisco.com/download.
Stap 2. Open de Nexus Dashboard-interface en selecteer de juiste softwareversie (bijvoorbeeld 3.2 (2m)) uit de beschikbare releasemogelijkheden.
Voorbeeld:
Stap 3. Kopieer het ISO-image van de Nexus Dashboard-software naar de HTTP-server.
Voorbeeld: http://x.x.x.x/iso/
Stap 4. SSH/Console naar Cisco Integrated Management Controller.
- Meld u aan bij de CIMC-console vanuit een terminalvenster.
# ssh admin@cimc_ip
Waarbij cimc_ip het CIMC IP-adres is.
Voorbeeld:
# ssh admin@x.x.x.x
admin@x.x.x.x's password:
system#
- Wijzig het bereik in virtuele media:
system# scope vmedia
system /vmedia #
-
Koppel de .iso-afbeelding aan de HTTP-server.
system /vmedia # map-www volume_name http://http_server_ip_and_path iso_file_name
Waarbij:
-
volume_name is de naam van het volume.
-
http_server_ip_and_path is het IP-adres van de HTTP-server en het pad naar de .iso-bestandslocatie.
-
ISO_filename is de naam van het .ISO-bestand.
Voorbeeld:
Opmerking: er is ruimte tussen de http_server_ip_and_path en de iso_bestandsnaam.
system /vmedia # map-www apic http://x.x.x.x/iso/ nd-dk9.3.2.2m.iso
Server username: admin
Server password:
Confirm password:
Opmerking: Voer de referenties in en druk op Enter.
-
Controleer de toewijzingsstatus:
 system /vmedia # show mappings detail

The Map-Status must be shown as OK.

For Example:

system /vmedia # show mappings detail
Volume apic:
    Map-Status: OK
    Drive-Type: CD
    Remote-Share: http://x.x.x.x/iso/

    Remote-File:nd-dk9.3.2.2m.iso
    Mount-Type: www
    Mount-Options: noauto,username=admin,password=********3
    system /vmedia #
Als de toewijzing mislukt of er een fout optreedt tijdens de toewijzing, kunt u de opdracht verwijderen gebruiken om de bestaande toewijzing te verwijderen en vervolgens de toewijzing opnieuw proberen.
Server # scope vmedia
Server /vmedia # show mappings
Volume  Map-status   Drive-type     remote-share        remote-file                mount-type
------  ----------  ------------  ------------------- -------------------        -----------
Huu     OK           removable    http://x.x.x.x/ rhel-server-6.1-x86_6.iso      www
Server /vmedia # unmap Huu
Server /vmedia # show mappings
Volume  Map-status   Drive-type     remote-share        remote-file                mount-type
------  ----------  ------------  ------------------- -------------------        -----------
-
Verbinding maken met SOL om het installatieproces te bewaken:
system /vmedia # connect host
CISCO Serial Over LAN:
Press Ctrl+x to Exit the session
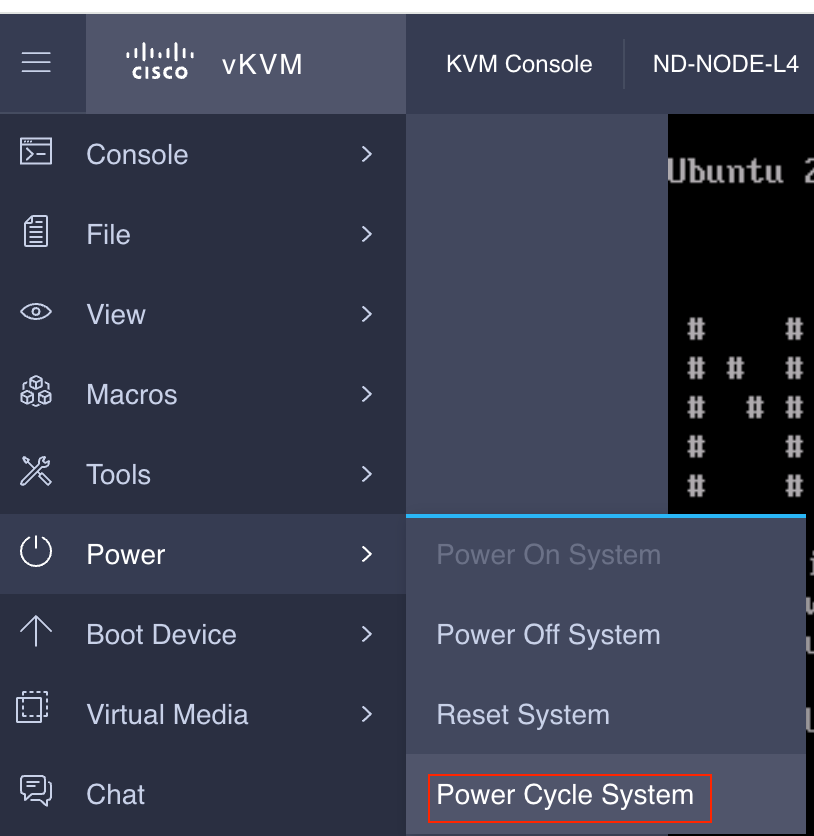
Stap 5. Energiecyclus vanaf de KVM-console van de CIMC GUI.
Choose Power > Power Cycle System (cold boot) to power cycle the controller.
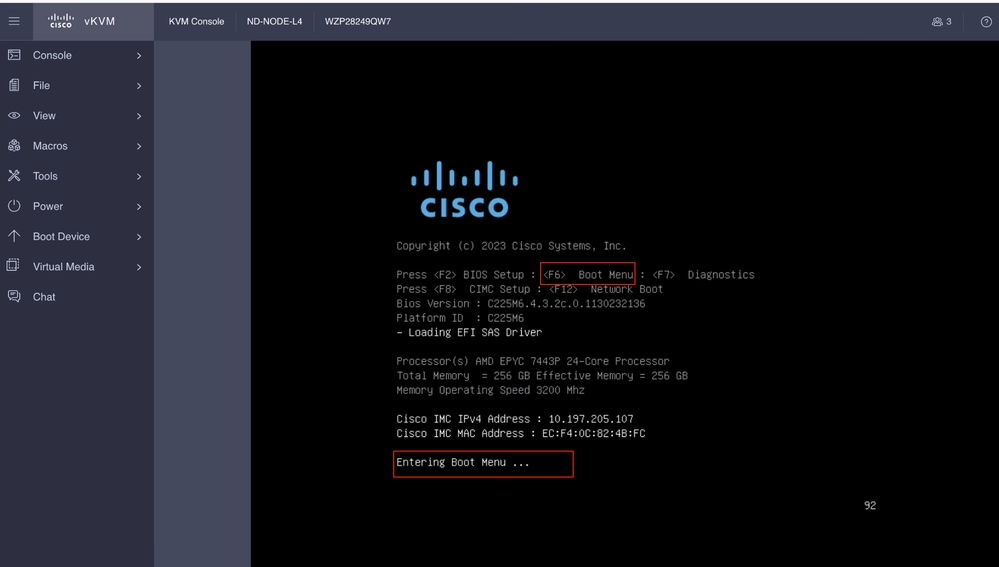
Vanaf de SOL-console: Bekijk het scherm tijdens het opstartproces en bereid je voor om op het juiste moment op F6 te drukken om het opstartselectiemenu te openen.
Voorbeeld:
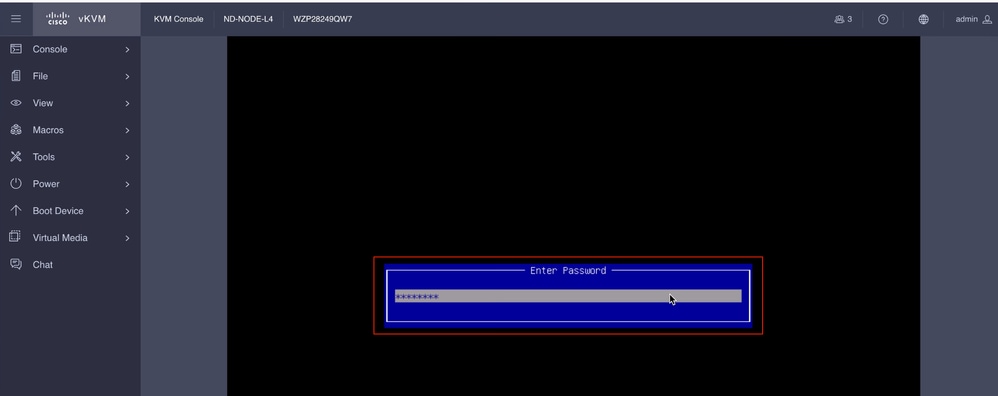
U kunt ook het BIOS-wachtwoord invoeren. Het standaardwachtwoord is wachtwoord.
Selecteer in het menu Opstartselectie de optie Cisco CIMC-Mapped vDVD2.00 als eenmalige opstartapparaat.
Stap 6. Ga terug naar CIMC CLI en bewaak de uitvoer van Connect Host.
Monitor de CIMC-cli, wanneer u het bericht ontvangt Om de installatie te versnellen, voert u binnen tien minuten de iso-URL in en voert u vervolgens de http-server-URL in met de Nexus Dashboard-afbeelding.
Boot000A* UEFI: Cisco CIMC-Mapped vDVD2.00 PciRoot(0x1)/Pci(0x8,0x1)/Pci(0x0,0x3)/USB(1,0)/USB(2,0)/Unit(3)/CDROM(1,0x35,0x5597ed)..BO'
+ return 1
+ '[' -n '' ']'
++ mount
++ grep /run/install/repo
++ cut -f 1 -d ' '
++ tr -d '[:digit:]'
++ true
+ usbdevice=
+ mkdir /mnt/usbdata
+ '[' -n '' ']'
+ '[' true = true ']'
+ read_iso_url
+ dmesg --console-off
+ true
+ echo 'To speed up the install, enter iso url. Type '\''skip'\'' to use local media:'
To speed up the install, enter iso url. Type 'skip' to use local media:
+ echo ' Either http://server/path/to/file or nfs:server:/path/to/file are supported'
Either http://server/path/to/file or nfs:server:/path/to/file are supported
+ read -r -p '? ' url

 http://x.x.x.x197.204.4/iso/DCApps/ND/nd-dk9.3.2.1i.iso << Enter the http server details  >>
+ '[' http://x.x.x.x197.204.4/iso/DCApps/ND/nd-dk9.3.2.1i.iso = skip ']'
+ '[' http://x.x.x.x197.204.4/iso/DCApps/ND/nd-dk9.3.2.1i.iso = '' ']'
+ '[' http = nfs: ']'
+ echo http://x.x.x.x197.204.4/iso/DCApps/ND/nd-dk9.3.2.1i.iso
+ grep -q '\[.*\]'
++ awk -F '/|:' '{print $4}'
+ urlip=x.x.x.x197.204.4
+ '[' -z x.x.x.x197.204.4 ']'
+ break
+ dmesg --console-on
+ '[' -n http://x.x.x.x197.204.4/iso/DCApps/ND/nd-dk9.3.2.1i.iso ']'
+ '[' http://x.x.x.x197.204.4/iso/DCApps/ND/nd-dk9.3.2.1i.iso '!=' skip ']'
+ dmesg --console-of
Stap 7. Nadat u de HTTP-URL hebt ingevoerd, wordt het opstartproces voortgezet.
Opmerking: Kies een statische optie en u wordt gevraagd om de naam van de interface, het IP-adres van het beheer en de gateway in te voeren.
+ set +e
+ configured=0
+ interface=none
+ addr=none
+ gw=none
+ '[' 0 -eq 0 ']'
+ echo 'Configuring network interface'
Configuring network interface
+ echo 'type static, dhcp, bash for a shell to configure networking, or url to re-enter the url: '
type static, dhcp, bash for a shell to configure networking, or url to re-enter the url:
+ read -p '? ' ntype
? static << Enter the static  to configure the networking >>
+ case $ntype in
+ configure_static
+ '[' none '!=' none ']'
Opmerking: Na het typen van de statische het zal een lijst naar beneden de CIMC-interface, selecteer de juiste interface. als u de verkeerde interface geselecteerd dan is het pakketverlies 100% dan na drie mislukte pogingen van ping, zal het opnieuw vragen om de juiste interface te selecteren totdat pakketverlies is 0 als u niet op de hoogte bent van de interface selecteer de alle interface een voor een.
Voorbeeld
+ echo 'Available interfaces'
Available interfaces
+ ls -l /sys/class/net
total 0
lrwxrwxrwx 1 root root 0 Aug 12 03:53 eno5 -> ../../devices/pci0000:40/0000:40:03.1/0000:46:00.0/0000:47:01.0/0000:49:00.0/0000:4a:00.0/0000:4b:00.0/net/eno5
lrwxrwxrwx 1 root root 0 Aug 12 03:53 eno6 -> ../../devices/pci0000:40/0000:40:03.1/0000:46:00.0/0000:47:01.0/0000:49:00.0/0000:4a:00.0/0000:4b:00.1/net/eno6
lrwxrwxrwx 1 root root 0 Aug 12 03:53 enp1s0f0 -> ../../devices/pci0000:00/0000:00:01.1/0000:01:00.0/net/enp1s0f0
lrwxrwxrwx 1 root root 0 Aug 12 03:53 enp1s0f1 -> ../../devices/pci0000:00/0000:00:01.1/0000:01:00.1/net/enp1s0f1
lrwxrwxrwx 1 root root 0 Aug 12 03:51 lo -> ../../devices/virtual/net/lo
+ read -p 'Interface to configure: ' interface
Interface to configure: enp1s0f0        <<  select the correct interface   >>
+ read -p 'address: ' addr
Opmerking: ND-NODE-L4 vereist interfacenamen in het formaat enp1s0fX, waarbij X een numerieke identifier is. SE-NODE-G2 vereist het formaat enoX, waarbij X een getal is.
Stap 8. Controleer de juiste interface.
Na het invoeren van de interface zal het proberen te pingen http server en als de geselecteerde interface correct is dan pakket verlies moet 0% en beginnen met het ophalen van de afbeelding van http server.
Bijvoorbeeld: na het invoeren van de juiste interface met 0% pakketverlies.
Interface to configure: enp1s0f0
+ read -p 'address: ' addr
address: x.x.x.x/24
+ read -p 'gateway: ' gw
gateway:x.x.x.x
+ ip addr add x.x.x.x/24 dev enp1s0f0
+ ip link set enp1s0f0 up
+ ip route add default via x.x.x.x
++ seq 1 6
+ for count in $(seq 1 6)
+ ping -c 1 x.x.x.x
PING x.x.x.x (x.x.x.x): 56 data bytes

---x.x.x.x ping statistics ---
1 packets transmitted, 0 packets received, 100% packet loss
+ sleep 20
+ for count in $(seq 1 6)
+ ping -c x.x.x.x
PING x.x.x.x (x.x.x.x): 56 data bytes
64 bytes from x.x.x.x : seq=0 ttl=63 time=0.512 ms

---x.x.x.x ping statistics ---
1 packets transmitted, 1 packets received, 0% packet loss
round-trip min/avg/max = 0.512/0.512/0.512 ms
+ configured=1
+ break
+ '[' 1 -eq 0 ']'
+ set -e
+ tmpiso=/tmp/cdrom.iso
+ echo 'Fetching http://x.x.x.x/iso/DCApps/ND/nd-dk9.3.2.2f.iso to /tmp/cdrom.iso'
Fetching http://x.x.x.x/iso/DCApps/ND/nd-dk9.3.2.2f.iso to /tmp/cdrom.iso >> started fetching the apic image from HTTP server
+ '[' http = nfs: ']'
+ download http://x.x.x.x/iso/DCApps/ND/nd-dk9.3.2.2f.iso /tmp/cdrom.iso
+ local url=http://x.x.x.x/iso/DCApps/ND/nd-dk9.3.2.2f.iso dest=/tmp/cdrom.iso tries=5
+ wget --server-response --no-check-certificate --tries=5 --progress=dot:mega --read-timeout=60 --output-document=/tmp/cdrom.iso.tmp http://x.x.x.x197.204.4/iso/DCApps/ND/nd-dk9.3.2.2f.iso
--2025-08-12 09:39:08-- http://x.x.x.x197.204.4/iso/DCApps/ND/nd-dk9.3.2.2f.iso
Connecting to x.x.x.x:80... connected.
HTTP request sent, awaiting response...
HTTP/1.1 200 OK
Date: Tue, 12 Aug 2025 09:39:09 GMT
Server: Apache/2.4.6 (CentOS) OpenSSL/1.0.2k-fips mod_wsgi/3.4 Python/2.7.5
Last-Modified: Tue, 10 Jun 2025 06:51:41 GMT
ETag: "2c66bd000-6373220f3b940"
Accept-Ranges: bytes
Content-Length: 11918888960
Keep-Alive: timeout=5, max=100
Connection: Keep-Alive
Content-Type: application/octet-stream
Length: 11918888960 (11G) [application/octet-stream]
Saving to: '/tmp/cdrom.iso.tmp'
Als u de verkeerde interface hebt geselecteerd, is het pakketverlies 100% en na drie mislukte pingpogingen zal het opnieuw vragen om de juiste interface te selecteren.
Bijvoorbeeld: na het invoeren van de verkeerde interface met 100% pakketverlies.
+ read -p 'Interface to configure: ' interface
Interface to configure: enp11s0
+ read -p 'address: ' addr
address: x.x.x.x/24
+ read -p 'gateway: ' gw
gateway: x.x.x.x
+ ip addr add x.x.x.x/24 dev enp11s0
+ ip link set enp11s0 up
+ ip route add default via x.x.x.x
++ seq 1 2
+ for count in '$(seq 1 2)'
+ ping -c 1 x.x.x.x
PING x.x.x.x (x.x.x.x) 56(84) bytes of data.
From x.x.x.x icmp_seq=1 Destination Host Unreachable

--- x.x.x.x ping statistics ---
1 packets transmitted, 0 received, +1 errors, 100% packet loss, time 0ms

+ sleep 20
+ for count in '$(seq 1 2)'
+ ping -c 1 x.x.x.x
PING x.x.x.x (x.x.x.x) 56(84) bytes of data.
From x.x.x.x icmp_seq=1 Destination Host Unreachable

--- x.x.x.x ping statistics ---
1 packets transmitted, 0 received, +1 errors, 100% packet loss, time 0ms

+ sleep 20
+ '[' 0 -eq 0 ']'
+ echo 'Configuring network interface'
Configuring network interface
+ echo 'type static, dhcp, bash for a shell to configure networking, or url to re-enter the url: ' <>
type static, dhcp, bash for a shell to configure networking, or url to re-enter the url:
+ read -p '? ' ntype
?
Bewaak de CIMC CLI en wacht ongeveer 40-50 min, u krijgt de volgende uitvoer op cli.
+ log 'Shutting down Atomix Installer'
+ echo 'Shutting down Atomix Installer'
Shutting down Atomix Installer
+ log 'reboot: Power down'
+ echo 'reboot: Power down'
reboot: Power down
+ sleep 5
+ poweroff
+ ec[  533.195532] sysrq: Emergency Sync
ho s
[  533.195563] sysrq: Emergency Sync
[  533.212106] sysrq: Emergency Sync
[  533.212117] sysrq: Emergency Remount R/O
[  533.212189] sysrq: Power Off
[  533.212226] kvm: exiting hardware virtualization
[  533.213874] EXT4-fs (sdf1): re-mounted. Opts: (null). Quota mode: none.
[  533.215431] sd 1:0:0:0: [sdf] Synchronizing SCSI cache
[  533.215749] EXT4-fs (dm-3): re-mounted. Opts: (null). Quota mode: none.
[  533.216395] EXT4-fs (dm-1): re-mounted. Opts: (null). Quota mode: none.
[  533.217221] EXT4-fs (sdf6): re-mounted. Opts: (null). Quota mode: none.
[  533.217689] EXT4-fs (sdf4): re-mounted. Opts: (null). Quota mode: none.
[  533.218965] Emergency Remount complete
[  533.218997] Emergency Sync complete
[  533.218997] Emergency Sync complete
[  533.219002] Emergency Sync complete
[  533.359024] sd 1:0:0:0: [sdf] Stopping disk
+ echo s
+ echo s
+ echo u
+ echo o
+ log 'Nap time'
+ echo 'Nap time'
Nap time
+ true
+ sleep 60
[  535.571545] megaraid_sas 0000:41:00.0: megasas_disable_intr_fusion is called outbound_intr_mask:0x40000009
[  535.692202] ACPI: PM: Preparing to enter system sleep state S5
[  535.706849] reboot: Power down
Stap 9. SOL afsluiten na uitschakelen
Wacht tot het bericht wordt uitgeschakeld in de SOL-console, sluit vervolgens af van SOL door op Ctrl en x (Ctrl+x) te drukken en opnieuw in te loggen bij CIMC en het bereik opnieuw te wijzigen.
(i) Change the scope to virtual media again:
system# scope vmedia
system /vmedia #
(ii) Unmap the .iso image that you mapped in 2.c:
 system /vmedia # unmap volume_name
 At the Save mapping prompt, enter yes if you want to save the mapping or no if you do not want to save the mapping. For example:
 system /vmedia # unmap apic
 Save mapping? Enther 'yes' or 'no' to confirm (CTRL-C to cancel) → yes
 system /vmedia #
(iii) Connect back to SOL again:
 system /vmedia #  connect host
Nadat u het systeem hebt uitgeschakeld, moet u het systeem opnieuw opstarten met behulp van de KVM en vervolgens doorgaan met de volgende stappen.
Stap x.x.x.x Eerste opstartconfiguratie
[  274.210045] nd_bootstrap.sh[2628]:   INFO[0174] bootDisk: found disk=/dev/sdf bootPart=/dev/sdf4 espPart=/dev/sdf3
[  274.224041] nd_bootstrap.sh[2628]:   INFO[0174] boot devices/filesystems have been mounted
[  274.236038] nd_bootstrap.sh[2628]:   INFO[0174] |12231-start| ["expand-stub.bash" "/boot/efi/EFI/atx-current/kernel.efi"]
[  274.251228] nd_bootstrap.sh[2628]:   INFO[0174] |12231-out  | 21870+1 records in
[  274.262061] nd_bootstrap.sh[2628]:   INFO[0174] |12231-out  | 21870+1 records out
[  274.272065] nd_bootstrap.sh[2628]:   INFO[0174] |12231-out  | 11197856 bytes (11 MB, 11 MiB) copied, 0.0716082 s, 156 MB/s
[  274.287060] nd_bootstrap.sh[2628]:   INFO[0174] |12231-out  | 0+1 records in
[  274.297060] nd_bootstrap.sh[2628]:   INFO[0174] |12231-out  | 0+1 records out
[  274.307049] nd_bootstrap.sh[2628]:   INFO[0174] |12231-out  | 187 bytes copied, 7.2325e-05 s, 2.6 MB/s
[  274.566030] nd_bootstrap.sh[2628]:   INFO[0175] |12231-out  | 102375+1 records in
[  274.576055] nd_bootstrap.sh[2628]:   INFO[0175] |12231-out  | 102375+1 records out
[  274.588059] nd_bootstrap.sh[2628]:   INFO[0175] |12231-out  | 52416297 bytes (52 MB, 50 MiB) copied, 0.329377 s, 159 MB/s
[  274.604075] nd_bootstrap.sh[2628]:   INFO[0175] |12231-out  | 0+1 records in
[  OK  ] Finished atomix-boot-setup.
[  274.615055] nd_bootstrap.sh[2628]:   INFO[0175] |12231-out  | 0+1 records out
Starting Initial cloud-init job (pre-networking)...
[  274.634046] nd_bootstrap.sh[2628]:   INFO[0175] |12231-out  | 82 bytes copied, 9.4287e-05 s, 870 kB/s
[  274.656064] nd_bootstrap.sh[2628]:   INFO[0175] |12231-exit | rc=0
[  274.666047] nd_bootstrap.sh[2628]:   INFO[0175] Boot()                    duration=175321
[  274.837851] cloud-init[12253]: Cloud-init v. 24.1.3-0ubuntu1~22.04.5 running 'init-local' at Tue, 12 Aug 2025 09:53:39 +0000. Up 274.82 seconds.
Press any key to run first-boot setup on this console...
Starting Nexus Dashboard setup utility
Welcome to Nexus Dashboard 3.2.2f
Press Enter to manually bootstrap your first master node..
Stap 11. Beheerderswachtwoord en beheernetwerk configureren van de Nexus Dashboard-beheerinterface
Starting Nexus Dashboard setup utility
Welcome to Nexus Dashboard 3.2.2f
Press Enter to manually bootstrap your first master node...

Admin Password:
Reenter Admin Password:
Management Network:
  IP Address/Mask: x.x.x.x/24
  Gateway: x.x.x.x
Config opnieuw invoeren?(y/N): N
System configured successfully
Initializing System on first boot. Please wait..
[  OK  ] Listening on Network Service Netlink Socket.
[  OK  ] Finished Initial cloud-init job (pre-networking).
[  OK  ] Reached target Preparation for Network.
         Starting Network Configuration...
[  OK  ] Started Network Configuration.
[  OK  ] Reached target Network.
Starting Wait for Network to be Configured...
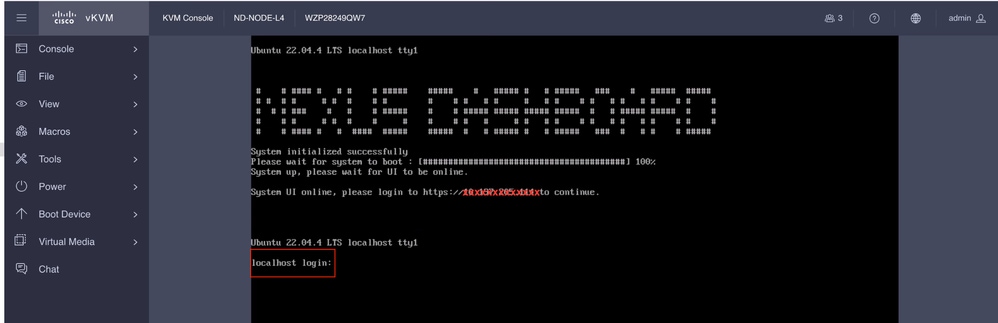
Stap 12. De Nexus Dashboard Node is klaar voor aanmelding. U kunt zich voor de rest van de configuratie aanmelden bij de ND GUI via de IP-beheerinterface
Van console:
Ubuntu 22.04.4 LTS localhost ttyS0

#    # #### #   # #    # #####    #####    #   ##### #   # #####   ###    #   #####  #####

# #  # #     # #  #    # #        #    # #   # #     #   # #    # #   # #   # #    # #    #

#  # # ###    #   #    # #####    #    # ##### ##### ##### #####  #   # ##### #####  #    #

#    # #     # #  #    #     #    #    # #   #     # #   # #    # #   # #   # #    # #    #

#    # #### #   #  ####  #####    #####  #   # ##### #   # #####   ###  #   # #    # #####
System initialized successfully
[  564.309561] cloud-init[12560]: Cloud-init v. 24.1.3-0ubuntu1~22.04.5 running 'modules:final' at Tue, 12 Aug 2025 09:58:28 +0000. Up 564.27 seconds.
ci-info: no authorized SSH keys fingerprints found for user ubuntu.
<14>Aug 12 09:58:29 cloud-init: #############################################################
<14>Aug 12 09:58:29 cloud-init: -----BEGIN SSH HOST KEY FINGERPRINTS-----
<14>Aug 12 09:58:29 cloud-init: 256 SHA256:vKu7Zj3MAP+vFOXaeW14HClEhAwrSpA9AqcUC4SZVlU root@localhost (ECDSA)
<14>Aug 12 09:58:29 cloud-init: 256 SHA256:I7eiUnQq6pZsoFPy+UxIUQ66jQOgHyG4zGuF6cAtSl0 root@localhost (ED25519)
<14>Aug 12 09:58:29 cloud-init: 3072 SHA256:SvodRIEgWzEAaQQdH2rlw0qLziBbv0e88VAGkt/ox14 root@localhost (RSA)
<14>Aug 12 09:58:29 cloud-init: -----END SSH HOST KEY FINGERPRINTS-----
<14>Aug 12 09:58:29 cloud-init: #############################################################

-----BEGIN SSH HOST KEY KEYS-----
ecdsa-sha2-nistp256 AAAAE2VjZHNhLXNoYTItbmlzdHAyNTYAAAAIbmlzdHAyNTYAAABBBBf9S1BXcR48cWcIKhvfjLGYufJgycGIf1Yx8OpRsk4e1I+y80J/x5dfX90h+3cwt9kjH8IubMpleK66mlW+xd0= root@localhost
ssh-ed25519 AAAAC3NzaC1lZDI1NTE5AAAAIGWTN7hoB2/dYSVA0gpV88FWh2iRD2hwJ2LMryhhhQHg root@localhost
ssh-rsa AAAAB3NzaC1yc2EAAAADAQABAAABgQCeM+In/dciDwCKEPLV/97oIA5pHHRBRf0Lij5NcUwzYAf9q/m/lUsdzv2zVYc4WAJd8uX9ZxDAGa9D358Tvxh/lKzBKqNQpQdAjyby6IGGui+UK9Mq1RVxoUkFtIIJ97IzaBoR9ScnucMXpu5mp5OAjws+VrUhKk1XNFAui1QgW507I0Xk+2AaR/W0rwJCQRsHx3orDxCwJkDQDiQQAf/SrvSnuAe/8pSuCuvscqPjZeIF7LnJ6dAms0XXrhbxRQ8c4q/Ud6RL2sKjinlZPfqsbVFSpjbJ9m4jtXvuGE5llyJbS1FcU8DsFbkY6HH9JQru49iXcd5mKt7fyPg0ypp7Hl+2g07mEcYlEMBXxNZw+HqNW27xp0ZkRfWO+Zl2t0s6DjM0LHWqV0wZLYqqBTlQIkhf2irM6mr7s2bVAcvEsuZzG9d7uY8aC/CR5GwkgKW8s4oI7m56ccdRPHV0qQFXnBybBToUInmIK+1fxtaUXYbQbQ83wxNOvG7O55gDsws= root@localhost
-----END SSH HOST KEY KEYS-----
[  564.364630] cloud-init[12560]: Cloud-init v. 24.1.3-0ubuntu1~22.04.5 finished at Tue, 12 Aug 2025 09:58:29 +0000. Datasource DataSourceAtomix [sources=/var/lib/cloud/seed/atomix][dsmode=net].  Up 564.36 seconds
Please wait for system to boot : [########################################] 100%
System up, please wait for UI to be online.
System UI online, please login to https://x.x.x.x to continue. << Access the Nexus Dashboard GUI via this URL >>
Ubuntu 22.04.4 LTS localhost ttyS0
localhost login:
Van KVM:
Revisiegeschiedenis
| Revisie | Publicatiedatum | Opmerkingen |
|---|---|---|
1.0 |
29-Aug-2025
|
Eerste vrijgave |
Bijgedragen door Cisco-engineers
- Shivam TripathiTAC
 Feedback
Contact Cisco
- Een ondersteuningscase openen

- (Vereist een Cisco-servicecontract)