소개
이 문서에서는 Device Classifier Dynamic XML Support(디바이스 분류자 동적 XML 지원) 기능을 사용하여 Catalyst 9800 WLC에서 디바이스 분류자를 업데이트하는 방법에 대해 설명합니다.
사전 요구 사항
요구 사항
Cisco 9800 WLC 기본 사항 및 장치 분류에 대한 지식
사용되는 구성 요소
이 문서의 정보는 다음 소프트웨어 및 하드웨어 버전을 기반으로 합니다.
- C9800-CL v17.12.4, v17.15.4ES 및 v17.18.2ES
이 문서의 정보는 특정 랩 환경의 디바이스를 토대로 작성되었습니다. 이 문서에 사용된 모든 디바이스는 초기화된(기본) 컨피그레이션으로 시작되었습니다. 현재 네트워크가 작동 중인 경우 모든 명령의 잠재적인 영향을 미리 숙지하시기 바랍니다.
구성
설정

참고: 이 기능은 v17.10.1부터 지원됩니다.
.xml 파일의 예는 기본적으로 WLC의 dc_profile_dir 폴더에서 찾을 수 있습니다.
C9800#dir bootflash:dc_profile_dir
Directory of bootflash:/dc_profile_dir/

393224 -rw- 443023 Dec 23 2025 07:14:35 +00:00 dc_embedded_profiles.txt.bkp
393233 -rw- 303835 Dec 23 2025 07:14:35 +00:00 dc_default_profiles.txt
393222 -rw- 443023 Dec 23 2025 07:14:35 +00:00 dc_embedded_profiles.txt
393223 -rw- 1367 Dec 23 2025 07:14:35 +00:00 dc_user_profiles.xml
393221 -rw- 303835 Dec 18 2025 07:13:57 +00:00 dc_default_profiles.txt.bkp
예를 들어, 변경 사항을 적용하기 전의 클라이언트 세부사항은 다음과 같습니다.
C9800#show wireless client mac-address 74da.38eb.c01f detail

Client MAC Address : 74da.38eb.c01f
Client MAC Type : Universally Administered Address
Client DUID: NA
Client IPv4 Address : 10.14.42.101
...
Device Classification Information:
Device Type : Microsoft-Workstation
Device Name : DESKTOP-R2CH8G5
Protocol Map : 0x000009 (OUI, DHCP)
Device Vendor : MSFT 5.0
Device Protocol : DHCP
Type : 12 19
Data : 13
00000000 00 0c 00 0f 44 45 53 4b 54 4f 50 2d 52 32 43 48 |....DESKTOP-R2CH|
00000010 38 47 35 |8G5 |
Type : 60 12
Data : 0c
00000000 00 3c 00 08 4d 53 46 54 20 35 2e 30 |.<..MSFT 5.0 |
Type : 55 18
Data : 12
00000000 00 37 00 0e 01 03 06 0f 1f 21 2b 2c 2e 2f 77 79 |.7.......!+,./wy|
00000010 f9 fc |.. |
...
C9800#show device classifier mac-address 74da.38eb.c01f detail
Client Mac: 74da.38eb.c01f
Device Type: Microsoft-Workstation
Confidence Level: 10
Device Name: DESKTOP-R2CH8G5
Device Vendor: MSFT 5.0
클라이언트는 다른 프로토콜을 기반으로 분류할 수 있습니다.
DHCP를 기반으로 클라이언트 분류
.xml 파일을 편집합니다. 이 예에서는 다음 규칙이 적용됩니다.
<?xml version="1.0" encoding="UTF-8"?>
<장치 목록>
<CopyRight>Copyright (c) 2021-2022 by Cisco Systems, Inc. All rights reserved.</CopyRight>
<Version>1.0</Version>
<장치>
<DeviceType>Sample_Profile_2</DeviceType>
<RuleName>Sample_Rule_1</RuleName>
<RuleOperator>또는</RuleOperator>
<RuleCertaintyMetric>20</RuleCertaintyMetric>
<확인>
<Protocol>DHCP</Protocol>
<TLV-Type>60</TLV-Type>
<TLV-Value-Type>문자열</TLV-Value-Type>
<TLV-Value>MSFT</TLV-Value>
</확인>
</디바이스>
</DeviceList>
여기에 사용된 값은 이전 show wireless client mac-address [mac] detail 출력에서 추출된 값과 같습니다.
굵게 표시된 부분은 구문 분석 오류가 발생할 수 있으므로 공백을 방지하기 위해 선택되었습니다. 하지만 이것은 결과의 시작, 중간 또는 마지막 부분일 수 있습니다.
메트릭의 경우: 20은 더 높은 메트릭을 주기 위해 선택되었으므로 우선 적용됩니다. 메트릭이 높을수록 선호도가 높습니다.
파일을 bootflash에 직접 복사합니다.
CLI에서
{ftp 복사: | tftp:} {flash:}
또는 GUI에서:
Administration(관리) > Management(관리) > File Manager(파일 관리자)
부트플래시:
업로드
그 후에는 WLC에서 파일을 사용할 수 있어야 합니다.
C9800#more bootflash:dc_user_profiles.xml
<?xml version="1.0" encoding="UTF-8"?>
<DeviceList>
<CopyRight>Copyright (c) 2021-2022 by Cisco Systems, Inc. All rights reserved.</CopyRight>
<Version>1.0</Version>
<Device>
<DeviceType>Sample_Profile_2</DeviceType>
<RuleName>Sample_Rule_1</RuleName>
<RuleOperator>OR</RuleOperator>
<RuleCertaintyMetric>20</RuleCertaintyMetric>
<Check>
<Protocol>DHCP</Protocol>
<TLV-Type>60</TLV-Type>
<TLV-Value-Type>String</TLV-Value-Type>
<TLV-Value>MSFT</TLV-Value>
</Check>
</Device>
</DeviceList>
디바이스 분류자 활성화:
C9800#config t
C9800(config)#device classifier
이제 생성된 프로파일이 다음 출력 아래에 표시됩니다.
C9800#show device classifier profile type custom
Valid Type Profile Name mCon ID
----------------------------------------------------------------------------
Valid Custom Sample_Profile_2 1 0
이후, 클라이언트 분류는 변경되어야 합니다.
클라이언트가 이미 연결되어 있는 경우 연결을 끊은 다음 클라이언트를 다시 연결합니다.
C9800#clear wireless client device cache
!--- To clear any classification cache
C9800#show wireless client mac-address 74da.38eb.c01f detail

Client MAC Address : 74da.38eb.c01f
Client MAC Type : Universally Administered Address
Client DUID: NA
Client IPv4 Address : 10.14.42.101
...
Device Classification Information:
Device Type : Sample_Profile_2
Device Name : DESKTOP-R2CH8G5
Protocol Map : 0x000009 (OUI, DHCP)
Device Vendor : MSFT 5.0
Device Protocol : DHCP
Type : 12 19
Data : 13
00000000 00 0c 00 0f 44 45 53 4b 54 4f 50 2d 52 32 43 48 |....DESKTOP-R2CH|
00000010 38 47 35 |8G5 |
Type : 60 12
Data : 0c
00000000 00 3c 00 08 4d 53 46 54 20 35 2e 30 |.<..MSFT 5.0 |
Type : 55 18
Data : 12
00000000 00 37 00 0e 01 03 06 0f 1f 21 2b 2c 2e 2f 77 79 |.7.......!+,./wy|
00000010 f9 fc |.. |
...
C9800#show device classifier mac-address 74da.38eb.c01f detail
Client Mac: 74da.38eb.c01f
Device Type: Sample_Profile_2
Confidence Level: 20
Device Name: DESKTOP-R2CH8G5
Device Vendor: MSFT 5.0
17.18 이전의 OUI를 기준으로 클라이언트 분류
.xml 파일을 편집합니다. 이 예에서는 다음 규칙이 적용됩니다.
<?xml version="1.0" encoding="UTF-8"?>
<장치 목록>
<CopyRight>Copyright (c) 2021-2022 by Cisco Systems, Inc. All rights reserved.</CopyRight>
<Version>4.3</Version>
<장치>
<DeviceType>Test-3</DeviceType>
<RuleName>Cisco-Rule</RuleName>
<RuleOperator>AND</RuleOperator>
<RuleCertaintyMetric>20</RuleCertaintyMetric>
<확인>
<Protocol>MAC</Protocol>
<TLV-Value-Type>문자열</TLV-Value-Type>
<TLV-Value>Edimax</TLV-Value>
</확인>
</디바이스>
</DeviceList>
여기서 문자열은 MAC 주소의 접두사를 기반으로 선택되었습니다. 이는 IEEE에서 정의한 표준 OUI에서 확인할 수 있습니다.
파일을 bootflash에 직접 복사합니다.
CLI에서
{ftp 복사: | tftp:} {flash:}
또는 GUI에서:
Administration(관리) > Management(관리) > File Manager(파일 관리자)
부트플래시:
업로드
그 후에는 WLC에서 파일을 사용할 수 있어야 합니다.
C9800#more bootflash:dc_user_profiles.xml
<?xml version="1.0" encoding="UTF-8"?>
<DeviceList>
<CopyRight>Copyright (c) 2021-2022 by Cisco Systems, Inc. All rights reserved.</CopyRight>
<Version>4.3</Version>
<Device>
<DeviceType>Test-3</DeviceType>
<RuleName>Cisco-Rule</RuleName>
<RuleOperator>AND</RuleOperator>
<RuleCertaintyMetric>20</RuleCertaintyMetric>
<Check>
<Protocol>MAC</Protocol>
<TLV-Value-Type>String</TLV-Value-Type>
<TLV-Value>Edimax</TLV-Value>
</Check>
</Device>
</DeviceList>
디바이스 분류자 활성화:
C9800#config t
C9800(config)#device classifier
이제 생성된 프로파일이 다음 출력 아래에 표시됩니다.
C9800#show device classifier profile type custom
Valid Type Profile Name mCon ID
----------------------------------------------------------------------------
Valid Custom Test-3 1 0
이후, 클라이언트 분류는 변경되어야 합니다.
클라이언트가 이미 연결되어 있는 경우 연결을 끊은 다음 클라이언트를 다시 연결합니다.
C9800#clear wireless client device cache
!--- To clear any classification cach

C9800#show wireless client mac-address 74da.38eb.c01f detail

Client MAC Address : 74da.38eb.c01f
Client MAC Type : Universally Administered Address
Client DUID: NA
Client IPv4 Address : 10.14.42.101
...
Device Classification Information:
Device Type : Test-3
Device Name : EDIMAX TECHNOLOGY CO. LTD.
Protocol Map : 0x000001 (OUI)
Day Zero Classification : EDIMAX TECHNOLOGY CO. LTD.
...
C9800#show device classifier mac-address 74da.38eb.c01f detail
Client Mac: 74da.38eb.c01f
Device Type: Sample_Profile_2
Confidence Level: 20
Device Name: DESKTOP-R2CH8G5
Device Vendor: MSFT 5.0
OUI를 기반으로 클라이언트 분류 17.18

경고: 현재 Cisco 버그 IDCSCws66837에서 이 문제를 해결하고 있습니다. 해당 문제를 해결할 버그를 추적하십시오.
.xml 파일을 편집합니다. 이 예에서는 다음 규칙이 적용됩니다.
<?xml version="1.0" encoding="UTF-8"?>
<장치 목록>
<CopyRight>Copyright (c) 2021-2022 by Cisco Systems, Inc. All rights reserved.</CopyRight>
<Version>4.3</Version>
<장치>
<DeviceType>Test-1</DeviceType>
<RuleName>Cisco-Rule</RuleName>
<RuleOperator>AND</RuleOperator>
<RuleCertaintyMetric>20</RuleCertaintyMetric>
<확인>
<Protocol>MAC</Protocol>
<TLV-Value-Type>Regex</TLV-Value-Type>
<TLV-Value>74da.38*</TLV-Value>
</확인>
</디바이스>
</DeviceList>
17.18부터 MAC 주소의 접두사를 사용하여 분류할 수 있습니다.
여기서 별표(* 기호)는 이 예에서 74da.38로 시작하는 모든 MAC 주소가 이 규칙에 따라 분류됨을 의미합니다.
다른 옵션: 전체 MAC 주소는 여기에 배치할 수 있으며, 이는 MAC 주소를 개별적으로 분류할 수 있는 기회를 제공합니다.
파일을 bootflash에 직접 복사합니다.
CLI에서
{ftp 복사: | tftp:} {flash:}
또는 GUI에서:
Administration(관리) > Management(관리) > File Manager(파일 관리자)
부트플래시:
업로드
그 후에는 WLC에서 파일을 사용할 수 있어야 합니다.
C9800#more bootflash:dc_user_profiles.xml
<?xml version="1.0" encoding="UTF-8"?>
<DeviceList>
<CopyRight>Copyright (c) 2021-2022 by Cisco Systems, Inc. All rights reserved.</CopyRight>
<Version>4.3</Version>
<Device>
<DeviceType>Test-1</DeviceType>
<RuleName>Cisco-Rule</RuleName>
<RuleOperator>AND</RuleOperator>
<RuleCertaintyMetric>20</RuleCertaintyMetric>
<Check>
<Protocol>MAC</Protocol>
<TLV-Value-Type>Regex</TLV-Value-Type>
<TLV-Value>74da.38*</TLV-Value>
</Check>
</Device>
</DeviceList>
디바이스 분류자 활성화:
C9800#config t
C9800(config)#device classifier
이제 생성된 프로파일이 다음 출력 아래에 표시됩니다.
C9800#show device classifier profile type custom
Valid Type Profile Name mCon ID
----------------------------------------------------------------------------
Valid Custom Test-1 1 0
이후, 클라이언트 분류는 변경되어야 합니다.
클라이언트가 이미 연결되어 있는 경우 연결을 끊은 다음 클라이언트를 다시 연결합니다.
C9800#clear wireless client device cache
!--- To clear any classification cache
C9800#show wireless client mac-address 74da.38eb.c01f detail

Client MAC Address : 74da.38eb.c01f
Client MAC Type : Universally Administered Address
Client DUID: NA
Client IPv4 Address : 10.14.42.101
...
Device Classification Information:
Device Type : Test-1
Device Name : EDIMAX TECHNOLOGY CO. LTD.
Protocol Map : 0x000001 (OUI)
Day Zero Classification : EDIMAX TECHNOLOGY CO. LTD.
...
C9800#show device classifier mac-address 74da.38eb.c01f detail
Client Mac: 74da.38eb.c01f
Device Type: Test-1
Confidence Level: 20
Day Zero Classification: EDIMAX TECHNOLOGY CO. LTD.
Device Name: EDIMAX TECHNOLOGY CO. LTD.
다음을 확인합니다.
CLI에서:
more bootflash:dc_user_profiles.xml
show device classifier profile type custom
show wireless client mac-address [mac] detail
show device classifier mac-address [mac] detail
GUI에서:
1. Monitoring(모니터링) > Wireless(무선) > Clients(클라이언트)로 이동합니다.
2. 장치 유형은 열로 표시됩니다.
 Monitoring(모니터링) 페이지의 디바이스 유형
클라이언트를 클릭하면 Device Type(디바이스 유형)이 Client 360 View(클라이언트 360 보기)에도 표시됩니다.
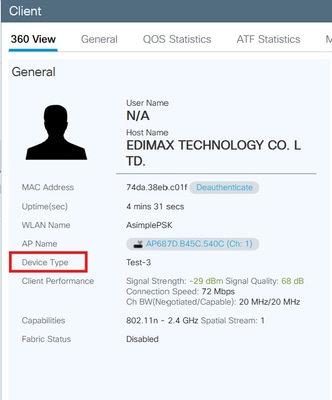 Client 360의 Device Type(디바이스 유형)
문제 해결
클라이언트를 분류하는 데 사용하는 프로토콜을 클라이언트에서 전송하는지 확인합니다.
DHCP 분류의 경우 클라이언트는 클라이언트 유형을 구별하기 위해 WLC에서 문자열로 사용할 수 있는 고유한 TLV를 보내야 합니다.
OUI 분류 측면에서는 MAC 임의 지정에 유의하십시오.
첫 번째 연결을 시작하는 동안 클라이언트에 대한 방사성 추적을 수집합니다.
https://www.cisco.com/c/en/us/support/docs/wireless/catalyst-9800-series-wireless-controllers/213949-wireless-debugging-and-log-collection-on.html#toc-hId-2010809796
추가 조사를 위해 다음 추적을 수집할 수 있습니다.
request platform soft trace rotate all
delete /force bootflash:tracelogs/*

set platform software trace smd chassis active R0 dc-profile noise
set platform software trace smd chassis active R0 dc-sub noise
set platform software trace smd chassis active R0 dc-sm noise
set platform software trace smd chassis active R0 dc-mem noise
set platform software trace smd chassis active R0 dc noise
문제를 재현한 다음 이 명령을 사용하여 출력을 수집합니다.
show logging process smd internal start last 20 minutes to-file flash:cls_logging.log
참고: 이 기능이 이미 사용되고 있고 .xml 사용자 지정 파일이 bootflash에 이미 있지만 파일을 편집할 때마다 프로파일을 업데이트하지 않을 경우 다음 단계를 적용합니다.
1) 플래시에서 기존 dc_user_profiles.xml 삭제
2) 디바이스 분류자 비활성화(디바이스 분류자 없음)
3) 디바이스 분류자를 다시 활성화합니다(디바이스 분류자).
4) 새 dc_user_profiles.xml 파일을 플래시에 복사
참조
https://www.cisco.com/c/en/us/td/docs/wireless/controller/9800/17-18/config-guide/b_wl_17_18_cg/m_device_classifier_dynamic_xml_support.html
 피드백
피드백