소개
이 문서에서는 iOS용 Cisco Security Connector를 추가 모바일 디바이스 관리 플랫폼에 구축하는 방법에 대해 설명합니다.
배경 정보
iOS용 CSC(Cisco Security Connector)는 iPhone에 대한 완전한 Umbrella DNS 보호입니다. 구축에 이 설명서를 사용하기 전에 CSC 구축 설명서를 참조하십시오. CSC를 사용하려면 장치가 감독 모드에 있어야 합니다.
이 문서에서는 CSC에 대한 추가 MDM(Mobile Device Management) 소프트웨어 지원을 요약합니다. 이러한 MDM은 성공적인 구축에 의해 검증되었지만 아직 대시보드에 직접 제공되지 않습니다.
프로파일이 iOS 디바이스에 존재하는지 확인하려면
- Settings(설정) > General(일반) > Device Management(디바이스 관리) > [MDM Profile Name](MDM 프로필 이름) > More details(추가 정보)로 이동합니다.
- 프로파일 유형 DNS 프록시가 다음 세부 정보와 함께 있는지 확인합니다.
- 앱 세부 정보:
com.cisco.ciscosecurity.app
- 공급자 번들 세부 정보:
com.cisco.ciscosecurity.ciscoumbrella
Apple MDM 사이트에서 구성할 iOS 프로필 세부사항에 대해 자세히 알아보십시오.
모든 MDM
다음 단계는 모든 MDM에 배포에 적용되며 먼저 완료해야 합니다.
- 관리자 이메일 주소가 Mobile Devices 페이지 "Settings(설정)" 옵션 아래의 대시보드에 추가되었는지 확인합니다.
- iOS 디바이스에서 사용할
Cisco_Umbrella_Root_CA.cer 파일을 다운로드합니다. 이 인증서는 오류 없는 HTTPS 차단 페이지를 허용합니다. 루트 CA를 가져오려면
- Deployments(구축) > Configuration(컨피그레이션) > Root Certificate(루트 인증서)로 이동합니다.
- Download Certificate를 선택합니다.
- 다운로드를
.cer 파일로 저장합니다.
MobileIron 클라우드
현재 대시보드의 MobileIron 다운로드는 온프레미스 버전만 지원합니다. 클라우드 버전은 온프레미스 소프트웨어와 다른 장치 변수를 사용합니다. 구축은 몇 가지 예외를 제외하고 온프레미스와 매우 유사합니다. 버전에 따라 MobileIron Core는 이 수정이 필요할 수 있습니다.
MobileIron Cloud에 배포하려면
- 관리자 이메일 주소가 Mobile Devices 페이지 "Settings(설정)" 옵션 아래의 대시보드에 추가되었는지 확인합니다.
- Umbrella 대시보드에서 Mobile Iron 프로파일을 다운로드합니다.
- 다음 변수를 대체합니다.
|
제네릭 자리 표시자 변수
|
새 변수
|
|
"$DEVICE_SN$"
|
${deviceSN}
|
|
"$DEVICE_MAC$"*
|
${deviceWifiMacAddress}
|
*이는 CSC의 Clarity 구성 요소에만 사용되며 Umbrella 구성 요소에는 사용되지 않습니다. Clarity를 사용하지 않으면 대체할 $DEVICE_MAC$이 없습니다.
Citrix Endpoint Management MDM
Citrix에 구축하려면 대시보드에서 다음 준비 단계를 완료하십시오.
- 관리자 이메일 주소가 Mobile Devices 페이지 "Settings(설정)" 옵션 아래의 대시보드에 추가되었는지 확인합니다.
- Umbrella에서 일반 MDM 컨피그레이션을 다운로드합니다(AMP도 동일한 방식으로 구성됨).
- Umbrella의 루트 인증서를 다운로드합니다.
- Deployments(구축) > Configuration(컨피그레이션) > Root Certificate(루트 인증서)로 이동합니다.
- Download Certificate를 선택합니다.
- 다운로드를
.cer 파일로 저장합니다.
- 구성을 수정하고 일반 자리 표시자를 Citrix MDM에 대한 올바른 변수로 바꿉니다.
|
제네릭 자리 표시자 변수
|
새 변수
|
|
일련 번호
|
${device.serialnumber}
|
|
MAC_주소*
|
${device.MAC_ADDRESS}
|
*이는 CSC의 Clarity 구성 요소에만 사용되며 Umbrella 구성 요소에는 사용되지 않습니다.
그런 다음 다음 다음 MDM 단계를 완료합니다.
- Apple Business Manager(ABM)(이전의 VPP, Volume Purchase Program)를 사용하여 CSC 앱을 설치하도록 MDM을 구성합니다.
- 준비 단계에서 수정된 Umbrella 및/또는 Clarity 컨피그레이션을 업로드합니다.
- Citrix 설명서의 단계를 사용하여 프로파일을 가져옵니다.
- Umbrella 루트 인증 기관을 신뢰할 수 있는 디바이스에 대한 인증서를 업로드합니다.
- 필요한 디바이스에 프로필, 1개의 CA 및 1개의 CSC 앱을 푸시하도록 정책을 구성합니다.
Lightspeed MDM
Lightspeed MDM은 iOS DNS 프록시의 텍스트 기반 컨피그레이션을 지원합니다. 일반 MDM 프로파일을 수정하여 이 작업을 수행할 수 있습니다.
- "generic mobileconfig file"을 다운로드하고 파일 확장명을 .xml에서 .txt로 변경합니다.
- 파일을 열고 행 58의 자리 표시자 일련 번호 문자열을
%serial_number%로 변경합니다.
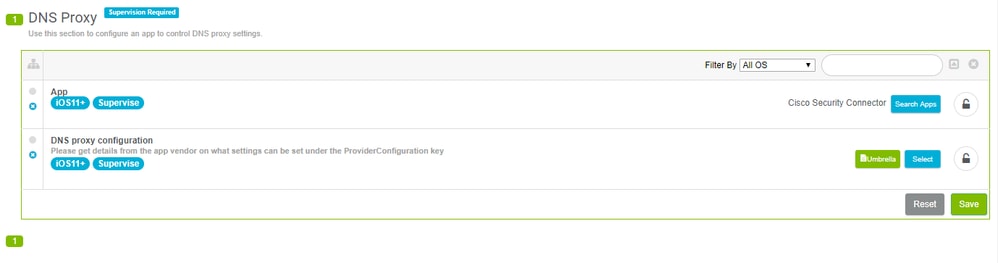
- 그림과 같이 Lightspeed에서 DNS 프록시 프로필에 Cisco Security Connection을 추가합니다
 360019477192
- 수정된 일반 mobileconfig 파일을 앱 아래의 DNS 프록시 컨피그레이션 옵션에 추가합니다.
 360019477152
- 마지막으로, Umbrella에서 Cisco Root CA를 다운로드하고 Lightspeed로 구축하여 인증서 없는 블록 페이지를 보장합니다.
 360019477132
이 단계는 모든 MDM에 구축에 적용됩니다. 먼저 다음 단계를 사용하십시오.
JAMF 학교
JAMF Schools에 CSC를 구축하는 것은 JAMF와 다릅니다. 일반 프로필로 시작하고 JAMF 설명서의 단계를 참조하십시오.
다음은 일련 번호에 사용할 변수 및 선택 위치를 구성하는 예입니다.
PayloadContent AppBundleIdentifier com.cisco.ciscosecurity.app PayloadDescription Cisco Umbrella PayloadDisplayName Cisco Umbrella PayloadIdentifier com.apple.dnsProxy.managed.{pre-filled in the download} PayloadType com.apple.dnsProxy.managed PayloadUUID {pre-filled in the download} PayloadVersion 1 ProviderBundleIdentifier com.cisco.ciscosecurity.app.CiscoUmbrella ProviderConfiguration disabled disabled internalDomains 10.in-addr.arpa 16.172.in-addr.arpa 17.172.in-addr.arpa 18.172.in-addr.arpa 19.172.in-addr.arpa 20.172.in-addr.arpa 21.172.in-addr.arpa 22.172.in-addr.arpa 23.172.in-addr.arpa 24.172.in-addr.arpa 25.172.in-addr.arpa 26.172.in-addr.arpa 27.172.in-addr.arpa 28.172.in-addr.arpa 29.172.in-addr.arpa 30.172.in-addr.arpa 31.172.in-addr.arpa 168.192.in-addr.arpa local logLevel verbose orgAdminAddress {pre-filled in the download} organizationId {pre-filled in the download} regToken {pre-filled in the download} serialNumber %SerialNumber% PayloadDisplayName Cisco Security PayloadIdentifier com.cisco.ciscosecurity.app.CiscoUmbrella.{pre-filled in the download} PayloadRemovalDisallowed PayloadType Configuration PayloadUUID {pre-filled in the download} PayloadVersion 1
- JAMF School에서 새 프로필을 만듭니다.
자세한 내용은 디바이스 프로필에 대한 JAMF 설명서를 참조하십시오.
- DNS 프록시 페이로드를 사용하여 다음 설정을 구성합니다.
-
App Bundle ID(앱 번들 ID) 필드에 com.cisco.ciscosecurity.app을 입력합니다.
-
Provider Bundle ID(사업자 번들 ID) 필드에 com.cisco.ciscosecurity.app.CiscoUmbrella를 입력합니다.
-
JAMF 설명서의 2단계에서 만든 XML 파일을 제공자 컨피그레이션에 추가합니다.
JAMF 10.2.0 이전
JAMF를 사용하여 CSC를 구축하려면 중대한 프로파일 수정이 필요합니다. JAMF MDM을 사용하여 CSC를 구축하려면 다음 단계를 수행합니다.
- 관리자 이메일 주소가 Mobile Devices(모바일 디바이스) 페이지 Settings(설정) 옵션 아래의 대시보드에 추가되었는지 확인합니다.
- Umbrella 루트 CA를 추가합니다.
- Deployments(구축) > Configuration(컨피그레이션) > Root Certificate(루트 인증서)로 이동합니다.
- Download Certificate를 선택합니다.
- 다운로드를 .cer 파일로 저장합니다.
- 인증서의 이름을 입력하고 Upload Certificate(인증서 업로드)를 선택합니다.
- .cer을 업로드하고 비밀번호 필드를 비워 둡니다.
- 이 인증서를 푸시하려면 디바이스 범위에 적용하십시오.
- Umbrella 대시보드에서 일반 프로파일을 다운로드합니다.
- JAMF Pro v.10.2.0 이상을 사용하는 경우 이 단계를 건너뛸 수 있습니다. 다음을 추가하여 현재 상태로 가져올 수 있습니다.
<key>serialNumber</key>
<string>$SERIALNUMBER</string>
<key>label</key>
<string>$DEVICENAME</string>
- v.10.2.0 이전 버전의 JAMF를 사용하는 경우 이 예제 프로필에 나와 있는 것처럼 XML 프로필을 광범위하게 편집합니다. 이 예는 그대로 작동하지 않으므로 복사하지 마십시오. 대시보드의 일반 다운로드 컨피그레이션만 사용하십시오.
<?xml version="1.0" encoding="UTF-8"?>
<!DOCTYPE plist PUBLIC "-//Apple//DTD PLIST 1.0//EN" "http://www.apple.com/DTDs/PropertyList-1.0.dtd">
<plist version="1.0">
<dict>
<key>PayloadContent</key>
<array>
<dict>
<key>AppBundleIdentifier</key>
<string>com.cisco.ciscosecurity.app</string>
<key>PayloadDescription</key>
<string>Cisco Umbrella</string>
<key>PayloadDisplayName</key>
<string>Cisco Umbrella</string>
<key>PayloadIdentifier</key>
<string>com.apple.dnsProxy.managed.DBE2A157-E134-3E8C-B4FB-23EDF48A0CD1</string>
<key>PayloadType</key>
<string>com.apple.dnsProxy.managed</string>
<key>PayloadUUID</key>
<string>59401AAF-CDBF-4FD7-9250-443A58EAD706</string>
<key>PayloadVersion</key>
<integer>1</integer>
<key>ProviderBundleIdentifier</key>
<string>com.cisco.ciscosecurity.app.CiscoUmbrella</string>
<key>ProviderConfiguration</key>
<dict>
<key>disabled</key>
<false/>
<key>internalDomains</key>
<array>
<string>10.in-addr.arpa</string>
<string>16.172.in-addr.arpa</string>
<string>17.172.in-addr.arpa</string>
<string>18.172.in-addr.arpa</string>
<string>19.172.in-addr.arpa</string>
<string>20.172.in-addr.arpa</string>
<string>21.172.in-addr.arpa</string>
<string>22.172.in-addr.arpa</string>
<string>23.172.in-addr.arpa</string>
<string>24.172.in-addr.arpa</string>
<string>25.172.in-addr.arpa</string>
<string>26.172.in-addr.arpa</string>
<string>27.172.in-addr.arpa</string>
<string>28.172.in-addr.arpa</string>
<string>29.172.in-addr.arpa</string>
<string>30.172.in-addr.arpa</string>
<string>31.172.in-addr.arpa</string>
<string>168.192.in-addr.arpa</string>
<string>local</string>
<string>cisco.com</string>
</array>
<key>logLevel</key>
<string>{pre-filled in the download}</string>
<key>orgAdminAddress</key>
<string>{pre-filled in the download}</string>
<key>organizationId</key>
<string>{pre-filled in the download}</string>
<key>regToken</key>
<string>{pre-filled in the download}</string>
<key>serialNumber</key>
<string>$SERIALNUMBER</string>
<key>label</key>
<string>$DEVICENAME</string>
</dict>
</dict>
</array>
<key>PayloadDisplayName</key>
<string>Cisco Security</string>
<key>PayloadIdentifier</key>
<string>com.cisco.ciscosecurity.app.CiscoUmbrella.{pre-filled in the download}</string>
<key>PayloadRemovalDisallowed</key>
<false/>
<key>PayloadType</key>
<string>Configuration</string>
<key>PayloadUUID</key>
<string>{pre-filled in the download}</string>
<key>PayloadVersion</key>
<integer>{pre-filled in the download}</integer>
</dict>
</plist>
- JAMF로 가져오기:
- 기본 MDM 컨피그레이션 창에서 New(새로 만들기)를 클릭하여 새 프로필을 만듭니다.

참고: 이 프로파일은 별도의 프로파일이어야 하며 생성된 인증서 프로파일과 함께 사용하면 안 됩니다. 앱이 작동하려면 이 두 프로필을 별도로 디바이스에 푸시해야 합니다.
- 프로파일의 이름을 지정하고 DNS 프록시로 이동합니다.
- DNS 프록시에서 Configure를 클릭합니다.
- 프록시 컨피그레이션을 Umbrella 세부 정보로 설정합니다.
-
App Bundle ID(앱 번들 ID) 필드에 com.cisco.ciscosecurity.app을 입력합니다.
-
Provider Bundle ID(공급자 번들 ID) 필드에
com.cisco.ciscosecurity.app.CiscoUmbrella.
-
Umbrella에서 편집한 XML 내용 붙여넣기
Provider Configuration으로
XML 섹션.
-
Scope(범위)를 클릭하고 적절한 디바이스 범위에 적용합니다.
인튠
InTune이 Umbrella 대시보드에 직접 추가됩니다. 자세한 내용은 Umbrella InTune 문서를 참조하십시오.
참고: 명확성은 Cisco AMP for Endpoints의 제품입니다. 현재 이 제품에 대한 라이선스가 없는 경우 관련 설정 부분을 건너뜁니다.
모질
Mosyle 지원은 DNS Proxy 컨피그레이션의 형식입니다.
XML <key>ProviderConfiguration</key> 내의 내용을 Mobile Provider Configuration 필드에 추가합니다.
<dict>
<key>anonymizationLevel</key>
<integer>0</integer>
***
<key>serialNumber</key>
<string>%SerialNumber%</string>
</dict>
참고: 설정을 사용하려면 컨피그레이션을 수신하기 위해 디바이스 범위를 지정해야 하며, 기본적으로 범위가 추가되지는 않습니다.
안전하게
DNS Proxy profile(DNS 프록시 프로파일) 페이지에서 보안을 구성합니다.
- App Bundle ID(앱 번들 ID) 필드에
com.cisco.ciscosecurity.app을 입력합니다
- Provider Bundle ID(제공자 번들 ID) 필드에
com.cisco.ciscosecurity.app.CiscoUmbrella를 입력합니다
다음 단계를 사용하여 .plist 파일을 구성합니다.
- iOS Common Config 템플릿으로 시작하여
<key>ProviderConfiguration</key> 주석의 내부에 <dict>~</dict>만으로 파일을 .plist로 편집하십시오.
- serialNumber
키를 Securly에 정의된 $serialnumber 변수로 교체합니다.
.plist 파일 내용은 이 예와 매우 비슷할 수 있습니다. 이를 DNS 프록시 컨피그레이션에 업로드합니다.
anonymizationLevel0disabledinternalDomains10.in-addr.arpa16.172.in-addr.arpa17.172.in-addr.arpa18.172.in-addr.arpa19.172.in-addr.arpa20.172.in-addr.arpa21.172.in-addr.arpa22.172.in-addr.arpa23.172.in-addr.arpa24.172.in-addr.arpa25.172.in-addr.arpa26.172.in-addr.arpa27.172.in-addr.arpa28.172.in-addr.arpa29.172.in-addr.arpa30.172.in-addr.arpa31.172.in-addr.arpa168.192.in-addr.arpalocallogLevel{pre-filled in the download}orgAdminAddress{pre-filled in the download}organizationId{pre-filled in the download}regToken{pre-filled in the download}serialNumber$serialnumber
 피드백
피드백