Cisco Business Edition 7000 インストール ガイド リリース 10.6
偏向のない言語
この製品のマニュアルセットは、偏向のない言語を使用するように配慮されています。このマニュアルセットでの偏向のない言語とは、年齢、障害、性別、人種的アイデンティティ、民族的アイデンティティ、性的指向、社会経済的地位、およびインターセクショナリティに基づく差別を意味しない言語として定義されています。製品ソフトウェアのユーザーインターフェイスにハードコードされている言語、RFP のドキュメントに基づいて使用されている言語、または参照されているサードパーティ製品で使用されている言語によりドキュメントに例外が存在する場合があります。シスコのインクルーシブランゲージに対する取り組みの詳細は、こちらをご覧ください。
翻訳について
このドキュメントは、米国シスコ発行ドキュメントの参考和訳です。リンク情報につきましては、日本語版掲載時点で、英語版にアップデートがあり、リンク先のページが移動/変更されている場合がありますことをご了承ください。あくまでも参考和訳となりますので、正式な内容については米国サイトのドキュメントを参照ください。
- Updated:
- 2017年6月26日
章のタイトル: インストール
目次
- インストール
- 電源オンおよび初期設定
- リモート アクセス用の仮想化ハイパーバイザのカスタマイズ
- 仮想化ハイパーバイザのアクセスと設定
- データストアにプリロードされたファイル
- 事前展開された仮想マシンを使用する
- 新しい仮想マシンの導入
- 仮想マシン上でのアプリケーションのインストール
電源オンおよび初期設定
| ステップ 1 | モニタとキーボードが『Quick Start Guide』で説明されているように接続されていることを確認します。 | ||
| ステップ 2 |
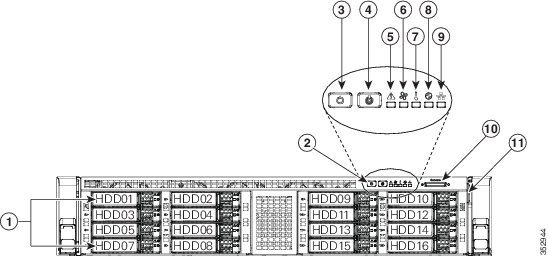
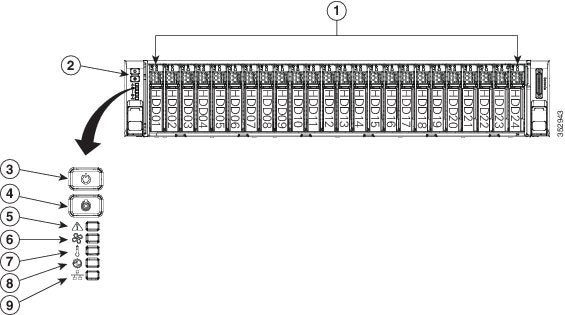
電源が接続され、LED ステータスが図 1と図 2に示すようになっていることを確認します。
|
||
| ステップ 3 | モニタの電源をオンにします。 | ||
| ステップ 4 | 電源ボタン(3)を押し、電源ボタン LED ディスク LED ディスク ドライブが緑に変わることを確認します。 | ||
| ステップ 5 | モニタでブート プロセスを視聴します。 | ||
| ステップ 6 |
(任意)プロンプトが表示されたら F8 キーを押して、[CIMC Configuration] ウィンドウを開きます。 [CIMC Configuration] ウィンドウで、CIMC パスワードをリセットし、管理インターフェイス IP アドレスを設定してウィンドウを閉じます。
|
||
| ステップ 7 | (任意)リモート コンソールへのアクセスに CIMC を使用する場合は、設定した IP アドレスに移動し、次のいずれかを実行します。 | ||
| ステップ 8 |
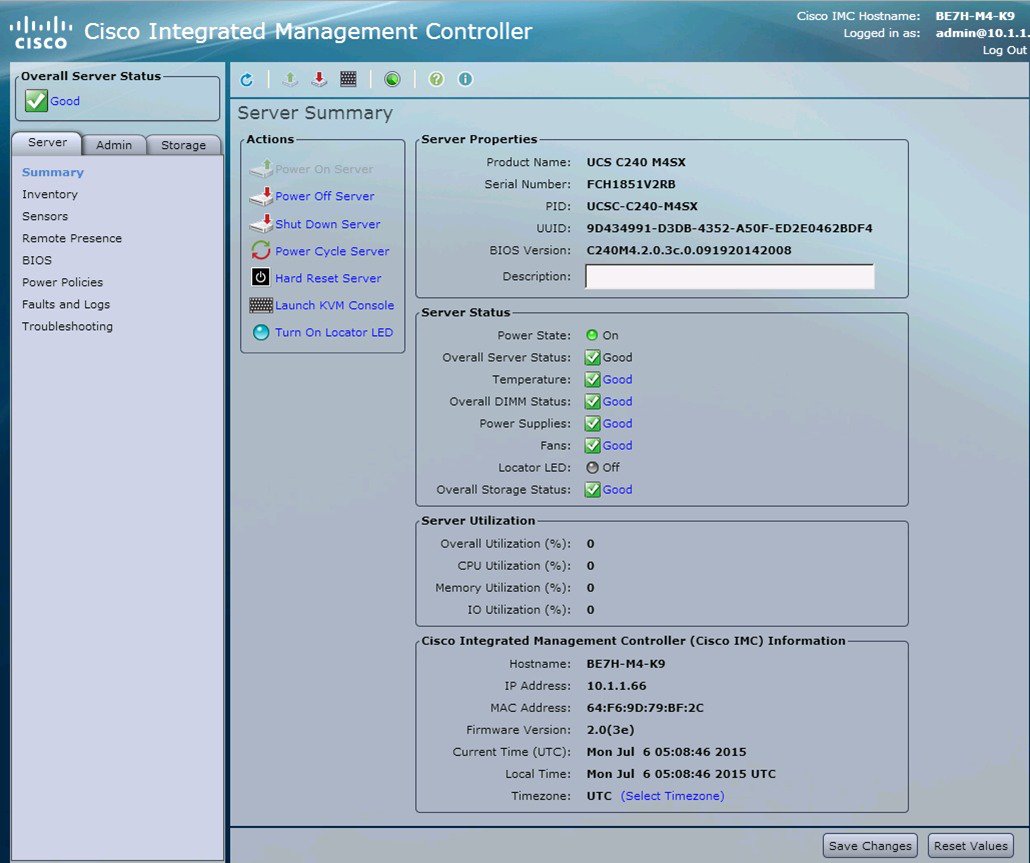
デフォルトのユーザ名とパスワードを使用して [Cisco Integrated Management Controller] 画面にログインすると、そのパスワードを変更するよう求められます。 パスワードの変更は必須です。 CIMC 画面(図 3)では、ロケータ LED の点灯や KVM コンソールの起動などさまざまなタスクを提供しています。
|
リモート アクセス用の仮想化ハイパーバイザのカスタマイズ
ハイパーバイザ(VMware vSphereハイパーバイザ)をカスタマイズして vSphere クライアントを使用した PC からのリモート アクセスを有効にするには、次の手順に従います。
仮想化ハイパーバイザのアクセスと設定
Business Edition アプリケーションの中には、有効な NTP サーバのサービスを必要とするものがあります。 次の手順に従って、ESXi ホストにアクセスし、NTP を設定し、NIC チーミング機能を使用してネットワーク インターフェイス カード(NIC)の耐障害性を設定し、プレインストールされたアプリケーションを表示し、データストアを参照して、事前にロードされたコラボレーション アプリケーション ソフトウェアを確認します。
| ステップ 1 |
vSphere クライアント アプリケーションを起動し、仮想化ハイパーバイザの IP アドレスを入力します。
|
||||
| ステップ 2 | 以前に設定したログイン クレデンシャルを使用します。 | ||||
| ステップ 3 |
(任意)BE7000 仮想化ハイパーバイザのライセンスは、プレインストールされ、受け取った時には使用できる状態にあります。 ライセンスを再適用する必要がある場合は、次の手順に従います。
|
||||
| ステップ 4 | 次のようにして NTP を設定します。 | ||||
| ステップ 5 |
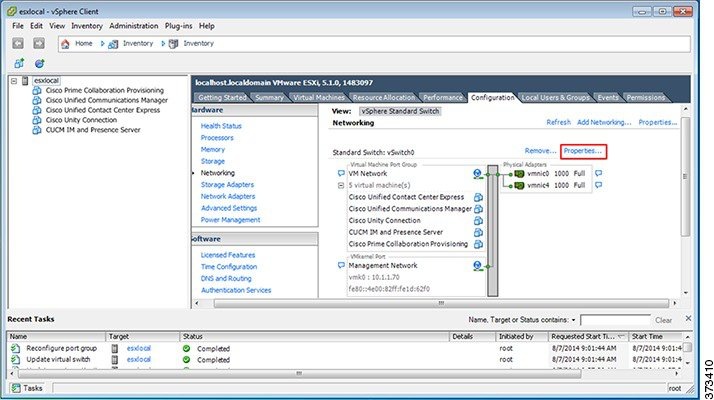
VMware の NIC チーミング機能を使用して、耐障害性を設定します。
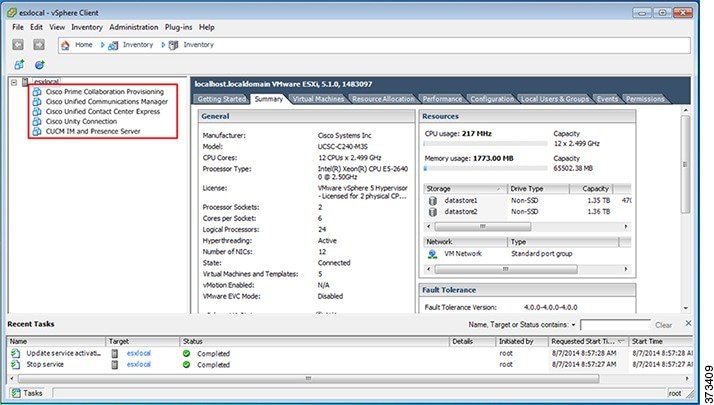
ハイパーバイザは、仮想化されたコラボレーション アプリケーションをホストする準備が整いました。 5 つの最も一般的なコラボレーション アプリケーション用の仮想マシンが、ハイパーバイザに事前に導入されています。 これらのコラボレーション アプリケーションや他のアプリケーションのソフトウェアもデータストアにプリロードされています。 |
||||
| ステップ 6 |
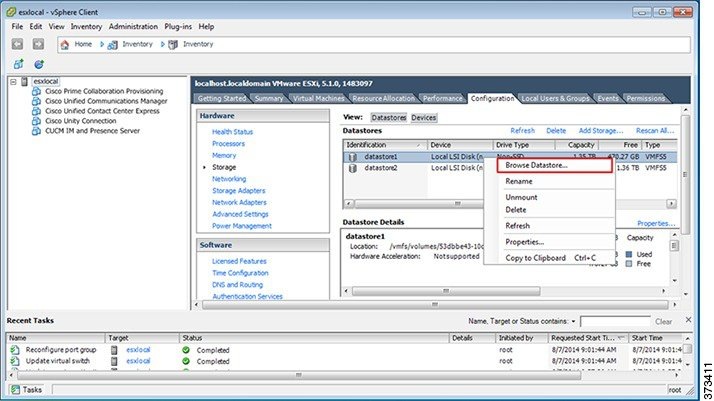
データ ストアを参照します。
|
||||
| ステップ 7 | (オプション)シスコは OVA-ISO ディレクトリをローカルにアーカイブすることを推奨します。 サーバに障害が発生した場合、代替品にはプリロード コンテンツが含まれていません。 |
次の作業
仮想マシンをインストールします。
データストアにプリロードされたファイル
Cisco Business Edition サーバでは、事前に導入された仮想マシンに加えて、指定されたコラボレーション アプリケーション ソフトウェアがデータストアにプリロードされた状態で発送されます。 プリロードされるファイル タイプの基礎知識として、次の点を考慮してください。
- ISO
-
ISO ファイルは DVD イメージで、アプリケーション インストール ファイルを含んでいます。
- OVA
-
Open Virtualization Archive(OVA)を使用して、仮想マシンのパッケージを作成し、配布します。
一部の OVA ファイルには、プレインストールされたソフトウェア(たとえば、cpc-provisioning-10.6.0-1015-medium.ova)を含む準備済みのディスクが含まれている場合があります。
他の OVA ファイルには、プレインストールされたアプリケーション ソフトウェアは含まれません。 この場合、OVA テンプレートを導入してから、データストアで提供される ISO ファイルを使用してソフトウェアをインストールする必要があります(たとえば、cucm_10.5_vmv8_v1.9.ova および関連 ISO ファイル Bootable_UCSInstall_UCOS_10.5.2.10000-5.sgn.iso)。
 (注) |
各サーバに付属するファイルの詳細については、関連するリリース ノート(http://www.cisco.com/c/en/us/support/unified-communications/business-edition-7000/products-release-notes-list.html)を参照してください。 |
事前展開された仮想マシンを使用する
BE7000のインストールを簡素化するために、いくつかの一般的なアプリケーション仮想マシンはインストールを完了するために、設定情報を追加するために、Ready predeployed。
このプロセスを完了するには、の手順を使用して、電源投入、続行する仮想マシンのハイパーバイザのコンソールを起動します。
あるコラボレーション アプリケーションは、(Unified Communications Manager、Unity Connection、UCMインスタント メッセージングおよびプレゼンス サービスとUnified Contact Center Express)このプロセスを自動化するコンフィギュレーション ファイルを受け入れます。 この機能を使用するには、次の手順を実行します。
| ステップ 1 | オンライン ツールを使用してアプリケーションの応答ファイルを作成しますwww.cisco.com/web/cuc_afg/。 |
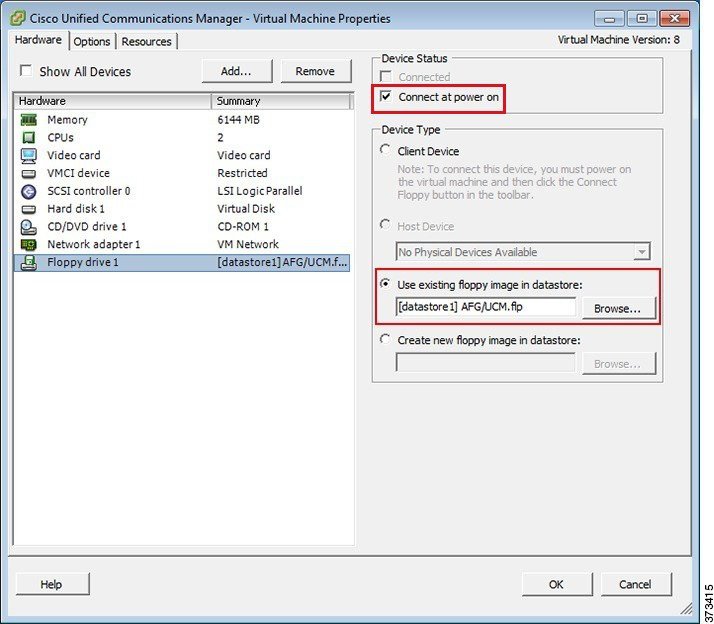
| ステップ 2 | 仮想フロッピー(vFloppy)イメージにこのファイルを追加します。 アプリケーションに基づいてUCM.flp、CUC.flp、IMP.flp or CCX.flpファイルとして使用します。 |
| ステップ 3 | ハイパーバイザ データストアのAFGフォルダにこのファイルをコピーします。 |
| ステップ 4 |
仮想マシンの電源をオンにします。 アプリケーションのインストールを完了します。 |
新しい仮想マシンの導入
次の手順に従い、あらかじめロードされたファイルにリスト表示されているアプリケーション用に追加の仮想マシンを導入します。 Export Restricted または Export Unrestricted ソフトウェアにあらかじめロードされたファイルについては、次のリンク先から関連するリリース ノートを参照してください。http://www.cisco.com/c/en/us/support/unified-communications/business-edition-7000/products-release-notes-list.html
OVA テンプレート ファイルは、特定アプリケーションの仮想マシンを定義します。
(注) |
リリース 10.5(1) 以降では、5 つのアプリケーションがプレインストールされています。 この 5 つのアプリケーションのいずれかを使用して仮想マシンを導入する場合は、次の手順を省略できます。 |
| ステップ 1 |
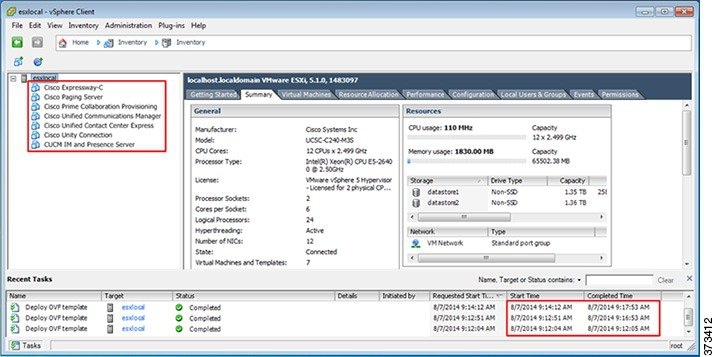
vSphere クライアント上で、 に移動します。 [Deploy OVF Template] 画面が起動されます。 |
||
| ステップ 2 |
PC 上でソースの OVA テンプレート ファイルを参照し、選択します。 アプリケーションとファイル名のマッピングについては、リリース ノート(http://www.cisco.com/c/en/us/support/unified-communications/business-edition-7000/products-release-notes-list.html)を参照してください。
|
||
| ステップ 3 | プロンプトが表示された場合、引き続き [Next] をクリックして、ライセンス契約を受諾します。 | ||
| ステップ 4 | 導入に適切な仮想マシンのサイズを選択します。 | ||
| ステップ 5 | 仮想マシンに意味のある名前を指定します。 |
次の作業
必要なすべての仮想マシンを導入した後、必要なインストールを完了し、使用可能なアプリケーションを設定します。
仮想マシン上でのアプリケーションのインストール
Cisco Unified Communications Manager、Cisco Unified Communications Manager IM and Presence Service、Cisco Unity Connection、Cisco Emergency responder、Cisco Unified Contact Center Express などの Unified Communications アプリケーションをインストールするには、応答ファイルを使用してインストール プロセスを自動化するか、手動インストールを選択します。 次の手順では、使用可能な仮想化アプリケーションをインストールしてセットアップするこの両方のオプションについて説明します。
次の表に、各アプリケーションのおおよそのインストール時間を示します。
| アプリケーション |
おおよそのインストール時間(分) |
|---|---|
| Cisco Unified Communications Manager |
60 |
| Cisco Unity Connection |
60 |
| Cisco Unified Communications Manager IM and Presence Service |
45 |
| Cisco Prime Collaboration Provisioning |
15 |
| Cisco Emergency Responder |
45 |
| Cisco Unified Contact Center Express および Cisco Unified IP Interactive Voice Response |
60 |
| Cisco Expressway |
30 |
| Cisco TelePresence Video Communication Server Control |
30 |
| Cisco TelePresence Conductor |
30 |
| Cisco TelePresence Server Virtual Machine |
15 |
| Cisco TelePresence Management Suite |
60 |
| Cisco Paging Server |
15 |
| Cisco TelePresence Content Server |
60 |
(注) |
| ステップ 1 | データ ネットワーク管理者に問い合わせて、"準備"で説明したネットワーク情報を確実に収集します。 | ||
| ステップ 2 | 必要な時間を最小限にするために、アプリケーションのインストール順序を計画します。 | ||
| ステップ 3 |
応答ファイルを使用する場合は、次の手順に従って必要なファイルを準備します。 図 14 に示すように、右クリック メニューで [Edit Settings] を選択します。 図 15 に示すように、[Virtual Machines Properties] 編集画面が表示されます。
|
||
| ステップ 4 |
vSphere クライアントを使用して、アプリケーションの仮想マシンを選択します。 クライアントは、パネル名をアプリケーション名に変更し、"Getting Started" という名前のタブをもう 1 つ追加します。 下図に示すように、右クリックしてアクション メニューを開きます。

|
||
| ステップ 5 |
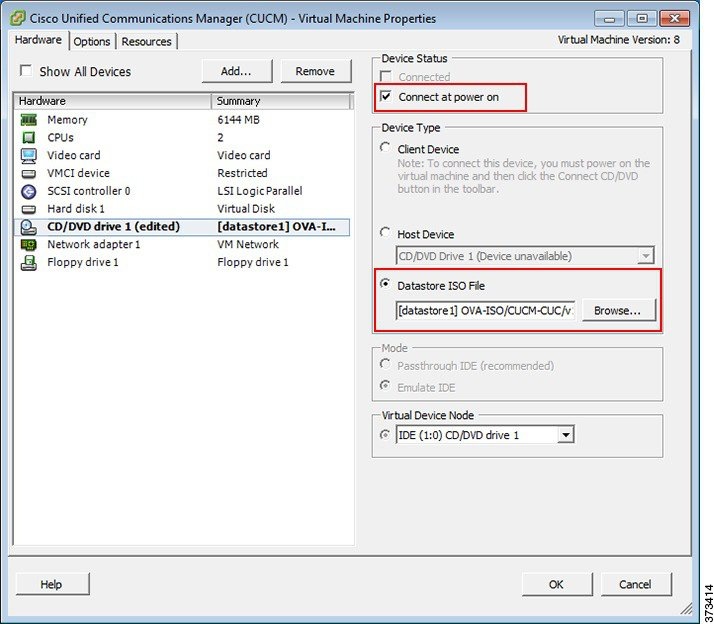
ブランク OVA テンプレートを使用して展開された VM では、電源オン時にデータストアからアプリケーション ソフトウェアの ISO イメージを接続するように仮想マシンの CD/DVD ドライブ設定を編集する必要があります。 この手順は、プレインストール済みアプリケーションでは不要です。 Cisco Unified Communications Manager と Cisco Unity Connection が同じ ISO ファイルを使用することに留意してください(以下の Cisco Business Editition 7000 用のプリロードされたファイルを参照:http://www.cisco.com/c/en/us/support/unified-communications/business-edition-7000/products-release-notes-list.html)。
|
||
| ステップ 6 |
各アプリケーションのインストールを開始するには、次の手順を実行します。
|
次の作業
必要なすべてのアプリケーションをインストール後に、Web ブラウザを使用してアプリケーションにアクセスします。 必要に応じてライセンスを追加して機能を設定します。
目次
電源オンおよび初期設定
手順
ステップ 1 モニタとキーボードが『Quick Start Guide』で説明されているように接続されていることを確認します。 ステップ 2 電源が接続され、LED ステータスが図 1と図 2に示すようになっていることを確認します。 ステップ 3 モニタの電源をオンにします。 ステップ 4 電源ボタン(3)を押し、電源ボタン LED ディスク LED ディスク ドライブが緑に変わることを確認します。 ステップ 5 モニタでブート プロセスを視聴します。 ステップ 6 (任意)プロンプトが表示されたら F8 キーを押して、[CIMC Configuration] ウィンドウを開きます。 [CIMC Configuration] ウィンドウで、CIMC パスワードをリセットし、管理インターフェイス IP アドレスを設定してウィンドウを閉じます。
(注) Cisco Integrated Management Controller(CIMC)は、C シリーズ サーバ用の管理インターフェイスです。 CIMC はサーバ内で実行し、Web または SSH コマンドライン アクセスにより、サーバのリモート管理、設定、およびモニタリングを可能にします。
ステップ 7 (任意)リモート コンソールへのアクセスに CIMC を使用する場合は、設定した IP アドレスに移動し、次のいずれかを実行します。 ステップ 8 デフォルトのユーザ名とパスワードを使用して [Cisco Integrated Management Controller] 画面にログインすると、そのパスワードを変更するよう求められます。 パスワードの変更は必須です。 CIMC 画面(図 3)では、ロケータ LED の点灯や KVM コンソールの起動などさまざまなタスクを提供しています。
(注) [Server Properties] セクションの [Product Name] では、BE7000M の場合は UCS C240 M4S2 と表示され、BE7000H の場合は UCS C240 M4SX と表示されます。
リモート アクセス用の仮想化ハイパーバイザのカスタマイズ
手順
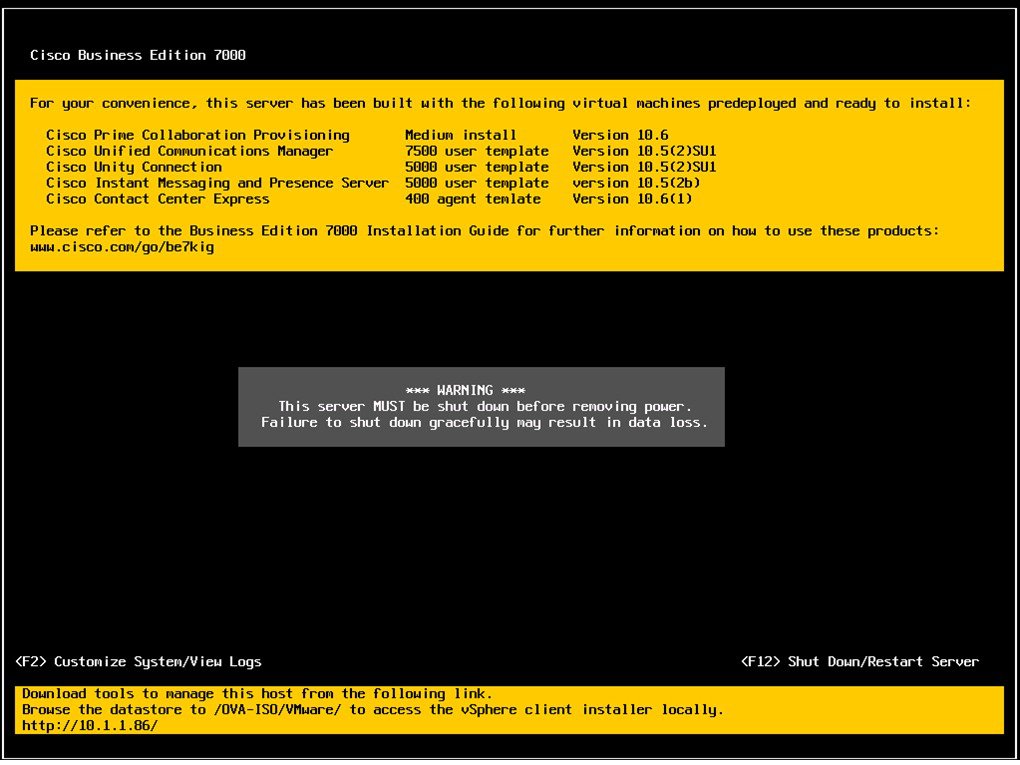
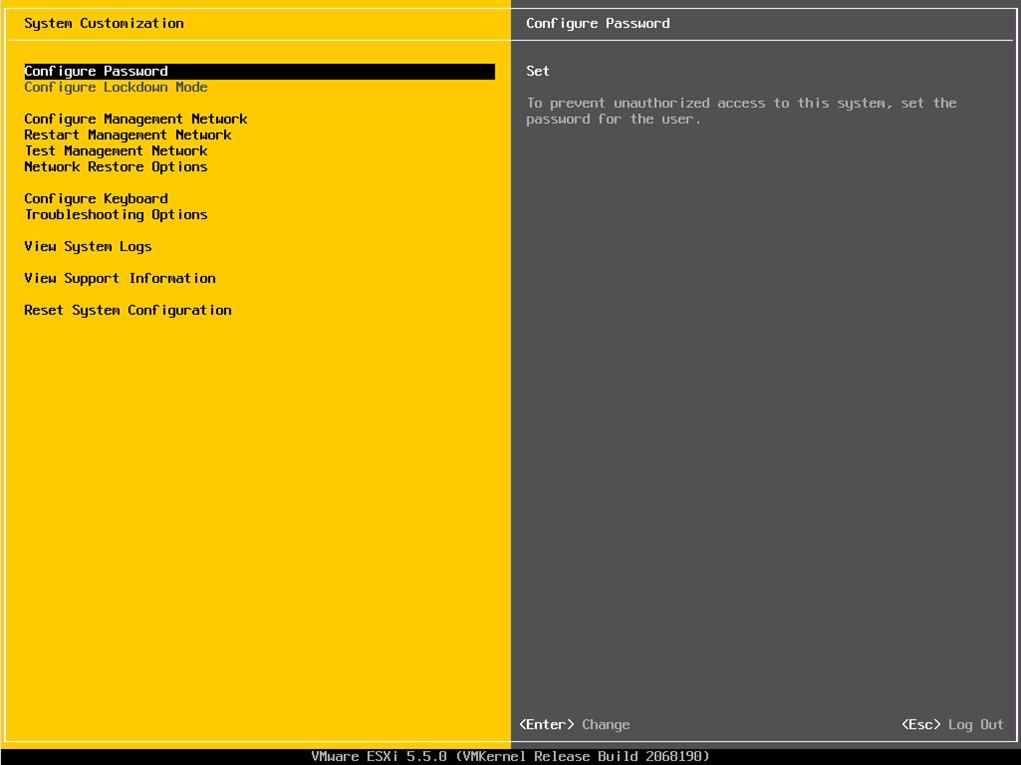
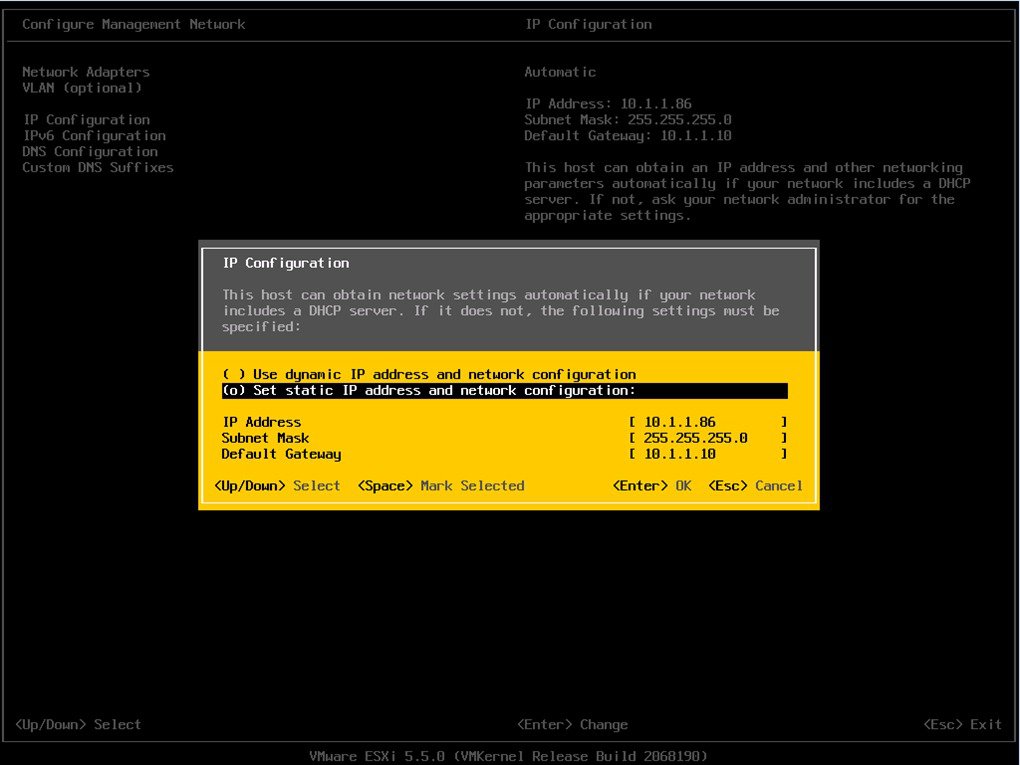
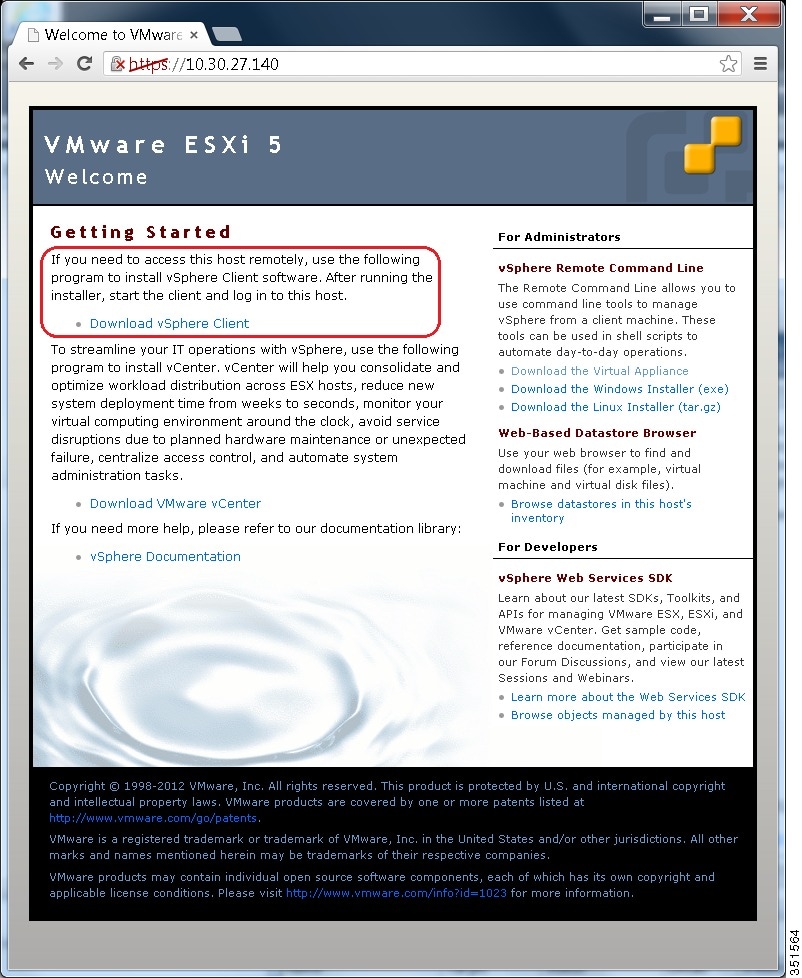
ステップ 1 ハイパーバイザが起動されると、図 4 に示すように、Direct Console のユーザ インターフェイスがモニタ上に表示されます。 ステップ 2 F2 キーを押して、次の図に示すような [System Customization] メニューに入ります。 ステップ 3 (推奨)[Configure Password] を選択してパスワードを変更します。 ステップ 4 固定 IP アドレスを割り当てるには、[Configure Management Network] メニューに入り、図 6 に示すように、画面の指示に従って "IP Configuration" を変更します。 ステップ 5 PC をデータ ネットワークに接続し、新しいハイパーバイザの IP アドレスにアクセスします。 図 7 に示すように Web ページが表示されることを確認します。 ステップ 6 vSphere クライアントが PC にインストールされていない場合は、ハイパーバイザの Welcome ページのリンクから vSphere クライアントをダウンロードしてインストールします。 このリンクから vSphere クライアントをダウンロードするには、インターネット アクセスが必要です。 インターネット アクセスが使用できない場合は、データストアからクライアント インストール ファイルをダウンロードできます。
仮想化ハイパーバイザのアクセスと設定
手順Business Edition アプリケーションの中には、有効な NTP サーバのサービスを必要とするものがあります。 次の手順に従って、ESXi ホストにアクセスし、NTP を設定し、NIC チーミング機能を使用してネットワーク インターフェイス カード(NIC)の耐障害性を設定し、プレインストールされたアプリケーションを表示し、データストアを参照して、事前にロードされたコラボレーション アプリケーション ソフトウェアを確認します。
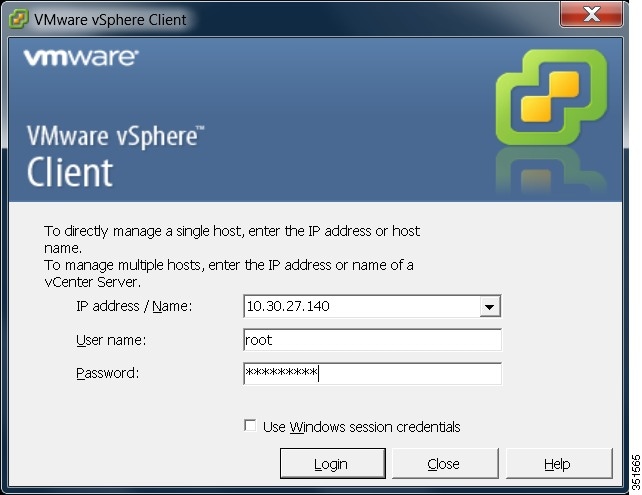
ステップ 1 vSphere クライアント アプリケーションを起動し、仮想化ハイパーバイザの IP アドレスを入力します。 ステップ 2 以前に設定したログイン クレデンシャルを使用します。 ステップ 3 (任意)BE7000 仮想化ハイパーバイザのライセンスは、プレインストールされ、受け取った時には使用できる状態にあります。 ライセンスを再適用する必要がある場合は、次の手順に従います。
(注) 図 9 のインベントリ ペインに、プレインストール済みアプリケーションが表示されています。 ステップ 4 次のようにして NTP を設定します。 ステップ 5 VMware の NIC チーミング機能を使用して、耐障害性を設定します。
- に移動します。
- 下図に示すように、"Standard Switch: vSwitch0" の [Properties] をクリックします。
- vSwitch0 Properties 設定画面で、[Network Adapters] タブを選択します。
- データ ネットワークに接続されている NIC を追加するには、[Add…] をクリックします。
- 対話形式の設定ダイアログに従い、下図に示すように、複数の NIC が vSwitch0 に追加されたことを確認したら画面を閉じます。
(注) デフォルトでは、ハイパーバイザで有効な NIC は 1 つだけで、vmnic0 として識別されます。
(注) チーム構成された NIC を Cisco スイッチのチャネル グループに接続する場合は、NIC チーミング ロード バランシング ポリシーが [Route based on IP hash] に設定されていることを確認します。 このポリシーおよび Cisco Collaboration アプリケーションのハイパーバイザ ネットワークの他の側面に関する詳細については、『Deploying Expressway with Business Edition(Business Edition での Expressway の展開)』(http://www.cisco.com/c/dam/en/us/td/docs/voice_ip_comm/cucm/BE6000/InstallationGuide/10_01/Deploying_Expressway_with_Business_Edition.pdf)を参照してください。 ハイパーバイザは、仮想化されたコラボレーション アプリケーションをホストする準備が整いました。 5 つの最も一般的なコラボレーション アプリケーション用の仮想マシンが、ハイパーバイザに事前に導入されています。 これらのコラボレーション アプリケーションや他のアプリケーションのソフトウェアもデータストアにプリロードされています。
ステップ 6 データ ストアを参照します。 ステップ 7 (オプション)シスコは OVA-ISO ディレクトリをローカルにアーカイブすることを推奨します。 サーバに障害が発生した場合、代替品にはプリロード コンテンツが含まれていません。
次の作業
仮想マシンをインストールします。
データストアにプリロードされたファイル
Cisco Business Edition サーバでは、事前に導入された仮想マシンに加えて、指定されたコラボレーション アプリケーション ソフトウェアがデータストアにプリロードされた状態で発送されます。 プリロードされるファイル タイプの基礎知識として、次の点を考慮してください。
- ISO
ISO ファイルは DVD イメージで、アプリケーション インストール ファイルを含んでいます。
- OVA
Open Virtualization Archive(OVA)を使用して、仮想マシンのパッケージを作成し、配布します。
一部の OVA ファイルには、プレインストールされたソフトウェア(たとえば、cpc-provisioning-10.6.0-1015-medium.ova)を含む準備済みのディスクが含まれている場合があります。
他の OVA ファイルには、プレインストールされたアプリケーション ソフトウェアは含まれません。 この場合、OVA テンプレートを導入してから、データストアで提供される ISO ファイルを使用してソフトウェアをインストールする必要があります(たとえば、cucm_10.5_vmv8_v1.9.ova および関連 ISO ファイル Bootable_UCSInstall_UCOS_10.5.2.10000-5.sgn.iso)。
(注)
各サーバに付属するファイルの詳細については、関連するリリース ノート(http://www.cisco.com/c/en/us/support/unified-communications/business-edition-7000/products-release-notes-list.html)を参照してください。
事前展開された仮想マシンを使用する
手順BE7000のインストールを簡素化するために、いくつかの一般的なアプリケーション仮想マシンはインストールを完了するために、設定情報を追加するために、Ready predeployed。
このプロセスを完了するには、の手順を使用して、電源投入、続行する仮想マシンのハイパーバイザのコンソールを起動します。
あるコラボレーション アプリケーションは、(Unified Communications Manager、Unity Connection、UCMインスタント メッセージングおよびプレゼンス サービスとUnified Contact Center Express)このプロセスを自動化するコンフィギュレーション ファイルを受け入れます。 この機能を使用するには、次の手順を実行します。
ステップ 1 オンライン ツールを使用してアプリケーションの応答ファイルを作成しますwww.cisco.com/web/cuc_afg/。 ステップ 2 仮想フロッピー(vFloppy)イメージにこのファイルを追加します。 アプリケーションに基づいてUCM.flp、CUC.flp、IMP.flp or CCX.flpファイルとして使用します。 ステップ 3 ハイパーバイザ データストアのAFGフォルダにこのファイルをコピーします。 ステップ 4 仮想マシンの電源をオンにします。 アプリケーションのインストールを完了します。
新しい仮想マシンの導入
手順次の手順に従い、あらかじめロードされたファイルにリスト表示されているアプリケーション用に追加の仮想マシンを導入します。 Export Restricted または Export Unrestricted ソフトウェアにあらかじめロードされたファイルについては、次のリンク先から関連するリリース ノートを参照してください。http://www.cisco.com/c/en/us/support/unified-communications/business-edition-7000/products-release-notes-list.html
OVA テンプレート ファイルは、特定アプリケーションの仮想マシンを定義します。
次の点に注意してください。
(注)
リリース 10.5(1) 以降では、5 つのアプリケーションがプレインストールされています。 この 5 つのアプリケーションのいずれかを使用して仮想マシンを導入する場合は、次の手順を省略できます。
ステップ 1 vSphere クライアント上で、 に移動します。 [Deploy OVF Template] 画面が起動されます。
ステップ 2 PC 上でソースの OVA テンプレート ファイルを参照し、選択します。 アプリケーションとファイル名のマッピングについては、リリース ノート(http://www.cisco.com/c/en/us/support/unified-communications/business-edition-7000/products-release-notes-list.html)を参照してください。
(注) 選択した OVA によって仮想マシンのサイズと容量が決定されるアプリケーションもあれば、 OVA の導入時に仮想マシンのサイズを選択するアプリケーションもあります。
ステップ 3 プロンプトが表示された場合、引き続き [Next] をクリックして、ライセンス契約を受諾します。 ステップ 4 導入に適切な仮想マシンのサイズを選択します。 ステップ 5 仮想マシンに意味のある名前を指定します。
次の作業
必要なすべての仮想マシンを導入した後、必要なインストールを完了し、使用可能なアプリケーションを設定します。
仮想マシン上でのアプリケーションのインストール
手順Cisco Unified Communications Manager、Cisco Unified Communications Manager IM and Presence Service、Cisco Unity Connection、Cisco Emergency responder、Cisco Unified Contact Center Express などの Unified Communications アプリケーションをインストールするには、応答ファイルを使用してインストール プロセスを自動化するか、手動インストールを選択します。 次の手順では、使用可能な仮想化アプリケーションをインストールしてセットアップするこの両方のオプションについて説明します。
次の表に、各アプリケーションのおおよそのインストール時間を示します。
アプリケーション
おおよそのインストール時間(分)
Cisco Unified Communications Manager
60
Cisco Unity Connection
60
Cisco Unified Communications Manager IM and Presence Service
45
Cisco Prime Collaboration Provisioning
15
Cisco Emergency Responder
45
Cisco Unified Contact Center Express および Cisco Unified IP Interactive Voice Response
60
Cisco Expressway
30
Cisco TelePresence Video Communication Server Control
30
Cisco TelePresence Conductor
30
Cisco TelePresence Server Virtual Machine
15
Cisco TelePresence Management Suite
60
Cisco Paging Server
15
Cisco TelePresence Content Server
60
(注)
ステップ 1 データ ネットワーク管理者に問い合わせて、"準備"で説明したネットワーク情報を確実に収集します。 ステップ 2 必要な時間を最小限にするために、アプリケーションのインストール順序を計画します。 ステップ 3 応答ファイルを使用する場合は、次の手順に従って必要なファイルを準備します。 図 14 に示すように、右クリック メニューで [Edit Settings] を選択します。 図 15 に示すように、[Virtual Machines Properties] 編集画面が表示されます。
ステップ 4 vSphere クライアントを使用して、アプリケーションの仮想マシンを選択します。 クライアントは、パネル名をアプリケーション名に変更し、"Getting Started" という名前のタブをもう 1 つ追加します。 下図に示すように、右クリックしてアクション メニューを開きます。 ステップ 5 ブランク OVA テンプレートを使用して展開された VM では、電源オン時にデータストアからアプリケーション ソフトウェアの ISO イメージを接続するように仮想マシンの CD/DVD ドライブ設定を編集する必要があります。 この手順は、プレインストール済みアプリケーションでは不要です。 Cisco Unified Communications Manager と Cisco Unity Connection が同じ ISO ファイルを使用することに留意してください(以下の Cisco Business Editition 7000 用のプリロードされたファイルを参照:http://www.cisco.com/c/en/us/support/unified-communications/business-edition-7000/products-release-notes-list.html)。 ステップ 6 各アプリケーションのインストールを開始するには、次の手順を実行します。
- 仮想マシンの電源をオンにして、図 13 に示すように [Open Console] を右クリックして選択します。
- インストール 応答ファイルを使用しない場合には、コンソールの対話型インストール手順に従ってください。 ステップ 1で収集した情報を使用します。
- コンソールから正常にログインできたときに、インストールは完了し、成功です。
- Prime Collaboration の場合、"localhost login:" のプロンプトで setup と入力して、アプリケーションを設定してインストールを完了します。 その後、インストール スクリプトにより、ネットワーク情報およびさまざまなクレデンシャル(admin、root、globaladmin のパスワード)情報が要求されます。
- VCS または Expressway サーバの場合、デフォルトのユーザ名(admin)とパスワード(TANDBERG)を使用してログインすることで、アプリケーションをセットアップします。 "Run install wizard [n]:" と求められたときに y と入力すると、対話型インストールが続行されます。
(注) インストールの詳細なガイダンスが必要な場合は、詳細情報のセクションにリスト表示されている Cisco Business Edition 7000 Support Documents Web サイトでアプリケーションのインストール ガイドを参照してください。
次の作業
必要なすべてのアプリケーションをインストール後に、Web ブラウザを使用してアプリケーションにアクセスします。 必要に応じてライセンスを追加して機能を設定します。
 フィードバック