ネットワークの検出と対応の設定

ネットワークの検出と対応の前提条件

  • ネットワーク内のすべてのデバイスは、Stealthwatch Cloud ポータルに到達可能である必要があります。また、すべての暗号化トラフィックは、HTTPS(TCP ポート 443)を使用して Stealthwatch Cloud ポータルに到達する必要があります。

  • Stealthwatch Cloud ポータルによって提供される証明書を検証するには、該当するルート認証局(CA)をデバイスで設定する必要があります。

  • データの損失を避けるため、十分な帯域幅があることを確認してください。

ネットワークの検出と対応の制約事項

  • Cisco Encrypted Traffic Analytics は、Stealthwatch Cloud ポータルではサポートされていません。

  • HTTP プロキシはサポートされていません。

  • Stealthwatch Cloud ポータルは、プライマリ DNS サーバーのみを使用します。プライマリ DNS サーバーに障害が発生すると、エラーが表示されます。

  • デバイスで設定されている DNS サーバーが Stealthwatch Cloud モニターの URL を解決できない場合、Stealthwatch Cloud センサーが Stealthwatch Cloud ポータルに登録されていても、ファイルのアップロードは失敗します。

ネットワークの検出と対応について

Cisco Secure Network Analytics(Stealthwatch Cloud とも呼ばれる)は、エンタープライズテレメトリを使用して脅威を検出し、ネットワーク セグメンテーションとともに脅威への迅速な対応を提供するネットワーク検出および対応ソリューションです。Cisco Secure Network Analytics を使用すると、ネットワーク管理者は、ネットワークにログインしているすべてのユーザーを追跡し、そのアクティビティを監視することもできます。

Cisco Catalyst スイッチのネットワーク検出および対応ソリューションの一部として、分析に使用されるエンタープライズテレメトリは、Flexible NetFlow フローです。

デバイスで Stealthwatch Cloud プロパティを設定する必要があります。次に、Stealthwatch Cloud ポータルのフローレコードとフローエクスポータを作成する必要があります。


(注)  


フローレコードでは、必須の 5 タプルフィールド(プロトコル、送信元アドレス、送信元ポート、宛先アドレス、および宛先ポート)が、フローの開始、フローの終了、パケット数、Stealthwatch Cloud ポータルにアップロードされるレコードのバイト数とともに設定されていることが必要です。


フローモニターに対してフローレコードおよびフローエクスポータを設定します。設定後にフローモニターから生成されたすべてのフローは、カスタム形式に変換され、Stealthwatch Cloud ポータルにアップロードされます。

ネットワークの検出と対応の設定方法

次のセクションでは、ネットワークの検出と対応の設定に関する情報を示します。

登録に向けた証明書の設定

登録に向けて証明書を設定するには、次の手順を実行します。

手順

  コマンドまたはアクション 目的

ステップ 1

enable

例:

Device> enable

特権 EXEC モードを有効にします。

プロンプトが表示されたらパスワードを入力します。

ステップ 2

configure terminal

例:

Device# configure terminal

グローバル コンフィギュレーション モードを開始します。

ステップ 3

crypto pki trustpoint name

例:

Device(config)# crypto pki trustpoint stealthwatch1

トラストポイントおよび設定された名前を宣言して、CA トラストポイント コンフィギュレーション モードを開始します。

ステップ 4

revocation-check method1 [method2 method3]

例:

Device(ca-trustpoint)# revocation-check none

証明書の失効ステータスをチェックします。

none :証明書のチェックは無視されます。

ステップ 5

enrollment mode

例:

Device(ca-trustpoint)# enrollment terminal

証明書の登録モードとして端末を指定します。

ステップ 6

exit

例:

Device(ca-trustpoint)# exit

CA トラストポイント コンフィギュレーション モードを終了し、グローバル コンフィギュレーション モードに戻ります。

ステップ 7

crypto pki authenticate name

例:

Device(config)# crypto pki authenticate stealthwatch1
Enter the base 64 encoded CA certificate.
End with a blank line or the word "quit" on a line by itself

トラストポイント名を認証して、CA トラストポイント コンフィギュレーション モードを開始します。

プロンプトが表示されたら、https://www.amazontrust.com/repository/SFC2CA-SFSRootCAG2.pem から Starfield Services ルート証明書をコピーして貼り付けます。

システムは、次のステートメントとともにプロンプトを表示します。
% Do you accept this certificate? [yes/no]:
確認するには、yes と入力します。

ステップ 8

exit

例:

Device(config)# exit

特権 EXEC モードに戻ります。

ステップ 9

show pki trustpoints name

例:

Device# show crypto pki trustpoints stealthwatch1

(オプション)設定したトラストポイントに関する情報を表示します。

ファイルアップロードに向けた証明書の設定

ファイルアップロードに向けて証明書を設定するには、次の手順を実行します。

始める前に

Baltimore CyberTrust ルート証明書をダウンロードします。

  1. Web ブラウザで https://www.digicert.com/kb/digicert-root-certificates.htm を開きます。

  2. [Baltimore CyberTrust Root] で、[Download PEM] をクリックします。

  3. 場所を選択して、BaltimoreCyberTrustRoot.crt.pem ファイルを保存します。

手順

  コマンドまたはアクション 目的

ステップ 1

enable

例:

Device> enable

特権 EXEC モードを有効にします。

プロンプトが表示されたらパスワードを入力します。

ステップ 2

configure terminal

例:

Device# configure terminal

グローバル コンフィギュレーション モードを開始します。

ステップ 3

crypto pki trustpoint name

例:

Device(config)# crypto pki trustpoint stealthwatch2

トラストポイントおよび設定された名前を宣言して、CA トラストポイント コンフィギュレーション モードを開始します。

ステップ 4

revocation-check method1 [method2 method3]

例:

Device(ca-trustpoint)# revocation-check none

証明書の失効ステータスをチェックします。

none :証明書のチェックは無視されます。

ステップ 5

enrollment terminal

例:

Device(ca-trustpoint)# enrollment terminal

証明書の登録モードとして terminal を指定します。

ステップ 6

exit

例:

Device(ca-trustpoint)# exit

CA トラストポイント コンフィギュレーション モードを終了し、グローバル コンフィギュレーション モードに戻ります。

ステップ 7

crypto pki authenticate name

例:

Device(config)# crypto pki authenticate stealthwatch2
Enter the base 64 encoded CA certificate.
End with a blank line or the word "quit" on a line by itself

トラストポイント名を認証して、CA トラストポイント コンフィギュレーション モードを開始します。

プロンプトが表示されたら、BaltimoreCyberTrustRoot.crt.pem ファイルからテキストをコピーして貼り付けます。

システムは、次のステートメントとともにプロンプトを表示します。
% Do you accept this certificate? [yes/no]:
確認のために yes を入力します。

ステップ 8

exit

例:

Device(config)# exit

特権 EXEC モードに戻ります。

ステップ 9

show pki trustpoints name

例:

Device# show crypto pki trustpoints stealthwatch2

(オプション)設定したトラストポイントに関する情報を表示します。

デバイスでの Stealthwatch Cloud の設定

デバイスで Stealthwatch Cloud を設定するには、次の手順を実行します。

始める前に

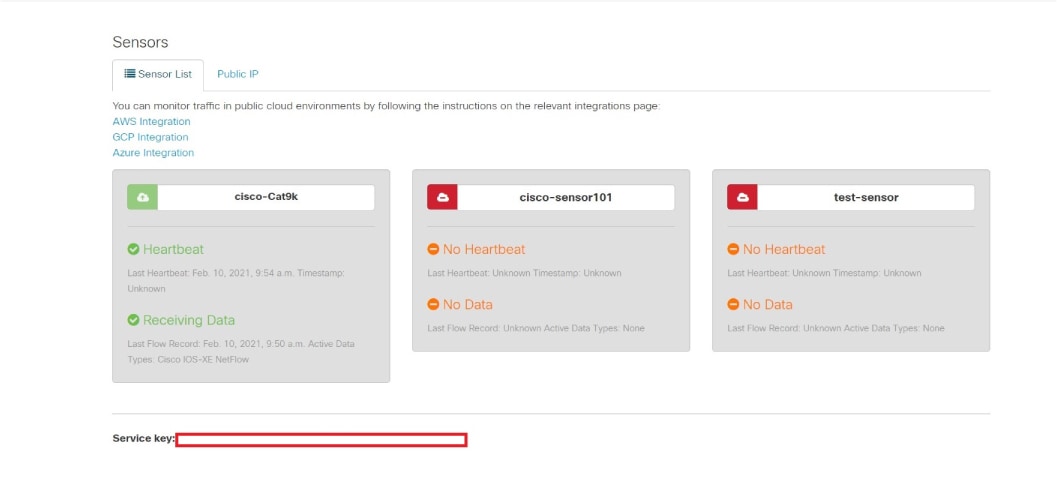
Stealthwatch Cloud ポータルからサービスキーを表示するには、次の手順を実行します。

  1. ブラウザから Stealthwatch Cloud ポータルを開きます。

  2. [Dashboard] ビューで、ウィンドウの右隅にあるクラウドアイコンをクリックし、[Sensors] を選択します。

  3. ウィンドウの下部に移動して、サービスキーを見つけます。


    (注)  


    SCA クラウドセンサーには、地域に基づいてさまざまな URL が含まれています。地域サーバーと、そのサーバーの証明書に署名したルート CA を見つけて、それをトラストポイントとしてスイッチに追加します。


手順

  コマンドまたはアクション 目的

ステップ 1

enable

例:

Device> enable

特権 EXEC モードを有効にします。

プロンプトが表示されたらパスワードを入力します。

ステップ 2

configure terminal

例:

Device# configure terminal

グローバル コンフィギュレーション モードを開始します。

ステップ 3

stealthwatch-cloud-monitor

例:

Device(config)# stealthwatch-cloud-monitor

Stealthwatch Cloud モニターを設定し、stealthwatch-cloud-monitor コンフィギュレーション モードを開始します。

ステップ 4

service-key SwC-service-key

例:

Device(config-stealthwatch-cloud-monitor)# service-key xxxxxxxxxxxxxxxxxxxxxxxxxxxxxxxxx

Stealthwatch Cloud サービスキーを設定します。

ステップ 5

sensor-name SwC-sensor-name

例:

Device(config-stealthwatch-cloud-monitor)# sensor-name mysensor

(オプション)Stealthwatch Cloud 登録に使用するセンサー名を設定します。デフォルトでは、デバイスのシリアル番号がセンサー名として使用されます。

ステップ 6

url SwC-server-url

例:

Device(config-stealthwatch-cloud-monitor)# url https://sensors.eu-2.obsrvbl.com

(オプション)Stealthwatch Cloud サーバーの URL を設定します。

リダイレクトを回避するため、適切な Stealthwatch Cloud サーバーの URL を設定します。URL が設定されていない場合は、米国内の Stealthwatch Cloud サーバーの URL がデフォルトで使用されます。ロケーションに基づいて、デフォルトの URL は最も近い Stealthwatch Cloud サーバーの URL にリダイレクトされます。

ステップ 7

end

例:

Device(config-stealthwatch-cloud-monitor)# end

特権 EXEC モードに戻ります。

Flexible NetFlow を Stealthwatch Cloud ポータルと統合する方法

次のセクションでは、Flexible Netflow を Stealthwatch Cloud ポータルと統合する方法に関する設定情報を提供します。

フロー レコードの作成

フローレコードを作成するには、次の手順を実行します。

手順
  コマンドまたはアクション 目的

ステップ 1

enable

例:
Device> enable

特権 EXEC モードを有効にします。

プロンプトが表示されたらパスワードを入力します。

ステップ 2

configure terminal

例:
Device# configure terminal

グローバル コンフィギュレーション モードを開始します。

ステップ 3

flow record record-name

例:
Device(config)# flow record SWCRec

フローレコードを作成し、フロー レコード コンフィギュレーション モードを開始します。

ステップ 4

description description

例:
Device(config-flow-record)# description swc flow

(任意)フロー レコードの説明を作成します。

ステップ 5

match ipv4 source address

例:
Device(config-flow-record)# match ipv4 source address

レコードのキーフィールドとして IPv4 送信元アドレスを設定します。

ステップ 6

match ipv4 destination address

例:
Device(config-flow-record)# match ipv4 destination address

レコードのキーフィールドとして IPv4 宛先アドレスを設定します。

ステップ 7

match transport source-port

例:
Device(config-flow-record)# match transport source-port

レコードのキーフィールドとして送信元ポートを設定します。

ステップ 8

match transport destination-port

例:
Device(config-flow-record)# match transport destination-port

レコードのキーフィールドとして宛先ポートを設定します。

ステップ 9

match ipv4 protocol

例:
Device(config-flow-record)# match ipv4 protocol

レコードのキーフィールドとして IPv4 プロトコルを設定します。

ステップ 10

collect counter bytes long

例:
Device(config-flow-record)# collect counter bytes long

フローの確認されたバイト数を非キー フィールドとして設定し、フローの合計バイト数を収集します。

ステップ 11

collect counter packets long

例:
Device(config-flow-record)# collect counter packets long

フローで確認されるパケット数を非キーフィールドとして設定し、フローから合計パケット数を収集します。

ステップ 12

collect timestamp absolute first

例:
Device(config-flow-record)# collect timestamp absolute first

フロー内の最初に確認されたタイムスタンプを非キーフィールドとして設定し、フローからの最初のパケットが確認された絶対時間の収集を有効にします。

ステップ 13

collect timestamp absolute last

例:
Device(config-flow-record)# collect timestamp absolute last

フロー内の最初に確認されたタイムスタンプを非キーフィールドとして設定し、フローからの最新のパケットが確認された絶対時間の収集を有効にします。

ステップ 14

end

例:
Device(config-flow-record)# end

特権 EXEC モードに戻ります。

フロー エクスポータの作成

フローエクスポータを作成するには、次の手順を実行します。


(注)  


Stealthwatch Cloud に設定できるアクティブなフローエクスポータは 1 つだけです。


手順
  コマンドまたはアクション 目的

ステップ 1

enable

例:
Device> enable

特権 EXEC モードを有効にします。

プロンプトが表示されたらパスワードを入力します。

ステップ 2

configure terminal

例:
Device# configure terminal

グローバル コンフィギュレーション モードを開始します。

ステップ 3

flow exporter name

例:
Device(config)# flow exporter SWCExp

フローエクスポータを作成し、フロー エクスポータ コンフィギュレーション モードを開始します。

ステップ 4

destination {hostname}

例:
Device(config-flow-exporter)# destination stealthwatch-cloud

このエクスポータに IPv4 宛先アドレスまたはホスト名を設定します。

ステップ 5

end

例:
Device(config-flow-record)# end

特権 EXEC モードに戻ります。

フロー モニタの設定

フローモニターを設定するには、次の手順を実行します。

手順
  コマンドまたはアクション 目的

ステップ 1

enable

例:
Device> enable

特権 EXEC モードを有効にします。

プロンプトが表示されたらパスワードを入力します。

ステップ 2

configure terminal

例:
Device# configure terminal

グローバル コンフィギュレーション モードを開始します。

ステップ 3

flow monitor flow-monitor-name

例:
Device(config)# flow monitor SWCMon

フローモニターを定義します。

ステップ 4

cache timeout active seconds

例:
Device(config-flow-monitor)# cache timeout active 60

アクティブ フロー タイムアウトを秒単位で指定します。

ステップ 5

exporter flow-exporter-name

例:
Device(config-flow-monitor)# exporter SWCExp

フロー情報をエクスポータにエクスポートします。

ステップ 6

record flow-exporter-name

例:
Device(config-flow-monitor)# record SWCRec

基本の IPv4 テンプレートを使用してフローレコードを指定します。

ステップ 7

end

例:
Device(config-flow-monitor)# end

特権 EXEC モードに戻ります。

インターフェイスへのフローの適用

インターフェイスにフローを適用するには、次の手順を実行します。

手順
  コマンドまたはアクション 目的

ステップ 1

enable

例:
Device> enable

特権 EXEC モードを有効にします。

プロンプトが表示されたらパスワードを入力します。

ステップ 2

configure terminal

例:
Device# configure terminal

グローバル コンフィギュレーション モードを開始します。

ステップ 3

interface type number

例:
Device(config)# interface gigabitethernet 1/0/1

インターフェイスを指定し、インターフェイス コンフィギュレーション モードを開始します。

ステップ 4

ip flow monitor monitor-name input

例:
Device(config-if)# ip flow monitor SWCMon input

入力パケット用のインターフェイスに IPv4 フローモニターを関連付けます。

ステップ 5

ip flow monitor monitor-name output

例:
Device(config-if)# ip flow monitor SWCMon output

出力パケット用のインターフェイスに IPv4 フローモニターを関連付けます。

ステップ 6

end

例:
Device(config-if)# end

インターフェイス コンフィギュレーション モードを終了し、特権 EXEC モードに戻ります。

ネットワークの検出と対応の設定の確認

ネットワークの検出と対応の設定を確認するには、特権 EXEC モードで次のコマンドを使用します。

表 1. ネットワークの検出と対応の設定を確認するためのコマンド

コマンド

目的

show stealth-watch-cloud detail

Stealthwatch Cloud 登録ステータスとその設定値を表示します。

show platform software fed switch switch-number swc statistics

Stealthwatch Cloud 統合の統計情報を表示します。

clear platform software fed switch switch-number swc statistics

Stealthwatch Cloud 統合の統計情報をクリアします。

show platform software fed switch switch-number swc connection

Stealthwatch Cloud 統合の接続の詳細とイベントを表示します。

clear platform software fed switch switch-number swc connection

Stealthwatch Cloud 統合の接続の詳細とイベントをクリアします。

ネットワークの検出と対応の設定例

次のセクションでは、ネットワークの検出と対応の設定例を示します。

例:デバイスでの Stealthwatch Cloud の設定と統合

次に、デバイスで Stealthwatch Cloud を設定し統合する方法の例を示します。

Device> enable
Device# configure terminal
Device(config)# stealthwatch-cloud-monitor
Device(stealthwatch-cloud-monitor)# service-key XXXXXXXXXXXXXXXXXXXXX
Device(stealthwatch-cloud-monitor)# sensor-name mysensor
Device(stealthwatch-cloud-monitor)# url https://sensors.eu-2.obsrvbl.com
Device(stealthwatch-cloud-monitor)# exit
Device(config)# flow record SWCRec
Device(config-flow-record)# description for stealthwatch cloud
Device(config-flow-record)# match ipv4 source address
Device(config-flow-record)# match ipv4 destination address
Device(config-flow-record)# match ipv4 protocol
Device(config-flow-record)# match transport source-port
Device(config-flow-record)# match transport destination-port
Device(config-flow-record)# match flow cts source group-tag
Device(config-flow-record)# match flow cts destination group-tag
Device(config-flow-record)# collect counter byte long 
Device(config-flow-record)# collect counter packet long 
Device(config-flow-record)# collect timestamp absolute first 
Device(config-flow-record)# collect timestamp absolute last 
Device(config-flow-record)# exit
Device(config)# flow exporter SWCExp
Device(config-flow-exporter)# destination stealthwatch-cloud
Device(config- flow-exporter)# exit
Device(config)# flow monitor SWCMon
Device(config-flow-monitor)# cache timeout active 60
Device(config-flow-monitor)# exporter SWCExp
Device(config-flow-monitor)# record SWCRec
Device(config-flow-monitor)# exit
Device(config)# interface gigabitethernet 1/0/1
Device(config-if)# ip flow monitor SWCMon input
Device(config-if)# ip flow monitor SWCMon output
Device(config-if)# end

例:Stealthwatch Cloud の設定の確認

次に、show stealthwatch-cloud detail コマンドの出力例を示します。

Device> enable
Device# show stealthwatch-cloud detail
========================================
Stealthwatch Cloud Parameters
========================================
   Service Key  : XXXXXXXXXXXXXXXXXXXXXXXX
   Sensor Name  : C9200
   URL          : https://sensor.eu-prod.obsrvbl.com
========================================
Stealthwatch Cloud Sensor Info
========================================
   Sensor Status    : Registered
   Last heartbeat   : 2020-08-21T10:35:16

次に、show platform fed switch active swc statistics コマンドの出力例を示します。

Device> enable
Device# show platform software fed switch active swc statistics
==========================
SWC Upload Statistics:
==========================
 1: Last file uploaded		:  202102100928_1 
 2: Time of upload		:  02/10/21 09:29:41 UTC 
 3: Current file uploading	:   
 4: Files queued for upload	:   
 5: Number of files queued	:  0 
 6: Last failed upload		:   
 7: Files failed to upload	:  0 
 8: Files successfully uploaded	:  1 
==========================
SWC File Creation Statistics:
==========================
 9: Last file created		:  202102100929_1
10: Time of creation		:  02/10/21 09:29:08 UTC 
==========================
SWC Flow Statistics:
==========================
11: Number of flows in prev file:  15 
12: Number of flows in curr file:  11 
13: Invalid dropped flows	:  0 
14: Error dropped flows		:  0 
==========================
SWC Flags:
==========================
15: Is Registered		:  Registered 
16: Delete debug 		:  Disabled 
17: Exporter delete debug 	:  Disabled 
18: Certificate Validation 	:  Enabled 

次に、show platform software fed switch active swc connection コマンドの出力例を示します。

Device> enable
Device# show platform software fed switch active swc connection
Stealthwatch-Cloud details
  Registration
    #ID         : 0xc000001
    URL         : https://sensor.ext.obsrvbl.com
    Service Key : XXXXXXXXXXXXXXXXXXXXXXXX
    Sensor Name : C9200
    Registered  : N/A
  Connection
    Status               : DOWN
<<— Status will be in UP state only when the flow uploads into the Stealthwatch Cloud.
    Last status update   : 02/09/2021 10:10:47
    # Flaps              : 0
    # Heartbeats         : 0
    # Lost heartbeats    : 0
    Total RX bytes       : 7360
    Total TX bytes       : 869
    Upload Speed (B/s)   : 127
    Download Speed (B/s) : 58
    # Open sessions      : 0
    # Redirections       : 0
    # Timeouts           : 0

  HTTP Events
    GET response                   : 4
    GET request                    : 4
    GET Status Code 2XX            : 4
    PUT response                   : 12
    PUT request                    : 12
    PUT Status Code 2XX            : 2
    POST response                  : 2
    POST request                   : 2
    POST Status Code 2XX           : 2

  API Events
    TX                             : 4
    OK                             : 2
    Error                          : 2

  Event History
Timestamp               #Times   Event               RC Context
----------------------- -------- ------------------- -- ----------------------------------------
02/10/2021 09:29:41.126 2        SEND_OK              0 ID:0003                                 
02/10/2021 09:29:39.795 2        SIGNAL_DATA          0 ID:0003                                 
02/10/2021 09:29:38.279 12       PUT_DATA             0 ID:0003                                 
02/10/2021 09:29:37.962 4        GET_URL              0 ID:0003                                 
02/10/2021 09:29:37.961 4        SEND_START           0 ID:0003                                 
02/10/2021 09:27:41.484 2        SEND_ERR             0 ID:0001                                 
02/10/2021 09:27:41.484 2        MAX_ATTEMPTS         0 ID:0001                                 
02/10/2021 09:22:53.670 4        REGISTER_OK          0 Not applicable                          
02/10/2021 09:22:53.670 4        SEND_ABORT_ALL       0 config change                           
02/10/2021 09:22:53.670 1        OPTIONS_CONFIG       0 File Extension: .csv.gz (reset)         
02/10/2021 09:22:53.669 1        OPTIONS_CONFIG       0 Data Type: ios-xe-catalyst              
02/10/2021 09:22:53.669 1        OPTIONS_CONFIG       0 URL: https://sensor.ext.obsrvbl.com (res
02/10/2021 09:22:53.668 1        OPTIONS_CONFIG       0 Sensor Name: niinamdaUS (reset)         
02/10/2021 09:22:53.553 1        OPTIONS_CONFIG       0 Service Key: b5tQtXJM8AGZSp6oB8PvK4H0FiW

ネットワークの検出と対応の機能履歴

次の表に、このモジュールで説明する機能のリリースおよび関連情報を示します。

これらの機能は、特に明記されていない限り、導入されたリリース以降のすべてのリリースで使用できます。

リリース

機能

機能情報

Cisco IOS XE Bengaluru 17.5.1

ネットワークの検出と対応

Cisco Secure Network Analytics(Stealthwatch Cloud とも呼ばれる)は、高度な脅威検出、脅威への迅速な対応、簡素化されたネットワーク セグメンテーションを提供するネットワーク検出および対応ソリューションです。

Cisco Feature Navigator を使用すると、プラットフォームおよびソフトウェアイメージのサポート情報を検索できます。Cisco Feature Navigator には、http://www.cisco.com/go/cfn [英語] からアクセスします。