Cisco Prime License Manager ユーザ ガイド、リリース 10.5(1)
偏向のない言語
この製品のマニュアルセットは、偏向のない言語を使用するように配慮されています。このマニュアルセットでの偏向のない言語とは、年齢、障害、性別、人種的アイデンティティ、民族的アイデンティティ、性的指向、社会経済的地位、およびインターセクショナリティに基づく差別を意味しない言語として定義されています。製品ソフトウェアのユーザーインターフェイスにハードコードされている言語、RFP のドキュメントに基づいて使用されている言語、または参照されているサードパーティ製品で使用されている言語によりドキュメントに例外が存在する場合があります。シスコのインクルーシブランゲージに対する取り組みの詳細は、こちらをご覧ください。
翻訳について
このドキュメントは、米国シスコ発行ドキュメントの参考和訳です。リンク情報につきましては、日本語版掲載時点で、英語版にアップデートがあり、リンク先のページが移動/変更されている場合がありますことをご了承ください。あくまでも参考和訳となりますので、正式な内容については米国サイトのドキュメントを参照ください。
- Updated:
- 2017年6月21日
章のタイトル: 操作
目次
- 操作
- 使用する前に
- ログイン
- 製品インスタンスの追加
- 製品インスタンスの編集
- 製品インスタンスの削除
- システム ステータス情報
- [ダッシュボード(Dashboard)] ビュー
- [ライセンスの使用状況(License Usage)] ビュー
- [ライセンスの履行(License Fulfillment)] ビュー
- ライセンスを Cisco Prime License Manager に移行
- 電子履行が有効な場合の標準的な製品移行パス
- 電子履行が無効な場合の標準的な製品移行パス
- Cisco Unified Communications Manager の移行パス
- Cisco Unity Connection の移行パス
- Cisco Unified Communications Manager の代替移行パス
- 移行のサポート
- 新規ライセンスの計画と履行
- ライセンス計画
- 電子履行
- 既存のライセンスのアップグレード
- その他の履行オプション
次の項は、Cisco Prime License Manager の使用方法に関する情報を提供します。
- 使用する前に
- ログイン
- 製品インスタンスの追加
- 製品インスタンスの編集
- 製品インスタンスの削除
- システム ステータス情報
- [ダッシュボード(Dashboard)] ビュー
- [ライセンスの使用状況(License Usage)] ビュー
- [ライセンスの履行(License Fulfillment)] ビュー
- ライセンスを Cisco Prime License Manager に移行
- 新規ライセンスの計画と履行
- 既存のライセンスのアップグレード
- その他の履行オプション
使用する前に
Cisco Prime License Manager の使用を開始する場合、次の手順に従います。
- Cisco Prime License Manager にログインします。 ログインを参照してください。
- 製品インスタンスを追加します。 製品インスタンスの追加を参照してください。
- [ダッシュボード(Dashboard)] または [ライセンスの使用状況(License Usage)] ページを使用して、製品に必要なライセンスを判断します。 [ダッシュボード(Dashboard)] や [ライセンスの使用状況(License Usage)] ページの詳細については、システム ステータス情報を参照してください。
- Cisco Prime License Manager で異なるライセンス方法を実行する製品の以前のバージョンからアップグレードされた製品インスタンスを管理する場合は、既存のライセンスを移行します。 ライセンスを Cisco Prime License Manager に移行を参照してください。
- 新規ライセンスの履行を実行します。 ライセンス計画を参照してください。
ログイン
スタンドアロン Cisco Prime License Manager にログインするには、ユーザ名とパスワードを入力します。 [ログイン(Login)] をクリックします。
共存設定では、次の手順を使用してログインします。
| ステップ 1 | インストール済みアプリケーションの一覧から [Cisco Prime License Manager] を選択します。 | ||||
| ステップ 2 |
ユーザ名とパスワードを入力します。 [ログイン(Login)] をクリックします。
[はじめに(Getting Started)] ウィンドウが次のオプションとともに表示されます。
|
製品インスタンスの追加
次の手順では、Cisco Prime License Manager で製品インスタンスを追加する方法を説明します。
| ステップ 1 | Cisco Prime License Manager にログインします。 | ||||
| ステップ 2 | [製品インスタンス(Product Instances)] を選択します。 | ||||
| ステップ 3 | [追加(Add)] をクリックします。 [製品の追加(Product Add)] ダイアログボックスが表示されます。 | ||||
| ステップ 4 |
次の情報を入力します。
|
||||
| ステップ 5 | [OK] をクリックして、製品インスタンスを追加します。 | ||||
| ステップ 6 |
製品インスタンスが追加された時点で、製品が [製品インスタンス(Product Instances)] テーブルに表示されます。
|
製品インスタンスの編集
次の手順では、Cisco Prime License Manager で製品インスタンスを編集する方法を説明します。
製品インスタンスの削除
| ステップ 1 | 削除する製品インスタンスの [操作(Action)] 列で [削除(Delete)] ボタンをクリックします。 |
| ステップ 2 | 製品インスタンスが正常に削除されたことを確認するメッセージが表示されます。 |
| ステップ 3 | 正常に削除されたら [今すぐ同期(Synchronize Now)] ボタンをクリックし、システムの全ライセンス タイプに関する最新のライセンス情報を取得します。 |
システム ステータス情報
Cisco Prime License Manager インターフェイスは、システム ステータスを監視できるようにする次のビューを提供します。
[ダッシュボード(Dashboard)] ビュー
ダッシュボードには、システムの概要が示されます。 ダッシュボードのリンクから、Cisco Prime License Manager 内の関連ページに移動できます。
 (注) |
Cisco Prime License Manager を初めてインストールした場合は、ライセンス ファイルがインストールされるまでデモ モードで動作します。 Cisco Prime License Manager がデモ モードの間は、GUI の上部に警告が表示されます。 |
(注) |
Cisco Prime License Manager がデモ モードである場合、ライセンス ファイルがまだインストールされていないことを意味します。 ライセンス ファイルの初回インストール中に、Cisco Prime License Manager が Cisco ライセンス管理部門に登録され、デモ モードが終了します。 Cisco Prime License Manager がデモ モードの間は、Cisco Prime License Manager の管理対象の製品インスタンスは適合状態にありません。 製品タイプごとに(Unified CM、Unity Connection など)独自のバージョンの「デモ モード」が存在し、Cisco Prime License Manager のデモ モードとは関係なく動作します。 |
ダッシュボードには、次の項目があります。
概要
製品インスタンス、最後にライセンスを更新した日時、最後に同期した日時に関する情報が示されます。
ライセンスの使用状況(License Usage)
製品のタイプとライセンスの数をリスト表示します。
ライセンス アラート(License Alerts)
製品のタイプ、アラートのステータス、および使用可能なライセンス数に応じてアラートをリスト表示します。 次のアラートが示されます。
製品インスタンス アラート
製品インスタンス名、ステータス(製品の猶予期間の期限切れを含む)、および最後の正常な同期をリスト表示します。
(注) |
製品の猶予期間の期限切れは、ライセンスが不足している製品の追加情報を提供します。 [ステータス(Status)] 列で赤色の「x」またはアラート記号をクリックすると、詳細な情報が表示されます(「この製品インスタンスは Cisco Prime License Manager で利用できるライセンス数よりも多いライセンスを使用しており、その使用状況に応じた数のライセンスをインストールしないと、サービス低下が生じる可能性があります。 詳細は、製品のドキュメントを確認してください」など)。 |
[ライセンスの使用状況(License Usage)] ビュー
Cisco Prime License Manager インターフェイスで [ライセンス(Licenses)] > [使用状況(Usage)] を選択してアクセスできる [ライセンスの使用状況(License Usage)] ビューは、システムにインストールされたライセンスと、これらのライセンスが前回の同期時にどのように使用されたかを示します。
[ライセンスの使用状況(License Usage)] ビューでは、次の 3 つのビューを利用できます。
テーブル ビュー(Table View)
[テーブル ビュー(Table View)] には、各ライセンス タイプの次の情報が表示されます。
(注) |
ライセンス バージョンは、「9.0」ではなく、「9.x」として表示されます。 9.0 のライセンスはすべての 9.x ライセンスに対して有効であるため、これにより混乱が防止されます。 |
システムにインストールされているライセンスの 1 個を選択して、そのプロパティや使用状況を確認することもできます。 [ライセンス タイプ(License Type)] 詳細ページには次の情報が含まれています。
- ライセンスの説明(License Description)
- 使用状況チャート(Usage Chart)
- インスタンス別の使用状況(Usage by Instance)
- インストール済みライセンス(タイプ別)(Installed Licenses by Type)
ライセンス タイプをまとめて表示する場合は、[ライセンスの説明(License Description)] セクションの [すべてのライセンス タイプの説明とデバイスの分類の表示(新しいウィンドウ)(View All License Type Descriptions and Device Classifications (new window))] リンクをクリックします。
チャート ビュー(Chart View)
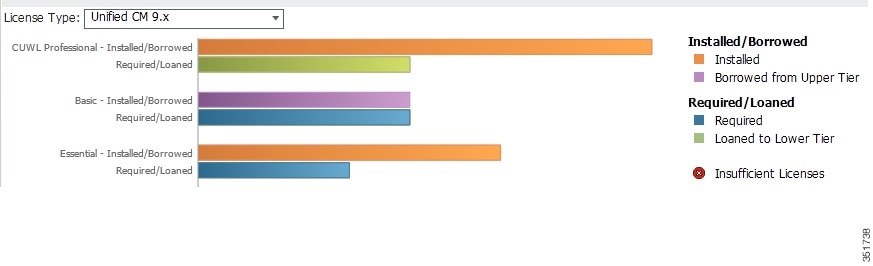
[チャート ビュー(Chart View)] タブには、特定の製品に使用されるライセンス数が図示されます。
そのライセンス バージョンのチャートを表示するには、ドロップダウン メニューから [ライセンスのタイプ(License Type)] を選択します。 チャートの各バーの上にマウスを置くと、ライセンス数の情報が表示されます。 次の図に、各製品タイプに合わせてカスタマイズされた [チャート ビュー(Chart View)] を示します。ここには、ライセンス数がグラフで表示されます。
また、[チャート ビュー(Chart View)] では、ライセンスが不足しているインスタンスに赤の「x」印が付けられます。
(注) |
表示されるチャートは、ドロップダウン メニューから選択したライセンスのタイプによって大きく異なります。 たとえば、Unified CM には借用とティア化が存在しますが、Emergency Responder には存在しません。 ライセンスの代用をサポートしない製品タイプの場合は、凡例が表示されません。 |
履歴(History)
[履歴(History)] タブを使用すると、ライセンスの使用状況が時間の経過とともにどのように変化したかを表示できます。 使用状況データは同期を実行するたびに、製品インスタンスと、ライセンス使用状況を変更する各操作とともに収集されます。 使用状況の履歴をダウンロードするには、日付範囲と製品を選択し、[ファイルの作成(Generate File)] ボタンをクリックします。
[ファイルの作成(Generate File)] ボタンをクリックすると、[履歴(History)] タブの下部に表示される履歴レポートが作成されます。 履歴レポートは csv ファイルとしてダウンロードし、スプレッドシートアプリケーションで開くことができます。 履歴レポートには、コンプライアンスのステータスを含め、インストール済みのライセンスとライセンスの使用量が表示されます。
代用とティア化
(注) |
Cisco Prime License Manager でサポートされている製品には、代用とティア化が適用されないものもあります。 ご使用の製品で代用とティア化がサポートされている場合は、次の説明と例を参照してください。 |
ライセンス タイプは階層に分かれています。上位層のライセンスは、下位層のライセンスに比べて多くの機能を提供します。 たとえば、Unified CM の最上位にある CUWL Professional は、CUWL Premium や Advanced よりも多くの機能を備えています(具体的な機能は [ライセンスの使用状況の詳細(License Usage Details)] 画面で指定します)。 [ライセンスの使用状況(License Usage)] の [テーブル ビュー(Table View)] と [チャート ビュー(Chart View)](上図を参照)では、階層の最上位から最下位の順にタイプが表示されます。
ライセンスの代用とは、超過になる下位ティアのライセンス タイプの代わりに上位ティアのライセンス タイプを使用できる、Cisco Prime License Manager の機能です。 上図の [チャート ビュー(Chart View)] の例では、50 個の予備 CUWL Professional ライセンスが Basic に貸与されています。 この例では、この 50 個の予備ライセンスによって、Basic 全体の超過が補われています。 ユーザが Basic ライセンスを追加するライセンス ファイルをインストールすると、予備 CUWL Professional ライセンスは、今後の CUWL Professional 要件に使用できるようになります。
[ライセンスの履行(License Fulfillment)] ビュー
製品インスタンスが追加されたら(製品インスタンスの追加を参照)、続いてライセンス要件を確認し、それに応じて計画を立てる必要があります。
(注) |
最初に [ダッシュボード(Dashboard)] または [ライセンスの使用状況(License Usage)] ページを確認すると、製品に必要なライセンスを判断できます。 [ダッシュボード(Dashboard)] や [ライセンスの使用状況(License Usage)] ページの詳細については、システム ステータス情報を参照してください。 |
Cisco Prime License Manager には、ライセンスの履行を実行するために、次の 2 つの主要なオプションが用意されています。
それぞれの履行オプションでは、次のいずれかを選択して実行できます。
電子履行は、2 つの中で迅速かつ容易なオプションです。しかし、インターネット接続が利用できない導入環境(ロックダウンされたラボなど)では、手動履行が唯一のオプションである場合があります。
電子履行では、次の機能がサポートされています。
- ライセンス機能のアップグレード(Basic UCL から Enhanced UCL へのアップグレードなど)
- ライセンス バージョンのアップグレード(バージョン 9.0 からバージョン 10.0(1) ライセンスへのアップグレードなど)
ライセンスの製品認証キー(PAK)は、Cisco Prime License Manager から直接履行して、インストールすることができます。
電子履行
電子履行によって新しいライセンスを追加するには、次の手順を使用します。
- Cisco Prime License Manager にログインします。
- [ライセンス(Licenses)] > [履行(Fulfillment)] を選択します。
- すでに選択されない場合は、[有効(Enable)] ボタンをクリックして電子履行を有効にします。
- [ライセンスを PAK から履行(Fulfill Licenses from PAK)] を選択します。 [ライセンスを PAK から履行(Fulfill Licenses from PAK)] ウィンドウが表示されます。
- [新しい PAK からライセンスを追加(Add licenses from a new PAK)] オプションを選択し、製品認証キー(PAK)コードを入力します。 Cisco Prime License Manager で以前に PAK を入力している場合は、2 番目のオプション [部分履行をサポートするインストール済みの PAK からライセンスを追加(Add licenses from an already-installed PAK that supports partial fulfillment)] を選択できます。 このオプションを選択した場合は、ドロップダウン メニューから既存の PAK コードを選択します。
- [次へ(Next)] ボタンをクリックします。 Cisco.com のアカウント情報を求められた場合は、Cisco.com に登録したときに入力したユーザ名とパスワードを入力します。
- [OK] ボタンをクリックします。 [ライセンスを履行(Fulfill Licenses)] セクションが表示されます。
-
PAK でライセンスは SKU 名別に表示されます。 各ライセンスの数はいくつかの見出しの下に分類され、履行済みのライセンスの数と履行前の残りのライセンスの数が示されます。 履行するライセンスの数を指定するには、そのライセンス タイプの [操作(Actions)] 列で [履行(Fulfill)] を選択します。 [ライセンスを履行(Fulfill Licenses)] ウィンドウが表示されます。 このウィンドウの [履行(Fulfill)] 列で数を指定し、[保存(Save)] をクリックしてから [OK] をクリックしてウィンドウを閉じます。 これで、更新された数が、[ライセンスを履行(Fulfill Licenses)] テーブルの [履行(Fulfill)] 列に表示されます。
重要: 一部の PAK は、部分履行に適していません。
(注)
ライセンスが [履行済み(Fulfilled)] として([ライセンスを履行(Fulfill Licenses)] テーブルの [履行前(Before Fulfillment)] の下に)表示されている場合、それらのライセンスは、使用中の、または別の Cisco Prime License Manager によって履行されています。
(注)
選択したライセンスを履行したら、[コンプライアンス チェックの実行(Run Compliance Check)] ボタンをクリックして、適合していることを確認できます。 - [次へ(Next)] ボタンをクリックして変更を確認します。 まだ変更する必要がある場合は、[前へ(Previous)] をクリックして [ライセンスを履行(Fulfill Licenses)] に戻ります。 変更を完了した場合は、[次へ(Next)] をクリックして次のセクションに移動します。
- [ライセンスを履行(Fulfill Licenses)] セクションで [次へ(Next)] をクリックすると、[トランザクション オプション(Transaction Options)] と [使用許諾契約書(License Agreement)] セクションが開きます。 このセクションでは、説明を入力できます(任意)。 また、オプションを選択してドロップダウン リストからライセンス要約の名前を選択することによって、このトランザクションを保存されているライセンス要約に関連付けることができます。
- チェックボックスを選択し、エンド ユーザ ライセンス契約書の条項に同意します。
- [終了(Finish)] ボタンをクリックします。
- 電子履行プロセスが正常に完了すると、新しい履行が [ライセンスの履行(License Fulfillment)] テーブルに表示されます。
PAK の履行を調整
電子履行モードで、次の手順を使用して、その Cisco Prime License Manager ですでに部分履行された特定の PAK の部分履行を実行できます:
-
[ライセンス(License)] > [履行(Fulfillment)] ページの [ライセンスの履行(License Fulfillment)] テーブルで、[PAK] 列のリストから PAK を選択します。
(注)
編集(鉛筆)のアイコンは、部分履行をサポートする PAK を示します。
- [PAK の詳細(PAK Details)] ウィンドウが開き、PAK のライセンスの元の番号が表示されます。 PAK の現在のステータスを取得するには、[PAK の履行を調整(Adjust PAK Fulfillment)] を選択します。
- 情報の入力を求められた場合は、Cisco.com のユーザ名とパスワード(Cisco.com に登録したときに入力した情報)を入力します。
- 履行するライセンスの数を指定するには、そのライセンス タイプの [操作(Actions)] 列で [履行(Fulfill)] を選択します。 [ライセンスを履行(Fulfill Licenses)] ウィンドウが表示されます。 このウィンドウの [履行(Fulfill)] 列で数を指定し、[保存(Save)] をクリックしてから [OK] をクリックしてウィンドウを閉じます。 これで、更新された数が [ライセンスを履行(Fulfill Licenses)] テーブルの [履行(Fulfill)] 列に表示されます。
- [トランザクション オプション(Transaction Options)] フィールドに説明を入力することもできます。 これにより、このトランザクションを追跡することができます。
-
PAK の履行数を調整したら、[PAK の履行を更新(Update PAK Fulfillment)] ボタンをクリックします。
(注)
履行数は増やすことはできますが、減らすことはできません。
手動履行
手動履行ではライセンスの履行を実行する追加の手順が必要になります。 インターネット接続が使用できない状態では、手動履行が使用できる唯一の方法です。 手動履行は、次に説明するようにライセンスの移行に必要です。
- 既存のライセンスを Cisco Prime License Manager に移行します(該当する場合)。 既存のライセンスを移行するには、ライセンスを Cisco Prime License Manager に移行 を参照してください。
- 既存のライセンスが移行されたら、ライセンス計画の手順を使用して新しいライセンスを取得します。
ライセンスを Cisco Prime License Manager に移行
この項では、Cisco Prime License Manager を使用して実行できる、さまざまな移行パスについて説明します。
標準的な製品とは、Cisco Unified Communications Manager または Cisco Unity Connection 以外の Cisco Prime License Manager でサポートされる製品のタイプです。
(注) |
ユーザの実行する移行パスは、いくつかの要因によって異なります(たとえば、製品タイプ、サーバに以前のバージョンのデータが含まれているかどうかなど)。 次のフロー チャートは、移行を正常に完了するために必要な意思決定に関するガイドを提供します。 より広範な移行プロセスについては、該当する製品インスタンスのリリース ノートを参照してください。
(注) |
Cisco Prime License Manager がデモ モードになっている場合は、複数の移行要求を作成しないでください。 2 つ目の移行を開始する前に、ライセンスのインストールを含め、最初の移行を完了します。 移行要求が複数のライセンス ファイルに分かれる場合は、先に進む前に、すべてのライセンス ファイル順番にをインストールします。 |
(注) |
Cisco Unified Communications Manager と Cisco Unity Connection には、それぞれ独自の移行プロセスがあります。 |
電子履行が有効な場合に Cisco Prime License Manager にライセンスがまだ移行されていない製品インスタンスの移行を計画するには、次の手順を使用します。
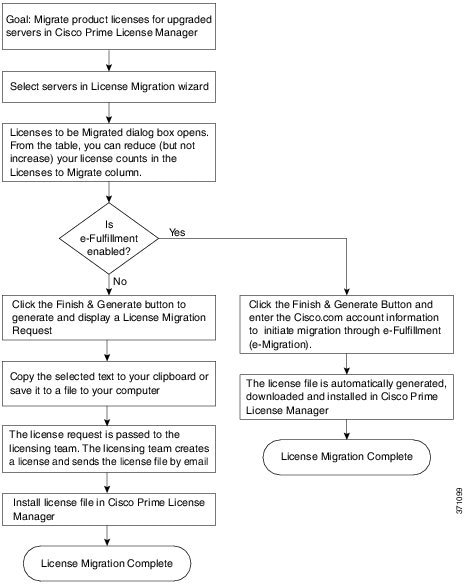
電子履行が有効な場合の標準的な製品移行パス
電子履行が無効な場合の標準的な製品移行パス
電子履行が無効な場合に Cisco Prime License Manager にライセンスがまだ移行されていない製品インスタンスの移行を計画するには、次の手順を使用します。
Cisco Unified Communications Manager の移行パス
次のフロー チャートは、Cisco Unified Communications Manager のライセンスを Cisco Prime License Manager に移行するのに役立ちます。

電子履行が無効な場合に Cisco Prime License Manager にライセンスがまだ移行されていないすべての Unified Communication 製品インスタンスの移行を計画するには、次の手順を使用します。
Cisco Unity Connection の移行パス
次のフロー チャートは、Cisco Unity Connection のライセンスを Cisco Prime License Manager に移行するのに役立ちます。
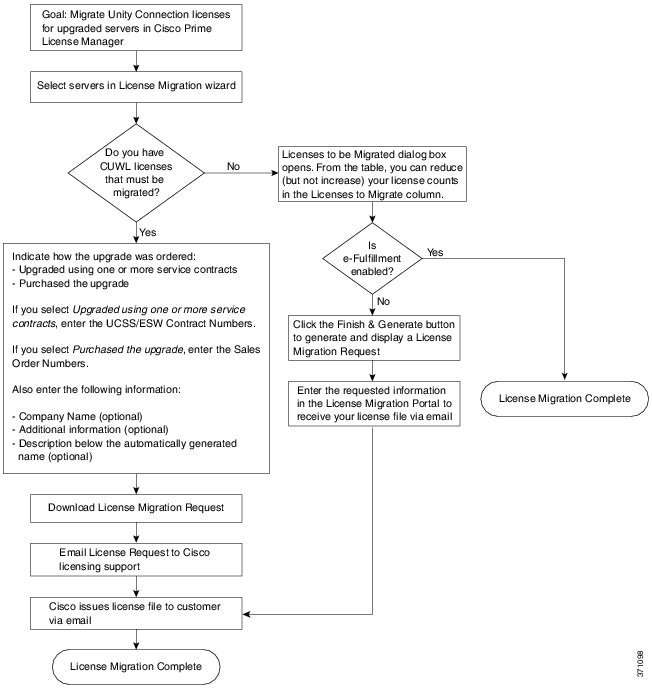
Cisco Prime License Manager にライセンスがまだ移行されていないすべての Unity Connection 製品インスタンスの移行を計画するには、次の手順を使用します。
| ステップ 1 | Cisco Prime License Manager の [ライセンス(Licenses)] > [履行(Fulfillment)] ページで、 をクリックします。 | ||||||||||
| ステップ 2 | [ライセンスを Cisco Prime License Manager に移行(Migrate Licenses to Cisco Prime License Manager)] ウィザードのウィンドウが表示されます。 最初に、製品タイプを選択します。 [製品タイプの選択(Choose Product Type)] セクションのドロップダウン メニューから、[Unity Connection] を選択します。 このセクションには、ユーザが選択した製品のタイプによって異なる移行プロセスの説明があります。 [次へ(Next)] をクリックします。 | ||||||||||
| ステップ 3 |
[製品インスタンスの選択(Choose Product Instances)] セクションが表示されます。 製品インスタンスをアップグレードするには、[利用可能な製品インスタンス(Available Product Instances)] ウィンドウで製品インスタンスを選択し、これを [移行対象の製品インスタンス(Product Instances to Migrate)] ウィンドウに矢印をクリックして移動します。 [次へ(Next)] をクリックします。 |
||||||||||
| ステップ 4 |
[ライセンス数(License Counts)] セクションが表示されます。 このセクションでは、Cisco Unified Workshop License(CUWL)に関する 2 つのオプションのいずれかを選択するように求められます。
|
||||||||||
| ステップ 5 |
[要約と次の手順(Summary and Next Steps)] セクションが表示されます。 ステップ 4 で選択したオプションによってこのセクションに表示される情報が決まります。
|
Cisco Unified Communications Manager の代替移行パス
特定の状況下で使用できる代替移行パスを次に示します。
LCU レポートなしで完了したアップグレード
Cisco Prime License Manager 移行ユーティリティは、アップグレード中に保持される DLU とライセンスの使用状況に依存します。
9.x より前のバージョンでライセンス数のユーティリティを実行することなく、製品を 10.x にアップグレードした場合は、 シスコのライセンス オフィスに連絡し、変更が必要な場合は、ライセンス ファイルの再発行を受けてください。
インポートされた 9.x 以前のデータがある新規インストール
9.0 より前の DLU またはライセンス情報がリリース 10.x VM で使用できない状況では、新規インストール後に移行が必要になることがあります。 これは、次の場合に発生する可能性があります。
次の手順を使用すると、新規インストール後に移行を実行できます。 この手順では、アップグレード前の製品インスタンスに対して LCU レポートを実行する(まだアクセス可能な場合)か、アップグレード前の製品インスタンスの MAC アドレスが使用可能である必要があります。
| ステップ 1 | Cisco Prime License Manager の [ライセンス(Licenses)] > [履行(Fulfillment)] ページで、 をクリックします。 |
| ステップ 2 | [ライセンスを Cisco Prime License Manager に移行(Migrate Licenses to Cisco Prime License Manager)] ウィザードのウィンドウが表示されます。 最初に、製品タイプを選択します。 [製品タイプの選択(Choose Product Type)] セクションのドロップダウン メニューから、アップグレードする製品のタイプとバージョンを選択します。 [次へ(Next)] をクリックします。 |
| ステップ 3 | [製品インスタンスの選択(Choose Product Instances)] セクションが表示されます。 [その他の Unified CM 製品インスタンスを表示(Show additional Unified CM product instances)] の横にあるチェックボックスをオンにします。 このオプションを選択すると、以前のバージョンのデータがなくても製品が表示されます。 |
| ステップ 4 | 製品インスタンスを移行するには、[利用可能な製品インスタンス(Available Product Instances)] ウィンドウで製品インスタンスを選択し、これを [移行対象の製品インスタンス(Product Instances to Migrate)] ウィンドウに矢印をクリックして移動します。 [次へ(Next)] をクリックします。 |
| ステップ 5 | [追加情報が必要(Additional Information Will Be Required)] ウィンドウが表示されます。 ウィンドウの内容を読み終わったら、[続行(Continue)] をクリックしてウィンドウを閉じます。 |
| ステップ 6 | [ライセンス数(License Counts)] セクションが表示されます。 次の情報を入力します。 [次へ(Next)] をクリックします。 |
| ステップ 7 | [ライセンス移行要求と次の手順(License Migration Request and Next Steps)] ウィンドウが表示されます。 ライセンス移行要求の zip ファイルを PC にダウンロードします。 |
| ステップ 8 | 提供されたリンクを使用してライセンス移行要求を Cisco のラインセンス サポートに電子メールで送信します。 |
| ステップ 9 | [閉じる(Close)] をクリックし、[ライセンス計画(License Planning)] ページに戻ります。 |
移行のサポート
Global Licensing Operations(GLO)チームは、24 時間、週 7 日、365 日利用可能で知識豊富なスタッフがサポートを提供しています。
移行のサポートを受けるには、次のいずれかのオプションを選択します。
- Web(https://tools.cisco.com/ServiceRequestTool/scm/mgmt/case )でサービス要求を作成します。
- licensing@cisco.com でサービス要求を作成します(Cisco.com ユーザ ID を含めます)。
- 国別の番号(http://www.cisco.com/en/US/support/tsd_cisco_worldwide_contacts.html)を使用して電話でサービス要求を作成します。
新規ライセンスの計画と履行
ライセンス計画
新しいライセンスの追加を計画するには、次の手順を実行します。
| ステップ 1 | Cisco Prime License Manager の [ライセンス(Licenses)] > [計画(Planning)] ページから、[ライセンス追加計画の作成(Create an Add Licenses Plan)] ボタンをクリックします。 |
| ステップ 2 | [ライセンス追加計画の作成(Create an Add Licenses Plan)] ウィザードのウィンドウが表示されます。 最初に、製品のタイプとライセンスのバージョンを選択します。 [製品の選択(Choose Product)] セクションのドロップダウン メニューから、製品のタイプとライセンスを追加する製品のライセンス バージョンを選択します。 [次へ(Next)] をクリックします。 |
| ステップ 3 |
[ライセンス数(License Counts)] セクションが表示されます。 このセクションで各タイプのライセンスに割り当てるライセンスの数を調整し、[保存(Save)] をクリックしてそのライセンス タイプに対する変更を保存します。 また、[コンプライアンス チェックの実行(Run Compliance Check)] ボタンをクリックしてコンプライアンス チェックを実行したり、[値のリセット(Reset Values)] ボタンをクリックしてライセンスの値をリセットしたりすることも可能です。 ライセンス数が設定されたら、[次へ(Next)] をクリックします。 各ライセンス タイプの横の矢印をクリックすると、そのライセンス タイプの詳細情報が表示されます。 |
| ステップ 4 | コンプライアンス チェックは、[次へ(Next)] をクリックすると自動的に実行されます。 コンプライアンス チェックに合格したかどうかを示すウィンドウが表示されます。 コンプライアンス チェックに合格しなかった場合は、[ライセンス数(License Counts)] に戻って追加の変更を行うことができます。 コンプライアンス チェックに合格した場合は、[続行(Continue)] をクリックして次のセクションに移動します。 |
| ステップ 5 | [要約と次の手順(Summary and Next Steps)] セクションが表示されます。 このセクションでは、行った変更の要約を確認して保存できます。 また、独自の要約名と説明を入力することも可能です。 |
| ステップ 6 | 要約を表示するには、[要約の表示(View Summary)] をクリックします。 デフォルトで、[Cisco Prime License Manager に要約を保存(Save Summary in Cisco Prime License Manager)] オプションが選択されます。 要約のデフォルト名が [名前(Name)] フィールドにも <製品のタイプ>-add-<日時スタンプ> の形式で表示されます。 発注やライセンスの履行に関する説明も、このセクションに表示されます。 [終了(Finish)] をクリックして、ライセンスの追加ウィザードを完了します。 |
次の作業
電子履行
ライセンス計画が完了したら、ライセンスを電子履行するために次の手順を使用します。
| ステップ 1 | Cisco Prime License Manager のメイン メニューから、[ライセンス(Licenses)] > [履行(Fulfillment)] を選択します。 [ライセンスの履行(License Fulfillment)] ページが開きます。 | ||||
| ステップ 2 | 電子履行モードでは、[ライセンスを PAK から履行(Fulfill Licenses from PAK)] ボタンをクリックします。 [ライセンスを PAK から履行(Fulfill Licenses from PAK)] ウィンドウが表示されます。 | ||||
| ステップ 3 | [新しい PAK からライセンスを追加(Add licenses from a new PAK)] オプションを選択し、製品認証キー(PAK)コードを入力します。 Cisco Prime License Manager で以前に PAK を入力している場合は、2 番目のオプション [部分履行をサポートするインストール済みの PAK からライセンスを追加(Add licenses from an already-installed PAK that supports partial fulfillment)] を選択できます。 このオプションを選択した場合は、ドロップダウン メニューから既存の PAK コードを選択します。 | ||||
| ステップ 4 | [次へ(Next)] ボタンをクリックします。 Cisco.com のアカウント情報を求められた場合は、Cisco.com に登録したときに入力したユーザ名とパスワードを入力します。 | ||||
| ステップ 5 | [OK] ボタンをクリックします。 履行する残りのライセンスがある場合(および PAK のユーザ名とパスワードが確認されている場合)、[ライセンスを履行(Fulfill Licenses)] セクションが表示されます。 | ||||
| ステップ 6 |
PAK でライセンスは SKU 名別に表示されます。 各ライセンスの数はいくつかの見出しの下に分類され、履行済みのライセンスの数と履行前の残りのライセンスの数が示されます。 履行するライセンスの数を指定するには、そのライセンス タイプの [操作(Actions)] 列で [履行(Fulfill)] を選択します。 [ライセンスを履行(Fulfill Licenses)] ウィンドウが表示されます。 このウィンドウの [履行(Fulfill)] 列で数を指定し、[保存(Save)] をクリックしてから [OK] をクリックしてウィンドウを閉じます。 これで、更新された数が、[ライセンスを履行(Fulfill Licenses)] テーブルの [履行(Fulfill)] 列に表示されます。
|
||||
| ステップ 7 | [次へ(Next)] ボタンをクリックして変更を確認します。 まだ変更する必要がある場合は、[前へ(Previous)] をクリックして [ライセンスを履行(Fulfill Licenses)] に戻ります。 変更を完了した場合は、[次へ(Next)] をクリックして次のセクションに移動します。 | ||||
| ステップ 8 | [ライセンスを履行(Fulfill Licenses)] セクションで [次へ(Next)] をクリックすると、[トランザクション オプション(Transaction Options)] と [使用許諾契約書(License Agreement)] セクションが開きます。 このセクションでは、説明を入力できます(任意)。 また、オプションを選択してドロップダウン リストからライセンス要約の名前を選択することによって、このトランザクションを保存されているライセンス要約に関連付けることができます。 | ||||
| ステップ 9 | チェックボックスを選択し、エンド ユーザ ライセンス契約書の条項に同意します。 | ||||
| ステップ 10 | [終了(Finish)] ボタンをクリックします。 | ||||
| ステップ 11 | 電子履行プロセスが正常に完了すると、新しい履行が [ライセンスの履行(License Fulfillment)] テーブルに表示されます。 |
既存のライセンスのアップグレード
ライセンス アップグレードには、次の 3 つのタイプがあります。
(注) |
PAK の内容は、ライセンスが機能またはバージョンによってアップグレードできるかどうかを決定します。 |
電子履行を使用してメジャー バージョン アップグレードを履行するには、次の手順に従います。
| ステップ 1 | Cisco Prime License Manager のメイン メニューから、[ライセンス(Licenses)] > [履行(Fulfillment)] を選択します。 [ライセンスの履行(License Fulfillment)] ページが開きます。 | ||||
| ステップ 2 | 電子履行モードでは、[ライセンスを PAK から履行(Fulfill Licenses from PAK)] ボタンをクリックします。 [ライセンスを PAK から履行(Fulfill Licenses from PAK)] ウィンドウが表示されます。 | ||||
| ステップ 3 | [新しい PAK からライセンスを追加(Add licenses from a new PAK)] オプションを選択し、製品認証キー(PAK)コードを入力します。 Cisco Prime License Manager で以前に PAK を入力している場合は、2 番目のオプション [部分履行をサポートするインストール済みの PAK からライセンスを追加(Add licenses from an already-installed PAK that supports partial fulfillment)] を選択できます。 このオプションを選択した場合は、ドロップダウン メニューから既存の PAK コードを選択します。 | ||||
| ステップ 4 | [次へ(Next)] ボタンをクリックします。 Cisco.com のアカウント情報を求められた場合は、Cisco.com に登録したときに入力したユーザ名とパスワードを入力します。 | ||||
| ステップ 5 | [OK] ボタンをクリックします。 履行する残りのライセンスがある場合(および PAK のユーザ名とパスワードが確認されている場合)、[ライセンスを履行(Fulfill Licenses)] セクションが表示されます。 | ||||
| ステップ 6 |
PAK でライセンスは SKU 名別に表示されます。 各ライセンスの数はいくつかの見出しの下に分類され、履行済みのライセンスの数と履行前の残りのライセンスの数が示されます。 履行するライセンスの数を指定するには、そのライセンス タイプの [操作(Actions)] 列で [履行(Fulfill)] を選択します。 [ライセンスを履行(Fulfill Licenses)] ウィンドウが表示されます。 このウィンドウでライセンスのバージョン、機能、または両方を指定し、[保存(Save)] をクリックしてから [OK] をクリックしてウィンドウを閉じます。 これで、更新された数が、[ライセンスを履行(Fulfill Licenses)] テーブルの [履行(Fulfill)] 列に表示されます。
|
||||
| ステップ 7 | [次へ(Next)] ボタンをクリックして変更を確認します。 まだ変更する必要がある場合は、[前へ(Previous)] をクリックして [ライセンスを履行(Fulfill Licenses)] に戻ります。 変更を完了した場合は、[次へ(Next)] をクリックして次のセクションに移動します。 | ||||
| ステップ 8 | [ライセンスを履行(Fulfill Licenses)] セクションで [次へ(Next)] をクリックすると、[トランザクション オプション(Transaction Options)] と [使用許諾契約書(License Agreement)] セクションが開きます。 このセクションでは、説明を入力できます(任意)。 また、オプションを選択してドロップダウン リストからライセンス要約の名前を選択することによって、このトランザクションを保存されているライセンス要約に関連付けることができます。 | ||||
| ステップ 9 | チェックボックスを選択し、エンド ユーザ ライセンス契約書の条項に同意します。 | ||||
| ステップ 10 | [終了(Finish)] ボタンをクリックします。 | ||||
| ステップ 11 | 電子履行プロセスが正常に完了すると、新しい履行が [ライセンスの履行(License Fulfillment)] テーブルに表示されます。 |
その他の履行オプション
[ライセンスの履行(License Fulfillment)] ページの [ライセンスを PAK から履行(Fulfill Licenses from PAK)] オプションの横には、[その他の履行オプション(Other Fulfillment Options)] というタイトルの別のオプションがあります。
手動履行モードでこのオプションの下にあるドロップダウン矢印を選択すると、[ライセンス要求の作成(Generate License Request)] という 1 つのオプションのみが表示されます。
電子履行モードでこのオプションの下にあるドロップダウン矢印を選択すると、次の 3 つのオプションが表示されます。
ライセンスをファイルから履行(Fulfill Licenses From File)
PC 上のファイルからライセンスを履行するには、次を実行します。
- [その他の履行オプション(Other Fulfillment Options)] > [ライセンスをファイルから履行(Fulfill Licenses from File)] を選択します。
- [ライセンス ファイルのインストール(Install License File)] ウィンドウが開きます。 [参照(Browse)] ボタンをクリックして、PC 内のファイルを探します。 ファイルを選択し、[開く(Open)] をクリックします。
- 説明を追加して、保存されたライセンス計画とトランザクションを関連付けることができます(任意)。
- [インストール(Install)] ボタンをクリックし、ライセンス ファイルをインストールします。
ライセンス要求の作成(Generate License Request)
新しいライセンスを取得するには(手動履行を使用)、[ライセンス(License)] > [履行(Fulfillment)] ページで最初にライセンス要求を生成してから、生成された情報を使用して要求を送信します。 その後、電子メールでライセンス ファイルが送信されます。 ライセンス要求を作成するには、次の手順を実行します。
- Cisco Prime License Manager にログインします。
- [ライセンス(License)] > [履行(Fulfillment)] ページで [その他の履行オプション(Other Fulfillment options)] ドロップダウン リストから [ライセンス要求の作成(Generate License Request)] を選択します。
- [ライセンス要求と次の手順(License Request and Next Steps)] ウィンドウが表示されます。 選択したテキストをクリップボードにコピーするか、[PC のファイルに保存します(Save it to a file on your PC)] をクリックします。
履行済みのライセンスの取得(Retrieve Fulfilled Licenses)
[履行済みのライセンスの取得(Retrieve Fulfilled Licenses)] オプションは電子履行専用です。 この機能は、この Prime License Manager に対して履行済みのライセンスを取得してインストールするためにシスコ ライセンス サーバに接続します。 この機能は履行済みのライセンスについてシスコ バック オフィスと Cisco Prime License Manager を同期する場合に役立ちます。
次の手順を使用して履行済みのライセンスを取得します。
- Cisco Prime License Manager にログインします。
- [ライセンス(Licenses)] > [履行(Fulfillment)] を選択します。
- すでに選択されない場合は、[有効(Enable)] ボタンをクリックして電子履行を有効にします。
- [その他の履行オプション(Other Fulfillment Options)] で [履行済みのライセンスの取得(Retrieve Fulfilled Licenses)] を選択します。 [履行済みのライセンスの取得(Retrieve Fulfilled Licenses)] ウィンドウが表示されます。
- シスコ ユーザ名とパスワードを入力します。 [トランザクションの説明(Transaction Description)] フィールドに説明を追加できます(任意)。
- [ライセンスの取得とインストール(Retrieve and Install Licenses)] ボタンをクリックします。
- Cisco Prime License Manager はシスコ バック オフィスと同期され、現在履行済みのすべてのライセンスがインストールされます。
目次
- 操作
- 使用する前に
- ログイン
- 製品インスタンスの追加
- 製品インスタンスの編集
- 製品インスタンスの削除
- システム ステータス情報
- [ダッシュボード(Dashboard)] ビュー
- [ライセンスの使用状況(License Usage)] ビュー
- [ライセンスの履行(License Fulfillment)] ビュー
- ライセンスを Cisco Prime License Manager に移行
- 電子履行が有効な場合の標準的な製品移行パス
- 電子履行が無効な場合の標準的な製品移行パス
- Cisco Unified Communications Manager の移行パス
- Cisco Unity Connection の移行パス
- Cisco Unified Communications Manager の代替移行パス
- 移行のサポート
- 新規ライセンスの計画と履行
- ライセンス計画
- 電子履行
- 既存のライセンスのアップグレード
- その他の履行オプション
次の項は、Cisco Prime License Manager の使用方法に関する情報を提供します。
- 使用する前に
- ログイン
- 製品インスタンスの追加
- 製品インスタンスの編集
- 製品インスタンスの削除
- システム ステータス情報
- [ダッシュボード(Dashboard)] ビュー
- [ライセンスの使用状況(License Usage)] ビュー
- [ライセンスの履行(License Fulfillment)] ビュー
- ライセンスを Cisco Prime License Manager に移行
- 新規ライセンスの計画と履行
- 既存のライセンスのアップグレード
- その他の履行オプション
使用する前に
Cisco Prime License Manager の使用を開始する場合、次の手順に従います。
- Cisco Prime License Manager にログインします。 ログインを参照してください。
- 製品インスタンスを追加します。 製品インスタンスの追加を参照してください。
- [ダッシュボード(Dashboard)] または [ライセンスの使用状況(License Usage)] ページを使用して、製品に必要なライセンスを判断します。 [ダッシュボード(Dashboard)] や [ライセンスの使用状況(License Usage)] ページの詳細については、システム ステータス情報を参照してください。
- Cisco Prime License Manager で異なるライセンス方法を実行する製品の以前のバージョンからアップグレードされた製品インスタンスを管理する場合は、既存のライセンスを移行します。 ライセンスを Cisco Prime License Manager に移行を参照してください。
- 新規ライセンスの履行を実行します。 ライセンス計画を参照してください。
ログイン
手順スタンドアロン Cisco Prime License Manager にログインするには、ユーザ名とパスワードを入力します。 [ログイン(Login)] をクリックします。
共存設定では、次の手順を使用してログインします。
ステップ 1 インストール済みアプリケーションの一覧から [Cisco Prime License Manager] を選択します。 ステップ 2 ユーザ名とパスワードを入力します。 [ログイン(Login)] をクリックします。
(注) 初回ログイン時には、インストール中に作成したアプリケーションのユーザ名とパスワードが必要です。 Cisco Prime License Manager へのサインイン時に使用するユーザ名とパスワードがわからない場合は、トラブルシューティングを参照してください。 [はじめに(Getting Started)] ウィンドウが次のオプションとともに表示されます。
(注) [はじめに(Getting Started)] ウィンドウは、インスタンスの追加、またはライセンスのインストール後には表示されません。 また、[今後表示しない(Do not show this again)] オプションを選択してウィンドウを無効にすることもできます。 これらの手順を実行した後もウィンドウが表示される場合は、Cisco Prime License Manager セッションからログアウトして再度ログインします。
製品インスタンスの追加
手順
ステップ 1 Cisco Prime License Manager にログインします。 ステップ 2 [製品インスタンス(Product Instances)] を選択します。 ステップ 3 [追加(Add)] をクリックします。 [製品の追加(Product Add)] ダイアログボックスが表示されます。 ステップ 4 次の情報を入力します。
- 名前(Name)
- 説明(Description)(任意)
- 製品のタイプ(Product Type)
- ホスト名/IP アドレス(Hostname/IP Address)
- ユーザ名(Username)
- パスワード(Password)
(注) クレデンシャルとは、製品の OS 管理者のユーザ名とパスワードのことです。
ステップ 5 [OK] をクリックして、製品インスタンスを追加します。 ステップ 6 製品インスタンスが追加された時点で、製品が [製品インスタンス(Product Instances)] テーブルに表示されます。
(注) [製品インスタンス(Product Instances)] ページで [今すぐ同期(Synchronize Now)] ボタンをクリックし、新しい製品のライセンス情報を取得します。 同期しないと、最新の製品インスタンス情報が Cisco Prime License Manager に表示されません。
(注) Cisco Prime License Manager にライセンスがまだ移行されていないすべての製品インスタンスの [ステータス(Status)] フィールドに [移行可能なライセンスを含む(Contains Migratable Licenses)] が表示されます。 製品インスタンスにインストール可能なすべてのライセンスを Cisco Prime License Manager で使用できるようにするには、これらのライセンスを移行する必要があります。 ライセンスの移行については、ライセンスを Cisco Prime License Manager に移行 を参照してください。
製品インスタンスの編集
手順
ステップ 1 製品インスタンスを編集するには、[製品インスタンス(Product Instances)] テーブルからインスタンスを選択します。 ステップ 2 [製品インスタンス(Product Instance)] 詳細ページの [一般(General)] タブで、製品インスタンスの推奨設定を編集します。 重要: 製品インスタンスのホスト名または IP アドレスを変更する場合は、ホスト名または IP アドレスを変更する前に、 Cisco Prime License Manager から製品インスタンスを削除する必要があります。 ホスト名または IP アドレスの変更が完了した時点で、製品インスタンスを Cisco Prime License Manager に再び追加できます。
[ダッシュボード(Dashboard)] ビュー
ダッシュボードには、システムの概要が示されます。 ダッシュボードのリンクから、Cisco Prime License Manager 内の関連ページに移動できます。
(注)
Cisco Prime License Manager を初めてインストールした場合は、ライセンス ファイルがインストールされるまでデモ モードで動作します。 Cisco Prime License Manager がデモ モードの間は、GUI の上部に警告が表示されます。
(注)
Cisco Prime License Manager がデモ モードである場合、ライセンス ファイルがまだインストールされていないことを意味します。 ライセンス ファイルの初回インストール中に、Cisco Prime License Manager が Cisco ライセンス管理部門に登録され、デモ モードが終了します。 Cisco Prime License Manager がデモ モードの間は、Cisco Prime License Manager の管理対象の製品インスタンスは適合状態にありません。 製品タイプごとに(Unified CM、Unity Connection など)独自のバージョンの「デモ モード」が存在し、Cisco Prime License Manager のデモ モードとは関係なく動作します。ダッシュボードには、次の項目があります。
製品インスタンス アラート
製品インスタンス名、ステータス(製品の猶予期間の期限切れを含む)、および最後の正常な同期をリスト表示します。
(注)
製品の猶予期間の期限切れは、ライセンスが不足している製品の追加情報を提供します。 [ステータス(Status)] 列で赤色の「x」またはアラート記号をクリックすると、詳細な情報が表示されます(「この製品インスタンスは Cisco Prime License Manager で利用できるライセンス数よりも多いライセンスを使用しており、その使用状況に応じた数のライセンスをインストールしないと、サービス低下が生じる可能性があります。 詳細は、製品のドキュメントを確認してください」など)。[ライセンスの使用状況(License Usage)] ビュー
Cisco Prime License Manager インターフェイスで [ライセンス(Licenses)] > [使用状況(Usage)] を選択してアクセスできる [ライセンスの使用状況(License Usage)] ビューは、システムにインストールされたライセンスと、これらのライセンスが前回の同期時にどのように使用されたかを示します。
[ライセンスの使用状況(License Usage)] ビューでは、次の 3 つのビューを利用できます。
テーブル ビュー(Table View)
[テーブル ビュー(Table View)] には、各ライセンス タイプの次の情報が表示されます。
(注)
ライセンス バージョンは、「9.0」ではなく、「9.x」として表示されます。 9.0 のライセンスはすべての 9.x ライセンスに対して有効であるため、これにより混乱が防止されます。システムにインストールされているライセンスの 1 個を選択して、そのプロパティや使用状況を確認することもできます。 [ライセンス タイプ(License Type)] 詳細ページには次の情報が含まれています。
- ライセンスの説明(License Description)
- 使用状況チャート(Usage Chart)
- インスタンス別の使用状況(Usage by Instance)
- インストール済みライセンス(タイプ別)(Installed Licenses by Type)
ライセンス タイプをまとめて表示する場合は、[ライセンスの説明(License Description)] セクションの [すべてのライセンス タイプの説明とデバイスの分類の表示(新しいウィンドウ)(View All License Type Descriptions and Device Classifications (new window))] リンクをクリックします。
チャート ビュー(Chart View)
[チャート ビュー(Chart View)] タブには、特定の製品に使用されるライセンス数が図示されます。
そのライセンス バージョンのチャートを表示するには、ドロップダウン メニューから [ライセンスのタイプ(License Type)] を選択します。 チャートの各バーの上にマウスを置くと、ライセンス数の情報が表示されます。 次の図に、各製品タイプに合わせてカスタマイズされた [チャート ビュー(Chart View)] を示します。ここには、ライセンス数がグラフで表示されます。
また、[チャート ビュー(Chart View)] では、ライセンスが不足しているインスタンスに赤の「x」印が付けられます。
(注)
表示されるチャートは、ドロップダウン メニューから選択したライセンスのタイプによって大きく異なります。 たとえば、Unified CM には借用とティア化が存在しますが、Emergency Responder には存在しません。 ライセンスの代用をサポートしない製品タイプの場合は、凡例が表示されません。履歴(History)
[履歴(History)] タブを使用すると、ライセンスの使用状況が時間の経過とともにどのように変化したかを表示できます。 使用状況データは同期を実行するたびに、製品インスタンスと、ライセンス使用状況を変更する各操作とともに収集されます。 使用状況の履歴をダウンロードするには、日付範囲と製品を選択し、[ファイルの作成(Generate File)] ボタンをクリックします。
[ファイルの作成(Generate File)] ボタンをクリックすると、[履歴(History)] タブの下部に表示される履歴レポートが作成されます。 履歴レポートは csv ファイルとしてダウンロードし、スプレッドシートアプリケーションで開くことができます。 履歴レポートには、コンプライアンスのステータスを含め、インストール済みのライセンスとライセンスの使用量が表示されます。
代用とティア化
(注)
Cisco Prime License Manager でサポートされている製品には、代用とティア化が適用されないものもあります。 ご使用の製品で代用とティア化がサポートされている場合は、次の説明と例を参照してください。ライセンス タイプは階層に分かれています。上位層のライセンスは、下位層のライセンスに比べて多くの機能を提供します。 たとえば、Unified CM の最上位にある CUWL Professional は、CUWL Premium や Advanced よりも多くの機能を備えています(具体的な機能は [ライセンスの使用状況の詳細(License Usage Details)] 画面で指定します)。 [ライセンスの使用状況(License Usage)] の [テーブル ビュー(Table View)] と [チャート ビュー(Chart View)](上図を参照)では、階層の最上位から最下位の順にタイプが表示されます。
ライセンスの代用とは、超過になる下位ティアのライセンス タイプの代わりに上位ティアのライセンス タイプを使用できる、Cisco Prime License Manager の機能です。 上図の [チャート ビュー(Chart View)] の例では、50 個の予備 CUWL Professional ライセンスが Basic に貸与されています。 この例では、この 50 個の予備ライセンスによって、Basic 全体の超過が補われています。 ユーザが Basic ライセンスを追加するライセンス ファイルをインストールすると、予備 CUWL Professional ライセンスは、今後の CUWL Professional 要件に使用できるようになります。
[ライセンスの履行(License Fulfillment)] ビュー
製品インスタンスが追加されたら(製品インスタンスの追加を参照)、続いてライセンス要件を確認し、それに応じて計画を立てる必要があります。
(注)
最初に [ダッシュボード(Dashboard)] または [ライセンスの使用状況(License Usage)] ページを確認すると、製品に必要なライセンスを判断できます。 [ダッシュボード(Dashboard)] や [ライセンスの使用状況(License Usage)] ページの詳細については、システム ステータス情報を参照してください。重要: 移行が必要な製品インスタンスに、インストール可能なライセンスがある場合は、 ライセンスを Cisco Prime License Manager に移行を参照してください。Cisco Prime License Manager には、ライセンスの履行を実行するために、次の 2 つの主要なオプションが用意されています。
それぞれの履行オプションでは、次のいずれかを選択して実行できます。
電子履行は、2 つの中で迅速かつ容易なオプションです。しかし、インターネット接続が利用できない導入環境(ロックダウンされたラボなど)では、手動履行が唯一のオプションである場合があります。
電子履行では、次の機能がサポートされています。
- ライセンス機能のアップグレード(Basic UCL から Enhanced UCL へのアップグレードなど)
- ライセンス バージョンのアップグレード(バージョン 9.0 からバージョン 10.0(1) ライセンスへのアップグレードなど)
ライセンスの製品認証キー(PAK)は、Cisco Prime License Manager から直接履行して、インストールすることができます。
電子履行
電子履行によって新しいライセンスを追加するには、次の手順を使用します。
- Cisco Prime License Manager にログインします。
- [ライセンス(Licenses)] > [履行(Fulfillment)] を選択します。
- すでに選択されない場合は、[有効(Enable)] ボタンをクリックして電子履行を有効にします。
- [ライセンスを PAK から履行(Fulfill Licenses from PAK)] を選択します。 [ライセンスを PAK から履行(Fulfill Licenses from PAK)] ウィンドウが表示されます。
- [新しい PAK からライセンスを追加(Add licenses from a new PAK)] オプションを選択し、製品認証キー(PAK)コードを入力します。 Cisco Prime License Manager で以前に PAK を入力している場合は、2 番目のオプション [部分履行をサポートするインストール済みの PAK からライセンスを追加(Add licenses from an already-installed PAK that supports partial fulfillment)] を選択できます。 このオプションを選択した場合は、ドロップダウン メニューから既存の PAK コードを選択します。
- [次へ(Next)] ボタンをクリックします。 Cisco.com のアカウント情報を求められた場合は、Cisco.com に登録したときに入力したユーザ名とパスワードを入力します。
- [OK] ボタンをクリックします。 [ライセンスを履行(Fulfill Licenses)] セクションが表示されます。
- PAK でライセンスは SKU 名別に表示されます。 各ライセンスの数はいくつかの見出しの下に分類され、履行済みのライセンスの数と履行前の残りのライセンスの数が示されます。 履行するライセンスの数を指定するには、そのライセンス タイプの [操作(Actions)] 列で [履行(Fulfill)] を選択します。 [ライセンスを履行(Fulfill Licenses)] ウィンドウが表示されます。 このウィンドウの [履行(Fulfill)] 列で数を指定し、[保存(Save)] をクリックしてから [OK] をクリックしてウィンドウを閉じます。 これで、更新された数が、[ライセンスを履行(Fulfill Licenses)] テーブルの [履行(Fulfill)] 列に表示されます。
重要:一部の PAK は、部分履行に適していません。
(注)
ライセンスが [履行済み(Fulfilled)] として([ライセンスを履行(Fulfill Licenses)] テーブルの [履行前(Before Fulfillment)] の下に)表示されている場合、それらのライセンスは、使用中の、または別の Cisco Prime License Manager によって履行されています。
(注)
選択したライセンスを履行したら、[コンプライアンス チェックの実行(Run Compliance Check)] ボタンをクリックして、適合していることを確認できます。- [次へ(Next)] ボタンをクリックして変更を確認します。 まだ変更する必要がある場合は、[前へ(Previous)] をクリックして [ライセンスを履行(Fulfill Licenses)] に戻ります。 変更を完了した場合は、[次へ(Next)] をクリックして次のセクションに移動します。
- [ライセンスを履行(Fulfill Licenses)] セクションで [次へ(Next)] をクリックすると、[トランザクション オプション(Transaction Options)] と [使用許諾契約書(License Agreement)] セクションが開きます。 このセクションでは、説明を入力できます(任意)。 また、オプションを選択してドロップダウン リストからライセンス要約の名前を選択することによって、このトランザクションを保存されているライセンス要約に関連付けることができます。
- チェックボックスを選択し、エンド ユーザ ライセンス契約書の条項に同意します。
- [終了(Finish)] ボタンをクリックします。
- 電子履行プロセスが正常に完了すると、新しい履行が [ライセンスの履行(License Fulfillment)] テーブルに表示されます。
PAK の履行を調整
電子履行モードで、次の手順を使用して、その Cisco Prime License Manager ですでに部分履行された特定の PAK の部分履行を実行できます:
- [ライセンス(License)] > [履行(Fulfillment)] ページの [ライセンスの履行(License Fulfillment)] テーブルで、[PAK] 列のリストから PAK を選択します。
(注)
編集(鉛筆)のアイコンは、部分履行をサポートする PAK を示します。
- [PAK の詳細(PAK Details)] ウィンドウが開き、PAK のライセンスの元の番号が表示されます。 PAK の現在のステータスを取得するには、[PAK の履行を調整(Adjust PAK Fulfillment)] を選択します。
- 情報の入力を求められた場合は、Cisco.com のユーザ名とパスワード(Cisco.com に登録したときに入力した情報)を入力します。
- 履行するライセンスの数を指定するには、そのライセンス タイプの [操作(Actions)] 列で [履行(Fulfill)] を選択します。 [ライセンスを履行(Fulfill Licenses)] ウィンドウが表示されます。 このウィンドウの [履行(Fulfill)] 列で数を指定し、[保存(Save)] をクリックしてから [OK] をクリックしてウィンドウを閉じます。 これで、更新された数が [ライセンスを履行(Fulfill Licenses)] テーブルの [履行(Fulfill)] 列に表示されます。
- [トランザクション オプション(Transaction Options)] フィールドに説明を入力することもできます。 これにより、このトランザクションを追跡することができます。
- PAK の履行数を調整したら、[PAK の履行を更新(Update PAK Fulfillment)] ボタンをクリックします。
(注)
履行数は増やすことはできますが、減らすことはできません。
手動履行
手動履行ではライセンスの履行を実行する追加の手順が必要になります。 インターネット接続が使用できない状態では、手動履行が使用できる唯一の方法です。 手動履行は、次に説明するようにライセンスの移行に必要です。
- 既存のライセンスを Cisco Prime License Manager に移行します(該当する場合)。 既存のライセンスを移行するには、ライセンスを Cisco Prime License Manager に移行 を参照してください。
- 既存のライセンスが移行されたら、ライセンス計画の手順を使用して新しいライセンスを取得します。
ライセンスを Cisco Prime License Manager に移行
この項では、Cisco Prime License Manager を使用して実行できる、さまざまな移行パスについて説明します。
標準的な製品とは、Cisco Unified Communications Manager または Cisco Unity Connection 以外の Cisco Prime License Manager でサポートされる製品のタイプです。
(注)
ユーザの実行する移行パスは、いくつかの要因によって異なります(たとえば、製品タイプ、サーバに以前のバージョンのデータが含まれているかどうかなど)。 次のフロー チャートは、移行を正常に完了するために必要な意思決定に関するガイドを提供します。 より広範な移行プロセスについては、該当する製品インスタンスのリリース ノートを参照してください。
(注)
Cisco Prime License Manager がデモ モードになっている場合は、複数の移行要求を作成しないでください。 2 つ目の移行を開始する前に、ライセンスのインストールを含め、最初の移行を完了します。 移行要求が複数のライセンス ファイルに分かれる場合は、先に進む前に、すべてのライセンス ファイル順番にをインストールします。
(注)
Cisco Unified Communications Manager と Cisco Unity Connection には、それぞれ独自の移行プロセスがあります。
電子履行が有効な場合に Cisco Prime License Manager にライセンスがまだ移行されていない製品インスタンスの移行を計画するには、次の手順を使用します。
電子履行が有効な場合の標準的な製品移行パス
手順
ステップ 1 Cisco Prime License Manager の [ライセンス(Licenses)] > [履行(Fulfillment)] ページで、 をクリックします。 ステップ 2 [ライセンスを Cisco Prime License Manager に移行(Migrate Licenses to Cisco Prime License Manager)] ウィザードのウィンドウが表示されます。 最初に、製品タイプを選択します。 [製品タイプの選択(Choose Product Type)] セクションのドロップダウン メニューから、アップグレードする製品のタイプを選択します。 [次へ(Next)] をクリックします。 ステップ 3 [製品インスタンスの選択(Choose Product Instances)] セクションが表示されます。 製品インスタンスをアップグレードするには、[利用可能な製品インスタンス(Available Product Instances)] ウィンドウで製品インスタンスを選択し、これを [移行対象の製品インスタンス(Product Instances to Migrate)] ウィンドウに矢印をクリックして移動します。 [次へ(Next)] をクリックします。
ステップ 4 [移行するライセンス(Licenses to be Migrated)] ダイアログ ボックスが開きます。 テーブルの [移行するライセンス(Licenses to Migrate)] カラムでライセンス数を減らすことができます(ライセンス数を増やすことはできません)。 また、[コンプライアンス チェックの実行(Run Compliance Check)] ボタンをクリックしてコンプライアンス チェックを実行したり、[値のリセット(Reset Values)] ボタンをクリックしてライセンスの値をリセットしたりすることも可能です。 [OK] をクリックしてダイアログボックスを閉じてから、[次へ(Next)] をクリックして [要約と次の手順(Summary and Next Steps)] のセクションに移動します。 ステップ 5 トランザクションの任意の説明を指定します。 エンド ユーザ ライセンス契約を読み、[終了して要求を作成(Finish & Generate Request)] をクリックします。 ステップ 6 [Cisco.com(CCO)ユーザ ID(Cisco.com (CCO) User ID)] フィールドに Cisco ユーザ ID を入力します。 要求は電子的に送信され、すぐに処理されます。 ライセンスは自動的にインストールされます。
電子履行が無効な場合の標準的な製品移行パス
手順
ステップ 1 Cisco Prime License Manager の [ライセンス(Licenses)] > [履行(Fulfillment)] ページで、 をクリックします。 ステップ 2 [ライセンスを Cisco Prime License Manager に移行(Migrate Licenses to Cisco Prime License Manager)] ウィザードのウィンドウが表示されます。 最初に、製品タイプを選択します。 [製品タイプの選択(Choose Product Type)] セクションのドロップダウン メニューから、アップグレードする製品のタイプを選択します。 [次へ(Next)] をクリックします。 ステップ 3 [製品インスタンスの選択(Choose Product Instances)] セクションが表示されます。 製品インスタンスをアップグレードするには、[利用可能な製品インスタンス(Available Product Instances)] ウィンドウで製品インスタンスを選択し、これを [移行対象の製品インスタンス(Product Instances to Migrate)] ウィンドウに矢印をクリックして移動します。 [次へ(Next)] をクリックします。
ステップ 4 [移行するライセンス(Licenses to be Migrated)] ダイアログ ボックスが開きます。 テーブルの [移行するライセンス(Licenses to Migrate)] カラムでライセンス数を減らすことができます(ライセンス数を増やすことはできません)。 また、[コンプライアンス チェックの実行(Run Compliance Check)] ボタンをクリックしてコンプライアンス チェックを実行したり、[値のリセット(Reset Values)] ボタンをクリックしてライセンスの値をリセットしたりすることも可能です。 [OK] をクリックしてダイアログボックスを閉じてから、[次へ(Next)] をクリックして [要約と次の手順(Summary and Next Steps)] のセクションに移動します。 ステップ 5 [要約と次の手順(Summary and Next Steps)] セクションが表示されます。 このセクションでは、行った変更の要約を確認して保存できます。 要約を表示するには、[要約の表示(View Summary)] をクリックします。 また、要約のデフォルト名は、<productname>-migrate-<date-time-stamp> のフォーマットで [名前(Name)] フィールドに表示されます。 発注やライセンスの履行に関する説明も、このセクションに表示されます。 [終了して要求を作成(Finish & Generate Request)] をクリックします。 ステップ 6 [ライセンス移行要求と次の手順(License Migration Request and Next Steps)] ウィンドウが表示されます。 選択したテキストをクリップボードにコピーするか、[コンピュータのファイルに保存します(Save it to a file on your computer)] をクリックします。 ステップ 7 ステップ 2 で [ライセンス移行ポータル(License Migration Portal)] を選択し、コピーしたテキストを指定されたフィールドに貼り付けるか、コンピュータに保存したファイルを選択します。 ステップ 8 [閉じる(Close)] をクリックし、[ライセンスの履行(License Fulfillment)] ページに戻ります。
Cisco Unified Communications Manager の移行パス
手順次のフロー チャートは、Cisco Unified Communications Manager のライセンスを Cisco Prime License Manager に移行するのに役立ちます。
電子履行が無効な場合に Cisco Prime License Manager にライセンスがまだ移行されていないすべての Unified Communication 製品インスタンスの移行を計画するには、次の手順を使用します。
ステップ 1 Cisco Prime License Manager の [ライセンス(Licenses)] > [履行(Fulfillment)] ページで、 をクリックします。 ステップ 2 [ライセンスを Cisco Prime License Manager に移行(Migrate Licenses to Cisco Prime License Manager)] ウィザードのウィンドウが表示されます。 最初に、製品タイプを選択します。 [製品タイプの選択(Choose Product Type)] セクションのドロップダウン メニューから、[Unified CM] を選択します。 このセクションには、ユーザが選択した製品のタイプによって異なる移行プロセスの説明があります。 [次へ(Next)] をクリックします。 ステップ 3 [製品インスタンスの選択(Choose Product Instances)] セクションが表示されます。 製品インスタンスをアップグレードするには、[利用可能な製品インスタンス(Available Product Instances)] ウィンドウで製品インスタンスを選択し、これを [移行対象の製品インスタンス(Product Instances to Migrate)] ウィンドウに矢印をクリックして移動します。
(注) デフォルトでは、Cisco Unified Communications Manager の以前のバージョンのライセンスのデータを含む製品インスタンスのみが [利用可能な製品インスタンス(Available Product Instances)] テーブルに表示されます。 アップグレードした製品インスタンスがリストに表示されない場合は、[その他の Unified CM 製品インスタンスを表示(Show additional Unified CM product instances)] チェックボックスをクリックします。 このチェックボックスを選択すると、以前のライセンス データを含まない製品インスタンスと以前のライセンス移行要求に含まれる製品インスタンスがリストに追加されます。 [次へ(Next)] をクリックします。
ステップ 4 [ライセンス数(License Counts)] セクションが表示されます。 [アップグレード前の製品インスタンス データの要約(Summary of Pre-Upgrade Product Instance Data)] テーブルには、前のステップで選択した製品インスタンスがリスト表示されます。 このテーブルは編集できません。 テーブルの下に入力が必要ないくつかのフィールドがあります。 適切なオプションを選択して必要な情報を入力したら、[次へ(Next)] をクリックします。
フィールド 入力 Public Space 電話(Public Space Phones) 推測される Public Space 電話の数。 Public Space 電話にはユーザが割り当てられていないため、通常は共有ワークスペース、ロビー、会議室に配置されます。 これらの電話機には一般に低レベルのライセンスが必要であるため、これらの電話機を何台導入するかを見積もることにより、シスコがより正確にお客様のライセンス要件を判断できます。
ケース番号(任意) Cisco Licensing Support にレポートを送信した場合に割り当てられるケース番号です。
ライセンス数のユーティリティ レポート(License Count Utility Reports)(任意) [レポートのアップロード(Upload Report)] ボタンをクリックし、[ラインセンス数のユーティリティ レポートのアップロード(Upload License Count Utility Report)] ダイアログボックスを開きます。 [参照(Browse)] ボタンをクリックしてレポート ファイルを選択し、[レポートのアップロード(Upload Report)] をクリックします。
MAC アドレス(任意) アップグレードされた元のサーバの MAC アドレスです。 これらの MAC アドレスを使用して製品インスタンスで登録されたライセンスを検索することができます。
ステップ 5 [要約と次の手順(Summary and Next Steps)] セクションが表示されます。 このセクションでは、アップグレードをどのように注文したかを指定する必要があります。 [1 つ以上のサービス契約を利用してアップグレードした(Upgraded using one or more service contracts)] を選択した場合は、[UCSS/ESW 契約番号(UCSS/ESW Contract Numbers)] を入力します。 [アップグレードを購入した(Purchased the upgrade)] を選択した場合は、[SO 番号(Sales Order Numbers)] を入力します。 ステップ 6 [Cisco.com(CCO)ユーザ ID(Cisco.com (CCO) User ID)] フィールドに Cisco ユーザ ID を入力します。 [会社名(Company Name)] やその他の情報をキャプチャするために使用するフィールドは任意選択です。 会社名を入力すると、その名前が電子メールの件名行で使用され、zip ファイルの名前に含まれます。
また、要約のデフォルト名は、<productname>-migrate-<date-time-stamp> のフォーマットで [名前(Name)] フィールドに表示されます。 発注やライセンスの履行に関する説明も、このセクションに表示されます。 [終了して要求を作成(Finish & Generate Request)] をクリックします。
ステップ 7 [ライセンス移行要求と次の手順(License Migration Request and Next Steps)] ウィンドウが表示されます。 ライセンス移行要求の zip ファイルを PC にダウンロードします。 提供されたリンクを使用してライセンス移行要求を Cisco のラインセンス サポートに電子メールで送信します。
[閉じる(Close)] をクリックし、[ライセンスの履行(License Fulfillment)] ページに戻ります。
Cisco Unity Connection の移行パス
手順次のフロー チャートは、Cisco Unity Connection のライセンスを Cisco Prime License Manager に移行するのに役立ちます。
Cisco Prime License Manager にライセンスがまだ移行されていないすべての Unity Connection 製品インスタンスの移行を計画するには、次の手順を使用します。
ステップ 1 Cisco Prime License Manager の [ライセンス(Licenses)] > [履行(Fulfillment)] ページで、 をクリックします。 ステップ 2 [ライセンスを Cisco Prime License Manager に移行(Migrate Licenses to Cisco Prime License Manager)] ウィザードのウィンドウが表示されます。 最初に、製品タイプを選択します。 [製品タイプの選択(Choose Product Type)] セクションのドロップダウン メニューから、[Unity Connection] を選択します。 このセクションには、ユーザが選択した製品のタイプによって異なる移行プロセスの説明があります。 [次へ(Next)] をクリックします。 ステップ 3 [製品インスタンスの選択(Choose Product Instances)] セクションが表示されます。 製品インスタンスをアップグレードするには、[利用可能な製品インスタンス(Available Product Instances)] ウィンドウで製品インスタンスを選択し、これを [移行対象の製品インスタンス(Product Instances to Migrate)] ウィンドウに矢印をクリックして移動します。 [次へ(Next)] をクリックします。
ステップ 4 [ライセンス数(License Counts)] セクションが表示されます。 このセクションでは、Cisco Unified Workshop License(CUWL)に関する 2 つのオプションのいずれかを選択するように求められます。
オプション 入力 移行する CUWL ライセンスがある [次へ(Next)] をクリックし、[要約と次の手順(Summary and Next Steps)] のセクションに移動します。
移行する CUWL ライセンスがない(I do not have CUWL licenses to be migrated) [移行するライセンス(Licenses to be Migrated)] ダイアログ ボックスが開きます。 テーブルの [移行するライセンス(Licenses to Migrate)] カラムでライセンス数を減らすことができます(ライセンス数を増やすことはできません)。 また、[コンプライアンス チェックの実行(Run Compliance Check)] ボタンをクリックしてコンプライアンス チェックを実行したり、[値のリセット(Reset Values)] ボタンをクリックしてライセンスの値をリセットしたりすることも可能です。 [OK] をクリックしてダイアログボックスを閉じてから、[次へ(Next)] をクリックして [要約と次の手順(Summary and Next Steps)] のセクションに移動します。
ステップ 5 [要約と次の手順(Summary and Next Steps)] セクションが表示されます。 ステップ 4 で選択したオプションによってこのセクションに表示される情報が決まります。
オプション 説明 移行する CUWL ライセンスがある このセクションでは、アップグレードをどのように注文したかを指定する必要があります。
- 1 つ以上のサービス契約を利用してアップグレードした
- アップグレードを購入した
1 つ以上のサービス契約を利用してアップグレードした場合は、[UCSS/ESW 契約番号(UCSS/ESW Contract Numbers)] を入力します。
アップグレードを購入した場合は、[SO 番号(Sales Order Numbers)] を入力します。
[Cisco.com(CCO)ユーザ ID(Cisco.com (CCO) User ID)] フィールドに Cisco ユーザ ID を入力します。
[会社名(Company Name)] やその他の情報をキャプチャするために使用するフィールドは任意選択です。 会社名を入力すると、その名前が電子メールの件名行で使用され、zip ファイルの名前に含まれます。
また、要約のデフォルト名は、<productname>-migrate-<date-time-stamp> のフォーマットで [名前(Name)] フィールドに表示されます。 発注やライセンスの履行に関する説明も、このセクションに表示されます。 [終了して要求を作成(Finish & Generate Request)] をクリックします。
[ライセンス移行要求と次の手順(License Migration Request and Next Steps)] ウィンドウが表示されます。 ライセンス移行要求の zip ファイルを PC にダウンロードします。
提供されたリンクを使用してライセンス移行要求を Cisco のラインセンス サポートに電子メールで送信します。
[閉じる(Close)] をクリックし、[ライセンスの履行(License Fulfillment)] ページに戻ります。
移行する CUWL ライセンスがなく電子履行が有効(I do not have CUWL licenses to be migrated and e-Fulfillment is enabled) 移行する CUWL ライセンスがなく電子履行が無効(I do not have CUWL licenses to be migrated and e-Fulfillment is disabled) このセクションでは、行った変更の要約を確認して保存できます。 要約を表示するには、[要約の表示(View Summary)] をクリックします。 また、要約のデフォルト名は、<productname>-migrate-<date-time-stamp> のフォーマットで [名前(Name)] フィールドに表示されます。 発注やライセンスの履行に関する説明も、このセクションに表示されます。 [終了して要求を作成(Finish & Generate Request)] をクリックします。
[ライセンス移行要求と次の手順(License Migration Request and Next Steps)] ウィンドウが表示されます。 選択したテキストをクリップボードにコピーするか、[コンピュータのファイルに保存します(Save it to a file on your computer)] をクリックします。
ステップ 2 で [ライセンス移行ポータル(License Migration Portal)] を選択し、コピーしたテキストを指定されたフィールドに貼り付けるか、コンピュータに保存したファイルを選択します。
[閉じる(Close)] をクリックし、[ライセンスの履行(License Fulfillment)] ページに戻ります。
(注) [ライセンスの履行(License Fulfillment)] ページからは、電子移行のトランザクションにのみアクセスできます。 これは手動移行であるため、移行計画には [ライセンス計画(License Planning)] ページでのみアクセスできます。
Cisco Unified Communications Manager の代替移行パス
手順特定の状況下で使用できる代替移行パスを次に示します。
LCU レポートなしで完了したアップグレード
Cisco Prime License Manager 移行ユーティリティは、アップグレード中に保持される DLU とライセンスの使用状況に依存します。
9.x より前のバージョンでライセンス数のユーティリティを実行することなく、製品を 10.x にアップグレードした場合は、 シスコのライセンス オフィスに連絡し、変更が必要な場合は、ライセンス ファイルの再発行を受けてください。
インポートされた 9.x 以前のデータがある新規インストール
9.0 より前の DLU またはライセンス情報がリリース 10.x VM で使用できない状況では、新規インストール後に移行が必要になることがあります。 これは、次の場合に発生する可能性があります。
次の手順を使用すると、新規インストール後に移行を実行できます。 この手順では、アップグレード前の製品インスタンスに対して LCU レポートを実行する(まだアクセス可能な場合)か、アップグレード前の製品インスタンスの MAC アドレスが使用可能である必要があります。
ステップ 1 Cisco Prime License Manager の [ライセンス(Licenses)] > [履行(Fulfillment)] ページで、 をクリックします。 ステップ 2 [ライセンスを Cisco Prime License Manager に移行(Migrate Licenses to Cisco Prime License Manager)] ウィザードのウィンドウが表示されます。 最初に、製品タイプを選択します。 [製品タイプの選択(Choose Product Type)] セクションのドロップダウン メニューから、アップグレードする製品のタイプとバージョンを選択します。 [次へ(Next)] をクリックします。 ステップ 3 [製品インスタンスの選択(Choose Product Instances)] セクションが表示されます。 [その他の Unified CM 製品インスタンスを表示(Show additional Unified CM product instances)] の横にあるチェックボックスをオンにします。 このオプションを選択すると、以前のバージョンのデータがなくても製品が表示されます。 ステップ 4 製品インスタンスを移行するには、[利用可能な製品インスタンス(Available Product Instances)] ウィンドウで製品インスタンスを選択し、これを [移行対象の製品インスタンス(Product Instances to Migrate)] ウィンドウに矢印をクリックして移動します。 [次へ(Next)] をクリックします。 ステップ 5 [追加情報が必要(Additional Information Will Be Required)] ウィンドウが表示されます。 ウィンドウの内容を読み終わったら、[続行(Continue)] をクリックしてウィンドウを閉じます。 ステップ 6 [ライセンス数(License Counts)] セクションが表示されます。 次の情報を入力します。 [次へ(Next)] をクリックします。 ステップ 7 [ライセンス移行要求と次の手順(License Migration Request and Next Steps)] ウィンドウが表示されます。 ライセンス移行要求の zip ファイルを PC にダウンロードします。 ステップ 8 提供されたリンクを使用してライセンス移行要求を Cisco のラインセンス サポートに電子メールで送信します。 ステップ 9 [閉じる(Close)] をクリックし、[ライセンス計画(License Planning)] ページに戻ります。
移行のサポート
Global Licensing Operations(GLO)チームは、24 時間、週 7 日、365 日利用可能で知識豊富なスタッフがサポートを提供しています。
メモ: 製品のライセンスには、システムでユーザが設定された時点からの猶予期間があります。 Unified CM および Unity Connection の場合、猶予期間は 60 日です。移行のサポートを受けるには、次のいずれかのオプションを選択します。
- Web(https://tools.cisco.com/ServiceRequestTool/scm/mgmt/case )でサービス要求を作成します。
- licensing@cisco.com でサービス要求を作成します(Cisco.com ユーザ ID を含めます)。
- 国別の番号(http://www.cisco.com/en/US/support/tsd_cisco_worldwide_contacts.html)を使用して電話でサービス要求を作成します。
新規ライセンスの計画と履行
ライセンス計画
手順
ステップ 1 Cisco Prime License Manager の [ライセンス(Licenses)] > [計画(Planning)] ページから、[ライセンス追加計画の作成(Create an Add Licenses Plan)] ボタンをクリックします。 ステップ 2 [ライセンス追加計画の作成(Create an Add Licenses Plan)] ウィザードのウィンドウが表示されます。 最初に、製品のタイプとライセンスのバージョンを選択します。 [製品の選択(Choose Product)] セクションのドロップダウン メニューから、製品のタイプとライセンスを追加する製品のライセンス バージョンを選択します。 [次へ(Next)] をクリックします。 ステップ 3 [ライセンス数(License Counts)] セクションが表示されます。 このセクションで各タイプのライセンスに割り当てるライセンスの数を調整し、[保存(Save)] をクリックしてそのライセンス タイプに対する変更を保存します。 また、[コンプライアンス チェックの実行(Run Compliance Check)] ボタンをクリックしてコンプライアンス チェックを実行したり、[値のリセット(Reset Values)] ボタンをクリックしてライセンスの値をリセットしたりすることも可能です。 ライセンス数が設定されたら、[次へ(Next)] をクリックします。 各ライセンス タイプの横の矢印をクリックすると、そのライセンス タイプの詳細情報が表示されます。
ステップ 4 コンプライアンス チェックは、[次へ(Next)] をクリックすると自動的に実行されます。 コンプライアンス チェックに合格したかどうかを示すウィンドウが表示されます。 コンプライアンス チェックに合格しなかった場合は、[ライセンス数(License Counts)] に戻って追加の変更を行うことができます。 コンプライアンス チェックに合格した場合は、[続行(Continue)] をクリックして次のセクションに移動します。 ステップ 5 [要約と次の手順(Summary and Next Steps)] セクションが表示されます。 このセクションでは、行った変更の要約を確認して保存できます。 また、独自の要約名と説明を入力することも可能です。 ステップ 6 要約を表示するには、[要約の表示(View Summary)] をクリックします。 デフォルトで、[Cisco Prime License Manager に要約を保存(Save Summary in Cisco Prime License Manager)] オプションが選択されます。 要約のデフォルト名が [名前(Name)] フィールドにも <製品のタイプ>-add-<日時スタンプ> の形式で表示されます。 発注やライセンスの履行に関する説明も、このセクションに表示されます。 [終了(Finish)] をクリックして、ライセンスの追加ウィザードを完了します。
次の作業
電子履行
手順
ステップ 1 Cisco Prime License Manager のメイン メニューから、[ライセンス(Licenses)] > [履行(Fulfillment)] を選択します。 [ライセンスの履行(License Fulfillment)] ページが開きます。 ステップ 2 電子履行モードでは、[ライセンスを PAK から履行(Fulfill Licenses from PAK)] ボタンをクリックします。 [ライセンスを PAK から履行(Fulfill Licenses from PAK)] ウィンドウが表示されます。 ステップ 3 [新しい PAK からライセンスを追加(Add licenses from a new PAK)] オプションを選択し、製品認証キー(PAK)コードを入力します。 Cisco Prime License Manager で以前に PAK を入力している場合は、2 番目のオプション [部分履行をサポートするインストール済みの PAK からライセンスを追加(Add licenses from an already-installed PAK that supports partial fulfillment)] を選択できます。 このオプションを選択した場合は、ドロップダウン メニューから既存の PAK コードを選択します。 ステップ 4 [次へ(Next)] ボタンをクリックします。 Cisco.com のアカウント情報を求められた場合は、Cisco.com に登録したときに入力したユーザ名とパスワードを入力します。 ステップ 5 [OK] ボタンをクリックします。 履行する残りのライセンスがある場合(および PAK のユーザ名とパスワードが確認されている場合)、[ライセンスを履行(Fulfill Licenses)] セクションが表示されます。 ステップ 6 PAK でライセンスは SKU 名別に表示されます。 各ライセンスの数はいくつかの見出しの下に分類され、履行済みのライセンスの数と履行前の残りのライセンスの数が示されます。 履行するライセンスの数を指定するには、そのライセンス タイプの [操作(Actions)] 列で [履行(Fulfill)] を選択します。 [ライセンスを履行(Fulfill Licenses)] ウィンドウが表示されます。 このウィンドウの [履行(Fulfill)] 列で数を指定し、[保存(Save)] をクリックしてから [OK] をクリックしてウィンドウを閉じます。 これで、更新された数が、[ライセンスを履行(Fulfill Licenses)] テーブルの [履行(Fulfill)] 列に表示されます。 重要: 一部の PAK は、部分履行に適していません。 これらの PAK はまとめてパッケージ化されているため、単一 Cisco Prime License Manager でのみ履行できます。 たとえば、NFR(再販なし)の注文は 20 個の CUWL Pro Unified CM および Unity Connection ライセンス、5 個の TelePresence Room ライセンスが含まれるパッケージとして販売されています。
(注) ライセンスが [履行済み(Fulfilled)] として([ライセンスを履行(Fulfill Licenses)] テーブルの [履行前(Before Fulfillment)] の下に)表示されている場合、それらのライセンスは、使用中の、または別の Cisco Prime License Manager によって履行されています。
(注) 選択したライセンスを履行したら、[コンプライアンス チェックの実行(Run Compliance Check)] ボタンをクリックして、適合していることを確認できます。 ステップ 7 [次へ(Next)] ボタンをクリックして変更を確認します。 まだ変更する必要がある場合は、[前へ(Previous)] をクリックして [ライセンスを履行(Fulfill Licenses)] に戻ります。 変更を完了した場合は、[次へ(Next)] をクリックして次のセクションに移動します。 ステップ 8 [ライセンスを履行(Fulfill Licenses)] セクションで [次へ(Next)] をクリックすると、[トランザクション オプション(Transaction Options)] と [使用許諾契約書(License Agreement)] セクションが開きます。 このセクションでは、説明を入力できます(任意)。 また、オプションを選択してドロップダウン リストからライセンス要約の名前を選択することによって、このトランザクションを保存されているライセンス要約に関連付けることができます。 ステップ 9 チェックボックスを選択し、エンド ユーザ ライセンス契約書の条項に同意します。 ステップ 10 [終了(Finish)] ボタンをクリックします。 ステップ 11 電子履行プロセスが正常に完了すると、新しい履行が [ライセンスの履行(License Fulfillment)] テーブルに表示されます。
既存のライセンスのアップグレード
手順ライセンス アップグレードには、次の 3 つのタイプがあります。
(注)
PAK の内容は、ライセンスが機能またはバージョンによってアップグレードできるかどうかを決定します。電子履行を使用してメジャー バージョン アップグレードを履行するには、次の手順に従います。
ステップ 1 Cisco Prime License Manager のメイン メニューから、[ライセンス(Licenses)] > [履行(Fulfillment)] を選択します。 [ライセンスの履行(License Fulfillment)] ページが開きます。 ステップ 2 電子履行モードでは、[ライセンスを PAK から履行(Fulfill Licenses from PAK)] ボタンをクリックします。 [ライセンスを PAK から履行(Fulfill Licenses from PAK)] ウィンドウが表示されます。 ステップ 3 [新しい PAK からライセンスを追加(Add licenses from a new PAK)] オプションを選択し、製品認証キー(PAK)コードを入力します。 Cisco Prime License Manager で以前に PAK を入力している場合は、2 番目のオプション [部分履行をサポートするインストール済みの PAK からライセンスを追加(Add licenses from an already-installed PAK that supports partial fulfillment)] を選択できます。 このオプションを選択した場合は、ドロップダウン メニューから既存の PAK コードを選択します。 ステップ 4 [次へ(Next)] ボタンをクリックします。 Cisco.com のアカウント情報を求められた場合は、Cisco.com に登録したときに入力したユーザ名とパスワードを入力します。 ステップ 5 [OK] ボタンをクリックします。 履行する残りのライセンスがある場合(および PAK のユーザ名とパスワードが確認されている場合)、[ライセンスを履行(Fulfill Licenses)] セクションが表示されます。 ステップ 6 PAK でライセンスは SKU 名別に表示されます。 各ライセンスの数はいくつかの見出しの下に分類され、履行済みのライセンスの数と履行前の残りのライセンスの数が示されます。 履行するライセンスの数を指定するには、そのライセンス タイプの [操作(Actions)] 列で [履行(Fulfill)] を選択します。 [ライセンスを履行(Fulfill Licenses)] ウィンドウが表示されます。 このウィンドウでライセンスのバージョン、機能、または両方を指定し、[保存(Save)] をクリックしてから [OK] をクリックしてウィンドウを閉じます。 これで、更新された数が、[ライセンスを履行(Fulfill Licenses)] テーブルの [履行(Fulfill)] 列に表示されます。 重要: 一部の PAK は、部分履行に適していません。 これらの PAK はまとめてパッケージ化されているため、単一 Cisco Prime License Manager でのみ履行できます。 たとえば、NFR(再販なし)の注文は 20 個の CUWL Pro Unified CM および Unity Connection ライセンス、5 個の TelePresence Room ライセンスが含まれるパッケージとして販売されています。
(注) ライセンスが [履行済み(Fulfilled)] として([ライセンスを履行(Fulfill Licenses)] テーブルの [履行前(Before Fulfillment)] の下に)表示されている場合、それらのライセンスは、使用中の、または別の Cisco Prime License Manager によって履行されています。
(注) 選択したライセンスを履行したら、[コンプライアンス チェックの実行(Run Compliance Check)] ボタンをクリックして、適合していることを確認できます。 ステップ 7 [次へ(Next)] ボタンをクリックして変更を確認します。 まだ変更する必要がある場合は、[前へ(Previous)] をクリックして [ライセンスを履行(Fulfill Licenses)] に戻ります。 変更を完了した場合は、[次へ(Next)] をクリックして次のセクションに移動します。 ステップ 8 [ライセンスを履行(Fulfill Licenses)] セクションで [次へ(Next)] をクリックすると、[トランザクション オプション(Transaction Options)] と [使用許諾契約書(License Agreement)] セクションが開きます。 このセクションでは、説明を入力できます(任意)。 また、オプションを選択してドロップダウン リストからライセンス要約の名前を選択することによって、このトランザクションを保存されているライセンス要約に関連付けることができます。 ステップ 9 チェックボックスを選択し、エンド ユーザ ライセンス契約書の条項に同意します。 ステップ 10 [終了(Finish)] ボタンをクリックします。 ステップ 11 電子履行プロセスが正常に完了すると、新しい履行が [ライセンスの履行(License Fulfillment)] テーブルに表示されます。
その他の履行オプション
[ライセンスの履行(License Fulfillment)] ページの [ライセンスを PAK から履行(Fulfill Licenses from PAK)] オプションの横には、[その他の履行オプション(Other Fulfillment Options)] というタイトルの別のオプションがあります。
手動履行モードでこのオプションの下にあるドロップダウン矢印を選択すると、[ライセンス要求の作成(Generate License Request)] という 1 つのオプションのみが表示されます。
電子履行モードでこのオプションの下にあるドロップダウン矢印を選択すると、次の 3 つのオプションが表示されます。
ライセンスをファイルから履行(Fulfill Licenses From File)
PC 上のファイルからライセンスを履行するには、次を実行します。
- [その他の履行オプション(Other Fulfillment Options)] > [ライセンスをファイルから履行(Fulfill Licenses from File)] を選択します。
- [ライセンス ファイルのインストール(Install License File)] ウィンドウが開きます。 [参照(Browse)] ボタンをクリックして、PC 内のファイルを探します。 ファイルを選択し、[開く(Open)] をクリックします。
- 説明を追加して、保存されたライセンス計画とトランザクションを関連付けることができます(任意)。
- [インストール(Install)] ボタンをクリックし、ライセンス ファイルをインストールします。
ライセンス要求の作成(Generate License Request)
新しいライセンスを取得するには(手動履行を使用)、[ライセンス(License)] > [履行(Fulfillment)] ページで最初にライセンス要求を生成してから、生成された情報を使用して要求を送信します。 その後、電子メールでライセンス ファイルが送信されます。 ライセンス要求を作成するには、次の手順を実行します。
- Cisco Prime License Manager にログインします。
- [ライセンス(License)] > [履行(Fulfillment)] ページで [その他の履行オプション(Other Fulfillment options)] ドロップダウン リストから [ライセンス要求の作成(Generate License Request)] を選択します。
- [ライセンス要求と次の手順(License Request and Next Steps)] ウィンドウが表示されます。 選択したテキストをクリップボードにコピーするか、[PC のファイルに保存します(Save it to a file on your PC)] をクリックします。
メモ: クリップボードまたはコンピュータにライセンス要求情報を保存する場合は、Cisco License Registration サイトにアクセスし、該当するフィールドに情報を貼り付ける必要があります。 電子メールでライセンス ファイルを受け取ったら、 新規ライセンスの計画と履行の手順を使用して Cisco Prime License Manager に新しいライセンス ファイルをインストールします。履行済みのライセンスの取得(Retrieve Fulfilled Licenses)
[履行済みのライセンスの取得(Retrieve Fulfilled Licenses)] オプションは電子履行専用です。 この機能は、この Prime License Manager に対して履行済みのライセンスを取得してインストールするためにシスコ ライセンス サーバに接続します。 この機能は履行済みのライセンスについてシスコ バック オフィスと Cisco Prime License Manager を同期する場合に役立ちます。
次の手順を使用して履行済みのライセンスを取得します。
- Cisco Prime License Manager にログインします。
- [ライセンス(Licenses)] > [履行(Fulfillment)] を選択します。
- すでに選択されない場合は、[有効(Enable)] ボタンをクリックして電子履行を有効にします。
- [その他の履行オプション(Other Fulfillment Options)] で [履行済みのライセンスの取得(Retrieve Fulfilled Licenses)] を選択します。 [履行済みのライセンスの取得(Retrieve Fulfilled Licenses)] ウィンドウが表示されます。
- シスコ ユーザ名とパスワードを入力します。 [トランザクションの説明(Transaction Description)] フィールドに説明を追加できます(任意)。
- [ライセンスの取得とインストール(Retrieve and Install Licenses)] ボタンをクリックします。
- Cisco Prime License Manager はシスコ バック オフィスと同期され、現在履行済みのすべてのライセンスがインストールされます。
 フィードバック