BroadWorksでの新しい管理者ユーザの設定
ダウンロード オプション
偏向のない言語
この製品のドキュメントセットは、偏向のない言語を使用するように配慮されています。このドキュメントセットでの偏向のない言語とは、年齢、障害、性別、人種的アイデンティティ、民族的アイデンティティ、性的指向、社会経済的地位、およびインターセクショナリティに基づく差別を意味しない言語として定義されています。製品ソフトウェアのユーザインターフェイスにハードコードされている言語、RFP のドキュメントに基づいて使用されている言語、または参照されているサードパーティ製品で使用されている言語によりドキュメントに例外が存在する場合があります。シスコのインクルーシブ ランゲージの取り組みの詳細は、こちらをご覧ください。
翻訳について
シスコは世界中のユーザにそれぞれの言語でサポート コンテンツを提供するために、機械と人による翻訳を組み合わせて、本ドキュメントを翻訳しています。ただし、最高度の機械翻訳であっても、専門家による翻訳のような正確性は確保されません。シスコは、これら翻訳の正確性について法的責任を負いません。原典である英語版(リンクからアクセス可能)もあわせて参照することを推奨します。
内容
はじめに
このドキュメントでは、BroadWorks Application Server(AS)のさまざまな種類の管理者アカウントと、新しいアカウントを作成する手順について説明します。
背景説明
Cisco BroadWorksはLinux OS上にインストールされるアプリケーションで、複数のインターフェイスからアクセスできます。したがって、複数の異なる管理者アカウントが付属しています。
- ルートユーザ:OSのインストール時に作成されるアカウント。システムへのフルアクセスを提供するため、注意して使用する必要があります。これは、この文書の範囲外です。ルートアクセスを管理し、安全に保つためには、OSベンダーのガイドラインを適用する必要があります。たとえば、BroadWorksがRed Hat Enterprise Linux(RHEL)の上にインストールされている場合は、Red Hatのスーパーユーザアクセスに関するドキュメントを参照できます。
- BroadWorks管理者(bwadminとも呼ばれる):BroadWorksアプリケーションを管理し、コマンドラインインターフェイス(CLI)経由でアプリケーションにアクセスするために使用するアカウント。
- システム管理者 – Webインターフェイスを介してBroadWorksアプリケーションにログインするために使用されるアカウント。
- リセラー/エンタープライズ/サービスプロバイダー/グループ管理者:特定のリセラー/エンタープライズ/サービスプロバイダー/グループの管理に使用するアカウント。
前提条件
要件
次の項目に関する知識があることが推奨されます。
- BroadWorksの基本管理。
- 基本的なLinuxコマンド。
使用するコンポーネント
このドキュメントの情報は、BroadWorks ASバージョンR24に基づくものです。
このドキュメントの情報は、特定のラボ環境にあるデバイスに基づいて作成されました。このドキュメントで使用するすべてのデバイスは、クリアな(デフォルト)設定で作業を開始しています。本稼働中のネットワークでは、各コマンドによって起こる可能性がある影響を十分確認してください。
BroadWorks管理者
設定
最初のBroadWorks管理者アカウントは、BroadWorksのインストール時に作成されます。追加のアカウントを作成するには、次の手順を使用します。
ステップ 1:ルートクレデンシャルでBroadWorks CLIにログインします。
ステップ 2:/usr/local/broadworks/bw_base/sbinディレクトリに移動します。
[root@as1 ~]# cd /usr/local/broadworks/bw_base/sbinステップ 3:bwuseradd -hコマンドを実行して、設定オプションをリストします。
[root@as1 sbin]# ./bwuseradd –h
Missing argument: role
bwuseradd Version 1.14
USAGE: bwuseradd
                   <-r, --role BWORKS|BWSUPERADMIN|OPERATOR|VIEWER>
                   [-p, --passwd password]
                   [-d, --default]
                   [-c, --centralized]
                   [-v, --verbose]
                   [-h, --help]
Parameters:
 : the new user name
-r, --role : the user assigned role
-p, --passwd : the user password. Enclose the password in single quotes if it contains special characters.
-d, --default : reset passwd
-c, --centralized : for centralized user management
-v, --verbose : run in verbose mode
-h, --help : print this Help

Description:
Invokes Unix/ldap commands to create a local/centralized bw user

Example:
bwuseradd -r OPERATOR --passwd admin123 admin
新しいアカウントを作成するときは、次の4つのロールのいずれかを選択する必要があります。
- BWSUPERADMIN:このロールには、インストールファイルのルートアクセス権があります。このロールは、Cisco BroadWorksのインストールとアップグレードに使用されます。
- BWORKS:このロールは、Cisco BroadWorksサーバで使用できるCLIまたはその他のツールを使用して、開始、停止、および変更を行うことができます。
- オペレータ:このロールは、Cisco BroadWorksコンフィギュレーションファイルを設定できますが、Cisco BroadWorksを開始または停止することはできません。
- VIEWER:このロールは現在の設定を表示できますが、変更を実行できません。
このセクションで使用されるコマンドの詳細については、『UNIXユーザアカウント設定ガイド』を参照してください。
ステップ 4:bwuseraddコマンドを実行して、新しいユーザを作成します。
[root@as1 sbin]# ./bwuseradd -r BWORKS --passwd bwadmin1 bwadmin1
Changing password for user bwadmin1.
passwd: all authentication tokens updated successfully.

User will be required to change password upon next login
Expiring password for user bwadmin1.
passwd: Success

WARNING: Please make sure this user is created on all servers.

WARNING: Do not forget to run 'config-ssh -createKeys ' for the new user.
ステップ 5:ASがクラスタモードでインストールされている場合は、セカンダリノードで同じコマンドを実行します。
[root@as2 sbin]# ./bwuseradd -r BWORKS --passwd bwadmin1 bwadmin1
Changing password for user bwadmin1.
passwd: all authentication tokens updated successfully.

User will be required to change password upon next login
Expiring password for user bwadmin1.
passwd: Success

WARNING: Please make sure this user is created on all servers.

WARNING: Do not forget to run 'config-ssh -createKeys ' for the new user.
手順 6:新しいユーザとしてログインすると、パスワードのリセットを求めるプロンプトが表示されます。
bwadmin1@as1's password:
You are required to change your password immediately (administrator enforced)
WARNING: Your password has expired.
You must change your password now and login again!
Changing password for user bwadmin1.
Current password:
New password:
Retype new password:
手順 7:binコマンドを実行して、プライマリAS上の/usr/local/broadworks/bw_base/binに移動します。
bwadmin1@as1.mleus.lab$ bin
bwadmin1@as1.mleus.lab$ pwd
/usr/local/broadworks/bw_base/bin
ステップ 8:config-sshコマンドを実行し、共通キーペアを作成します。
bwadmin1@as1.mleus.lab$ ./config-ssh -createKeys bwadmin1@as2

==============================================
==== SSH CONFIGURATION TOOL version 2.2.22  ====
=> Setting default settings <=
   Setting 'StrictHostKeyChecking no'
   Setting 'ServerAliveInterval 250'
=> DNS Sanity test <=
   [###############]
   [...............]
   Configured: y, Reachable: y, Resolved: y, Required: n.
   Using bwadmin1@as1.mleus.lab as local peer name for as1.mleus.lab.
=> DNS OK <=
=> Peer reachability test <=
   [###]
   [...]
=> Creating SSH keys <=
   Creating keys for bwadmin1@as2...
bwadmin1@as2's password:
     Generating ecdsa key...
     Generating rsa key...

   Creating keys for bwadmin1@as1.mleus.lab...
bwadmin1@as1.mleus.lab's password:
     Generating ecdsa key...
     Generating rsa key...

=> Keying SSH <=
   Preparing bwadmin1@as1.mleus.lab for keying...

     Cleaning public keys for bwadmin1@as2...
   Sharing keys with bwadmin1@as2...
     Pushing local public keys...
bwadmin1@as2's password:
     Pulling remote public keys...
bwadmin1@as2's password:
   Sharing keys with bwadmin1@as2...		[done]


=> Fully meshing SSH peers <=

=> Recursing with bwadmin1@as2 <=
   Pushing config-ssh script to bwadmin1@as2...
   Launching config-ssh on bwadmin1@as2...

=> Setting default settings <=
   Adding 'StrictHostKeyChecking no'
   Adding 'ServerAliveInterval 250'
=> DNS Sanity test <=
   [###############]
   [...............]
   Configured: y, Reachable: y, Resolved: y, Required: n.
   Using bwadmin1@as2.mleus.lab as local peer name for as2.mleus.lab.
=> DNS OK <=
=> Peer reachability test <=
   [###]
   [...]
=> Keying SSH <=
   Preparing bwadmin1@as2.mleus.lab for keying...

     Cleaning public keys for bwadmin1@as1.mleus.lab...
   Sharing keys with bwadmin1@as1.mleus.lab...
     Pushing local public keys...
     Pulling remote public keys...
   Sharing keys with bwadmin1@as1.mleus.lab...		[done]


=> Testing ssh configuration <=
   Testing bwadmin1@as2...			[done]

==== SSH CONFIGURATION TOOL completed ====
確認
新しいユーザを確認するには、新しいクレデンシャルでCLIにログインし、いくつかの基本的なBroadWorksコマンドを実行します。
bwadmin1@as1.mleus.lab$ bwshowver
AS version Rel_24.0_1.944

Built  Sat Jun  6 00:26:50 EDT 2020
- BASE revision 909962
- AS revision 909962


Patching Info:
  Active Patches: 701

bwadmin1@as1.mleus.lab$ bwcli
======================================================================
BroadWorks Command Line Interface
  Type HELP for more information
======================================================================

AS_CLI>
システム管理者
設定
ステップ 1:https://<AS_FQDN>/Loginページに移動し、Webインターフェイスとしてログインします。
ステップ 2:System > Profile > Administratorsの順に移動します。
ステップ 3:Addボタンをクリックします。
ステップ 4:すべてのフィールドの入力:
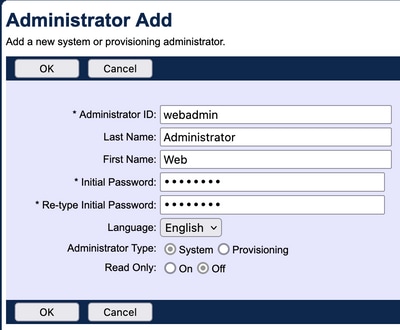
選択する管理者には、次の2つのタイプがあります。
-
管理者はシステムへのフルアクセス権を付与されます。
-
Provisioningでは、新しい顧客の追加と顧客アカウントの管理を目的として、システムへの制限付きアクセスが管理者に提供されます。
ステップ 5:[OK] をクリックして変更を保存します。
確認
System > Profile > Administratorsの順に移動し、新しく作成したアカウントを検索します。

ログアウトし、新しいクレデンシャルを使用して再度ログインします(パスワードの変更を求められます)。
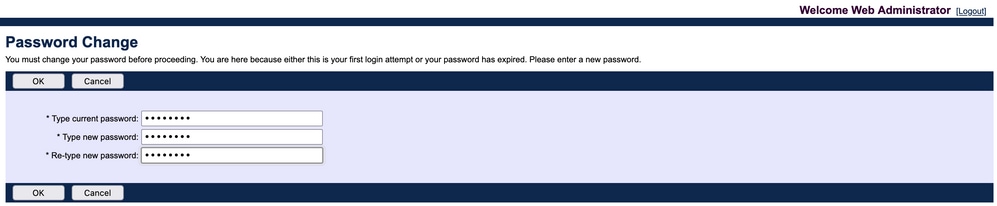
メニューをナビゲートして、必要なオプションがすべて使用可能であることを確認します。
また、CLIを使用して新しいクレデンシャルを確認することもできます。BroadWorks CLI(BWCLI)を開き、新しいクレデンシャルのセットを使用してloginコマンドを実行します。
AS_CLI> login webadmin
Password:
webadmin logging in...
リセラー/エンタープライズ/サービスプロバイダー/グループ管理者
設定
ステップ 1:https://<AS_FQDN>/Loginページに移動し、Webインターフェイスとしてログインします。
ステップ 2:System > Profileに移動し、さらに管理者を作成するReseller、Enterprises、Service Providers、またはGroupに移動します。この設定例ではサービスプロバイダーを使用していますが、他のエンティティの設定は同じです。
ステップ 3:新しい管理者を追加するサービスプロバイダーを選択してください。
ステップ 4:Profile > Administratorsの順に移動し、Addボタンをクリックします。
ステップ 5:すべてのフィールドの入力:
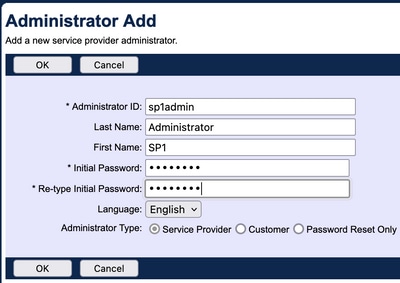
サービスプロバイダー/エンタープライズに対して選択する管理者のタイプは3つあります(リセラーとグループに対しては、タイプの選択はありません)。
-
サービスプロバイダーは通常の管理者を作成します。この管理者は、管理者ポリシーページで設定したポリシーによって決定されるWebインターフェイスへのアクセス権を持ちます。
-
顧客が顧客管理者を作成します。 顧客管理者は、サービスプロバイダーのGroups、Users、Service Instances、およびChange Passwordページにのみアクセスできます。 顧客管理者は、Intercept Groupページへの読み取り専用アクセス権を除くすべてのグループのグループページにアクセスでき、Call Capacityページにはアクセスできません。 Administrator Policiesページで設定したポリシーによって、顧客管理者のアクセスをさらに制限できます。
-
[パスワードのリセットのみ]管理者はユーザーパスワードのみを変更できます。管理者は、Webインターフェイス内の他のページ、データ、またはコマンドにアクセスできません。
手順 6:[OK] をクリックして変更を保存します。
確認
System > Profile > Service ProvidersまたはEnterprisesに移動し、管理者アカウントを作成したエンティティを選択します。次に、Profile > Administratorsの順に移動し、新しく作成された管理者を検索します。

ログアウトし、新しいクレデンシャルを使用して再度ログインします(パスワードの変更を求められます)。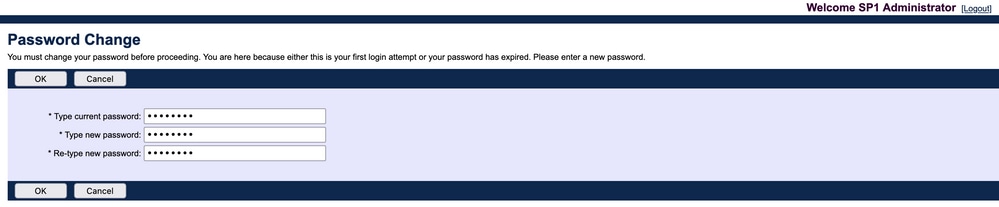
メニューをナビゲートして、特定のサービスプロバイダー/エンタープライズに関連する設定のみが表示されていることを確認します。
CLIコマンドを使用した管理者アカウントの追加
すべてのWebアクセスアカウントは、BWCLIコマンドから作成することもできます。この詳細についてはこのドキュメントでは説明していませんが、次に参照用のそれぞれのコマンドを示します。
- システム管理者:
AS_CLI/SubscriberMgmt/Administrator> h add When adding a new administrator to the system, you set the administrator user ID, access level, first and last names, and password. Parameters description: userId : The user ID for the administrator. type : when set to "system", allows for complete access to the Application Server CLI and its functions. When set to "prov", allows only limited access to the Application Server CLI, specifically functions in the network level only. readOnly : Cannot configure the system. attribute: Additional attributes to include through the add command. lastName : The user's last name. firstName: The user's first name. language : Indicates the language to be used for the administrator. ====================================================================== add, String {2 to 80 characters} , Choice = {system, prov} , Choice = {false, true} [ , Multiple Choice = {lastName, firstName, language}] , String {1 to 30 characters} , String {1 to 30 characters} , String {1 to 40 characters} - リセラー管理者:
AS_CLI/SubscriberMgmt/Reseller/Administrator> h add This command is used to add a new reseller administrator. When this command is used, you are prompted for password information. Parameters description: resellerId: The ID of the reseller. userId : The user ID for the reseller administrator. attribute : Additional attributes to include with the name command. lastName : This parameter specifies the reseller administrator's last name. firstName : This parameter specifies the reseller administrator's first name. language : This parameter specifies the reseller administrator's supported language. ====================================================================== add, String {1 to 36 characters} , String {2 to 80 characters} [ , Multiple Choice = {lastName, firstName, language}] , String {1 to 30 characters} , String {1 to 30 characters} , String {1 to 40 characters} - エンタープライズ/サービスプロバイダー管理者:
AS_CLI/SubscriberMgmt/ServiceProvider/Administrator> h add When adding a new service provider administrator to the system, the corresponding service provider administrator's user ID, first name, and last names are set. You are prompted for password information. Parameters description: svcProviderId: The service provider. userId : The user ID for the service provider administrator. adminType : When set to "normal", the service provider administrator has all standard access rights and privileges. When set to "customer", the customer administrator only has access to the Group, User, and Change Password web portal pages. Also, the customer administrator has no access to Call Capacity and has read-only access to Intercept Group pages. When set to "passwordResetOnly", this value allows the service provider administrator to reset the user's web and portal password only. attribute : Additional attributes to include through the add command. lastName : The service provider administrator's last name. firstName : The service provider administrator's first name. language : The service provider's supported language. ====================================================================== add, String {1 to 30 characters} , String {2 to 80 characters} , Choice = {normal, customer, passwordResetOnly} [ , Multiple Choice = {lastName, firstName, language}] , String {1 to 30 characters} , String {1 to 30 characters} , String {1 to 40 characters} - グループ管理者:
AS_CLI/SubscriberMgmt/Group/Administrator> h add When adding a new group administrator to the system, the corresponding group name and service provider, and the group administrator's user ID, first name, and last name are set. Parameters description: svcProviderId: The ID of the service provider to whom the group and group administrator belong. groupId : The ID of the group to which the administrator belongs. userId : The user ID for the group administrator. attribute : Additional attributes to include through the add command. lastName : The group administrator's last name. firstName : The group administrator's first name. language : The supported language for the group administrator. ====================================================================== add, String {1 to 30 characters} , String {1 to 30 characters} , String {2 to 161 characters} [ , Multiple Choice = {lastName, firstName, language}] , String {1 to 30 characters} , String {1 to 30 characters} , String {1 to 40 characters}
更新履歴
| 改定 | 発行日 | コメント |
|---|---|---|
1.0 |
30-Jan-2023
|
初版 |
 フィードバック