Thousand Eyes - Enterprise Agent for ASR1k、ISR4k、およびCat8kプラットフォームの設定( Dockerインストール)
ダウンロード オプション
偏向のない言語
この製品のドキュメントセットは、偏向のない言語を使用するように配慮されています。このドキュメントセットでの偏向のない言語とは、年齢、障害、性別、人種的アイデンティティ、民族的アイデンティティ、性的指向、社会経済的地位、およびインターセクショナリティに基づく差別を意味しない言語として定義されています。製品ソフトウェアのユーザインターフェイスにハードコードされている言語、RFP のドキュメントに基づいて使用されている言語、または参照されているサードパーティ製品で使用されている言語によりドキュメントに例外が存在する場合があります。シスコのインクルーシブ ランゲージの取り組みの詳細は、こちらをご覧ください。
翻訳について
シスコは世界中のユーザにそれぞれの言語でサポート コンテンツを提供するために、機械と人による翻訳を組み合わせて、本ドキュメントを翻訳しています。ただし、最高度の機械翻訳であっても、専門家による翻訳のような正確性は確保されません。シスコは、これら翻訳の正確性について法的責任を負いません。原典である英語版(リンクからアクセス可能)もあわせて参照することを推奨します。
はじめに
このドキュメントでは、Cisco IOS-XE®プラットフォームでThousandEyeを設定する方法について説明します。
前提条件
要 件
シスコは、ThousandEyesのドキュメントポータルで要件を検証することをお勧めします。
サポートマトリックス千眼
使用するコンポーネント
このドキュメントの情報は、Cisco IOS-XEを搭載したルータに基づくものです。
このドキュメントの情報は、特定のラボ環境にあるデバイスに基づいて作成されたものです。このドキュメントで使用するすべてのデバイスは、クリアな(デフォルト)設定で作業を開始しています。本稼働中のネットワークでは、各コマンドによって起こる可能性がある影響を十分確認してください。
ISR4Ks Dockerのインストール
ステップ 1:
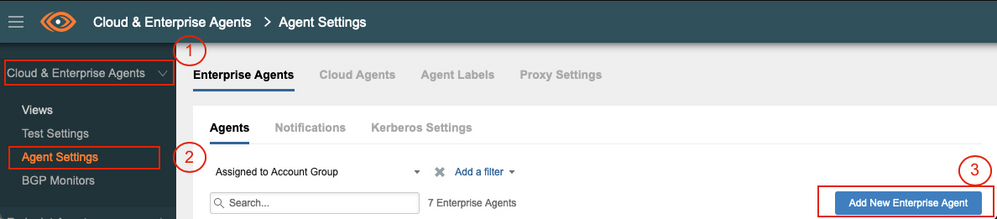
https://app.thousandeyes.comのメニューCloud & Enterprise Agents > Agent settings > Add New Enterprise Agent > Cisco Application Hostingの下から、ThousandEyesエージェントをダウンロードします。
ステップ 2
.tarファイルをルータのブートフラッシュにコピーします。これはTFTPを使用して実行できます。または、USBフラッシュドライブにファイルをダウンロードして、ルータのブートフラッシュにコピーします。
Router#dir bootflash: | sec .tar
24577 -rw- 186705920 May 19 2022 16:26:31 +00:00 thousandeyes-enterprise-agent-4.2.2.cisco.tar
ステップ 3
ioxコマンドを使用してルータのIOxデーモンを有効にし、サービスステータスを検証します。
Router(config)#iox
*May 19 16:40:48.485: %UICFGEXP-6-SERVER_NOTIFIED_START: R0/0: psd: Server iox has been notified to start
Router#show iox-service
IOx Infrastructure Summary:
---------------------------
IOx service (CAF)              : Not Running
IOx service (HA)               : Not Supported
IOx service (IOxman)           : Not Running
IOx service (Sec storage)      : Not Supported
Libvirtd 5.5.0                 : Running
ステップ 4
app-hosting install appid <agent_name> package bootflash:<file.tar>コマンドを使用して、以前にブートフラッシュに保存したエージェントをインストールします。
Router#app-hosting install appid ISR4k_Agent package bootflash:thousandeyes-enterprise-agent-4.2.2.cisco.tar
Installing package 'bootflash:thousandeyes-enterprise-agent-4.2.2.cisco.tar' for 'ISR4k_Agent'. Use 'show app-hosting list' for progress.
ステップ 5
show app-hosting listコマンドを使用して、エージェントが正しくインストールされていることを確認します。
Router#show app-hosting list
App id                                   State
---------------------------------------------------------
ISR4k_Agent                              DEPLOYED
ステップ 6
仮想ポートインターフェイスを設定します。
interface VirtualPortGroup1
ip address 192.168.2.254 255.255.255.0
no mop enabled
no mop sysid
end
ステップ 8
アプリケーションホスティング用にVNICを設定します。
Router(config)#app-hosting appid ISR4k_Agent
Router(config-app-hosting)#app-vnic gateway1 virtualportgroup 1 guest-interface 1
Router(config-app-hosting-gateway1)#guest-ipaddress 192.168.2.10 netmask 255.255.255.0
Router(config-app-hosting-gateway#)#exit
Router(config-app-hosting)#app-default-gateway 192.168.2.254 guest-interface 1
Router(config-app-hosting)#name-server1 8.8.8.8
Router(config-app-hosting)#end
注: name-serverコマンドのIPアドレスは、内部または外部のDNSサーバです。 |
ステップ 7
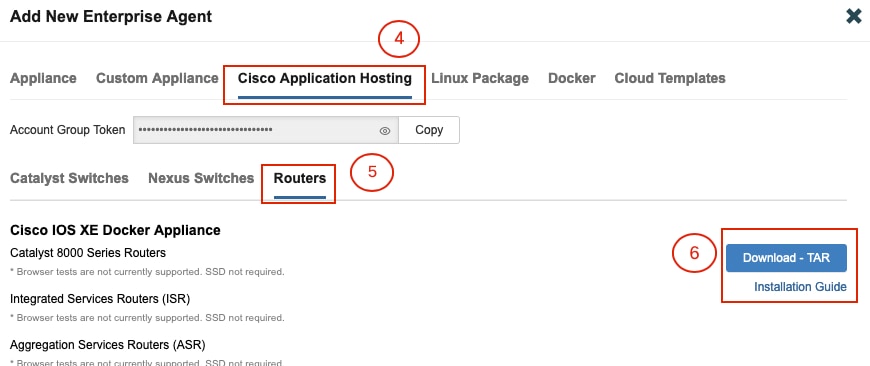
Dockerをセットアップします。必要なトークンは、https://app.thousandeyes.comのCloud & Enterprise Agents > Agent settings > Add a New Enterprise Agent > Cisco Application Hostingメニューから取得できます。
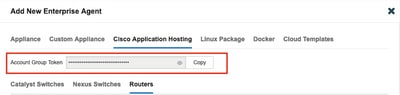
小さな目のアイコンをクリックします。暗号化されていないトークン番号が表示されます。文字列をコピーし、ルータへのインストールを続行します。
Dockerインストールコマンド:
Router(config-app-hosting)#app-resource docker
Router(config-app-hosting-docker)#prepend-pkg-opts
Router(config-app-hosting-docker)#run-opts 1 "-e TEAGENT_ACCOUNT_TOKEN= EAGENT_ACCOUNT_TOKEN= xxxxxxxxxxxxxxxxxxxx"
Router(config-app-hosting-docker)#run-opts 2 "--hostname ISR_Agent"
Router(config-app-hosting)#start
Router(config-app-hosting)#end
Router#
*May 30 20:10:00.282: %SYS-5-CONFIG_I: Configured from console by console
*May 30 20:10:06.980: %IM-6-START_MSG: R0/0: ioxman: app-hosting: Start succeeded: ISR_Agent started successfully Current state is RUNNING
ステップ 9
show app-hosting listコマンドを使用して、エージェントがアクティブであることを確認します。
Router#show app-hosting list
App id                                   State
---------------------------------------------------------
ISR_Agent                                RUNNING
ASR1K Dockerのインストール
ステップ 1:
Thousandeyes-enterprise-agent-x.x.x.cisco.tarのThousandeyesのWebサイトからエージェント.tarアーカイブをダウンロードします。
ステップ 2
.tarファイルをルータのブートフラッシュにコピーします。これはTFTPを使用して実行できます。または、USBフラッシュドライブにファイルをダウンロードして、ルータのブートフラッシュにコピーします。
Router#dir bootflash: | sec .tar
16 -rw- 186705920 Sep 21 2022 15:02:21 +00:00 thousandeyes-enterprise-agent-4.2.2.cisco.tar
ステップ 3
ioxコマンドを使用してルータでIOxデーモンを有効にし、サービスステータスを検証します。
Router(config)#iox
Router#show iox-service
IOx Infrastructure Summary:
---------------------------
IOx service (CAF)              : Running
IOx service (HA)               : Not Supported
IOx service (IOxman)           : Running
IOx service (Sec storage)      : Not Supported
Libvirtd 5.5.0                 : Running
ステップ 4
app-hosting install appid <agent_name> package bootflash:<file.tar>コマンドを使用して、以前にブートフラッシュに保存したエージェントをインストールします。
Router#app-hosting install appid ASR_TE package bootflash:thousandeyes-enterprise-agent-4.2.2.cisco.tar
Installing package 'bootflash:thousandeyes-enterprise-agent-4.2.2.cisco.tar' for 'ASR_TE'. Use 'show app-hosting list' for progress.
*Sep 21 16:10:12.900: %IOXCAF-6-INSTALL_MSG: R0/0: ioxman: app-hosting: ASR_TE installed successfully Current state is DEPLOYED
Router#show app-hosting list
App id                                   State
---------------------------------------------------------
ASR1k_TE                                 DEPLOYED
ステップ 5
仮想ポートインターフェイスにプライベートIPアドレスを設定します。
interface VirtualPortGroup0
ip address 192.168.2.254 255.255.255.0
no mop enabled
no mop sysid
end
ステップ 6
アプリケーションホスティング用にVNICを設定します。
Router(config)#app-hosting appid ASR1k_TE
Router(config-app-hosting)#app-vnic gateway1 virtualportgroup 0 guest-interface 0
Router(config-app-hosting-gateway0)#guest-ipaddress 192.168.2.1 netmask 255.255.255.0
Router(config-app-hosting-gateway0)#exit
Router(config-app-hosting)#app-default-gateway 192.168.2.254 guest-interface 0
Router(config-app-hosting)#name-server0 8.8.8.8
Router(config-app-hosting)#app-resource docker
Router(config-app-hosting-docker)#prepend-pkg-opts
Router(config-app-hosting-docker)#run-opts 1 "--hostname ASR1kTE"
Router(config-app-hosting-docker)#run-opts 1 "-e TEAGENT_ACCOUNT_TOKEN=XXXXXXXXXXXXXXXXX"
Router(config-app-hosting-docker)#exit
ステップ 7
引用したアプリIDのアプリケーションホスティングをアクティブにします。
Router(config)#app-hosting appid ASR1k_TE
Router(config-app-hosting)#start
ステップ 8
ThousandEyesエージェントをインストールし、show app-hosting listコマンドを使用してエージェントがアクティブであることを確認します。
Router#app-hosting install appid ASR1k_TE package bootflash:thousandeyes-enterprise-agent-4.2.2.cisco.tar
Installing package 'bootflash:thousandeyes-enterprise-agent-4.2.2.cisco.tar' for 'ASR1k_TE'. Use 'show app-hosting list' for progress.
Router#show app-hosting list
App id                                   State
---------------------------------------------------------
ASR1k_TE                                 RUNNING
Catalyst 8K Dockerのインストール
Catalyst 8200 の設定
ステップ 1:
Thousandeyes-enterprise-agent-x.x.x.cisco.tarのWebサイトからエージェント.tarファイルをダウンロードします。
ステップ 2
.tarファイルをデバイスのハードディスクにコピーします。
C8200k#dir harddisk:thousandeyes-enterprise-agent-4.3.0.cisco.tar
Directory of harddisk:/thousandeyes-enterprise-agent-4.3.0.cisco.tar

12      -rw-        123064320  Nov 12 2022 21:35:06 +00:00  thousandeyes-enterprise-agent-4.3.0.cisco.tar

15239921664 bytes total (14280880128 bytes free)
C8200k#
ステップ 3
ioxコマンドを使用してルータでIOxデーモンを有効にし、サービスステータスを検証します。
C8200k(config)#iox
*Nov 12 21:46:51.539: %UICFGEXP-6-SERVER_NOTIFIED_START: R0/0: psd: Server iox has been notified to start
*Nov 12 21:46:52.443: %SYS-5-CONFIG_I: Configured from console by console
*Nov 12 21:47:13.866: %IM-6-IOX_ENABLEMENT: R0/0: ioxman: IOX is ready.

C8200k#show iox-service
IOx Infrastructure Summary:
---------------------------
IOx service (CAF)              : Running
IOx service (HA)               : Not Supported
IOx service (IOxman)           : Running
IOx service (Sec storage)      : Not Supported
Libvirtd 5.5.0                 : Running
ステップ 4
プラットフォームリソースをapp-heavyに設定します。 設定変更を保存して、シャーシをリロードします。
C8200k(config)#platform resource service-plane-heavy
C8200k(config)#end
C8200k#wr
C8200k#reload
ステップ 5
仮想ポートインターフェイスを設定します。
interface virtualportgroup 0
ip address 192.168.2.254 255.255.255.0
exit
ステップ 6
アプリケーションホスティング用にVNICを設定します。
C8200k(config)#app-hosting appid TEcat8k
C8200k(config-app-hosting)#app-vnic gateway1 virtualportgroup 0 guest-interface 0
C8200k(config-app-hosting-gateway1)#guest-ipaddress 192.168.2.10 netmask 255.255.255.0
C8200k(config-app-hosting-gateway1)#exit
C8200k(config-app-hosting)#app-default-gateway 192.168.2.254 guest-interface 0
C8200k(config)#app-hosting appid TEcat8k
C8200k(config-app-hosting)#app-resource docker
C8200k(config-app-hosting-docker)#prepend-pkg-opts
C8200k(config-app-hosting-docker)#run-opts 1 "-e TEAGENT_ACCOUNT_TOKEN=xxxxxxxxxxxxxxxxxxxx"
C8200k(config-app-hosting-docker)#run-opts 2 "--hostname TEcat8k"
C8200k(config-app-hosting)#name-server0 8.8.8.8
C8200k(config-app-hosting)#end
ステップ 7
引用したアプリIDのアプリケーションホスティングをアクティブにします。
C8200k(config)#app-hosting appid TEcat8k
C8200k(config-app-hosting)#start
ステップ 8
ThousandEyesエージェントをインストールし、実行されていることを確認します。
C8200k#app-hosting install appid TEcat8k package harddisk:thousandeyes-enterprise-agent-4.3.0.cisco.tar
Installing package 'harddisk:thousandeyes-enterprise-agent-4.3.0.cisco.tar' for 'TEcat8k'. Use 'show app-hosting list' for progress.

*Jan 21 21:30:17.194: %IM-6-INSTALL_MSG: R0/0: ioxman: app-hosting: Install succeeded: TEcat8k installed successfully Current state is DEPLOYED
*Jan 21 21:30:41.019: %IM-6-START_MSG: R0/0: ioxman: app-hosting: Start succeeded: TEcat8k started successfully Current state is RUNNING

C8200k#show app-hosting list
App id                                   State
---------------------------------------------------------
TEcat8k                                  RUNNING
Catalyst 8300 の設定
ステップ 1:
Thousandeyes-enterprise-agent-x.x.x.cisco.tarのWebサイトからエージェント.tarファイルをダウンロードします。
ステップ 2
.tarファイルをデバイスのハードディスクにコピーします。
Router#dir harddisk:thousandeyes-enterprise-agent-4.2.2.cisco.tar
Directory of harddisk:/thousandeyes-enterprise-agent-4.2.2.cisco.tar

12 -rw- 186705920 Sep 14 2022 19:02:02 +00:00 thousandeyes-enterprise-agent-4.2.2.cisco.tar
ステップ 3
ioxコマンドを使用してルータでIOxデーモンを有効にし、サービスステータスを検証します。
Router(config)#iox
*Sep 5 17:48:31.952: %UICFGEXP-6-SERVER_NOTIFIED_START: R0/0: psd: Server iox has been notified to start
*Sep 5 17:48:40.953: %IM-6-IOX_ENABLEMENT: R0/0: ioxman: IOX is ready.
Router#show iox-service
IOx Infrastructure Summary:
---------------------------
IOx service (CAF)              : Running
IOx service (HA)               : Not Supported
IOx service (IOxman)           : Running
IOx service (Sec storage)      : Not Supported
Libvirtd 5.5.0                 : Running
ステップ 4
仮想ポートインターフェイスを設定します。
interface VirtualPortGroup1
ip address 192.168.2.254 255.255.255.0
no mop enabled
no mop sysid
end
ステップ 5
アプリケーションホスティング用にVNICを設定します。
Router(config)#app-hosting appid Cat8k_TE
Router(config-app-hosting)#app-vnic gateway1 virtualportgroup 1 guest-interface 1
Router(config-app-hosting-gateway1)#guest-ipaddress 192.168.2.1 netmask 255.255.255.0
Router(config-app-hosting)#app-default-gateway 192.168.2.254 guest-interface 1
Router(config-app-hosting)#app-resource docker
Router(config-app-hosting-docker)#prepend-pkg-opts
Router(config-app-hosting-docker)#run-opts 1 "--hostname C8k_TE"
Router(config-app-hosting-docker)#run-opts 2 "-e TEAGENT_ACCOUNT_TOKEN=xxxxxxxxxxxxxxxxxxxx"
Router(config-app-hosting)#name-server1 8.8.8.8
Router(config-app-hosting)#start
ステップ 6
アプリケーションを起動するようにstartコマンドを設定します。
Router(config)#app-hosting appid Cat8k_TE
Router(config-app-hosting)#start
ステップ 7
ThousandEyesエージェントをインストールし、展開されていることを確認します。
Router#app-hosting install appid TEcat8k package harddisk:thousandeyes-enterprise-agent-4.2.2.cisco.tar

Router#show app-hosting list
App id                                   State
---------------------------------------------------------
Cat8k_TE                                 DEPLOYED
Catalyst 8500Lの設定
ステップ 1:
Thousandeyes-enterprise-agent-x.x.x.cisco.tarのWebサイトからエージェント.tarファイルをダウンロードします。
ステップ 2
.tarファイルをデバイスのハードディスクにコピーします。
Router#dir harddisk:thousandeyes-enterprise-agent-4.2.2.cisco.tar
Directory of harddisk:/thousandeyes-enterprise-agent-4.2.2.cisco.tar

12 -rw- 186705920 Sep 14 2022 19:02:02 +00:00 thousandeyes-enterprise-agent-4.2.2.cisco.tar
ステップ 3
ioxコマンドを使用してルータでIOxデーモンを有効にし、サービスステータスを検証します。
Router#conf t
Enter configuration commands, one per line. End with CNTL/Z.
Router(config)#iox
Router(config)#end
*Sep 15 15:41:23.992: %UICFGEXP-6-SERVER_NOTIFIED_START: R0/0: psd: Server iox has been notified to startsh
*Sep 15 15:41:25.006: %SYS-5-CONFIG_I: Configured from console by console
*Sep 15 15:41:32.914: %IM-6-IOX_ENABLEMENT: R0/0: ioxman: IOX is ready.

Router#show iox-service

IOx Infrastructure Summary:
---------------------------
IOx service (CAF)              : Not Running
IOx service (HA)               : Not Supported
IOx service (IOxman)           : Not Running
IOx service (Sec storage)      : Not Supported
Libvirtd 5.5.0                 : Running
ステップ 4
仮想ポートインターフェイスを設定します。
interface VirtualPortGroup1
ip address 192.168.2.254 255.255.255.0
no mop enabled
no mop sysid
end
ステップ 5
アプリケーションホスティング用にVNICを設定します。
Router(config)#app-hosting appid Cat8500L_TE
Router(config-app-hosting)#app-vnic gateway0 virtualportgroup 0 guest-interface 0
Router(config-app-hosting-gateway0)#guest-ipaddress 192.168.2.1 netmask 255.255.255.0
Router(config-app-hosting-gateway0)#exit
Router(config-app-hosting)#guest-gateway 192.168.2.254 guest-interface 0
Router(config-app-hosting)#app-resource docker
Router(config-app-hosting-docker)#prepend-pkg-opts
Router(config-app-hosting-docker)#run-opts 1 "--hostname Cat8500L_TE"
Router(config-app-hosting-docker)#run-opts 2 "-e TEAGENT_ACCOUNT_TOKEN=TEAGENT_ACCOUNT_TOKEN=xxxxxxxxxxxxxxxxxxxx"
Router(config-app-hosting)#name-server1 8.8.8.8
Router(config-app-hosting)#start
ステップ 6
プラットフォームリソースapp-heavyを設定します。次に、設定変更を保存して、シャーシをリロードします。
Router(config)#platform resource app-heavy
Please reboot to activate this template
Router(config)#exit
Router#wr
Router#reload
ステップ 7
ThousandEyesエージェントをインストールし、展開されていることを確認します。
Router#app-hosting install appid Cat8500L_TE package harddisk:thousandeyes-enterprise-agent-4.2.2.cisco.tar
Installing package 'harddisk:thousandeyes-enterprise-agent-4.2.2.cisco.tar' for 'Cat8500L_TE'. Use 'show app-hosting list' for progress.

Router#show app-hosting list
App id                                   State
---------------------------------------------------------
Cat8500L_TE                              DEPLOYED
| 注:NATはThousandEyeで使用できます。 |
仮想ポートインターフェイスは、NATの内部インターフェイスとして使用できます。
例:
Router(config)#ip nat inside source list NAT interface gi0/0/0 overload
Router(config)#ip access-list extended NAT
Router(config-ext-nacl)#permit ip 192.168.2.0 0.0.0.255 any

interface VirtualPortGroup1
description ThousandEyes
192.168.2.254 255.255.255.0
ip nat inside

interface GigabitEthernet0/0/0
description WAN interface
192.168.114.10 255.255.255.252
ip nat outside
更新履歴
| 改定 | 発行日 | コメント |
|---|---|---|
1.0 |
17-Apr-2023
|
初版 |
 フィードバック