
はじめに
このドキュメントでは、NK9でCLIを使用してTACACSのカスタマイズされたNexusロールを設定する方法について説明します。
前提条件
要 件
次の項目に関する知識があることが推奨されます。
- TACACS+
- ISE 3.2
使用するコンポーネント
このドキュメントの情報は、次のソフトウェアとハードウェアのバージョンに基づいています。
- Cisco Nexus9000、NXOSイメージファイル:bootflash:///nxos.9.3.5.bin
- Identity Service Engine(ISE)バージョン3.2
このドキュメントの情報は、特定のラボ環境にあるデバイスに基づいて作成されたものです。このドキュメントで使用するすべてのデバイスは、クリアな(デフォルト)設定で作業を開始しています。本稼働中のネットワークでは、各コマンドによって起こる可能性がある影響を十分確認してください。
バックグラウンド情報
ライセンス要件
Cisco NX-OS:TACACS+にはライセンスは必要ありません。
Cisco Identity Service Engine
新規ISEインストールの場合、すべてのISE機能にアクセスできる90日間の評価期間ライセンスがあります。評価ライセンスがない場合、ISE TACACS機能を使用するには、認証を実行するポリシーサーバノードのデバイス管理者ライセンスが必要です。
管理者/ヘルプデスクのユーザがNexusデバイスで認証された後、ISEは目的のNexusシェルロールを返します。
このロールを割り当てられたユーザは、基本的なトラブルシューティングを実行し、特定のポートをバウンスできます。
Nexusロールを取得するTACACSセッションは、次のコマンドとアクションだけを使用および実行できる必要があります。
- 1/1-1/21および1/25-1/30から、シャットダウンおよびno shut-onインターフェイスのみを実行するように端末を設定するためのアクセス権
- SSH
- ssh6
- telnet
- Telnet6
- トレースルート
- トレースルート6
- ping
- Ping6
- [Enable]
設定
ネットワーク図
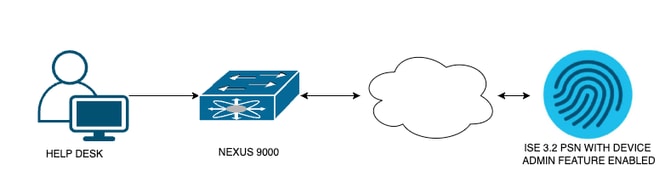 フローコンポーネント図
ステップ1:Nexus 9000の設定
1. AAAを設定します。

警告:TACACS認証を有効にすると、Nexusデバイスではローカル認証の使用が停止し、AAAサーバベース認証の使用が開始されます。
Nexus9000(config)# feature tacacs+
Nexus9000(config)# tacacs-server host <Your ISE IP> key 0 Nexus3xample
Nexus9000(config)# tacacs-server key 0 "Nexus3xample"
Nexus9000(config)# aaa group server tacacs+ IsePsnServers
Nexus9000(config-tacacs+)# server <Your ISE IP>
Nexus9000(config)# aaa authentication login default group IsePsnServers local
2. カスタマイズされたロールを、指定された要件で構成します。
Nexus9000(config)# role name helpdesk
Nexus9000(config-role)#   description Can perform basic Toubleshooting and bounce certain  ports
Nexus9000(config-role)# rule 1 permit read
Nexus9000(config-role)# rule 2 permit command enable *
Nexus9000(config-role)# rule 3 permit command ssh *
Nexus9000(config-role)# rule 4 permit command ssh6 *
Nexus9000(config-role)# rule 5 permit command ping *
Nexus9000(config-role)# rule 6 permit command ping6 *
Nexus9000(config-role)# rule 7 permit command telnet *
Nexus9000(config-role)# rule 8 permit command traceroute *
Nexus9000(config-role)# rule 9 permit command traceroute6 *
Nexus9000(config-role)# rule 10 permit command telnet6 *
Nexus9000(config-role)# rule 11 permit command config t ; interface * ; shutdown
Nexus9000(config-role)# rule 12 permit command config t ; interface * ; no shutdown

vlan policy deny
interface policy deny

Nexus9000(config-role-interface)#     permit interface Ethernet1/1
Nexus9000(config-role-interface)#     permit interface Ethernet1/2
Nexus9000(config-role-interface)#     permit interface Ethernet1/3
Nexus9000(config-role-interface)#     permit interface Ethernet1/4
Nexus9000(config-role-interface)#     permit interface Ethernet1/5
Nexus9000(config-role-interface)#     permit interface Ethernet1/6
Nexus9000(config-role-interface)#     permit interface Ethernet1/7
Nexus9000(config-role-interface)#     permit interface Ethernet1/8
Nexus9000(config-role-interface)#     permit interface Ethernet1/8
Nexus9000(config-role-interface)#     permit interface Ethernet1/9
Nexus9000(config-role-interface)#     permit interface Ethernet1/10
Nexus9000(config-role-interface)#     permit interface Ethernet1/11
Nexus9000(config-role-interface)#     permit interface Ethernet1/12
Nexus9000(config-role-interface)#     permit interface Ethernet1/13
Nexus9000(config-role-interface)#     permit interface Ethernet1/14
Nexus9000(config-role-interface)#     permit interface Ethernet1/15
Nexus9000(config-role-interface)#     permit interface Ethernet1/16
Nexus9000(config-role-interface)#     permit interface Ethernet1/17
Nexus9000(config-role-interface)#     permit interface Ethernet1/18
Nexus9000(config-role-interface)#     permit interface Ethernet1/19
Nexus9000(config-role-interface)#     permit interface Ethernet1/20
Nexus9000(config-role-interface)#     permit interface Ethernet1/21
Nexus9000(config-role-interface)#     permit interface Ethernet1/22
Nexus9000(config-role-interface)#     permit interface Ethernet1/25
Nexus9000(config-role-interface)#     permit interface Ethernet1/26
Nexus9000(config-role-interface)#     permit interface Ethernet1/27
Nexus9000(config-role-interface)#     permit interface Ethernet1/28
Nexus9000(config-role-interface)#     permit interface Ethernet1/29
Nexus9000(config-role-interface)#     permit interface Ethernet1/30

Nexus9000# copy running-config startup-config
[########################################] 100%
Copy complete, now saving to disk (please wait)...

Copy complete.
ステップ 2Identity Service Engine 3.2の設定
1. Nexus TACACSセッション中に使用されるIDを設定します。
ISEローカル認証が使用されます。
Administration > Identity Management > Groupsタブに移動し、ユーザが属する必要があるグループを作成します。このデモンストレーション用に作成されたIDグループはiseUsersです。
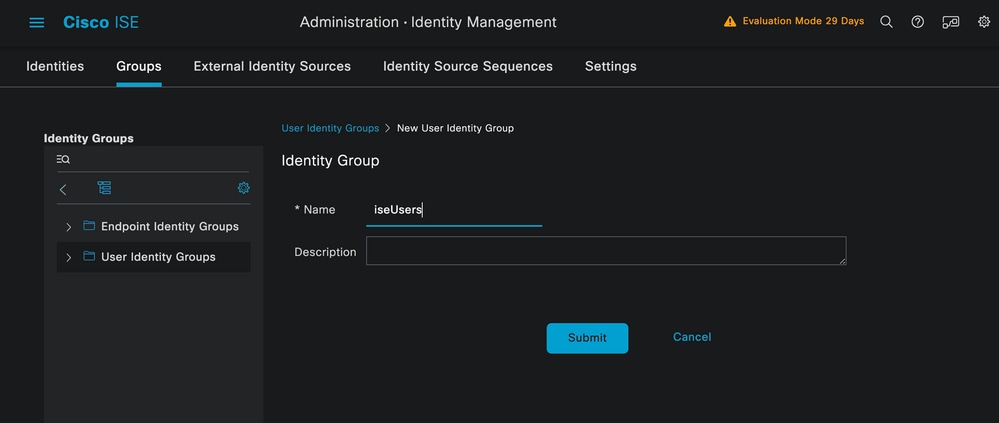 ユーザグループの作成
Submitボタンをクリックします。
次に、Administration > Identity Management > Identityタブに移動します。
[Add] ボタンをクリックします。
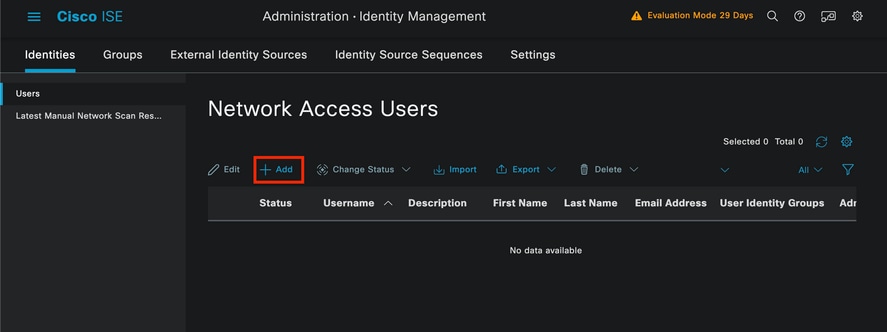 ユーザの作成
この例では、必須フィールドの一部として、ユーザ名で始めて、ユーザ名iseiscoolを使用しています。
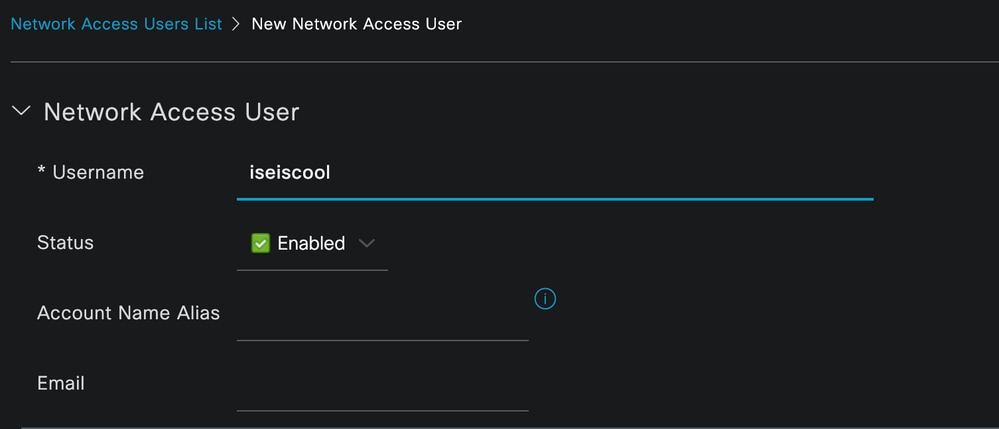 ユーザの命名と作成
次に、作成したユーザ名にパスワードを割り当てます。このデモンストレーションで使用するパスワードはVainillaISE97です。
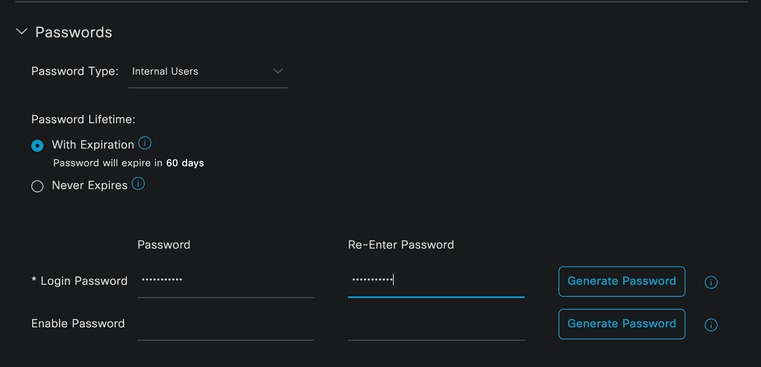 パスワードの割り当て
最後に、先に作成したグループ(この例ではiseUsers)にユーザを割り当てます。
 グループの割り当て
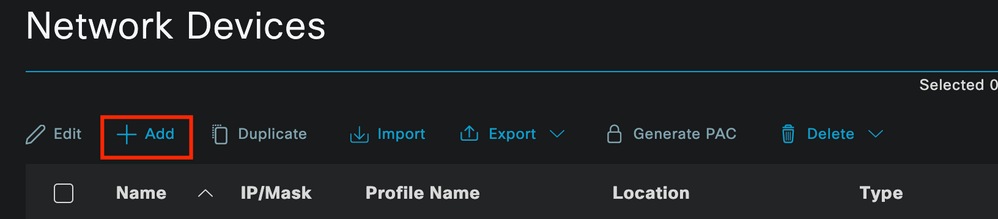
2. ネットワークデバイスを設定し、追加します。
ISEへのNEXUS 9000デバイスの追加:Administration > Network Resources > Network Devices
開始するにはAddボタンをクリックします。
 Network Access Deviceページ
フォームに値を入力し、作成するNADに名前を割り当て、NADがTACACSカンバセーションのためにISEと通信する元のIPを割り当てます。
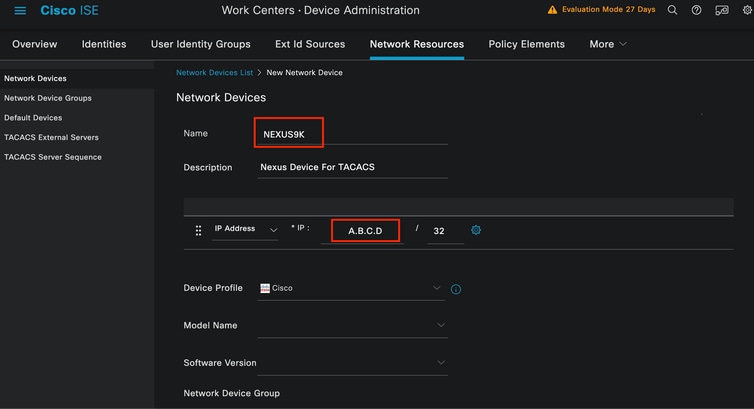 ネットワークデバイスの設定
ドロップダウンオプションは空白のままにすることも、省略することもできます。これらのオプションの目的は、NADを場所、デバイスタイプ、バージョンで分類し、これらのフィルタに基づいて認証フローを変更することです。
Administration > Network Resources > Network Devices > Your NAD > TACACS Authentication Settingsで、NAD設定で使用した共有秘密を追加します。このデモンストレーションでは、Nexus3exampleを使用します。
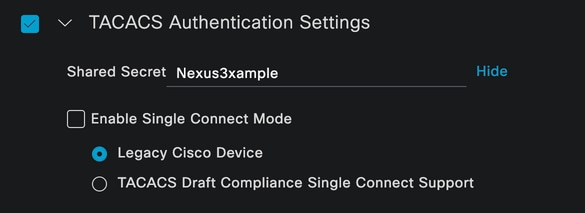 TACACS Configurationセクション
Submitボタンをクリックして、変更を保存します。
3. ISE上でTACACSを設定します。
Nexus 9000で設定したPSNでオプションDevice Adminが有効になっていることを再確認します。

注:Enable Device Admin Serviceを実行しても、ISEは再起動しません。
 PSNデバイス管理機能の確認
これは、ISEメニューのAdministration > System > Deployment > Your PSN > Policy Server section > Enable Device Admin Servicesで確認できます。
- TACACSプロファイルを作成します。認証が成功すると、Nexusデバイスに役割ヘルプデスクが返されます。
ISEメニューから、Workcenters > Device Administration > Policy Elements > Results > TACACS Profilesの順に移動し、Addボタンをクリックします。
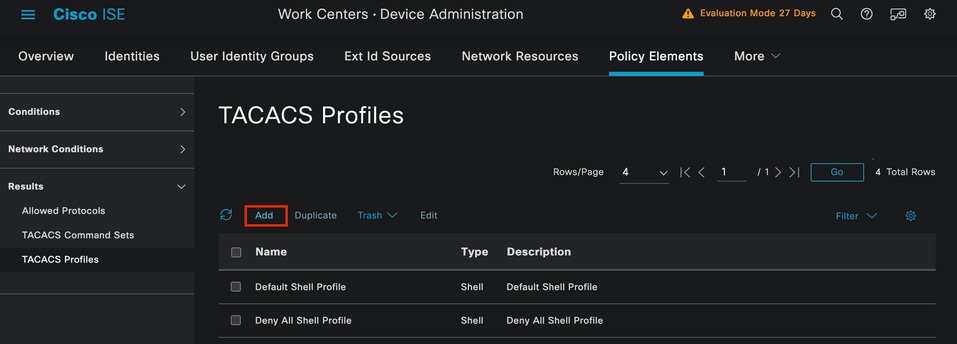 TACACSプロファイル
名前を割り当てます。オプションで説明も割り当てます。
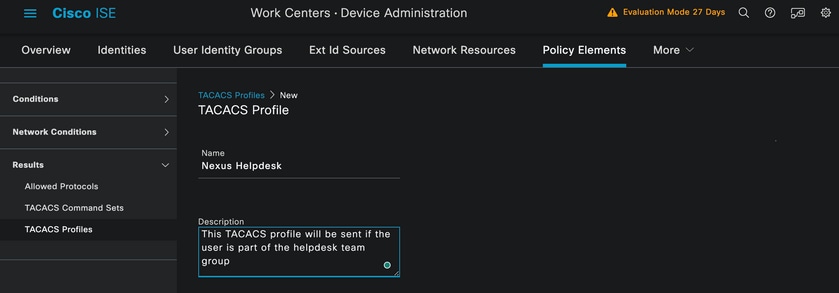 Tacacsプロファイルの命名
「タスク属性ビュー」セクションを無視し、「未加工ビュー」セクションに移動します。
shell:roles="helpdesk"と入力します。
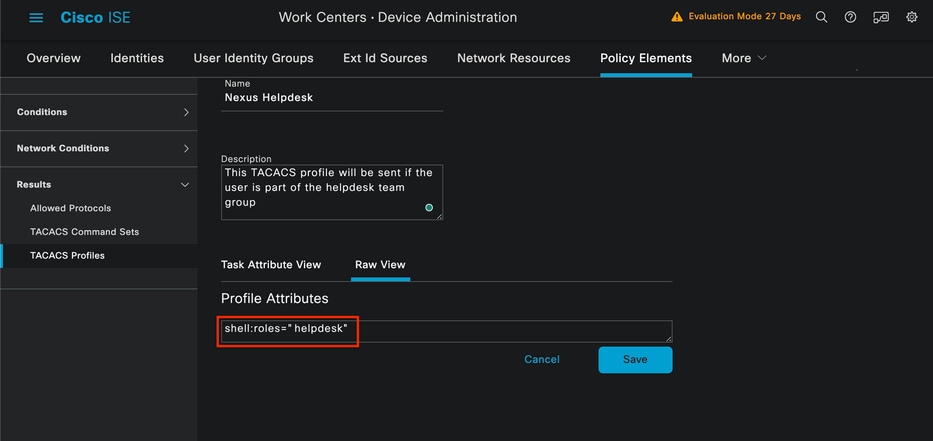 プロファイル属性の追加
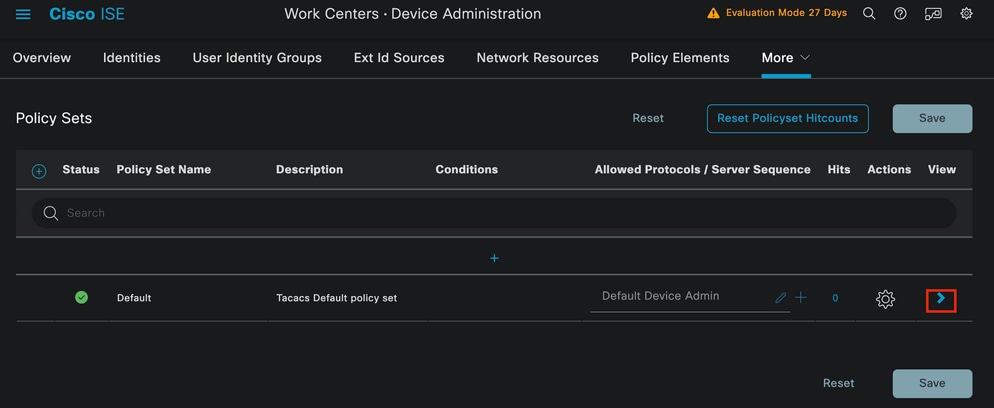
認証ポリシーと認可ポリシーを含むポリシーセットを設定します。
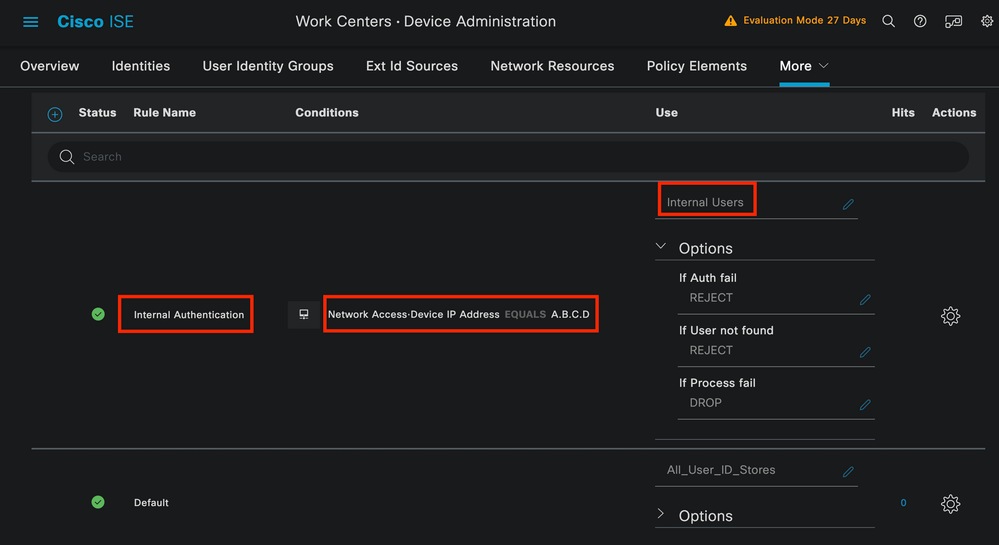
ISEメニューで、Work Centers > Device Administration > Device Admin Policy Setsにアクセスします。
デモ目的では、デフォルトポリシーセットが使用されます。ただし、特定のシナリオに一致する条件を持つ別のポリシーセットを作成できます。
行の最後にある矢印をクリックします。
 Device Admin Policy Setsページ
ポリシーセット設定が表示されたら、下にスクロールしてAuthentication Policyセクションを展開します。
Addアイコンをクリックします。
この設定例では、Nameの値がInternal Authenticationであり、選択された条件がネットワークデバイス(Nexus)のIPです(A.B.C.Dを置き換えます)。 この認証ポリシーでは、内部ユーザIDストアを使用します。
 認証ポリシー
条件がどのように設定されたかを次に示します。
Network Access > Device IP address Dictionary Attributeの順に選択します。
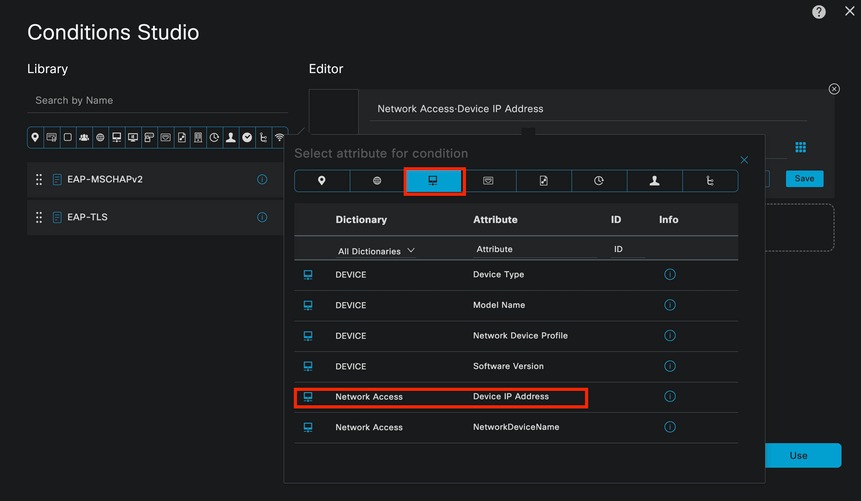 認証ポリシーの条件スタジオ
<Nexus IP address>コメントを正しいIPに置き換えてください。
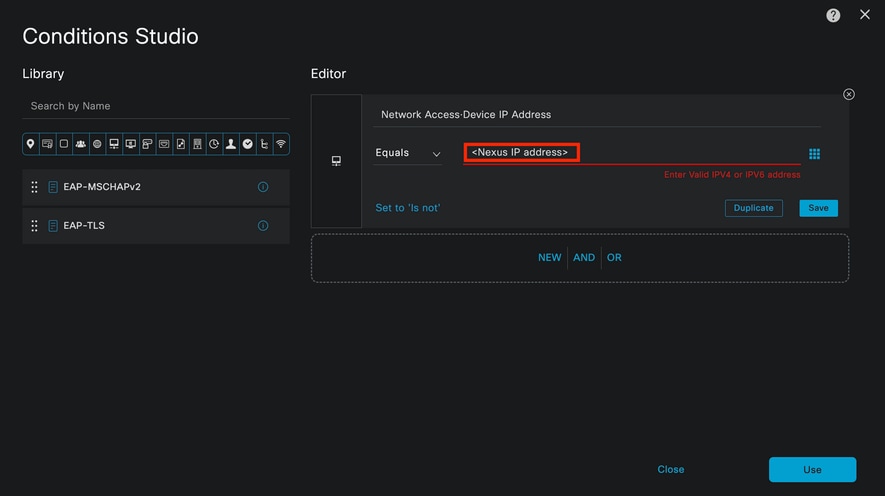 IPフィルタの追加
Useボタンをクリックします。
この状態は、設定したNexusデバイスにのみ該当します。ただし、大量のデバイスに対してこの条件を有効にする目的がある場合は、別の条件を検討してください。
次に、Authorization Policyセクションに移動して、これを展開します。
+(プラス)アイコンをクリックします。
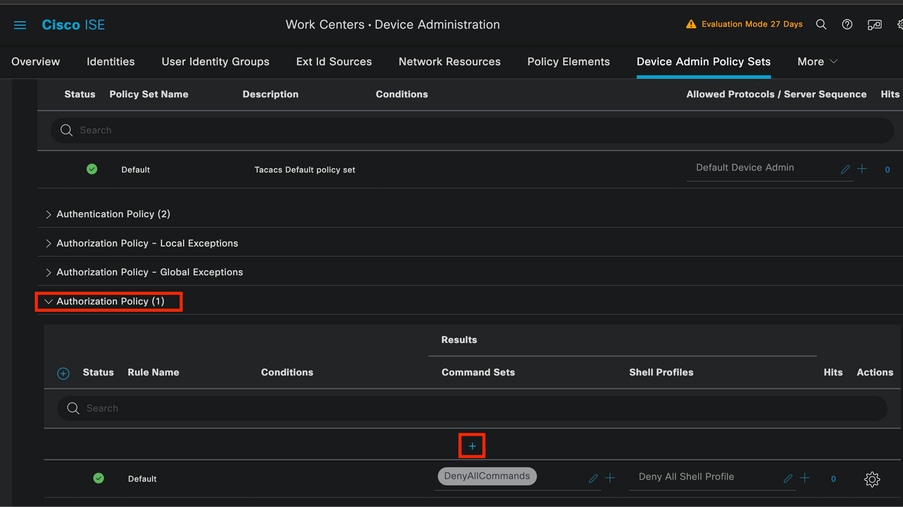 Authorization Policyセクション
この例では、認可ポリシーの名前としてNEXUS HELP DESKが使用されました。
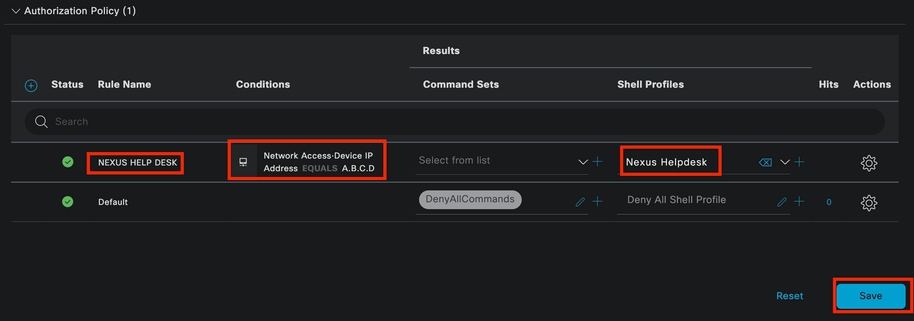 認可ポリシーの条件スタジオ
認証ポリシーで設定した条件と同じ条件が、認可ポリシーにも使用されます。
「シェルプロファイル」列で、Nexus Helpdeskが選択される前に設定されたプロファイル。
最後に、Saveボタンをクリックします。
確認
この項では、設定が正常に機能していることを確認します。
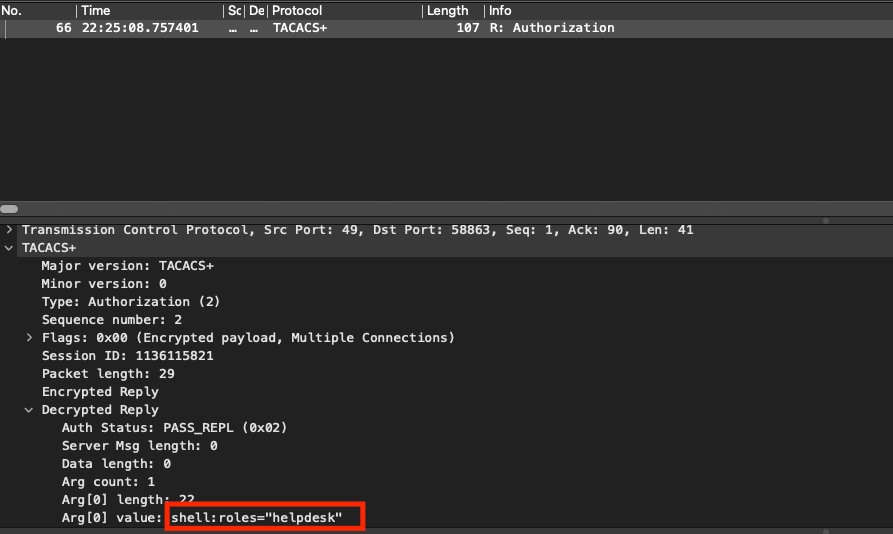
ISE GUIから、Operations > TACACS > Live Logsの順に移動します。 使用されるユーザ名と一致するレコードを特定し、許可イベントのライブログの詳細をクリックします。
 TACACSライブログ
このレポートに含まれる詳細の一部として、ISEが値shell:roles="helpdesk"を返した方法を確認できる「応答」セクションがあります。
 ライブログの詳細応答
Nexusデバイスで、次の手順を実行します。
Nexus9000 login: iseiscool
Password: VainillaISE97

Nexus9000# conf t
Enter configuration commands, one per line. End with CNTL/Z.
Nexus9000(config)# interface ethernet 1/23
% Interface permission denied

Nexus9000(config)# ?
  interface  Configure interfaces
  show       Show running system information
  end        Go to exec mode
  exit       Exit from command interpreter

Nexus9000(config)# role name test
% Permission denied for the role

Nexus9000(config)#

Nexus9000(config)# interface loopback 0
% Interface permission denied

Nexus9000(config)#
Nexus9000# conf t

Nexus9000(config)# interface ethernet 1/5
Notice that only the commands allowed are listed.
Nexus9000(config-if)# ?

  no        Negate a command or set its defaults
  show      Show running system information
  shutdown  Enable/disable an interface
  end       Go to exec mode
  exit      Exit from command interpreter

Nexus9000(config-if)# cdp
Nexus9000(config-if)# cdp enable
% Permission denied for the role
Nexus9000(config-if)#
トラブルシュート
- ISEがNexusデバイスから到達可能であることを確認します。
Nexus9000# ping <Your ISE IP>
PING <Your ISE IP>(<Your ISE IP> 😞 56データバイト
<Your ISE IP>からの64バイト:icmp_seq=0 ttl=59 time=1.22ミリ秒
<Your ISE IP>からの64バイト:icmp_seq=1 ttl=59 time=0.739ミリ秒
64バイトを<Your ISE IP>から: icmp_seq=2 ttl=59 time=0.686ミリ秒
64バイトを<Your ISE IP>から: icmp_seq=3 ttl=59 time=0.71ミリ秒
64バイトを<Your ISE IP>から: icmp_seq=4 ttl=59 time=0.72ミリ秒
- ISEとNexusデバイスの間でポート49が開いていることを確認します。
Nexus9000# telnet <Your ISE IP> 49
<Your ISE IP>を試行しています…
<Your ISE IP>に接続
Escape character is '^]'. - 次のデバッグを使用します。
debug tacacs+ all(オプション)
Nexus9000番号
Nexus9000# 2024 Apr 19 22:50:44.199329 tacacs: event_loop(): calling process_rd_fd_set
2024年4月19日22:50:44.199355 tacacs: process_rd_fd_set: calling callback for fd 6
2024年4月19日22:50:44.199392 tacacs: fsrv didnt consume 8421 opcode
2024年4月19日22:50:44.199406 tacacs: process_implicit_cfs_session_start: entering...
2024年4月19日22:50:44.199414 tacacs: process_implicit_cfs_session_start: exiting; we are in distribution disabled state
2024年4月19日22:50:44.199424 tacacs: process_aaa_tplus_request: entering for aaa session id 0
2024年4月19日22:50:44.199438 tacacs: process_aaa_tplus_request:Checking for state of mgmt0 port with servergroup IsePsnServers
2024年4月19日22:50:44.199451 tacacs: tacacs_global_config(4220): entering ...
2024年4月19日22:50:44.199466 tacacs: tacacs_global_config(4577): GET_REQ...
2024年4月19日22:50:44.208027 tacacs: tacacs_global_config(4701): got back the return value of global Protocol configuration operation:SUCCESS
2024年4月19日22:50:44.208045 tacacs: tacacs_global_config(4716): REQ:num server 0
2024年4月19日22:50:44.208054 tacacs: tacacs_global_config: REQ:num group 1
2024年4月19日22:50:44.208062 tacacs: tacacs_global_config: REQ:num timeout 5
2024年4月19日22:50:44.208070 tacacs: tacacs_global_config: REQ:num deadtime 0
2024年4月19日22:50:44.208078 tacacs: tacacs_global_config: REQ:num encryption_type 7
2024年4月19日22:50:44.208086 tacacs: tacacs_global_config: retval 0を返す
2024年4月19日22:50:44.208098 tacacs: process_aaa_tplus_request:group_info is populated in aaa_req, so Using servergroup IsePsnServers
2024年4月19日22:50:44.208108 tacacs: tacacs_servergroup_config: entering for server group, index 0
2024年4月19日22:50:44.208117 tacacs: tacacs_servergroup_config: GETNEXT_REQ for Protocol server group index:0 name:
2024年4月19日22:50:44.208148 tacacs: tacacs_pss2_move2key: rcode = 40480003 syserr2str = no such pss key
2024年4月19日22:50:44.208160 tacacs: tacacs_pss2_move2key: calling pss2_getkey
2024年4月19日22:50:44.208171 tacacs: tacacs_servergroup_config: GETNEXT_REQ got Protocol server group index:2 name:IsePsnServers
2024年4月19日22:50:44.208184 tacacs: tacacs_servergroup_config: got back the return value of Protocol group operation:SUCCESS
2024年4月19日22:50:44.208194 tacacs: tacacs_servergroup_config:プロトコル・サーバ・グループ:IsePsnServersのretval 0を返す
2024年4月19日22:50:44.208210 tacacs: process_aaa_tplus_request: Group IsePsnServers found.対応するvrfはデフォルト、source-intfは0です
2024年4月19日22:50:44.208224 tacacs: process_aaa_tplus_request: checking for mgmt0 vrf:management against vrf:default of requested group
2024年4月19日22:50:44.208256 tacacs: process_aaa_tplus_request:mgmt_if 83886080
2024年4月19日22:50:44.208272 tacacs: process_aaa_tplus_request:global_src_intf : 0, local src_intf is 0 and vrf_name is default
2024年4月19日22:50:44.208286 tacacs: create_tplus_req_state_machine(902): enter for aaa session id 0
2024年4月19日22:50:44.208295 tacacs:ステートマシンカウント0
2024年4月19日22:50:44.208307 tacacs: init_tplus_req_state_machine: entering for aaa session id 0
2024年4月19日22:50:44.208317 tacacs: init_tplus_req_state_machine(1298):tplus_ctx is NULL it should be if author and test
2024年4月19日22:50:44.208327 tacacs: tacacs_servergroup_config:サーバgroupIsePsnServers、インデックス0に対して入力
2024年4月19日22:50:44.208339 tacacs: tacacs_servergroup_config: GET_REQ for Protocol server group index:0 name:IsePsnServers
2024年4月19日22:50:44.208357 tacacs: find_tacacs_servergroup: entering for server group IsePsnServers
2024年4月19日22:50:44.208372 tacacs: tacacs_pss2_move2key: rcode = 0 syserr2str = SUCCESS
2024年4月19日22:50:44.208382 tacacs: find_tacacs_servergroup: exiting for server group IsePsnServers index is 2
2024年4月19日22:50:44.208401 tacacs: tacacs_servergroup_config: GET_REQ: find_tacacs_servergroup error 0 for Protocol server group IsePsnServers
2024年4月19日22:50:44.208420 tacacs: tacacs_pss2_move2key: rcode = 0 syserr2str = SUCCESS
2024年4月19日22:50:44.208433 tacacs: tacacs_servergroup_config: GET_REQ got Protocol server group index:2 name:IsePsnServers
2024 A2024 4月19日22:52024 4月19日22:52024 4月19日22:5
Nexus9000番号
- パケットキャプチャを実行します。(パケットの詳細を表示するには、Wireshark TACACS+の設定を変更し、NexusとISEで使用される共有キーを更新する必要があります)。
 TACACS許可パケット
- 共有キーがISE側とNexus側で同じであることを確認します。これはWiresharkでも確認できます。
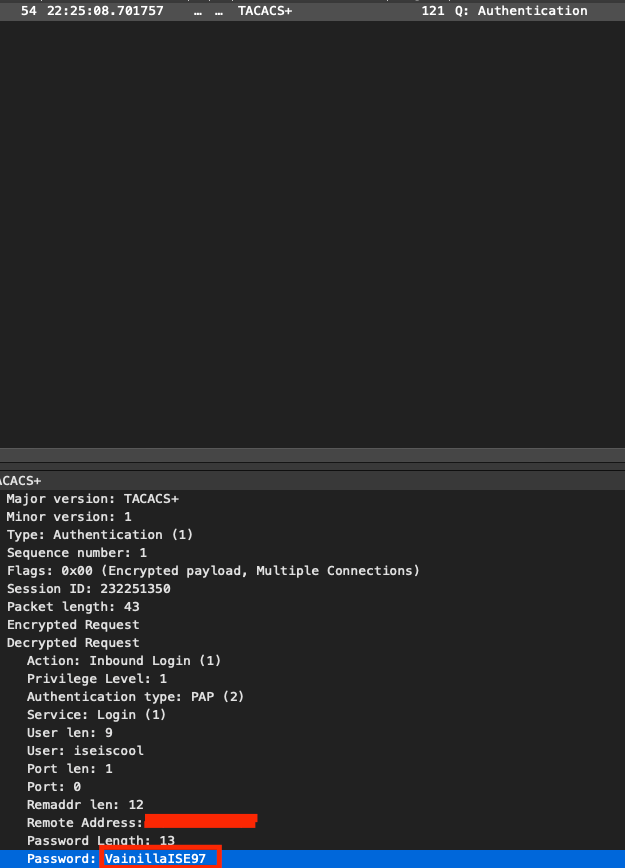 認証パケット
更新履歴
| 改定 | 発行日 | コメント |
|---|---|---|
1.0 |
March 26, 2026
|
初版 |