Procedura per la re-imaging dei nodi del dashboard Cisco Nexus tramite un server HTTP
Opzioni per il download
Linguaggio senza pregiudizi
La documentazione per questo prodotto è stata redatta cercando di utilizzare un linguaggio senza pregiudizi. Ai fini di questa documentazione, per linguaggio senza di pregiudizi si intende un linguaggio che non implica discriminazioni basate su età, disabilità, genere, identità razziale, identità etnica, orientamento sessuale, status socioeconomico e intersezionalità. Le eventuali eccezioni possono dipendere dal linguaggio codificato nelle interfacce utente del software del prodotto, dal linguaggio utilizzato nella documentazione RFP o dal linguaggio utilizzato in prodotti di terze parti a cui si fa riferimento. Scopri di più sul modo in cui Cisco utilizza il linguaggio inclusivo.
Informazioni su questa traduzione
Cisco ha tradotto questo documento utilizzando una combinazione di tecnologie automatiche e umane per offrire ai nostri utenti in tutto il mondo contenuti di supporto nella propria lingua. Si noti che anche la migliore traduzione automatica non sarà mai accurata come quella fornita da un traduttore professionista. Cisco Systems, Inc. non si assume alcuna responsabilità per l’accuratezza di queste traduzioni e consiglia di consultare sempre il documento originale in inglese (disponibile al link fornito).
Introduzione
In questo documento viene descritta la procedura per ricreare l'immagine dei nodi Cisco Nexus Dashboard utilizzando un server HTTP e vengono fornite linee guida chiare e dettagliate per assicurare la creazione di nuove immagini standardizzate ed efficienti dei nodi tramite la distribuzione remota di immagini ospitate dal protocollo HTTP.
Prerequisiti
- Cisco Integrated Management Controller (CIMC) deve essere configurato con l'indirizzo IP OOB.
- Controllare le note di rilascio di Nexus Dashboard e confermare a quale immagine software di Nexus Dashboard è necessario ricreare l'immagine.
- Ottenere un'immagine software da software.cisco.com.
- Verificare che il checksum MD5 dell'immagine corrisponda a quello pubblicato su Cisco.com.
- Caricare l'immagine Nexus Dashboard sul server HTTP.
- Il server HTTP deve essere raggiungibile dall'interfaccia di gestione CIMC. Per verificare questa raggiungibilità, è possibile usare la GUI o la CLI di CIMC.
Componenti usati
Il documento può essere consultato per tutte le versioni software o hardware.
Le informazioni discusse in questo documento fanno riferimento a dispositivi usati in uno specifico ambiente di emulazione. Su tutti i dispositivi menzionati nel documento la configurazione è stata ripristinata ai valori predefiniti. Se la rete è operativa, valutare attentamente eventuali conseguenze derivanti dall'uso dei comandi.
Premesse
Quando un nodo Cisco Nexus Dashboard ha esito negativo a causa di danneggiamento del sistema, aggiornamenti non supportati o GUI inaccessibile, gli amministratori possono ricreare l'immagine del nodo utilizzando un ISO ospitato su un server HTTP. Il processo prevede il download dell'ISO Nexus Dashboard, l'hosting su un server Web e l'utilizzo di CIMC (Cisco Integrated Management Controller) per mappare e avviare l'ISO tramite HTTP. Ciò consente il ripristino o la reinstallazione efficiente di nodi remoti come parte del ripristino del cluster.
Soluzione
Per eseguire il re-imaging ND tramite un server HTTP, sono necessari i passi riportati di seguito.
Passaggio 1. Scaricare il firmware dal sito Web di Cisco.
Aprire software.cisco.com/download.
Passaggio 2. Accedere all'interfaccia di Nexus Dashboard e selezionare la versione del software appropriata, ad esempio 3.2(2m), dalle opzioni di rilascio disponibili.
Ad esempio:
Passaggio 3. Copiare l'immagine ISO del software Nexus Dashboard sul server HTTP.
Esempio: http://x.x.x.x/iso/
Passaggio 4. SSH/Console su Cisco Integrated Management Controller.
- Da una finestra del terminale, accedere alla console CIMC.
# ssh admin@cimc_ip
Dove cimc_ip è l'indirizzo IP CIMC.
Ad esempio:
# ssh admin@x.x.x.x
admin@x.x.x.x's password:
system#
- Modificare l'ambito in supporto virtuale:
system# scope vmedia
system /vmedia #
-
Mappare l'immagine ISO al server HTTP.
system /vmedia # map-www volume_name http://http_server_ip_and_path iso_file_name
Dove:
-
nome_volume è il nome del volume.
-
http_server_ip_and_path è l'indirizzo IP del server HTTP e il percorso del file ISO.
-
nomefile_iso è il nome del file iso.
Ad esempio:
Nota: Tra http_server_ip_and_path e iso_filename è presente uno spazio.
system /vmedia # map-www apic http://x.x.x.x/iso/ nd-dk9.3.2.2m.iso
Server username: admin
Server password:
Confirm password:
Nota: Immettere le credenziali e premere Invio.
-
Controllare lo stato del mapping:
 system /vmedia # show mappings detail

The Map-Status must be shown as OK.

For Example:

system /vmedia # show mappings detail
Volume apic:
    Map-Status: OK
    Drive-Type: CD
    Remote-Share: http://x.x.x.x/iso/

    Remote-File:nd-dk9.3.2.2m.iso
    Mount-Type: www
    Mount-Options: noauto,username=admin,password=********3
    system /vmedia #
Se il mapping non riesce o si verifica un errore durante il mapping, è possibile utilizzare il comando unmap per rimuovere il mapping esistente e quindi ritentare il mapping.
Server # scope vmedia
Server /vmedia # show mappings
Volume  Map-status   Drive-type     remote-share        remote-file                mount-type
------  ----------  ------------  ------------------- -------------------        -----------
Huu     OK           removable    http://x.x.x.x/ rhel-server-6.1-x86_6.iso      www
Server /vmedia # unmap Huu
Server /vmedia # show mappings
Volume  Map-status   Drive-type     remote-share        remote-file                mount-type
------  ----------  ------------  ------------------- -------------------        -----------
-
Connetti a SOL per monitorare il processo di installazione:
system /vmedia # connect host
CISCO Serial Over LAN:
Press Ctrl+x to Exit the session
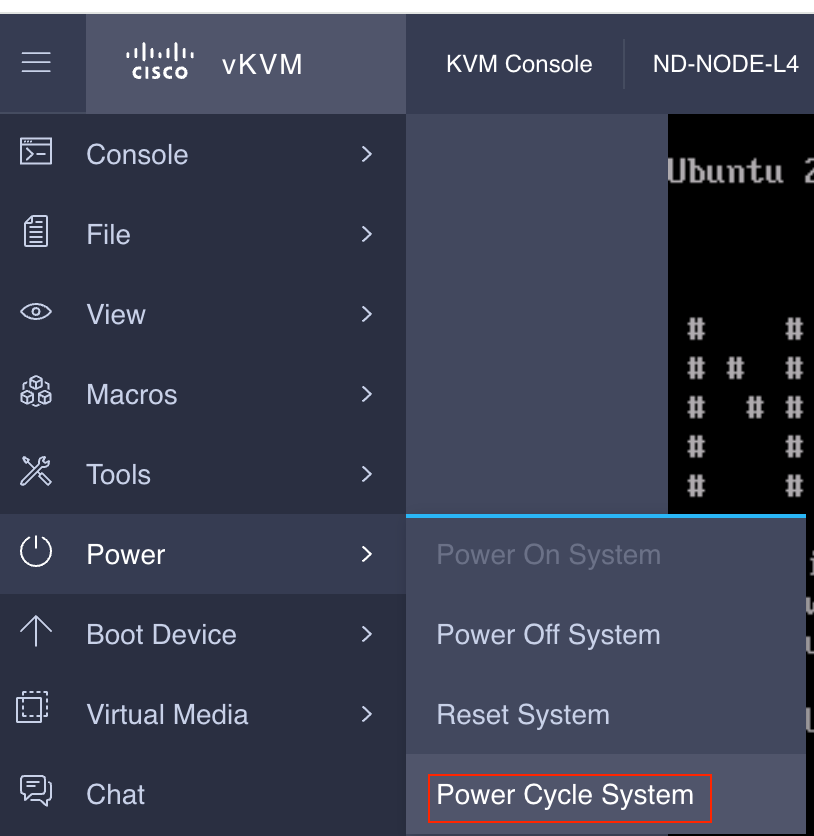
Passaggio 5. Spegnere e riaccendere la console KVM della GUI CIMC.
Choose Power > Power Cycle System (cold boot) to power cycle the controller.
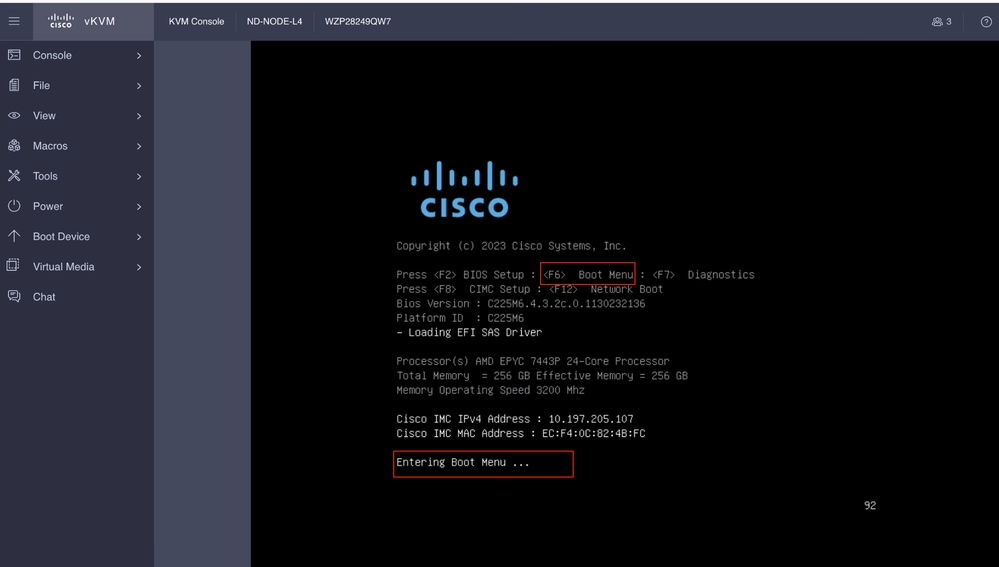
Dalla console SOL: Controllare lo schermo durante il processo di avvio e prepararsi a premere F6 al momento opportuno per accedere al menu di selezione di avvio.
Ad esempio:
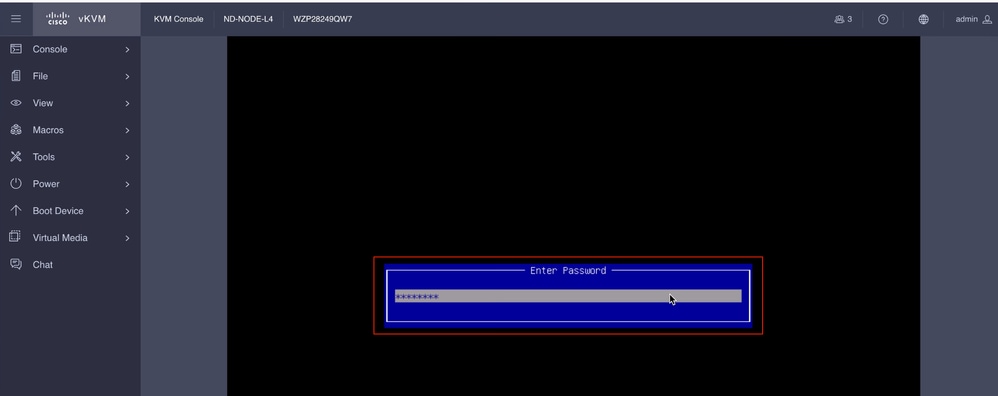
È inoltre possibile che sia necessario immettere la password del BIOS. La password predefinita è password.
Nel menu di selezione dell'avvio, selezionare l'opzione Cisco CIMC-Mapped vDVD2.00 come dispositivo di avvio singolo.
Passaggio 6. Tornare alla CLI di CIMC e monitorare l'output di Connect Host.
Monitorare la cli CIMC, quando viene visualizzato il messaggio Per accelerare l'installazione, immettere l'URL iso tra dieci minuti, quindi l'URL del server http con l'immagine del dashboard Nexus.
Boot000A* UEFI: Cisco CIMC-Mapped vDVD2.00 PciRoot(0x1)/Pci(0x8,0x1)/Pci(0x0,0x3)/USB(1,0)/USB(2,0)/Unit(3)/CDROM(1,0x35,0x5597ed)..BO'
+ return 1
+ '[' -n '' ']'
++ mount
++ grep /run/install/repo
++ cut -f 1 -d ' '
++ tr -d '[:digit:]'
++ true
+ usbdevice=
+ mkdir /mnt/usbdata
+ '[' -n '' ']'
+ '[' true = true ']'
+ read_iso_url
+ dmesg --console-off
+ true
+ echo 'To speed up the install, enter iso url. Type '\''skip'\'' to use local media:'
To speed up the install, enter iso url. Type 'skip' to use local media:
+ echo ' Either http://server/path/to/file or nfs:server:/path/to/file are supported'
Either http://server/path/to/file or nfs:server:/path/to/file are supported
+ read -r -p '? ' url

 http://x.x.x.x197.204.4/iso/DCApps/ND/nd-dk9.3.2.1i.iso << Enter the http server details  >>
+ '[' http://x.x.x.x197.204.4/iso/DCApps/ND/nd-dk9.3.2.1i.iso = skip ']'
+ '[' http://x.x.x.x197.204.4/iso/DCApps/ND/nd-dk9.3.2.1i.iso = '' ']'
+ '[' http = nfs: ']'
+ echo http://x.x.x.x197.204.4/iso/DCApps/ND/nd-dk9.3.2.1i.iso
+ grep -q '\[.*\]'
++ awk -F '/|:' '{print $4}'
+ urlip=x.x.x.x197.204.4
+ '[' -z x.x.x.x197.204.4 ']'
+ break
+ dmesg --console-on
+ '[' -n http://x.x.x.x197.204.4/iso/DCApps/ND/nd-dk9.3.2.1i.iso ']'
+ '[' http://x.x.x.x197.204.4/iso/DCApps/ND/nd-dk9.3.2.1i.iso '!=' skip ']'
+ dmesg --console-of
Passaggio 7. Dopo aver immesso l'URL HTTP, il processo di avvio continuerà.
Nota: Selezionare l'opzione static, verrà richiesto di immettere il nome dell'interfaccia, l'indirizzo IP di gestione e il gateway.
+ set +e
+ configured=0
+ interface=none
+ addr=none
+ gw=none
+ '[' 0 -eq 0 ']'
+ echo 'Configuring network interface'
Configuring network interface
+ echo 'type static, dhcp, bash for a shell to configure networking, or url to re-enter the url: '
type static, dhcp, bash for a shell to configure networking, or url to re-enter the url:
+ read -p '? ' ntype
? static << Enter the static  to configure the networking >>
+ case $ntype in
+ configure_static
+ '[' none '!=' none ']'
Nota: Dopo aver digitato l'interfaccia statica, questa verrà elencata nell'interfaccia CIMC e verrà selezionata l'interfaccia corretta. se è stata selezionata l'interfaccia errata, il pacchetto perderà il 100% e dopo tre tentativi di ping non riusciti verrà nuovamente richiesto di selezionare l'interfaccia corretta finché il valore di perdita del pacchetto sarà 0. Se non si è a conoscenza dell'interfaccia, selezionare l'interfaccia tutte una alla volta.
Ad esempio
+ echo 'Available interfaces'
Available interfaces
+ ls -l /sys/class/net
total 0
lrwxrwxrwx 1 root root 0 Aug 12 03:53 eno5 -> ../../devices/pci0000:40/0000:40:03.1/0000:46:00.0/0000:47:01.0/0000:49:00.0/0000:4a:00.0/0000:4b:00.0/net/eno5
lrwxrwxrwx 1 root root 0 Aug 12 03:53 eno6 -> ../../devices/pci0000:40/0000:40:03.1/0000:46:00.0/0000:47:01.0/0000:49:00.0/0000:4a:00.0/0000:4b:00.1/net/eno6
lrwxrwxrwx 1 root root 0 Aug 12 03:53 enp1s0f0 -> ../../devices/pci0000:00/0000:00:01.1/0000:01:00.0/net/enp1s0f0
lrwxrwxrwx 1 root root 0 Aug 12 03:53 enp1s0f1 -> ../../devices/pci0000:00/0000:00:01.1/0000:01:00.1/net/enp1s0f1
lrwxrwxrwx 1 root root 0 Aug 12 03:51 lo -> ../../devices/virtual/net/lo
+ read -p 'Interface to configure: ' interface
Interface to configure: enp1s0f0        <<  select the correct interface   >>
+ read -p 'address: ' addr
Nota: ND-NODE-L4 richiede nomi di interfaccia nel formato enp1s0fX, dove X è un identificatore numerico. SE-NODE-G2 richiede il formato enoX, dove X è un numero.
Passaggio 8. Controllo dell'interfaccia corretto.
Dopo aver immesso l'interfaccia, tenterà di eseguire il ping sul server http e, se l'interfaccia selezionata è corretta, il pacchetto perduto deve essere 0% e inizierà il recupero dell'immagine dal server http.
Ad esempio: Dopo aver inserito l'interfaccia corretta con perdita del pacchetto pari a 0%.
Interface to configure: enp1s0f0
+ read -p 'address: ' addr
address: x.x.x.x/24
+ read -p 'gateway: ' gw
gateway:x.x.x.x
+ ip addr add x.x.x.x/24 dev enp1s0f0
+ ip link set enp1s0f0 up
+ ip route add default via x.x.x.x
++ seq 1 6
+ for count in $(seq 1 6)
+ ping -c 1 x.x.x.x
PING x.x.x.x (x.x.x.x): 56 data bytes

---x.x.x.x ping statistics ---
1 packets transmitted, 0 packets received, 100% packet loss
+ sleep 20
+ for count in $(seq 1 6)
+ ping -c x.x.x.x
PING x.x.x.x (x.x.x.x): 56 data bytes
64 bytes from x.x.x.x : seq=0 ttl=63 time=0.512 ms

---x.x.x.x ping statistics ---
1 packets transmitted, 1 packets received, 0% packet loss
round-trip min/avg/max = 0.512/0.512/0.512 ms
+ configured=1
+ break
+ '[' 1 -eq 0 ']'
+ set -e
+ tmpiso=/tmp/cdrom.iso
+ echo 'Fetching http://x.x.x.x/iso/DCApps/ND/nd-dk9.3.2.2f.iso to /tmp/cdrom.iso'
Fetching http://x.x.x.x/iso/DCApps/ND/nd-dk9.3.2.2f.iso to /tmp/cdrom.iso >> started fetching the apic image from HTTP server
+ '[' http = nfs: ']'
+ download http://x.x.x.x/iso/DCApps/ND/nd-dk9.3.2.2f.iso /tmp/cdrom.iso
+ local url=http://x.x.x.x/iso/DCApps/ND/nd-dk9.3.2.2f.iso dest=/tmp/cdrom.iso tries=5
+ wget --server-response --no-check-certificate --tries=5 --progress=dot:mega --read-timeout=60 --output-document=/tmp/cdrom.iso.tmp http://x.x.x.x197.204.4/iso/DCApps/ND/nd-dk9.3.2.2f.iso
--2025-08-12 09:39:08-- http://x.x.x.x197.204.4/iso/DCApps/ND/nd-dk9.3.2.2f.iso
Connecting to x.x.x.x:80... connected.
HTTP request sent, awaiting response...
HTTP/1.1 200 OK
Date: Tue, 12 Aug 2025 09:39:09 GMT
Server: Apache/2.4.6 (CentOS) OpenSSL/1.0.2k-fips mod_wsgi/3.4 Python/2.7.5
Last-Modified: Tue, 10 Jun 2025 06:51:41 GMT
ETag: "2c66bd000-6373220f3b940"
Accept-Ranges: bytes
Content-Length: 11918888960
Keep-Alive: timeout=5, max=100
Connection: Keep-Alive
Content-Type: application/octet-stream
Length: 11918888960 (11G) [application/octet-stream]
Saving to: '/tmp/cdrom.iso.tmp'
Se è stata selezionata l'interfaccia errata, il pacchetto andrà perduto al 100% e, dopo tre tentativi di ping non riusciti, verrà chiesto di nuovo di selezionare l'interfaccia corretta.
Ad esempio: Dopo aver inserito l'interfaccia sbagliata con una perdita del 100%.
+ read -p 'Interface to configure: ' interface
Interface to configure: enp11s0
+ read -p 'address: ' addr
address: x.x.x.x/24
+ read -p 'gateway: ' gw
gateway: x.x.x.x
+ ip addr add x.x.x.x/24 dev enp11s0
+ ip link set enp11s0 up
+ ip route add default via x.x.x.x
++ seq 1 2
+ for count in '$(seq 1 2)'
+ ping -c 1 x.x.x.x
PING x.x.x.x (x.x.x.x) 56(84) bytes of data.
From x.x.x.x icmp_seq=1 Destination Host Unreachable

--- x.x.x.x ping statistics ---
1 packets transmitted, 0 received, +1 errors, 100% packet loss, time 0ms

+ sleep 20
+ for count in '$(seq 1 2)'
+ ping -c 1 x.x.x.x
PING x.x.x.x (x.x.x.x) 56(84) bytes of data.
From x.x.x.x icmp_seq=1 Destination Host Unreachable

--- x.x.x.x ping statistics ---
1 packets transmitted, 0 received, +1 errors, 100% packet loss, time 0ms

+ sleep 20
+ '[' 0 -eq 0 ']'
+ echo 'Configuring network interface'
Configuring network interface
+ echo 'type static, dhcp, bash for a shell to configure networking, or url to re-enter the url: ' <>
type static, dhcp, bash for a shell to configure networking, or url to re-enter the url:
+ read -p '? ' ntype
?
Monitorare la CLI di CIMC e attendere circa 40-50 min. , si otterrà il seguente output sulla CLI.
+ log 'Shutting down Atomix Installer'
+ echo 'Shutting down Atomix Installer'
Shutting down Atomix Installer
+ log 'reboot: Power down'
+ echo 'reboot: Power down'
reboot: Power down
+ sleep 5
+ poweroff
+ ec[  533.195532] sysrq: Emergency Sync
ho s
[  533.195563] sysrq: Emergency Sync
[  533.212106] sysrq: Emergency Sync
[  533.212117] sysrq: Emergency Remount R/O
[  533.212189] sysrq: Power Off
[  533.212226] kvm: exiting hardware virtualization
[  533.213874] EXT4-fs (sdf1): re-mounted. Opts: (null). Quota mode: none.
[  533.215431] sd 1:0:0:0: [sdf] Synchronizing SCSI cache
[  533.215749] EXT4-fs (dm-3): re-mounted. Opts: (null). Quota mode: none.
[  533.216395] EXT4-fs (dm-1): re-mounted. Opts: (null). Quota mode: none.
[  533.217221] EXT4-fs (sdf6): re-mounted. Opts: (null). Quota mode: none.
[  533.217689] EXT4-fs (sdf4): re-mounted. Opts: (null). Quota mode: none.
[  533.218965] Emergency Remount complete
[  533.218997] Emergency Sync complete
[  533.218997] Emergency Sync complete
[  533.219002] Emergency Sync complete
[  533.359024] sd 1:0:0:0: [sdf] Stopping disk
+ echo s
+ echo s
+ echo u
+ echo o
+ log 'Nap time'
+ echo 'Nap time'
Nap time
+ true
+ sleep 60
[  535.571545] megaraid_sas 0000:41:00.0: megasas_disable_intr_fusion is called outbound_intr_mask:0x40000009
[  535.692202] ACPI: PM: Preparing to enter system sleep state S5
[  535.706849] reboot: Power down
Passaggio 9. Esci da SOL dopo lo spegnimento
Attendere che venga visualizzato il messaggio poweroff nella console SOL, quindi uscire da SOL premendo Ctrl e x (Ctrl+x) ed eseguire nuovamente il login a CIMC e modificare nuovamente l'ambito.
(i) Change the scope to virtual media again:
system# scope vmedia
system /vmedia #
(ii) Unmap the .iso image that you mapped in 2.c:
 system /vmedia # unmap volume_name
 At the Save mapping prompt, enter yes if you want to save the mapping or no if you do not want to save the mapping. For example:
 system /vmedia # unmap apic
 Save mapping? Enther 'yes' or 'no' to confirm (CTRL-C to cancel) → yes
 system /vmedia #
(iii) Connect back to SOL again:
 system /vmedia #  connect host
Dopo lo spegnimento, è necessario riaccendere il sistema utilizzando lo switch KVM e quindi procedere con le fasi successive.
Fase x.x.x.x Configurazione del primo avvio
[  274.210045] nd_bootstrap.sh[2628]:   INFO[0174] bootDisk: found disk=/dev/sdf bootPart=/dev/sdf4 espPart=/dev/sdf3
[  274.224041] nd_bootstrap.sh[2628]:   INFO[0174] boot devices/filesystems have been mounted
[  274.236038] nd_bootstrap.sh[2628]:   INFO[0174] |12231-start| ["expand-stub.bash" "/boot/efi/EFI/atx-current/kernel.efi"]
[  274.251228] nd_bootstrap.sh[2628]:   INFO[0174] |12231-out  | 21870+1 records in
[  274.262061] nd_bootstrap.sh[2628]:   INFO[0174] |12231-out  | 21870+1 records out
[  274.272065] nd_bootstrap.sh[2628]:   INFO[0174] |12231-out  | 11197856 bytes (11 MB, 11 MiB) copied, 0.0716082 s, 156 MB/s
[  274.287060] nd_bootstrap.sh[2628]:   INFO[0174] |12231-out  | 0+1 records in
[  274.297060] nd_bootstrap.sh[2628]:   INFO[0174] |12231-out  | 0+1 records out
[  274.307049] nd_bootstrap.sh[2628]:   INFO[0174] |12231-out  | 187 bytes copied, 7.2325e-05 s, 2.6 MB/s
[  274.566030] nd_bootstrap.sh[2628]:   INFO[0175] |12231-out  | 102375+1 records in
[  274.576055] nd_bootstrap.sh[2628]:   INFO[0175] |12231-out  | 102375+1 records out
[  274.588059] nd_bootstrap.sh[2628]:   INFO[0175] |12231-out  | 52416297 bytes (52 MB, 50 MiB) copied, 0.329377 s, 159 MB/s
[  274.604075] nd_bootstrap.sh[2628]:   INFO[0175] |12231-out  | 0+1 records in
[  OK  ] Finished atomix-boot-setup.
[  274.615055] nd_bootstrap.sh[2628]:   INFO[0175] |12231-out  | 0+1 records out
Starting Initial cloud-init job (pre-networking)...
[  274.634046] nd_bootstrap.sh[2628]:   INFO[0175] |12231-out  | 82 bytes copied, 9.4287e-05 s, 870 kB/s
[  274.656064] nd_bootstrap.sh[2628]:   INFO[0175] |12231-exit | rc=0
[  274.666047] nd_bootstrap.sh[2628]:   INFO[0175] Boot()                    duration=175321
[  274.837851] cloud-init[12253]: Cloud-init v. 24.1.3-0ubuntu1~22.04.5 running 'init-local' at Tue, 12 Aug 2025 09:53:39 +0000. Up 274.82 seconds.
Press any key to run first-boot setup on this console...
Starting Nexus Dashboard setup utility
Welcome to Nexus Dashboard 3.2.2f
Press Enter to manually bootstrap your first master node..
Passaggio 11. Configurare la password amministratore e la rete di gestione dell'interfaccia di gestione di Nexus Dashboard
Starting Nexus Dashboard setup utility
Welcome to Nexus Dashboard 3.2.2f
Press Enter to manually bootstrap your first master node...

Admin Password:
Reenter Admin Password:
Management Network:
  IP Address/Mask: x.x.x.x/24
  Gateway: x.x.x.x
Reimmettere config?(y/N): N
System configured successfully
Initializing System on first boot. Please wait..
[  OK  ] Listening on Network Service Netlink Socket.
[  OK  ] Finished Initial cloud-init job (pre-networking).
[  OK  ] Reached target Preparation for Network.
         Starting Network Configuration...
[  OK  ] Started Network Configuration.
[  OK  ] Reached target Network.
Starting Wait for Network to be Configured...
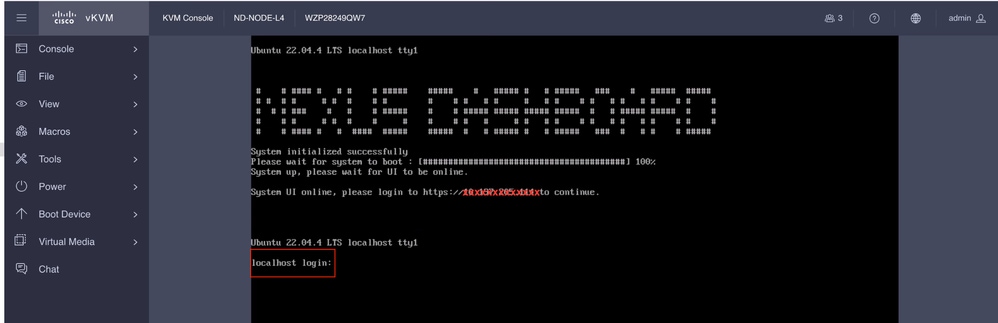
Passaggio 12. Il nodo del dashboard Nexus è pronto per l'accesso. È possibile accedere alla GUI ND utilizzando l'IP dell'interfaccia di gestione per il resto della configurazione
Da console:
Ubuntu 22.04.4 LTS localhost ttyS0

#    # #### #   # #    # #####    #####    #   ##### #   # #####   ###    #   #####  #####

# #  # #     # #  #    # #        #    # #   # #     #   # #    # #   # #   # #    # #    #

#  # # ###    #   #    # #####    #    # ##### ##### ##### #####  #   # ##### #####  #    #

#    # #     # #  #    #     #    #    # #   #     # #   # #    # #   # #   # #    # #    #

#    # #### #   #  ####  #####    #####  #   # ##### #   # #####   ###  #   # #    # #####
System initialized successfully
[  564.309561] cloud-init[12560]: Cloud-init v. 24.1.3-0ubuntu1~22.04.5 running 'modules:final' at Tue, 12 Aug 2025 09:58:28 +0000. Up 564.27 seconds.
ci-info: no authorized SSH keys fingerprints found for user ubuntu.
<14>Aug 12 09:58:29 cloud-init: #############################################################
<14>Aug 12 09:58:29 cloud-init: -----BEGIN SSH HOST KEY FINGERPRINTS-----
<14>Aug 12 09:58:29 cloud-init: 256 SHA256:vKu7Zj3MAP+vFOXaeW14HClEhAwrSpA9AqcUC4SZVlU root@localhost (ECDSA)
<14>Aug 12 09:58:29 cloud-init: 256 SHA256:I7eiUnQq6pZsoFPy+UxIUQ66jQOgHyG4zGuF6cAtSl0 root@localhost (ED25519)
<14>Aug 12 09:58:29 cloud-init: 3072 SHA256:SvodRIEgWzEAaQQdH2rlw0qLziBbv0e88VAGkt/ox14 root@localhost (RSA)
<14>Aug 12 09:58:29 cloud-init: -----END SSH HOST KEY FINGERPRINTS-----
<14>Aug 12 09:58:29 cloud-init: #############################################################

-----BEGIN SSH HOST KEY KEYS-----
ecdsa-sha2-nistp256 AAAAE2VjZHNhLXNoYTItbmlzdHAyNTYAAAAIbmlzdHAyNTYAAABBBBf9S1BXcR48cWcIKhvfjLGYufJgycGIf1Yx8OpRsk4e1I+y80J/x5dfX90h+3cwt9kjH8IubMpleK66mlW+xd0= root@localhost
ssh-ed25519 AAAAC3NzaC1lZDI1NTE5AAAAIGWTN7hoB2/dYSVA0gpV88FWh2iRD2hwJ2LMryhhhQHg root@localhost
ssh-rsa AAAAB3NzaC1yc2EAAAADAQABAAABgQCeM+In/dciDwCKEPLV/97oIA5pHHRBRf0Lij5NcUwzYAf9q/m/lUsdzv2zVYc4WAJd8uX9ZxDAGa9D358Tvxh/lKzBKqNQpQdAjyby6IGGui+UK9Mq1RVxoUkFtIIJ97IzaBoR9ScnucMXpu5mp5OAjws+VrUhKk1XNFAui1QgW507I0Xk+2AaR/W0rwJCQRsHx3orDxCwJkDQDiQQAf/SrvSnuAe/8pSuCuvscqPjZeIF7LnJ6dAms0XXrhbxRQ8c4q/Ud6RL2sKjinlZPfqsbVFSpjbJ9m4jtXvuGE5llyJbS1FcU8DsFbkY6HH9JQru49iXcd5mKt7fyPg0ypp7Hl+2g07mEcYlEMBXxNZw+HqNW27xp0ZkRfWO+Zl2t0s6DjM0LHWqV0wZLYqqBTlQIkhf2irM6mr7s2bVAcvEsuZzG9d7uY8aC/CR5GwkgKW8s4oI7m56ccdRPHV0qQFXnBybBToUInmIK+1fxtaUXYbQbQ83wxNOvG7O55gDsws= root@localhost
-----END SSH HOST KEY KEYS-----
[  564.364630] cloud-init[12560]: Cloud-init v. 24.1.3-0ubuntu1~22.04.5 finished at Tue, 12 Aug 2025 09:58:29 +0000. Datasource DataSourceAtomix [sources=/var/lib/cloud/seed/atomix][dsmode=net].  Up 564.36 seconds
Please wait for system to boot : [########################################] 100%
System up, please wait for UI to be online.
System UI online, please login to https://x.x.x.x to continue. << Access the Nexus Dashboard GUI via this URL >>
Ubuntu 22.04.4 LTS localhost ttyS0
localhost login:
Da KVM:
Cronologia delle revisioni
| Revisione | Data di pubblicazione | Commenti |
|---|---|---|
1.0 |
29-Aug-2025
|
Versione iniziale |
Contributo dei tecnici Cisco
- Shivam TripathiTAC
 Feedback