Introduction:
Ce document décrit comment dépanner les échecs de sauvegarde UCS Central causés par une incompatibilité de clé d'hôte SSH dans UCS Central version 2.0 et ultérieure.
Conditions préalables
Exigences:
Ce document suppose que vous avez des connaissances sur les sujets suivants :
- Cisco UCS Central
- Compréhension des commandes Linux de base.
Composants utilisés
- UCS Central version 2.1(1a)
The information in this document was created from the devices in a specific lab environment. All of the devices used in this document started with a cleared (default) configuration. Si votre réseau est en ligne, assurez-vous de bien comprendre l’incidence possible des commandes.
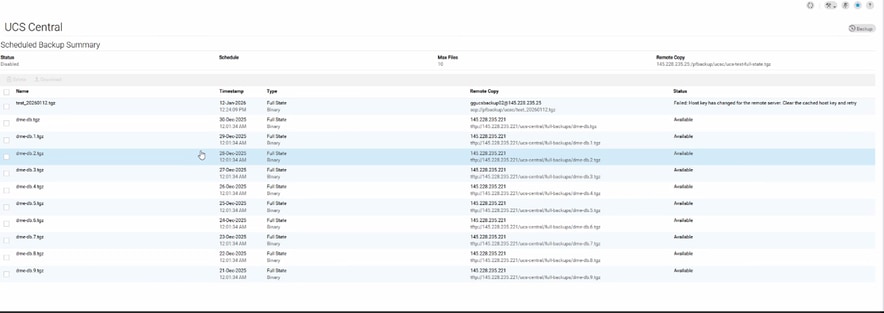
Énoncé du problème :
Les opérations de sauvegarde UCS Central échouent et l'onglet État affiche le message d'erreur suivant :
“Host key has changed for the remote server. Clear the cached host key and retry.”
Preuve de journal :
# From svc_ops_dme.log:

Jan 6 11:36:47 degtlue2100 svc_ops_dme[1597]: [EVENT][E14194351][79965][transition][internal][] [FSM:STAGE:ASYNC]: uploading data to backup server(FSM-STAGE:sam:dme:MgmtDataExporterExportData:upload)
Jan 6 11:36:47 degtlue2100 svc_ops_dme[1597]: [EVENT][E14194351][79966][transition][internal][] [FSM:STAGE:STALE-FAIL]: uploading data to backup server(FSM-STAGE:sam:dme:MgmtDataExporterExportData:upload)
Jan 6 11:36:47 degtlue2100 svc_ops_dme[1597]: [EVENT][E14194351][79968][transition][internal][] [FSM:STAGE:REMOTE-ERROR]: Result: end-point-failed Code: unspecified Message: Host key has changed for the remote server. Clear the cached host key and retry (sam:dme:MgmtDataExporterExportData:upload)     <<<<<<<
Jan 6 11:36:47 degtlue2100 svc_ops_dme[1597]: [EVENT][E14194351][79970][transition][internal][] [FSM:STAGE:FAILED]: uploading data to backup server(FSM-STAGE:sam:dme:MgmtDataExporterExportData:upload)
Solution :
- Établir une session SSH vers le système UCS Central.
2. Vérifiez la version installée du package UCS Central.
Central-HTTS1# connect local-mgmt
Cisco UCS Central
TAC support: http://www.cisco.com/tac
Copyright (c) 2011-2025, Cisco Systems, Inc. All rights reserved.
The copyrights to certain works contained in this software are
owned by other third parties and used and distributed under
license. Certain components of this software are licensed under
the GNU General Public License (GPL) version 2.0 or the GNU
Lesser General Public License (LGPL) Version 2.1 or later version. A copy of each
such license is available at
https://opensource.org/license/gpl-2-0 and
https://opensource.org/license/lgpl-2-1
Central-HTTS1(local-mgmt)# show version

Name                Package             Version        GUI
----                -------             -------        ----
core                Base System         2.1(1a)        2.1(1a)
central-mgr         Central Manager     2.1(1a)        2.1(1a)
service-reg         Service Registry    2.1(1a)        2.1(1a)
identifier-mgr      Identifier Manager  2.1(1a)        2.1(1a)
operation-mgr       Operations Manager  2.1(1a)        2.1(1a)
resource-mgr        Resource Manager    2.1(1a)        2.1(1a)
policy-mgr          Policy Manager      2.1(1a)        2.1(1a)
stats-mgr           Statistics Manager  2.1(1a)        2.1(1a)
server-mgr          Server Manager      2.1(1a)        2.1(1a)
gch                 Generic Call Home   2.1(1a)        none
rel-key             Release Key         2.1(1a)        none

Central-HTTS1(local-mgmt)#
3. Obtenez le jeton du serveur central.

Remarque : Cela change toutes les 10 minutes.
Central-HTTS1(local-mgmt)# show token

0HPPCXXYGVR
* Utilisez le jeton sur le générateur de clé de réponse : https://cspg-releng.cisco.com/UCSPassGen.php
Remarque : Choisissez d'abord votre version UCSC. (2.0 ou 2.1). Sinon, le mot de passe ne fonctionne pas pour l'utilisateur racine. Veillez à supprimer le mot « token » du champ Debug-Token sur le site Web de génération de mot de passe avant de coller le jeton obtenu à partir d'UCS Central. Le texte reste inchangé et génère un mot de passe non valide.
4. Lancez une nouvelle session SSH vers UCS Central en utilisant les informations d'identification racine et la clé de réponse comme mot de passe.
login as: root
root@ <IP Address> password:
Last login: Tue Jan 13 17:57:20 2026 from <IP Address>
5. Accédez à ce chemin et recherchez l'adresse IP du serveur affecté dans le fichier 'known_hosts' :
[root@Central-HTTS1 ~]# cd /root/.ssh
[root@Central-HTTS1 .ssh]# cat known_hosts

[root@Central-HTTS1 ~]# cd /root/
anaconda-ks.cfg  .bash_profile    .cshrc           ks-pre.log       .ssh/
.bash_history    .bashrc          ks-post1.log     opt/             .tcshrc
.bash_logout     .config/         ks-post.log      original-ks.cfg  .viminfo

[root@Central-HTTS1 ~]# cd /root/.ssh/
[root@Central-HTTS1 .ssh]# ls
id_rsa  id_rsa.pub  known_hosts

[root@Central-HTTS1 .ssh]# cat known_hosts
Si l'adresse IP du serveur affecté est présente dans le fichier, supprimez manuellement l'entrée correspondante à l'aide de l'éditeur « vim ».
Accédez à la ligne spécifique et supprimez-la en tapant 'dd'.
[root@Central-HTTS1 .ssh]# vi known_hosts
[root@Central-HTTS1 .ssh]# vi known_hosts
....
....
....
!wq     (Write and Quit  >> Saving changes and exiting)
Après avoir supprimé l'adresse IP affectée, enregistrez le fichier et quittez l'éditeur à l'aide de : wq.
Une fois le fichier known_hosts mis à jour, recommencez l'opération de sauvegarde depuis UCS Central.
La sauvegarde se termine ensuite cette fois avec succès.
 Commentaires