Procédure de réinstallation des noeuds du tableau de bord Cisco Nexus à l'aide d'un serveur HTTP
Options de téléchargement
-
ePub (634.6 KB)
Consulter à l’aide de différentes applications sur iPhone, iPad, Android ou Windows Phone -
Mobi (Kindle) (440.1 KB)
Consulter sur un appareil Kindle ou à l’aide d’une application Kindle sur plusieurs appareils
Langage exempt de préjugés
Dans le cadre de la documentation associée à ce produit, nous nous efforçons d’utiliser un langage exempt de préjugés. Dans cet ensemble de documents, le langage exempt de discrimination renvoie à une langue qui exclut la discrimination en fonction de l’âge, des handicaps, du genre, de l’appartenance raciale de l’identité ethnique, de l’orientation sexuelle, de la situation socio-économique et de l’intersectionnalité. Des exceptions peuvent s’appliquer dans les documents si le langage est codé en dur dans les interfaces utilisateurs du produit logiciel, si le langage utilisé est basé sur la documentation RFP ou si le langage utilisé provient d’un produit tiers référencé. Découvrez comment Cisco utilise le langage inclusif.
À propos de cette traduction
Cisco a traduit ce document en traduction automatisée vérifiée par une personne dans le cadre d’un service mondial permettant à nos utilisateurs d’obtenir le contenu d’assistance dans leur propre langue. Il convient cependant de noter que même la meilleure traduction automatisée ne sera pas aussi précise que celle fournie par un traducteur professionnel.
Introduction
Ce document décrit la procédure de recréation d'image des noeuds du tableau de bord Cisco Nexus à l'aide d'un serveur HTTP. Il fournit des conseils clairs et détaillés pour garantir une recréation d'image de noeud standardisée et efficace via un déploiement d'image hébergé HTTP à distance.
Conditions préalables
- Le contrôleur de gestion intégré Cisco (CIMC) doit être configuré avec une adresse IP OOB.
- Consultez les notes de version du tableau de bord Nexus et confirmez l'image logicielle du tableau de bord Nexus que vous devez réimager.
- Procurez-vous l'image logicielle à l'adresse software.cisco.com.
- Vérifiez que la somme de contrôle MD5 de l'image correspond à celle publiée sur Cisco.com.
- Téléchargez l'image du tableau de bord Nexus sur le serveur HTTP.
- Le serveur HTTP doit être accessible à partir de l'interface de gestion CIMC. Cette accessibilité peut être vérifiée à l’aide de l’interface graphique ou de la CLI CIMC.
Composants utilisés
Ce document n'est pas limité à des versions de matériel et de logiciel spécifiques.
The information in this document was created from the devices in a specific lab environment. All of the devices used in this document started with a cleared (default) configuration. Si votre réseau est en ligne, assurez-vous de bien comprendre l’incidence possible des commandes.
Informations générales
Lorsqu'un noeud du tableau de bord Cisco Nexus tombe en panne, en raison d'une corruption du système, de mises à jour non prises en charge ou d'une interface utilisateur graphique inaccessible, les administrateurs peuvent réinstaller l'image du noeud à l'aide d'un fichier ISO hébergé sur un serveur HTTP. Le processus implique le téléchargement de l'ISO du tableau de bord Nexus, son hébergement sur un serveur Web et l'utilisation de CIMC (Cisco Integrated Management Controller) pour mapper et démarrer l'ISO via HTTP. Cela permet une restauration ou une réinstallation efficace des noeuds distants dans le cadre de la restauration des clusters.
Solution
Pour effectuer une nouvelle création d'image ND via un serveur HTTP, les étapes suivantes sont requises :
Étape 1.Téléchargez le micrologiciel à partir du site Web de Cisco.
Ouvrez software.cisco.com/download.
Étape 2. Accédez à l'interface Nexus Dashboard et sélectionnez la version logicielle appropriée (par exemple, 3.2(2m)) parmi les options de version disponibles.
Exemple :
Étape 3. Copiez l'image ISO du logiciel Nexus Dashboard sur le serveur HTTP.
Exemple : http://x.x.x.x/iso/
Étape 4. SSH/Console vers Cisco Integrated Management Controller
- À partir d’une fenêtre de terminal, connectez-vous à la console CIMC.
# ssh admin@cimc_ip
Où cimc_ip est l'adresse IP CIMC.
Exemple :
# ssh admin@x.x.x.x
admin@x.x.x.x's password:
system#
- Modifiez l'étendue en Virtual Media :
system# scope vmedia
system /vmedia #
-
Mappez l'image .iso au serveur HTTP.
system /vmedia # map-www volume_name http://http_server_ip_and_path iso_file_name
Where:
-
nom_volume est le nom du volume.
-
http_server_ip_and_path est l'adresse IP du serveur HTTP et le chemin vers l'emplacement du fichier .iso.
-
iso_filename est le nom du fichier .iso.
Exemple :
Remarque : Il y a un espace entre http_server_ip_and_path et iso_filename.
system /vmedia # map-www apic http://x.x.x.x/iso/ nd-dk9.3.2.2m.iso
Server username: admin
Server password:
Confirm password:
Remarque : Saisissez les informations d'identification et appuyez sur Entrée.
-
Vérifiez l'état du mappage :
 system /vmedia # show mappings detail

The Map-Status must be shown as OK.

For Example:

system /vmedia # show mappings detail
Volume apic:
    Map-Status: OK
    Drive-Type: CD
    Remote-Share: http://x.x.x.x/iso/

    Remote-File:nd-dk9.3.2.2m.iso
    Mount-Type: www
    Mount-Options: noauto,username=admin,password=********3
    system /vmedia #
Si le mappage échoue ou si une erreur se produit pendant le mappage, vous pouvez utiliser la commande unmap pour supprimer le mappage existant, puis tenter à nouveau le mappage.
Server # scope vmedia
Server /vmedia # show mappings
Volume  Map-status   Drive-type     remote-share        remote-file                mount-type
------  ----------  ------------  ------------------- -------------------        -----------
Huu     OK           removable    http://x.x.x.x/ rhel-server-6.1-x86_6.iso      www
Server /vmedia # unmap Huu
Server /vmedia # show mappings
Volume  Map-status   Drive-type     remote-share        remote-file                mount-type
------  ----------  ------------  ------------------- -------------------        -----------
-
Connectez-vous à SOL pour surveiller le processus d'installation :
system /vmedia # connect host
CISCO Serial Over LAN:
Press Ctrl+x to Exit the session
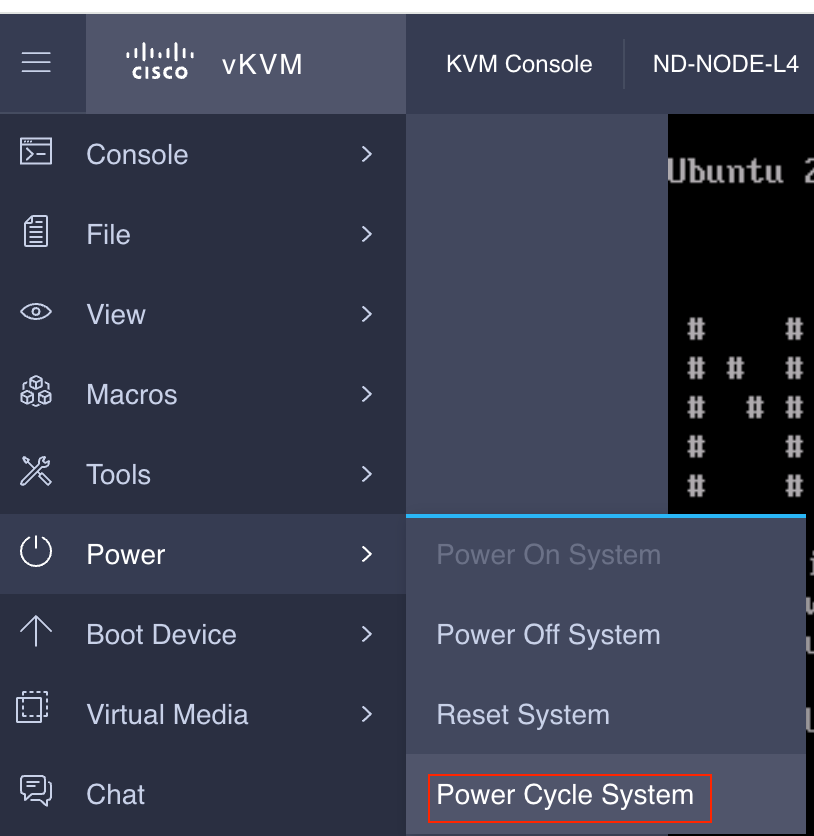
Étape 5. Mise hors tension puis sous tension de la console KVM de l'interface utilisateur graphique CIMC
Choose Power > Power Cycle System (cold boot) to power cycle the controller.
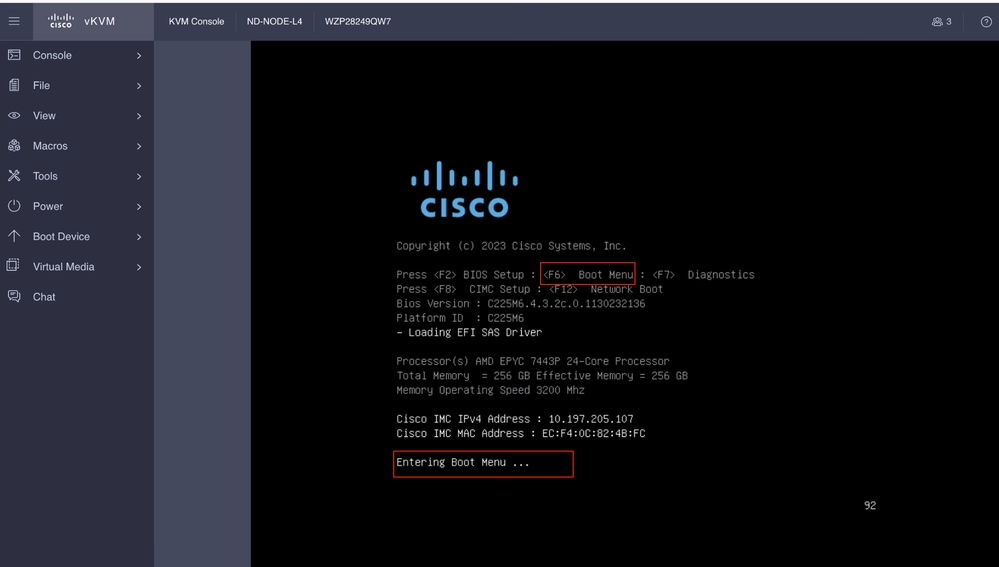
À partir de la console SOL : Regardez l'écran pendant le processus de démarrage et préparez-vous à appuyer sur F6 au moment approprié pour accéder au menu de sélection du démarrage.
Exemple :
Vous pouvez également entrer le mot de passe du BIOS. Le mot de passe par défaut est password.
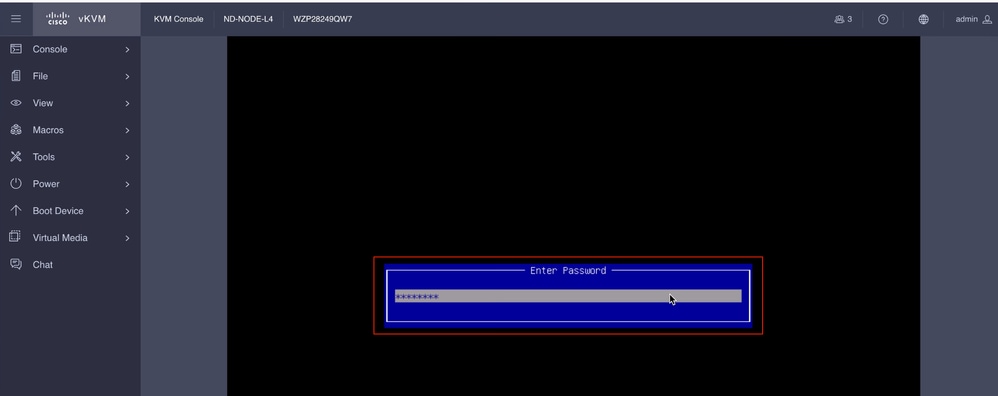
Dans le menu de sélection du démarrage, sélectionnez l'option Cisco CIMC-Mapped vDVD2.00 comme périphérique de démarrage unique.
Étape 6. Revenez à l’interface de ligne de commande CIMC et surveillez le résultat de Connect Host.
Surveillez l'interface de ligne de commande CIMC , lorsque vous recevez le message Pour accélérer l'installation, saisissez iso url dans les dix minutes qui suivent, puis saisissez http server URL with Nexus Dashboard image.
Boot000A* UEFI: Cisco CIMC-Mapped vDVD2.00 PciRoot(0x1)/Pci(0x8,0x1)/Pci(0x0,0x3)/USB(1,0)/USB(2,0)/Unit(3)/CDROM(1,0x35,0x5597ed)..BO'
+ return 1
+ '[' -n '' ']'
++ mount
++ grep /run/install/repo
++ cut -f 1 -d ' '
++ tr -d '[:digit:]'
++ true
+ usbdevice=
+ mkdir /mnt/usbdata
+ '[' -n '' ']'
+ '[' true = true ']'
+ read_iso_url
+ dmesg --console-off
+ true
+ echo 'To speed up the install, enter iso url. Type '\''skip'\'' to use local media:'
To speed up the install, enter iso url. Type 'skip' to use local media:
+ echo ' Either http://server/path/to/file or nfs:server:/path/to/file are supported'
Either http://server/path/to/file or nfs:server:/path/to/file are supported
+ read -r -p '? ' url

 http://x.x.x.x197.204.4/iso/DCApps/ND/nd-dk9.3.2.1i.iso << Enter the http server details  >>
+ '[' http://x.x.x.x197.204.4/iso/DCApps/ND/nd-dk9.3.2.1i.iso = skip ']'
+ '[' http://x.x.x.x197.204.4/iso/DCApps/ND/nd-dk9.3.2.1i.iso = '' ']'
+ '[' http = nfs: ']'
+ echo http://x.x.x.x197.204.4/iso/DCApps/ND/nd-dk9.3.2.1i.iso
+ grep -q '\[.*\]'
++ awk -F '/|:' '{print $4}'
+ urlip=x.x.x.x197.204.4
+ '[' -z x.x.x.x197.204.4 ']'
+ break
+ dmesg --console-on
+ '[' -n http://x.x.x.x197.204.4/iso/DCApps/ND/nd-dk9.3.2.1i.iso ']'
+ '[' http://x.x.x.x197.204.4/iso/DCApps/ND/nd-dk9.3.2.1i.iso '!=' skip ']'
+ dmesg --console-of
Étape 7. Après avoir saisi l'URL HTTP, le processus de démarrage se poursuit.
Remarque : Choisissez l'option static, vous serez invité à entrer le nom de l'interface, l'adresse IP de gestion et la passerelle.
+ set +e
+ configured=0
+ interface=none
+ addr=none
+ gw=none
+ '[' 0 -eq 0 ']'
+ echo 'Configuring network interface'
Configuring network interface
+ echo 'type static, dhcp, bash for a shell to configure networking, or url to re-enter the url: '
type static, dhcp, bash for a shell to configure networking, or url to re-enter the url:
+ read -p '? ' ntype
? static << Enter the static  to configure the networking >>
+ case $ntype in
+ configure_static
+ '[' none '!=' none ']'
Remarque : Après avoir tapé la valeur static, il affichera l’interface CIMC, sélectionnez l’interface correcte. Si vous avez sélectionné l’interface incorrecte, la perte de paquets sera de 100 %, puis après trois tentatives infructueuses de ping , il vous demandera à nouveau de sélectionner l’interface correcte jusqu’à ce que la perte de paquets soit de 0 si vous ne connaissez pas l’interface, sélectionnez l’interface all un par un.
Exemple
+ echo 'Available interfaces'
Available interfaces
+ ls -l /sys/class/net
total 0
lrwxrwxrwx 1 root root 0 Aug 12 03:53 eno5 -> ../../devices/pci0000:40/0000:40:03.1/0000:46:00.0/0000:47:01.0/0000:49:00.0/0000:4a:00.0/0000:4b:00.0/net/eno5
lrwxrwxrwx 1 root root 0 Aug 12 03:53 eno6 -> ../../devices/pci0000:40/0000:40:03.1/0000:46:00.0/0000:47:01.0/0000:49:00.0/0000:4a:00.0/0000:4b:00.1/net/eno6
lrwxrwxrwx 1 root root 0 Aug 12 03:53 enp1s0f0 -> ../../devices/pci0000:00/0000:00:01.1/0000:01:00.0/net/enp1s0f0
lrwxrwxrwx 1 root root 0 Aug 12 03:53 enp1s0f1 -> ../../devices/pci0000:00/0000:00:01.1/0000:01:00.1/net/enp1s0f1
lrwxrwxrwx 1 root root 0 Aug 12 03:51 lo -> ../../devices/virtual/net/lo
+ read -p 'Interface to configure: ' interface
Interface to configure: enp1s0f0        <<  select the correct interface   >>
+ read -p 'address: ' addr
Remarque : ND-NODE-L4 nécessite des noms d'interface au format enp1s0fX, où X est un identificateur numérique. SE-NODE-G2 requiert le format enoX, où X est un nombre.
Étape 8. Vérifiez l'interface.
Après avoir entré l'interface, il essaiera d'envoyer une requête ping au serveur http et si l'interface sélectionnée est correcte, alors la perte de paquets doit être de 0% et commencer à récupérer l'image à partir du serveur http.
Exemple : Après avoir entré l’interface correcte avec une perte de paquets de 0 %.
Interface to configure: enp1s0f0
+ read -p 'address: ' addr
address: x.x.x.x/24
+ read -p 'gateway: ' gw
gateway:x.x.x.x
+ ip addr add x.x.x.x/24 dev enp1s0f0
+ ip link set enp1s0f0 up
+ ip route add default via x.x.x.x
++ seq 1 6
+ for count in $(seq 1 6)
+ ping -c 1 x.x.x.x
PING x.x.x.x (x.x.x.x): 56 data bytes

---x.x.x.x ping statistics ---
1 packets transmitted, 0 packets received, 100% packet loss
+ sleep 20
+ for count in $(seq 1 6)
+ ping -c x.x.x.x
PING x.x.x.x (x.x.x.x): 56 data bytes
64 bytes from x.x.x.x : seq=0 ttl=63 time=0.512 ms

---x.x.x.x ping statistics ---
1 packets transmitted, 1 packets received, 0% packet loss
round-trip min/avg/max = 0.512/0.512/0.512 ms
+ configured=1
+ break
+ '[' 1 -eq 0 ']'
+ set -e
+ tmpiso=/tmp/cdrom.iso
+ echo 'Fetching http://x.x.x.x/iso/DCApps/ND/nd-dk9.3.2.2f.iso to /tmp/cdrom.iso'
Fetching http://x.x.x.x/iso/DCApps/ND/nd-dk9.3.2.2f.iso to /tmp/cdrom.iso >> started fetching the apic image from HTTP server
+ '[' http = nfs: ']'
+ download http://x.x.x.x/iso/DCApps/ND/nd-dk9.3.2.2f.iso /tmp/cdrom.iso
+ local url=http://x.x.x.x/iso/DCApps/ND/nd-dk9.3.2.2f.iso dest=/tmp/cdrom.iso tries=5
+ wget --server-response --no-check-certificate --tries=5 --progress=dot:mega --read-timeout=60 --output-document=/tmp/cdrom.iso.tmp http://x.x.x.x197.204.4/iso/DCApps/ND/nd-dk9.3.2.2f.iso
--2025-08-12 09:39:08-- http://x.x.x.x197.204.4/iso/DCApps/ND/nd-dk9.3.2.2f.iso
Connecting to x.x.x.x:80... connected.
HTTP request sent, awaiting response...
HTTP/1.1 200 OK
Date: Tue, 12 Aug 2025 09:39:09 GMT
Server: Apache/2.4.6 (CentOS) OpenSSL/1.0.2k-fips mod_wsgi/3.4 Python/2.7.5
Last-Modified: Tue, 10 Jun 2025 06:51:41 GMT
ETag: "2c66bd000-6373220f3b940"
Accept-Ranges: bytes
Content-Length: 11918888960
Keep-Alive: timeout=5, max=100
Connection: Keep-Alive
Content-Type: application/octet-stream
Length: 11918888960 (11G) [application/octet-stream]
Saving to: '/tmp/cdrom.iso.tmp'
Si vous avez sélectionné la mauvaise interface, la perte de paquets sera de 100 %, puis après trois tentatives infructueuses de ping, il demandera à nouveau de sélectionner la bonne interface.
Exemple : Après avoir entré la mauvaise interface avec une perte de paquets de 100 %.
+ read -p 'Interface to configure: ' interface
Interface to configure: enp11s0
+ read -p 'address: ' addr
address: x.x.x.x/24
+ read -p 'gateway: ' gw
gateway: x.x.x.x
+ ip addr add x.x.x.x/24 dev enp11s0
+ ip link set enp11s0 up
+ ip route add default via x.x.x.x
++ seq 1 2
+ for count in '$(seq 1 2)'
+ ping -c 1 x.x.x.x
PING x.x.x.x (x.x.x.x) 56(84) bytes of data.
From x.x.x.x icmp_seq=1 Destination Host Unreachable

--- x.x.x.x ping statistics ---
1 packets transmitted, 0 received, +1 errors, 100% packet loss, time 0ms

+ sleep 20
+ for count in '$(seq 1 2)'
+ ping -c 1 x.x.x.x
PING x.x.x.x (x.x.x.x) 56(84) bytes of data.
From x.x.x.x icmp_seq=1 Destination Host Unreachable

--- x.x.x.x ping statistics ---
1 packets transmitted, 0 received, +1 errors, 100% packet loss, time 0ms

+ sleep 20
+ '[' 0 -eq 0 ']'
+ echo 'Configuring network interface'
Configuring network interface
+ echo 'type static, dhcp, bash for a shell to configure networking, or url to re-enter the url: ' <>
type static, dhcp, bash for a shell to configure networking, or url to re-enter the url:
+ read -p '? ' ntype
?
Continuez à surveiller l’interface de ligne de commande CIMC et attendez environ 40 à 50 min pour obtenir les informations suivantes sur l’interface de ligne de commande.
+ log 'Shutting down Atomix Installer'
+ echo 'Shutting down Atomix Installer'
Shutting down Atomix Installer
+ log 'reboot: Power down'
+ echo 'reboot: Power down'
reboot: Power down
+ sleep 5
+ poweroff
+ ec[  533.195532] sysrq: Emergency Sync
ho s
[  533.195563] sysrq: Emergency Sync
[  533.212106] sysrq: Emergency Sync
[  533.212117] sysrq: Emergency Remount R/O
[  533.212189] sysrq: Power Off
[  533.212226] kvm: exiting hardware virtualization
[  533.213874] EXT4-fs (sdf1): re-mounted. Opts: (null). Quota mode: none.
[  533.215431] sd 1:0:0:0: [sdf] Synchronizing SCSI cache
[  533.215749] EXT4-fs (dm-3): re-mounted. Opts: (null). Quota mode: none.
[  533.216395] EXT4-fs (dm-1): re-mounted. Opts: (null). Quota mode: none.
[  533.217221] EXT4-fs (sdf6): re-mounted. Opts: (null). Quota mode: none.
[  533.217689] EXT4-fs (sdf4): re-mounted. Opts: (null). Quota mode: none.
[  533.218965] Emergency Remount complete
[  533.218997] Emergency Sync complete
[  533.218997] Emergency Sync complete
[  533.219002] Emergency Sync complete
[  533.359024] sd 1:0:0:0: [sdf] Stopping disk
+ echo s
+ echo s
+ echo u
+ echo o
+ log 'Nap time'
+ echo 'Nap time'
Nap time
+ true
+ sleep 60
[  535.571545] megaraid_sas 0000:41:00.0: megasas_disable_intr_fusion is called outbound_intr_mask:0x40000009
[  535.692202] ACPI: PM: Preparing to enter system sleep state S5
[  535.706849] reboot: Power down
Étape 9. Quitter SOL après la mise hors tension
Attendez que le message « poweroff » s’affiche dans la console SOL, puis quittez SOL en appuyant sur Ctrl et x (Ctrl+x) et reconnectez-vous à CIMC et modifiez à nouveau l’étendue.
(i) Change the scope to virtual media again:
system# scope vmedia
system /vmedia #
(ii) Unmap the .iso image that you mapped in 2.c:
 system /vmedia # unmap volume_name
 At the Save mapping prompt, enter yes if you want to save the mapping or no if you do not want to save the mapping. For example:
 system /vmedia # unmap apic
 Save mapping? Enther 'yes' or 'no' to confirm (CTRL-C to cancel) → yes
 system /vmedia #
(iii) Connect back to SOL again:
 system /vmedia #  connect host
Après la mise hors tension, vous devez remettre le système sous tension à l'aide du commutateur KVM, puis procéder aux étapes suivantes.
Étape x.x.x.x Configuration au premier démarrage
[  274.210045] nd_bootstrap.sh[2628]:   INFO[0174] bootDisk: found disk=/dev/sdf bootPart=/dev/sdf4 espPart=/dev/sdf3
[  274.224041] nd_bootstrap.sh[2628]:   INFO[0174] boot devices/filesystems have been mounted
[  274.236038] nd_bootstrap.sh[2628]:   INFO[0174] |12231-start| ["expand-stub.bash" "/boot/efi/EFI/atx-current/kernel.efi"]
[  274.251228] nd_bootstrap.sh[2628]:   INFO[0174] |12231-out  | 21870+1 records in
[  274.262061] nd_bootstrap.sh[2628]:   INFO[0174] |12231-out  | 21870+1 records out
[  274.272065] nd_bootstrap.sh[2628]:   INFO[0174] |12231-out  | 11197856 bytes (11 MB, 11 MiB) copied, 0.0716082 s, 156 MB/s
[  274.287060] nd_bootstrap.sh[2628]:   INFO[0174] |12231-out  | 0+1 records in
[  274.297060] nd_bootstrap.sh[2628]:   INFO[0174] |12231-out  | 0+1 records out
[  274.307049] nd_bootstrap.sh[2628]:   INFO[0174] |12231-out  | 187 bytes copied, 7.2325e-05 s, 2.6 MB/s
[  274.566030] nd_bootstrap.sh[2628]:   INFO[0175] |12231-out  | 102375+1 records in
[  274.576055] nd_bootstrap.sh[2628]:   INFO[0175] |12231-out  | 102375+1 records out
[  274.588059] nd_bootstrap.sh[2628]:   INFO[0175] |12231-out  | 52416297 bytes (52 MB, 50 MiB) copied, 0.329377 s, 159 MB/s
[  274.604075] nd_bootstrap.sh[2628]:   INFO[0175] |12231-out  | 0+1 records in
[  OK  ] Finished atomix-boot-setup.
[  274.615055] nd_bootstrap.sh[2628]:   INFO[0175] |12231-out  | 0+1 records out
Starting Initial cloud-init job (pre-networking)...
[  274.634046] nd_bootstrap.sh[2628]:   INFO[0175] |12231-out  | 82 bytes copied, 9.4287e-05 s, 870 kB/s
[  274.656064] nd_bootstrap.sh[2628]:   INFO[0175] |12231-exit | rc=0
[  274.666047] nd_bootstrap.sh[2628]:   INFO[0175] Boot()                    duration=175321
[  274.837851] cloud-init[12253]: Cloud-init v. 24.1.3-0ubuntu1~22.04.5 running 'init-local' at Tue, 12 Aug 2025 09:53:39 +0000. Up 274.82 seconds.
Press any key to run first-boot setup on this console...
Starting Nexus Dashboard setup utility
Welcome to Nexus Dashboard 3.2.2f
Press Enter to manually bootstrap your first master node..
Étape 11. Configuration du mot de passe admin et du réseau de gestion de l’interface de gestion du tableau de bord Nexus
Starting Nexus Dashboard setup utility
Welcome to Nexus Dashboard 3.2.2f
Press Enter to manually bootstrap your first master node...

Admin Password:
Reenter Admin Password:
Management Network:
  IP Address/Mask: x.x.x.x/24
  Gateway: x.x.x.x
Retapez la commande config?(o/N): n
System configured successfully
Initializing System on first boot. Please wait..
[  OK  ] Listening on Network Service Netlink Socket.
[  OK  ] Finished Initial cloud-init job (pre-networking).
[  OK  ] Reached target Preparation for Network.
         Starting Network Configuration...
[  OK  ] Started Network Configuration.
[  OK  ] Reached target Network.
Starting Wait for Network to be Configured...
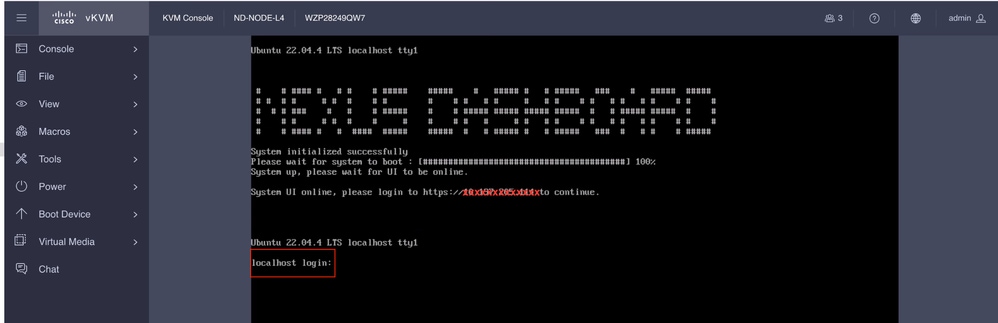
Étape 12. Le noeud Tableau de bord Nexus est prêt pour la connexion. Vous pouvez vous connecter à l'interface utilisateur graphique ND en utilisant l'adresse IP de l'interface de gestion pour le reste de la configuration
Depuis la console :
Ubuntu 22.04.4 LTS localhost ttyS0

#    # #### #   # #    # #####    #####    #   ##### #   # #####   ###    #   #####  #####

# #  # #     # #  #    # #        #    # #   # #     #   # #    # #   # #   # #    # #    #

#  # # ###    #   #    # #####    #    # ##### ##### ##### #####  #   # ##### #####  #    #

#    # #     # #  #    #     #    #    # #   #     # #   # #    # #   # #   # #    # #    #

#    # #### #   #  ####  #####    #####  #   # ##### #   # #####   ###  #   # #    # #####
System initialized successfully
[  564.309561] cloud-init[12560]: Cloud-init v. 24.1.3-0ubuntu1~22.04.5 running 'modules:final' at Tue, 12 Aug 2025 09:58:28 +0000. Up 564.27 seconds.
ci-info: no authorized SSH keys fingerprints found for user ubuntu.
<14>Aug 12 09:58:29 cloud-init: #############################################################
<14>Aug 12 09:58:29 cloud-init: -----BEGIN SSH HOST KEY FINGERPRINTS-----
<14>Aug 12 09:58:29 cloud-init: 256 SHA256:vKu7Zj3MAP+vFOXaeW14HClEhAwrSpA9AqcUC4SZVlU root@localhost (ECDSA)
<14>Aug 12 09:58:29 cloud-init: 256 SHA256:I7eiUnQq6pZsoFPy+UxIUQ66jQOgHyG4zGuF6cAtSl0 root@localhost (ED25519)
<14>Aug 12 09:58:29 cloud-init: 3072 SHA256:SvodRIEgWzEAaQQdH2rlw0qLziBbv0e88VAGkt/ox14 root@localhost (RSA)
<14>Aug 12 09:58:29 cloud-init: -----END SSH HOST KEY FINGERPRINTS-----
<14>Aug 12 09:58:29 cloud-init: #############################################################

-----BEGIN SSH HOST KEY KEYS-----
ecdsa-sha2-nistp256 AAAAE2VjZHNhLXNoYTItbmlzdHAyNTYAAAAIbmlzdHAyNTYAAABBBBf9S1BXcR48cWcIKhvfjLGYufJgycGIf1Yx8OpRsk4e1I+y80J/x5dfX90h+3cwt9kjH8IubMpleK66mlW+xd0= root@localhost
ssh-ed25519 AAAAC3NzaC1lZDI1NTE5AAAAIGWTN7hoB2/dYSVA0gpV88FWh2iRD2hwJ2LMryhhhQHg root@localhost
ssh-rsa AAAAB3NzaC1yc2EAAAADAQABAAABgQCeM+In/dciDwCKEPLV/97oIA5pHHRBRf0Lij5NcUwzYAf9q/m/lUsdzv2zVYc4WAJd8uX9ZxDAGa9D358Tvxh/lKzBKqNQpQdAjyby6IGGui+UK9Mq1RVxoUkFtIIJ97IzaBoR9ScnucMXpu5mp5OAjws+VrUhKk1XNFAui1QgW507I0Xk+2AaR/W0rwJCQRsHx3orDxCwJkDQDiQQAf/SrvSnuAe/8pSuCuvscqPjZeIF7LnJ6dAms0XXrhbxRQ8c4q/Ud6RL2sKjinlZPfqsbVFSpjbJ9m4jtXvuGE5llyJbS1FcU8DsFbkY6HH9JQru49iXcd5mKt7fyPg0ypp7Hl+2g07mEcYlEMBXxNZw+HqNW27xp0ZkRfWO+Zl2t0s6DjM0LHWqV0wZLYqqBTlQIkhf2irM6mr7s2bVAcvEsuZzG9d7uY8aC/CR5GwkgKW8s4oI7m56ccdRPHV0qQFXnBybBToUInmIK+1fxtaUXYbQbQ83wxNOvG7O55gDsws= root@localhost
-----END SSH HOST KEY KEYS-----
[  564.364630] cloud-init[12560]: Cloud-init v. 24.1.3-0ubuntu1~22.04.5 finished at Tue, 12 Aug 2025 09:58:29 +0000. Datasource DataSourceAtomix [sources=/var/lib/cloud/seed/atomix][dsmode=net].  Up 564.36 seconds
Please wait for system to boot : [########################################] 100%
System up, please wait for UI to be online.
System UI online, please login to https://x.x.x.x to continue. << Access the Nexus Dashboard GUI via this URL >>
Ubuntu 22.04.4 LTS localhost ttyS0
localhost login:
Depuis KVM :
Historique de révision
| Révision | Date de publication | Commentaires |
|---|---|---|
1.0 |
29-Aug-2025
|
Première publication |
Contribution d’experts de Cisco
- Shivam TripathiTAC
 Commentaires
Contacter Cisco
- Ouvrir un dossier d’assistance

- (Un contrat de service de Cisco est requis)