- Preface
- Chapter 1 - Product Overview
- Chapter 2 - Preparing for Installation
- Chapter 3 - Installing the Client Adapter
- Chapter 4 - Using the Profile Manager
- Chapter 5 - Configuring the Client Adapter
- Chapter 6 - Using EAP Authentication
- Chapter 7 - Viewing Status and Statistics
- Chapter 8 - Using the Aironet System Tray Utility (ASTU)
- Chapter 9 - Routine Procedures
- Chapter 10 - Troubleshooting
- Appendix A - Technical Specifications
- Appendix B - Translated Safety Warnings
- Appendix C - Declarations of Conformity and Regulatory Information
- Appendix D - Channels, Power Levels, and Antenna Gains
- Appendix E - Configuring the Client Adapter through the Windows XP Operating System
- Appendix F - Performing a Site Survey
- Appendix G - Using the Profile Migration Tool
- Glossary
- Index
Cisco Aironet 802.11a/b/g Wireless LAN Client Adapters (CB21AG and PI21AG) Installation and Configuration Guide, Release 2.5
Bias-Free Language
The documentation set for this product strives to use bias-free language. For the purposes of this documentation set, bias-free is defined as language that does not imply discrimination based on age, disability, gender, racial identity, ethnic identity, sexual orientation, socioeconomic status, and intersectionality. Exceptions may be present in the documentation due to language that is hardcoded in the user interfaces of the product software, language used based on RFP documentation, or language that is used by a referenced third-party product. Learn more about how Cisco is using Inclusive Language.
- Updated:
- June 29, 2007
Chapter: Chapter 4 - Using the Profile Manager
Using the Profile Manager
This chapter explains how to use the ADU profile manager feature to create and manage profiles for your client adapter.
The following topics are covered in this chapter:
•![]() Including a Profile in Auto Profile Selection
Including a Profile in Auto Profile Selection
•![]() Importing and Exporting Profiles
Importing and Exporting Profiles
Overview of Profile Manager
The ADU profile manager feature enables you to create and manage up to 16 profiles (saved configurations) for your client adapter. These profiles enable you to use your client adapter in different locations, each of which requires different configuration settings. For example, you may want to set up profiles for using your client adapter at the office, at home, and in public areas such as airports. After the profiles are created, you can easily switch between them without having to reconfigure your client adapter each time you enter a new location.
Profiles are stored in the registry and are lost if you uninstall the client adapter's software. To prevent your profiles from becoming lost, Cisco recommends that you back up your profiles using the profile manager's import/export feature. See the "Importing and Exporting Profiles" section for details.
Opening Profile Manager
Step 1 ![]() To open the ADU profile manager, double-click the Aironet Desktop Utility icon on your desktop.
To open the ADU profile manager, double-click the Aironet Desktop Utility icon on your desktop.
Step 2 ![]() Click the Profile Management tab. The Cisco Aironet Desktop Utility (Profile Management) window appears (see Figure 4-1).
Click the Profile Management tab. The Cisco Aironet Desktop Utility (Profile Management) window appears (see Figure 4-1).
Figure 4-1 Cisco Aironet Desktop Utility (Profile Management) Window
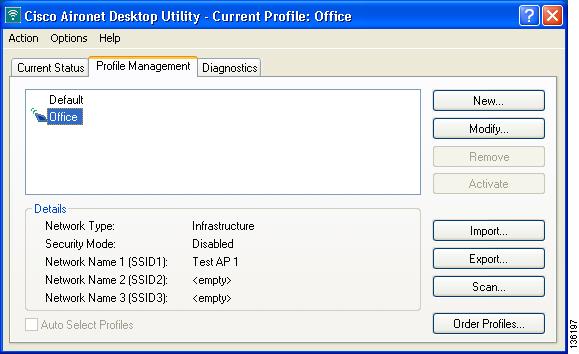

Note ![]() The profile manager feature provides you with a default profile that is configured to use default values. This profile is named Default and appears in the profiles list on the Cisco Aironet Desktop Utility (Profile Management) window. You can use this profile as is by double-clicking it or modify it by following the instructions in the "Modifying a Profile" section.
The profile manager feature provides you with a default profile that is configured to use default values. This profile is named Default and appears in the profiles list on the Cisco Aironet Desktop Utility (Profile Management) window. You can use this profile as is by double-clicking it or modify it by following the instructions in the "Modifying a Profile" section.
Table 4-1 provides a description of the status fields on the Cisco Aironet Desktop Utility (Profile Management) window.
|
|
|
|---|---|
Network Type |
The type of network that is configured for the selected profile. Note |
Security Mode |
The type of security that is configured for the selected profile. Note |
Network Name 1 (SSID1) |
The service set identifier (SSID) is the wireless network that is configured for the selected profile. Note |
Network Name 2 (SSID2) |
An optional SSID that is configured for the selected profile. It identifies a second distinct network and enables the client adapter to connect and/or roam to that network without having to be reconfigured. Note |
Network Name 3 (SSID3) |
An optional SSID that is configured for the selected profile. It identifies a third distinct network and enables the client adapter to connect and/or roam to that network without having to be reconfigured. Note |
Profile manager enables you to perform the following tasks related to the management of profiles:
•![]() Create a new profile, page 4
Create a new profile, page 4
•![]() Include a profile in auto profile selection, page 8
Include a profile in auto profile selection, page 8
•![]() Select the active profile, page 10
Select the active profile, page 10
•![]() Edit a profile, page 11
Edit a profile, page 11
•![]() Delete a profile, page 11
Delete a profile, page 11
•![]() Import a profile, page 12
Import a profile, page 12
•![]() Export a profile, page 12
Export a profile, page 12
Follow the instructions on the page indicated for the task you want to perform.
Note ![]() If your system administrator used an administrative tool to deactivate certain parameters, these parameters are disabled and cannot be selected.
If your system administrator used an administrative tool to deactivate certain parameters, these parameters are disabled and cannot be selected.
Creating a New Profile
Follow the steps below to create a new profile.
Step 1 ![]() Perform one of the following:
Perform one of the following:
•![]() If you want to create a new profile from scratch, click New on the Cisco Aironet Desktop Utility (Profile Management) window. Then go to Step 4.
If you want to create a new profile from scratch, click New on the Cisco Aironet Desktop Utility (Profile Management) window. Then go to Step 4.
•![]() If you want to find an available network and create a profile based on it, click Scan on the Cisco Aironet Desktop Utility (Profile Management) window. The Available Infrastructure and Ad Hoc Networks window appears (see Figure 4-2).
If you want to find an available network and create a profile based on it, click Scan on the Cisco Aironet Desktop Utility (Profile Management) window. The Available Infrastructure and Ad Hoc Networks window appears (see Figure 4-2).
Figure 4-2 Available Infrastructure and Ad Hoc Networks Window
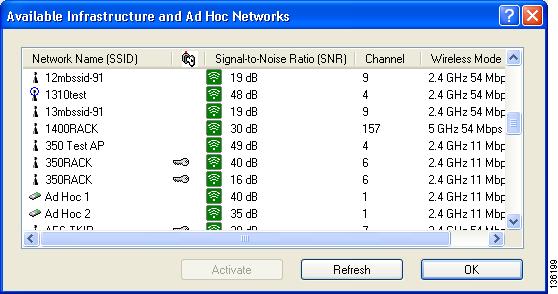
This window displays a list of all available networks. Click the Refresh button when you want to refresh the window and update the list of available networks.
Note ![]() The SSID of a Cisco IOS access point appears in the list of available networks only if a Guest Mode SSID is enabled or the Broadcast SSID in Beacon option is selected. Refer to the software configuration guide for your access point for additional information.
The SSID of a Cisco IOS access point appears in the list of available networks only if a Guest Mode SSID is enabled or the Broadcast SSID in Beacon option is selected. Refer to the software configuration guide for your access point for additional information.
Table 4-2 provides a description of the default fields on the Available Infrastructure and Ad Hoc Networks window. If you want to be able to view additional fields, choose Scan List Settings from the Options drop-down menu. The Configure Scan List Columns window appears (see Figure 4-3).
Figure 4-3 Configure Scan List Columns Window

All of the fields that can be displayed on the Available Infrastructure and Ad Hoc Networks window appear in the Available Columns box. Highlight the fields that you want to be displayed and click the right arrow to move those fields to the Selected Columns box. You can use the left arrow to move any undesired fields from the Selected Columns box to the Available Columns box and the up and down arrows to change the order in which the fields are presented on the Available Infrastructure and Ad Hoc Networks window. Click OK to save your changes.
|
|
|
|
|---|---|---|
Network Name (SSID) |
The service set identifier (SSID) indicates the name of an available wireless network. The icons to the left of the SSIDs provide information on network type and link status. |
|
|
|
|
|
|
An available infrastructure network. |
|
|
The infrastructure network to which your client adapter is currently associated. |
|
|
An available ad hoc network. |
|
|
The ad hoc network to which your client adapter is currently associated. |
|
Key icon |
SSIDs that are designated with a key icon are being advertised as secure networks. |
|
Signal-to-Noise Ratio (SNR) |
The difference between the signal strength and the current noise level. The higher the value, the better the client adapter's ability to communicate with the access point. Note Note |
|
Channel |
The channel that the access point (in infrastructure mode) or the other client (in ad hoc mode) is using for communications. |
|
Wireless Mode |
The frequency and rate at which the access point (in infrastructure mode) or the other client (in ad hoc mode) is configured to transmit and receive packets. |
|


Step 2 ![]() Scroll down to see the full list of available networks.
Scroll down to see the full list of available networks.
Step 3 ![]() Click the SSID of the network to which you want your client adapter to associate and click Activate.
Click the SSID of the network to which you want your client adapter to associate and click Activate.
Note ![]() If the SSID is blank, you cannot activate the network.
If the SSID is blank, you cannot activate the network.
Step 4 ![]() When the Profile Management (General) window appears (see Figure 4-4), enter a name for your new profile (such as Office, Home, etc.) in the Profile Name field.
When the Profile Management (General) window appears (see Figure 4-4), enter a name for your new profile (such as Office, Home, etc.) in the Profile Name field.
Figure 4-4 Profile Management (General) Window
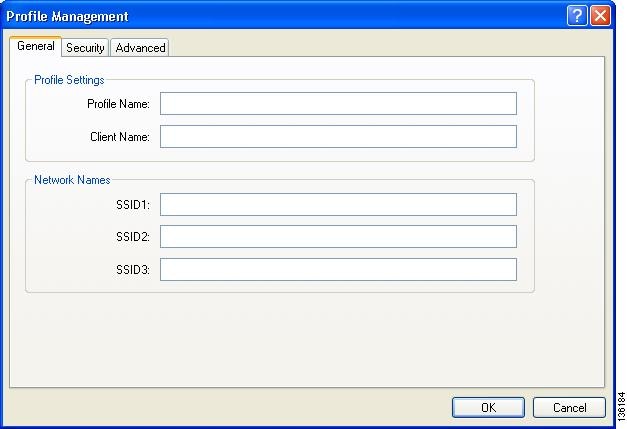
Note ![]() If you are creating a profile after scanning for an available network, the SSID of the network appears in the SSID1 field.
If you are creating a profile after scanning for an available network, the SSID of the network appears in the SSID1 field.
Step 5 ![]() Perform one of the following:
Perform one of the following:
•![]() If you want this profile to use the default values, click OK. The profile is added to the profiles list on the Cisco Aironet Desktop Utility (Profile Management) window.
If you want this profile to use the default values, click OK. The profile is added to the profiles list on the Cisco Aironet Desktop Utility (Profile Management) window.
•![]() If you want to change any of the configuration parameter settings, follow the instructions in Chapter 5, . The profile is added to the profiles list on the Cisco Aironet Desktop Utility (Profile Management) window.
If you want to change any of the configuration parameter settings, follow the instructions in Chapter 5, . The profile is added to the profiles list on the Cisco Aironet Desktop Utility (Profile Management) window.
Note ![]() The profiles for PC-Cardbus cards are tied to the slot in which the card is inserted. Therefore, you must always insert your PC-Cardbus card into the same slot, create profiles for both slots, or export the profiles from one slot and import them for the other slot.
The profiles for PC-Cardbus cards are tied to the slot in which the card is inserted. Therefore, you must always insert your PC-Cardbus card into the same slot, create profiles for both slots, or export the profiles from one slot and import them for the other slot.
Step 6 ![]() Go to the "Including a Profile in Auto Profile Selection" section to enable the profile to be selected automatically or go to the "Selecting the Active Profile" section to activate the profile.
Go to the "Including a Profile in Auto Profile Selection" section to enable the profile to be selected automatically or go to the "Selecting the Active Profile" section to activate the profile.
Including a Profile in Auto Profile Selection
After you have created profiles for your client adapter, you can choose to include them in the profile manager's auto profile selection feature. Then when auto profile selection is enabled, the client adapter automatically selects a profile from the list of profiles that were included in auto profile selection and uses it to establish a connection to the network.
Follow these steps to include any of your profiles in auto profile selection and to establish the order in which the profiles will be selected for use.
Step 1 ![]() Open ADU and click the Profile Management tab.
Open ADU and click the Profile Management tab.
Step 2 ![]() Click Order Profiles. The Auto Profile Selection Management window appears (see Figure 4-5).
Click Order Profiles. The Auto Profile Selection Management window appears (see Figure 4-5).
Figure 4-5 Auto Profile Selection Management Window

Step 3 ![]() The profiles that you created are listed in the Available Profiles box. Highlight each one that you want to include in auto profile selection and click the Add button. The profiles appear in the Auto Selected Profiles box.
The profiles that you created are listed in the Available Profiles box. Highlight each one that you want to include in auto profile selection and click the Add button. The profiles appear in the Auto Selected Profiles box.
The following rules apply to auto profile selection:
•![]() You must include at least two profiles in the Auto Selected Profiles box.
You must include at least two profiles in the Auto Selected Profiles box.
•![]() The profiles must specify an SSID; otherwise, they do not appear in the Available Profiles
The profiles must specify an SSID; otherwise, they do not appear in the Available Profiles
box.
•![]() Profiles cannot specify multiple SSIDs; otherwise, they do not appear in the Available
Profiles cannot specify multiple SSIDs; otherwise, they do not appear in the Available
Profiles box.
•![]() Each profile that is included in auto profile selection must have a unique SSID. For example,
Each profile that is included in auto profile selection must have a unique SSID. For example,
if Profile A and Profile B both have "ABCD" as their SSID, only Profile A or Profile B (whichever was created first) appears in the Available Profiles box and can be included in auto profile selection.
Note ![]() To remove a profile from auto profile selection, select the profile in the Auto Selected Profiles box and click Remove. The profile is removed from the Auto Selected Profiles box.
To remove a profile from auto profile selection, select the profile in the Auto Selected Profiles box and click Remove. The profile is removed from the Auto Selected Profiles box.
Step 4 ![]() The first profile in the Auto Selected Profiles box has the highest priority while the last profile has the lowest priority. To change the order (and priority) of your auto-selectable profiles, select the profile that you want to move and click Move up or Move down to move the profile up or down, respectively.
The first profile in the Auto Selected Profiles box has the highest priority while the last profile has the lowest priority. To change the order (and priority) of your auto-selectable profiles, select the profile that you want to move and click Move up or Move down to move the profile up or down, respectively.
Step 5 ![]() Click OK to save your changes.
Click OK to save your changes.
When auto profile selection is enabled (see the "Selecting the Active Profile" section for instructions), the client adapter scans for an available network. The profile with the highest priority and the same SSID as one of the found networks is the one that is used to connect to the network. If the connection fails, the client adapter tries the next highest priority profile that matches the SSID and so on.
Note ![]() When you enable auto profile selection, the client adapter scans the wireless modes specified by all the profiles in the auto profile selection list for an available network. The client ignores the selected profile's wireless mode setting, which was configured on the ADU Profile Management (Advanced) window. Using this method, the client does not need to disassociate nor change the current profile while looking for networks in other profiles.
When you enable auto profile selection, the client adapter scans the wireless modes specified by all the profiles in the auto profile selection list for an available network. The client ignores the selected profile's wireless mode setting, which was configured on the ADU Profile Management (Advanced) window. Using this method, the client does not need to disassociate nor change the current profile while looking for networks in other profiles.
Step 6 ![]() Go to the "Selecting the Active Profile" section to enable auto profile selection.
Go to the "Selecting the Active Profile" section to enable auto profile selection.
Selecting the Active Profile
Follow the steps below to specify the profile that the client adapter is to use.
Note ![]() You can use ASTU instead of the ADU Profile Manager to select the active profile. Refer to Chapter 8 for instructions.
You can use ASTU instead of the ADU Profile Manager to select the active profile. Refer to Chapter 8 for instructions.
Step 1 ![]() Open ADU and click the Profile Management tab. The Cisco Aironet Desktop Utility (Profile Management) window appears (see Figure 4-1).
Open ADU and click the Profile Management tab. The Cisco Aironet Desktop Utility (Profile Management) window appears (see Figure 4-1).
Step 2 ![]() Perform one of the following:
Perform one of the following:
•![]() Select one profile for the client adapter to use either by double-clicking that profile in the profiles list or by clicking that profile in the profiles list and then clicking Activate.
Select one profile for the client adapter to use either by double-clicking that profile in the profiles list or by clicking that profile in the profiles list and then clicking Activate.
If the client adapter cannot associate (or establish a connection) to an access point (in infrastructure mode) or another client (in ad hoc mode) or loses association while using the selected profile, the adapter does not attempt to associate using another profile. To associate, you must select a different profile or enable auto profile selection.
•![]() Enable auto profile selection by checking the Auto Select Profiles check box.
Enable auto profile selection by checking the Auto Select Profiles check box.
This option causes the client adapter's driver to automatically select a profile from the list of profiles that were set up to be included in auto profile selection.
If the client adapter loses association for more than 10 seconds (or for more than the time specified by the LEAP/EAP-FAST authentication timeout value on the LEAP/EAP-FAST Settings window if LEAP/EAP-FAST is enabled), the driver switches automatically to another profile that is included in auto profile selection. The adapter does not switch profiles as long as it remains associated or reassociates within 10 seconds (or within the time specified by the LEAP/EAP-FAST authentication timeout value). To force the client adapter to associate to a different access point (in infrastructure mode) or another client (in ad hoc mode), you must uncheck the Auto Select Profiles check box and select a new profile from the profiles list.
Note ![]() This option is available only if two or more profiles are included in auto profile selection.
This option is available only if two or more profiles are included in auto profile selection.
Note ![]() Login scripts are not reliable if you use auto profile selection with LEAP or EAP-FAST. If you authenticate and achieve full network connectivity before or at the same time as you log into the computer, login scripts will run. However, if you authenticate and achieve full network connectivity after you log into the computer, login scripts will not run.
Login scripts are not reliable if you use auto profile selection with LEAP or EAP-FAST. If you authenticate and achieve full network connectivity before or at the same time as you log into the computer, login scripts will run. However, if you authenticate and achieve full network connectivity after you log into the computer, login scripts will not run.
•![]() Click Scan. The Available Infrastructure and Ad Hoc Networks window appears (see Figure 4-2). Double-click the SSID of a network that is used by one of your profiles and click OK.
Click Scan. The Available Infrastructure and Ad Hoc Networks window appears (see Figure 4-2). Double-click the SSID of a network that is used by one of your profiles and click OK.
The client adapter starts using a profile based on the option selected above. The active profile is designated by the following icon in the profiles list:

Modifying a Profile
Follow the steps in the appropriate section below to edit or delete an existing profile.
Editing a Profile
Step 1 ![]() Open ADU and click the Profile Management tab. The Cisco Aironet Desktop Utility (Profile Management) window appears (see Figure 4-1).
Open ADU and click the Profile Management tab. The Cisco Aironet Desktop Utility (Profile Management) window appears (see Figure 4-1).
Step 2 ![]() In the profiles list, select the profile that you want to edit.
In the profiles list, select the profile that you want to edit.
Step 3 ![]() Click Modify.
Click Modify.
Step 4 ![]() Follow the instructions in Chapter 5 to change any of the configuration parameters for this profile.
Follow the instructions in Chapter 5 to change any of the configuration parameters for this profile.
Deleting a Profile
Step 1 ![]() Open ADU and click the Profile Management tab. The Cisco Aironet Desktop Utility (Profile Management) window appears (see Figure 4-1).
Open ADU and click the Profile Management tab. The Cisco Aironet Desktop Utility (Profile Management) window appears (see Figure 4-1).
Step 2 ![]() In the profiles list, select the profile that you want to delete.
In the profiles list, select the profile that you want to delete.
Note ![]() You cannot delete the active profile.
You cannot delete the active profile.
Step 3 ![]() Click Remove. The profile is deleted.
Click Remove. The profile is deleted.
Importing and Exporting Profiles
This section provides instructions for importing and exporting profiles. You may want to use the import/export feature for the following reasons:
•![]() To back up profiles before uninstalling client adapter software
To back up profiles before uninstalling client adapter software
•![]() To export profiles for a PC-Cardbus card in one Cardbus slot and import them for use with a second Cardbus slot
To export profiles for a PC-Cardbus card in one Cardbus slot and import them for use with a second Cardbus slot
•![]() To set up your computer with a profile from another computer
To set up your computer with a profile from another computer
•![]() To export one of your profiles and use it to set up additional computers
To export one of your profiles and use it to set up additional computers
Follow the instructions on the following pages to import or export profiles.
Importing a Profile
Step 1 ![]() If the profile that you want to import is on a floppy disk, insert the disk into your computer's floppy drive.
If the profile that you want to import is on a floppy disk, insert the disk into your computer's floppy drive.
Step 2 ![]() Open ADU and click the Profile Management tab. The Cisco Aironet Desktop Utility (Profile Management) window appears (see Figure 4-1).
Open ADU and click the Profile Management tab. The Cisco Aironet Desktop Utility (Profile Management) window appears (see Figure 4-1).
Step 3 ![]() Click Import. The Import Profile window appears (see Figure 4-6).
Click Import. The Import Profile window appears (see Figure 4-6).
Figure 4-6 Import Profile Window
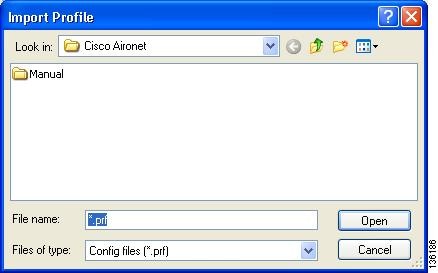
Step 4 ![]() In the Look in drop-down box, find the directory containing the profile.
In the Look in drop-down box, find the directory containing the profile.
Step 5 ![]() Select the profile that you want to import so it appears in the File name box at the bottom of the window.
Select the profile that you want to import so it appears in the File name box at the bottom of the window.
Step 6 ![]() Click Open. The imported profile appears in the profiles list on the Cisco Aironet Desktop Utility (Profile Management) window.
Click Open. The imported profile appears in the profiles list on the Cisco Aironet Desktop Utility (Profile Management) window.
Exporting a Profile
Note ![]() PACs are not exported with EAP-FAST profiles.
PACs are not exported with EAP-FAST profiles.
Step 1 ![]() Insert a blank floppy disk into your computer's floppy drive, if you wish to export a profile to a floppy disk.
Insert a blank floppy disk into your computer's floppy drive, if you wish to export a profile to a floppy disk.
Step 2 ![]() Open ADU and click the Profile Management tab. The Cisco Aironet Desktop Utility (Profile Management) window appears (see Figure 4-1).
Open ADU and click the Profile Management tab. The Cisco Aironet Desktop Utility (Profile Management) window appears (see Figure 4-1).
Step 3 ![]() In the profiles list, select the profile that you want to export.
In the profiles list, select the profile that you want to export.
Step 4 ![]() Click Export. The Export Profile window appears (see Figure 4-7).
Click Export. The Export Profile window appears (see Figure 4-7).
Figure 4-7 Export Profile Window
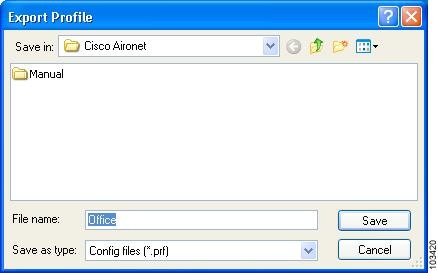
The profile name appears in the File name box.
Step 5 ![]() Choose a directory (such as your computer's floppy disk drive or a location on the network) from the Save in drop-down box.
Choose a directory (such as your computer's floppy disk drive or a location on the network) from the Save in drop-down box.
Note ![]() The default location is the directory where ADU is installed (such as C:\Program Files\Cisco Aironet).
The default location is the directory where ADU is installed (such as C:\Program Files\Cisco Aironet).
Step 6 ![]() Click Save. The profile is exported to the specified location.
Click Save. The profile is exported to the specified location.
Step 7 ![]() Follow the instructions in the "Importing a Profile" section to import the profile on another computer.
Follow the instructions in the "Importing a Profile" section to import the profile on another computer.
 Feedback