Cisco Aironet Configuration Administration Tool (ACAT) 1.6 Administrator Guide for Windows
Bias-Free Language
The documentation set for this product strives to use bias-free language. For the purposes of this documentation set, bias-free is defined as language that does not imply discrimination based on age, disability, gender, racial identity, ethnic identity, sexual orientation, socioeconomic status, and intersectionality. Exceptions may be present in the documentation due to language that is hardcoded in the user interfaces of the product software, language used based on RFP documentation, or language that is used by a referenced third-party product. Learn more about how Cisco is using Inclusive Language.
- Updated:
- May 4, 2007
Chapter: Profile Settings Tab
Profile Settings Tab
This chapter describes ACAT profile options. The following topics are covered in this section:
•![]() Editing Profiles Using the Profile Settings Tab
Editing Profiles Using the Profile Settings Tab
Adding Profiles
ACAT enables you to import existing configuration profiles or create new profiles. The ACAT File menu contains two profile options:
•![]() Create/Manage Profile—This option enables you to add, delete, or rename new profile names. When profile names are defined, you can use the ACAT Profile Settings tab to configure each of the profiles.
Create/Manage Profile—This option enables you to add, delete, or rename new profile names. When profile names are defined, you can use the ACAT Profile Settings tab to configure each of the profiles.
•![]() Load from Registry—This option imports or loads existing profiles from your PC's registry into the ACAT configuration file.
Load from Registry—This option imports or loads existing profiles from your PC's registry into the ACAT configuration file.
The ACU enables you to create and verify profiles prior to distributing them to other users. The profiles created with the ACU are stored in your PC's registry. When you are satisfied that the profiles are correct and operational, you can use the ACAT Load from Registry option to import the profiles for a specific client adapter type into the ACAT configuration file.
Profiles are stored in the part of the registry reserved for the client adapter driver and therefore are tied to a specific radio type. Consequently, if you set up profiles for a 350 series PC card and the client adapter is later upgraded to a CB20A PC card, all of the profiles are not usable for the new client adapter.
General Recommendations
When you need to configure multiple client adapter types, you should consider the following recommendations:
•![]() On a server accessible to all users, create and name a directory for each client adapter type.
On a server accessible to all users, create and name a directory for each client adapter type.
•![]() Place a copy of all the Install Wizard files and sub-directories into each of the client adapter directories.
Place a copy of all the Install Wizard files and sub-directories into each of the client adapter directories.
•![]() Create an ACAT configuration file with the needed profiles and configuration parameters for each client adapter type. Save each ACAT configuration file into the appropriate client adapter directory with the Install Wizard files.
Create an ACAT configuration file with the needed profiles and configuration parameters for each client adapter type. Save each ACAT configuration file into the appropriate client adapter directory with the Install Wizard files.

Note ![]() All ACAT configuration files use the same filename (CiscoAdminConfig.dat) and therefore must be saved separately.
All ACAT configuration files use the same filename (CiscoAdminConfig.dat) and therefore must be saved separately.
•![]() To install profiles for a specific client adapter type, each user must execute the Install Wizard (IWSetup.exe) in the appropriate client adapter directory for their client adapter type.
To install profiles for a specific client adapter type, each user must execute the Install Wizard (IWSetup.exe) in the appropriate client adapter directory for their client adapter type.
Create/Manage Profile
Prior to configuring a profile in ACAT, you must create a new profile name for each profile. The Create/Manage Profile option in the File menu enables you to add, delete, or rename new profile names. A maximum of 16 profiles can be created.
To create new profile names, follow these steps:
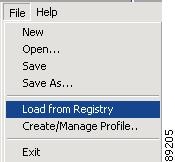
Step 1 ![]() Choose Create/Manage Profile in the ACAT File menu (see Figure 4-1).
Choose Create/Manage Profile in the ACAT File menu (see Figure 4-1).
Figure 4-1 Create/Manage Profile Option

When you choose this option, the Create/Manage Profile window appears (see Figure 4-2).
Figure 4-2 Create/Manage Profile Window
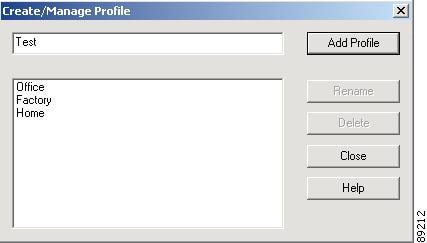
Step 2 ![]() Enter a new profile name (1 to 79 ASCII characters) in the entry field and click Add Profile.
Enter a new profile name (1 to 79 ASCII characters) in the entry field and click Add Profile.
Step 3 ![]() To rename or delete a profile name, click the profile name and click Rename or Delete.
To rename or delete a profile name, click the profile name and click Rename or Delete.
Step 4 ![]() When you have completed the entry of new profile names, click Close.
When you have completed the entry of new profile names, click Close.
Note ![]() A maximum of 16 profiles can be created.
A maximum of 16 profiles can be created.
To enter profile configuration parameters, go to the "Editing Profiles Using the Profile Settings Tab" section.
Load From Registry
The ACAT utility enables you to import existing profiles from your PC's registry by using the Load from Registry option located in the File menu (see Figure 4-3).
Figure 4-3 Load from Registry Option
Prior to selecting this option, you must create new profiles using the ACU. These profiles are saved in your PC's registry.
To view or edit the imported profile parameters, go to the "Editing Profiles Using the Profile Settings Tab" section.
Editing Profiles Using the Profile Settings Tab
The ACAT Profile Settings tab enables you to edit existing profiles and new profiles being created (see Figure 4-4).
Figure 4-4 Profile Settings Tab Window

This section includes the following topics:
Card Type
The Card Type field specifies the client adapter card type being used in the profiles. You specify the card type when you select the New option in the File menu. ACAT defaults to the 350 series PCMCIA (PCM-35x) card type. The following card types are supported:
•![]() PCM-35x—Cisco Aironet 350 series PCMCIA card
PCM-35x—Cisco Aironet 350 series PCMCIA card
•![]() MPI-35x—Cisco Aironet 350 series Mini-PCI card
MPI-35x—Cisco Aironet 350 series Mini-PCI card
•![]() PCI-35x—Cisco Aironet 350 series PCI card
PCI-35x—Cisco Aironet 350 series PCI card
•![]() CB20A—Cisco Aironet 5-GHz PC-Cardbus card
CB20A—Cisco Aironet 5-GHz PC-Cardbus card
Note ![]() ACAT 1.6 is compatible only with Install Wizard 1.6.
ACAT 1.6 is compatible only with Install Wizard 1.6.
Note ![]() ACAT 1.6 does not support the Cisco Aironet 340 and 4800 series client adapters or the Cisco Aironet IEEE 802.11a/b/g Wireless LAN Client Adapters (CB21AG and PI21AG).
ACAT 1.6 does not support the Cisco Aironet 340 and 4800 series client adapters or the Cisco Aironet IEEE 802.11a/b/g Wireless LAN Client Adapters (CB21AG and PI21AG).
Profile
The Profile field enables you to select the profile to be configured. You can click the arrow on the right of the field to view the profile list.
Connection Tab
The Connection tab enables you to specify connection-specific parameters and the client adapter power save mode. The window is shown in Figure 4-5.
Figure 4-5 Connection Tab Window
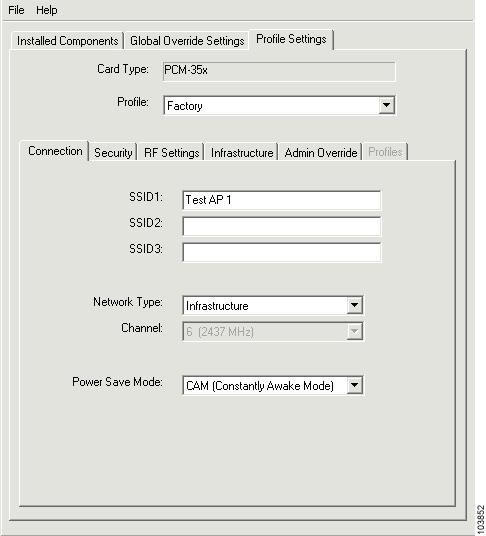
Table 4-1 lists and describes the Connection tab parameters.
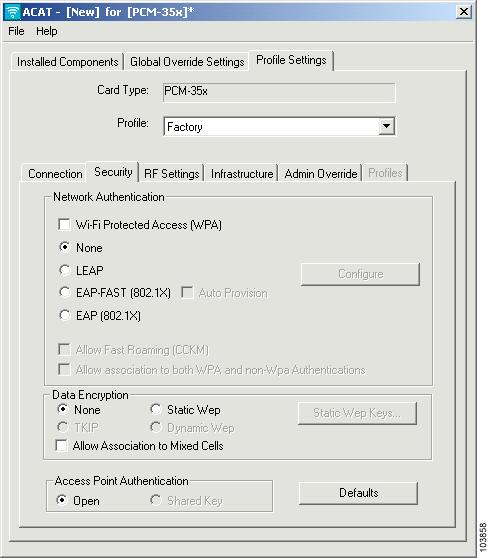
Security Tab
The Security tab window (see Figure 4-6) enables you to set parameters that control how the client adapter associates to an access point, authenticates to the wireless network, and encrypts and decrypts data. The Security tab window is organized into three sections:
•![]() Network Authentication—specifies network authentication options.
Network Authentication—specifies network authentication options.
•![]() Data Encryption—specifies data encryption options.
Data Encryption—specifies data encryption options.
•![]() Access Point Authentication—specifies access point authentication options.
Access Point Authentication—specifies access point authentication options.
Figure 4-6 Security Tab Window
This window presents several security features, each of which involves a number of steps. In addition, the security features themselves are complex and need to be understood before they are implemented. "Security Features," provides an overview of the security features.
Network Authentication
The network authentication section specifies the network authentication options available for your client adapter. Table 4-2 describes the parameter options.
Data Encryption
The Data Encryption section specifies the encryption options (see Table 4-3) used by the client adapter.
Allow Association To Mixed Cells Parameter
The Allow Association To Mixed Cells parameter indicates whether the client adapter can associate to an access point that enables both WEP and non-WEP associations. Follow the guidelines below to set this parameter.
•![]() Check the Allow Association To Mixed Cells check box if the access point with which the client adapter is to associate has WEP set to Optional and WEP is enabled on the client adapter. Otherwise, the client is unable to establish a connection with the access point.
Check the Allow Association To Mixed Cells check box if the access point with which the client adapter is to associate has WEP set to Optional and WEP is enabled on the client adapter. Otherwise, the client is unable to establish a connection with the access point.
•![]() Uncheck the Allow Association To Mixed Cells check box if the access point with which the client adapter is to associate does not have WEP set to Optional.
Uncheck the Allow Association To Mixed Cells check box if the access point with which the client adapter is to associate does not have WEP set to Optional.
Note ![]() For security reasons, Cisco recommends that WEP-enabled and WEP-disabled clients not be allowed in the same cell because broadcast packets are sent unencrypted, even to clients running WEP.
For security reasons, Cisco recommends that WEP-enabled and WEP-disabled clients not be allowed in the same cell because broadcast packets are sent unencrypted, even to clients running WEP.
Note ![]() This parameter is not available in Ad Hoc mode.
This parameter is not available in Ad Hoc mode.
Note ![]() This parameter is not available if WPA is selected unless the Allow association to both WPA and non-WPA Authentications parameter is also selected.
This parameter is not available if WPA is selected unless the Allow association to both WPA and non-WPA Authentications parameter is also selected.
Access Point Authentication
The access point authentication section defines how your client adapter attempts to authenticate to an access point:
•![]() Open Authentication—Enables your client adapter, regardless of its WEP settings, to associate and attempt to communicate with an access point. Open Authentication is the default setting.
Open Authentication—Enables your client adapter, regardless of its WEP settings, to associate and attempt to communicate with an access point. Open Authentication is the default setting.
Note ![]() The client adapter can successfully send data frames only when it has the same WEP key as the access point.
The client adapter can successfully send data frames only when it has the same WEP key as the access point.
•![]() Shared Key Authentication—Enables your client adapter to communicate only with access points that have the same WEP key.
Shared Key Authentication—Enables your client adapter to communicate only with access points that have the same WEP key.
In shared key authentication, the access point sends a known unencrypted challenge packet to the client adapter, which encrypts the packet and sends it back to the access point. The access point attempts to decrypt the encrypted packet and sends an authentication response packet indicating the success or failure of the decryption back to the client adapter. If the packet is successfully encrypted/decrypted, the user is considered to be authenticated.
Note ![]() Cisco does not recommend the use of shared key authentication because it is a security risk.
Cisco does not recommend the use of shared key authentication because it is a security risk.
Note ![]() Shared key authentication is only available when Static WEP is selected as the data encryption method.
Shared key authentication is only available when Static WEP is selected as the data encryption method.
Entering a New Static WEP Key
Follow the steps below to enter a new static WEP key for this profile.
Step 1 ![]() Check None under the Network Associations section on the Security Tab Window.
Check None under the Network Associations section on the Security Tab Window.
Step 2 ![]() Check Static WEP under Data Encryption.
Check Static WEP under Data Encryption.
Note ![]() Selecting LEAP from the Network Authentication section on the Security tab window automatically disables static WEP and enables dynamic WEP.
Selecting LEAP from the Network Authentication section on the Security tab window automatically disables static WEP and enables dynamic WEP.
Step 3 ![]() Click Static WEP Keys and the WEP Key Setting window appears.
Click Static WEP Keys and the WEP Key Setting window appears.
Step 4 ![]() Choose one of the following WEP key entry methods using the drop-down menu:
Choose one of the following WEP key entry methods using the drop-down menu:
•![]() Hexadecimal—Specifies that the WEP key will be entered in hexadecimal characters, which include 0-9, A-F, and a-f.
Hexadecimal—Specifies that the WEP key will be entered in hexadecimal characters, which include 0-9, A-F, and a-f.
•![]() ASCII Text—Specifies that the WEP key will be entered in ASCII text, which includes alpha characters, numbers, and punctuation marks.
ASCII Text—Specifies that the WEP key will be entered in ASCII text, which includes alpha characters, numbers, and punctuation marks.
Note ![]() ASCII text WEP keys are not supported on Cisco Aironet 1200 Series Access Points (running VxWorks software), so you must select the Hexadecimal (0-9, A-F, a-f) option if you are planning to use your client adapter with these access points.
ASCII text WEP keys are not supported on Cisco Aironet 1200 Series Access Points (running VxWorks software), so you must select the Hexadecimal (0-9, A-F, a-f) option if you are planning to use your client adapter with these access points.
Step 5 ![]() For the static WEP key that you are entering (1, 2, 3, or 4), select a WEP key size of 40 or 128 using the drop-down menu. 128-bit client adapters can use 40- or 128-bit keys, but 40-bit adapters can use only 40-bit keys.
For the static WEP key that you are entering (1, 2, 3, or 4), select a WEP key size of 40 or 128 using the drop-down menu. 128-bit client adapters can use 40- or 128-bit keys, but 40-bit adapters can use only 40-bit keys.
Step 6 ![]() Obtain the static WEP key from your system administrator and enter it in the blank field for the key you are creating. Follow the guidelines below to enter a new static WEP key:
Obtain the static WEP key from your system administrator and enter it in the blank field for the key you are creating. Follow the guidelines below to enter a new static WEP key:
•![]() WEP keys must contain the following number of characters:
WEP keys must contain the following number of characters:
–![]() 10 hexadecimal characters or 5 ASCII text characters for 40-bit keys
10 hexadecimal characters or 5 ASCII text characters for 40-bit keys
Example: 5A5A313859 (hexadecimal) or ZZ18Y (ASCII)
–![]() 26 hexadecimal characters or 13 ASCII text characters for 128-bit keys
26 hexadecimal characters or 13 ASCII text characters for 128-bit keys
Example: 5A583135333554595549333534 (hexadecimal) or ZX1535TYUI354 (ASCII)
•![]() Your client adapter's WEP key must match the WEP key used by the access point (in infrastructure mode) or clients (in ad hoc mode) with which you are planning to communicate.
Your client adapter's WEP key must match the WEP key used by the access point (in infrastructure mode) or clients (in ad hoc mode) with which you are planning to communicate.
•![]() When setting more than one WEP key, the keys must be assigned to the same WEP key numbers for all devices. For example, WEP key 2 must be WEP key number 2 on all devices. When multiple WEP keys are set, they must be in the same order on all devices.
When setting more than one WEP key, the keys must be assigned to the same WEP key numbers for all devices. For example, WEP key 2 must be WEP key number 2 on all devices. When multiple WEP keys are set, they must be in the same order on all devices.
Step 7 ![]() Click the Transmit Key button to the left of the key you want to use to transmit packets. Only one WEP key can be selected as the transmit key.
Click the Transmit Key button to the left of the key you want to use to transmit packets. Only one WEP key can be selected as the transmit key.
Step 8 ![]() Choose one of the following access point authentication options, which defines how your client adapter attempts to authenticate to an access point:
Choose one of the following access point authentication options, which defines how your client adapter attempts to authenticate to an access point:
•![]() Open—Enables your client adapter to authenticate and attempt to communicate with an access point, regardless of its WEP settings. Open Authentication is the default setting.
Open—Enables your client adapter to authenticate and attempt to communicate with an access point, regardless of its WEP settings. Open Authentication is the default setting.
•![]() Shared Key—Enables your client adapter to communicate only with access points that have the same WEP key. This option is only available if Static WEP is selected.
Shared Key—Enables your client adapter to communicate only with access points that have the same WEP key. This option is only available if Static WEP is selected.
Note ![]() Cisco recommends that shared key authentication not be used because it is a security risk.
Cisco recommends that shared key authentication not be used because it is a security risk.
Step 9 ![]() Click OK to return to the Security tab window.
Click OK to return to the Security tab window.
Note ![]() After a WEP key is configured, you can enter a new key value, but you cannot view the original key or delete it.
After a WEP key is configured, you can enter a new key value, but you cannot view the original key or delete it.
Disabling Static WEP
To disable static WEP for a particular profile, check None under Data Encryption on the Security Tab Window.
Note ![]() Selecting LEAP from the Network Authentication section on the Security tab window automatically disables static WEP and enables dynamic WEP.
Selecting LEAP from the Network Authentication section on the Security tab window automatically disables static WEP and enables dynamic WEP.
Enabling LEAP
Before you can enable LEAP authentication, your network devices must meet the following requirements:
•![]() Client adapters must support WEP and use the firmware, drivers, utilities, and security modules included in the Install Wizard file.
Client adapters must support WEP and use the firmware, drivers, utilities, and security modules included in the Install Wizard file.
•![]() To use WPA, 350 series and CB20A client adapters must use the software included in
To use WPA, 350 series and CB20A client adapters must use the software included in
Install Wizard 1.2 or later on a computer running Windows 2000 or XP operating systems.
•![]() To use the reporting access points that fail LEAP authentication and fast secure roaming features, client adapters must use the client adapter firmware included in Install Wizard 1.2 or later.
To use the reporting access points that fail LEAP authentication and fast secure roaming features, client adapters must use the client adapter firmware included in Install Wizard 1.2 or later.
•![]() Access points to which your client adapter may attempt to authenticate must use the following software releases or later: VxWorks release 11.23T (340 and 350 series access points), 11.54T (1200 series access points) or Cisco IOS Release 12.2(4)JA (1100 series access points).
Access points to which your client adapter may attempt to authenticate must use the following software releases or later: VxWorks release 11.23T (340 and 350 series access points), 11.54T (1200 series access points) or Cisco IOS Release 12.2(4)JA (1100 series access points).
Note ![]() To use WPA, access points must use Cisco IOS Release 12.2(11)JA or later. To use the reporting access points that fail LEAP authentication and fast secure roaming features, access points must use the VxWorks release 12.00T (340, 350, and 1200 series access points) or Cisco IOS Release 12.2(4)JA (1100 series access points).
To use WPA, access points must use Cisco IOS Release 12.2(11)JA or later. To use the reporting access points that fail LEAP authentication and fast secure roaming features, access points must use the VxWorks release 12.00T (340, 350, and 1200 series access points) or Cisco IOS Release 12.2(4)JA (1100 series access points).
•![]() All necessary infrastructure devices (such as access points, servers, etc.) must be properly configured for LEAP authentication.
All necessary infrastructure devices (such as access points, servers, etc.) must be properly configured for LEAP authentication.
Follow these steps to enable LEAP authentication for the selected profile.
Step 1 ![]() If you want to enable WPA, check Wi-Fi Protected Access (WPA) on the Network Authentication section of the Security tab window. This parameter enables client adapters to associate to access points using WPA (for additional information refer to "Wi-Fi Protected Access (WPA)" section).
If you want to enable WPA, check Wi-Fi Protected Access (WPA) on the Network Authentication section of the Security tab window. This parameter enables client adapters to associate to access points using WPA (for additional information refer to "Wi-Fi Protected Access (WPA)" section).
Step 2 ![]() Check LEAP on the Network Authentication section of the Security tab window.
Check LEAP on the Network Authentication section of the Security tab window.
Note ![]() When you check this option, dynamic WEP is automatically enabled. If WPA is also selected, TKIP is enabled.
When you check this option, dynamic WEP is automatically enabled. If WPA is also selected, TKIP is enabled.
Step 3 ![]() Click Configure and the LEAP Settings window appears (see Figure 4-7).
Click Configure and the LEAP Settings window appears (see Figure 4-7).
Figure 4-7 LEAP Settings Window
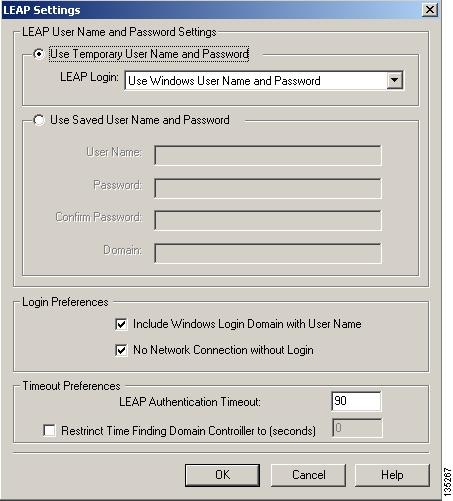
Step 4 ![]() Choose one of the following LEAP username and password setting options:
Choose one of the following LEAP username and password setting options:
•![]() Use Temporary User Name and Password—Requires the entry of a LEAP username and password each time the computer reboots in order to authenticate and gain access to the network.
Use Temporary User Name and Password—Requires the entry of a LEAP username and password each time the computer reboots in order to authenticate and gain access to the network.
•![]() Use Saved User Name and Password—Uses the LEAP username and password saved by the ACU in the computer's registry each time the computer reboots. Authentication occurs automatically as needed using the saved username and password (which are registered with the RADIUS server).
Use Saved User Name and Password—Uses the LEAP username and password saved by the ACU in the computer's registry each time the computer reboots. Authentication occurs automatically as needed using the saved username and password (which are registered with the RADIUS server).
Note ![]() When this option is selected, you must use the ACU on their PCs to configure LEAP by selecting the Use Saved User Name and Password option and entering the appropriate LEAP username and password. The option fields are unavailable in ACAT.
When this option is selected, you must use the ACU on their PCs to configure LEAP by selecting the Use Saved User Name and Password option and entering the appropriate LEAP username and password. The option fields are unavailable in ACAT.
Note ![]() The Use Saved User Name and Password option is available only if the Allow Saved LEAP User Name and Password option is enabled on the Installed Components tab (refer to the "Installed Components Tab Window" section for additional information).
The Use Saved User Name and Password option is available only if the Allow Saved LEAP User Name and Password option is enabled on the Installed Components tab (refer to the "Installed Components Tab Window" section for additional information).
Step 5 ![]() If you selected Use Temporary User Name and Password in Step 4, choose one of the following options using the drop-down menu:
If you selected Use Temporary User Name and Password in Step 4, choose one of the following options using the drop-down menu:
•![]() Use Windows User Name and Password—Causes your Windows username and password to also serve as your LEAP username and password, giving you only one set of credentials to remember. After you log in, the LEAP authentication process begins automatically. This option is the default setting.
Use Windows User Name and Password—Causes your Windows username and password to also serve as your LEAP username and password, giving you only one set of credentials to remember. After you log in, the LEAP authentication process begins automatically. This option is the default setting.
•![]() Automatically Prompt for LEAP User Name and Password—Requires you to enter a separate LEAP username and password (which are registered with the RADIUS server) in addition to your regular Windows login in order to start the LEAP authentication process.
Automatically Prompt for LEAP User Name and Password—Requires you to enter a separate LEAP username and password (which are registered with the RADIUS server) in addition to your regular Windows login in order to start the LEAP authentication process.
•![]() Manually Prompt for LEAP User Name and Password—Requires you to manually invoke the LEAP authentication process as needed using the Manual LEAP Login option from the ACU Commands drop-down menu. You are not prompted to enter a LEAP username and password during the Windows login. This option might be used to support a software token one-time password system or other systems that require additional software that is not available at login.
Manually Prompt for LEAP User Name and Password—Requires you to manually invoke the LEAP authentication process as needed using the Manual LEAP Login option from the ACU Commands drop-down menu. You are not prompted to enter a LEAP username and password during the Windows login. This option might be used to support a software token one-time password system or other systems that require additional software that is not available at login.
Step 6 ![]() If you want to force the client adapter to disassociate after you log off so that another user cannot gain access to the wireless network using your credentials, check the No Network Connection without Login check box. The default setting is not selected.
If you want to force the client adapter to disassociate after you log off so that another user cannot gain access to the wireless network using your credentials, check the No Network Connection without Login check box. The default setting is not selected.
Step 7 ![]() If you work in an environment with multiple domains and want your Windows login domain to be passed to the RADIUS server along with your username, check the Include Windows Login Domain With User Name check box. The default setting is not selected.
If you work in an environment with multiple domains and want your Windows login domain to be passed to the RADIUS server along with your username, check the Include Windows Login Domain With User Name check box. The default setting is not selected.
Step 8 ![]() If you want to force the client adapter to disassociate after you log off so that another user cannot gain access to the wireless network using your credentials, check the No Network Connection without Login check box. The default setting is checked.
If you want to force the client adapter to disassociate after you log off so that another user cannot gain access to the wireless network using your credentials, check the No Network Connection without Login check box. The default setting is checked.
Step 9 ![]() In the LEAP Authentication Timeout Value field, enter the amount of time (in seconds) after which a LEAP authentication is considered a failure and an error message appears.
In the LEAP Authentication Timeout Value field, enter the amount of time (in seconds) after which a LEAP authentication is considered a failure and an error message appears.
Range: 45 to 300 seconds
Default: 90 seconds
Step 10 ![]() If you want to limit the amount of time that is spent finding a domain controller during the authentication process, follow these steps:
If you want to limit the amount of time that is spent finding a domain controller during the authentication process, follow these steps:
a. ![]() Check Restrict Time Finding the Domain Controller to (seconds).
Check Restrict Time Finding the Domain Controller to (seconds).
Default: Unchecked
b. ![]() Enter the amount of time (in seconds) allowed in the authentication process to find the domain controller. Finding the domain controller is the last sequence of the authentication process.
Enter the amount of time (in seconds) allowed in the authentication process to find the domain controller. Finding the domain controller is the last sequence of the authentication process.
Range: 0 to 300 seconds
Default: 0 seconds
Note ![]() Entering a value of zero causes the authentication process to skip the "Finding Domain Controller" step altogether.
Entering a value of zero causes the authentication process to skip the "Finding Domain Controller" step altogether.
Note ![]() The finding domain controller timeout value is included in the overall LEAP authentication timeout value. For example, if the authentication timeout value is 60 seconds, and the finding domain controller timeout value is 10 seconds, the client adapter has up to 60 seconds to complete the entire authentication process, up to 10 seconds of which is allocated for finding the domain controller.
The finding domain controller timeout value is included in the overall LEAP authentication timeout value. For example, if the authentication timeout value is 60 seconds, and the finding domain controller timeout value is 10 seconds, the client adapter has up to 60 seconds to complete the entire authentication process, up to 10 seconds of which is allocated for finding the domain controller.
Note ![]() If you require domain services such as login scripts and roaming desktops, Cisco recommends that you do not check the Restrict Time Finding Domain Controller to (seconds) check box.
If you require domain services such as login scripts and roaming desktops, Cisco recommends that you do not check the Restrict Time Finding Domain Controller to (seconds) check box.
Note ![]() Regardless of whether the check box is checked or unchecked, the "Finding Domain Controller" step is bypassed once you are logged into Windows or if you log into the local machine and not into a domain.
Regardless of whether the check box is checked or unchecked, the "Finding Domain Controller" step is bypassed once you are logged into Windows or if you log into the local machine and not into a domain.
Step 11 ![]() Click OK to exit the LEAP Settings window and return to the Security tab window.
Click OK to exit the LEAP Settings window and return to the Security tab window.
Step 12 ![]() If you want to enable fast roaming on your client adapter, check Allow Fast Roaming (CCKM) in the Network Authentication section of the Security tab window.
If you want to enable fast roaming on your client adapter, check Allow Fast Roaming (CCKM) in the Network Authentication section of the Security tab window.
•![]() Selecting this option enables the client adapter to use CCKM when associated to access points that are using CCKM. Using this option your client adapter can also associate to access points that are not using CCKM.
Selecting this option enables the client adapter to use CCKM when associated to access points that are using CCKM. Using this option your client adapter can also associate to access points that are not using CCKM.
•![]() Not selecting this option prevents your client adapter from using CCKM even with access points that use CCKM.
Not selecting this option prevents your client adapter from using CCKM even with access points that use CCKM.
Default: Not selected
Note ![]() This option is available only when WPA is enabled.
This option is available only when WPA is enabled.
Note ![]() If your computer uses the Microsoft 802.1X supplicant and you want to take advantage of the fast roaming feature, refer to the Microsoft documentation for instructions.
If your computer uses the Microsoft 802.1X supplicant and you want to take advantage of the fast roaming feature, refer to the Microsoft documentation for instructions.
Step 13 ![]() If you want to associate to access points that support WPA and even those that do not support it, check Allow Association to both WPA and non-WPA authentication. If this option is not selected, your client adapter can associate only to access points that use WPA.
If you want to associate to access points that support WPA and even those that do not support it, check Allow Association to both WPA and non-WPA authentication. If this option is not selected, your client adapter can associate only to access points that use WPA.
Default: Not selected
Enabling EAP-FAST
Before you can enable EAP-FAST authentication, your network devices must meet the following requirements:
•![]() Client adapters must support WEP and use the firmware, drivers, utilities, and security modules included in the Install Wizard file.
Client adapters must support WEP and use the firmware, drivers, utilities, and security modules included in the Install Wizard file.
•![]() The 350 series and CB20A client adapters must use the software included in Install Wizard 1.3 or later on a computer running Windows 2000 or XP operating systems.
The 350 series and CB20A client adapters must use the software included in Install Wizard 1.3 or later on a computer running Windows 2000 or XP operating systems.
•![]() To use the reporting access points that fail EAP-FAST authentication and fast secure roaming features, client adapters must use the client adapter firmware included in Install Wizard 1.3 or later.
To use the reporting access points that fail EAP-FAST authentication and fast secure roaming features, client adapters must use the client adapter firmware included in Install Wizard 1.3 or later.
•![]() Access points to which your client adapter may attempt to authenticate must use the following software releases or later: VxWorks release 11.23T (340 and 350 series access points), 11.54T (1200 series access points) or Cisco IOS Release 12.2(4)JA (1100 series access points).
Access points to which your client adapter may attempt to authenticate must use the following software releases or later: VxWorks release 11.23T (340 and 350 series access points), 11.54T (1200 series access points) or Cisco IOS Release 12.2(4)JA (1100 series access points).
Note ![]() To use WPA, access points must use Cisco IOS Release 12.2(11)JA or later. To use the reporting access points that fail EAP-FAST authentication and fast secure roaming features, access points must use the VxWorks release 12.00T (340, 350, and 1200 series access points) or Cisco IOS Release 12.2(4)JA (1100 series access points).
To use WPA, access points must use Cisco IOS Release 12.2(11)JA or later. To use the reporting access points that fail EAP-FAST authentication and fast secure roaming features, access points must use the VxWorks release 12.00T (340, 350, and 1200 series access points) or Cisco IOS Release 12.2(4)JA (1100 series access points).
•![]() All necessary infrastructure devices (such as access points, servers, etc.) must be properly configured for EAP-FAST authentication.
All necessary infrastructure devices (such as access points, servers, etc.) must be properly configured for EAP-FAST authentication.
Follow these steps to enable EAP-FAST authentication for the selected profile.
Step 1 ![]() If you want to enable WPA, check Wi-Fi Protected Access (WPA) on the Network Authentication section of the Security tab window. This parameter enables client adapters to associate to access points using WPA (for additional information refer to "Wi-Fi Protected Access (WPA)" section).
If you want to enable WPA, check Wi-Fi Protected Access (WPA) on the Network Authentication section of the Security tab window. This parameter enables client adapters to associate to access points using WPA (for additional information refer to "Wi-Fi Protected Access (WPA)" section).
Step 2 ![]() Check EAP-FAST on the Network Authentication section of the Security tab window.
Check EAP-FAST on the Network Authentication section of the Security tab window.
Note ![]() When you check this option, dynamic WEP is automatically enabled. If WPA is also selected, TKIP is enabled.
When you check this option, dynamic WEP is automatically enabled. If WPA is also selected, TKIP is enabled.
Step 3 ![]() Check Auto Provision to allow the EAP-FAST protocol to transmit the username and password to the EAP-FAST server to automatically obtain the PAC provisioning.
Check Auto Provision to allow the EAP-FAST protocol to transmit the username and password to the EAP-FAST server to automatically obtain the PAC provisioning.
Note ![]() The Auto Provision option is available only if the Allow Auto Provisioning option is enabled on the Installed Components tab (refer to the "Installed Components Tab Window" section for additional information).
The Auto Provision option is available only if the Allow Auto Provisioning option is enabled on the Installed Components tab (refer to the "Installed Components Tab Window" section for additional information).
Note ![]() If Auto-Provision is not checked, the ACU must be used to manually configure the PAC settings for this profile.
If Auto-Provision is not checked, the ACU must be used to manually configure the PAC settings for this profile.
Step 4 ![]() Click Configure and the EAP-FAST Settings window appears (see Figure 4-8).
Click Configure and the EAP-FAST Settings window appears (see Figure 4-8).
Figure 4-8 EAP-FAST Settings Window
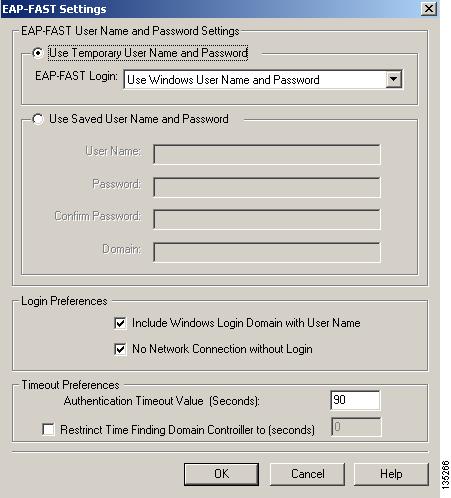
Step 5 ![]() Check one of the following EAP-FAST username and password setting options:
Check one of the following EAP-FAST username and password setting options:
•![]() Use Temporary User Name and Password—Requires the entry of an EAP-FAST username and password each time the computer reboots in order to authenticate and gain access to the network. This option is the default setting.
Use Temporary User Name and Password—Requires the entry of an EAP-FAST username and password each time the computer reboots in order to authenticate and gain access to the network. This option is the default setting.
•![]() Use Saved User Name and Password—Uses the EAP-FAST username and password saved by the ACU in the computer's registry each time the computer reboots. Authentication occurs automatically as needed using the saved username and password (which are registered with the EAP-FAST server).
Use Saved User Name and Password—Uses the EAP-FAST username and password saved by the ACU in the computer's registry each time the computer reboots. Authentication occurs automatically as needed using the saved username and password (which are registered with the EAP-FAST server).
Note ![]() When this option is selected, you must use the ACU to configure EAP-FAST by selecting the Use Saved User Name and Password option and entering the appropriate EAP-FAST username and password. The option fields are unavailable in ACAT.
When this option is selected, you must use the ACU to configure EAP-FAST by selecting the Use Saved User Name and Password option and entering the appropriate EAP-FAST username and password. The option fields are unavailable in ACAT.
Note ![]() The Use Saved User Name and Password option is available only if the Allow Saved EAP-FAST User Name and Password option is enabled on the Installed Components tab (refer to the "Installed Components Tab Window" section for additional information).
The Use Saved User Name and Password option is available only if the Allow Saved EAP-FAST User Name and Password option is enabled on the Installed Components tab (refer to the "Installed Components Tab Window" section for additional information).
Step 6 ![]() If you selected Use Temporary User Name and Password in Step 4, choose one of the following options using the drop-down menu:
If you selected Use Temporary User Name and Password in Step 4, choose one of the following options using the drop-down menu:
•![]() Use Windows User Name and Password—Causes your Windows username and password to also serve as your EAP-FAST username and password, giving you only one set of credentials to remember. After you log in, the LEAP authentication process begins automatically. This option is the default setting.
Use Windows User Name and Password—Causes your Windows username and password to also serve as your EAP-FAST username and password, giving you only one set of credentials to remember. After you log in, the LEAP authentication process begins automatically. This option is the default setting.
•![]() Automatically Prompt for User Name and Password—Requires you to enter a separate EAP-FAST username and password (which are registered with the EAP-FAST server) in addition to your regular Windows login in order to start the EAP-FAST authentication process.
Automatically Prompt for User Name and Password—Requires you to enter a separate EAP-FAST username and password (which are registered with the EAP-FAST server) in addition to your regular Windows login in order to start the EAP-FAST authentication process.
•![]() Manually Prompt for User Name and Password—Requires you to manually invoke the EAP-FAST authentication process as needed using the Manual EAP-FAST Login option from the ACU Commands drop-down menu. You are not prompted to enter a EAP-FAST username and password during the Windows login. This option might be used to support a software token one-time password system or other systems that require additional software that is not available at login.
Manually Prompt for User Name and Password—Requires you to manually invoke the EAP-FAST authentication process as needed using the Manual EAP-FAST Login option from the ACU Commands drop-down menu. You are not prompted to enter a EAP-FAST username and password during the Windows login. This option might be used to support a software token one-time password system or other systems that require additional software that is not available at login.
Step 7 ![]() If you want to force the client adapter to disassociate after you log off so that another user cannot gain access to the wireless network using your credentials, check the No Network Connection without Login check box. The default setting is not selected.
If you want to force the client adapter to disassociate after you log off so that another user cannot gain access to the wireless network using your credentials, check the No Network Connection without Login check box. The default setting is not selected.
Step 8 ![]() If you work in an environment with multiple domains and want your Windows login domain to be passed to the EAP-FAST server along with your username, check the Include Windows Login Domain With User Name check box. The default setting is not selected.
If you work in an environment with multiple domains and want your Windows login domain to be passed to the EAP-FAST server along with your username, check the Include Windows Login Domain With User Name check box. The default setting is not selected.
Step 9 ![]() If you want to force the client adapter to disassociate after you log off so that another user cannot gain access to the wireless network using your credentials, check the No Network Connection without Login check box. The default setting is checked.
If you want to force the client adapter to disassociate after you log off so that another user cannot gain access to the wireless network using your credentials, check the No Network Connection without Login check box. The default setting is checked.
Step 10 ![]() In the Authentication Timeout Value field, enter the amount of time (in seconds) before a EAP-FAST authentication is considered a failure and an error message appears.
In the Authentication Timeout Value field, enter the amount of time (in seconds) before a EAP-FAST authentication is considered a failure and an error message appears.
Range: 45 to 300 seconds
Default: 90 seconds
Step 11 ![]() If you want to limit the amount of time that is spent finding a domain controller during the authentication process, follow these steps:
If you want to limit the amount of time that is spent finding a domain controller during the authentication process, follow these steps:
a. ![]() Check Restrict Time Finding the Domain Controller to (seconds).
Check Restrict Time Finding the Domain Controller to (seconds).
Default: Unchecked
b. ![]() Enter the amount of time (in seconds) allowed in the authentication process to find the domain controller. Finding the domain controller is the last sequence of the authentication process.
Enter the amount of time (in seconds) allowed in the authentication process to find the domain controller. Finding the domain controller is the last sequence of the authentication process.
Range: 0 to 300 seconds
Default: 0 seconds
Note ![]() Entering a value of zero causes the authentication process to skip the "Finding Domain Controller" step altogether.
Entering a value of zero causes the authentication process to skip the "Finding Domain Controller" step altogether.
Note ![]() The finding domain controller timeout value is included in the overall EAP-FAST authentication timeout value. For example, if the authentication timeout value is 60 seconds, and the finding domain controller timeout value is 10 seconds, the client adapter has up to 60 seconds to complete the entire authentication process, up to 10 seconds of which is allocated for finding the domain controller.
The finding domain controller timeout value is included in the overall EAP-FAST authentication timeout value. For example, if the authentication timeout value is 60 seconds, and the finding domain controller timeout value is 10 seconds, the client adapter has up to 60 seconds to complete the entire authentication process, up to 10 seconds of which is allocated for finding the domain controller.
Note ![]() If you require domain services such as login scripts and roaming desktops, Cisco recommends that you do not check the Restrict Time Finding Domain Controller to (seconds) check box.
If you require domain services such as login scripts and roaming desktops, Cisco recommends that you do not check the Restrict Time Finding Domain Controller to (seconds) check box.
Note ![]() Regardless of whether the check box is checked or unchecked, the "Finding Domain Controller" step is bypassed once you are logged into Windows or if you log into the local machine and not into a domain.
Regardless of whether the check box is checked or unchecked, the "Finding Domain Controller" step is bypassed once you are logged into Windows or if you log into the local machine and not into a domain.
Step 12 ![]() Click OK to exit the EAP-FAST Settings window and return to the Security tab window.
Click OK to exit the EAP-FAST Settings window and return to the Security tab window.
Step 13 ![]() If you want to enable fast roaming on your client adapter, check Allow Fast Roaming (CCKM) in the Network Authentication section of the Security tab window.
If you want to enable fast roaming on your client adapter, check Allow Fast Roaming (CCKM) in the Network Authentication section of the Security tab window.
•![]() Selecting this option enables the client adapter to use CCKM when associated to access points that are using CCKM. Using this option your client adapter can also associate to access points that are not using CCKM.
Selecting this option enables the client adapter to use CCKM when associated to access points that are using CCKM. Using this option your client adapter can also associate to access points that are not using CCKM.
•![]() Not selecting this option prevents your client adapter from using CCKM even with access points that use CCKM.
Not selecting this option prevents your client adapter from using CCKM even with access points that use CCKM.
Default: Not selected
Note ![]() This option is available only when WPA is enabled.
This option is available only when WPA is enabled.
Note ![]() If your computer uses the Microsoft 802.1X supplicant and you want to take advantage of the fast roaming feature, refer to the Microsoft documentation for instructions.
If your computer uses the Microsoft 802.1X supplicant and you want to take advantage of the fast roaming feature, refer to the Microsoft documentation for instructions.
Step 14 ![]() If you want to associate to access points that support WPA and even those that do not support it, check Allow Association to both WPA and non-WPA authentication. If this option is not selected, your client adapter can associate only to access points that use WPA.
If you want to associate to access points that support WPA and even those that do not support it, check Allow Association to both WPA and non-WPA authentication. If this option is not selected, your client adapter can associate only to access points that use WPA.
Default: Not selected
Enabling Host-Based EAP
Before you can enable host-based EAP authentication, your network devices must meet the following requirements:
•![]() EAP authentication is supported only by 340 and 350 series access points running VxWorks release11.06 (or later) or 1200 series access points running VxWorks release 11.40T (or later) or 1100 series access points.
EAP authentication is supported only by 340 and 350 series access points running VxWorks release11.06 (or later) or 1200 series access points running VxWorks release 11.40T (or later) or 1100 series access points.
•![]() MIC, TKIP, PEAP, Broadcast Key Rotation, and EAP-SIM authentications are supported only by 340 and 350 series access points running VxWorks release 11.23T (or later), 1200 series access points running VxWorks release 11.54T (or later), or 1100 series access points.
MIC, TKIP, PEAP, Broadcast Key Rotation, and EAP-SIM authentications are supported only by 340 and 350 series access points running VxWorks release 11.23T (or later), 1200 series access points running VxWorks release 11.54T (or later), or 1100 series access points.
•![]() The Microsoft 802.1X supplicant must be installed on your user's PCs running Windows.
The Microsoft 802.1X supplicant must be installed on your user's PCs running Windows.
•![]() To use WPA or WPA-PSK, you must use a 350 series or CB20A client adapter with the software included in Install Wizard 1.2 or later on a computer running Windows 2000 or XP. Also one of the following host supplicants must be installed. You can download these supplicants from the URLs provided:
To use WPA or WPA-PSK, you must use a 350 series or CB20A client adapter with the software included in Install Wizard 1.2 or later on a computer running Windows 2000 or XP. Also one of the following host supplicants must be installed. You can download these supplicants from the URLs provided:
–![]() Funk Odyssey Client supplicant release 2.2 (for Windows 2000)
Funk Odyssey Client supplicant release 2.2 (for Windows 2000)
http://www.funk.com/radius/wlan/wlan_c_radius.asp
–![]() Windows XP Service Pack 1 and Microsoft supplicant Q815485 (for Windows XP)
Windows XP Service Pack 1 and Microsoft supplicant Q815485 (for Windows XP)
http://www.microsoft.com/WindowsXP/pro/downloads/servicepacks/sp1/default.asp
Note ![]() To use WPA, access points must use Cisco IOS Release 12.2(11)JA or later.
To use WPA, access points must use Cisco IOS Release 12.2(11)JA or later.
Note ![]() For additional information on configuring WPA or WPA-PSK on Microsoft Window PCs, refer to Microsoft documentation and the Cisco Aironet 350 and CB20A Wireless LAN Client Adapters Installation and Configuration Guide for Windows..
For additional information on configuring WPA or WPA-PSK on Microsoft Window PCs, refer to Microsoft documentation and the Cisco Aironet 350 and CB20A Wireless LAN Client Adapters Installation and Configuration Guide for Windows..
•![]() All necessary infrastructure devices (for example, access points, servers, gateways, user databases, etc.) must be properly configured for the authentication type you plan to enable on the client.
All necessary infrastructure devices (for example, access points, servers, gateways, user databases, etc.) must be properly configured for the authentication type you plan to enable on the client.
Follow the steps below to enable host-based EAP authentication (EAP-TLS, PEAP, or EAP-SIM) for this profile.
Note ![]() Because EAP-TLS, PEAP, and EAP-SIM authentication are enabled in the operating system and not in ACU, you cannot switch between these authentication types simply by switching profiles in ACU. You can create a profile that uses host-based EAP, but you must enable the specific authentication type in Windows (provided Windows uses the Microsoft 802.1X supplicant). In addition, Windows can be set for only one authentication type at a time; therefore, if you have more than one profile that uses host-based EAP and you want to use another authentication type, you must change authentication types in Windows after switching profiles in ACU.
Because EAP-TLS, PEAP, and EAP-SIM authentication are enabled in the operating system and not in ACU, you cannot switch between these authentication types simply by switching profiles in ACU. You can create a profile that uses host-based EAP, but you must enable the specific authentication type in Windows (provided Windows uses the Microsoft 802.1X supplicant). In addition, Windows can be set for only one authentication type at a time; therefore, if you have more than one profile that uses host-based EAP and you want to use another authentication type, you must change authentication types in Windows after switching profiles in ACU.
Step 1 ![]() Check Wi-Fi Protected Access (WPA) under Network Authentication on the Security tab window if you want to enable WPA. This parameter enables the client adapter to associate to access points using WPA.
Check Wi-Fi Protected Access (WPA) under Network Authentication on the Security tab window if you want to enable WPA. This parameter enables the client adapter to associate to access points using WPA.
Step 2 ![]() Check Host Based EAP from the Network Authentication on the Security tab window.
Check Host Based EAP from the Network Authentication on the Security tab window.
Step 3 ![]() Dynamic WEP Keys are used if your access point is configured for EAP-TLS, PEAP, and EAP-SIM authentication. Click Dynamic WEP if WPA is not enabled.
Dynamic WEP Keys are used if your access point is configured for EAP-TLS, PEAP, and EAP-SIM authentication. Click Dynamic WEP if WPA is not enabled.
Note ![]() For additional information on configuring a PC running Windows 2000 or XP, refer to Microsoft documentation or the Cisco Aironet 350 and CB20A Wireless LAN Client Adapters Installation and Configuration Guide for Windows.
For additional information on configuring a PC running Windows 2000 or XP, refer to Microsoft documentation or the Cisco Aironet 350 and CB20A Wireless LAN Client Adapters Installation and Configuration Guide for Windows.
RF Settings Tab
The RF Settings tab window (see Figure 4-9) enables you to set parameters that control how and when the client adapter transmits and receives data.
Figure 4-9 RF Settings Tab Window
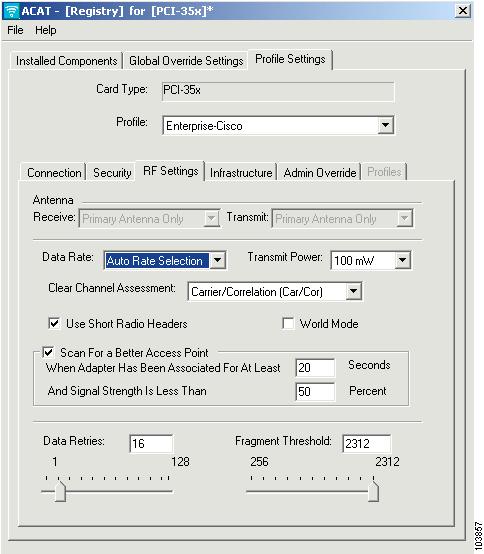
Table 4-4 lists and describes the client adapter's RF network parameters. Follow the instructions in the table to change any parameters.
Infrastructure Tab
The Infrastructure tab window (see Figure 4-10) enables you to set parameters that control how the client adapter operates within an infrastructure network.
Note ![]() You can set infrastructure parameters only if your client adapter is set to operate in an infrastructure network. See the Network Type parameter in Table 4-1.
You can set infrastructure parameters only if your client adapter is set to operate in an infrastructure network. See the Network Type parameter in Table 4-1.
Figure 4-10 Infrastructure Tab Window
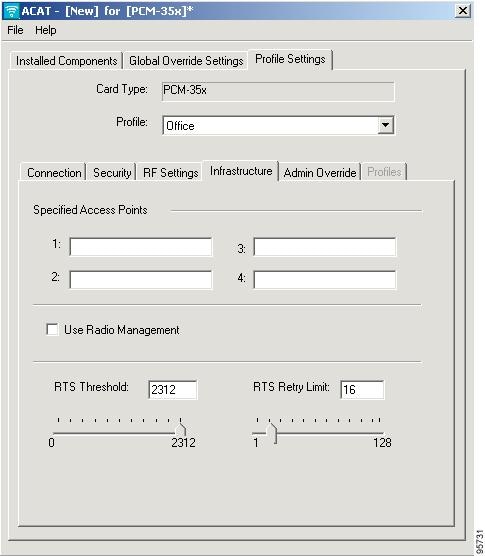
Table 4-5 lists and describes the client adapter's infrastructure parameters. Follow the instructions in the table to change any parameters.
Ad Hoc Tab
The Ad Hoc tab window (see Figure 4-11) enables you to set parameters that control how the client adapter operates within an ad hoc network.
Note ![]() You can set ad hoc parameters only if your client adapter is set to operate in an ad hoc network. See the network type parameter in Table 4-1.
You can set ad hoc parameters only if your client adapter is set to operate in an ad hoc network. See the network type parameter in Table 4-1.
Figure 4-11 Ad Hoc Tab Window
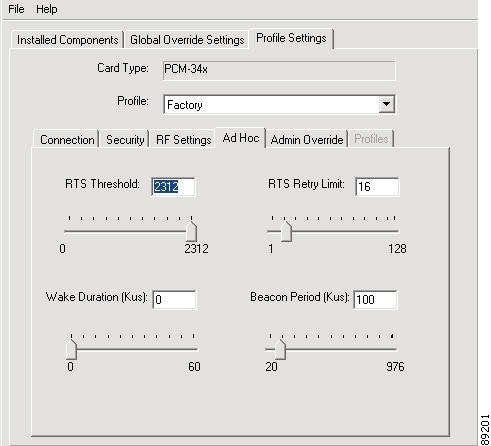
Table 4-6 lists and describes the client adapter's advanced ad hoc parameters. Follow the instructions in the table to change any parameter.
|
|
|
|---|---|
RTS Threshold |
Specifies the size of the data packet that the low-level RF protocol issues to a request-to-send (RTS) packet. Setting this parameter to a small value causes RTS packets to be sent more often. When this occurs, more of the available bandwidth is consumed and the throughput of other network packets is reduced. However, the system is able to recover faster from interference or collisions that may be caused from a high multipath environment characterized by obstructions or metallic surfaces. Note |
RTS Retry Limit |
Specifies the number of times the client adapter resends a request-to-send (RTS) packet if it does not receive a clear-to-send (CTS) packet from the previously sent RTS packet. Setting this parameter to a large value decreases the available bandwidth whenever interference is encountered. However, a large value makes the system more immune to interference and collisions that may be caused from a high multipath environment characterized by obstructions or metallic surfaces. Note |
Wake Duration (Kms) |
Specifies the amount of time following a beacon that the client adapter stays awake to receive announcement traffic indication message (ATIM) packets, which are sent to the adapter to keep it awake until the next beacon. Refer to the power save mode parameter in Table 4-1. Note Note |
Beacon Period (Kms) |
Specifies the duration between beacon packets, which are used to help clients find each other in ad hoc mode. |
Admin Override Tab
The Admin Override tab window (see Figure 4-12) enables you to specify administrator override settings for individual profiles. Each profile can have different settings.
Note ![]() The settings on the Global Override Settings tab apply to all profiles and override these individual profile settings.
The settings on the Global Override Settings tab apply to all profiles and override these individual profile settings.
Figure 4-12 Admin Override Tab Window
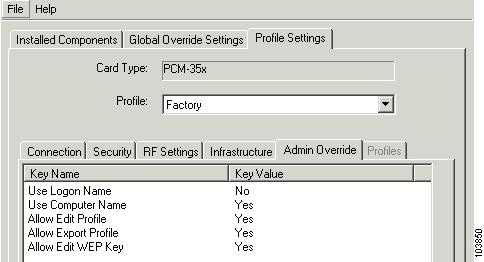
Table 4-7 lists and describes the Admin Override tab parameters. Follow the instructions in the table to change any parameter.
Auto Profile Selection
When Auto Profile Selection is selected in the Profile field, you can manage up to 16 profiles (or saved configurations) for a client adapter. These profiles enable the client adapter to be used in different locations, each of which requires different configuration settings. For example, you may want to set up profiles for using the client adapter at the office, at home, and in public areas such as airports. After the profiles are created, they are automatically switched without requiring you to reconfigure the client adapter each time it is moved to a new location.
Note ![]() Auto profile selection does not support profiles with multiple SSIDs, profiles with a null SSID (no value specified), or profiles with the same SSID.
Auto profile selection does not support profiles with multiple SSIDs, profiles with a null SSID (no value specified), or profiles with the same SSID.
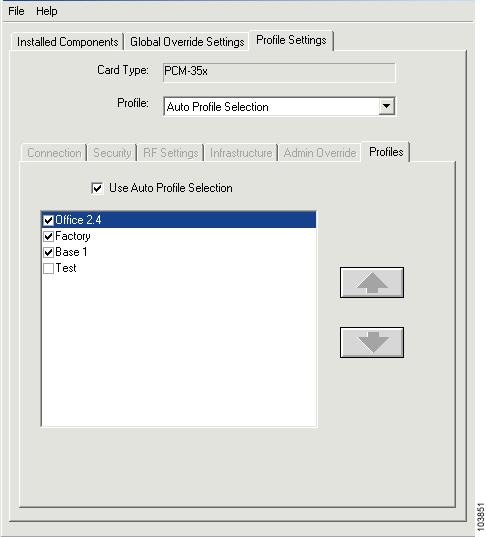
Profiles Tab
When you select Auto Profile Selection using the Profile drop-down menu, the Profiles tab window appears (see Figure 4-13). The window lists all available profiles and enables you to select and prioritize the profiles that are automatically switched. When you roam from one area to another, the SSIDs from the profiles are scanned by priority until a connection to an access point is established. When the client adapter's association to the access point is lost, the SSID scanning starts again from the highest priority profile in the list.
Note ![]() Auto profile selection does not display profiles containing a null SSID (no value specified), a duplicate SSID, or multiple SSIDs. These types of profiles cannot be used in auto profile switching.
Auto profile selection does not display profiles containing a null SSID (no value specified), a duplicate SSID, or multiple SSIDs. These types of profiles cannot be used in auto profile switching.
Figure 4-13 Profile Tab Window
Setting Priorities and Activating Auto Profile Selection
To set priorities and activate auto profile selection on the client adapter, follow these steps:
Step 1 ![]() Check the profiles that you want to include in auto profile selection.
Check the profiles that you want to include in auto profile selection.
Step 2 ![]() Click each profile and use the up and down arrow keys to position the profile into the desired order, highest priority at top of the list and the lowest priority at the bottom of the list.
Click each profile and use the up and down arrow keys to position the profile into the desired order, highest priority at top of the list and the lowest priority at the bottom of the list.
Step 3 ![]() Check the Use Auto Profile Selection check box.
Check the Use Auto Profile Selection check box.
 Feedback