About CPS
DRA
DRA Overview
Cisco Policy Suite DRA (Diameter Routing Agent) is a GUI platform that enables you to perform CPS vDRA related operations and launch the following applications and utilities:
-
Policy Builder - CPS Policy Builder with CPS vDRA specific options to customize and optimize CPS vDRA. For more information, see Chapter 2 Configuring CPS DRA.
-
Custom Reference Data - Interface for service providers to create and populate data tables. For more information, see Chapter 3 Managing Custom Reference Data.
-
Operations
-
DRA Monitoring - Interfaces to monitor the CPS vDRA related operations such as DRA Peer Monitoring, DRA Binding Monitoring, DRA SLF Bindings, and Grafana.
-
DRA API Information - Provides vPAS API and SLF API Documentation.
For more information, see Chapter 4 Managing DRA Operations.
-
DRA Architecture
DRA GUI is compliant with CPS Central functional structure.
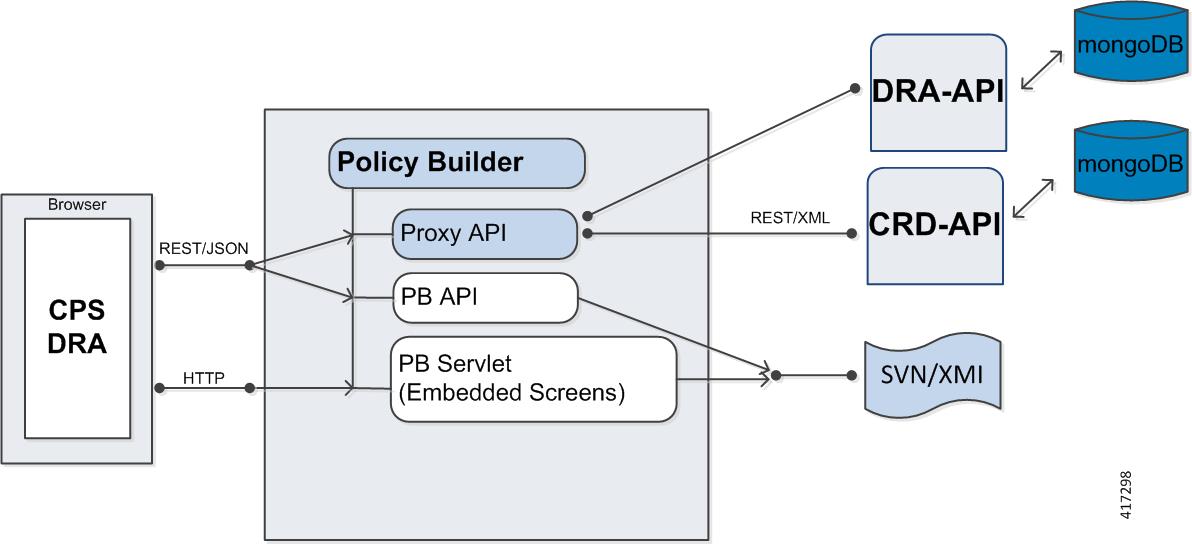
-
PB API layer - Manages PB API requests and interfaces with other CPS APIs. The PB API layer is one unified CPS API layer.
-
PB servlet layer - Manages requests and responses between DRA GUI and the embedded PB screens.
-
DRA GUI client layer -DRA GUI which reuses PB2 modularity and implements CPS vDRA specific GUI.
DRA System Flow
The following section describes the DRA system flow:
DRA Users And Roles
The following types of users/roles are supported in CPS DRA:
Access CPS DRA
You can access CPS DRA on the same port as Policy Builder with /central/dra and /central/dra/ context.
You can enter /central or /central/ in the browser, the application server redirects you to either CPS Central or CPS DRA depending on the install type you have selected during installation.
To access the CPS DRA Interface, use the supported URLs as described in the following table:
|
Install Type |
Entered URLs |
Redirected URLs |
|---|---|---|
|
DRA |
https:// <ip-address>/ |
https:// <ip-address>:7443/central/dra/ |
|
https:// <ip-address>:7443/central |
https:// <ip-address>:7443/central/dra/ |
|
|
https:// <ip-address>:7443/central/ |
https:// <ip-address>:7443/central/dra/ |
|
|
https:// <ip-address>:7443/central/dra |
https:// <ip-address>:7443/central/dra/ |
|
|
https:// <ip-address>:7443/central/dra/ |
https:// <ip-address>:7443/central/dra/ |
|
|
https:// <ip-address>:443/central |
https:// <ip-address>:7443/central/dra/ |
|
|
https:// <ip-address>:443/central/ |
https:// <ip-address>:7443/central/dra/ |
|
|
https:// <ip-address>:443/central/dra |
https:// <ip-address>:7443/central/dra/ |
|
|
https:// <ip-address>:443/central/dra/ |
https:// <ip-address>:7443/central/dra/ |
|
|
Mobile |
https:// <ip-address>/ |
https:// <ip-address>:7443/central/ |
|
https:// <ip-address>:7443/central |
https:// <ip-address>:7443/central/ |
|
|
https:// <ip-address>:7443/central/ |
https:// <ip-address>:7443/central/ |
|
|
https:// <ip-address>:7443/central/dra |
HTTP ERROR 404 |
|
|
https:// <ip-address>:7443/central/dra/ |
HTTP ERROR 404 |
|
|
https:// <ip-address>:443/central |
https:// <ip-address>:443/central/ |
|
|
https:// <ip-address>:443/central/ |
https:// <ip-address>:443/central/ |
|
|
https:// <ip-address>:443/central/dra |
HTTP ERROR 404 (As the installed system is not DRA) |
The hostname is displayed in the login dialog box and system banner to differentiate between open windows while performing any operation of the CPS system. It indicates which system is being modified and prevents any errors or misconfigurations.
The hostname is displayed when the parameter -Dhostname=lab is configured in pb/qns.conf files. If it is not configured in the qns.conf file, it is displayed as a result of the command "hostname" on the server.
The hostname is displayed in the login panel only when the following argument is set to true:
-DshowSitenameLogin
Manage Users
Perform the following steps to add a new user:
-
Enter CONFIG mode as shown:
scheduler# config
Entering configuration mode terminal
scheduler(config)#
-
Use the aaa authentication command to create the user:
scheduler(config)# aaa authentication users user test2 gid 100 uid 9000 homedir / password testpassword ssh_keydir /
scheduler(config-user-test2)# commit
scheduler(config-user-test2)# exit

Note
The gid, uid, homedir and ssh_keydir are required but not used by the application.
Add User To A Viewer Operational Group
In CONFIG mode, add the user to the “oper” group and commit the change as shown:
scheduler(config)# nacm groups group oper user-name test2
scheduler(config-group-oper)# commit
Add User To An Editor Group
In CONFIG mode, add the user to the “editor” group and commit the change as shown:
scheduler(config)# nacm groups group editor user-name test2
scheduler(config-group-editor)# commit
Add User To An Admin Group
In config mode, add the user to the “admin” group and commit the change as shown:
scheduler(config)# nacm groups group admin user-name test2
scheduler(config-group-admin)# commit
Note | To provide a user with Admin CRUD access to CPS DRA Central, add the user to the “policy-admin” group. |
Change A User's Password
In the Management CLI, use the aaa authentication users user change-password command as shown:
scheduler# aaa authentication users user test2 change-password
Value for 'old-password' (<string>): ************
Value for 'new-password' (<string>): ********
Value for 'confirm-password' (<string>): ********
scheduler#
System message at 2017-03-08 21:17:18...
Commit performed by system via system using system.
Supported Browsers
CPS DRA supports the most recent versions of the following browsers:
 Feedback