- Install Policy Reporting Plug-in
- Configure Policy Reporting Plug-in
- Configure a Reporting Server
- Define Policies in Cisco Policy Builder
- Policy CDR Management
- Charging Characteristics AVP in Diameter GY CDR's
- Remove MySQL JDBC Connectors from Standard Load Line-up
- Configuration File Parameters
Reporting Plug-in
Configuration
- Install Policy Reporting Plug-in
- Configure Policy Reporting Plug-in
- Configure a Reporting Server
- Define Policies in Cisco Policy Builder
- Policy CDR Management
- Charging Characteristics AVP in Diameter GY CDR's
- Remove MySQL JDBC Connectors from Standard Load Line-up
- Configuration File Parameters
Install Policy Reporting Plug-in
By default, policy reporting plug-in is not installed in CPS. To install policy reporting plug-in, perform the following steps:
Configure Policy Reporting Plug-in
To configure the policy reporting plug-in feature, perform the following steps:
Configure a Reporting Server
To configure a reporting server, perform the following steps:
| Step 1 | On the Policy Reporting Configuration page, under Create Child: click Reporting Server Configuration. | ||
| Step 2 | The Reporting Server Configuration page opens up. Click select near Related Cdr field. | ||
| Step 3 | Select the
required policy CDR object from
Please
select a 'PolicyCdr’ object... and click
OK. The added policy CDR is added in the
Related Cdr field.
|
Replicate JDBC CDR
Use this procedure if your deployment stores records for offline accounting as JDBC. To enable JDBC CDR database replication, perform the following steps:
The following steps resumes form the Step 3 in Configure a Reporting Server.
Replicate CSV
Use this procedure if your deployment uses a CSV format to store subscriber records. This screen specifies the location of the subscriber records in the output directory.
 Note | Only one CSV configuration should be added under a given server. You can also copy the current CSV Replication configuration. |
The File Generation Schedule Location and File Naming Rules related sections under Csv replication are not used for logging based CDR implementation and instead are configured via logback configuration).
To enable CSV Replication, perform the following steps:
The following steps resume from Step 3 in Configure a Reporting Server.
| Step 1 | Begin from . | ||||||||||||||||||||||||||||||||||||||||
| Step 2 | Click
CSV
Replication to open CSV Replication page.
|
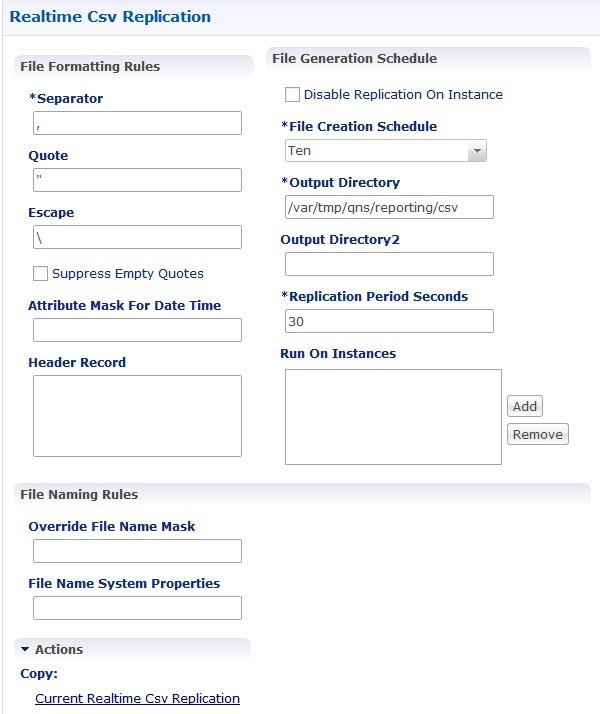
Replicate Real-time CSV
Use this procedure if your deployment uses a realtime CSV format to store subscriber records. This screen specifies the location of the subscriber records in the output directory.
Note | Only one realtime CSV configuration should be added under a given server. The user can also copy the current realtime CSV Replication configuration. |
To enable Realtime CSV Replication, perform the following steps:
The following steps resume from Step 3 in Configure a Reporting Server.
| Step 1 | Begin from . | ||||||||||||||||||||||||
| Step 2 | Click
Realtime CSV Replication to open Realtime CSV
Replication page.
|
Define Policies in Cisco Policy Builder
Based on the extension point used for configuration, the results may differ.
For example, in cases of session termination, the conditions depending on the presence of a session are not satisfied.
If A Diameter Gx TGPP Session exists is configured in the Conditions pane under Send outbound messages, it captures CDRs for all messages including CCR-T message.
But if A Diameter Gx TGPP Session exists is configured for Post outbound message policies, it can capture blank CDRs for CCR-T message. This is due to the session being deleted once the CCR-T message is sent.
As mentioned above, since post outbound message policy is executed after the outbound message is sent across by the CPS, the condition A Diameter Gx TGPP Session exists does not hold true for CCR-T message, resulting in blank CDRs being captured.
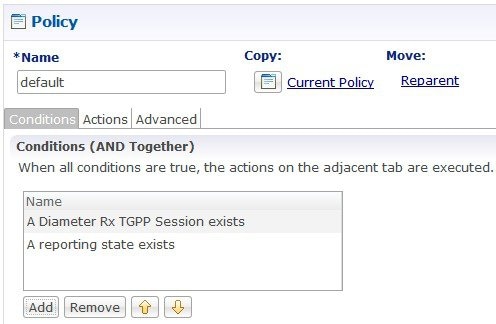
To define a policy in the Policy Builder, add the required fields in the Policy CDR using the data fields available in the Policy Reporting field Category.
| Step 1 | To add a field
into a report, use the following steps:
|
| Step 2 | To map the
fields, use the following steps:
|
| Step 3 | Once the fields are defined for a report, conditions and policies need to be defined, which are available in the Policies tab. To specify a condition, use the following steps: |
| Step 4 | The user needs
to initialize the Input Variables, Type and Operator Value to establish a
connection with the Report. To initialize the values, use the following steps:
|
Policy CDR Management
Cisco Policy Suite (CPS) generates Call Data Records (CDR). For improved management, the generated CDRs are moved onto a server, which provides external tools and dashboards for Reporting.
The following topics briefs you on the Policy CDR Management:
- Policy Reports
- Configure Maximum Number of Files
- Configure File Transfer Protocol (FTP) for Policy CDRs
- Store files in GZip Format
- Non-blocking CDRs
Policy Reports
The Policy Reports are designed to provide all its relevant details in a single page.
Viewing of the Policy Reports can be classified in two ways:
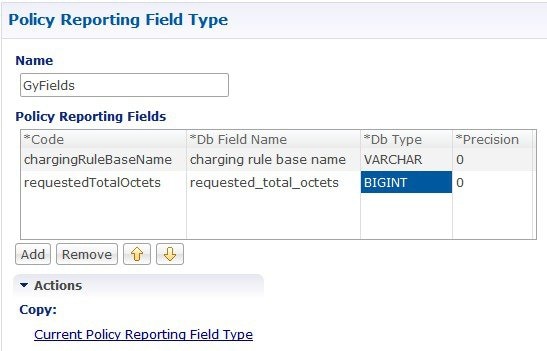
Categories of Policy Reporting Field Types
Data Fields that are available for the Policy Reporting field Types are categorized into the following:
The Data Fields for each of the above mentioned Policy Reporting Fields are displayed in columns on the same page.
For example, The Data Fields for NETWORK is displayed in columns on the same page, along with its other relevant details.
View Data Fields of a Category
To view a categorized list of Policy Reporting Fields and it’s Data Fields, use the following steps:
| Step 1 | Log in to Cisco Policy Builder. By default, the screen displays window. |
| Step 2 | Click Policy Reporting. |
| Step 3 | Select Policy Reporting Field Types. |
| Step 4 | Select a Policy
Reporting Field Type from the categorized list.
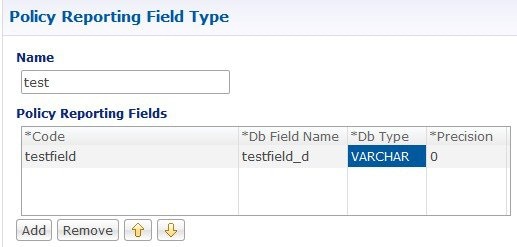
For example, click NETWORK to view the list of data fields that belong to NETWORK on the right side. The data fields related to NETWORK are displayed. 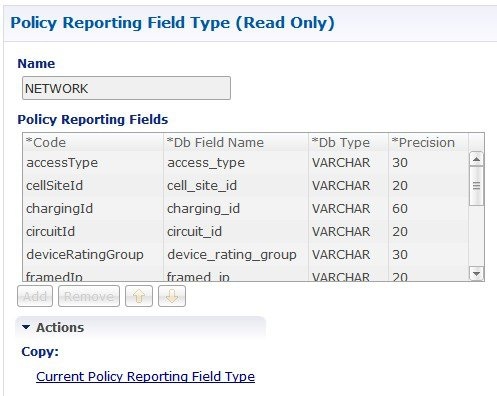 Apart from the fields in the categorized list mentioned, extra fields can be created and configured separately under a new category. These extra fields are called non-default fields. |
Create a Non-default Field
| Step 1 | Click . |
| Step 2 | On the right side, under Create Child:, click Policy Reporting Field Type to open policy reporting field type page. |
| Step 3 | Provide a name to the category in the Name filed. New policy reporting fields can be added to this category. |
| Step 4 | Click
Add to create a field.
 |
View Policy CDR Fields
The Policy CDR provides for the configuration of all the Policy Reporting Fields in the same page, avoiding the creation of multiple child pages for each Policy Report.
To view and configure the Policy Reporting Fields, perform the following steps:
Accumulate CDR Column Values
You can configure a CDR column to report an accumulated value. For example, as shown in the following figure, if you want to report an accumulated value for balance used, you can set the Type for the balanceUsed column to accumulation, which displays the accumulated balance used reported by each CCR-U during a Gx session.
| Step 1 | In Policy Builder in the Reference Data tab, select in the left pane. |
| Step 2 | Click Policy Cdrs under Create Child. |
| Step 3 | Configure the relevant details for the report. |
| Step 4 | Under Reporting Cdr Columns, select a Type of accumulation beside the name of the column whose values you want to accumulate.
Notice that, in this example configuration, the imsi CRD column is the key column. 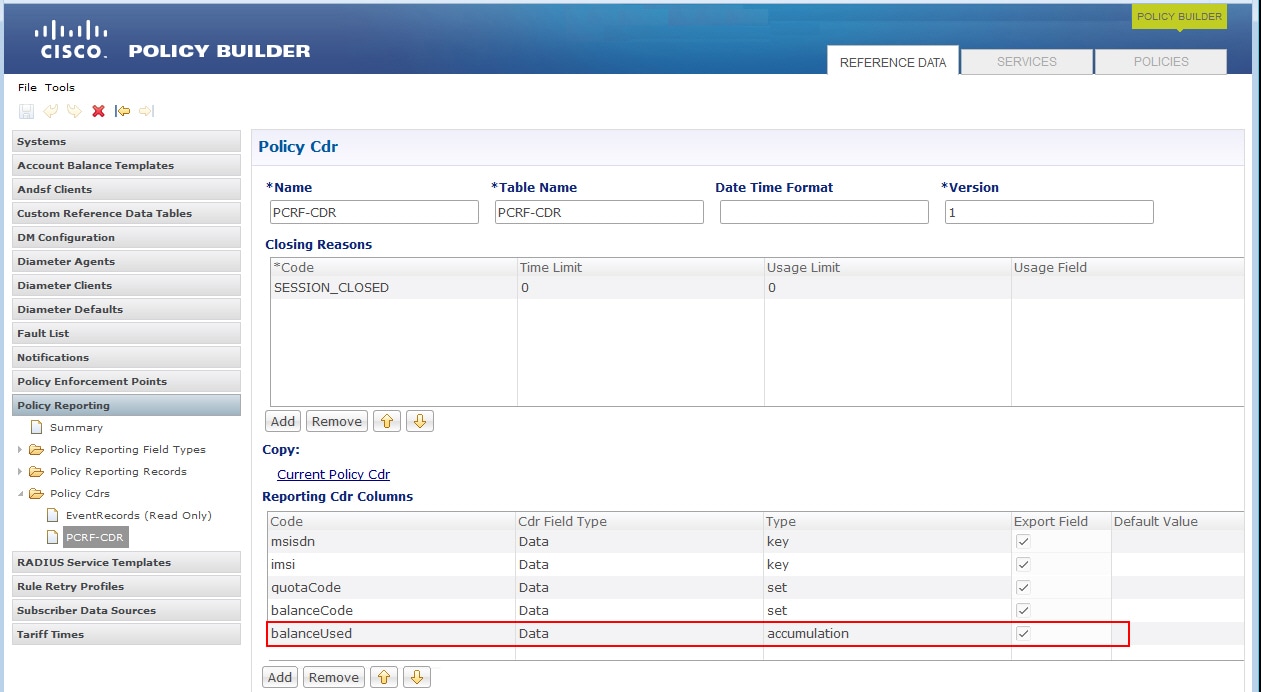 |
| Step 5 | Select the Policy Builder Policies tab. |
| Step 6 | In the left pane, select . |
| Step 7 | Select PCRF-CDR (the name of the policy CDR created above), and click the Actions tab in the Policy pane. |
| Step 8 | Under Actions, click Add. |
| Step 9 | In the dialog box, search for and select Add reporting data, and click OK. |
| Step 10 | Select the new Add reporting data action in the Actions list. The Policy pane now looks like the following figure.
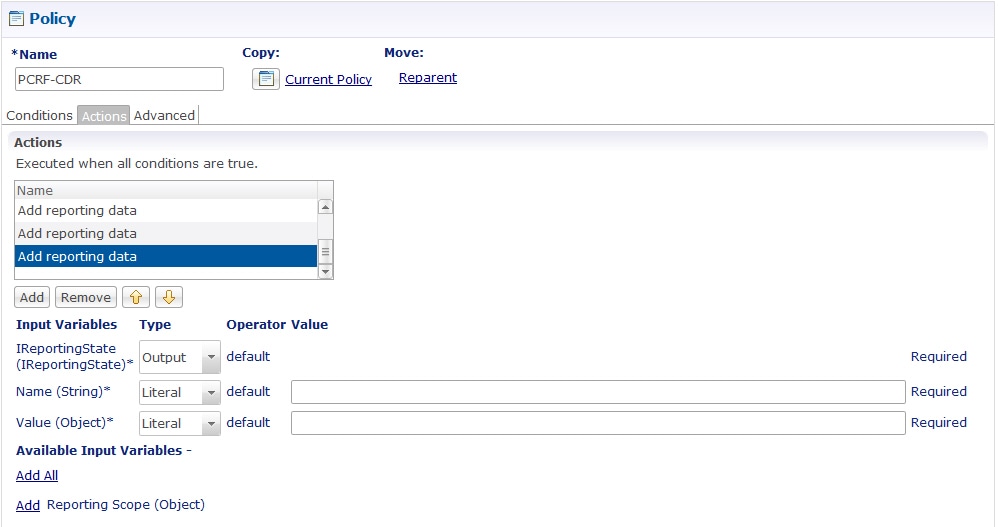 |
| Step 11 | Under Type, select Output for IReportingState (IReportingState). The Available Output Variables dialog box opens. |
| Step 12 | Select IReportingState under A reporting state exists, and click OK. |
| Step 13 | For Name (String), type the name of the CRD column that you configured as an accumulation type (balanceUsed in our example). |
| Step 14 | Under Type, select Output for Value (Object). The Available Output Variables dialog box opens. |
| Step 15 | Select the appropriate variable, and click OK. In our example, for the balanceUsed column, you would select Amount Charged1 under An OCSChargeReservationResponse exists. |
| Step 16 | Under Available Input Variables, click Add beside Reporting Scope (Object). |
| Step 17 | Under Type, select Output for Reporting Scope (Object). The Available Output Variables dialog box opens. |
| Step 18 | Select the name of the key CDR column under A Diameter Gx TGPP Session exists (imsi is the key column in our example) and click OK.
The configuration should now look like that shown in the following figure. 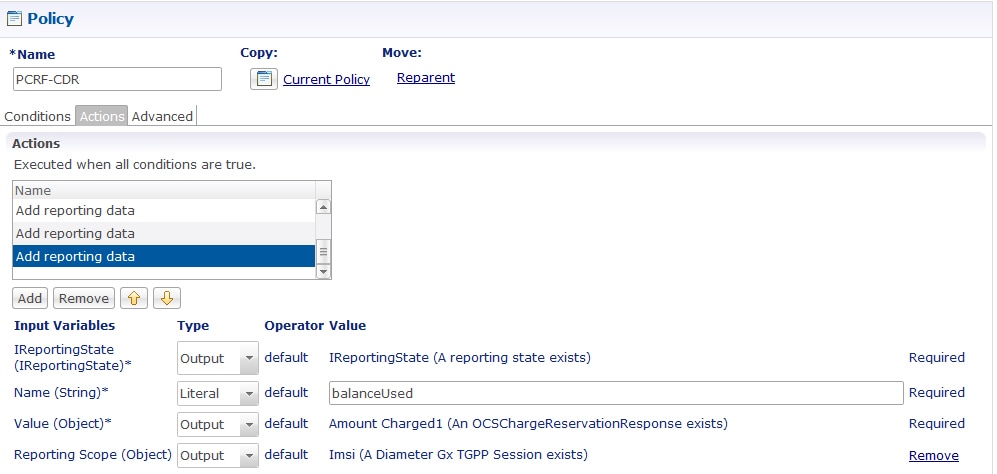 |
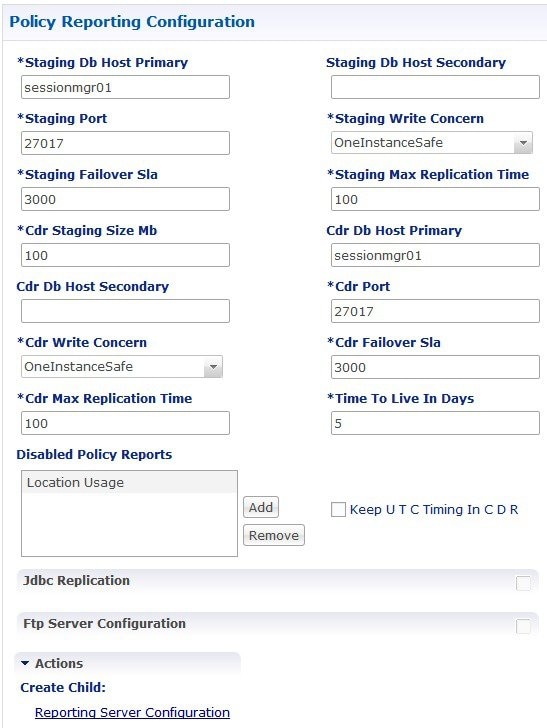
Configure Maximum Number of Files
Using maximum number of files field, you can configure the maximum limit of files that can be stored in the configured output directory. On reaching the maximum limit, the oldest report is deleted.
To set the maximum number of files, perform the following steps:
| Step 1 | Log in to Cisco Policy Builder. | ||||||||
| Step 2 | Click . | ||||||||
| Step 3 | Expand the existing system to navigate to Plugin Configurations. | ||||||||
| Step 4 | Select Policy Reporting Configuration under the Plugin Configuration summary page. The Policy Reporting Configuration page is displayed. | ||||||||
| Step 5 | Scroll down to locate Reporting Server Configuration, under Actions and click on the link. | ||||||||
| Step 6 | From the Reporting Server Configuration page, under Actions select Csv Replication. | ||||||||
| Step 7 | Under
File
Generation Schedule, in the
Max
Number of Files configure the maximum value in the field provided.
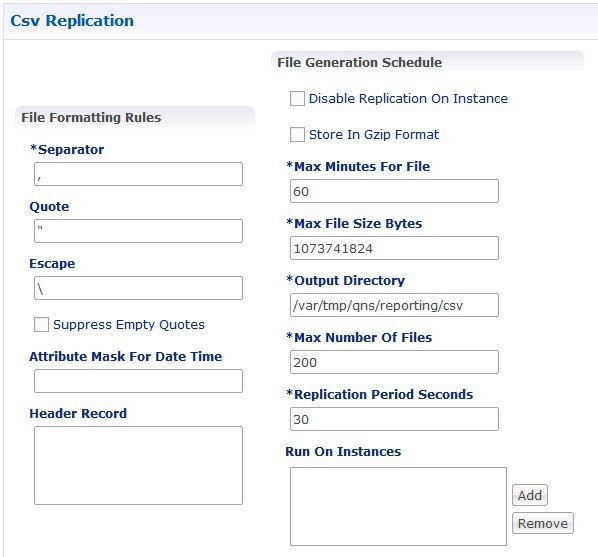 The following parameters can be configured under File Generation Schedule:
|
Configure File Transfer Protocol (FTP) for Policy CDRs
When the FTP server is configured, the generated Policy CDR reports are copied to the configured destination directory on the primary remote server using File Transfer Protocol. If the primary remote server is not reachable, the Policy CDR reports are copied to the configured destination directory on the secondary remote server.
To configure FTP server, perform the following steps:
| Step 1 | Log in to Cisco Policy Builder. | ||||||||||||||||||||
| Step 2 | Click . | ||||||||||||||||||||
| Step 3 | Navigate to Plugin Configuration. | ||||||||||||||||||||
| Step 4 | Select Policy Reporting Configuration under the Plugin Configurations. The Policy Reporting Configuration page appears. | ||||||||||||||||||||
| Step 5 | Locate
Ftp
Server Configuration check box and select it.
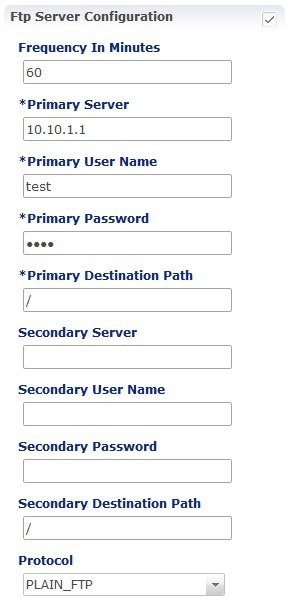 The following parameters can be configured under Ftp Server Configuration:
|
Store files in GZip Format
The policy reports in the configured directory can be stored in the GZip format.
To store the file in the GZip format, perform the following steps:
| Step 1 | Log in to Cisco Policy Builder. |
| Step 2 | Click . The Policy Reporting Configuration page appears on the right side. |
| Step 3 | Under Actions, click . |
| Step 4 | Under
File Generation Schedule, select
Store In Gzip Format check box.
By default this check box is unchecked. If this check box is enabled, the files are stored in GZip format in the configured output directory. Otherwise, files are not zipped. |
Non-blocking CDRs
During the time when CDR database is down/slow, CDR attempts be logged in the Policy Server (QNS) logger (to its best but not 100% writes) and not in database, so that live traffic can be served. CDR can be made non-blocking and non-guaranteed (best effort to make it available), so that policy engine performance does not get degraded. CPS does best try to preserve CDR, however there is no guarantee.
Note | Cisco recommends disabling blocking CDRs and enable compression. |
| Step 1 | Configure
non-blocking CDR: Non-blocking CDR do not block the processing threads when CDR
writing takes time. This prevents performance degradation of live traffic.
| ||
| Step 2 | Configure CDR
compression: CDR compression is used to compress CDR records and adds padding
to improve the write performance. It also helps in preventing database lock (%)
to grow over period.
| ||
| Step 3 | Configure CDR
mongo parameters:
| ||
| Step 4 | Configure
logger, to see dropped message. When non-blocking CDR is configured, CDR may
dropped.
| ||
| Step 5 | Configure
grafana to see the average number of CDR drops and writes.
Sample grafana query: groupByNode(cisco.quantum.qps.*qns*.node1.counters.cdr.*, 6, 'sum') |
Charging Characteristics AVP in Diameter GY CDR's
Cisco Policy Suite(CPS) provides the ability to produce reports on Gy Charging Characteristics AVP in Call Data Records (EDR/CDRs).
When a Gy session takes place, PS-Information in the AVPs is processed from the Gy CDR messages and populated in the reporting records. The Policy Builder is configured to populate the CDRs with the required fields, when a Gy Session is initiated.
- Add Variables to Policy Reporting Field Types
- Create Call Data Record (CDR) for a Gy Session
- Define Conditions for a Gy Session
Add Variables to Policy Reporting Field Types
To add variable to a non-default Policy Reporting Field Type, perform the following steps:
| Step 1 | Log in to Policy Builder. |
| Step 2 | Click . A summary window appears on the right side. |
| Step 3 | In the summary window, click Policy Reporting Field Type to create a non-default policy reporting field type. |
| Step 4 | Provide a name for the policy reporting field type in the Name field. |
| Step 5 | In the Policy Reporting Fields table, click Add to add a variable. |
| Step 6 | To create the CDR for the Gy Session, the AVP (variables) need to be added. |
| Step 7 | Click
Add to add more variables to the Policy Reporting
Field Type.
 |
| Step 8 | Click the Save icon to save the new policy reporting field type. |
Create Call Data Record (CDR) for a Gy Session
To create a CDR for a Gy session, perform the following steps:
| Step 1 | Log in to Policy Builder. |
| Step 2 | Click . A summary window appears on the right side. |
| Step 3 | In the summary window, click Policy Cdr to create a new report. |
| Step 4 | Provide name and table name to the new report in the Name field and the Table Name field respectively. |
| Step 5 | Enter a value for the Version field. |
| Step 6 | In the
Reporting Cdr Columns table, add the variables
required as defined in the
Policy Reporting Field Types created for the
Gy session. To add required the required variables:
|
| Step 7 | To associate the
variables with the Policy Reporting Field Type:
Repeat the following steps for all the variables defined in Reporting Cdr Columns table. |
Define Conditions for a Gy Session
When a Gy session is initiated the Policy Report defined in the above sections is populated with the Call Data Records (CDR).
In order to populate the policy report when a Gy session is initiated, conditions are needed to be defined. These conditions are defined under the Policies tab. When a Gy session is initiated if the conditions is matched, the policy report is populated for the required fields in the CDR.
To define a condition, perform the following steps:
| Step 1 | Click on the Policies Tab, a summary window is displayed. |
| Step 2 | In the left pane, click . |
| Step 3 | In the Policypage, select Conditions tab. |
| Step 4 | Select the
required condition from the
Conditions tab.
A list of available input variables are displayed, which can be assigned to the condition in the Actions tab, where all the defined conditions are executed. |
| Step 5 | Select Actions tab and click Add to add an action. A window is displayed requesting the user to select an Action Phrase. |
| Step 6 | Select Add reporting data and click OK. For the selected action, assign the Input Variables, Type and Operator Value. |
| Step 7 | For the input variable, IReportingState, assign the output variable type from the drop-down list. Select Output. A window displaying the available output variables is displayed. Select the required output variable and click OK. |
| Step 8 | For the input variable, Value, assign the output variable type from the drop-down list. Select Output. A window displaying the available output variables is displayed. Select the required output variable and click OK. |
| Step 9 | For the input
variable,
Name, enter the field name such that the field
name is matched with the Gy field name created in Policy Cdr field.
The output field name defined for Name should be the same as defined in the Policy Cdr to populate the column in the policy report accordingly. When a Gy session is initiated, the condition A Gy V8 session exists is checked. If the condition is matched, the values that are defined in the Actions tab are executed and the fields in the policy report are populated respectively. |
Remove MySQL JDBC Connectors from Standard Load Line-up
| Step 1 | Add the
following entry to
qns.conf
file on all the
Cisco Policy Suite boxes.
-DmysqlDriver=file:///var/broadhop/jdbc/jdbc_5_1_6.jar |
| Step 2 | Download MySQL jdbc 5.1.6 binary jar from http://ebr.springsource.com (search for com.springsource.com.mysql.jdbc and download version 5.1.6 from the link). |
| Step 3 | Rename the downloaded jar file to jdbc_5_1_6.jar and copy the jar file to /var/broadhop/jdbc/ directory on all the system boxes. |
| Step 4 | Synchronize all the boxes and then restart the system. |
Configuration File Parameters
In addition to the configurations mentioned in the above sections, the following parameters need to be set in qns.conf file.
-
Parameter disableCdrReplication in qns.conf file:
This flag is used to specify whether the process should participate in doing CDR replication or not. -
If disableCdrReplication is set to true (as disableCdrReplication=true) then the processes using corresponding configuration file will not participate in CDR replication.
-
If disableCdrReplication is set to false (as disableCdrReplication=false) then the processes using corresponding configuration file will participate in CDR replication.
-
If disableCdrReplication is not specified then disableCdrReplication=false will be used as default and corresponding behavior is applicable.
By default, this flag is set as false. Configuration is applicable only for processes for which com.broadhop.policyintel.service.feature is installed. It does not have any effect on other processes.
Example: -
With disableCdrReplication=true in /var/broadhop/qns.conf file, none of the processes will participate in CDR replication as /var/broadhop/qns.conf is used by all processes.
-
With disableCdrReplication=true in /etc/broadhop/pcrf/qns.conf file, Policy Server (QNS) VMs processes will not participate in CDR replication as /etc/broadhop/pcrf/qns.conf is used by process on Policy Server VMs.
For synchronizing configuration files from Cluster Manager to VM, refer to CPS Installation Guide for 9.0.0 and prior releases or CPS Installation Guide for VMware for 9.1.0 and later releases.
-
-
Parameter oracleDriver in qns.conf file.
This flag is used to specify the oracle driver to be used for replication to database.
Configuration is applicable only for processes that have com.broadhop.policyintel.service.feature installed and are participating in database replication. It does not have any effect for other processes.
Example:
-DoracleDriver=file:///var/broadhop/odbc7.jar
Oracle ODBC jar can be downloaded from http://www.oracle.com/technetwork/database/features/jdbc/.
Downloaded jar may need to be renamed to the name specified in configuration and needs to be copied to all required VMs at the same path that is specified in above configuration.
Enabling Redis Reporting
You can add the following parameters in the qns.conf file to enable Redis for reporting purposes. When you enable these parameters, the current Mongo storage is bypassed, and each Policy Server node writes the CDRs to a Redis queue.
-
The enableRedisReporting parameter enables Redis reporting and bypasses Mongo when set to true. This parameter should be configured on each Policy Server and Policy Director. Possible values are true and false. If this parameter is not present in the qns.conf file, the default value is false.
Example:
-DenableRedisReporting=true
-
The reporting.redisSLA parameter sets the time an incoming message from the Redis server remains in the reporting queue before being dropped. This parameter should be configured on all Policy Director nodes, or on any node that is performing replication. The value is in milliseconds, and the default value is 500. You may want to increase this value based on your requirements.
Example:
-Dreporting.redisSLA=1000
 Feedback