About Wireless LAN Design Guide
This design guide provides updated engineering guidelines and practical techniques for designing, planning, and implementing a wireless LAN (WLAN) within any High Client-Density environment.
High Client-Density can be defined as any environment with a high number of concentrated clients (1 client every > 1.5 sq m) , such as a conference room, classroom, lecture hall, auditorium, sports arena or Conference hall. The concepts stay the same regardless of the size of the challenge. The tools required and methods employed increase in complexity with the complexity (size) of the challenge.
-
you cannot serve more bandwidth than you have available, and
-
Capitalizing on ALL of the potential bandwidth is a matter of proper sizing and an Efficient and tuned design
In this guide, we will look at 3 use cases of different sizes/challenges. We will walk through how we planned, designed, and implemented these solutions. We will Identify key criteria that characterizes the environment in each use case and discuss the key priorities to be managed in all phases of the solution. This guide is about the RF physical layer requirements and how to scale it. Core services such as DHCP, Radius/ISE are critical to your success as well and need to scale with the client base. We assume that these on wire subjects are already familiar or covered adequately in one of the guides listed below in Related Documentation.
For this discussion we will focus on the wireless physical layer as this is where we routinely see issues. High Client Density is not something most Wi-Fi professionals design around on a daily or even quarterly basis. As the scale increases testing the results becomes impractical as a lab exercise. The only way we've found to get 5000 people to come and sit in your chairs and play with the Wi-Fi is to put something on the stage that interests them.
This document is intended for wireless network design engineers responsible for designing, deploying, and maintaining today's Wi-Fi networks. Knowledge of Cisco ® networking concepts, WLAN technology fundamentals, Cisco wireless access architectures and features along with familiarity with basic configurations are prerequisites.
Executive Summary
Since the first release of this document -many beneficial changes have taken place in the Wi-Fi industry. 802.11n has matured and 802.11ac is proliferating the market place. Along with advances in radio technology (orders of Magnitude), the maturation of the smartphone's and tablet's becoming, more frequently the preferred method of access. Application optimizations and much better hardware have all yielded quicker refreshes of our client base with consistently better and more up to date radios. At the initial writing of this document - we were quite happy to find just 50% of clients on a given network using the 802.11n protocol, we routinely see 98-99% at least at 802.11n with as many as 70% being 802.11ac capable clients.
It's easier than ever to plan and execute against a High Client Density requirement and deliver a High QOE (Quality of Experience). The key to this is planning, depending on your requirements it can be a little, or a lot. But making choices that support the intended goal of the network is required at some stage. We need to understand how the network will be used to make good technology and resource decisions. But what if the requirement details a new service offered on the network, no one really knows how or what the network will ultimately be used for. Fortunately we have some experience in this area, and we'll offer our experience below regarding sizing and expected results as well as design considerations. While the industry has made great strides advancing Wi-Fi in general, the specter of a flash mob showing up someplace where you don't expect and worse, don't have infrastructure deployed for continues to keep some network admin's awake at night. Today it is still true that if you didn't build for it, you can't supply it. Even here though - there is fresh hope. Innovations like the AP4800/3800/2800 can ease this worry and maximize on your investment. The Flexible Radio Architecture can sense an increased demand and automatically re-configure itself to bring another 5 GHz cell online doubling capacity on demand in the same space with the same Ethernet port (Via FRA-Client Select). Pretty Cool. It can do a lot of other cool stuff as well, we'll discuss it at length in the use cases ahead.
Since the first release of this document, high density success stories have accumulated. It almost seems routine to have an event where 5K users sit in densities of 1 user/meter with Wi-Fi that is delivering multi-media applications at a high QOE. Some examples of high client densities include CiscoLive events around the world (4 each year), operating in some of the harshest conditions for Wi-Fi and delivering great QOE at every event worldwide. Countless Universities, Stadiums, and corporate offices rely on it daily. The all wireless office is now being delivered routinely today as well. The current technology has proven reliable through a range of extremes whether it be a corporate training room with 100 seats, or a 4M ft2 /370K m sq Convention center with 100K of your closest friends dropping by for a party. The planning and techniques get more complex proportionally as the size of the challenge grows of course.
While these guidelines have been developed based on experience gathered at multiple small and large venue events, the design principles are applicable to any high client density environment. Some of the more common high client density scenarios are classrooms, meeting rooms, lecture halls, and anyplace that users are likely to gather in high numbers to collaborate.
Understanding the key challenges and learning to design and configure the system to overcome them in a managed fashion, will lead to success. Making Data Driven decisions is what this document is all about. Maximizing the bandwidth per square foot is what Cisco's commitment to RF excellence makes not only possible, but manageable and scalable.
In this guide we will look at 3 different use cases with common scenarios and solutions at varying scale. While every venue and different room can present unique challenges, there are solutions that can be applied in almost any vertical contained below. We'll discuss what the challenge is, what to plan for (we learned a lot of that the hard way) and how to properly size it. The intent of this paper is to provide you, the engineer, with the information you need to make informed decisions regarding design and implementation that will lead to repeatable, scalable results.
Introduction
In a wired network, the base unit of bandwidth is the switch port - 1 Gbps or more. If you need more bandwidth - you add more ports or the type of port (MGig, 10 Gig, 40 Gbps…). In Wi-Fi, the base unit of bandwidth is the AP radio and its cell (area of coverage). In a Wi-Fi cell - "Potential" bandwidth is based on the protocol supported on both radios (802.11a,n,ac - 1ss-3ss) and where the client is in relation to the AP/Radio within the cell. A single AP radio represents a finite amount of Potential bandwidth. This bandwidth will be shared with all the users of the cell. If the number of users increases, then the potential bandwidth each will receive decreases. In simple math it looks like this - if you have 100 Mbps available, and you have 10 active users concurrently accessing it then each user will potentially get 10 Mbps assuming all stations being the same capability. Differences in station capabilities make the math not so simple - but that's beyond our control. If the number of users within a cell is large enough that the required per user bandwidth can't be met, then you need to add another cell to get more bandwidth AND split the users between the two pools of finite potential bandwidth being offered. Unlike a wired port which contains it's bandwidth in an interference free copper pipe between two interfaces. Our cell is relying on RF energy, that propagates through the medium (air). Air and copper both have propagation losses associated to the resistance or decay in signal level associated with each medium. Copper is better - because the losses are lower and interference is manageable and stable. Air on the other hand is less conductive and interference cannot be managed as well.
The net is both technologies rely on SNR (signal to noise ratio) to effectively communicate. To understand SNR - let's pretend you are in a large room - with just you and one other person. Under quiet conditions - Its possible for you and that person to have a conversation using your inside voice from several meters away. Now, fill that room with talking people - and you need to be much closer to maintain that conversation - because the noise level went up - so must the signal level to maintain the same understanding of the words. Moving closer increases the energy you receive over the distance, and using your outside voice increases that further. Communication technologies are dependant on SNR as well. Copper SNR is relatively constant assuming a clean termination and specifications being observed. 1 Gbps going in yields 1 Gbps out at the other end regardless if the run length is 100 meters or 3 meters. The air medium has higher attenuation to RF energy than copper, and we can't control the noise as well, being a free medium open to all. The experience of bandwidth over distance is more restrictive and pronounced - BUT - we don't have to be on a wire. Wi-Fi channels keep cells separated in frequency - so we can add more bandwidth. It gets more complicated when you need to start re-using channels in order to provide enough bandwidth/cells to meet the requirements. Spectrum (the radio frequencies we rely on for our Wi-Fi Channels) and Airtime are the two critical resources we need to manage. The following pages illustrate current practices to meet these tasks. For you the engineer - this is how to do the magic trick, for everyone else it's just going to be magic.
High Client Density
High Client Density is different fundamentally. Unlike the Wireless Enterprise office where perhaps 20 users per AP is the design goal, users will sit and work much closer together. When clients and people condense and reduce the space between them RF physics doesn't change, but their relationships to one another do. The average occupancy rate for all AP's at the last GSMA Mobile World Congress show in Barcelona Spain with1200+ AP's ran at 50-60 clients per radio interface. Fira Barcelona's deployed average cell density is 2500 ft 2 /230 sq m. Peak associations on many of the AP's hit 100-150 associated clients per interface during the show when one location or another drew a lot of attention to their individual events. This example is an extreme to be sure but it illustrates the different ask between the two use cases.
The physical RF differences between the High AP Density and a High Client Density use case is in how the AP and client see one another, their RF realities shift sort of. Two terms common in radio is LOS (Line of sight) and NLOS (non-line of sight). In the office environment the AP is mounted at the ceiling, and the clients are on the floor. With higher densities of AP's being deployed along with less walls and cubes, both the client and the AP have near line of sight to one another, and the client to client view is also good in the relatively open space.
In high Client Density, the AP's on the ceiling still have relatively good LOS when compared with the client. The AP's sensitivity and antenna gain are generally much better than the client radios - due to form factor, available real-estate and function. Client sensitivity can and does vary from one device/implementation to the other and is always less than that of a good AP's. How well the devices can hear matters because all Wi-Fi operates on a contention mechanism to access the medium. Getting on the air is strictly listen before talk.
Before any radio can put a packet in the air - it has to hear quiet at its relative CCA (Clear Channel Assesment) threshold. The Wi-Fi standards all agree on what that threshold is, but an individual devices sensitivity determines how well it can hear (and demodulate). A client device calibration tolerance is generally +/- 3 dB, calibration determines how the device perceives a signal at -67 dBm reference to actually be (a 6dB margin means -71 to -64 dB). In testing we have noted a 13 dB difference between modern smartphones which have the highest resource constraints.
For an omni-directional antenna AP on the ceiling - It can and does hear pretty much everything within its cell radius and beyond. But for the client device, surrounded by bodies and with a lower sensitivity, negative rather than positive antenna gain, the perception of a free medium can be quite different. Clients still transmit when the carrier is free (from their perspective) however in the much denser RF environment of the floor devices at less spacing will be somewhat blinded to one another in RF essentially with the added shielding of users packed together. The net result is there are more collisions (between the clients) in the free space just over their heads. This raises the noise floor and lowers SNR. All of that translates to lower speeds and higher airtime utilization. This characteristic will be covered more in the following use cases at length as we discuss how to manage it.
For the bandwidth you need to provide, take a look at the chart below for some typical guidelines around popular applications. These are "typical", and if you have a specific application in mind - it bears testing in a lab setting and getting a good feeling for where it falls below an acceptable QOE threshold.
In most cases assuming 802.11ac (AP and Client) and a properly designed and configured edge - we can comfortably deliver 10-20 Mbps, to 50 clients. We generally shape the bandwidth to limit it to 4-8 Mbps (client occupancy rates of 100 per Radio) in the densest scenarios.
|
Application |
Throughput |
|---|---|
|
Web-casual |
500 Kbps |
|
Web-Instructional |
1 Mbps |
|
Audio-casual |
100 Kbps |
|
Audio - instructional |
1 Mbps |
|
On-demand or streaming Video casual |
1 Mbps |
|
On-Demand or streaming Video -(1080p) |
2-5 Mbps |
| On demand or Streaming video 4K | 15-18 Mbps |
| File-Sharing casual | 1-2 Mbps |
| File-Sharing instructional | 2-8 Mbps |
| Online testing | 2-4 Mbps |
| Device Backup's | 10-50 Mbps |
So let's begin by looking at 3 different use cases of increasing high client density and complexity. Identify the key design criteria and why it's different, identify the design elements to be managed, and the solutions used as well as the best practices and config choices used and why. In all cases, we are basing our assumptions and solutions on current 802.11ac Wave 1 and or Wave 2 infrastructure hardware. The same concepts apply to 802.11n, but there will be less bandwidth available and you should adjust accordingly based on your experience.
Smaller Cells, More Radios, More Bandwidth
-
TX power
-
Reducing the power will reduce the effective coverage by reducing the area covered at the target RSSI
-
The amount we can reduce power is limited however as we need to maintain a high SNR (25dBm). The clients will all be transmitting at 10-12 dBm generally and will need a balanced power level to be successful.
-
Reducing Tx power doesn't do anything to reduce the Rx Cell size. Clients will still TX at the same power level and will still be heard at the same distance as before.
-
-
Minimum Data Rate used
-
Increasing the mandatory minimum data rate in use will reduce the effective size of the cell by increasing SNR required to support it. This will force clients to be closer to the center in order to associate and authenticate.
-
The increased SNR required for a higher Data Rate will reduce the distance that another AP will be able to demodulate the signal. Any signal we can't demodulate becomes noise and saves us some Channel Utilization over a demodulated Wi-Fi packet increasing efficiency.
-
It will encourage better client load balancing as the cells are physically smaller (in RF)
-
Will not impact heard interference heard by the AP only change the impact from valid signal to noise from surrounding AP's
-
-
Attenuate the signal within the room
-
Under seat placement of the AP's will do this by using peoples bodies as attenuator between the AP's and making a decidedly non-line of site signal. This works to a degree, but inconsistent experience within the cells is a likely factor.
-
With the AP's under the seats- it depends on the seat construction on how the AP's will see one another. If metal seats, then there will be an all-inclusive waveguide for signal beneath the seats and the AP's will hear each other better than if they were on the ceiling.
-
In all cases, this method reduces the dynamic range of the cell, but is effective for temporary low to moderate use models (20-30% concurrent use).
-
-
Antenna Selection
-
An antenna will shape how the AP's transmit AND receive pattern will ultimately look. Most internal antenna AP models have omni directional antenna's to provide maximum coverage in a relatively round pattern - but there are many types of antenna's that do all sorts of different and beneficial things, we Will discuss this later.
-
Ceiling mounted provides excellent LOS coverage as well as interference rejection - and maximizes the dynamic range the design will handle. Even if you don't think you'll need it today, when was the last time you were handed requirements that stayed consistent against the test of time. In networking, More is always required over time.
-
TX_Power to control Cell Size
Adjusting the TX Power of the AP's would seem to be the intuitive way to reduce the sizes of the cell's. In fact at one time we thought (and many still do) that simply designing with the absolute minimum power levels in mind is the "right" way to manage all that could go wrong in high client density. It's intuitive, lower power (or the minimum required) = less interference. Like speaking softly in a large crowded room allows all to speak freely if everyone agrees to speak softly that is the problem and you have no control over the client power how one client hears you, is not how another manufacturers client - or even the same client in a pocket or blocked by a body at a different angle will hear the AP. Every device has a different internal architecture, so antenna type/placement, power budget, all play a role in the end result regarding radio performance. You can have the same client radio chip in two different devices and see real differences in their opinions of the RF. We also mentioned SNR was going to be a factor you will need to manage. At the client side - SNR is totaly dependent on the client and its current local conditions - which can and do vary.
How do you know if you have enough power? If you don't you'll be getting random user complaints from just about everywhere. Reducing the infrastructure Tx power does improve co-channel interference - however it lowers SNR at the floor which is something that must be managed. (see "High Client Density Characteristics" above regarding the client side observations.
Cell Size and Minimum Mandatory Data Rates
The Data Rate used in a Wi-Fi conversation is generally chosen by the devices based on the quality of the connection in terms of SNR.At one time a client would simply prefer a louder AP. The algorithms have gotten a lot better and SNR, retry rate, and other factors all contribute to more sensible decisions. Remember when many clients would automatically associate to 2.4 GHz and bypass 5 GHz because 2.4 was louder ?
-
Mandatory
-
Supported
-
Disabled
Mandatory means that unless the client also supports this data rate, it will not be admitted. Supported means - may or may not and Disabled means not supported and we will not use it.
With each higher data rate requiring a higher SNR to operate this translates directly to the ability to create a larger or smaller effective or logical cell. Important note - "Effective or Logical" because the RF energy can still be heard at the same distance, which means it can still interfere. However with a higher data rate than can be demodulated it is counted simply as noise and doesn't get copied into the equation with the cw-min and nav that adds time and Channel Utilization over and above the actual RF noise.
A "Minimum Mandatory" data rate is the lowest data rate that we set as mandatory, and this data rate has some special properties. Every client that wishes to join our cell "Must" support - and use that data rate or higher to associate and authenticate on our cell.This allows the designer to decide how close a client must be to join the cell.This allows the designer to decide how close a client must be to join the cell.This selected data rate will be the rate used to send not only beacons - but all management traffic, so it is very important and special.
Notice the focus on the legacy 802.11a/802.11g data rates - or the OFDM rates.
The below graphic represents the effects of data rate on Cell size
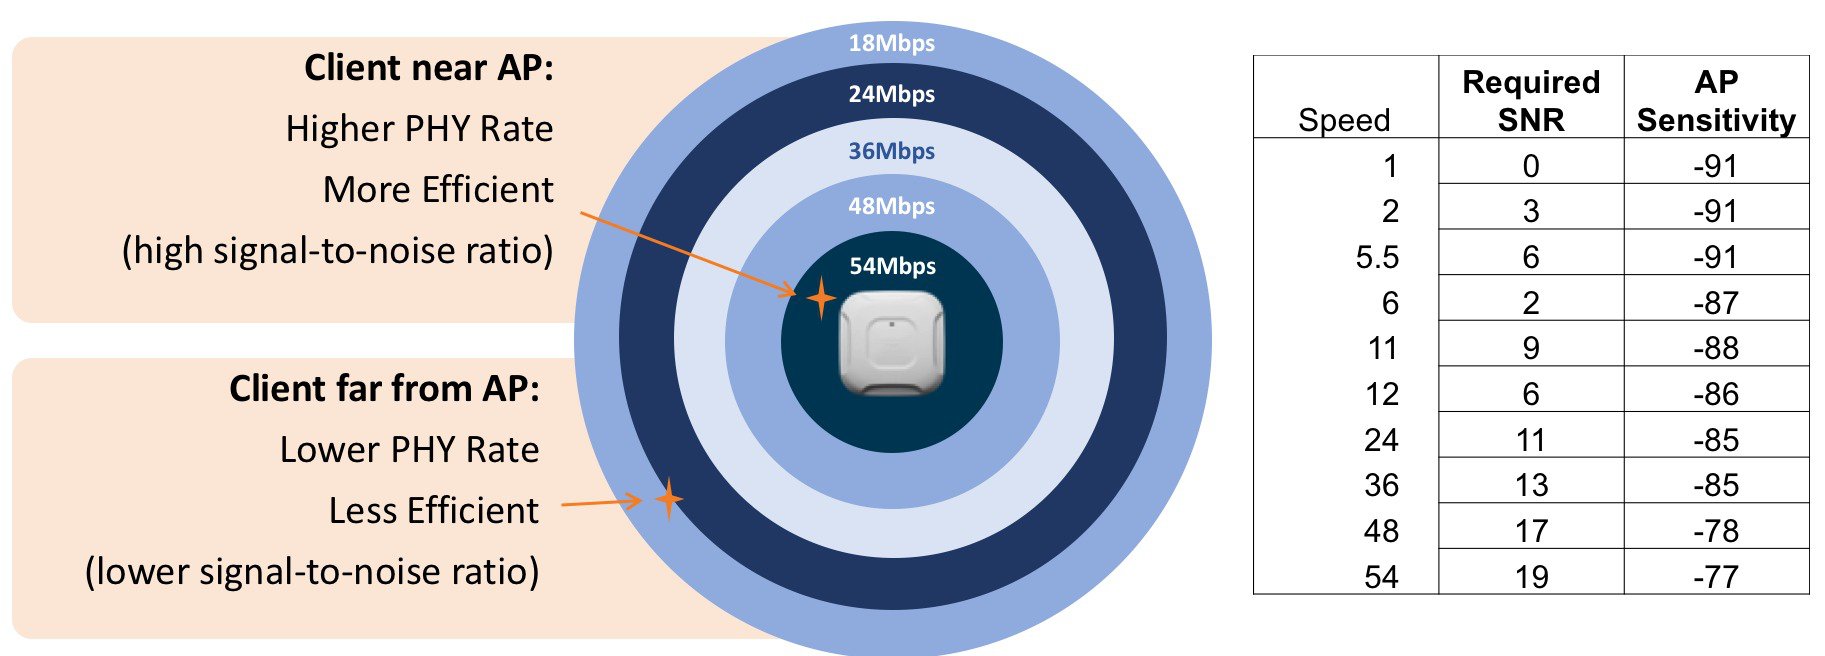
As you can see in the example chart and table above - each data rate has a required SNR, and a minimum sensitivity component. The sensitivity data is generalized as each radio has different characteristics. Data for all Cisco Radios can be found in each radios data sheet documented as Minimum Sensitivity like this one for the AP3800 . It also bears mentioning that not only does Data Rate govern effective cell size - it also enforces higher efficiency across the entire cell - higher data rates take less airtime and allow more bandwidth for all. A higher Data Rate = smaller cell and more efficient (higher capacity BW) coverage.
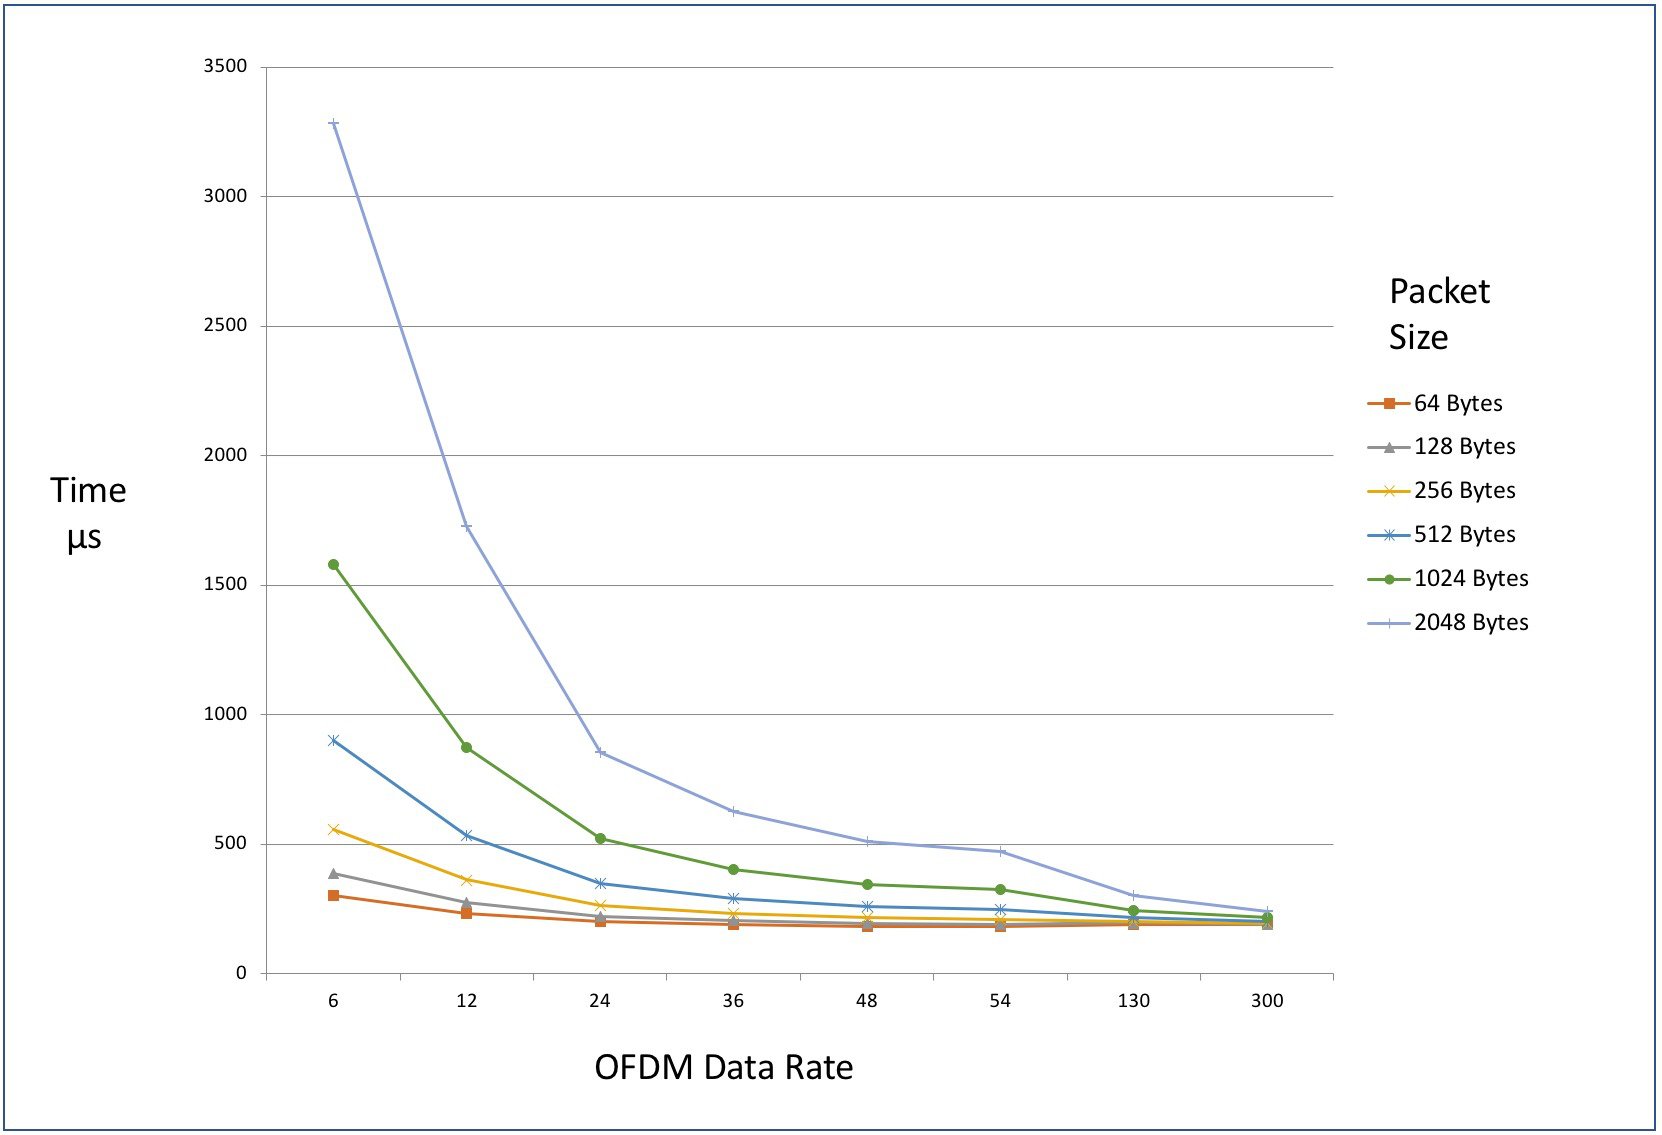
The Y axis is Time in µs (micro seconds 1k = 1ms) showing airtime consumed over the OFDM data rate range for varying sized packets. Higher data rates = more Mbps for every second.
Under-seat installation using Internal antenna models
Installing for quick and temporary installations can be accomplished by adding AP's into the room and placing them under the seats of the occupants. There will be cables on the floor going to these AP's, three strips of duct tape running the length will generally keep that in place. This will work, however it tends to make a lumpy response within the cells meaning the farther you are from any given AP the less bandwidth you will receive like normal. When you add the bodies and the angles at which you are to the AP antenna's, the circles around the AP where bandwidth actually changes become closer together and more pronounced than in a LOS deployment. Peak capacity will not be reached as the path loss increases rapidly expanding away from the AP and the minimum mandatory data rate will have to be lower, exhausting more airtime.
This method will get you through an event, but the margin between success and failure is much more narrow than in a LOS installation using antenna's overhead. It is also temporary - and must be installed for each event. The seats generally move from event to event even if they are not used in between.
This method should be used as a last resort. It is not fool proof, and once the event starts - it is permanent for the duration - even if things changed, cables were broken, disconnected.
 Note |
We once had the AP's being disconnected by some of the attendee's because of an unfounded concern with the RF exposure. Make certain you understand the local rules and the sentiment for minimum AP to user distances, these change by regulatory domain and region of the world. |
Antenna Selection
External antenna's are the king of high client density, but not just any antenna will do. When you think of an antenna it's useful to use the example of a stereo system and the speaker's. Hopefully everyone has put a set of good speakers on an otherwise OK amplifier. The speaker is the analog interface with the air, and a good speaker will make even a low end amplifier sound much better. In the same way - a good antenna matters since it is the analog interface that brings it all together in the air.
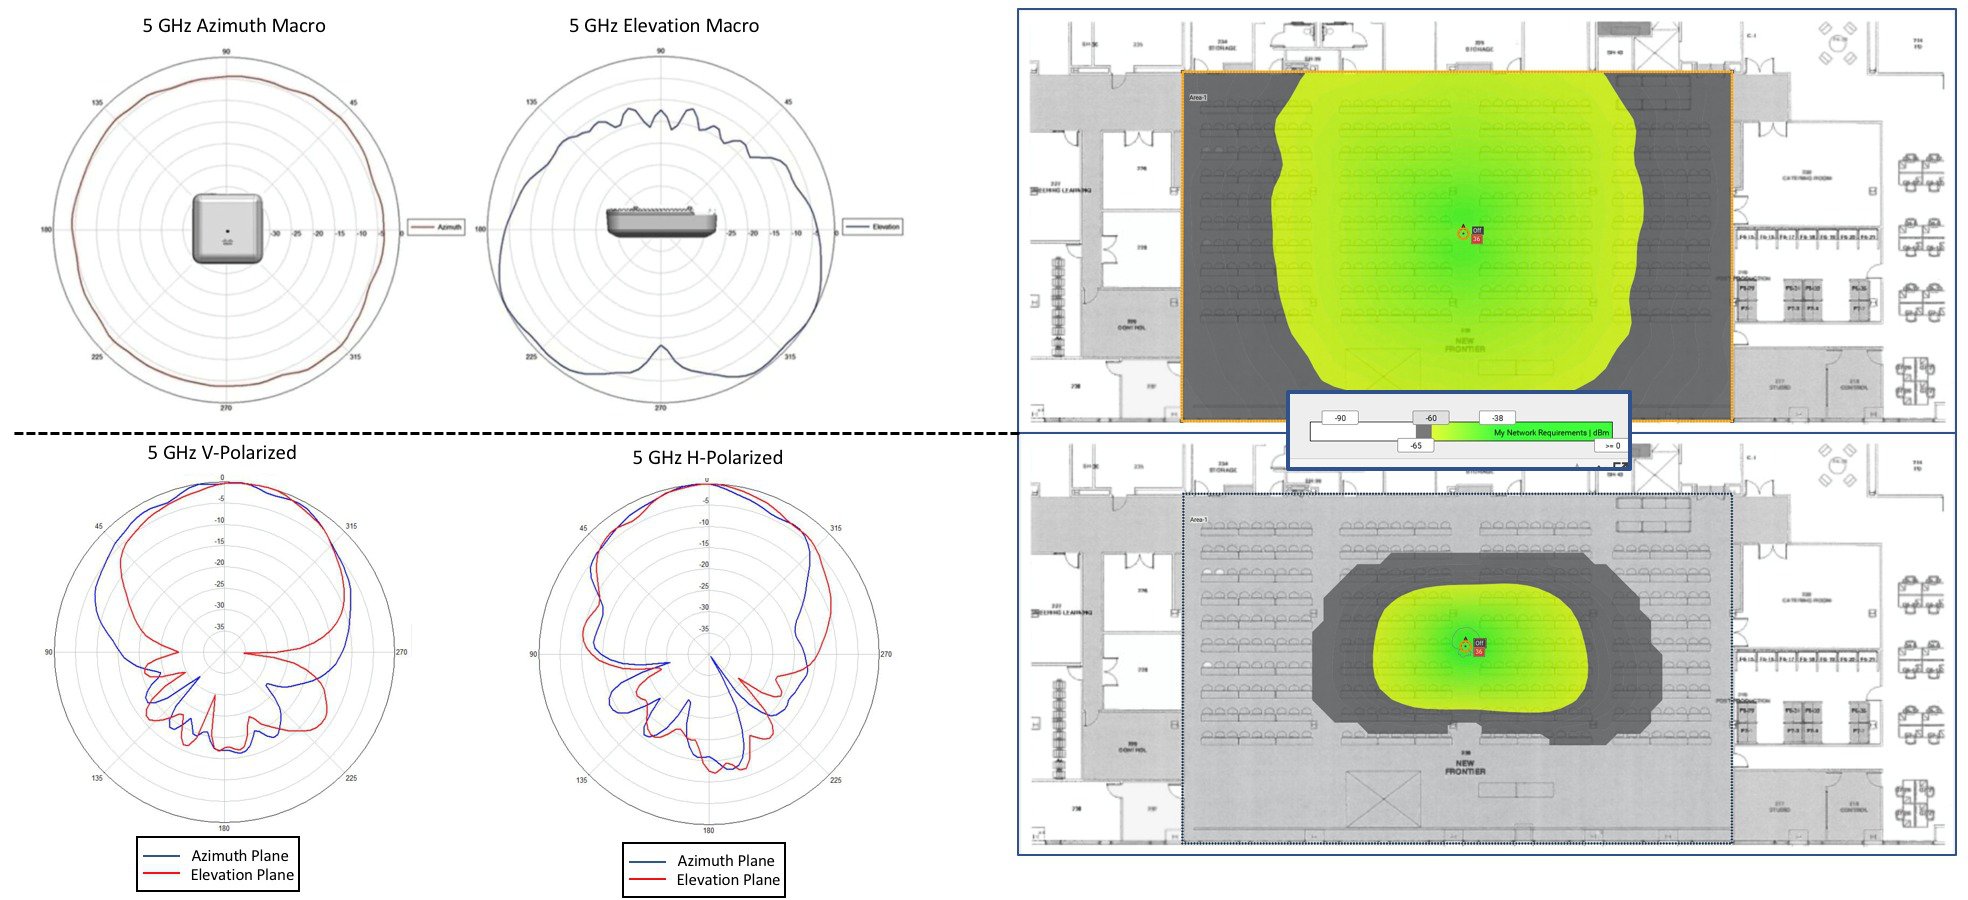
Most people have familiarity with internal antenna model AP's. I-Model AP's are deployed almost everywhere and are convenient and easy to install, have good visual appeal, and perform very well matched with the right environments. High Client Density is where an internal model is likely to fail simply because it is so capable, familiar, and in most cases forgiving. It is however not designed with small cell requirements in mind. Here is an example of an omni directional (internal) model AP and a good Directional AP mounted at 8 feet (2.4 m) in the same training room above.
o
In the graphic's above, you can clearly see the advantages of the antenna pattern below over the one above, it's smaller. In the visualizations on the right side, both are showing the -60 dBm line of the cell. The dark gray area is the edge between -60 and -65 dBm. So not only is the pattern smaller, it gets smaller faster after the usable edge we are trying to create. This is important in an antenna designed for high density.
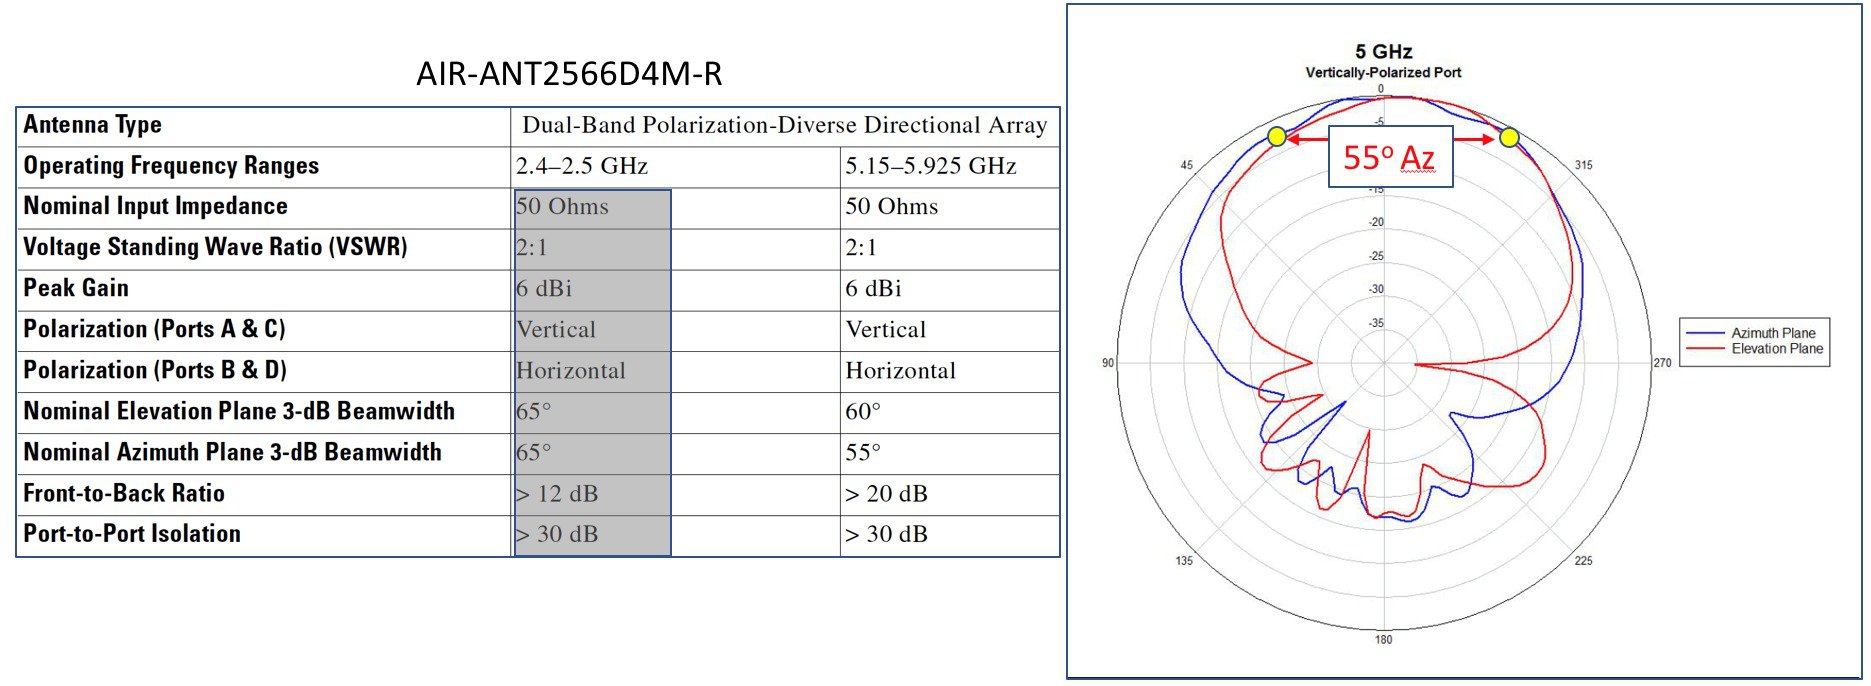
First, just a little bit about antenna theory and how and why to select and compare suitable antenna's. All directional antennas are not created equal even if they seemingly have the same specifications. Looking at the specification sheet below for the AIR-ANT2566D4M-R directional patch antenna and it's polar plot, lets walk through what it all means.
-
Antenna Type - Dual Polarized or Polarization Diverse indicate that the antenna elements are both horizontal and vertical - in a 4 element MIMO antenna (for any 802.11ac 4x4 radio).
-
Operating Frequency Range, Nominal Input Impedance and VSWR, should be the same for any suitable antenna application in wi-fi - and are not that important to this discussion - table stakes.
-
Peak Gain - can indicate a directional versus an Omni antenna - more on Gain below.
-
Polarization describes the individual elements designed polarization - vertical or Horizontal describes the phase relations - dual polarized or Polarization diverse in MIMO systems is preferred.
-
Elevation and Azimuth beamwidth–now this is where we really start to discriminate what we need for high density it characterizes the "shape" of the gain. More on this below.
-
Front-to-Back Ratio-The ratio of peak gain to the least gain in the polar plot, this describes the isolation provided in the non gain portions of the directional antenna.
Antenna Gain
RF Energy is Energy - in the specifications above - we use dBi to represent the antenna's gain. dBi is dB (Decibel) relevant to i (Isotropic) antenna. If you could release a quantity of RF energy from a single compressed point in space instantaneously - it would radiate Isotopically, in all directions, evenly and forever. In physics - a given quantity of energy always remains the same quantity, it may change states, but is never lost. So think of RF propagation like a balloon, as you inflate the balloon it gets larger, however the quantity of rubber, does not change. As it grows larger, the rubber gets thinner and expands with more air. This is what a radio wave does as it propagates from its source. We measure that effect in RF as dBm (decibels per meter) or Mw (per meter) as a density of RF energy over a meter of space - higher values represent denser (thicker) RF over a given area. That is RF Propagation in a nutshell - same amount of energy is always present - however how much energy actually falls on one point or another depends upon how near or far you are from the source or initial release of that energy.
As a Reference for gain the Isotropic model (dBi) gives us a constant to reference changes to the shape of the antenna design against.

Other than the Big Bang (arguably a one-time trick) there is no way to create a release of energy without some insertion point changing the resulting pattern. This changes the resulting shape of the outcome and gets reflected as gain in one direction or another over the Isotropic model. If you took your inflated round balloon, and you squeeze one end - the balloon will react by elongating at the other end. This is analogous to antenna gain - we have a known quantity of energy radiating in all directions evenly - if we squeeze that energy in one place, we won't have less energy we get higher directed energy in one direction and an overall less spherical shape. Antenna designs - even those described as Omni - are not Isotropic - but they don't need to be. An Omni antenna needs to radiate in a near 360 azimuth, the elevation angles can be higher or lower to increase or decrease the resulting gain.
The Dipole antenna depicted above is as close to an Isotropic antenna as we can get, but look at the Omni next to it - it serves the purpose from ceiling to floor - and does so with a higher gain by squeezing the pattern from the top and the bottom. Antenna gain works for us in both transmit and receive - by applying that gain to whatever signal is coming or going to the antenna.
So a directional antenna is simply optimized to produce a specific pattern - that is not Omni like, to favor one direction over another resulting in high gain for just a portion of the circle. The higher the gain dBi - the more the shape becomes directional. Areas with less gain will receive less energy and change the shape and sensitivity of the resulting cell.
Beamwidth
In the data sheet, the 3 dB Beamwidth is stated as 55 degree's in the azimuth plane. What's being described here is the width of the beam that is measured from the point of peak antenna gain to -3 dB from that peak - as represented by the two yellow dots in the polar plot in Figure 8 above. But you can look in the market and find lot's of antenna's that are 55 or 60 degree Beamwidth, whats really important to us when trying to reduce the cell size for a high density application is what happens AFTER that -3 dB point - how wide does the beam get before another 3 dB is lost? In our plt - that's about 92 degree's, and sensitivity drops rapidly after that. This is important - as there are a lot of antenna's where the second 3 dB will consume 120,140,even 180 degree's and will completely change the results you get in a high density cell edge. The goal is to have a nice sharp cell edge - good gain - and a rapid decay outside of the sweet spot.
Front-to-Back Ratio
The opposite of Gain is Loss, and a directional antenna will have gain in one direction - and opposite to this there will be a loss in gain - or sensitivity. The Front-to-Back ratio is the ratio of forward gain to the backside or oposite lobe gain. The higher that ratio is, the higher the back lobe isolation. This can be used to advantage - the antenna in figure 8 for instance can be mounted relatively close in a back to back fashion and provide 40 dB of isolation between the two active antennas, that's a lot. Or - you could mount that antenna - in a high density area - pointing into the room - and get 20 dB of isolation from the rest of your AP's outside of the room. Again - it's useful if you use it to your advantage you can increase your isolation and improve the experience of your customers.
A good over view of antennas and pattern information can be found in Antenna Patterns and Their Meaning.
Use Case 1-Team Room/Conference Room/Small Classroom
In planning and deploying an office WLAN, the AP's are typically placed near area's expected to have a higher user density like where people sit, or a waiting room or conference room. Common areas are left with less dense coverage as traffic tends to be transient through those spaces. In this way, a little pre-planning for high client density areas is anticipated and allowed for. Conference rooms are often placed in clusters, so assuming normal drywall (3dB) between them, its best to design for the maximum capacity of the combined rooms. For example, the listed maximum occupancy (use the Fire Marshalls max capacity) for the two rooms below is 30 people, In our example, user density would be one user per 17 ft 2 or 1 user every 1.5 sq m.
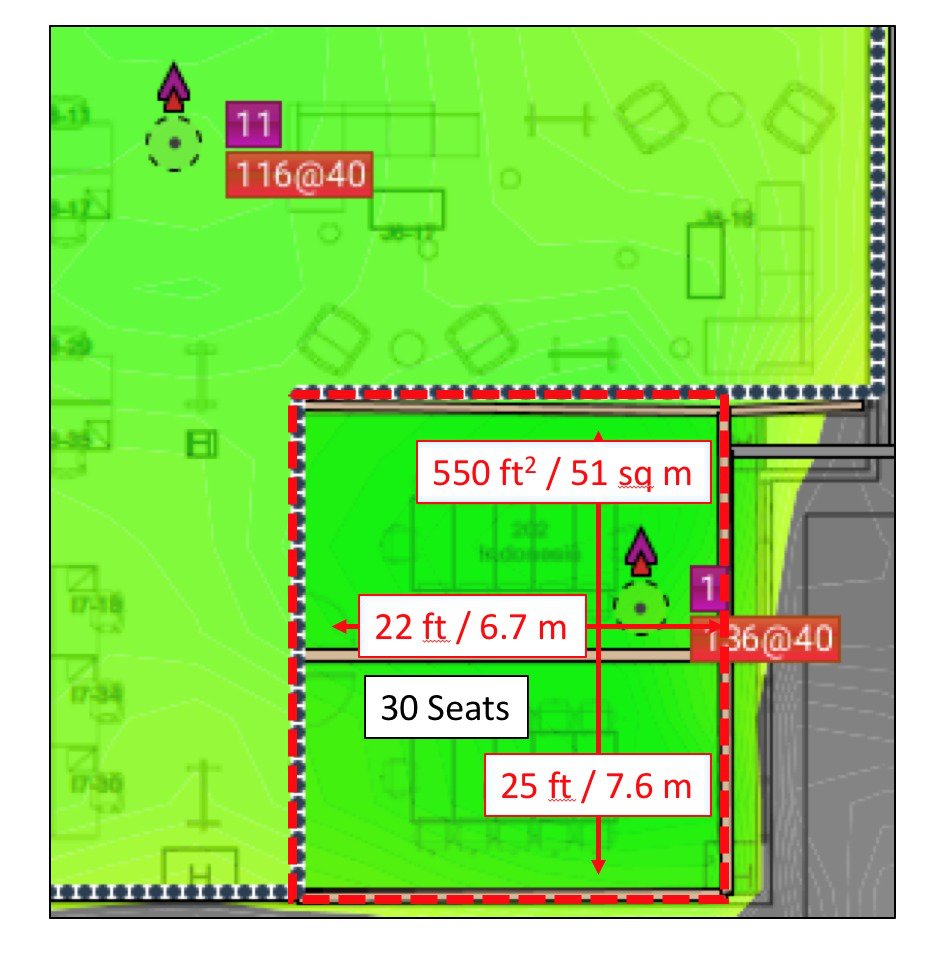
One user every 1.5 sq m puts the users much closer to one another than they are elsewhere in the office with an average at 1 x 8 sq m. This is significant, but not particularly challenging in this context. In a small contained space such as the conference room above, 30 users can easily be accommodated on a single 5 GHz radio on a single AP. With good results too.
 Note |
It's a good idea to put any collaboration displays, multimedia/video conferencing gear on a wire, since they can consume a lot of bandwidth (1080p=4-5 Mbps, 4K = 12-16 Mbps) and is going to be less tolerant to jitter - so get the ones that don't move out of the air. That will help ensure plenty of bandwidth for 30 occupants that do move frequently. |
Of course the above estimate of "plenty" is assuming we get nice clean channel(s) free from co-channel interference. Regarding bandwidth, there is actual bandwidth and potential bandwidth. Actual bandwidth is what you actually get in the room after implementation when the room is in use. Potential bandwidth is what you get when you look up 802.11ac rates and assume you will get the max (signaling) speed and all the airtime the cell has to offer as a design rule.
See the Enterprise Mobility 8.5 Design Guide WLAN RF design considerations for the basics and a definition of co-channel interference
In the next Use Case, we'll dive deeper into co-channel interference as it becomes much more relevant. For now ensure the network is running on a good healthy channel plan and read on.
A standard indoor 3802i/2802i/4800 AP will more than cover this space and exceed the likely requirements. The requirements are:
-
Bandwidth requirement/User to Interface ratio
-
Bandwidth requirement supports two 802.11ac Wave2 x 5 GHz interfaces – should be more than enough bandwidth with a user to interface ratio of 30/1 or 15/1 as options will easily support 10 Mbps or more per client assuming 802.11ac.
-
FRA Client Aware is available for 2800/3800/4800 access points with release 8.5 and beyond. Configuring this under FRA/Service Priority allows for dynamic re-configuration of the XOR radio from monitor Role to client serving 5 GHz and creates a Macro/Micro dual 5 GHz cell when Channel Utilization of the dedicated reaches a user configurable trigger.
-
You can permanently enable Dual 5 GHz mode and double the capacity at a future date. That’s investment protection.
-
-
Channel Space–you will need at least 1 20 MHz channel per radio interface
-
Assuming 40 MHz channel bandwidth, dual 5GHz mode consumes 4 channels. There should be very good channel isolation provided by RRM. If surrounding AP density is high, and channels are scarce then run as 20 MHz channels.
-
If you already suspect or know you have co-channel interference issues, adding more AP’s is not going to make that better. You can, reduce channel bandwidth (20 MHz = 1 channel, 40 Mhz = 2 channels 80 MHz = 4 channels, 160 MHz = 8 channels). Assessing your channel plan and co-channel interference is covered in the next section.
-
Configuration Recommendations for Conference Rooms/Classroom Use Cases
-
Use AP groups and RF Profiles
-
Placing all conference rooms of similar configuration in their own AP group (s) allows you to apply different RF profile configurations to meet the different demands of the higher client density spaces and isolates the configurations and impact from the main office
-
RF Profiles allow independent RF and feature control of the AP’s within the AP group. You can use the default 802.11a high density profile and change as below
-
Remember to save it with a meaningful name–conference rooms 1
Figure 7. Small conference room Configuration Profile 
-
-
RF Profile configurations, please refer to table above
-
802.11
-
Use a higher Minimum Mandatory Data rate and all rates below as disabled to reduce cell size
-
Keep traffic from users in the conference room physically close to the conference rooms boundaries. Raising the minimum data rate requires that a client be closer to the AP where it can get the higher SNR needed to associate with it. This effectively reduces the usable cell size and ensures that everyone attached will only use that data rate and above for the duration.
-
Traffic at a higher data rate reduces air time and also reduces the interference radius (A higher SNR is required to demodulate the signal, below that level it is simply noise.
-
For MCS settings all enabled (default). MCS applies to 802.11n and 802.11ac HT rates These need no modification. All data rates use 802.11a for management and signaling - which is all we need to modify.
-
-
RRM
-
TPC
-
Setting Min/Max to support the design power level of 11 dBm (*example - your mileage will vary), min is 6 dBm and max is 30 dBm
-
TPC v1-v2 power threshold set to -65 - however the above Min/Max overrides that setting for this AP group.
-
-
DCA
-
Avoid Foreign AP interference = yes
-
Channel Width–according to your design allowances
-
High Speed Roam = Disabled–This, does not do what you think it does. It is specifically put within the profile for High Speed Roaming, (i.e)a train rolling past a platform at high speed and not walking.
-
DCA Channels per your design–if all are enabled in the global profile then enable all here.
-
-
Coverage Hole detection (no change)
-
Profile Threshold for Traps
-
Interference 20%
-
Clients = 40 , the room capacity is 30, if your capacity gets 30% above it should be alerted
-
Noise -65 dBm amd Utilization 65% both to reduce nuisance alarms
-
-
-
High Density–RX-SOP low
-
Client Distribution–default values
-
-
AVC–Yes
-
There is no downside and all upside to understanding how your clients use the network. Application control policies should be similar to the surrounding spaces assuming same applications.
-
-
FRA Client Aware
-
For 2800/3800/4800 AP's running on FRA this allows protection against the dreaded flash mob by monitoring the client serving dedicated 5 GHz interface and bringing the monitor XOR interface online when needed for capacity. Will promote more restful sleep and preserve career momentum.
-
Use Case 2 - Corporate Training Room, Medium Auditorium
Use case #2 is a corporate training room that seats 400 people. The user density in this room with 6500 ft 2 /600 sq-m and 400 seats comes out to 1 user every 1.5 sq m, the same as the previous conference rooms density. However, you can not cover 400 clients on a single AP (not happily yet anyway). So you're going to need a couple more access points - at a minimum.
You may also be wondering why we count 1 seat as 1 client rather than the more popular 1.5- 3 devices per user. For purposes of general resource planning we consider that a single user is 1.5 to 3 clients. This applies to resources such as IP addresses and DHCP/ISE, location analytics. For this conversation we are focused on active throughput only and the worst (likely) case scenario. Even a user with 2 devices (or 3 or 4 as some of us will do) can only actively use one device at a time. (I know - I can max out multiples of my toys and you likely can as well - but we're talking about normal users here). The total device count is still important - It goes directly to the resources category for the core network and other things that are not airtime/throughput related. For bandwidth to the end user - we're more concerned about concurrent packets in the air.
 Note |
The max associated clients Cisco supports on an AP is 200 per interface - 400 per AP (so maybe we could get all 400 on the same AP - but it would likely not be very efficient if they all use it at once) QOE - would not be good. |
This image is not available in preview/cisco.com

For 400 users in a single corporate space we'll use a corporate High Client Density "rule of thumb" user/AP ratio of 50 users per radio interface. This is simply a design number that is based on experience with regard to the types of applications and activities the clients will likely be engaged in. It's a conservative number and accounts for the multiple background scans (virus, back up) and IT maintenance that starts automatically when we (cisco) connect to our internal networks. None of which is particularly high in bandwidth demand - but 5 or 6 of these processes running on a computer that doesn't get into the office very often can make a difference in bandwidth consumption. Your individual results will vary. In meetings folks will frequently watch the webex broadcast in the room as well as the live speaker to collaborate with the folks that are virtually attending on the bridge. Surprisingly this doesn't really add a lot to the demand. AT 50 per interface you also have room for the numbers of people that will be along the walls and aisles not in seats (this happens a lot especially if the content is good).
Using 50 users per interface as the design guideline yields 8 x 5 GHz interfaces required. 400 (seats)/50 (seats)=8 5 GHz radios.
Here in the US, FCC regulatory, we have 25 channels - 8 channels minimum will be needed for this room and @ 40 MHz channel bandwidth the total comes to 16 Channels. This is within reach, but it will require more attention to the details (like the surrounding AP's that bleed into the room. Now shove all 8 of those AP's into a 6500 ft 2 room in such a way that ensures 400+ clients are below them all and communicating efficiently.
Remember from above that success depends on the ability to isolate each cell from others. Before we go down the road happy that we don't need more AP's than we have channels (this happens too - see the next use case) - there's a couple of things to consider. This room isn't the only place where AP's are placed in this building. Others surround this room, and there are floors above and below that can be heard in this room.
Another consideration - If we put 8 AP's in this room - how will we get the 400 clients to spread out and use all 8 AP's? They're close together in space - and the signal from one AP is likely as good as it is from any other 3 AP's?
No, the answer is not fancy client steering features (anyone's, not just Cisco) - they cost airtime and efficiency in this environment
Below is a site survey of the room with a single existing 3702i operating at a modest (7 dBm) power, ~ 11 dBm EIRP . Note that this one AP - covers almost the entire room
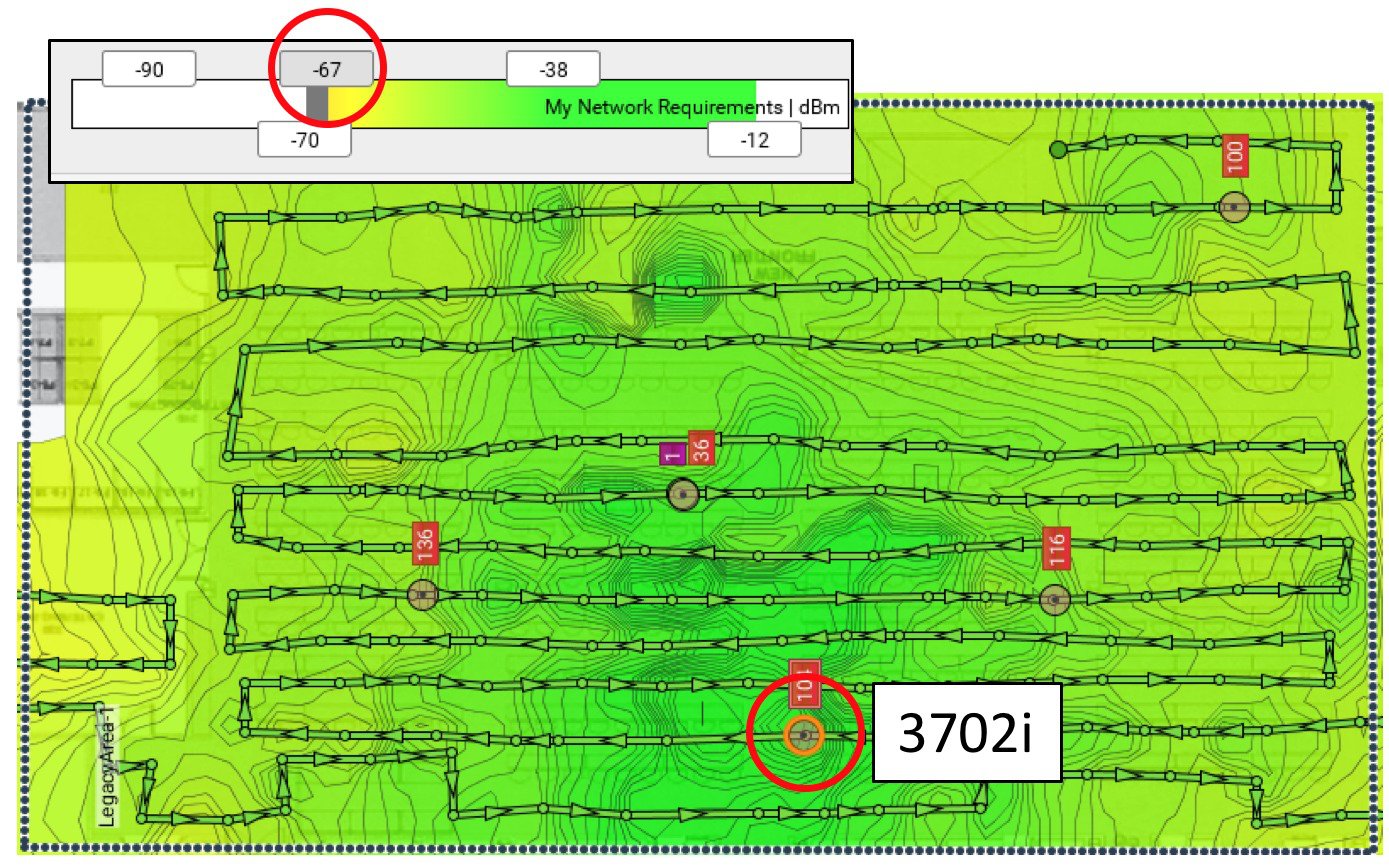
In a high client density environment such as this training room, things are going to change when the people get in the room. See "High Client Density Characteristics" from above.
These measurements are from an empty room and with a heat map of the current coverage from a single AP. With people being added, the RF absorption of the signal will attenuate at least 5 dB at the floor at this density, this will lower the perceived RSSI (signal) available for our SNR (Signal to Noise Ratio). We also fully expect in a room this size, a carpeted office space with normal ceiling height and 400 concurrent active clients that the noise floor will rise another 5 dB.
So we'll loose 5 dB on signal and gain 5 dB additional noise floor - that's a -10 dB hit to the SNR we need to be successful. ( If Signal = -67 dBm, and noise = -95 dBm then SNR = 28 dB. Subtract 5 from signal add 5 to noise SNR = 18 dB) The only thing we can do to mitigate this is raise the level of signal in the room by 10 dB to counter the effects. Knowing to do this in advance is key. We'll use -57 dB as the desired cell edge cutoff to correct for the 10 dB expected SNR loss. To visualize this on the existing map, use -57 dB instead of -67 dB cut off in the heat maps from the survey.
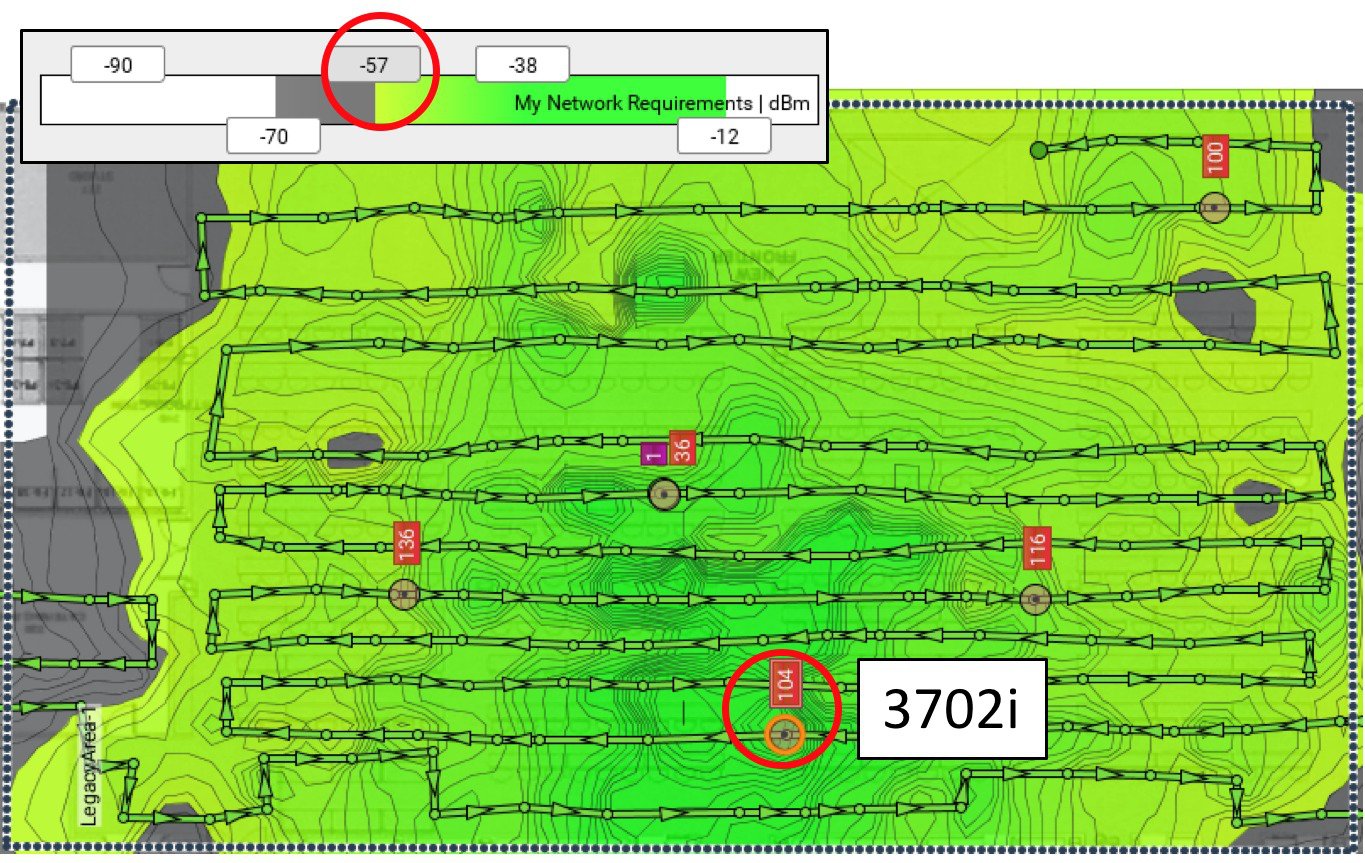
Even if we adjust the configurations for the expected conditions, this single existing internal antenna model AP covers a lot of area. Of course, that's it's job. An omni-directional antenna is a wide (360 degree) pattern. This is potentially a problem for high client to AP density for two reasons seen in the coverage map above.
The exposed pattern (in green) is what remains covered at or above -57 dBm at the floor. All of the AP's in the room's cells will be overlapped with all of the other AP's cells. So, interference potential is high, and given the pre-existing AP's we can hear inside the room - probable.
How will the clients behave when one AP looks as good as another from an RSSI perspective? We will be working with signal levels that are well above the 802.11K threshold of -70 dBm. Load balancing will need to be accomplished or there will be uneven user counts and inconsistent experiences by the users based on where they are sitting.
In order to get 8 radio interfaces and cells in this room we will need to make the cell sizes smaller. This will limit the number of seats that are covered in one cell and help to start balancing the room design in a more deterministic fashion.
Design Solution and Results for Corporate Training Room
This particular corporate training room is where the wireless field team holds their virtual training twice per year. If you have ever had a room filled with wireless professionals using your Wi-Fi you know you can expect a thorough review of the results in realtime.
We opted to use AP3700 and the AIR-ANT2566D4M-R antenna's, 8 of each to meet the challenge. The antenna's were all placed flush against the ceiling with the AP3700 installed above it for a neat installation. You can see in the design in Figure 10 below the AP positioning and the cell edge defined at -60, this allows for 5 dB attenuation when the room is full. 2.4 GHz is disabled. However, if we did require 2.4 Ghz within this room, - we could support 3 channels.
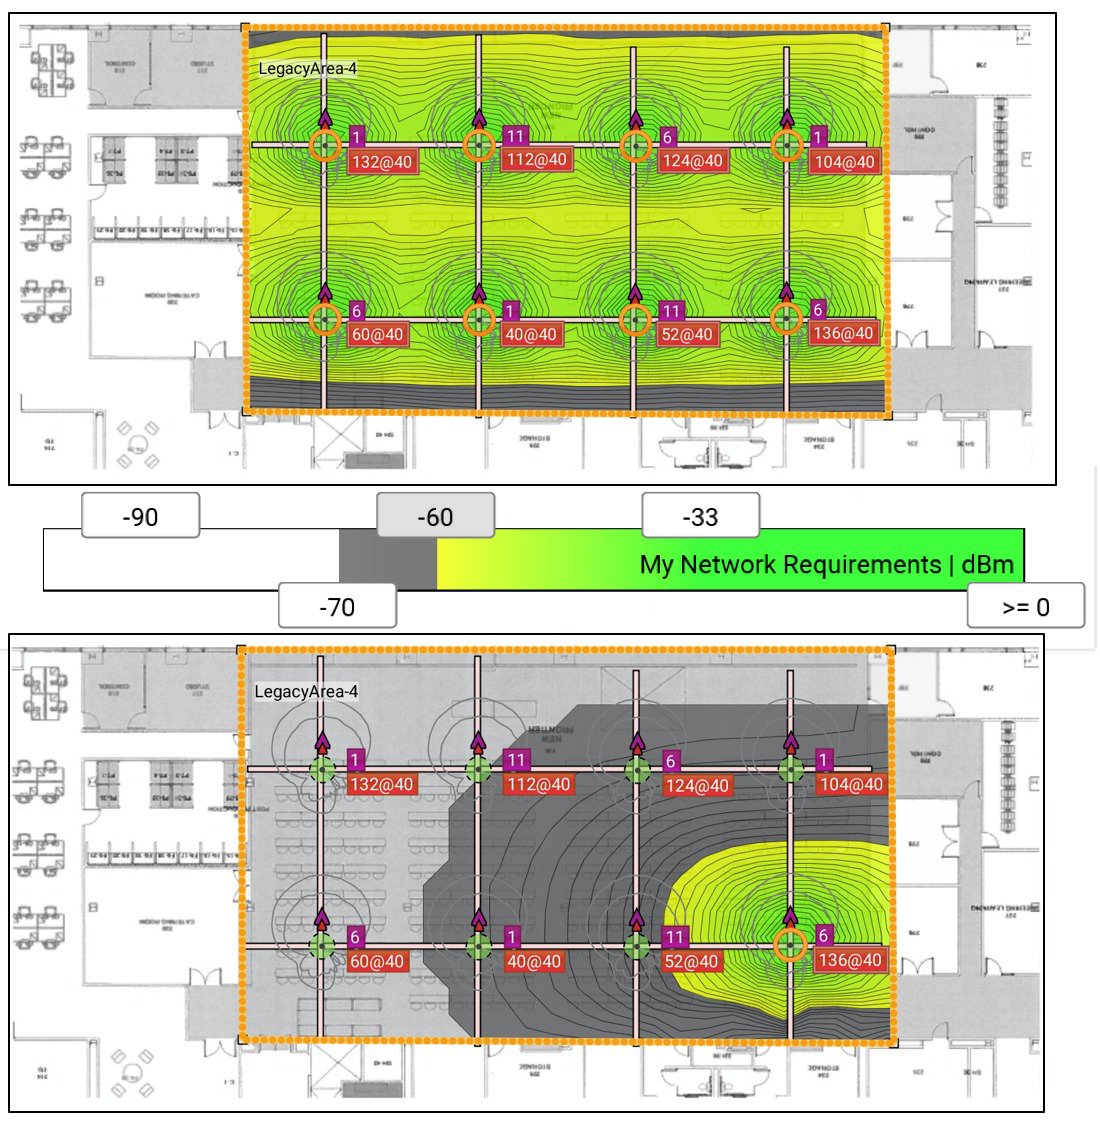
The power levels used in the design and the actual deployment where 11 dBm with a minimum Mandatory Data Rate at 24 Mbps. This design has served quite well for the last few years. One issue observed in the first big meeting held in this room was that the clients did not spread out between the AP's within the room as evenly as hoped. With 599 associations the second AP from the left on the bottom in Figure 11 below only has 38 clients . There were people standing along the back wall that drove the back row AP's client counts bit higher. An average of 75 -ish per AP is what we are looking for in an ideally occupied room, but right in front of the main stage only 38 clients?
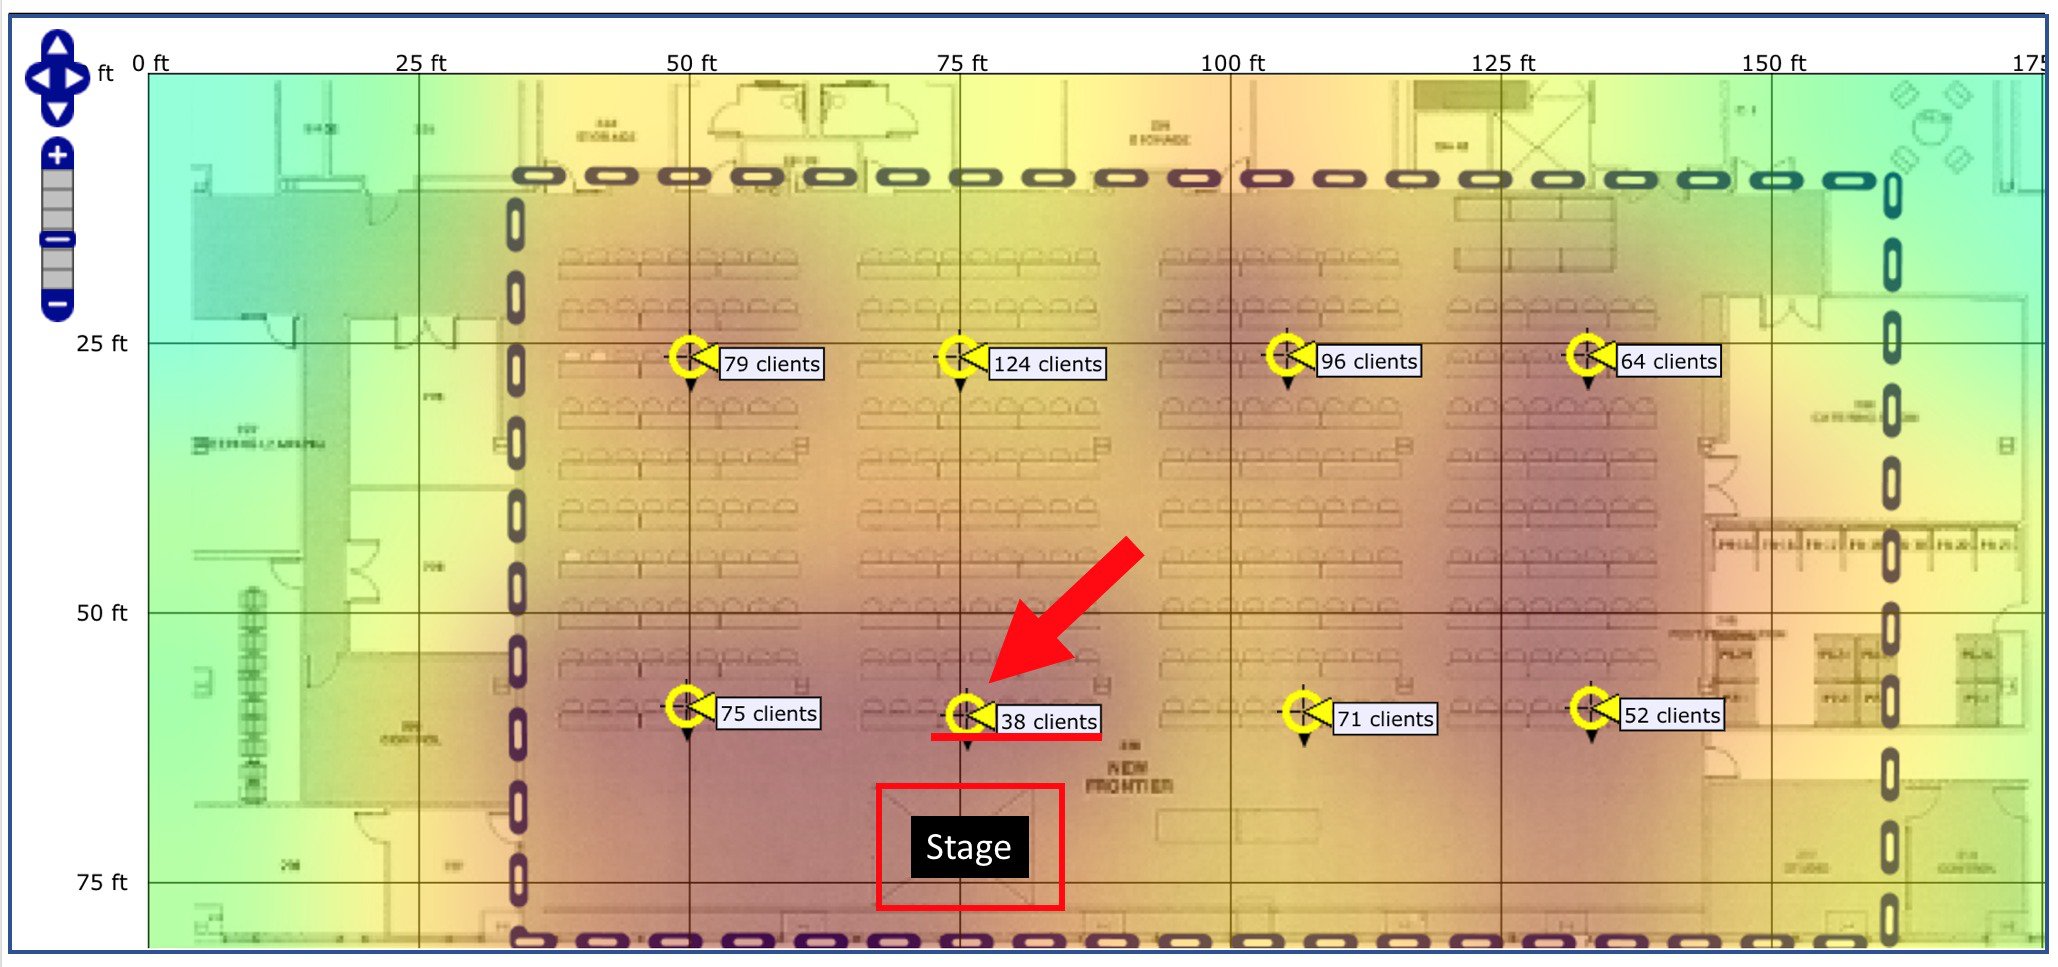
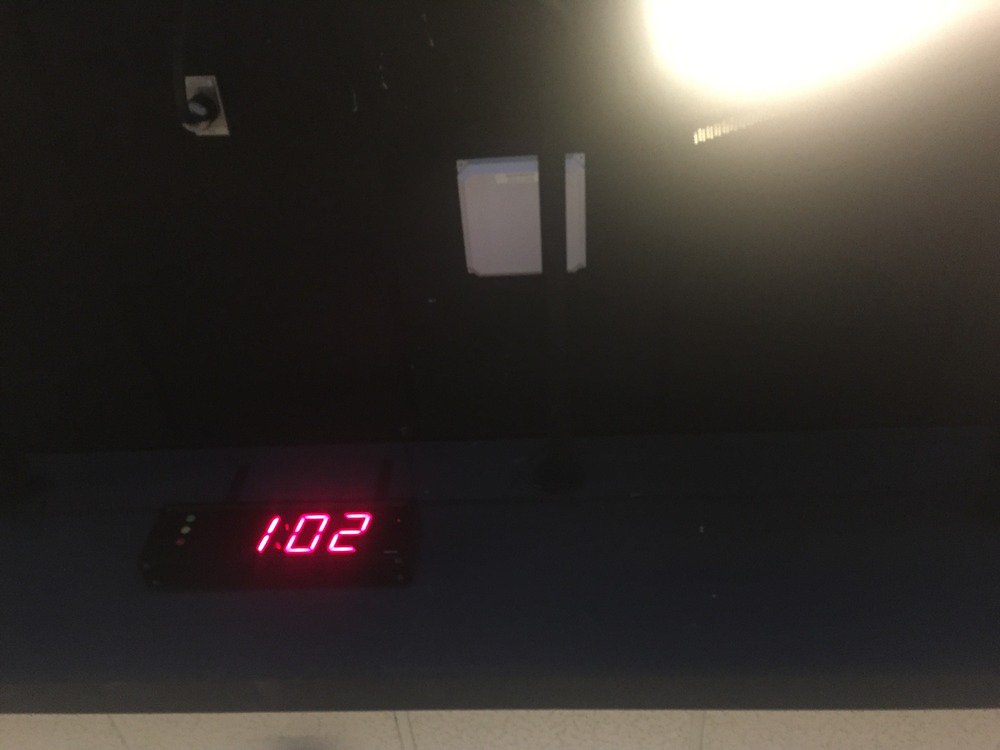
Inspecting the AP in front of (actually over)the stage revealed that the AP was incorrectly placed. This can be seen in Figure 12 below. It's installed in the recessed ceiling above the stage along with the lights and camera's - right behind the cast iron fire pipe and making massive changes in the AP's pattern. Nothing we could do about it except hope for the best. Why share this? Because it happens,and if the designed placement is not followed - or it's modified for convenience the results likely won't meet the intended goals.
In spite of this issue - no one reported a bad experience in the room. That leads us back to the 50 users per AP approach, when something went wrong, and it will at some time or another, the capacity to manage it exists in a proper design. Should that room become the scene of a flash mob at twice capacity seating - they'll still have usable wi-fi as long as resources (ip address, dhcp capacity, backhaul to core) aren't exhausted.
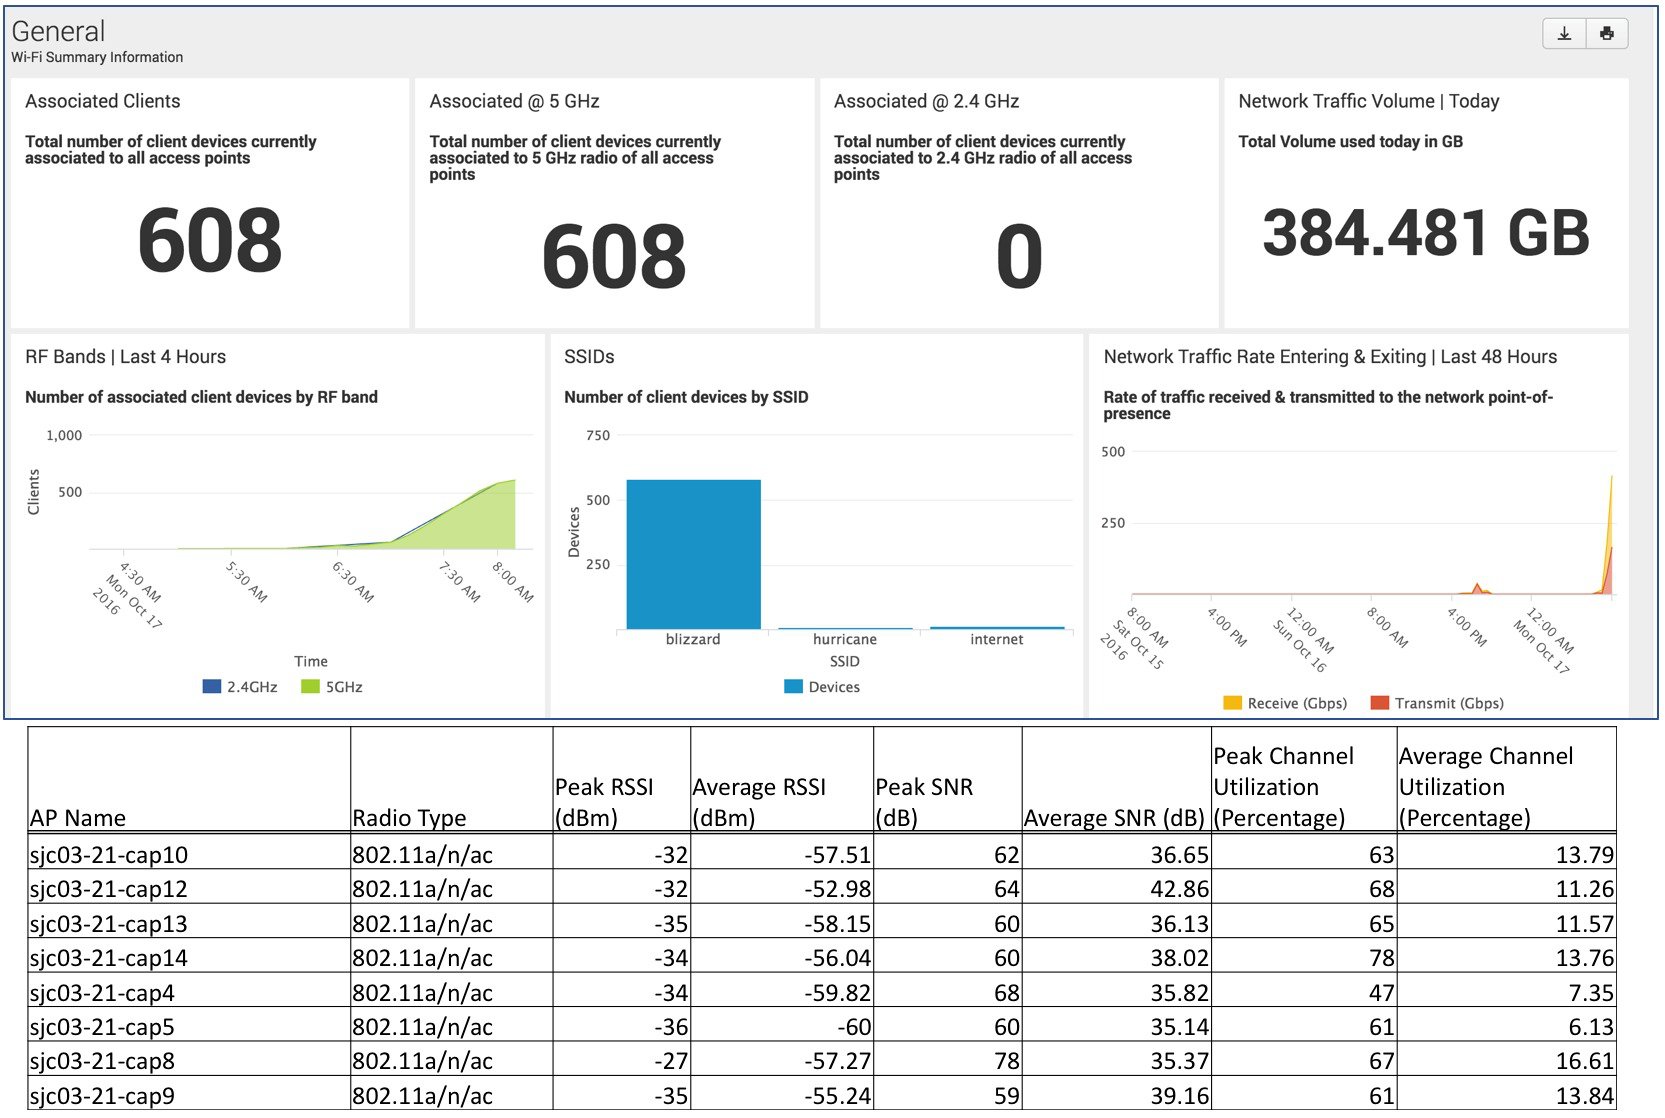
You can clearly see that clients from the affected cell are connecting on other AP's nearby. Namely the one directly behind it (with 124 clients). The airtime performance in the room was as expected - with Channel Utilization for 5 GHz under load holding at 40-45% with higher peaks while the room was filling up with fresh clients in the morning. A grand total of 384 GB was served to the room within a few hours in the morning sessions.
Presently - the design is under review to be upgraded with AP 3800's reusing the existing AIR-ANT2566D4M-R antenna's and reducing the number of AP's to 4 instead of 8. In order to do this - the antenna mounting will need to be different - the antenna's will be mounted back to back in the center of the room and covering the same 8 sections as the old design from a different angle. The antenna's will use a 60 o down tilt rather than parallel to the floor. Here's the designs for the updated architecture.

Figure 14 shows the overall expected coverage, the bottom graphic only has 3 of the interfaces displayed to give a better idea of each cells coverage. Will this work? Yes. How do we know? The next use case will dive deeper into that.
Configuration Recommendations for Corporate Training Room, Medium Auditorium
Before moving on, lets discuss the above room's configuration and the features that are enabled to manage the resulting design.
-
All AP's are in the same AP group and configurations are being managed using an RF Profile applied to the AP group.
Figure 15. Rf profile configurations for training room or small auditorium 
-
RF Profile configurations -
-
802.11
-
Use a higher Minimum Mandatory Data rate with none supported below to reduce cell size.
-
You want to keep traffic from users in the training room physically close to the training rooms boundaries. Raising the minimum data rate requires a client to be closer to the AP where it can get the higher SNR and associate. This effectively reduces the usable cell size and ensures that everyone attached will only use that data rate and faster for the duration.
-
Traffic at a higher data rate reduces air time utilization and also the interference radius (A higher SNR is required to demodulate the signal, below that and the signal becomes noise that cannot modify Tx access timers).
-
MCS settings are all enabled (default). MCS applies to 802.11n and 802.11ac HT rates These need no modification. All protocols (802.11a/n/ac) use 802.11a for management and signaling - management frames are all we need to modify.
-
-
RRM
-
TPC
-
Setting Min/Max to support the design power level of 11 dBm, min is 6 dBm and max is 30 dBm.
-
TPC v1-v2 power threshold set to -65 - however the above Min/Max overrides that setting for this AP group.
-
-
DCA
-
Avoid Foreign AP interference = yes
-
Channel Width - according to your design allowances
-
High Speed Roam = Disabled - This, does not do what you think it does. It is specifically put within the profile for High Speed Roaming - as in a train rolling past a platform high speed - not walking
-
DCA Channels - per your design - if all are enabled in the global profile - enable all here.
-
-
Coverage Hole detection (no change)
-
Profile Threshold for Traps
-
Interference 20%
-
Clients = 75 (unlike the conference room - we expect a lot of people to be on these AP's. Setting a meaningful trap here means you will only get an alert if the AP is getting unfairly loaded .
-
Noise -65 dBm amd Utilization 65% both to reduce nuisance alarms
-
-
-
High Density - RX-SOP low
-
Client Distribution - default values
-
-
AVC - Yes
-
There is no downside - and all upside to understanding how your clients use the network.
-
Application control policies should be similar to the surrounding spaces assuming same applications.
-
For an in depth review of RF Basics for Wi-Fi please see the Enterprise Mobility 8.5 Design Guide WLAN RF Design Considerations.
Use Case 3 - Big Events/lectures, Keynote's, Venues
So we've looked at a few use cases to manage areas you may have had trouble in and given some good ideas around how to handle challenges. Hopefully there is a pattern starting to form in that getting proper bandwidth on task is about the right number of cells - Isolated from each others RF - to get the job done. This doesn't change if the task is a single conference room - or an entire football Stadium (take your pick, American football or the rest of the world). Up until this point we have been working with normal height ceilings 2.5 meters or so. When you step into the big ring, literally, everything gets a bit bigger.
-
Regular exposure to the changing industry at very public levels, we see, how the client Market is adapting and adopting.
-
Allows us to evaluate solutions and identify gaps year after year in the same venue’s most times.
Not only do we run our own conferences, such as CiscoLive, GTX, and several other Cisco internal events every year. We regularly staff the NOC for several large shows where the venue deploys Cisco gear.
A large venue located in Barcelona, Spain is home to a couple of shows we regularly attend. CiscoLive Europe 2018 and the GSMA's Mobile World Congress. The focus here is on the higher density parts - the keynote auditoriums for the purposes of this design guide.
This example will be for Auditorium #1 which is a large theater (45x50 meters seating 1200 people) built entirely inside of the convention center hall. The large tent like structure has sound and thermally insulated materials allowing it to be set up in the middle of a field in the summer. The convention center has ceiling mounted AP 3702e models with AIR-ANT2513P4M-N (13 dBi 30x30 degree) antenna's at an average height of 12 M covering the entire hall at 3K ft 2 / 280 Sq m cells and is quite capable. However - the insulation of the structure prevents RF from penetrating as there are sheets of aluminum cladding as well as dense foam covering the roof.
For this solution we'll design an overlay specifically for the Auditoriums. There are 6 Auditoriums in all - ranging in capacity from 300 people up to 1200.
First - the challenge. For a production this size - there are always cad drawings available as the halls placement and theme change yearly - so does the arrangement of the floorplan. Fortunately the actual auditoriums don't change in size much - but the layout (stage, screens, AV) changes regularly. See below in figure 16 for the 2018 layout.

Below in Figure 17 is the side elevation drawing, showing the Second floor - notice the stadium seating along the right side (back) of the auditorium. This is elevated above the floor by 3 m and seating on the floor extends beneath it. This drawing also shows the audio/video rails positions and components that will be mounted there. This is where the AP's and antenna's will be mounted. The AP's and antenna's will be at 7 m above the floor.

This may sound like a lot of work - mounting the AP's on the AV rails - but it isn't bad at all with a little planning and preparation. After all they mount all the lights and AV equipment on the rails for easy installation and removal. More on this later.
The other option of course would be to go under the seats. That may sound easier and less involved - however in this auditorium - they bring in the floor as well. Accessing the main wiring trunks needs to be done before the floor is installed - and it needs to be drilled exactly where you're going need it -before the seats are installed. Turns out - that's far less practical and not as robust a solution since the seats are metal theater seating - with metal seat pan's that flip up when not in use. So there really isn't anywhere to leave an AP on the floor that's out of the way. Underseat method is far more practical with an environment such as a hotel ball room where seating will be chairs arranged on a carpeted floor. Underseat, or mounted on handrails has been used in stadiums with conduit and NEMA boxes if there is no other way to get signal to where it's needed. Remember, in the end no radio = no Wi-Fi.
There are 3 antenna's we primarily use in this venue and venues like it (Convention Centers, Sports and Multi Purpose Stadiums, Large Auditoriums).
Here's a look at the antenna line up most useful for High Density. The AIR-ANT2566D4M-N was introduced in the preceding use case, here's a look at the rest of the lineup. All of these can be used with the 3800e DART connector to provide dual cell coverage.

Here are the links to the data sheets. All of these are excellent antenna's with excellent F/B ratio and shape to support small sharp edged cells, we built them because "we" needed them. Take a look at the data sheets, and note that all 4 elements are mapped for reference. Various mounting options exist.
Nothing, at a large trade show, comes together without planning. It's typical to start planning for the next year's event at the conclusion of the current years. More often than not - network and logistics plans are in place 6 months out, and only minor adjustments and the will of Murphy's Law get left to the week before the event.
Auditorium 1 is implemented for 5 GHz only -1200 seats
AV rails mounting height is 7 m (22') = 28x AIR-ANT2566D4M-R
1200 seats at 50 per radio= 28 5 GHz interfaces = 14 2800e and DART cables Dual 5 GHz mode
Will require 28x 5 GHz channels at 20 Mhz = BW 20 MHz
14 Switch ports +uplink's
When mounting on AV rails, the "Riggers" are the ones who will be charged with planning and hanging the rails. Each point that will be used to "hang" the rail from on the ceiling allows for a finite amount of weight. It's very common to supply the AP and Switch position as well as the weight information for each component. Fortunately with LED lighting and the fact that everything gets smaller - weight isn't the issue as much anymore and the AP's and antennas are relatively light compared to the other gear and cables. Coordinating with the riggers schedule is key.
Design Considerations
The first step to any design is of course is understanding the requirements which can be summarized as above - how big, how many users. Now getting more into the detail - how many physically diverse areas are there and how will we solve for placement and capacity - within the auditorium. Looking at the side elevation for the auditorium - you can see that there are essentially 3 different coverage zones.

-
Open floor seating – AV rails cover evenly at 7 M.
-
Balcony – no overhead AV structure, use nearby. Seating is 4 meters below the height of AV rail levels.
-
Under the Balcony – ceiling is 3 meters, will be shadowed by the ceiling and body’s sitting above. May require some fill underneath.
For area 1 - the open floor we'll solve with directly overhead mounted dual 5 GHz AP's and antenna's - the antenna tilt will be -90 ° or parallel to the floor. Azimuth and orientation of the two antenna's will be slightly offset from one another to reduce overlap. The model below is showing the cutoff value at -55 dBm on the floor, height at 7 m = nets a 1k ft 2 cell (92 m sq).
Figure 20. -90 degree downtilt coverage for open floor area 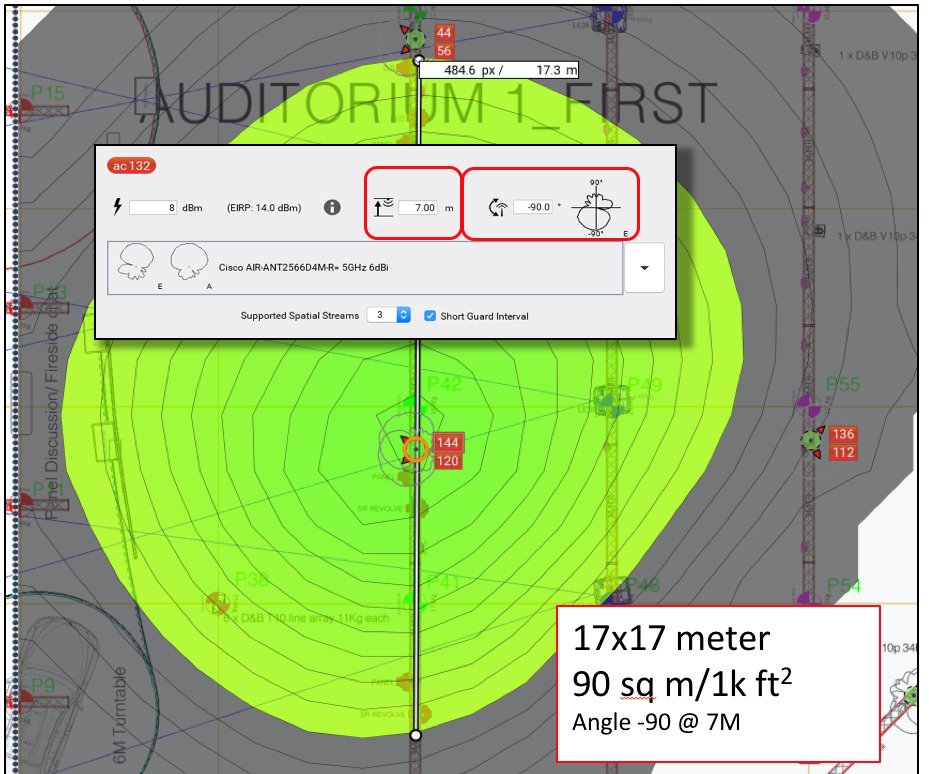
For Area 2 - our balcony, we need a little more creativity. There is no direct overhead mounting available - and the seats to be covered are only 4 meters below the AV rails mounting height. In order to cover the seats we'll mount to the rails closest - conveniently placed in front of each section - and use some downtilt on the antenna to cast the energy onto those seats in the back. You want to be careful with angles - even if you can create the most awesome coverage plan using -21, and -28, and -43 degree downtilt angles - it is extremely unlikely anyone will get all the angles correct if they are changing slightly between antenna's. Even the most conscientious installer might find it challenging. -45, -60, and -90 are common angles we use with -90 as the go to default in most scenarios.
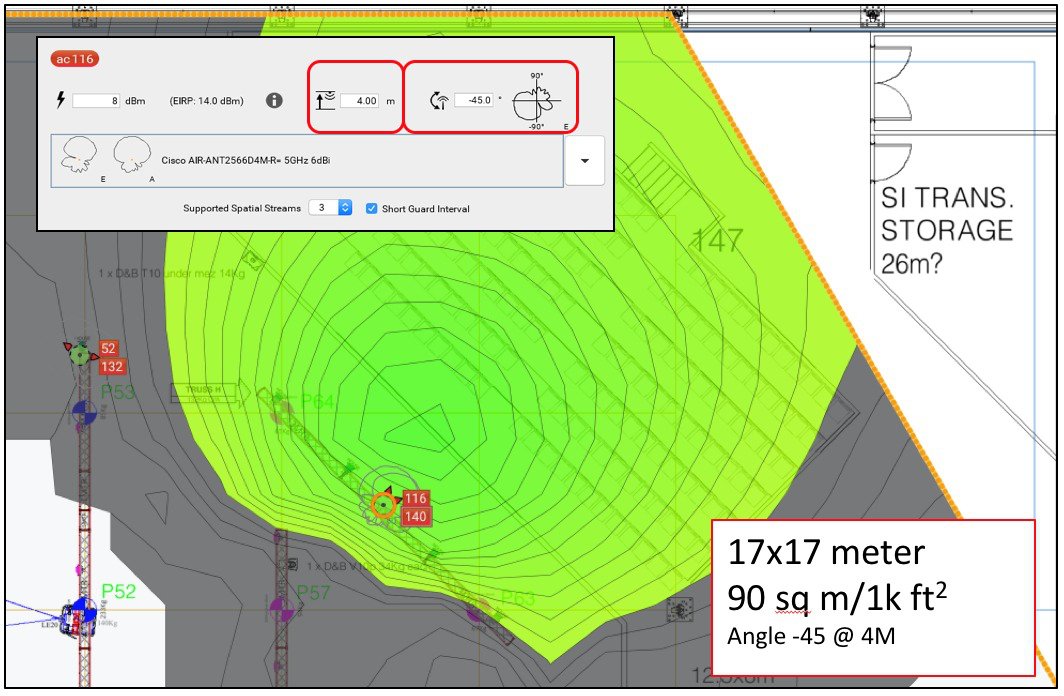
The resulting model shows about the same cell size - even though the floor is technically closer - the angle shapes the coverage nicely. Realistically these antenna's will get folks seated in front of the overhang in its coverage as well. This puts the users between 5 and 12 meters from the antenna - still fine for the antenna being used.

That leaves the third area to cover, that which sits beneath the balcony. We wouldn't expect too much usable signal to penetrate through the wood and steel floor of the balcony - especially after stadium seating and bodies are added. However we will get some reflected signal. The design shows an AP mounted under the overhang on both sides where the pocket is the deepest, however it later turned out that there really were no mounting options for the one AP to fill in the gaps under the overhang. Sometimes it can't be solved the way you'd like too. But what has been left out of the equation thus far - is all of the hall surrounding this auditorium. There are offices at the back of this auditorium - in fact under the balcony level that are right up to the seating. And - they have thin walls. The figure below shows the locations of the AP's in the offices on the ground floor and the seating on the other side of the thin separation walls. The AP's are 3800i models - however their coverage (power and data rates) was balanced with the coverage being provided inside of the auditorium, they performed great and filled in.
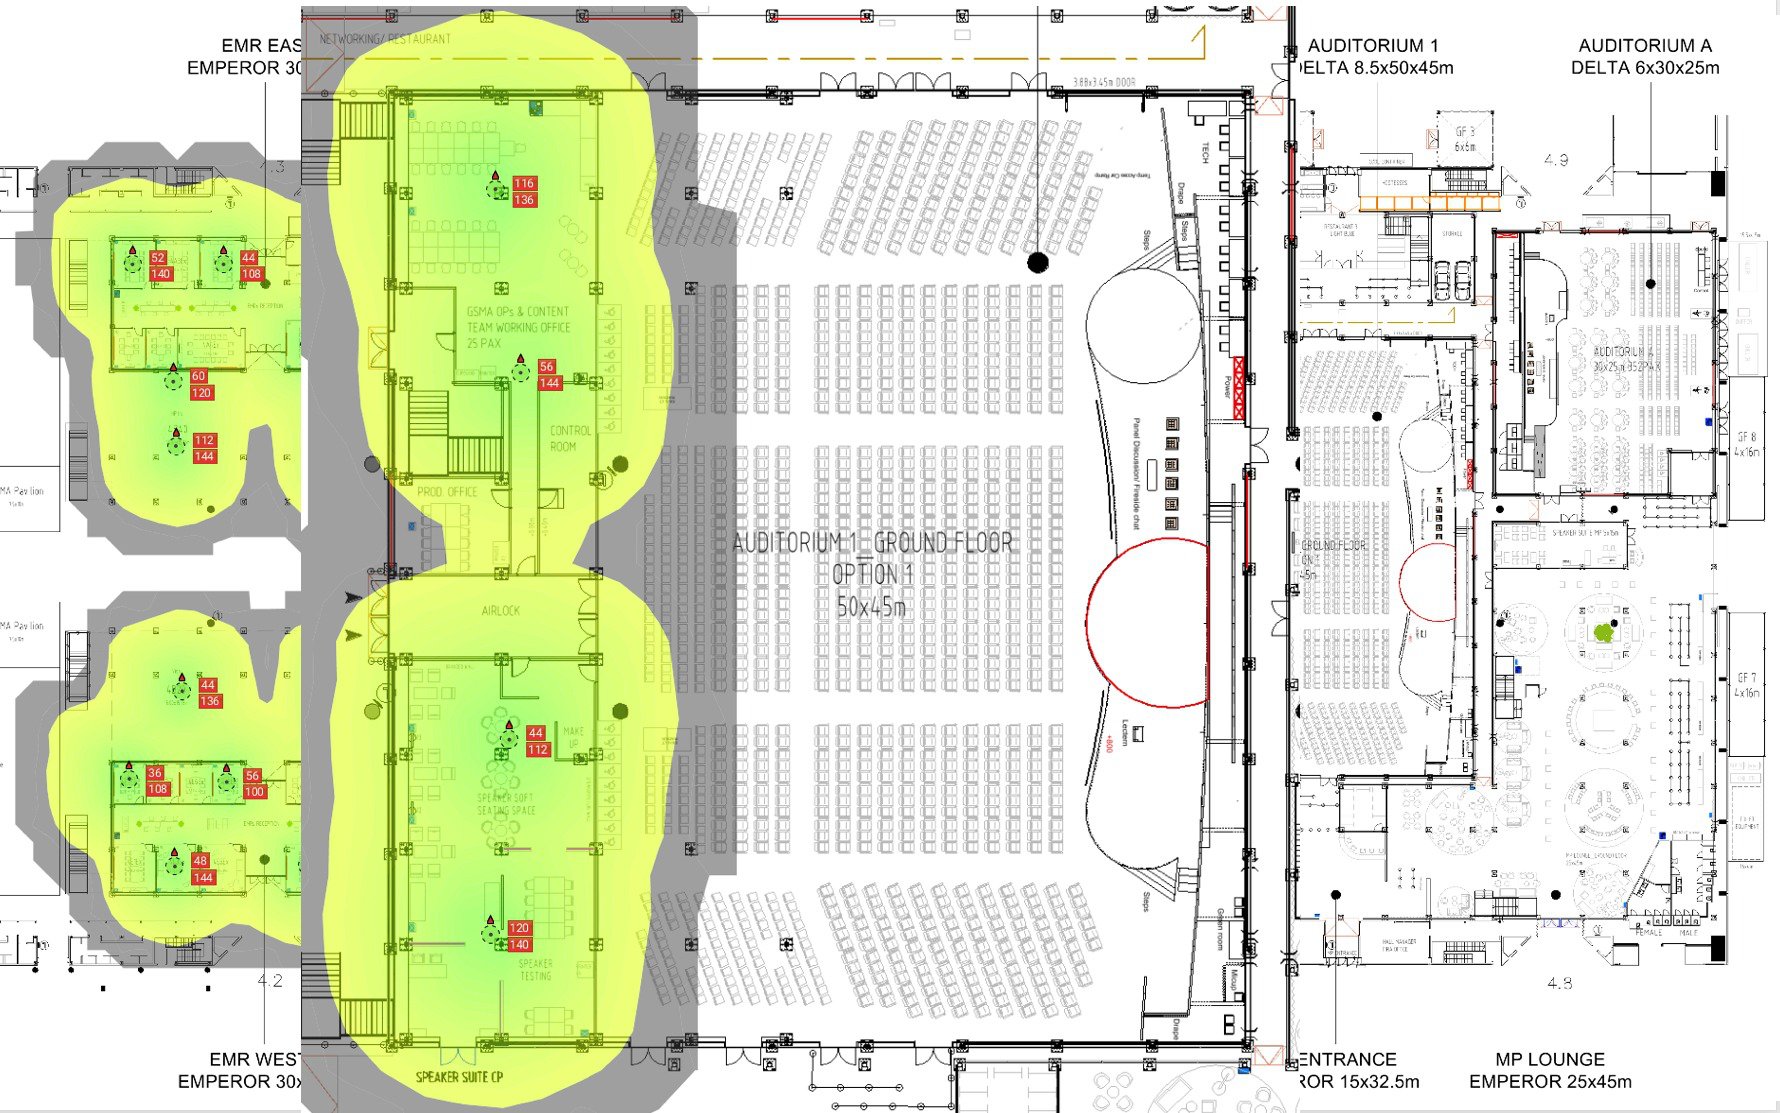
The planned coverage for Auditorium 1 - well covered with overlapping cells on dual 5 GHz radio AP's can be seen in Figure 24, the right side is the full coverage - only some of the AP's are enabled on the left to show the shape of the cells.

Once the requirements have been worked out, and you know what you have to work with on the physical installation site you can start to place AP's on the design. Placements should be as consistent as they can be given the mounting options. Always strive for even cells because balanced - similar cells in coverage and capacity - will yield a consistent user experience. Let's move on to some of the challenges we just introduced into this room by such dense coverage.
Knowing where and how the the AP's will be placed, the next challenge to think about is the practical matter of getting the clients to use all of the AP's. Since clients largely decide on the criteria to join or not join a given AP based on their own rules and their perception of the conditions (decidedly different from the AP's view). How will the clients load balance and spread out on these cells? The cells are not precisely overlapped - so that's creating two different areas of coverage - and unless your sitting directly in the center between the two - there is a slight difference between the two signals at the clients antenna. Some of the clients roaming logic's are well known. For instance - Apple initiates a roam when the signal drops below -70 dBm. However - that's not ever going to happen in this room unless the phone is under 2-3 people. 802.11v can - and does help. Client devices also base roaming decisions on other things such as signal quality - or SNR, relative duty cycle, and other lesser known secret sauces. If the data rates are set high enough - this will accentuate the difference in the usable signals even more. Lastly - there is the particular scan pattern of the device itself. Each device will start looking for a new channel as soon as the old one meets criteria for a change. The Channel they start scanning in the spectrum will determine which AP/Interface they see first - the interfaces on the AP's will be separated by a minimum of 100 MHz in all cases - so it is doubtful that a device will see both at the same time. In practice - once the room fills up and settles down perhaps 5-10 minutes after everyone stops moving, the users on the AP's interfaces will balance out pretty well if the configurations are correct and data rates are high enough.
Tuning the Design
Since this design actually exceeds the number of channels that are available to assign to interfaces (this is for ETSI - with 21 channels only, we have 28 interfaces) it's time to discuss how to evaluate and increase isolation of the Cells. This design gets more complicated when you realize that there are a whole lot of AP's within the same hall directly adjacent, or in some cases performing different duties inside of this auditoriums structure. Co-Channel interference is the killer of capacity.
Fortunately, Cisco 802.11 Wireless products enjoy a whole system view from the RF group leader regarding the RF distance of every single radio interface as it relates to every other radio interface through the use of Cisco's Neighbor Discovery Protocol. The mechanics of this are beyond the scope of this document - for full details on what, why, and how it works - please see the RRM (Radio Resource Management) White Paper regarding RF Grouping and NDP protocol. For now understand that NDP is a special packet sent by all Cisco AP's, it is a broadcast message - that documents the channel and power that an AP is operating at amongst other things. All Cisco AP's within the same RF Group listen for and report the RSSI value of their neighbors NDP packets and in this way we know both how we hear other AP's and how they also hear us.
There are multiple ways to look at Neighbor messaging between AP's. It can be displayed in the Cisco Prime maps in context and is fully exposed using a sh run-config file parsed in the WLCCA (WLC Configuration Analyzer). Either way -it needs to be evaluated before moving forward.
First, use RRM to get a good channel plan assigned. RRM's DCA (Dynamic Channel Assignment) Algorithm will manage channel assignments easily - if asked. It's important to understand that the DCA algorithm is tuned to assume steady state operations. And, in steady state, there are a lot of variations in interference that are of short duration due to the bursty nature of Wi-Fi communications. Channel Changes should not occur as an instantaneous response to a short duration "Event", but rather as a response to a "Trend". Channel changes can be disruptive - particularly to real time conversations.
DCA has a startup mode - think of this as a calibration mode that allows an aggressive set of DCA runs to override steady state criteria and go all out to maximize the RF distance between the cells and optimize the channel assignments. With 14 AP's and 28 5 GHz new interfaces added to an already dense channel environment. DCA would eventually balance the new network slowly - but we don't have time for that. Waiting on DCA is not necessary or advisable when adding or subtracting AP's or changing the question significantly. For instance, in a normal network changing the channel bandwidth from 40 to 80 MHz cuts in half the number of channels available, that qualifies as a major change as well. For this - the DCA restart is in order.
When all the radios are up and stable (give it 30 minutes or so for NDP to resolve) initiate a DCA restart from the CLI of the RF Group Leader WLC. The RF Group Leader is where the RRM process for the RF Group resides and is operating. The RF Group Leader WLC ip address and name can be determined from the GUI (wireless >802.11a/b>RF Grouping) From the CLI, initiate the following command (once each for 802.11a and 802.11b, only if needed for 802.11b though).
Config 802.11a/802.11b channel global DCA restartThis initiates 10 DCA cycles over 100 minutes at 10 minute intervals, suspends all dampening mechanisms supported in steady state operations, and increases the sensitivity. You can view the progress by issuing the Show advanced 802.11a/802.11b channel command which will detail remaining cycles and time till completion.
Once this is complete, there should be a good channel solution (or as good as we can get under the conditions). Next, verify the results. If you have Cisco Prime (3.2 shown) and your AP's are placed on the maps - looking at the relationships and all of the aspects of the AP's operation is easy, and it can be done in context regarding where the APs are physically located.
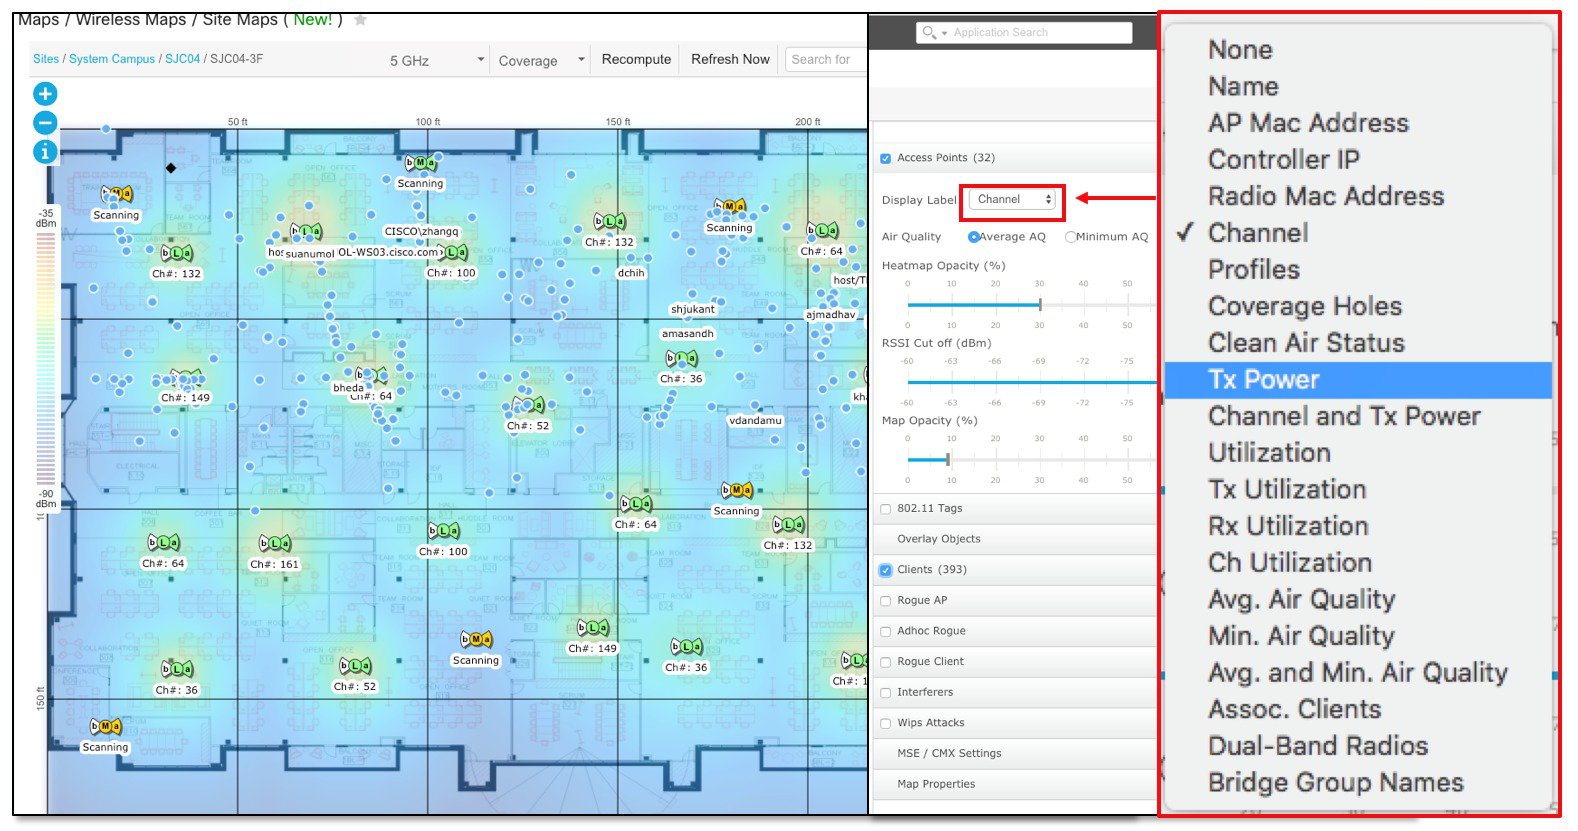
Prime offers several options - for instance looking at channels assigned, power, channel utilization, or associated client counts in real time can be done directly on the map screen - simply change the displayed information tags on the AP's themselves - and you have a whole world of context available to you.
Viewing the RF Neighbor Relations -is as easy as hovering over an AP, and selecting RX Neighbors from the pop up menu. Showing the AP selected - and how every one of his neighbors hears it.
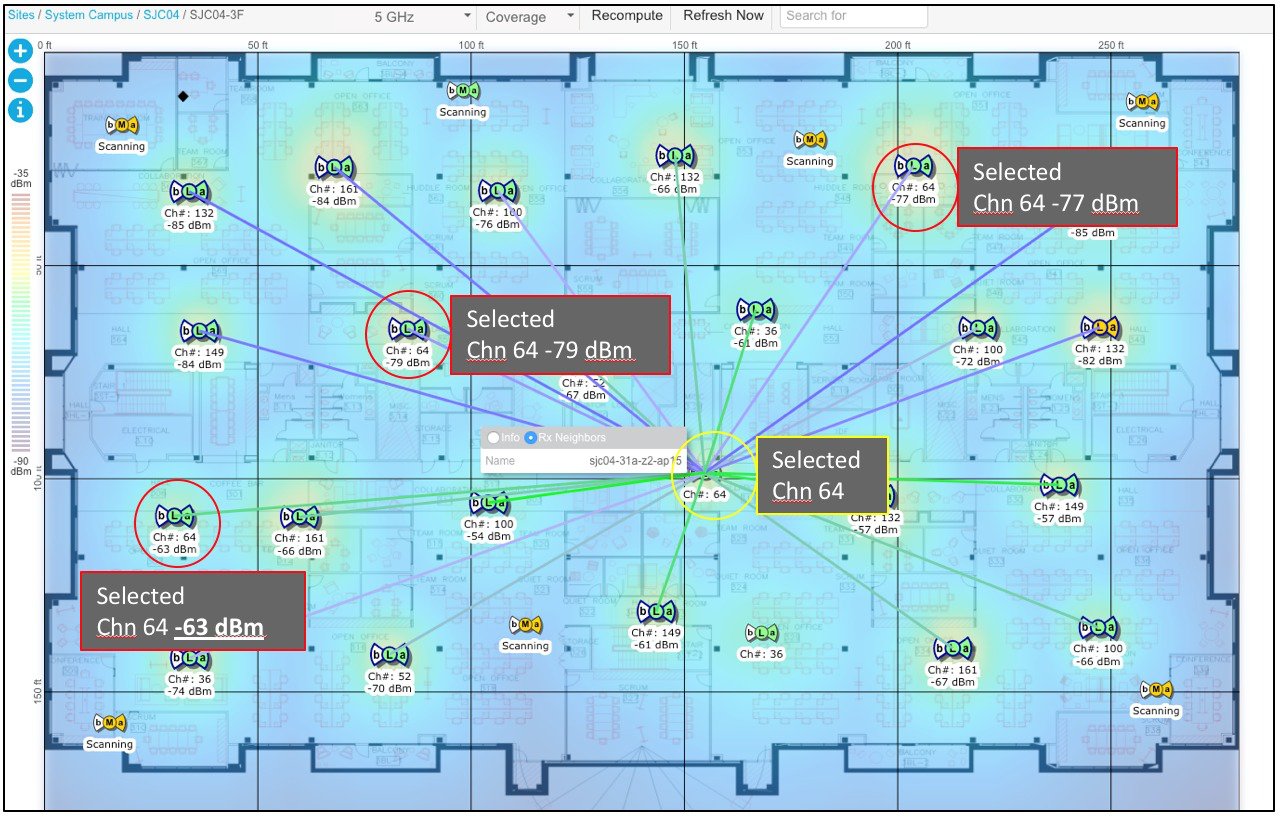
The metric being displayed in Figure 26 above is RAW NDP records. This is important, since NDP ALWAYS sends the packet at the maximum power allowed by regulatory channel. As such this measurement represents the worst case scenario. If your AP's are all at power level 1 then the RSSI displayed represents the real RF distance.
What's important here is Interference from our own network because we can manage it. Interference from Rogue devices is a different problem and less manageable. We want to know how near or far in RF terms is the next AP using the same channel because with 28 Interfaces needing channels in the same room - someone is, and they are close. NDP is sent and received on the same equipment (AP+Antenna) and represents the true transmission path between AP's. Anything operating above -70 dBm on the same channel is a concern. Holding the cursor over another AP will yield the same detail data as the present selected AP. In this way we will check all AP's in the installation.
The other way to see Neighbor relevant information is by using the WLCCA tool. This tool is available freely for download - and is a useful tool for tuning a network and unraveling it's mysteries. You can download it from the Cisco Support Community after registering here: Wireless Lan Controller Config Analyzer (WLCCA). There is also a cloud based automated WLCCA platform to parse these files, but for the purpose of this document - we'll use the local tool to shift the data.The Cisco Support Community pages have an excellent training on this tool located here: https://supportforums.cisco.com/t5/user/ssoregistrationpage?dest_url=https:%2F%2Fsupportforums.cisco.com%2Ft5%2Fwireless-mobility-videos%2Fwebcast-how-to-use-the-wireless-lan-controller-configuration%2Fba-p%2F3371495
To gather the files needed from the controller - there are two methods, you can do it over SSH from the CLI (if you have a single unloaded controller and low AP counts) or the Upload File option on the GUI at Commands > Upload File or through the command line transfer upload utility with datatype either support-bundle or run-config . The Support Bundle has the show run-config file included as part of it's collected data. You will need this file for every controller in the RF Group, the WLCCA tool can open all the files at once and sort it out.
Once loaded in the tool - you will want to select Devices> RF statistics >5 GHz>AP-Groups and select the AP group that represents the AP group of interest, our's is - GV_Hall4_Aud1. This displays only the AP's that are within that group and give us some excellent information about the general health of each AP in RF terms. Refer to the Figure 27 below, note that the 11th column to the right is labeled Highest Neighbor on Channel and displays the RSSI in dBm of the loudest neighbor heard on this AP's serving channel. Three columns to the left of that is RX Neighbors, displaying a count of the number of neighbors total. The number of RX Neighbors indicates how dense the network is (more neighbors = denser conditions) and the RSSI of the closest on channel neighbor represents the worst interference potential.
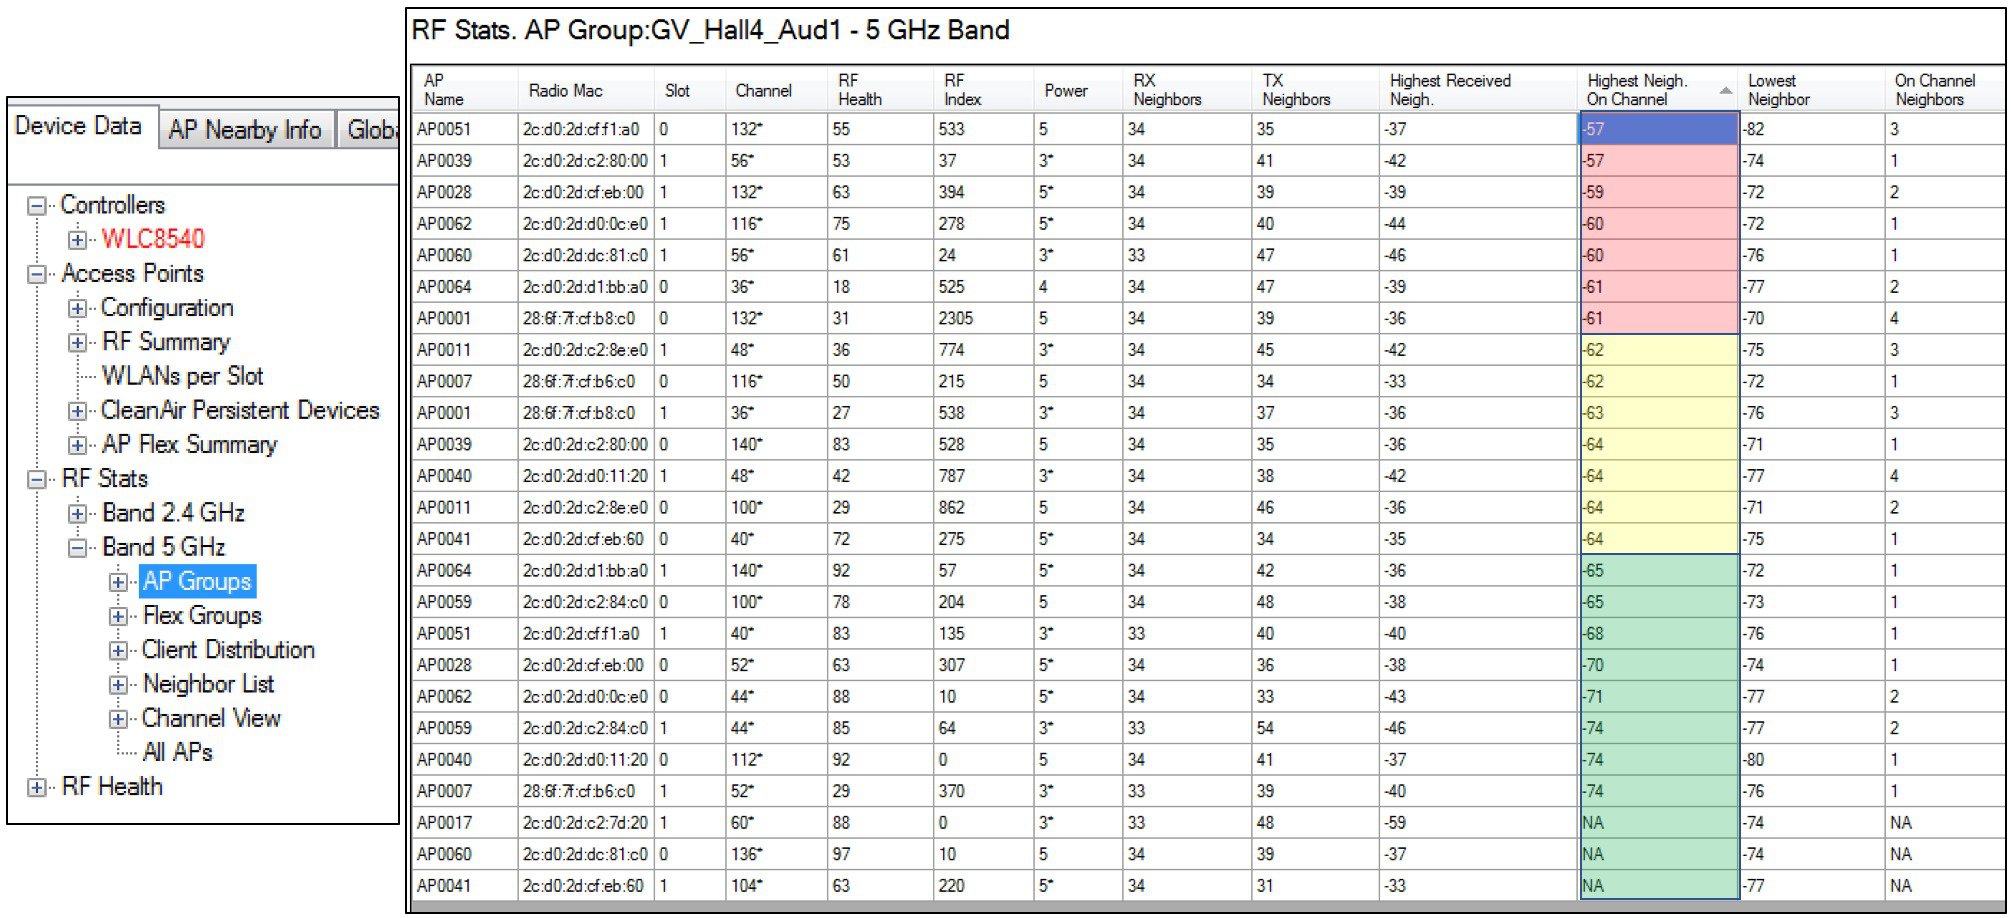
For neighbors on the same channel, -70 dBm is as close as any neighbor should be in carpeted office space. The density of AP's in this room is high, but they have directional antenna's. We can expect that this room will drop 5-8 dB at the floor level once the room is full. If -70 is my number - then +5 dB is -65 and +8 dB =-62 which represents the adjusted target value for assessment.
Starting with the highest neighbor on channel from the RF Stats output in Figure 27 above it looks like AP0051 is the worst case with an on-channel neighbor at -57 dBm. Before deciding if this is good or bad, we need to check the AP Nearby Neighbors for AP0051 and understand that neighbor better. To do that, select AP Nearby Info, RX Neighbors, Find AP by Name in Nearby and search on AP0051.

Which produces a list of AP0051's neighbors, with a lot of useful detail. Here's how to navigate it. The problem is that AP0051 has a neighbor AP that is heard on our channel at -57 dBm. That's potentially very close and full of co-channel interference potential at that RSSI. Following the sample Nearby report in Figure 29 - you can see the top left corner gives us information about the AP we're investigating. The columns of interest are explained below:
-
Heard Channel = the channel that we (AP0051) heard the NDP on.
-
Heard Power = the raw NDP RSSI received by AP0051 – this is sent at full power for the channel/band from the radio.
-
Compensated Heard Power = this is the power that the NDP would be if corrected for senders actual TX power.
-
Configured Channel = this is the channel that the senders AP is operating on.
Figure 29. Nearby Neighbor analysis 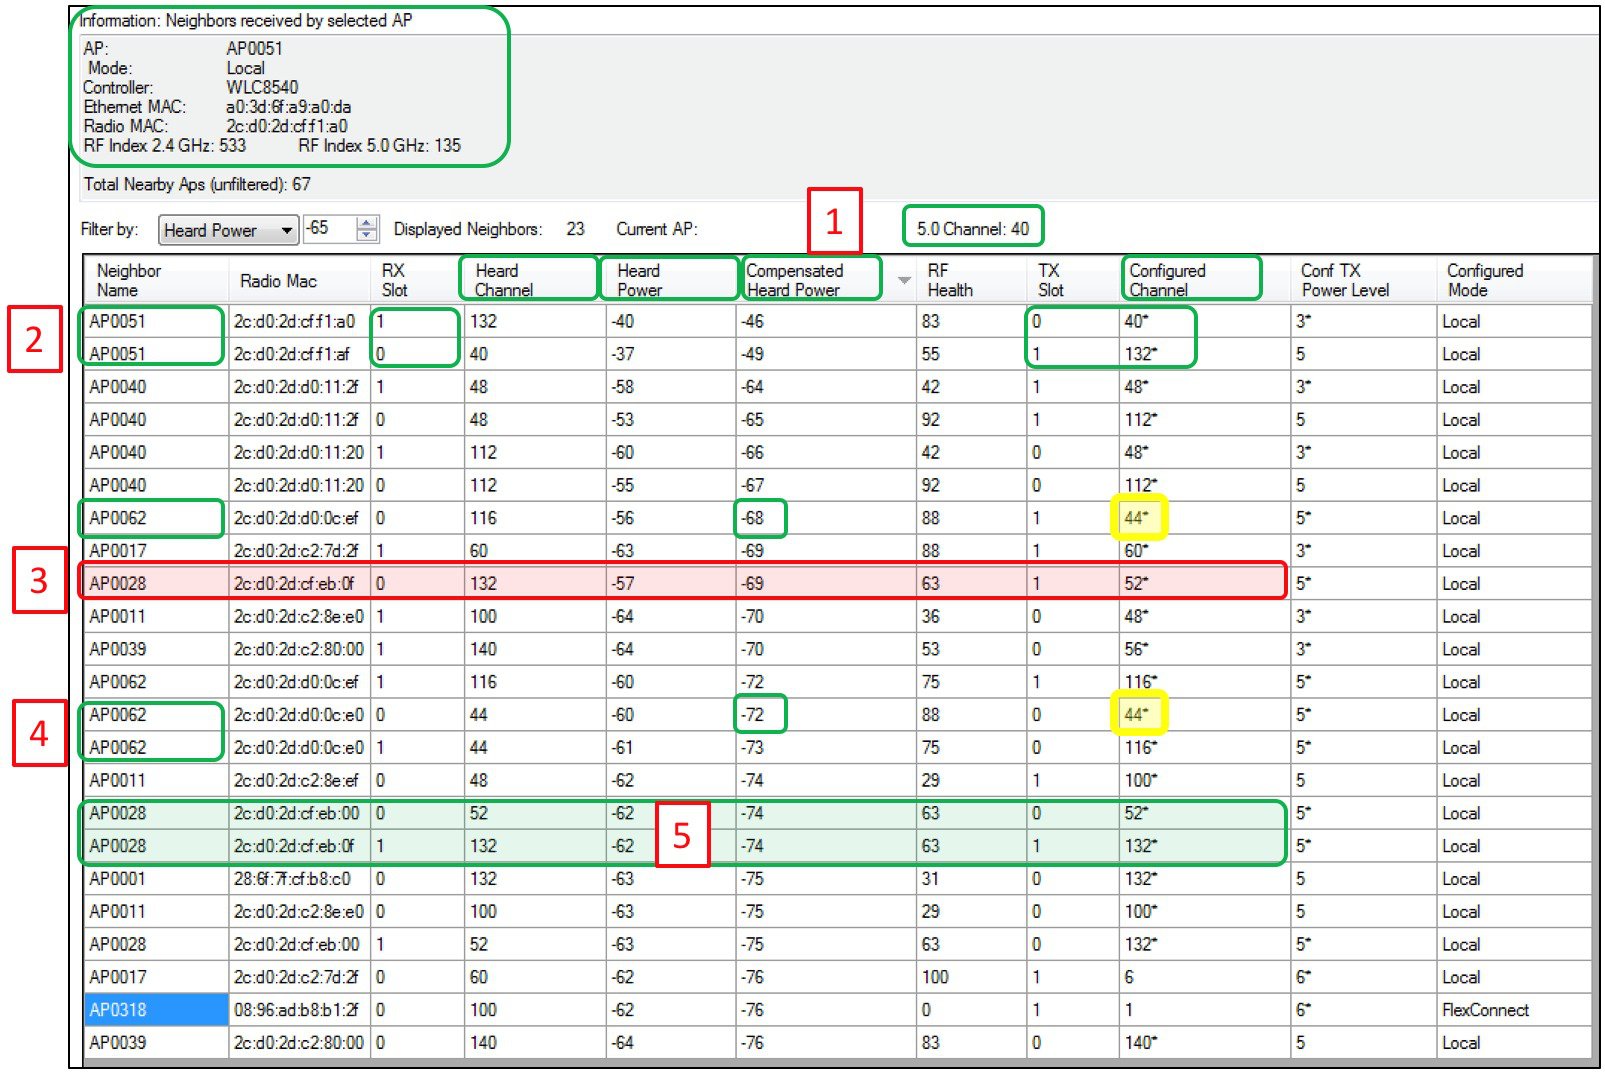
A couple of things to understand first. NDP is sent on every channel by the serving radio during the off channel operations. AP’s also hear NDP on every channel while listening passively during off channel operations.
Follow along on Figure 29 using the RED numbered markers
-
1 of AP0051’s operating channels is channel 40. Because this AP is operating in Dual 5 GHz mode, it actually has two operating channels, this can be seen in 2.
-
The first two entry are for AP0051, since the radios are both in 5 GHz they are the strongest neighbors to one another. Note the configured Channels for each entry – AP0051 is using Channels 40 and 132, and the loud neighbor will have been heard on one of these.
-
The entry for AP0028 shows it was heard – on channel 132 at a heard power of -57 dBm. This is the neighbor of concern. -57 dBm on Channel 132 is a match. And there is good news, it’s actually operating on channel 52 – so is not an interference problem. Even if it had been operating on channel 132, looking at the Compensated Heard Power value– the cell will be operating at -69 dBm -69 is not -70, but if there was nothing we could do with it - we could survive it. Compensated Heard Power adjusts the NDP value in accordance with the current power level of the AP - and represents what the actual traffic from the cell would be heard at.
-
The other kind of interference to worry about is adjacent channel, a channel near one of the channels AP0051 is on. There are a couple of entries of AP’s operating on channel 44, which is close to AP0051’s channel 40. But none too close.
-
These entries for AP0028 and the one 3 lines below it show that both AP0051 and AP0028 are both operating dual 5 GHz, and AP0051 hears both radios of AP0028 as neighbors on both of its interfaces for a total of 4 AP0028 entries.
In conclusion - using the same process above - we'd run through the list of AP's gathered from the RF stats output for the portion colored in Yellow (above -65) and verify each quickly as above.
But if RRM does this for you, why do you need to check it, don't you trust RRM ?" you might ask ? The answer is Yes, and it works quite well as was just demonstrated in this exercise (DCA was re-initialized to get this channel solution first). However; with 1200 C-Level executives sitting in an auditorium and a large portion of the free world's press in attendance, I check, then check again.
This exercise shows you the process to quickly weed through the data. If for instance an AP that wasn't part of the Auditorium 1 AP group being heard by one of the AP's inside the Auditorium that would still register in the RF stats for the AP's in the room as a neighbor on my channel. Then looking through the Nearby AP's list above, we find AP0318 (one of the back office AP's) if it was the problem - we would see it as long as it's a member of our RF Group.
One final note on the WLCCA and the show run-config file. NDP is cached for stability in a highly dynamic environment. The show run-config file is a snapshot in time and the data in it is representative of that period of time. An AP can and will get it's channel changed. And an AP that goes away will still be in the system for 15 minutes to an hour before being pruned. Just bear that in mind and try not to look too closely at the live AP's using an older file.
Mitigation: Evaluate it Realistically, and Stay Creative with solutions
Let's pretend for a minute that there is a source of interference being heard in the room that's potentially troubling to your design requirements. First, look a little deeper and define the problem - just because something is in the air doesn't mean it's going to cause you a problem. An example would be the massive 4K projector encountered a couple of years in a row now at CiscoLive keynote in Europe. It has a broadcasting Wi-Fi interface using a 160 MHz 802.11ac channel. Man, you just hate to have to say - "sorry guy's, but we can either watch the pretty pictures or have Wi-Fi". However a quick conversation with the folks running the gear revealed that they where using cabled connections to preserve the spectrum for Wi-Fi. And while we could see the 160 MHz channel in the room - it never did anything but beacon and hence, wasn't a problem at all. So first - evaluate "realistically" then ask "What can be done?".
Performance - Where the rubber meets the road
So, lets talk about how this auditorium worked and how to tell, then we'll wrap up with the configurations and best practices. Looking at the eye chart below in Figure 30- the channel utilization (equivalent to Airtime Utilization) never exceeds 50% on the AP's in Auditorium 1. Yellow is the XOR Flexible radio (Slot 0), Dark Blue is the dedicated 5 GHz (Slot 1), Red is the client count, and the lighter blue line is the 50% mark on the graph's Y axis.

Full disclosure - AP0017 had a broken Dart connector to its antenna, this happened sometime after the install. The interface had reverted to 2.4 GHz and we ended up just shutting it off. The seats where in, and there was no chance to get a ladder up to the AP.
The below plot shows the total user counts over 4 days in Auditorium 1. The big Keynote was Tuesday morning (the second day), and we saw just over 1200 concurrent connected clients during that event. Loading in the room differs by activity - so not every AP is used or needed for every single event held in the room. Plan for the worst - hope for the best.
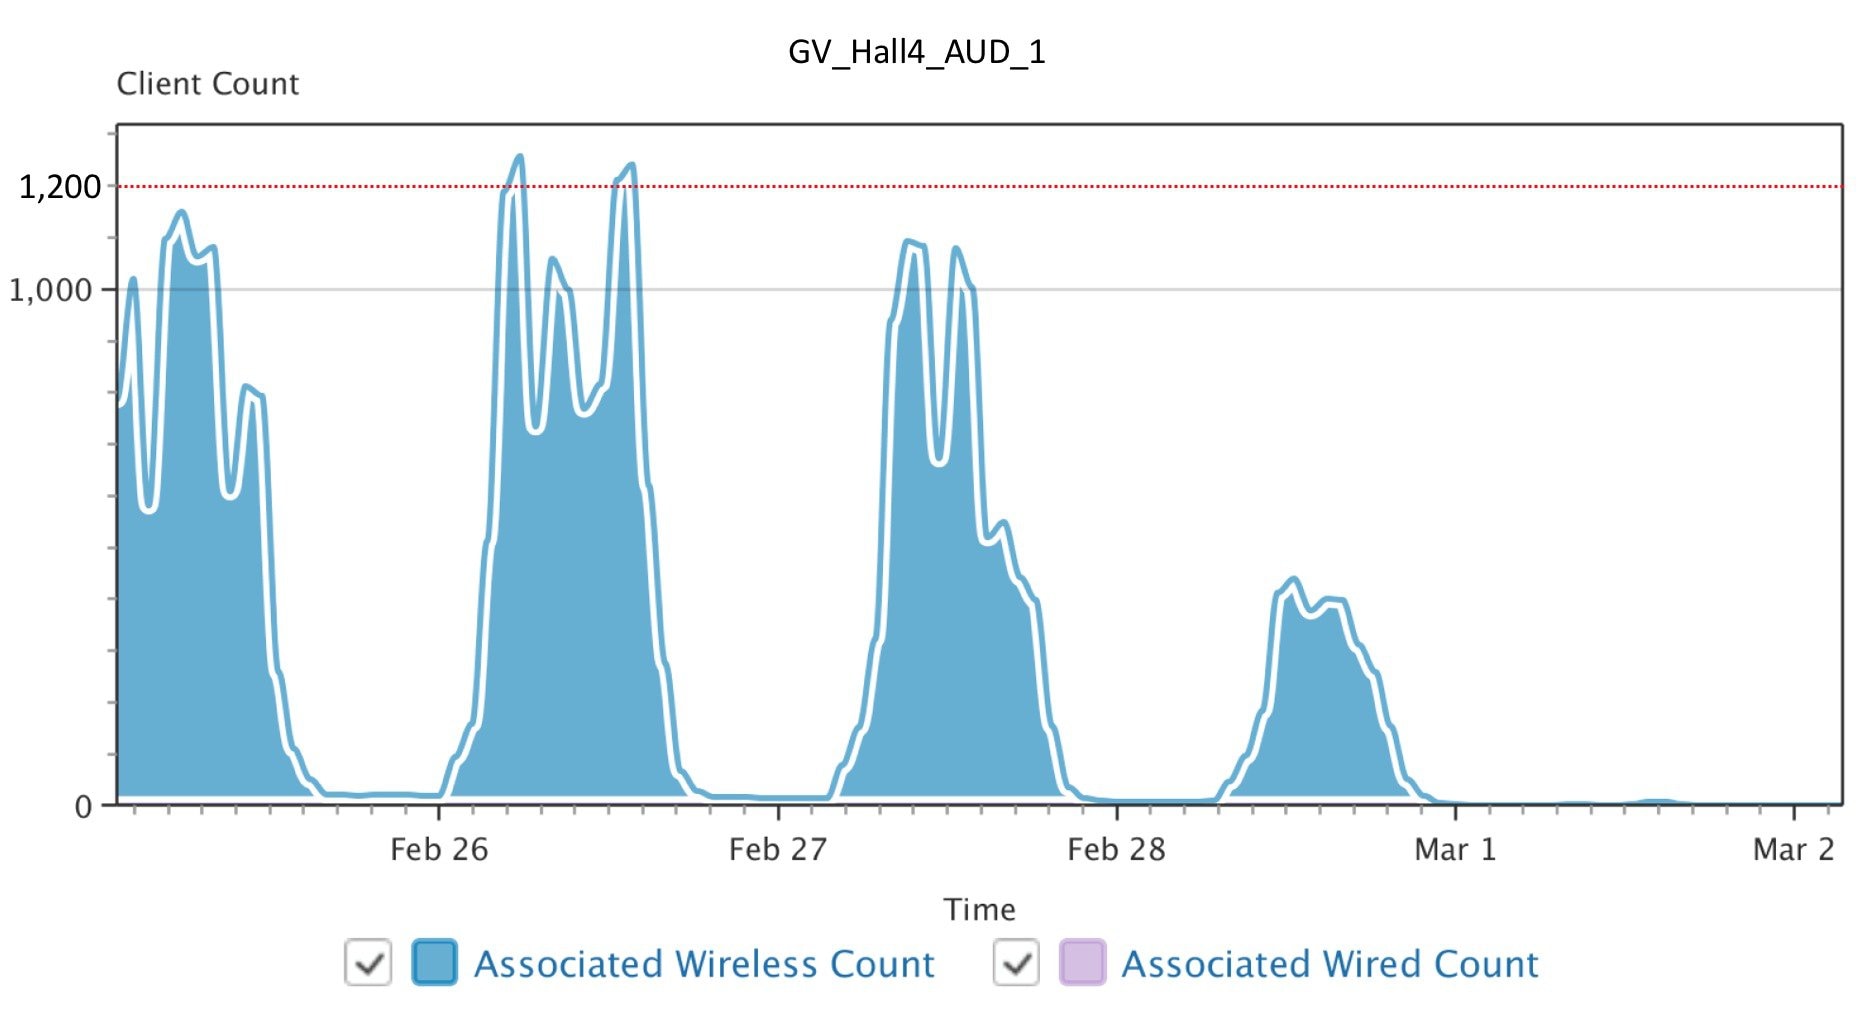
The room performed well, as did the other auditoriums within the hall. Here is a map of the whole hall, 1 layer actually showing only the AP's that are augmenting the ground floor structures. Most of the city like structure built in this hall has 2 floors - and the overhead AP's are only effective for the top floor and common areas, so there are a lot of AP's on the first floor's.
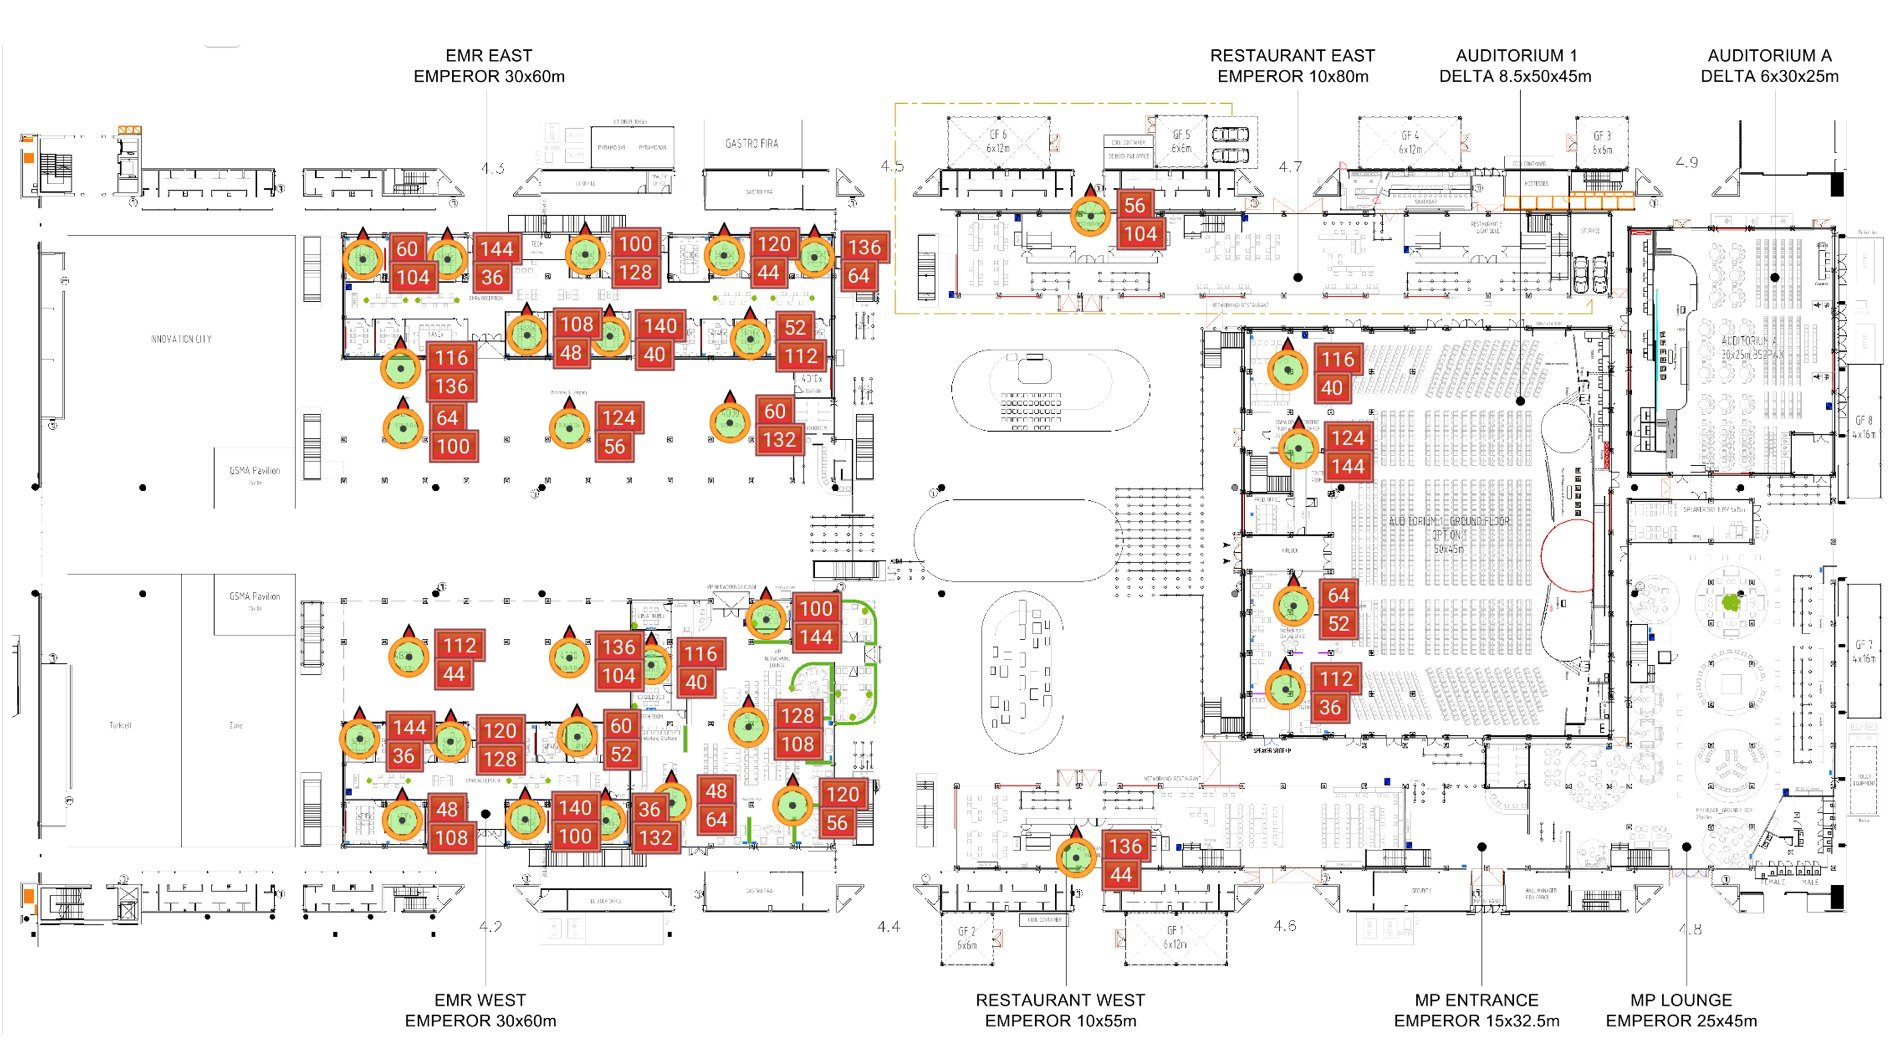
There are 140 AP's contained in the 200m x 80 m hall, and the walls and ceiling are all metal, the floor is incredibly hard concrete. It is - a faraday cage for all intents and purposes. In fact all 8 halls are a high density design case with multiple smaller solutions and requirements in play. This use case comes directly from the Fira Barcelona in Spain, which hosts the GSMA's Mobile World Congress event in Europe. Annually it attracts 100K+ attendee's.
Some fun Facts about this venue and the 2018 show from a networking standpoint.
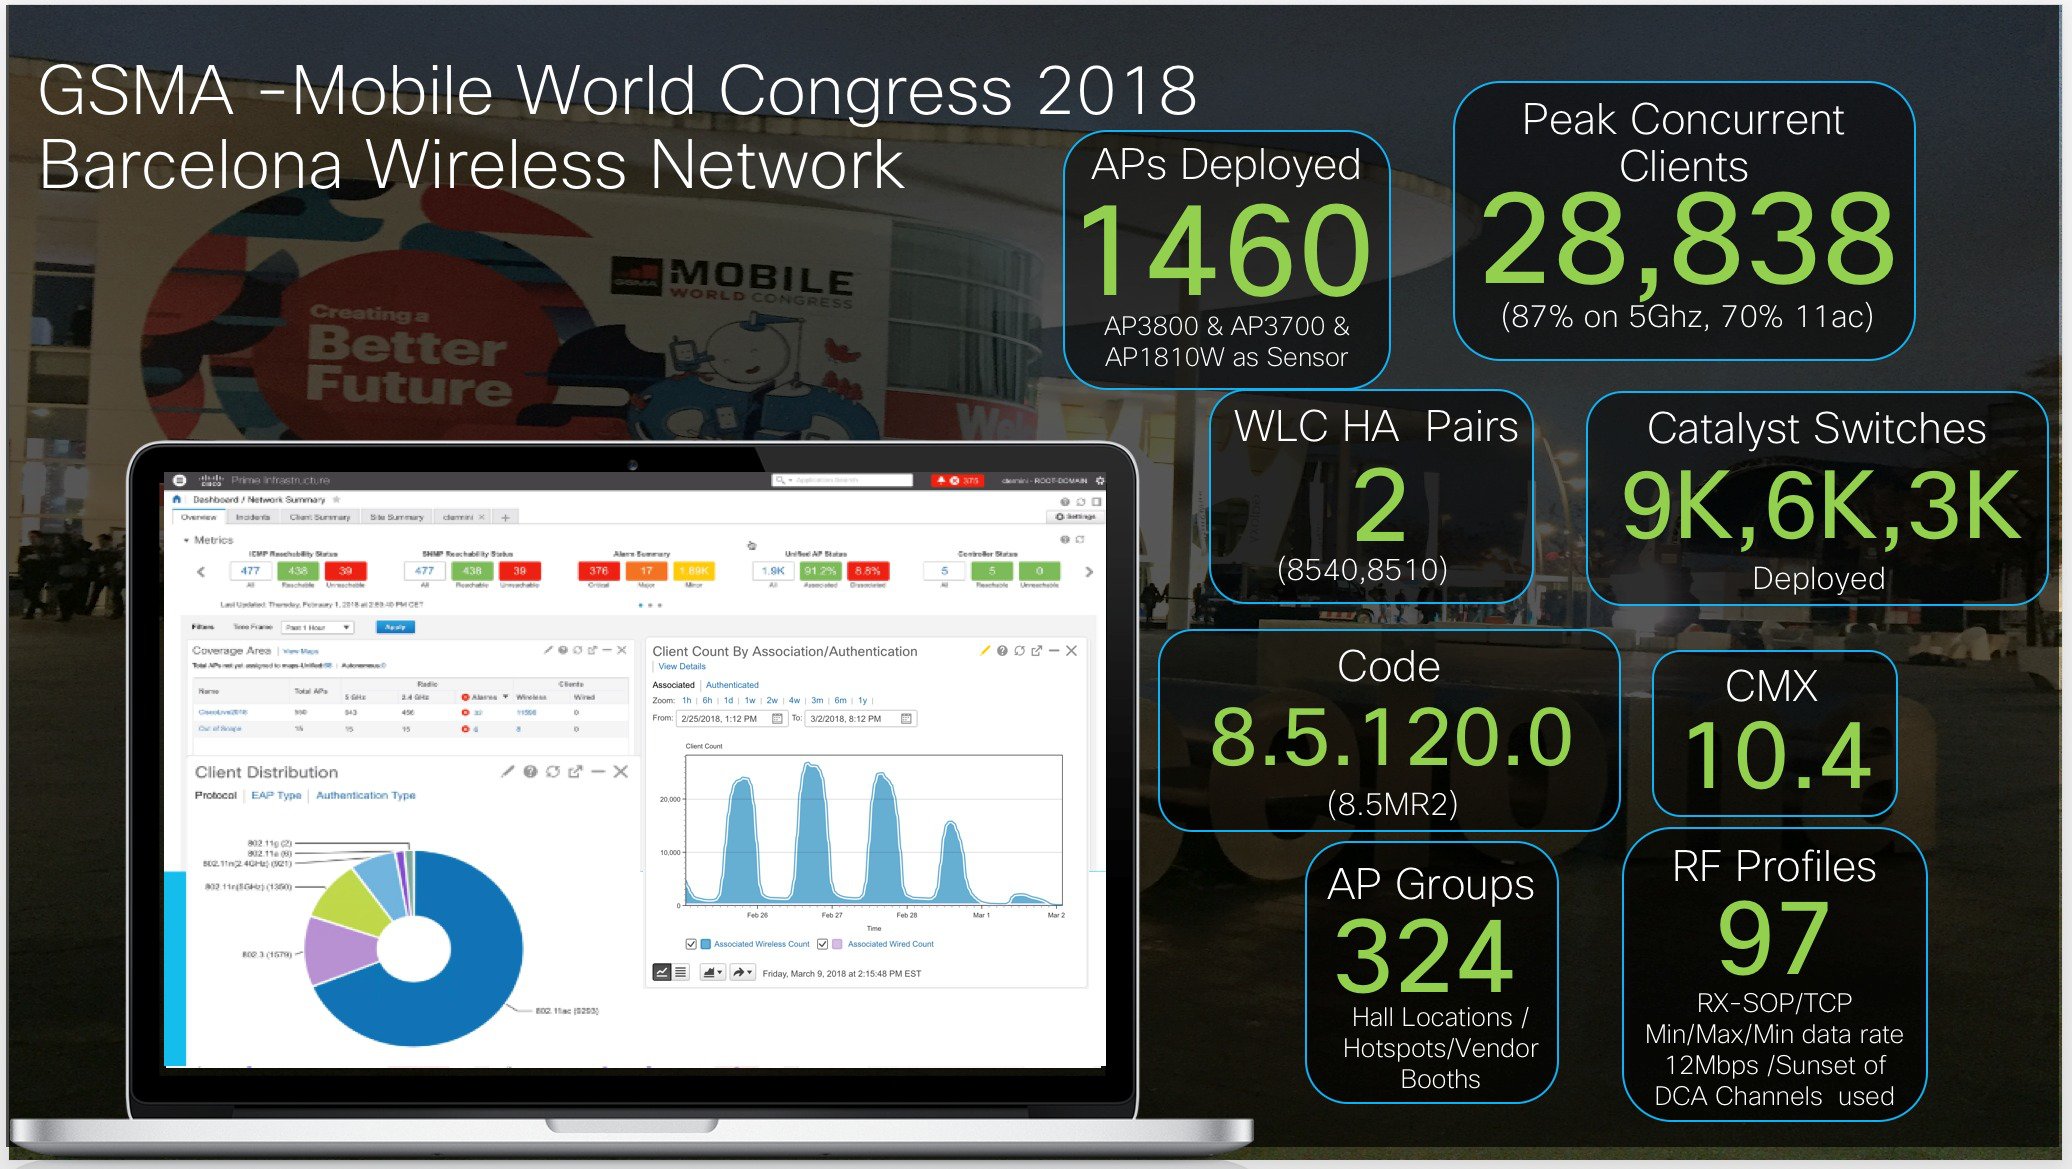
Configuration Recommendations–Big Events/lectures, Keynote's, Venues
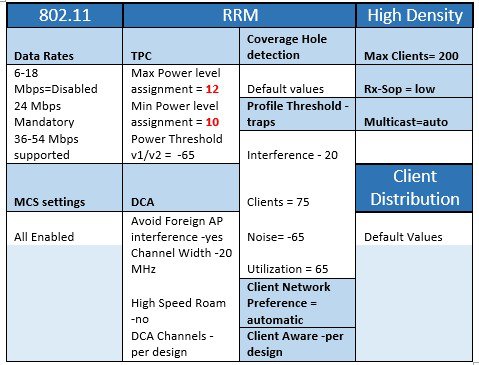
The end configurations differ slightly from use case to use case, but there should be a familiar theme to this now. The only change we'll see between this use case in a large auditorium and the last at ¼ the size is the min/max power settings. Here we need a little more energy to the floor because of the mounting height in spite of the 6 dB gain of the antenna. There are also valid concerns about interference and client load balancing. Defining the maximum power assignment ensures that one AP won't inadvertently get to loud and attract more than its fair share of clients.
Features in High Density
There are many features that have been developed that apply specifically to the High Density realm in name and function. . See the High Density Experience (HDX) Deployment Guide . Some of the relevant to High Client Density features will be discussed here in context. The full HDX guide should be consulted for a complete overview of the features.
In general HDX, or High Density “Extreme” deployment scenarios, where thousands of devices will be deployed at a given site, for the duration of events with a large number of roaming wireless devices are expected. In such an environment the top priority is always to get the device associated to a wireless network as soon as possible, as it will significantly impact the overall probing frequency of the device. So complete the “onbarding” as soon as possible, with the device detecting a connection to internet quickly. Why?
Several thousand devices probing without associating on a stadium can easily drive channel utilization and/or noise floor to huge levels. This is why it is important to get them connected as soon as possible to reduce that activity is a worthy effort.
For the high level architecture – Most of the AP’s will be installed in Local/Client serving mode (central Switching). There are several reasons for this, including:
-
Allows scale for the key caching to cover the complete network, and not just 100Aps which is the current upper limit of a FlexConnect group
-
Can avoid scenarios derived from packet loss between WLC and AP, where association frames, EAPoL , EAP for dot1x frames , DHCP, are lost in transit, all which could lead to slower on boarding or failed association/authentication attempts under extreme loads
-
Simplifies the underlying network configuration and AP ports can simply be access mode, and secured properly through the venue to avoid “port stealing” in the very public venue
Configuration Details
As mentioned, getting the client on the network as soon as possible is job 1. Here are some general points to consider:
-
Never use any feature that could delay association (load balancing, band select, optimized roaming for instance). They must be avoided at all costs their intended usage is for enterprise deployments not HDX.
-
In general, 2.4 band is simply not suitable, and most large recent events have been hosting services on 5GHz only, where there are sufficient channels to allow for a proper dense capacity RF design due to its limited non-overlapping channel count (just 3, 4 in some countries), plus the huge amount of possible interferers in 2.4 GHz. Add to this the longer propagation distance of 2.4 and the resulting larger coverage area, makes 2.4 GHz a poor chose for HDX. Per past experience, it is better to just simply disable it, or create separated SSID marked as “legacy” in the name, and not supported by the venue help desk.
-
In the extreme case that 2.4 is absolutely required, disable 11b rates totally (1,2,5.5,11 mbps)
-
For public venues, the SSIDs are normally secured with WPA2-PSK to avoid “accidental” association from passing devices. Alternatively WPA2-dot1x has been used for venues that need exhibitor specific support, This can provide the needed support to handle the dot1x provisioning process. For simplicity, PSK is what is most used.
-
Passpoint – is used.to simplify the user experience greatly. 10% of the users on the GSMA’s MWC2018 in Barcelona participated through HS2.0 and Passpoint. See Fierce Wireless.
-
From the controller, features such as webauth, WEP, must be avoided. If a splash page is required, it is advisable to use an external appliance to handle the web page injection for scalability reasons. ISE does a very nice job of this.
-
Client exclusion is enabled and recomended, to avoid misconfigured devices negatively impacting the network.
-
If using WLC code 8.3 or 8.5, Adaptive FT is recommended. Direct 802.11r/FT should not be used as it can cause interoperability problem with older devices, this is avoided using the adaptive option.
-
802.11w (PMF) must be avoided as it can cause interoperability issues with older devices, commonly due to client side bugs.
-
802.11k/v options should be enabled, avoid using the dual band option.
-
Do not enable multicast or broadcast forwarding. If mDNS is needed, try to use the mDNS proxy feature.
-
Disable IPv6 forwarding if it won’t be used.
-
Enable TCP MSS option, normally 1300 for ipv4, 1250 for IPv6, to optimize data plane IP reassembly.
-
Disable Aironet extensions.
-
For security reasons, it is advisable to enable DHCP required option on the WLAN’s.
-
Do not increase idle timeout, as it can negatively impact AP at the edge of the network (for instance when clients are leaving the venue).
-
Do not enable Wifi direct filtering in the WLAN, Presently this will block some Android versions.
-
Use of Peer to peer block mode, is something that some customers do to avoid client to client attacks. This is good if no client to client communication is required (it would for example break voice calls between two clients associated on the same network).
-
Coverage hole detection is disabled.
-
Cleanair is enabled, and there is monitoring to flag and take corrective actions if there is impacting non-wi-fi interference
-
WLAN AAA accounting interim is disabled, to reduce overall load (This is not really needed on code 8.2 or higher).
-
Broadcast key rotation is set to 24h to avoid client side defects.
-
GARP forwarding is disabled.
-
The Mobility group is restricted to only WLCs that share a common RF space for MWC we have two separate venue locations, there is no need to roam between them.
Security
-
Management via wireless is disabled.
-
SNMPv2 is not used, or if required for traps, read-only with IP address
-
CPU acl is set to block client subnetworks.
-
Remove the default SNMP community and user.
RF handling
-
Rogue policies are important, in large venues it is common to have teams looking for rogues and mitigating them. The venue has to have an RF policy accepted by exhibitors prior to the event or mayham can be the result.
-
DCA is set to monitor all channels.
-
Rogue contention must be avoided at all costs.
-
Create a rule marking your own SSID as malicious, this alerts to a rogue using your SSID.
-
Clean air enabled, BLE signature disabled for 2.4.
-
RX-SOP–Receive Start Of Packet: Is used – as indicated in configurations above. This can be increased to medium if interference is close and cannot be tuned out other wise.
-
Optimized Roaming is not generally used in high client density environments. The coverage is designed for stationary folks while they sit. Roaming is necessary for entering and exiting, then subsequent load balancing. The Data Rates take care of this for us as long as AP placement is even and consistent. Ensure this – and there won’t be a problem. If there is a problem, then optimized Roaming is appropriate but be very gentle. Picking thresholds that manage oddly overlapping cells will be difficult to get consistent results with.
-
DCA in RF Profiles can and is used to provide granular channel plans that coordinate sharing channels with required exhibitors networks. Simply remove the shared channels from the RF profile and your AP's will not use the reserved channels.
-
DBS–Dynamic Bandwidth Selection: Not applicable, we designed for 20/40 MHz based on capacity requirements and channel availability.
-
DFS–Dynamic Frequency Selection is always enabled
Special Situations and Solutions
Getting an AP where it needs to be seems to be one of the toughest yet most important problems to solve if capacity is to be reached. "You cannot make a Wi-Fi without a radio". That may seem like a tongue in cheek statement- but it's the simple truth. The fact of the matter is - people think AP's are ugly. And the aesthetics police (those who create the style and color coordinate the dressings for events) are often convinced that if you can see "anything" that's not in the style design - the whole thing is ruined. There are other restrictions you'll need to work around as well and all of them are like any other rule or policy they were created out of necessity. Safety and Security, Architects just to name a few will often have input. The important thing is to get to the owner of the policy.Compromises are achieved once both parties understand the full ask, alternatives always exist.
Some times - greatness is thrust upon you and circumstances dictate planning is a luxury. Happens to all of us. There is always something that can be done given just a little time to make the outcome better. For instance, these are not particularly pretty but were mostly hidden and they worked a LOT better than the indoor model AP in the corner alone would have.

One memorable experience was a conference which had two floors within the hall. The second floor was used for Hospitality, and the Press. Those are two places that need to have good solid internet access - if not they will find a connection and tell all their friends before you even know there's a problem. Sadly - this second floor was above the open hall which had amongst other things - a lot of RF from vendors as well as provider networks within the hall. The second floor was more or less a rack, in a microwave oven. The floor itself was really not that thick from an RF standpoint and the resulting interference was horrible. We mounted 3602i model AP's directly under the work desk's and pointed them up - which put the back of the AP towards the floor and the interference. And - it worked well enough to get us through. The following year - they found a great place to put both of those groups outside of the Microwave. If you think about the problem - there is usually something simple you can do to make it better.
For the above design and the AV mounting - we use AP2800e in Dual 5 GHz mode (2x5 GHz cells - 1 Ethernet Cable and port - it makes this simpler). We mount the antenna's and AP's individually with Showtec couplers and an extension bar (same sized material as the main AV rails)- then couple that to the AV rails in the room.
In the photos below, you can see the coupler, the antenna mount - and between the two is some purpose bent metal that allows the antenna mount to be attached to the coupler. The metal bracket between the coupler and the antenna is custom - and it cost's about $3/p from a local fabricator if you have 100 made. The coupler can be found on the internet all day long for under $20 (you don't need the heaviest one - the AP and both antenna's won't be over 10 lbs /4kg. This investment allows quick mounting of the whole rig while the rigging is on the ground. You will need to be efficient - and well coordinated with the folks hanging the rest of the stuff. It is always a rush, since the floor is filled with the work until the rails gets lifted and there is a lot to do on the floor after. Once the rig is lifted it's up till it comes down at the end of the show.

In addition to the AP's and antenna's - you'll need to connect them all together and power them. We use the Cisco Catalyst 3560CX (8 or 12 port) compact switches. We plan the runs well before the install on the same drawings used for the coverage plan. Generally there is a cable crew ready to make the cables as needed, but you have the measurements if you own the cabling too. Lastly - you will need power. I've witnessed debates over placing switches in the rigging or using home runs to the ground. At a certain distance/scale this becomes moot. But my argument has always been - things that move can break - and 14 lan cables lifted with the rigging is more potential trouble than it is worth. Lifting with perhaps 2 (always a back up uplink) lan cables and a power cable is a lot less problematic to manage during the lift as well. In the end - this takes less time than dropping AP's using the carpet bomb method and taping down all of those cables. And, it works a whole lot better.
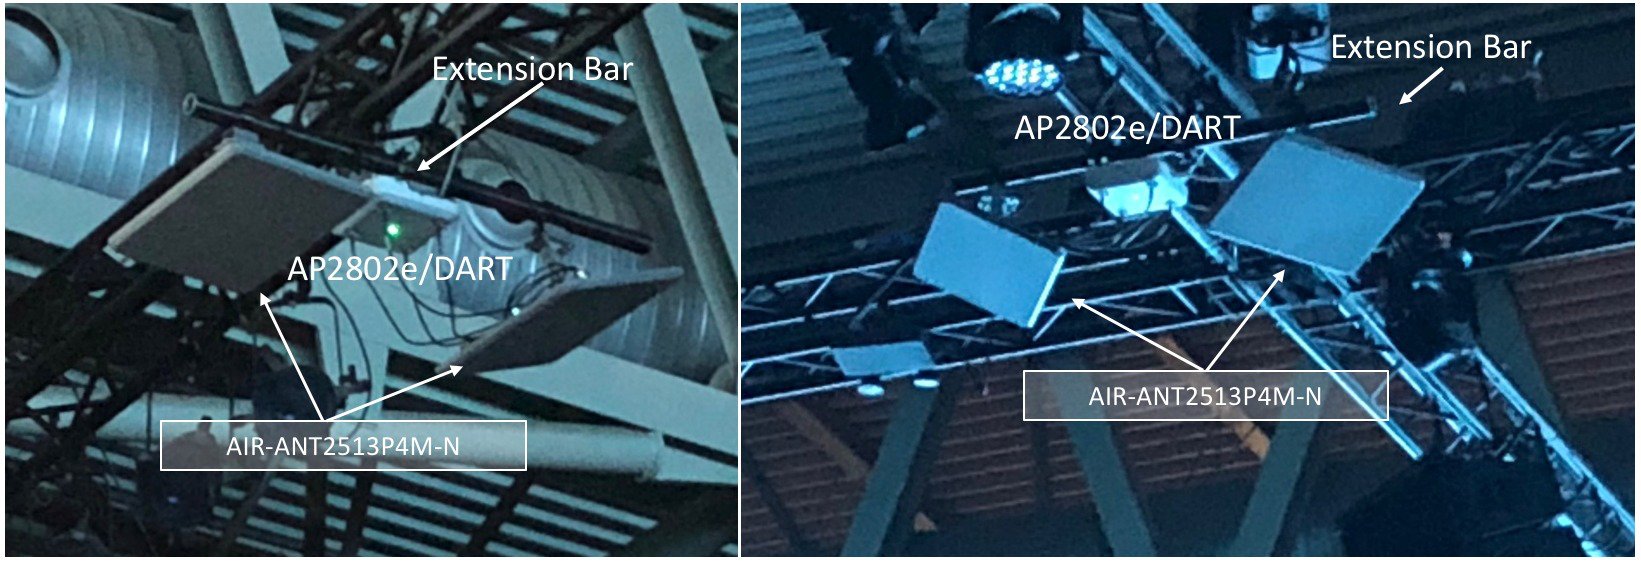
Lastly, I know I don't need to say this but every time I don't there is trouble, Test EVERYTHING while it is still on the ground. Seems intuitive, I know. However, I've seen a lot of guy's up on very tall ladders who were not fond of heights because they didn't test first.
Common Temporary Solutions
Lets talk about some other solutions for more common temporary installations. All of these are plenty applicable to smaller scale temporary requirements like a large event in the office lobby or even a parking lot. Getting the AP where it needs to be is key.
Temporary AP stands can be as simple as a speaker stand (the type a band or a DJ uses). The base is wide for stability aesthetically it's not the nicest - but they're black generally and blend well. Other solutions we have used and still do in several areas within the venue - especially for a CiscoLive where we bring a lot of the infrastructure with us are simple display stands such as below:
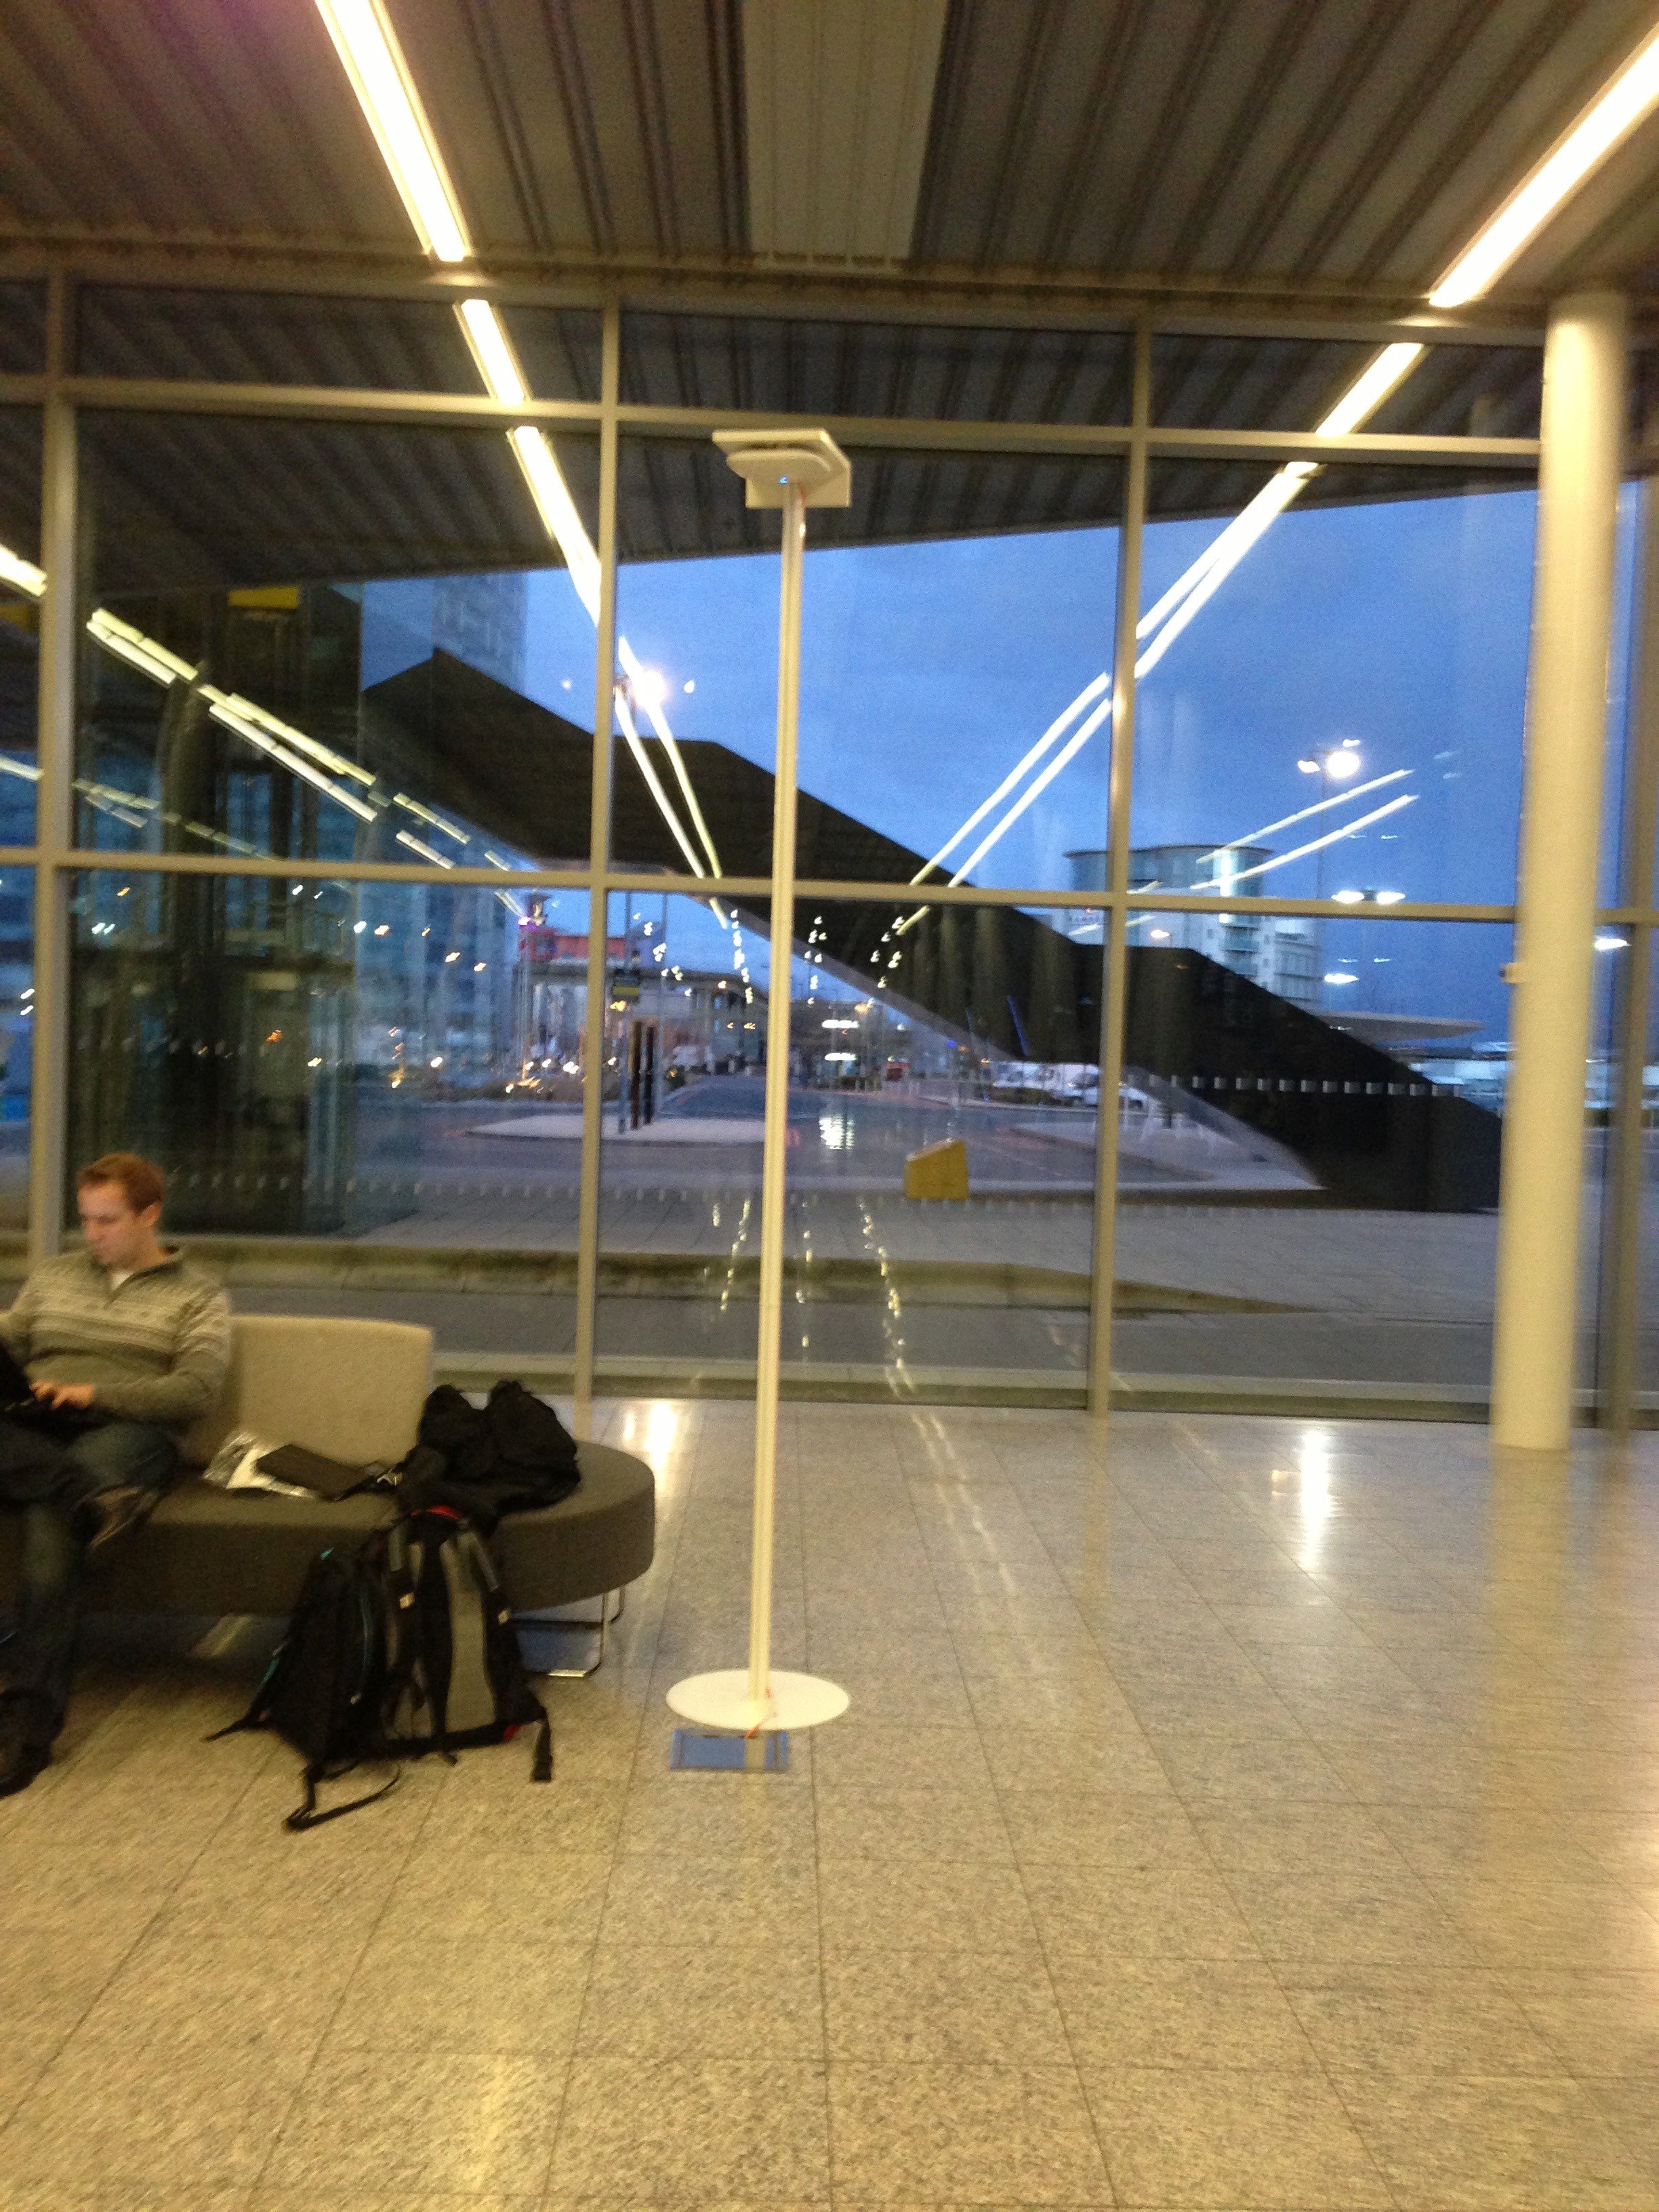
Local professional display companies should have aesthetic options. The base on the stand in Figure 38 are steel - and have some heft. An Internal antenna model is shown but in most cases a directional antenna model like the AIR-ANT2566P4W-R will be used for long hallways and common areas such as below. Another example is shown in Fig. 39 and 40 below. The post is the same diameter as the AV rails we often encounter. Note that the same mounting can be used as in the Auditorium solution for the AV rails then. Once you commit to this - life gets easy every where.
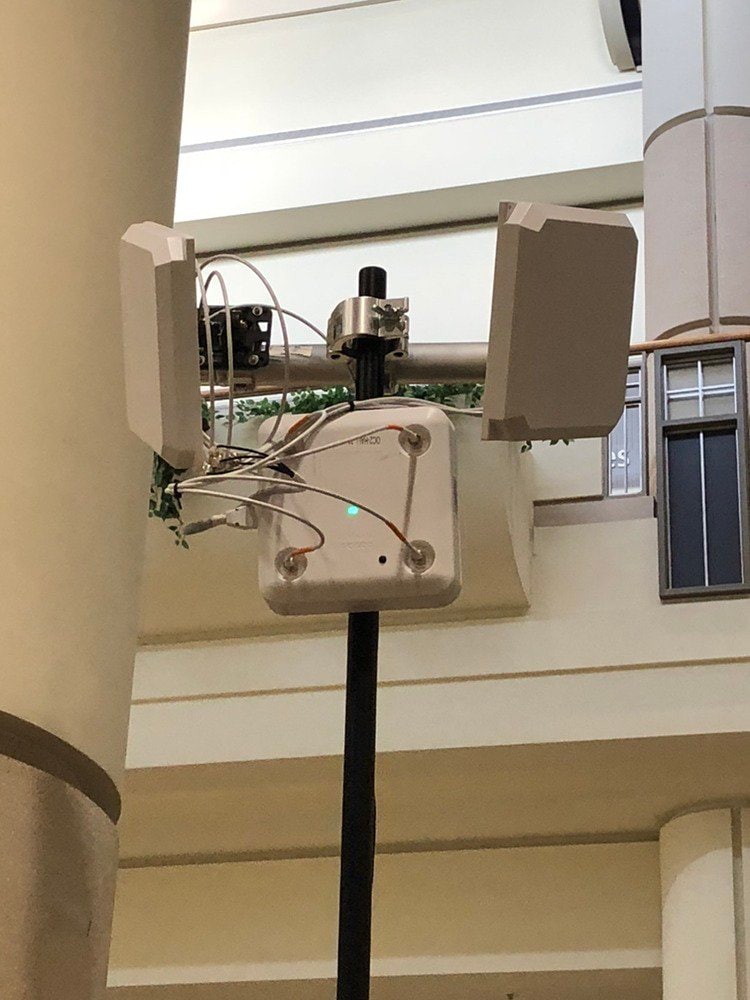
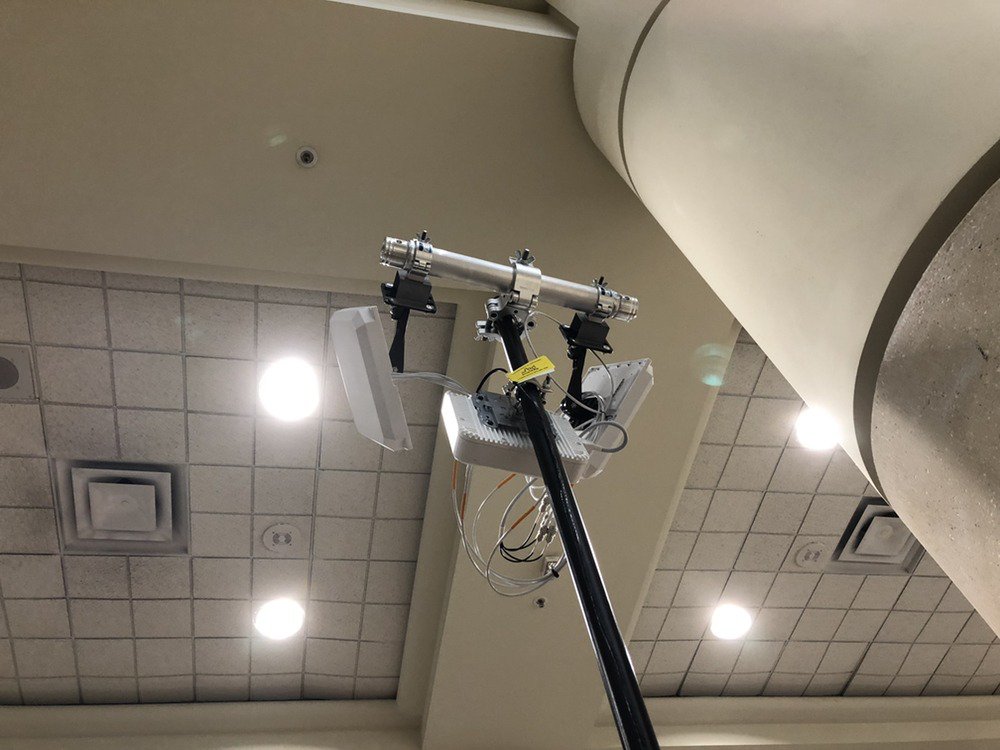
Another way to bring light (Wi-Fi spectrum type light) where there is darkness or to add some small capacity in a niche area (like the bottom floor of a steal floored double decked display booth) use wall plate style AP's like the AP1810/AP1815, they make great fill in's. This is more of a Micro/Macro model when it comes to RRM. But as long as you have channels - you can add more coverage. This model is regulalry used in the exhibitor halls. Initially there was concern with how this solution would react with the high gain antenna's on the ceiling. RRM did a fine job, the resulting cells were fairly well contained and easily managed.
Hopefully some of this gives you some ideas of your own. The combinations of things that you do will be born from the requirements as they always are. Stay fluid and creative, know the way to the hardware store if only to buy some Duct Tape/ Gaffers tape / Cintas Americano and have some fun with the process.
Useful Links
Wireless LAN Design Guide for High Density Client Environments While a bit dated on current technology, options for getting the RF where it needs to be never go out of style.
Optimized Wi-Fi Connectivity and Prioritized Business Apps Adaptive 802.11r.
Regulatory look up Cisco Aironet antenna accessories.
 Feedback