Introduction
This document introduces URL ACL (Enhanced) feature and provides general guidelines for its deployment. The purpose of this document is to:
-
Provide an overview of URL ACL (Enhanced) feature
-
Highlight supported Key Features
-
Provide details on deploying and managing URL ACL (Enhanced) on WLC
Pre–requisite
Customers must have AireOS 8.0 or higher release on a Wireless LAN Controller in order to upgrade to the 8.4 code.
Components Used
The information in this documentwas created from devices in a specificlab environment. All of the devices used in this document started with a cleared (default) configuration. If your network is live, make sure that you understand the potential impact of any command.
Conventions
Refer to Cisco Technical Tips Conventions for more information on document conventions.
Feature Introduction
The URL Filtering feature helps optimize network bandwidth utilization by restricting access to websites. It uses DNS snooping to snoop the DNS response sent from the DNS server to wireless clients. It is an ACL based implementation to restrict URLs for all protocol including HTTP and HTTPS.
Implementation
URL Filtering ACL is defined as set of URLs, which are associated with Allow/Deny action for all URLs. This is defined under an ACL type, either a white or black list. A mix of white and black list rules is not supported. An external server's ip address is configured which is used to redirect blocked page to client if the access URL is blocked as per configuration.
Work Flow
WLC snoops the DNS response for the client and if the URL is allowed as per the configuration (ACL rule), DNS response will be sent to the client. If the URL is not allowed as per the configuration (ACL rule), the resolved IP will be overwritten with an external server's IP (which we would have configured) and returned to the client. This external server will redirect blocked page to the clients. Counters for the allowed and denied DNS responses are viewable for an ACL as they are getting hit.
Configuration Steps
- Configure an ACL as either Allowed List or Blocked List to allow or deny access to domains
- Configure External Server IP address
-
Tie the created URL ACL to either
-
Interface
-
WLAN
-
Local Policy (highest priority)
Browsing is now restricted to specified domains for all protocols.
Platform Support
- Feature support is available on 5520 and 8540. It is not supported on 5508, 8510, vWLC, 2504 and ME.
-
Supported in Local mode and Flex central switching only.
Considerations
-
-
Wildcard support (e.g. *.domain.com)
-
10 Wildcards
-
5 subdomains per wildcard
-
-
- URL Filtering includes
-
Support of 100 URLs
-
No Sub-URL support (e.g. www.domain.com and www.domain.com/resources)
-
-
Maximum length of 32 chars to be supported for URLs
-
There is no AVC dependency for this feature. It is completely based on DNS snooping
-
Radius server returning URL filtering ACL name is not supported
-
Reverse DNS is not supported. Client access with direct IP (without doing DNS) is not allowed
-
IPv6 is not supported
Configuring URL Filtering
URL filtering determines which URLs to permit or deny using ACLs and rules that are assigned to WLANs, Interfaces or individual client sessions by way of Local Policies. The following steps demonstrate how to create URL based ACLs and rules for two common scenarios:
- Scenario 1–An ACL with List Type Blocked List which has rules defined to deny access to specific URLs.
- Scenario 2–An ACL with List Type Allowed List and rules are defined to only permit access to specific URLs.
Access Control Lists
Accessing Control Lists using GUI
To acess the control list using GUI, perform the following steps:
Procedure
| Step 1 |
From the WLC main menu select SECURITY Access > Control Lists > URL ACLs. Click New. 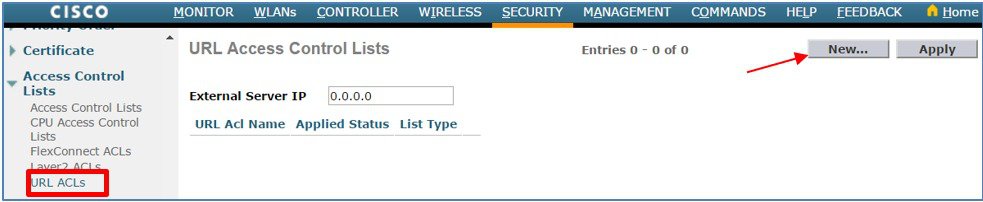 |
| Step 2 |
Enter the URL ACL Name then click Apply . In this example a ACL named BLOCK-SITES has been defined.  |
| Step 3 |
Select List Type as Blacklist from the dropdown and click Apply.  |
| Step 4 |
Configure External Server IP and hit Apply. In this example, we have defined 10.10.10.10 which will redirect blocked page to the client.  |
| Step 5 |
Click New to define additional ACLs. 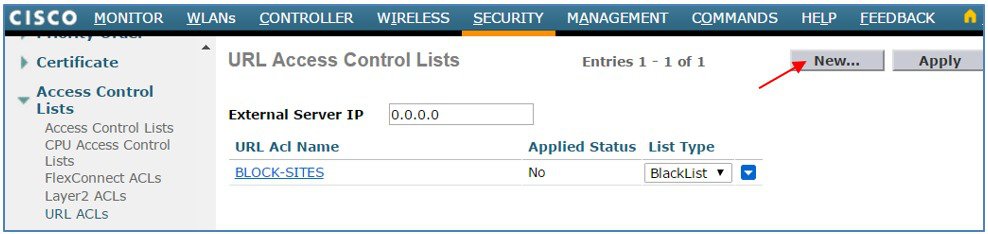 |
| Step 6 |
Enter the URL ACL Name then click Apply. In this example a second ACL named PERMIT-SITES has been defined. 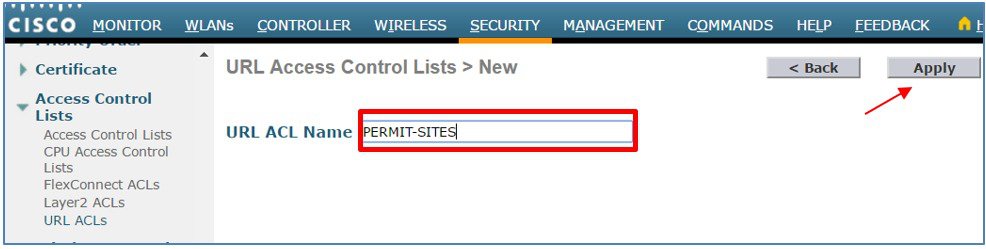 |
Accessing Control Lists using CLI
Procedure
| Step 1 |
Create the URL ACLs named BLOCK-SITES and PERMIT-SITES. |
| Step 2 |
Configure BLOCK-SITES as List Type Blacklist and PERMIT-SITES as List Type Whitelist |
| Step 3 |
Configure the external server IP, which is used to redirect the pages. |
| Step 4 |
Verify ACL creation. Note the Applied status fields for both ACLs will display as No until rules are added and the ACLs are applied. |
Rules–Blocked-List Example
The following configuration steps demonstrate how to use rules to deny access to specific URLs (blocked-listing). In this example an ordered list of URLs is defined with a deny action to block access to specific requested URLs. As the ACL itself has an implied deny, a wildcard permit rule is added as the last rule to provide access to all other requested URLs.
Blocked-Listing using GUI Procedure
Procedure
| Step 1 |
From the WLC main menu select SECURITY > Access Control Lists > URL ACLs. Click on the URL ACL Name to add rules. 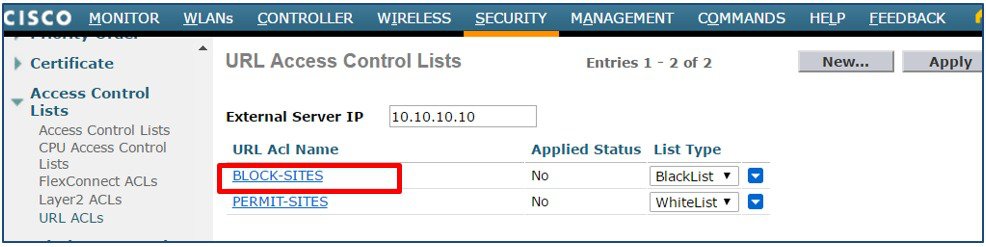 |
||
| Step 2 |
Click Add New Rule.  |
||
| Step 3 |
Enter a Rule Index then define a URL to match and Action. In this example the URL www.cisco.com has been defined as the first rule with the action set to Deny. Click Apply. Add additional blocked-list rules as required.  |
||
| Step 4 |
Verify your rules are correct then click Apply All. The Status field will change from Not Applied to Applied. 
|
Blocked-Listing using CLI Procedure
Procedure
| Step 1 |
Create rules for the ACL named BLOCK-SITES. |
| Step 2 |
Apply the ACL. |
| Step 3 |
Verify the ACL rules. |
| Step 4 |
Verify the ACL has been applied. Note the Applied status field for the BLOCK- SITES ACL will change from No to Yes. |
Rules–Allowed-Listing Example
The following configuration steps demonstrate how to use rules to only permit access to specific URLs. In this example an ordered list of URLs is defined with a permit action to allow access to specific requested URLs. As the ACL has an implied deny, access to all other requested URLs will be blocked.
Allowed-Listing using GUI Procedure
Procedure
| Step 1 |
From the WLC main menu select SECURITY > Access Control Lists > URL ACLs. Click on the URL ACL Name to add rules. 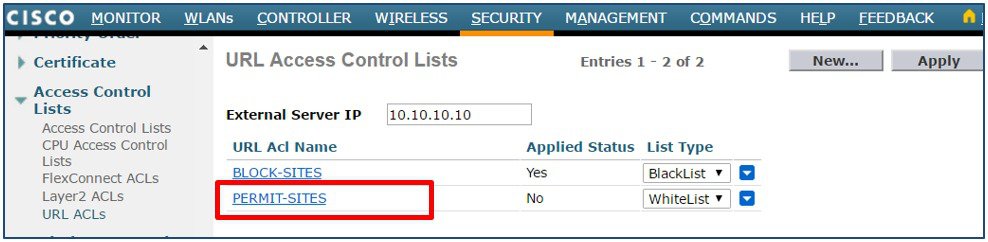 |
| Step 2 |
Click Add New Rule. 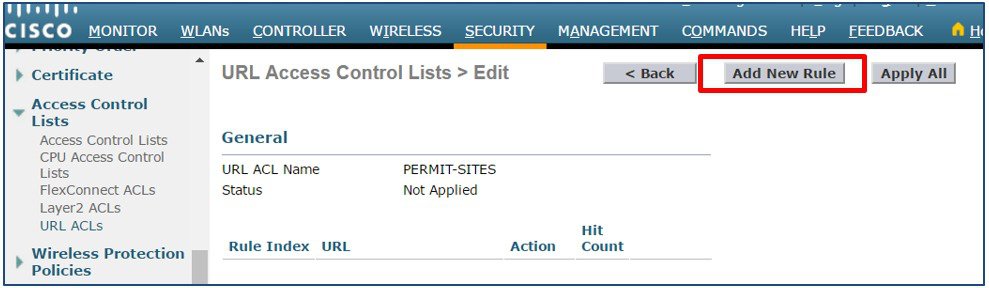 |
| Step 3 |
Enter a Rule Index then define a URL to match. In this example the URL www.cisco.com has been defined as the first rule with the action Permit. Click Apply. Add additional Permit rules as required. 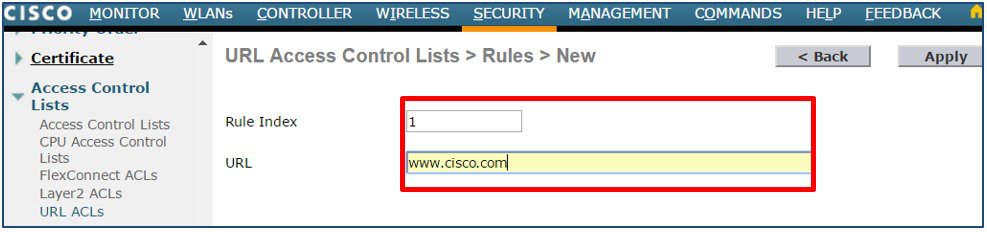 |
| Step 4 |
Verify your rules are correct then click Apply All. The Status field will change from Not Applied to Applied. 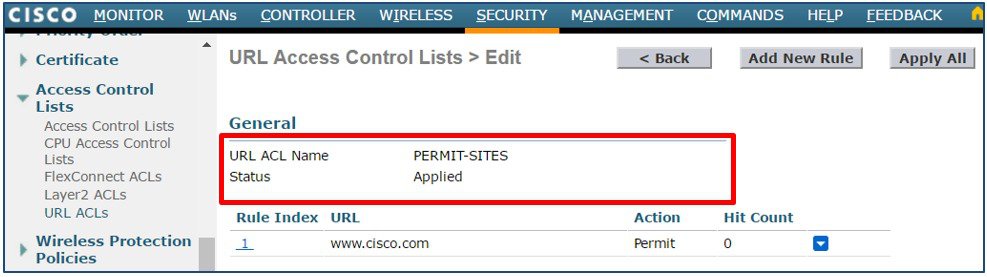 |
Allowed-Listing using CLI Procedure
Procedure
| Step 1 |
Create rules for the ACL named PERMIT-SITES. |
| Step 2 |
Apply the ACL. |
| Step 3 |
Verify the ACL rules. |
| Step 4 |
Verify the ACL has been applied. Note the Applied status field for the PERMIT-SITES ACL will change from No to Yes. |
Enabling Hit Counters
Hit counters can be optionally enabled to monitor the number of rule hits for each URL ACL. Hit counters are useful for troubleshooting ACLs as the counters are incremented by one as each rule is matched. The following step demonstrates how to globally enable ACL hit counters on a WLC.
Enabling Hit Counters using GUI Procedure
Procedure
| Step 1 |
From the WLC main menu select SECURITY > Access Control Lists. Select Enable Counters then click Apply . 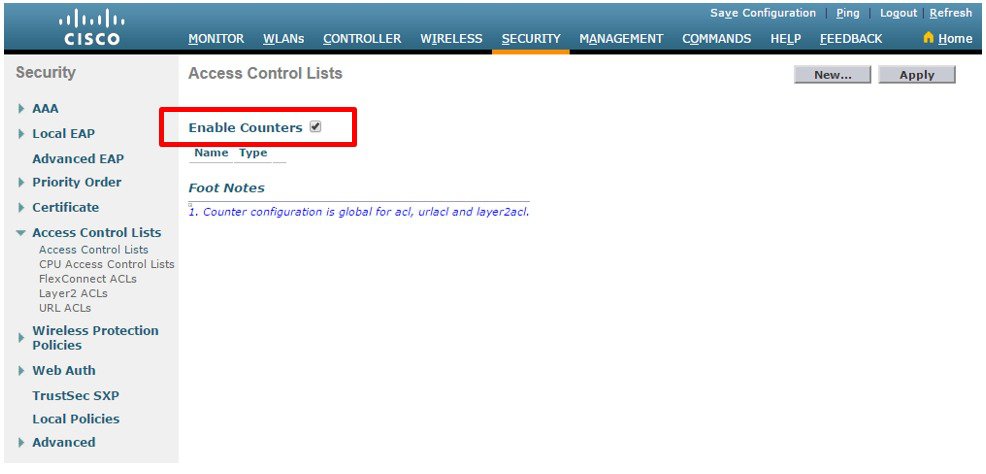 |
| Step 2 |
From the WLC main menu select SECURITY > Access Control Lists > URL ACLs. Click on the desired URL ACL Name to view the Hit Count for each matched URL. 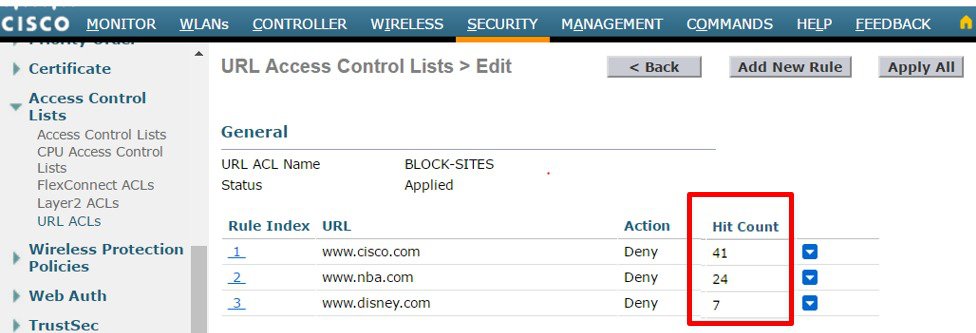 |
Enabling Hit Counters using CLI Procedure
Procedure
| Step 1 |
Globally enable ACL Hit Counters. |
| Step 2 |
View the Hit Counters for a specific ACL. In this example the Hit Count for the ACL named BLOCK-SITES is displayed. |
Applying Access Control Lists
URL ACLs can be assigned dynamically to clients using Local Policies or directly to WLANs or Interfaces:
- Local Policy–The URL ACL is applied to all clients assigned the Local Policy. URL ACLs assigned using Local Policies have the highest priority and will override URL ACLs assigned to the WLAN or Interface.
- WLANs–The URL ACL is applied to all clients associated to the WLAN (unless a URL ACL is assigned to a client using a Local Policy). URL ACLs assigned to a WLAN will override a URL ACL assigned to an Interface.
- Interfaces–The URL ACL is applied to all traffic forwarded specific interface.
The following steps demonstrate how to assign URL ACLs on a WLC to WLANs, Interfaces and Local Policies:
Assigning WLANs using GUI Procedure
Procedure
|
From the WLC main menu select WLANs > WLANs. Select a WLAN ID to modify. Access the Advanced Tab then assign the desired URL ACL. Click Apply.  |
Assigning WLANs using CLI Procedure
Procedure
| Step 1 |
Disable the target WLAN. In this example WLAN id 1 is disabled. Note the WLC will not allow you to assign the ACL if the target WLAN is enabled. |
||
| Step 2 |
Assign the URL ACL to the WLAN. In this example the ACL named BLOCK-SITES is assigned to WLAN 1. |
||
| Step 3 |
Re–enable the disabled WLAN |
||
| Step 4 |
Verify the ACL assignment. Note if no ACL has been assigned to the WLAN, the WLAN URL ACL field will show unconfigured.
|
Assigning Interfaces using GUI Procedure
Procedure
|
From the WLC main menu select CONTROLLER > Interfaces. Select an Interface Name to modify, then under Access Control List assign the desired URL ACL. Click Apply.  |
Assigning Interfaces using CLI Procedure
Procedure
| Step 1 |
Disable the WLANs using the target Interface. In this example WLAN id 3 is mapping client's management. Note the WLC will not allow you to assign the ACL to an Interface if there are any active WLANs using the interface |
||
| Step 2 |
Assign the URL ACL to the interface. |
||
| Step 3 |
Re-enable the disabled WLAN. |
||
| Step 4 |
Verify the ACL assignment. Note if no ACL has been assigned to the Interface, the WLAN URL ACL field will show unconfigured.
|
Assigning Local Policies using GUI Procedure
Procedure
|
From the WLC main menu select SECURITY > Local Policies. Select a Policy Name to modify, then under Action assign the desired URL ACL. Click Apply. 
|
Assigning Local Policies using CLI Procedure
Procedure
| Step 1 |
Assign the ACL to the target Local Policy. In this example the ACL named BLOCK-SITES is assigned to a Local Policy named STUDENTS. |
||
| Step 2 |
Verify the ACL assignment |
||
| Step 3 |
Re–enable the disabled WLAN. |
||
| Step 4 |
Verify the ACL assignment. Note if no ACL has been assigned to the Local Policy, the UR ACL field will show <none> .
|
Migration of URL ACL Configuration
-
Upgrading from 8.3 to 8.4
-
8.3 config contained blocked-list ACLs comprising of all deny rules. In 8.4 config, ACL type will show up as Whitelist (which is the default) and deny rules wiped out. User would be required to manually configure new ACL list type as Blacklist and add deny rules to it .
-
8.3 config contained allowed-list ACLs comprising of all permit rules. In 8.4, this config remains unchanged. The ACL type shows up as allowed-list with the permit rules in it. There is no user activity required in this case.
-
8.3 config contained a mix of allowed-list (permit) and blocked-list (deny) rules. In 8.4 config, ACL type will show up as Whitelist (default) and deny rules wiped out while permit rules will remain.
-
-
Downgrading from 8.4 to 8.3
-
No change in URL ACL rules.
-
Only HTTP protocol support in 8.3.
-
NBAR engine based URL Filtering and DNS snooping is not used.
-
 Feedback