Using the StarOS Quick Setup Wizard
The Quick Setup Wizard consists of three parts:
-
Configuring a context-level security administrator and hostname
-
Configuring the Ethernet interface for out-of-band (OOB) management
-
Configuring the system for remote CLI access via Telnet, Secure Shell (SSH), or File Transfer Protocol (FTP)
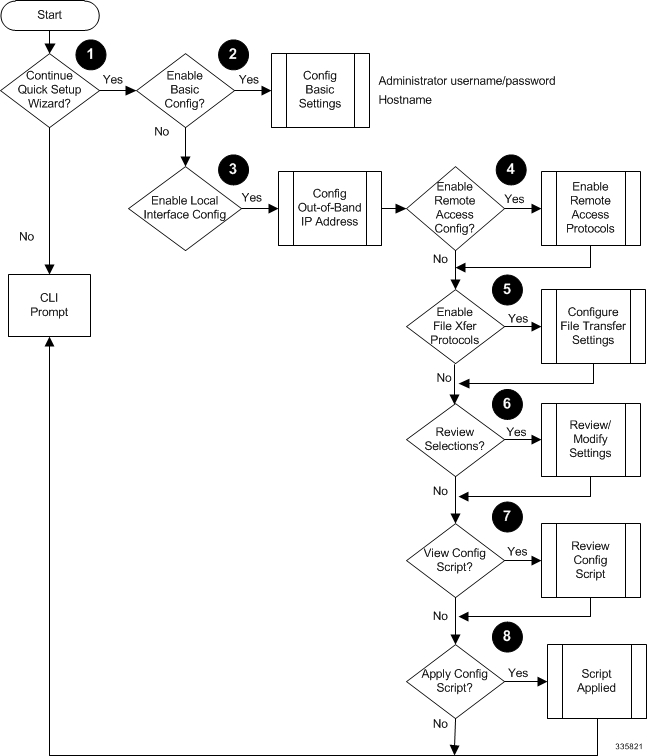
The following figure and table provides a flow diagram that shows the run logic of the wizard along with additional information and notes.
| Item | Task | Description/Notes |
|---|---|---|
|
1 |
Enter or exit the wizard. |
Enter no at the prompt to automatically be directed to the command line interface (CLI). Proceed to Using the StarOS CLI for Initial Configuration for instructions on performing an initial system configuration with the CLI. |
|
Enter setup at the command prompt to re-invoke the wizard. |
||
|
2 |
For release 19.2 and higher, configure a tech-support password. |
The tech-support password is used to access cli test-commands. |
|
Configure an administrative username/password and the a hostname for the system. |
The name of the default administrative user configured through the wizard is admin. |
|
|
Administrative user name is an alphanumeric string of 1 through 32 characters that is case sensitive. |
||
|
Administrative user password is an alphanumeric string of 1 through 63 characters that is case sensitive. For release 21.0 and later, you can enter 127 characters for the password. |
||
|
Configure a valid, non-null hostname. The hostname is an alphanumeric string of 1 through 63 characters that is case sensitive. |
||
|
3 |
Configure a single out-of-band management interface for the system. |
Traffic on the management LAN is not transferred over the same media as user data and control signaling. |
|
For security reasons, it is recommended that management functions be maintained on a separate network from user data and control signaling. |
||
|
Configure an IP address, subnet mask, and gateway for the interface. |
||
|
4 |
Enable the remote access protocol for accessing the system. |
Secure Shell (SSH) uses TCP port number 22 by default, if enabled. SSH V1 and/or V2 are supported. For maximum security, use only SSH v2. |
|
5 |
Enable file transfer protocols for copying files to/from the system. |
If SSH is enabled, you can also enable SSH File Transfer Protocol (SFTP) server functionality. Telnet uses TCP port number 23 by default, if enabled. The File Transfer Protocol (FTP) uses TCP port number 21 by default, if enabled. |
|
6 |
Review and/or modify the configuration of previous prompts. |
|
|
7 |
Review the configure script created by the wizard based on your inputs. |
A sample of a created script is displayed in the example below. Variables are displayed in italics (variable). |
|
8 |
Apply the configuration file to the system. |
Once applied, the parameter configuration is automatically saved to the system.cfg file stored in /flash memory. |
Sample Quick Setup Script
This is how the setup script appears if you run the EXEC mode setup command:
[local]host_name# setup
1. Do you wish to continue with the Quick Setup Wizard[yes/no]: yes
2. Enable basic configuration[yes/no]: yes
3. Change chassis key value[yes/no]: yes
4. New chassis key value: chassis_key
5. Create new tech-support password[yes/no]: yes
6. New tech-support password: new_password
7. local context administrator username[admin]: context_admin_username
8. local context administrator password: context_admin_password
9. confirm local context administrator password: context_admin_password
10. hostname[asr5500]: hostname

 Feedback