Users

Configure Users

Procedure
     Command or ActionPurpose
    Step 1Enable Synchronization
     
     
    Step 2Populate User ID and Directory URI
     
     
    Step 3Perform Synchronization
     
     
    Step 4Assign Roles and Groups
     
     
    Step 5Authentication Options


    Enable Synchronization

    To ensure that contact data in your directory server is replicated to Cisco Unified Communications Manager, you must synchronize with the directory server. Before you can synchronize with the directory server, you must enable synchronization.

    Procedure
      Step 1   Open the Cisco Unified CM Administration interface.
      Step 2   Select System > LDAP > LDAP System.

      The LDAP System Configuration window opens.

      Step 3   Locate the LDAP System Information section.
      Step 4   Select Enable Synchronizing from LDAP Server.
      Step 5   Select the type of directory server from which you are synchronizing data from the LDAP Server Type drop-down list.

      What to Do Next

      Specify an LDAP attribute for the user ID.

      Populate User ID and Directory URI
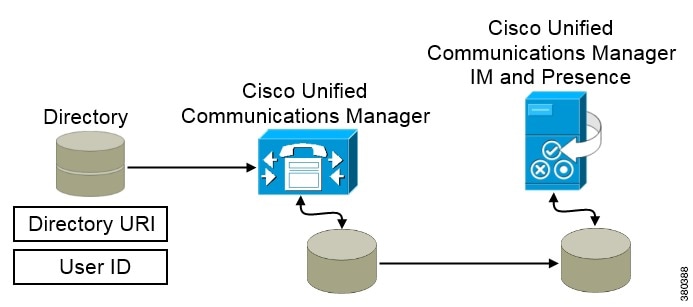
      When you synchronize your LDAP directory server with Cisco Unified Communications Manager, you can populate the end user configuration tables in both the Cisco Unified Communications Manager and the Cisco Unified Communications Manager IM and Presence Service databases with attributes that contain values for the following:
      • User ID — You must specify a value for the user ID on Cisco Unified Communications Manager. This value is required for the default IM address scheme and for users to sign in. The default value is sAMAccountName.

      • Directory URI — You should specify a value for the directory URI if you plan to:
        • Enable URI dialing in Cisco Jabber.

        • Use the directory URI address scheme on Cisco Unified Communications Manager IM and Presence Service version 10 and higher.


      When Cisco Unified Communications Manager synchronizes with the directory source, it retrieves the values for the directory URI and user ID and populates them in the end user configuration table in the Cisco Unified Communications Manager database.

      The Cisco Unified Communications Manager database then synchronizes with the Cisco Unified Communications Manager IM and Presence Service database. As a result, the values for the directory URI and user ID are populated in the end user configuration table in the Cisco Unified Communications Manager IM and Presence Service database.

      Specify an LDAP Attribute for the User ID

      When you synchronize from your directory source to Cisco Unified Communications Manager, you can populate the user ID from an attribute in the directory. The default attribute that holds the user ID is sAMAccountName.

      Procedure
        Step 1   Locate the LDAP Attribute for User ID drop-down list on the LDAP System Configuration window.
        Step 2   Specify an attribute for the user ID as appropriate and then select Save.
        Important:

        If the attribute for the user ID is other than sAMAccountName and you are using the default IM address scheme in Cisco Unified Communications Manager IM and Presence Service, you must specify the attribute as the value for the parameter in your client configuration file as follows:

        The EDI parameter is UserAccountName.

        <UserAccountName>attribute-name</UserAccountName>
        The BDI parameter is BDIUserAccountName.
        <BDIUserAccountName>attribute-name</BDIUserAccountName>

        If you do not specify the attribute in your configuration, and the attribute is other than sAMAccountName, the client cannot resolve contacts in your directory. As a result, users do not get presence and cannot send or receive instant messages.


        Related Tasks
        Specify an LDAP Attribute for the Directory URI

        Specify an LDAP Attribute for the Directory URI

        On Cisco Unified Communications Manager release 9.0(1) and later, you can populate the directory URI from an attribute in the directory.

        Before You Begin

        Enable Synchronization.

        Procedure
          Step 1   Select System > LDAP > LDAP Directory.
          Step 2   Select the appropriate LDAP directory or select Add New to add an LDAP directory.
          Step 3   Locate the Standard User Fields To Be Synchronized section.
          Step 4   Select one of the following LDAP attributes from the Directory URI drop-down list:
          • msRTCSIP-primaryuseraddress—This attribute is populated in the AD when Microsoft Lync or Microsoft OCS are used. This is the default attribute.

          • mail

          Step 5   Select Save.

          Related Tasks
          Specify an LDAP Attribute for the User ID

          Perform Synchronization

          After you add a directory server and specify the required parameters, you can synchronize Cisco Unified Communications Manager with the directory server.

          Before You Begin
          If your environment includes a presence server, you should ensure the following feature service is activated and started before you synchronize with the directory server:
          • Cisco Unified Communications Manager IM and Presence ServiceCisco Sync Agent

          This service keeps data synchronized between the presence server and Cisco Unified Communications Manager. When you perform the synchronization with your directory server, Cisco Unified Communications Manager then synchronizes the data with the presence server. However, the Cisco Sync Agent service must be activated and started.

          Procedure
            Step 1   Select System > LDAP > LDAP Directory.
            Step 2   Select Add New.

            The LDAP Directory window opens.

            Step 3   Specify the required details on the LDAP Directory window.

            See the Cisco Unified Communications Manager Administration Guide for more information about the values and formats you can specify.

            Step 4   Create an LDAP Directory Synchronization Schedule to ensure that your information is synchronized regularly.
            Step 5   Select Save.
            Step 6   Select Perform Full Sync Now.
            Note   

            The amount of time it takes for the synchronization process to complete depends on the number of users that exist in your directory. If you synchronize a large directory with thousands of users, you should expect the process to take some time.


            User data from your directory server is synchronized to the Cisco Unified Communications Manager database. Cisco Unified Communications Manager then synchronizes the user data to the presence server database.

            Assign Roles and Groups

            For all deployment types assign users to the Standard CCM End Users group.

            Procedure
              Step 1   Open the Cisco Unified CM Administration interface.
              Step 2   Select User Management > End User The Find and List Users window opens.
              Step 3   Find and select the user from the list. The End User Configuration window opens.
              Step 4   Locate the Permission Information section.
              Step 5   Select Add to Access Control Group. The Find and List Access Control Groups dialog box opens.
              Step 6   Select the access control groups for the user.

              At a minimum you should assign the user to the following access control groups:

              • Standard CCM End Users

              • Standard CTI Enabled—This option is used for desk phone control.

              If you provision users with secure phone capabilities, do not assign the users to the Standard CTI Secure Connection group.

              Certain phone models require additional control groups, as follows:

              • Cisco Unified IP Phone 9900, 8900, or 8800 series or DX series, select Standard CTI Allow Control of Phones supporting Connected Xfer and conf.

              • Cisco Unified IP Phone 6900 series, select Standard CTI Allow Control of Phones supporting Rollover Mode.

              Step 7   Select Add Selected. The Find and List Access Control Groups window closes.
              Step 8   Select Save on the End User Configuration window.

              Authentication Options

              Enable SAML SSO in the Client

              Before You Begin
              • If you do not use Cisco WebEx Messenger, enable SSO on Cisco Unified Communications Applications 10.5.1 Service Update 1—For information about enabling SAML SSO on this service, read the SAML SSO Deployment Guide for Cisco Unified Communications Applications, Release 10.5.

              • Enable SSO on Cisco Unity Connection version 10.5—For more information about enabling SAML SSO on this service, read Managing SAML SSO in Cisco Unity Connection.

              • If you use Cisco WebEx Messenger, enable SSO on Cisco WebEx Messenger Services to support Cisco Unified Communications Applications and Cisco Unity Connection—For more information about enabling SAML SSO on this service, read about Single Sign-On in the Cisco WebEx Messenger Administrator's Guide.

                For more information about enabling SAML SSO on this service, read about Single Sign-On in the Cisco WebEx Messenger Administrator's Guide.

              Procedure
                Step 1   Deploy certificates on all servers so that the certificate can be validated by a web browser, otherwise users receive warning messages about invalid certificates. For more information about certificate validation, see Certificate Validation.
                Step 2   Ensure Service Discovery of SAML SSO in the client. The client uses standard service discovery to enable SAML SSO in the client. Enable service discovery by using the following configuration parameters: ServicesDomain,VoiceServicesDomain, and ServiceDiscoveryExcludedServices. For more information about how to enable service discovery, see Configure Service Discovery for Remote Access.
                Step 3   Define how long a session lasts.

                A session is comprised of cookie and token values. A cookie usually lasts longer than a token. The life of the cookie is defined in the Identity Provider, and the duration of the token is defined in the service.

                Step 4   When SSO is enabled, by default all Cisco Jabber users sign in using SSO. Administrators can change this on a per user basis so that certain users do not use SSO and instead sign in with their Cisco Jabber username and password. To disable SSO for a Cisco Jabber user, set the value of the SSO_Enabled parameter to FALSE.

                If you have configured Cisco Jabber not to ask users for their email address, their first sign in to Cisco Jabber may be non-SSO. In some deployments, the parameter ServicesDomainSsoEmailPrompt needs to be set to ON. This ensures that Cisco Jabber has the information required to perform a first-time SSO sign in. If users signed in to Cisco Jabber previously, this prompt is not needed because the required information is available.


                Authenticate with the LDAP Server

                Perform this procedure if you want to enable LDAP authentication so that end user passwords are authenticated against the password that is assigned in the company LDAP directory. LDAP authentication gives system administrators the ability to assign an end user a single password for all company applications. This configuration applies to end user passwords only and does not apply to end user PINs or application user passwords. When users sign in to the client, the presence service routes that authentication to Cisco Unified Communications Manager. Cisco Unified Communications Manager then sends that authentication to the directory server.

                Procedure
                  Step 1   Open the Cisco Unified CM Administration interface.
                  Step 2   Select System > LDAP > LDAP Authentication.
                  Step 3   Select Use LDAP Authentication for End Users.
                  Step 4   Specify LDAP credentials and a user search base as appropriate.

                  See the Cisco Unified Communications Manager Administration Guide for information about the fields on the LDAP Authentication window.

                  Step 5   Select Save.