- Preface (Version 2.2)
- Product Overview (Version 2.2)
- Getting Started with Your Cisco SIP IP Phone (Version 2.2)
- Managing Cisco SIP IP Phones (Version 2.2)
- SIP Compliance with RFC-2543 Information (Version 2.2)
- SIP Call Flows (Version 2.2)
- Technical Specifications (Version 2.2)
- Translated Safety Warnings (Version 2.2)
- Glossary (Version 2.2)
5a. Cisco IP Phone 7960/40 Administrator Guide for SIP, Version 2.2
Bias-Free Language
The documentation set for this product strives to use bias-free language. For the purposes of this documentation set, bias-free is defined as language that does not imply discrimination based on age, disability, gender, racial identity, ethnic identity, sexual orientation, socioeconomic status, and intersectionality. Exceptions may be present in the documentation due to language that is hardcoded in the user interfaces of the product software, language used based on RFP documentation, or language that is used by a referenced third-party product. Learn more about how Cisco is using Inclusive Language.
- Updated:
- November 2, 2007
Chapter: Getting Started with Your Cisco SIP IP Phone (Version 2.2)
- Initialization Process Overview
- Installing the Cisco SIP IP Phone
Getting Started with Your Cisco SIP IP Phone
This chapter explains the Cisco SIP IP phone initialization and the process that you should follow to install and connect the Cisco SIP IP phone.
This chapter provides the following major sections:
•![]() Initialization Process Overview
Initialization Process Overview
•![]() Installing the Cisco SIP IP Phone
Installing the Cisco SIP IP Phone
•![]() Using the Cisco SIP IP Phone Menu Interface
Using the Cisco SIP IP Phone Menu Interface
•![]() Reading the Cisco SIP IP Phone Icons
Reading the Cisco SIP IP Phone Icons
•![]() Customizing the Cisco SIP IP Phone Ring Types
Customizing the Cisco SIP IP Phone Ring Types
Initialization Process Overview
The initialization process of the Cisco SIP IP phone is responsible for establishing network connectivity and for making the phone operational in your IP network.
Once you connect your phone to the network and to an electrical supply, the phone begins its initialization process.
During the initialization process, the following events take place:
1. ![]() The stored image is loaded.
The stored image is loaded.
The Cisco SIP IP phone has non-volatile Flash memory in which it stores the firmware images, user-defined preferences, and permanent factory information about the phone.
During initialization, the phone runs a bootstrap loader that loads and executes the phone image stored in Flash memory.
2. ![]() The VLAN is configured.
The VLAN is configured.
If the Cisco SIP IP phone is connected to a Catalyst switch, the switch notifies the phone of the voice VLAN defined on the switch. The phone needs to know its VLAN membership before it can proceed with the DHCP request for its IP settings (if using DHCP).
3. ![]() An IP address is acquired.
An IP address is acquired.
If the Cisco SIP IP phone is using DHCP to obtain the IP settings, the phone queries the DHCP server. If the phone is not using DHCP, then the phone will use IP settings that are stored in Flash memory.
4. ![]() The TFTP server is contacted.
The TFTP server is contacted.
On the TFTP server is the latest Cisco SIP IP phone firmware image and the dual boot file (OS79XX.TXT) that enables the phone to automatically determine and initialize for the VoIP environment in which it is being installed.
If the phone is using the TFTP server to obtain its SIP parameters, there should also be a configuration file or files on the TFTP server that the phone will request and download. In the configuration file or files, SIP parameters that are required by the phone to operate in a SIP VoIP environment are defined. If the phone is not obtaining its SIP parameters via the TFTP server, the phone will use SIP settings that are stored in Flash memory.
5. ![]() The firmware version is verified.
The firmware version is verified.
If the phone is obtaining its SIP parameters via a TFTP server, the configuration files are requested. If the phone determines that the image defined in a configuration file differs from the image it has stored in Flash memory, it performs a firmware upgrade.
When performing a firmware upgrade, the phone downloads the firmware image from the TFTP server, programs the image into Flash memory, and reboots.
Installing the Cisco SIP IP Phone
This section contains information on how to install Cisco SIP IP phones in your IP network. Before getting started, read over the information in this section carefully.
Installation Task Summary
To successfully install the Cisco SIP IP phone, you must complete the following tasks:
1. ![]() Download the required files from CCO to the TFTP server as described in the the "Downloading Files to Your TFTP Server" section.
Download the required files from CCO to the TFTP server as described in the the "Downloading Files to Your TFTP Server" section.
2. ![]() If you are configuring SIP parameters via a TFTP server, create and store the configuration files as described in the "Configuring SIP Parameters via a TFTP Server" section.
If you are configuring SIP parameters via a TFTP server, create and store the configuration files as described in the "Configuring SIP Parameters via a TFTP Server" section.
3. ![]() If you are using DCHP to configure the phones' network settings, configure the required network parameters on your DHCP server as described in the "Configuring Network Parameters via a DHCP Server" section.
If you are using DCHP to configure the phones' network settings, configure the required network parameters on your DHCP server as described in the "Configuring Network Parameters via a DHCP Server" section.
4. ![]() Connect the phone to the network and to a power supply as described in the "Connecting the Phone" section.
Connect the phone to the network and to a power supply as described in the "Connecting the Phone" section.
5. ![]() If you are not using DHCP to configure network parameters, manually configure the required network parameters as described in the "Manually Configuring the Network Parameters" section.
If you are not using DHCP to configure network parameters, manually configure the required network parameters as described in the "Manually Configuring the Network Parameters" section.
6. ![]() If you are not configuring the SIP parameters via a TFTP server, manually configure the required parameters as described in the "Manually Configuring the SIP Parameters" section.
If you are not configuring the SIP parameters via a TFTP server, manually configure the required parameters as described in the "Manually Configuring the SIP Parameters" section.
Downloading Files to Your TFTP Server
Before installing the Cisco SIP IP phones, copy the following files from CCO to the root directory of your TFTP server.
|
|
|
|---|---|
OS79XX.TXT |
(Required) Enables the phone to automatically determine and initialize for the VoIP environment in which it is being installed. After downloading this file, you will need to use an ASCII editor to open it and specify the file name (without the file extension) of the image version that you plan to run on your phones. |
SIPDefaultGeneric.cnf |
(Optional) File in which to configure SIP parameters intended for all phones. For more information on using the SIPDefault.cnf file, see the "Creating the Default SIP Configuration File" section. |
SIPConfigGeneric.cnf |
(Required) File which can be used as a template to configure SIP parameters specific to a phone. When customized for a phone, this file must be renamed to the MAC address of the phone. |
RINGLIST.DAT |
(Optional) Lists audio files that are the custom ring type options for the phones. The audio files listed in the RINGLIST.DAT file must also be in the root directory of the TFTP server. For more information on custom ring types, see the "Customizing the Cisco SIP IP Phone Ring Types" section. |
P0S3xxyy.bin Note |
(Required) The Cisco SIP IP phone firmware image. |
dialplan.xml |
(Optional) North American example dial plan. |
syncinfo.xml |
(Optional) Controls the image version and associated sync value to be used for remote reboots. |
Configuring SIP Parameters

Note ![]() This section describes how to configure the basic SIP parameters that are required for the phone to operate in a SIP VoIP environment. For a complete list of the SIP parameters that you can configure, see the "Modifying the Phone's SIP Settings" section.
This section describes how to configure the basic SIP parameters that are required for the phone to operate in a SIP VoIP environment. For a complete list of the SIP parameters that you can configure, see the "Modifying the Phone's SIP Settings" section.
The SIP parameters are those parameters that a Cisco SIP IP phone needs to operate in a SIP VoIP environment. You can configure SIP parameters via a TFTP server or you can manually configure the parameters on a phone-by-phone basis after connecting the phones.
When the phone initializes, it loads the parameters stored in Flash memory. After loading the parameters stored in Flash memory, the phone requests the default configuration file from the TFTP server. If the default configuration file has been configured and stored in the root directory of the TFTP server, the phone reads the parameters defined in the file, and stores those parameters that differ in Flash memory. The phone then requests its phone-specific configuration file. If the phone-specific configuration file has been configured and placed on the TFTP server (in the root directory or a subdirectory), the phone reads the parameters defined in the file and stores those parameters that differ in Flash memory.
Therefore, when configuring SIP parameters, remember the following:
•![]() Parameters defined in the default configuration file will override the values stored in Flash memory.
Parameters defined in the default configuration file will override the values stored in Flash memory.
•![]() Parameters defined in the phone-specific configuration file will override the values specified in the default configuration file.
Parameters defined in the phone-specific configuration file will override the values specified in the default configuration file.
•![]() Parameters entered locally will be used by the phone until the next reboot (if a phone-specific configuration file exists).
Parameters entered locally will be used by the phone until the next reboot (if a phone-specific configuration file exists).
•![]() If you choose not to configure the phone via a TFTP server, you must manage the phone locally.
If you choose not to configure the phone via a TFTP server, you must manage the phone locally.
Configuring SIP Parameters via a TFTP Server
If you are configuring SIP parameters via a TFTP server, you must use configuration files.
There are two configuration files that you can use to define the SIP parameters; the default configuration file (optional) and the phone-specific configuration file (required). If you choose to use a default configuration file, you must store the file in the root directory of your TFTP server. Phone-specific configuration files can be stored in the root directory or in a subdirectory in which all phone-specific configuration files are stored.
Except for parameters used to defined the lines and users on a phone, all other SIP parameters can be defined in either the default configuration file or the phone-specific configuration file. However, for network control and maintenance purposes, we recommend that you define the parameters that you want to apply to all phones in the default configuration file (SIPDefault.cnf). Phone-specific parameters should only be defined via a phone-specific configuration file or manually configured. Phone-specific parameters should not be defined in the default configuration file.
Configuration File Guidelines
When modifying the default configuration file and creating the phone-specific configuration files, adhere to the following guidelines and requirements:
•![]() SIP parameters specified in the default configuration file (SIPDefault.cnf) will override those parameters stored in Flash memory. Parameters specified in a phone-specific configuration file will override those stored in Flash memory and parameters specified in the default configuration file.
SIP parameters specified in the default configuration file (SIPDefault.cnf) will override those parameters stored in Flash memory. Parameters specified in a phone-specific configuration file will override those stored in Flash memory and parameters specified in the default configuration file.
•![]() The name of each phones' phone-specific configuration file is unique and is based on the MAC address of the phone.
The name of each phones' phone-specific configuration file is unique and is based on the MAC address of the phone.
The format of the file name must be "SIPXXXXYYYYZZZZ.cnf" where XXXXYYYYZZZZ is the MAC address of the phone. The MAC address must be in uppercase and the extension, cnf, must be in lower case (for example, SIP00503EFFD842.cnf).
Note ![]() The MAC address of a phone is identified on the middle sticker adhered to the base of the phone and can also be viewed on the Network Configuration menu.
The MAC address of a phone is identified on the middle sticker adhered to the base of the phone and can also be viewed on the Network Configuration menu.
•![]() The default configuration file must be stored in the root directory of the TFTP server. The phone-specific configuration file can be stored in the root directory or in a subdirectory in which all phone-specific configuration files are located.
The default configuration file must be stored in the root directory of the TFTP server. The phone-specific configuration file can be stored in the root directory or in a subdirectory in which all phone-specific configuration files are located.
•![]() Each line in the configuration files must use the following format:
Each line in the configuration files must use the following format:
variable-name : value ; optional comments
•![]() Use colons to separate variable names and values.
Use colons to separate variable names and values.
•![]() Only one value can be associated with a variable.
Only one value can be associated with a variable.
•![]() The variable and value can have as much white space before or after them and can contain any characters. However, if white spaces are needed within the value, the value must be enclosed in single or double quotes. If the value is enclosed in quotes, the end quote must be the same as the start quote.
The variable and value can have as much white space before or after them and can contain any characters. However, if white spaces are needed within the value, the value must be enclosed in single or double quotes. If the value is enclosed in quotes, the end quote must be the same as the start quote.
•![]() After the value, you can include optional comments. Use the semicolon (;) and pound (#) delimiters to distinguish the comments.
After the value, you can include optional comments. Use the semicolon (;) and pound (#) delimiters to distinguish the comments.
•![]() Blank lines are allowed.
Blank lines are allowed.
•![]() Comment lines are allowed.
Comment lines are allowed.
•![]() Variable names are not case sensitive.
Variable names are not case sensitive.
•![]() Only one variable can be set per line.
Only one variable can be set per line.
•![]() Distinguish the end of a line using <lf> or <cr><lf>.
Distinguish the end of a line using <lf> or <cr><lf>.
•![]() The variable and value must be on the same line and cannot break the line.
The variable and value must be on the same line and cannot break the line.
•![]() Except for parameters used to defined the lines and users on a phone, all other SIP parameters can be defined in either the default configuration file or the phone-specific configuration file. However, for network control and maintenance purposes, we recommend that you define the parameters that you want to apply to all phones in the default configuration file (SIPDefault.cnf).
Except for parameters used to defined the lines and users on a phone, all other SIP parameters can be defined in either the default configuration file or the phone-specific configuration file. However, for network control and maintenance purposes, we recommend that you define the parameters that you want to apply to all phones in the default configuration file (SIPDefault.cnf).
Creating the Default SIP Configuration File
In the default configuration file (SIPDefault.cnf), we recommend that you define the SIP parameters that will be common to all of your phones such as the image_version parameter and call environment parameters (for example, will the phones be required to register with a proxy server and which codec will the phones use when initiating a call).
By maintaining these parameters in the default configuration file, you can perform global changes, such as upgrading the image version, without having to modify the phone-specific configuration file for each phone.
Before You Begin
•![]() Ensure that you have downloaded the SIPDefault.cnf file from CCO to the root directory of your TFTP server.
Ensure that you have downloaded the SIPDefault.cnf file from CCO to the root directory of your TFTP server.
•![]() Review the guidelines and restrictions documented in the "Configuration File Guidelines" section.
Review the guidelines and restrictions documented in the "Configuration File Guidelines" section.
•![]() For a complete list of the SIP parameters that you can configure, see the "Modifying the Phone's SIP Settings" section.
For a complete list of the SIP parameters that you can configure, see the "Modifying the Phone's SIP Settings" section.
Procedure
Step 1 ![]() Using an ASCII editor, open the SIPDefault.cnf file and define values for the following SIP global parameters:
Using an ASCII editor, open the SIPDefault.cnf file and define values for the following SIP global parameters:
•![]() image_version—(Required) Firmware version that the Cisco SIP IP phone should run.
image_version—(Required) Firmware version that the Cisco SIP IP phone should run.
Enter the name of the image version (as it is released by Cisco). Do not enter the extension. You cannot change the image version by changing the file name because the version is also built into the file header. Trying to change the image version by changing the file name will cause the firmware to fail when it compares the version in the header against the file name.
•![]() proxy1_address—(Required) IP address of the primary SIP proxy server that will be used by the phones.
proxy1_address—(Required) IP address of the primary SIP proxy server that will be used by the phones.
•![]() tftp_cfg_dir—(Required if phone-specific configuration files are located in a subdirectory) Path to the TFTP subdirectory in which phone-specific configuration files are stored.
tftp_cfg_dir—(Required if phone-specific configuration files are located in a subdirectory) Path to the TFTP subdirectory in which phone-specific configuration files are stored.
Step 2 ![]() Save the file with the same file name, SIPDefault.cnf, to the root directory of your TFTP server.
Save the file with the same file name, SIPDefault.cnf, to the root directory of your TFTP server.
The following is an example of a SIP default configuration file:
; sip default configuration file
#Image Version
image_version:P0S3xxyy ;
#Proxy server address
proxy1_address: 192.168.1.1 ;
#Subdirectory config file location
tftp_cfg_dir: /tftpboot/configs/sipphone
Creating the Phone-Specific SIP Configuration File
In the phone-specific SIP configuration file, define the parameters that are specific to a phone such as the lines configured on a phone and the users defined for those lines.
Before You Begin
•![]() Review the guidelines and restrictions documented in the "Configuration File Guidelines" section.
Review the guidelines and restrictions documented in the "Configuration File Guidelines" section.
•![]() Line parameters (those identified as linex) define a line on the phone. If you configure a line to use an e-mail address, that line can be called only using an e-mail address. Similarly, if you configure a line to use a number, that line can only be called using the number. Each line can have a different proxy configured.
Line parameters (those identified as linex) define a line on the phone. If you configure a line to use an e-mail address, that line can be called only using an e-mail address. Similarly, if you configure a line to use a number, that line can only be called using the number. Each line can have a different proxy configured.
•![]() For a complete list of the SIP parameters that you can configure, see the "Modifying the Phone's SIP Settings" section.
For a complete list of the SIP parameters that you can configure, see the "Modifying the Phone's SIP Settings" section.
Procedure
Step 1 ![]() Using an ASCII editor, create a phone-specific configuration file for each phone that you plan to install. In the phone-specific configuration file, define values for the following SIP parameters (where x is a number 1 through 6):
Using an ASCII editor, create a phone-specific configuration file for each phone that you plan to install. In the phone-specific configuration file, define values for the following SIP parameters (where x is a number 1 through 6):
•![]() linex_name—(Required) Number or e-mail address used when registering. When entering a number, enter the number without any dashes. For example, enter 555-1212 as 5551212. When entering an e-mail address, enter the e-mail ID without the host name.
linex_name—(Required) Number or e-mail address used when registering. When entering a number, enter the number without any dashes. For example, enter 555-1212 as 5551212. When entering an e-mail address, enter the e-mail ID without the host name.
•![]() linex_authname—(Required when registration is enabled and the proxy server requires authentication) Name used by the phone for authentication if a registration is challenged by the proxy server during initialization. If a value is not configured for the linex_authname parameter when registration is enabled, the default name is used. The default name is UNPROVISIONED.
linex_authname—(Required when registration is enabled and the proxy server requires authentication) Name used by the phone for authentication if a registration is challenged by the proxy server during initialization. If a value is not configured for the linex_authname parameter when registration is enabled, the default name is used. The default name is UNPROVISIONED.
•![]() linex_password—(Required when registration is enabled and the proxy requires authentication) Password used by the phone for authentication if a registration is challenged by the proxy server during initialization. If a value is not configured for the linex_password parameter when registration is enabled, the default logical password is used. The default logical password is UNPROVISIONED.
linex_password—(Required when registration is enabled and the proxy requires authentication) Password used by the phone for authentication if a registration is challenged by the proxy server during initialization. If a value is not configured for the linex_password parameter when registration is enabled, the default logical password is used. The default logical password is UNPROVISIONED.
Step 2 ![]() Save the file to your TFTP server (in the root directory or a subdirectory containing all the phone-specific configuration files). Name the file "SIPXXXXYYYYZZZZ.cnf" where XXXXYYYYZZZZ is the MAC address of the phone. The MAC address must be in uppercase and the extension, cnf, must be in lower case (for example, SIP00503EFFD842.cnf).
Save the file to your TFTP server (in the root directory or a subdirectory containing all the phone-specific configuration files). Name the file "SIPXXXXYYYYZZZZ.cnf" where XXXXYYYYZZZZ is the MAC address of the phone. The MAC address must be in uppercase and the extension, cnf, must be in lower case (for example, SIP00503EFFD842.cnf).
The following is an example of a configuration file:
; phone-specific configuration file sample
; Line 1 phone number
line1_name : 5551212
; Line 1 name for authentication with proxy server
line1_authname : 5551212
; Line 1 authentication name password
line1_password : password
Manually Configuring the SIP Parameters
If you did not configure the SIP parameters via a TFTP server, you must manually configure them after you have connected the phone as described in the "Connecting the Phone" section.
Before You Begin
•![]() Connect your phone as described in the "Connecting the Phone" section.
Connect your phone as described in the "Connecting the Phone" section.
•![]() Unlock configuration mode as described in the "Unlocking Configuration Mode" section. By default, the SIP parameters are locked to ensure that end-users cannot modify settings that might affect their call capabilities.
Unlock configuration mode as described in the "Unlocking Configuration Mode" section. By default, the SIP parameters are locked to ensure that end-users cannot modify settings that might affect their call capabilities.
•![]() Review the guidelines on using the Cisco SIP IP phone menus documented in the "Using the Cisco SIP IP Phone Menu Interface" section.
Review the guidelines on using the Cisco SIP IP phone menus documented in the "Using the Cisco SIP IP Phone Menu Interface" section.
•![]() When configuring the Preferred Codec and Out of Band DTMF parameters, press the Change soft key until the option you desire is displayed and then press the Save soft key.
When configuring the Preferred Codec and Out of Band DTMF parameters, press the Change soft key until the option you desire is displayed and then press the Save soft key.
•![]() After making your changes, relock configuration mode as described in the "Locking Configuration Mode" section.
After making your changes, relock configuration mode as described in the "Locking Configuration Mode" section.
•![]() For a complete list of the SIP parameters that you can configure, see the "Modifying the Phone's SIP Settings" section.
For a complete list of the SIP parameters that you can configure, see the "Modifying the Phone's SIP Settings" section.
Procedure
Step 1 ![]() Press the settings key. The Settings menu is displayed.
Press the settings key. The Settings menu is displayed.
Step 2 ![]() Highlight SIP Configuration. The SIP Configuration menu is displayed.
Highlight SIP Configuration. The SIP Configuration menu is displayed.
Step 3 ![]() Highlight Line 1 Settings.
Highlight Line 1 Settings.
Step 4 ![]() Press the Select soft key. The Line 1 Configuration menu is displayed.
Press the Select soft key. The Line 1 Configuration menu is displayed.
Step 5 ![]() Highlight and press the Select soft key to configure the following parameters:
Highlight and press the Select soft key to configure the following parameters:
•![]() Name—(Required) Number or e-mail address used when registering. When entering a number, enter the number without any dashes. For example, enter 555-1212 as 5551212. When entering an e-mail address, enter the e-mail ID without the host name.
Name—(Required) Number or e-mail address used when registering. When entering a number, enter the number without any dashes. For example, enter 555-1212 as 5551212. When entering an e-mail address, enter the e-mail ID without the host name.
•![]() Authentication Name—(Required when registration is enabled) Name used by the phone for authentication if a registration is challenged by the proxy server during initialization. If a value is not configured for the Authentication Name parameter when registration is enabled, the default name is used. The default name is SIPmacaddress where macaddress is the MAC address of the phone.
Authentication Name—(Required when registration is enabled) Name used by the phone for authentication if a registration is challenged by the proxy server during initialization. If a value is not configured for the Authentication Name parameter when registration is enabled, the default name is used. The default name is SIPmacaddress where macaddress is the MAC address of the phone.
•![]() Authentication Password—(Required when registration is enabled) Password used by the phone for authentication if a registration is challenged by the proxy server during initialization. If a value is not configured for the Authentication Password parameter when registration is enabled, the default logical password is used. The default logical password is SIPmacaddress where macaddress is the MAC address of the phone.
Authentication Password—(Required when registration is enabled) Password used by the phone for authentication if a registration is challenged by the proxy server during initialization. If a value is not configured for the Authentication Password parameter when registration is enabled, the default logical password is used. The default logical password is SIPmacaddress where macaddress is the MAC address of the phone.
•![]() Proxy Address—(Required for the first line configured on the phone) IP address of the primary SIP proxy server that will be used by the phone. Enter this address in IP dotted-decimal notation, or as a FQDN.
Proxy Address—(Required for the first line configured on the phone) IP address of the primary SIP proxy server that will be used by the phone. Enter this address in IP dotted-decimal notation, or as a FQDN.
•![]() Proxy Port—(Required for the first line configured on the phone) Port of the primary SIP proxy server that will be used by the phone.
Proxy Port—(Required for the first line configured on the phone) Port of the primary SIP proxy server that will be used by the phone.
Step 6 ![]() Press the Back soft key to exit the Line 1 Configuration menu.
Press the Back soft key to exit the Line 1 Configuration menu.
Step 7 ![]() To configure additional lines on the phone, highlight the next Line x Settings, press the Select soft key and repeat Step 5 and Step 6.
To configure additional lines on the phone, highlight the next Line x Settings, press the Select soft key and repeat Step 5 and Step 6.
Step 8 ![]() When done, press the Save soft key to save your changes and exit the SIP Configuration menu.
When done, press the Save soft key to save your changes and exit the SIP Configuration menu.

Configuring Network Parameters
Note ![]() This section describes how to configure the basic network parameters that are required for the phone to operate on the network. For a complete list of the network parameters that you can configure, see the "Modifying the Phone's Network Settings" section.
This section describes how to configure the basic network parameters that are required for the phone to operate on the network. For a complete list of the network parameters that you can configure, see the "Modifying the Phone's Network Settings" section.
The network parameters include those parameters that must be configured on a phone for the phone to operate in an IP network. You can configure the required network parameters via DHCP or manually configure them after you have connected the phone to a power supply.
The following parameters must be defined for your phone to establish network connectivity:
•![]() Phone's IP address
Phone's IP address
•![]() Subnet mask
Subnet mask
•![]() Default gateway for the subnet (use "0.0.0.0" if not required)
Default gateway for the subnet (use "0.0.0.0" if not required)
•![]() Domain name
Domain name
•![]() DNS server IP address (use "0.0.0.0" if not required)
DNS server IP address (use "0.0.0.0" if not required)
•![]() TFTP server IP address
TFTP server IP address
When configuring the network parameters of an IP phone, adhere to the following guidelines:
•![]() Use 0.0.0.0 for unused IP addresses.
Use 0.0.0.0 for unused IP addresses.
•![]() You can use 0.0.0.0 for the subnet mask only if the default gateway is also 0.0.0.0.
You can use 0.0.0.0 for the subnet mask only if the default gateway is also 0.0.0.0.
•![]() The TFTP server must have a non-zero IP address.
The TFTP server must have a non-zero IP address.
•![]() The default gateway must be on the same subnet as the phone.
The default gateway must be on the same subnet as the phone.
•![]() The default gateway can be 0.0.0.0 only if the TFTP or DNS server is on the same subnet as the phone.
The default gateway can be 0.0.0.0 only if the TFTP or DNS server is on the same subnet as the phone.
Note ![]() By default, DHCP is enabled on your phone. Before you can manually configure the network parameters, you must disable DHCP after connecting your phone to a power supply.
By default, DHCP is enabled on your phone. Before you can manually configure the network parameters, you must disable DHCP after connecting your phone to a power supply.
Configuring Network Parameters via a DHCP Server
If you are using DHCP to configure the network parameters, configure the following DHCP options on your DHCP server before you connect your Cisco SIP IP phone:
•![]() dhcp option #50 (IP address)
dhcp option #50 (IP address)
•![]() dhcp option #1 (IP subnet mask)
dhcp option #1 (IP subnet mask)
•![]() dhcp option #3 (Default IP gateway)
dhcp option #3 (Default IP gateway)
•![]() dhcp option #15 (Domain name)
dhcp option #15 (Domain name)
•![]() dhcp option #6 (DNS server IP address)
dhcp option #6 (DNS server IP address)
•![]() dhcp option #66 (TFTP server IP address)
dhcp option #66 (TFTP server IP address)
Manually Configuring the Network Parameters
If you are not using DCHP to configure your network parameters, you must manually configure them.
Before You Begin
•![]() Connect your phone as described in the "Connecting the Phone" section.
Connect your phone as described in the "Connecting the Phone" section.
•![]() Unlock configuration mode as described in the "Unlocking Configuration Mode" section. By default, the network parameters are locked to ensure that end-users cannot modify settings that might affect their network connectivity.
Unlock configuration mode as described in the "Unlocking Configuration Mode" section. By default, the network parameters are locked to ensure that end-users cannot modify settings that might affect their network connectivity.
•![]() Review the guidelines on using the Cisco SIP IP phone menus documented in the "Using the Cisco SIP IP Phone Menu Interface" section.
Review the guidelines on using the Cisco SIP IP phone menus documented in the "Using the Cisco SIP IP Phone Menu Interface" section.
•![]() When configuring a domain name:
When configuring a domain name:
–![]() Press the Number soft key if entering a numerical ID or press the Alpha soft key to enter a name.
Press the Number soft key if entering a numerical ID or press the Alpha soft key to enter a name.
–![]() If entering letters, use the numbers on the dial pad associated with a particular letter. For example, the 2 key has the letters A, B, and C. For a lower case "a", press the 2 key once. To scroll through the available letters and numbers, press the key repeatedly.
If entering letters, use the numbers on the dial pad associated with a particular letter. For example, the 2 key has the letters A, B, and C. For a lower case "a", press the 2 key once. To scroll through the available letters and numbers, press the key repeatedly.
–![]() Press the << soft key to delete any mistakes.
Press the << soft key to delete any mistakes.
•![]() After making your changes, relock configuration mode as described in the "Locking Configuration Mode" section.
After making your changes, relock configuration mode as described in the "Locking Configuration Mode" section.
•![]() For a complete list of the SIP parameters that you can configure, see the "Modifying the Phone's Network Settings" section.
For a complete list of the SIP parameters that you can configure, see the "Modifying the Phone's Network Settings" section.
Procedure
Step 1 ![]() Press the settings key. The Settings menu is displayed.
Press the settings key. The Settings menu is displayed.
Step 2 ![]() Highlight Network Configuration.
Highlight Network Configuration.
Step 3 ![]() Press the Select soft key. The Network Configuration menu is displayed.
Press the Select soft key. The Network Configuration menu is displayed.
Step 4 ![]() Highlight DHCP Enabled.
Highlight DHCP Enabled.
Step 5 ![]() Press the No soft key. DHCP is now disabled.
Press the No soft key. DHCP is now disabled.
Step 6 ![]() Highlight and configured each of the following parameters:
Highlight and configured each of the following parameters:
•![]() IP Address—IP address of the phone.
IP Address—IP address of the phone.
•![]() Subnet Mask—IP subnet mask used by the phone.
Subnet Mask—IP subnet mask used by the phone.
•![]() TFTP Server—IP address of the TFTP server from which the phone downloads its configuration files and firmware images.
TFTP Server—IP address of the TFTP server from which the phone downloads its configuration files and firmware images.
•![]() Default Routers 1 through 5—IP address of the default gateway used by the phone. Default Routers 2 through 5 are the IP addresses of the gateways that the phone will attempt to use as an alternate gateway if the primary gateway is not available.
Default Routers 1 through 5—IP address of the default gateway used by the phone. Default Routers 2 through 5 are the IP addresses of the gateways that the phone will attempt to use as an alternate gateway if the primary gateway is not available.
•![]() Domain Name—Name of the DNS domain in which the phone resides.
Domain Name—Name of the DNS domain in which the phone resides.
•![]() DNS Servers 1 through 5—IP address of the DNS server used by the phone to result names to IP addresses. The phone will attempt to use DNS Servers 2 through 5 if DNS Server 1 is unavailable.
DNS Servers 1 through 5—IP address of the DNS server used by the phone to result names to IP addresses. The phone will attempt to use DNS Servers 2 through 5 if DNS Server 1 is unavailable.
Step 7 ![]() When done, press the Save soft key. The phone programs the new information into Flash memory and resets.
When done, press the Save soft key. The phone programs the new information into Flash memory and resets.
Connecting the Phone
You must connect the phone to the network and to a power source before using it.
Before You Begin
•![]() Refer to Figure 2-1 for a graphical overview of the procedures in this section.
Refer to Figure 2-1 for a graphical overview of the procedures in this section.
Figure 2-1 Cisco SIP IP Phone Cable Connections
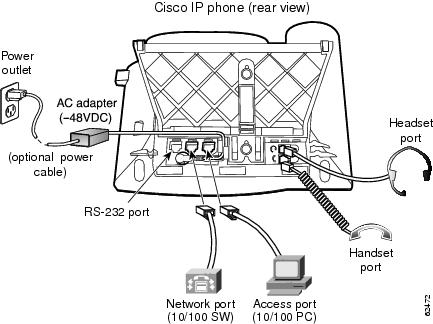
Procedure
Step 1 ![]() Connect a Category 3 or 5 straight-through Ethernet cable from the switch or hub to the network port on the phone.
Connect a Category 3 or 5 straight-through Ethernet cable from the switch or hub to the network port on the phone.
See "Connecting to the Network" section for more information on the network port.
Step 2 ![]() Connect the handset and headset to their respective ports.
Connect the handset and headset to their respective ports.
See "Using a Headset" section for more information on the headset port.
Step 3 ![]() Connect a Category 3 or 5 straight-through Ethernet cable from another network device, such as a desktop computer, to the access port on the phone (optional).
Connect a Category 3 or 5 straight-through Ethernet cable from another network device, such as a desktop computer, to the access port on the phone (optional).
See "Connecting to the Network" section for more information on the access port.
Step 4 ![]() Connect the power plug to the Cisco AC Adapter port (optional).
Connect the power plug to the Cisco AC Adapter port (optional).
See "Connecting to Power" section for more information.
Adjusting the Placement of the Cisco SIP Phone
The Cisco SIP IP phone includes an adjustable footstand. When placing the phone on a desktop surface, you can adjust the tilt height to several different angles in 7.5 degree increments from flat to 60 degrees. Alternatively, you can mount the phone to the wall using the footstand or using the optional locking accessory.
Adjusting Phone Placement on the Desktop
Adjust the footstand to the height that provides optimum view of the display and use of the buttons and keys.
To adjust the phone placement on the desktop:
Step 1 ![]() Push in the footstand adjustment knob.
Push in the footstand adjustment knob.
Step 2 ![]() Adjust the footstand to its desired height and release the knob.
Adjust the footstand to its desired height and release the knob.
Mounting the Phone to the Wall
You can mount the Cisco SIP IP phone on the wall using the footstand as a mounting bracket, or using the optional locking bracket. Use the following procedure to mount the phone on the wall using the standard footstand. To use the optional locking bracket, refer to the Installing the Wall Mount Kit for the Cisco IP Phone document.
Before You Begin
•![]() Mounting the Cisco SIP IP phone on the wall requires some tools and equipment that are not provided as standard equipment.
Mounting the Cisco SIP IP phone on the wall requires some tools and equipment that are not provided as standard equipment.
Following are the tools and parts required for a typical Cisco SIP IP phone installation:
–![]() Screwdriver
Screwdriver
–![]() Screws to secure the Cisco SIP IP phone to the wall
Screws to secure the Cisco SIP IP phone to the wall
•![]() Refer to Figure 2-1 for a graphical overview of these procedures.
Refer to Figure 2-1 for a graphical overview of these procedures.
Procedure
Step 1 ![]() Push in the footstand adjustment knob.
Push in the footstand adjustment knob.
Step 2 ![]() Adjust the footstand so it is flat against the back of the phone.
Adjust the footstand so it is flat against the back of the phone.
Step 3 ![]() Modify the handset rest so that the handset remains on the ear-piece rest when the phone is vertically placed.
Modify the handset rest so that the handset remains on the ear-piece rest when the phone is vertically placed.
a. ![]() Remove the handset from the ear-piece rest.
Remove the handset from the ear-piece rest.
b. ![]() Locate the tab (handset wall hook) at the base of the ear-piece rest.
Locate the tab (handset wall hook) at the base of the ear-piece rest.
c. ![]() Slide this tab out, rotate it 180 degrees, and reinsert it.
Slide this tab out, rotate it 180 degrees, and reinsert it.
d. ![]() Place the handset on the ear-piece rest.
Place the handset on the ear-piece rest.
Step 4 ![]() Insert two screws into a wall stud, matching them to the two screw holes on the back of the footstand.
Insert two screws into a wall stud, matching them to the two screw holes on the back of the footstand.
The keyholes fit standard phone jack mounts.
Step 5 ![]() Hang the phone on the wall.
Hang the phone on the wall.
Figure 2-2 Adjusting the Footstand

Verifying Startup
After the phone has power connected to it, the phone begins its startup process by cycling through these steps:
1. ![]() These buttons flash on and off in sequence:
These buttons flash on and off in sequence:
–![]() Headset
Headset
–![]() Mute
Mute
–![]() Speaker
Speaker
2. ![]() The Cisco Systems, Inc. copyright displays on the LCD.
The Cisco Systems, Inc. copyright displays on the LCD.
3. ![]() These messages display as phone starts up:
These messages display as phone starts up:
–![]() Configuring VLAN—The phone is configuring the Ethernet connection.
Configuring VLAN—The phone is configuring the Ethernet connection.
–![]() Configuring IP—The phone is contacting the DHCP server to obtain network parameters and the IP address of the TFTP server.
Configuring IP—The phone is contacting the DHCP server to obtain network parameters and the IP address of the TFTP server.
–![]() Requesting Configuration—The phone is contacting the TFTP server to request its configuration files and compare firmware images.
Requesting Configuration—The phone is contacting the TFTP server to request its configuration files and compare firmware images.
–![]() Upgrading Software—The Upgrade Software message displays only if the phone has determined that an image upgrade is required. After upgrading the image, the phone will automatically reboot to run the new image.
Upgrading Software—The Upgrade Software message displays only if the phone has determined that an image upgrade is required. After upgrading the image, the phone will automatically reboot to run the new image.
4. ![]() The main LCD screen appears displaying:
The main LCD screen appears displaying:
–![]() Primary directory number
Primary directory number
–![]() Soft keys
Soft keys
If the phone successfully passes through these stages, it has started up properly.
Using the Cisco SIP IP Phone Menu Interface
As you configure your phone's settings via the menu interface, follow these guidelines:
•![]() Select a parameter by pressing the down arrow to scroll to and highlight the parameter or by pressing the number that represents the parameter (located to the left of the parameter on the LCD).
Select a parameter by pressing the down arrow to scroll to and highlight the parameter or by pressing the number that represents the parameter (located to the left of the parameter on the LCD).
•![]() During configuration, use * for dots (periods) or press the "." soft key when available on the LCD.
During configuration, use * for dots (periods) or press the "." soft key when available on the LCD.
•![]() Press Cancel during configuration to cancel all changes and exit a menu.
Press Cancel during configuration to cancel all changes and exit a menu.
•![]() When configuring an SIP IP address or ID parameter:
When configuring an SIP IP address or ID parameter:
–![]() Press the Number soft key if entering a numerical value or press the Alpha soft key to enter a name.
Press the Number soft key if entering a numerical value or press the Alpha soft key to enter a name.
–![]() Use the buttons on the dial pad to enter a new value.
Use the buttons on the dial pad to enter a new value.
–![]() If entering letters, use the numbers on the dial pad associated with a particular letter. For example, the 2 key has the letters A, B, and C. For a lower case "a", press the 2 key once. To scroll through the available letters and numbers, press the key repeatedly.
If entering letters, use the numbers on the dial pad associated with a particular letter. For example, the 2 key has the letters A, B, and C. For a lower case "a", press the 2 key once. To scroll through the available letters and numbers, press the key repeatedly.
–![]() Press the << soft key to delete any mistakes.
Press the << soft key to delete any mistakes.
•![]() When configuring an network IP address or ID parameter:
When configuring an network IP address or ID parameter:
–![]() Use the buttons on the dial pad to enter a new value.
Use the buttons on the dial pad to enter a new value.
–![]() Press the << soft key to delete any mistakes.
Press the << soft key to delete any mistakes.
•![]() After editing a parameter, press the Validate soft key to save the value that you have entered and exit the Edit panel.
After editing a parameter, press the Validate soft key to save the value that you have entered and exit the Edit panel.
Reading the Cisco SIP IP Phone Icons
When using the Cisco SIP IP phone, a variety of icons can display on the phone's LCD. Table 1 lists and describes each icon that you might see while using the Cisco SIP IP phone.


Customizing the Cisco SIP IP Phone Ring Types
The Cisco SIP IP phone ships with two ring types: Chirp1 and Chirp2. By default, your ring type options will be those two choices. However, using the RINGLIST.DAT file, you can customize the ring types that are available to the Cisco SIP IP phone users.
Step 1 ![]() Create a pulse code modulation (PCM) file of the desired ring types and store the PCM files in the root directory of your TFTP server. PCM files must contain no header information and comply with the following format guidelines:
Create a pulse code modulation (PCM) file of the desired ring types and store the PCM files in the root directory of your TFTP server. PCM files must contain no header information and comply with the following format guidelines:
•![]() 8000 Hz sampling rate
8000 Hz sampling rate
•![]() 8 bits per sample
8 bits per sample
•![]() ulaw compression
ulaw compression
Step 2 ![]() Using a ASCII editor, open the RINGLIST.DAT file and for each of the ring types you are adding, specify the name as you want it to display on the Ring Type menu, press Tab, and then specify the filename of the ring type. For example, the format of a pointer in your RINGLIST.DAT file should appear similar to the following:
Using a ASCII editor, open the RINGLIST.DAT file and for each of the ring types you are adding, specify the name as you want it to display on the Ring Type menu, press Tab, and then specify the filename of the ring type. For example, the format of a pointer in your RINGLIST.DAT file should appear similar to the following:
Ring Type 1 ringer1.pcm
Step 3 ![]() After defining pointers for each of the ring types you are adding, save your modifications and close the RINGLIST.DAT file.
After defining pointers for each of the ring types you are adding, save your modifications and close the RINGLIST.DAT file.
Creating Dial Plans
Dial plans enable the Cisco SIP IP phone to support automatic dialing and automatic generation of a secondary dial tone. If a single dial plan is to be used for a system of phones, the dial plan is best specified in the default configuration file. However, you can create multiple dial plans and specify which phones are to use which dial plan by defining the dial_template parameter in the phone-specific configuration file. If one phone in a system of phones needs to use a different dial plan than the rest, you need to define the differing dial plan by specifying the dial_template parameter in that phone's phone-specific configuration file.
Note ![]() We recommend that you define the dial_template parameter in the default configuration file for maintenance and control purposes. Specify the dial_template parameter in a phone-specific configuration file only if that phone needs to use a different dial plan than is being used by the other phones in the same system.
We recommend that you define the dial_template parameter in the default configuration file for maintenance and control purposes. Specify the dial_template parameter in a phone-specific configuration file only if that phone needs to use a different dial plan than is being used by the other phones in the same system.
When creating a dial plan, remember the following:
•![]() Dial plans must be in an .xml format and be stored on your TFTP server.
Dial plans must be in an .xml format and be stored on your TFTP server.
•![]() You must specify which dial plan a phone is to use by specifying the path to the dial plan in the dial_template parameter that you define in either the phone-specific configuration file or the default configuration. We recommend that the dial_template parameter be defined in the default configuration file unless a specific phone must use a dial plan that differs from the one being used by other phones in the same system.
You must specify which dial plan a phone is to use by specifying the path to the dial plan in the dial_template parameter that you define in either the phone-specific configuration file or the default configuration. We recommend that the dial_template parameter be defined in the default configuration file unless a specific phone must use a dial plan that differs from the one being used by other phones in the same system.
•![]() <DIALTEMPLATE> indicates the start of a template and </DIALTEMPLATE> indicates the end of a template
<DIALTEMPLATE> indicates the start of a template and </DIALTEMPLATE> indicates the end of a template
•![]() Rules are matched from start to finish with the longest matching rule taken as the one to use. Matches against a period are not counted for the length to be the longest.
Rules are matched from start to finish with the longest matching rule taken as the one to use. Matches against a period are not counted for the length to be the longest.
Step 1 ![]() Using an ASCII editor, open a new file.
Using an ASCII editor, open a new file.
Step 2 ![]() Type <DIALTEMPLATE> to indicate the start of the dial plan template.
Type <DIALTEMPLATE> to indicate the start of the dial plan template.
Step 3 ![]() For each of the numbering schemes that you wish to define, add the following string to the template, each starting each on a separate line:
For each of the numbering schemes that you wish to define, add the following string to the template, each starting each on a separate line:
<TEMPLATE MATCH="pattern" Timeout="sec" User="type" Rewrite="altstrng" Route="route"
Where:
•![]() MATCH="pattern" is the dial pattern to match. When entering the pattern, use a period (.) to match any character or use an asterisk (*) to match one or more characters. To have the phone generate a secondary dial tone when the part of the template matches, use a comma (,).
MATCH="pattern" is the dial pattern to match. When entering the pattern, use a period (.) to match any character or use an asterisk (*) to match one or more characters. To have the phone generate a secondary dial tone when the part of the template matches, use a comma (,).
•![]() Timeout="sec" is the number of seconds before a timeout will occur and the number will be dialed as entered by the user. To have the number dial immediately, specify 0.
Timeout="sec" is the number of seconds before a timeout will occur and the number will be dialed as entered by the user. To have the number dial immediately, specify 0.
•![]() User="type" is the either IP or Phone. Enter User=phone or User=IP to have the tag automatically added to the dialed number. This entry is not case-sensitive
User="type" is the either IP or Phone. Enter User=phone or User=IP to have the tag automatically added to the dialed number. This entry is not case-sensitive
•![]() Rewrite="xxx" is the alternate string to be dialed instead of what the user enters.
Rewrite="xxx" is the alternate string to be dialed instead of what the user enters.
The rewrite rules are matched from start to finish with the longest matching rule taken as the one to use. Matches against a period are not counted for the length to be the longest. A complete rule will not be matched unless it has more non-wild card matches than an incomplete rule. You can put comments into the file with <!-- to start the comment and --> to terminate it.
The rules allow for substitution of up to 5 replacement strings as well as picking off replaced digits one at a time. For example, with a match string of
"ab..cd..ef*" and an input string of "ab12cd34ef5678"
The following replacement strings work as follows.
REWRITE Output Notes
%s ab12cd34ef5678
%0 ab12cd34ef5678
%1 12
%2 34
%3 56
%4 i.e. nothing
%5 i.e. nothing
XYZ.... XYZ1234
X.Y.Z... X1Y2Z345
919%1%2%3 919123456
AB...X%1X.. AB123X12X45 (Note how "12' appears twice)
X%1X%1X%1 X12X12X12 (You can reuse the string)
X%s%% Xab12cd34ef5678% %% (This produces a %)
919 919 (No need to use the input)
............ 12345678 (Note that nothing goes in for the extra dots)
•![]() Route="route" is default, emergency, or FQDN. FQDN is treated the same as default proxy. Route indicates which proxy the call is to be routed to. This entry is not case-sensitive.
Route="route" is default, emergency, or FQDN. FQDN is treated the same as default proxy. Route indicates which proxy the call is to be routed to. This entry is not case-sensitive.
Step 4 ![]() If desired, specify <!--comment--> at the end of each string where comment defines the type of plan (for example, Long Distance or Corporate Dial Plan).
If desired, specify <!--comment--> at the end of each string where comment defines the type of plan (for example, Long Distance or Corporate Dial Plan).
Step 5 ![]() When completed, specify </DIALTEMPLATE> to indicate the end the dial plan template.
When completed, specify </DIALTEMPLATE> to indicate the end the dial plan template.
Step 6 ![]() Give the file a unique name specific to the dial plan it defines and save the file with an .xml extension to you TFTP server.
Give the file a unique name specific to the dial plan it defines and save the file with an .xml extension to you TFTP server.
Step 7 ![]() If the dial plan applies to a specific phone, add the path to the dial plan (without specifying the file type of .xml) via the dial_template parameter in the phone specific configuration file. If the dial plan applies to a system of phones, add the path to the dial plan via the dial_template parameter in the default configuration file. For more information on defining the dial_template parameter, see the "Modifying the Phone's SIP Settings" section.
If the dial plan applies to a specific phone, add the path to the dial plan (without specifying the file type of .xml) via the dial_template parameter in the phone specific configuration file. If the dial plan applies to a system of phones, add the path to the dial plan via the dial_template parameter in the default configuration file. For more information on defining the dial_template parameter, see the "Modifying the Phone's SIP Settings" section.
The following is an example of a North American dial plan:
Example 2-1 Example of a PBX North American Dial Plan
<DIALTEMPLATE>
<TEMPLATE MATCH="0" Timeout="1" User="Phone"/> <!-- Local operator-->
<TEMPLATE MATCH="9,011*" Timeout="6" User="Phone"/> <!-- International calls-->
<TEMPLATE MATCH="9,0" Timeout="2" User="Phone"/> <!-- PSTN Operator-->
<TEMPLATE MATCH="9,11" Timeout="0" User="Phone" Rewrite="9911"/> <!-- Emergency-->
<TEMPLATE MATCH="w!" Timeout="1" User="PHONE" Rewrite="9911"/> <!-- 911 when entered in Alpha mode -->
<TEMPLATE MATCH="9,.11" Timeout="0" User="Phone"/> <!-- Service numbers -->
<TEMPLATE MATCH="9,101..............." Timeout="0" User="Phone"/> <!-- Long Distance Service-->
<TEMPLATE MATCH="9,10.............." Timeout="0" User="Phone"/> <!-- Long Distance Service-->
<TEMPLATE MATCH="9,10*" Timeout="6" User="Phone"/> <!-- Long Distance Service-->
<TEMPLATE MATCH="9,1.........." Timeout="0" User="Phone"/> <!-- Long Distance -->
<TEMPLATE MATCH="9,......." Timeout="0" User="Phone"/> <!-- Local numbers -->
<TEMPLATE MATCH="*" Timeout="15"/> <!-- Anything else -->
</DIALTEMPLATE>
 Feedback