Installation Guide for Cisco Business Edition 6000S, Release 11.5
Bias-Free Language
The documentation set for this product strives to use bias-free language. For the purposes of this documentation set, bias-free is defined as language that does not imply discrimination based on age, disability, gender, racial identity, ethnic identity, sexual orientation, socioeconomic status, and intersectionality. Exceptions may be present in the documentation due to language that is hardcoded in the user interfaces of the product software, language used based on RFP documentation, or language that is used by a referenced third-party product. Learn more about how Cisco is using Inclusive Language.
- Updated:
- July 13, 2016
Chapter: Installation
- Installation Overview
- Default Configuration
- Preloaded File Types in the Datastore
- Installation Task Flow
- Power on the Server
- Modify Default Configuration
- Delete VMs
- Deploy Virtual Machines
- Customize VM for Cisco Unity Connection Installation
- Associate Application ISO Files to VM
- Install UC Applications Using Touchless Installation
- Install UC Applications Manually
- Complete Packed Virtual Machine (OVA) Installation
Installation
Installation Overview
This chapter describes the tasks required to install software on your Business Edition 6000S server for custom installations. If your server has been prepared using CTOP, you can skip this section, and go to the post-installation section directly.
Default Configuration
The Cisco BE6000S ships with default configurations for the host router platform, the server module Cisco Integrated Management Controller (CIMC) and the VMware ESXi Hypervisor. These settings provide you with simple access to the product and a prepared environment in which to install your applications. If you would prefer to use different settings and addressing, follow the steps in the installation section to make your changes.
The default configuration accommodates two connectivity options:
-
Routed: When you connect the BE6000S to your network via GE0/0, the applications reside in a dedicated IP subnet within the appliance. To access the applications, your network will need to be configured to route traffic to the dedicated subnet via a static address that you assign to GE0/0.
-
Bridged: When you connect your BE6000S to your network via GE0/1, your applications reside directly on your Ethernet network. You will use your own IP addressing to configure the applications and will need to reconfigure interface BVI1 with an address from your subnet to provide access to the voice interface ports. Use this default configuration and switch connected to port GE0/1 to create a small standalone solution.
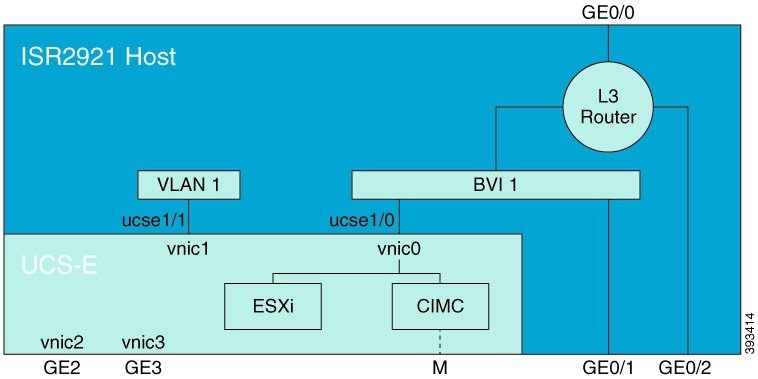
Default System Behavior
GE0/0: Configured as a DHCP client to connect to an existing network for routed access to server subnet. Reconfigure with a static address if handsets will be connected within the existing network.
GE0/1: Bridged access to server subnet. Access to router is available via BVI1. When connecting to this interface, clients will receive an IP address from the integrated DHCP server running from BVI1.
BVI1: Internal bridged interface connecting the router to the server module network and external networks via GE0/1. Default IP address 172.27.199.1/26
CIMC: Default IP address 172.27.199.2/26 configured via IOS.
ESXi: Default IP address 172.27.199.4/26 connected internally to the router via ESXi vnic0
Additional default services:
Preloaded File Types in the Datastore
In addition to pre-deployed virtual machines, Cisco Business Edition servers are shipped with selected Collaboration application software that is pre-loaded on the datastore. Following is a breakdown of the file types for application installs:
-
ISO Files—An ISO file is a DVD image containing application install files (for example, Bootable_UCSInstall_UCOS_11.0.1.20000-2.sgn.iso). An ISO file is present for a UC application only if the OVA file for that application does not include the application software.
-
OVA Files—Each UC application has an associated Open Virtualization Archive (OVA) file, which is used to package and deploy the virtual machine. There are two types of OVAs for Business Edition servers:
-
Some OVAs are templates that define the VM, but do not include any application software. For those applications, there is an associated ISO file in the datastore (for example, cucm_11.5_vmv8_v1.0.ova and associated ISO file Bootable_UCSInstall_UCOS_11.0.5.10000-6.sgn.iso ). For the installation, you must deploy the OVA template and install the software using the associated ISO file.
-
Other OVA files define the VM and include the application software (for example, cpc-provisioning-11.2.0-523-small.ova ). For these applications, there is no ISO file. You can deploy the VM and install the software using the OVA file.
-
For information on which ISO and OVA files are pre-loaded in your server's datastore, refer to the preload summary for your server at http://www.cisco.com/c/en/us/support/unified-communications/business-edition-6000/products-release-notes-list.html.
 Note | Cisco recommends that you archive the OVA-ISO directory locally. If a server fails, the replacement product will not include pre-loaded content. |
Installation Task Flow
Perform the following tasks to install software on your Cisco Business Edition 6000S server.
| Command or Action | Purpose | |||
|---|---|---|---|---|
| Step 1 | Power on the Server
|
Power on the BE6000S server. | ||
| Step 2 | Modify Default Configuration
|
Modify the appliance default configuration before installing your applications. | ||
| Step 3 | Delete VMs
|
Delete any pre-deployedVMs that you do not require. | ||
| Step 4 | Deploy Virtual Machines
|
Deploy virtual machine OVAs for each UC application that you want to install. | ||
| Step 5 | Customize VM for Cisco Unity Connection Installation
|
If your Business Edition 6000 deployment includes Cisco Unity Connection, customize the Unity Connection VM. | ||
| Step 6 | Associate Application ISO Files to VM
|
For UC application installations that require an ISO file, mount the ISO file on the application VM.
| ||
| Step 7 | Install UC Applications Using Touchless Installation
|
Optional. Use touchless installation to install any of the following core UC applications:
| ||
| Step 8 | Install UC Applications Manually
|
Use the manual interactive process to install any remaining UC applications. |
Power on the Server
Use this procedure to power on the server module.
Ensure that the BE6000S appliance has been rack-mounted and connected to a power supply and the data network as described in the Quick Start Guide.
What to Do Next
Modify Default Configuration
If you wish to modify the appliance default configuration, the following steps are recommended before installing your applications.
| Step 1 | Connect a PC or laptop to interface GE0/1. |
| Step 2 | If you need to install vSphere client, use a browser to download the installer from https://172.27.199.4/folder/OVA-ISO/VMware?dcPath=ha%252ddatacenter&dsName=datastore1 using the default username root and password password. |
| Step 3 | Use vSphere client to access ESXi at address 172.27.199.4 using the default username root and password password. Change the following settings as required: |
| Step 4 | With a
telnet or SSH client, access the router IOS command line at 172.27.199.1 using
the default username
admin and password
password. Before making any other change to the
configuration, you must update the authentication configuration as follows:
|
| Step 5 | Complete
CIMC Configuration. Use the following procedure to update settings for the
server module CIMC.
|
What to Do Next
Delete VMs
If you want to use a different application version to those that have been pre-deployed, delete these virtual machines from the vSphere inventory and install the preferred version.
| Step 1 | Log in to vSphere Client. |
| Step 2 | Locate the
virtual
machine that you wish to delete.
 |
| Step 3 | If the VM has a green triangle, right-click the icon and select . The green arrow disappears as the VM powers off. |
| Step 4 | Right-click the VM and select Delete From Disk. |
| Step 5 | Repeat this procedure for each virtual machine that you wish to remove. |
What to Do Next
See the next section to deploy Virtual Machines.
Deploy Virtual Machines
For each application that you want to install, deploy the appropriate virtual machine OVA file.
Note | If you are not using the default pre-deployed virtual machines, you can skip to Customize VM for Cisco Unity Connection Installation. |
Note | The OVA template file defines the virtual machine for specific applications. OVA templates are deployed in seconds, while a packaged OVA may take longer minutes to deploy. |
| Step 1 | On the vSphere
Client, navigate to
.
The Deploy OVF Template screen is launched. |
| Step 2 | Browse and select the source OVA template file on your PC. For application and filename mapping, see the Build Summary PDF in the datastore OVA-ISO directory, or download from: http://www.cisco.com/c/en/us/support/unified-communications/business-edition-6000/products-release-notes-list.html. |
| Step 3 | If prompted to accept license agreements, continue to click Next. |
| Step 4 | Specify a meaningful name for the virtual machine. |
| Step 5 | Select the appropriate virtual machine size for your deployment, if prompted. |
| Step 6 | Set the remaining parameters, as required. |
| Step 7 | If prompted for the Disk Format, specify Thick Provision Lazy Zero. |
| Step 8 | Deploy VMs for all of your UC applications before proceeding to the next task. |
What to Do Next
If your system includes Cisco Unity Connection, Customize VM for Cisco Unity Connection Installation.
Otherwise, Associate Application ISO Files to VM.
Customize VM for Cisco Unity Connection Installation
For Customized installations, use this procedure to configure your Cisco Unity Connection virtual machine settings to ensure optimum performance.
Note | If using two CPUs for Unity Connection, you must disable, or not use one of the other supported applications. The total number of CPUs used by active virtual machines must not exceed six. |
| Step 1 | From the virtual machine inventory in the vSphere client, right click the Unity Connection entry and select Edit Settings. |
| Step 2 | Click the Options tab. |
| Step 3 | If installing a version earlier than 11.5, select the menu, and click Configuration Parameters. Click Add Row and complete the following details: |
| Step 4 | If you want to use Unity Connection, Unified or Integrated Messaging, do the following: |
| Step 5 | For customized installs, if you are installing Unity Connection 11.0 or earlier with one CPU, do the following: |
What to Do Next
Associate Application ISO Files to VM
Note | This is not required for default pre-deployed VMs. |
Note | For an up to date list of installation files for your server, see the Preload Summary for your server in the datastore OVA-ISO directory or at: http://www.cisco.com/c/en/us/support/unified-communications/business-edition-6000/products-release-notes-list.html |
| Step 1 | In the vSphere client, select the UC application virtual machine. |
| Step 2 | Select . |
| Step 3 | From the Hardware tab, select CD/DVD Drive. |
| Step 4 | Select Datastore ISO File. |
| Step 5 | Browse to the datastore and locate the application ISO file. |
| Step 6 | Select the file and click OK. |
| Step 7 | Under Device Status, enable the Connected and Connect at power on option. |
| Step 8 | Repeat this procedure for each application that you want to install that includes an ISO file. |
What to Do Next
Install your UC applications using either of the following procedures:
Install UC Applications Using Touchless Installation
Touchless installation allows you to install multiple UC applications simultaneously, across hosts if required, without having to interact with the system while the install process runs. While you must prepare the system, touchless installation can save time, particularly if you want to install multiple applications. If you are installing only one or two applications, you may prefer to follow the manual procedure in the following section.
Note | If you are not custom installing any applications, you can skip this section. |
Use touchless installation to install the following applications:
| Command or Action | Purpose | |
|---|---|---|
| Step 1 | Generate Answer Files
|
Generate answer files (AFG files) for UC applications. |
| Step 2 | Create Virtual Floppy Images
|
Use your AFG files to create virtual floppy images. |
| Step 3 | Upload Virtual Floppy Images to Datastore
|
Upload your virtual floppy images to the datastore. |
| Step 4 | Mount Virtual Floppy on VM and Set Boot Option
|
Mount each virtual floppy on the corresponding UC application VM. |
| Step 5 | Run Touchless Installation
|
Run the touchless installation of your UC applications. We recommend that you run your installations simultaneously. |
Generate Answer Files
Use this procedure to generate answer files for the touchless installation of your UC applications.
 Tip | We recommend that you create application-specific folders (for example, UCM, IMP, CUC) in which to save the generated files so that you do not get the files mixed up. |
| Step 1 | Go to the online answer file generator at: www.cisco.com/web/cuc_afg/. |
| Step 2 | From the Product drop-down menu, select the UC application for which you want to generate answer files. |
| Step 3 | Select the Version that you want to install. |
| Step 4 | Complete the remaining fields with the installation details that you want to configure on the server. For example, you can assign items such as passwords, IP addressing, and DNS settings. |
| Step 5 | Click Generate Answer Files to generate the platformConfig.xml file for that UC application. Each UC application generates a platformConfig.xml file. Cisco Unified Communications Manager also generates a clusterConfig.xml file. |
| Step 6 | Save the generated answer files as follows: |
| Step 7 | Repeat these steps for each UC application for which you want to use touchless installation. |
What to Do Next
Create Virtual Floppy Images
Use this procedure to create virtual floppy images from the answer files. You will use the virtual floppy images in your touchless installation.
Tip | We recommend that you follow the recommended naming conventions for your .flp files. |
You can use Winimage to create the virtual floppy images. You can download Winimage from http://www.winimage.com/download.htm. You can also use other tools, such as BFI, to create virtual floppy images.
| Step 1 | In Winimage, select . |
| Step 2 | From the Standard format, select 1.44 MB and click OK. |
| Step 3 | Drag the platformConfig.xml file for the UC application onto the Winimage window. |
| Step 4 | When prompted to inject the file into Winimage, click Yes. |
| Step 5 | Cisco Unified Communications Manager only. Drag the clusterConfig.xml file onto the Winimage window. |
| Step 6 | Select . |
| Step 7 | Save the file as a virtual floppy image (.flp file) using the following naming conventions: |
| Step 8 | Repeat this procedure for each UC application for which you want to use touchless installation. |
What to Do Next
Upload Virtual Floppy Images to Datastore
Use this procedure to upload the virtual floppy images to the datastore.
| Step 1 | Start the vSphere client. |
| Step 2 | Select the Configuration tab. |
| Step 3 | Select Storage. |
| Step 4 | Right-click on a datastore and Browse the datastore. |
| Step 5 | Navigate to the destination directory and click the Upload files to this datastore icon. |
| Step 6 | Upload the vFloppy images to the AFG folder. |
| Step 7 | At the Upload/Download warning, click Yes. |
| Step 8 | Close the Datastore Browser window. |
What to Do Next
Mount Virtual Floppy on VM and Set Boot Option
Use this procedure to mount the UC application virtual floppy images on their corresponding VM.
This step is not required for pre-deployed VMs as they are already configured.
| Step 1 | In the vSphere client, select the UC application virtual machine. |
| Step 2 | Select . |
| Step 3 | From the Hardware tab, select Floppy drive. |
| Step 4 | Select Use existing floppy image in datastore. |
| Step 5 | Browse to the datastore and locate the virtual floppy image. |
| Step 6 | Select the file and click OK. |
| Step 7 | Under Device Status, enable the Connected and Connect at power on option. |
| Step 8 | Click the Options tab. Under Boot Options, check Force entry to BIOS, and then click OK. |
| Step 9 | Repeat this procedure for each UC application for which you want to perform touchless installation. |
What to Do Next
Run Touchless Installation
Note | If your VM is pre-deployed, you need to perform step 6 only. |
| Step 1 | In vSphere client, right-click the VM and select Open Console. A console window opens. |
| Step 2 | Click the Power On icon in the console tool bar to power on the virtual machine. |
| Step 3 | When the BIOS screen appears, configure the following boot order: |
| Step 4 | Save the settings and exit the console. The UC application installation commences immediately. |
| Step 5 | Repeat these steps for each UC application that you want to install. |
| Step 6 | Once the installations are complete, remove the vFloppy configurations from the virtual machines. |
What to Do Next
Use the manual method to install any remaining UC applications in the next section.
Install UC Applications Manually
Use this procedure to follow the interactive install process to install any UC applications.
Note | For details specific to Cisco Prime Collaboration Provisioning, refer to: |
Note | If you want to use this method to install both Cisco Unified Communications Manager and IM and Presence Service, you must complete the installation of the Unified Communications Manager publisher first. |
| Step 1 | In vSphere Client, power on the VM for the application that you want to install. |
| Step 2 | Right-click the VM, and choose Open Console. A console window appears. |
| Step 3 | Follow the screen prompts to install the application from the console. |
| Step 4 | If you are
using the manual method to install both Cisco Unified Communications Manager
and IM and Presence Service, once the Cisco Unified Communications Manager
publisher node installation completes, do the following:
|
| Step 5 | Repeat this procedure for each UC application that you want to install. |
Complete Packed Virtual Machine (OVA) Installation
Install Prime Collaboration Provisioning
Use this procedure to install Cisco Prime Collaboration Provisioning.
| Step 1 | In vSphere client, power on the VM that you deployed for Prime Collaboration Provisioning. |
| Step 2 | Right-click the VM and choose Open Console. A console window appears. |
| Step 3 | At the login prompt, type setup. |
| Step 4 | At the prompts, enter each network configuration detail, and press Enter. |
| Step 5 | At the Installation Mode prompt, enter 1 for Standard Prime Collaboration Provisioning. |
| Step 6 | Follow the prompts to complete the installation. |
 Feedback