Cisco ViewMail for Microsoft Outlook (Release 8.5 and Later)
About Cisco ViewMail for Microsoft Outlook
Cisco ViewMail for Microsoft Outlook provides a visual interface with which you can send, listen to, and manage your voice messages from Outlook.
Voice messages appear in either your Outlook Inbox folder or in a separate mail folder in Outlook, depending on how your voicemail system is set up.
Using ViewMail with Outlook 2010 and Outlook 2007
Composing Voice Messages in Outlook 2010 and 2007
In Outlook, select the New icon, or select Voice Message in the New list. Or press Ctrl-Shift-M.

|
1 |
Make the mail message a voice message, showing audio controls and the ViewMail tab. |
6 |
Select the Volume icon, then slide indicator to increase or decrease playback volume during playback. |
|
2 |
Message type label. |
7 |
Select the Speed arrows to increase or decrease playback speed during playback. |
|
3 |
Record a voice message. |
8 |
Enter recipient names, as applicable. |
|
4 |
Play back your voice message recording. |
9 |
Enter text to accompany the voice message, as applicable. Note that text and attachments are supported only with non-secure messages. |
|
5 |
Progress and length of message recording during playback. |
10 |
The ViewMail tab provides additional message options. |
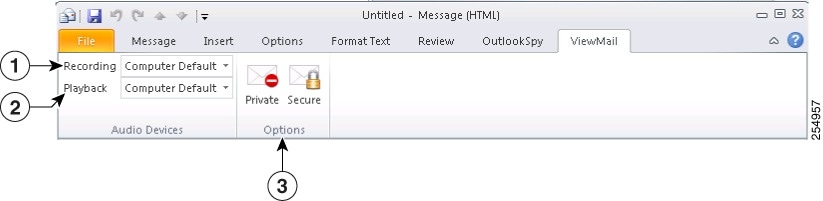
On the ViewMail tab, select audio devices and message options, as applicable.
|
1 |
Select the device to use for recording this voice message. (To select a device for all messages, see the “Changing ViewMail Account Settings” section on page 6.) |
3 |
Mark the message Private and/or Secure. (Depending on how your voicemail system is set up, some options may not be available.) |
|
2 |
Select the device to use for playing back this voice message recording. (To select a device for all messages, see the “Changing ViewMail Account Settings” section on page 6.) |
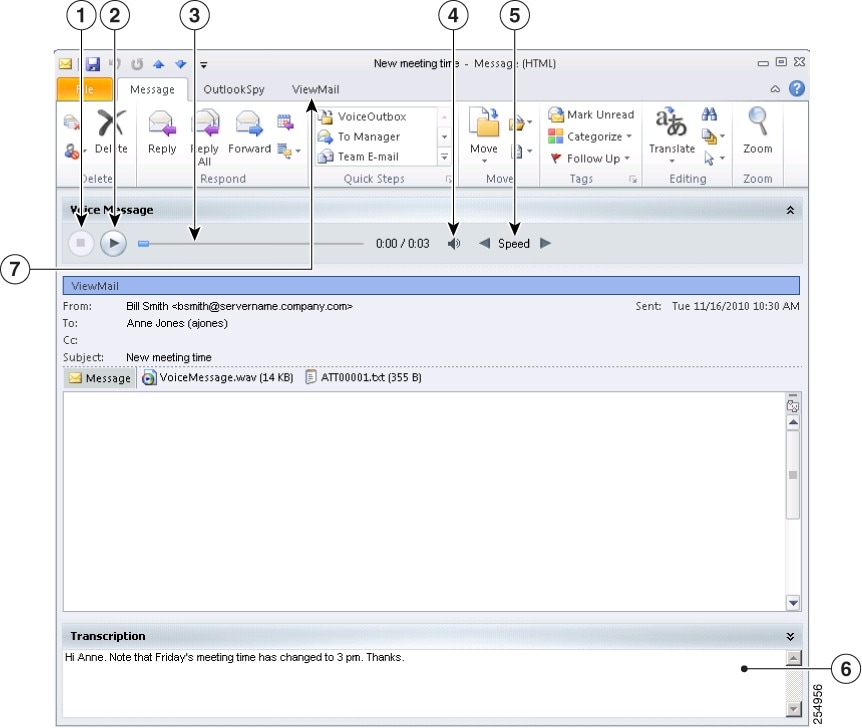
Checking Voice Messages in Outlook 2010 and 2007
You can forward and reply to voice messages from other users but not to those from outside callers.
|
1 |
Stop playback. |
5 |
Select the Speed arrows to increase or decrease playback speed. |
|
2 |
Start/pause playback. |
6 |
Transcription of voice message. (Depending on how your voicemail system is set up, this feature may not be available.) |
|
3 |
Progress and length of message recording. |
7 |
The ViewMail tab provides additional message options. |
|
4 |
Select the Volume icon, then slide indicator to increase or decrease playback volume. |
8 |
On the ViewMail tab, select a device for playing this message. (To select a device for all messages, see the “Changing ViewMail Account Settings” section on page 6.)

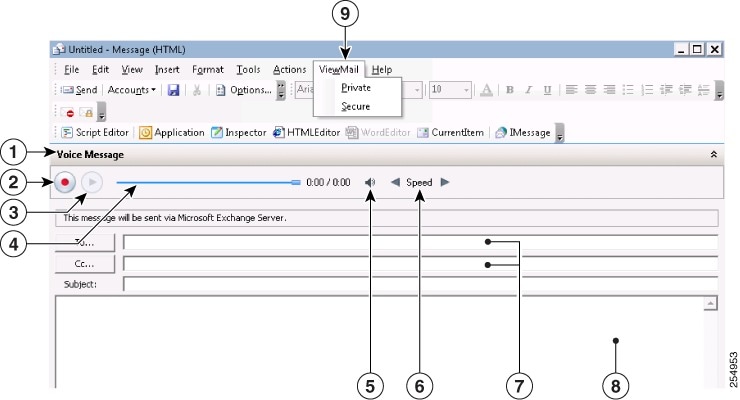
Using ViewMail with Outlook 2003
Composing Voice Messages in Outlook 2003
In Outlook, in the New list, select Voice Message. Or press Ctrl-Shift-M.
|
1 |
Message type label. |
5 |
Select the Volume icon, then slide indicator to increase or decrease playback volume during playback. |
|
2 |
Record a voice message. |
6 |
Select the Speed arrows to increase or decrease playback speed during playback. |
|
3 |
Play back your voice message recording. |
7 |
Enter recipient names, as applicable. |
|
4 |
Progress and length of message recording during playback. |
8 |
Enter text to accompany the voice message, as applicable. Note that text and attachments are supported only with non-secure messages. |
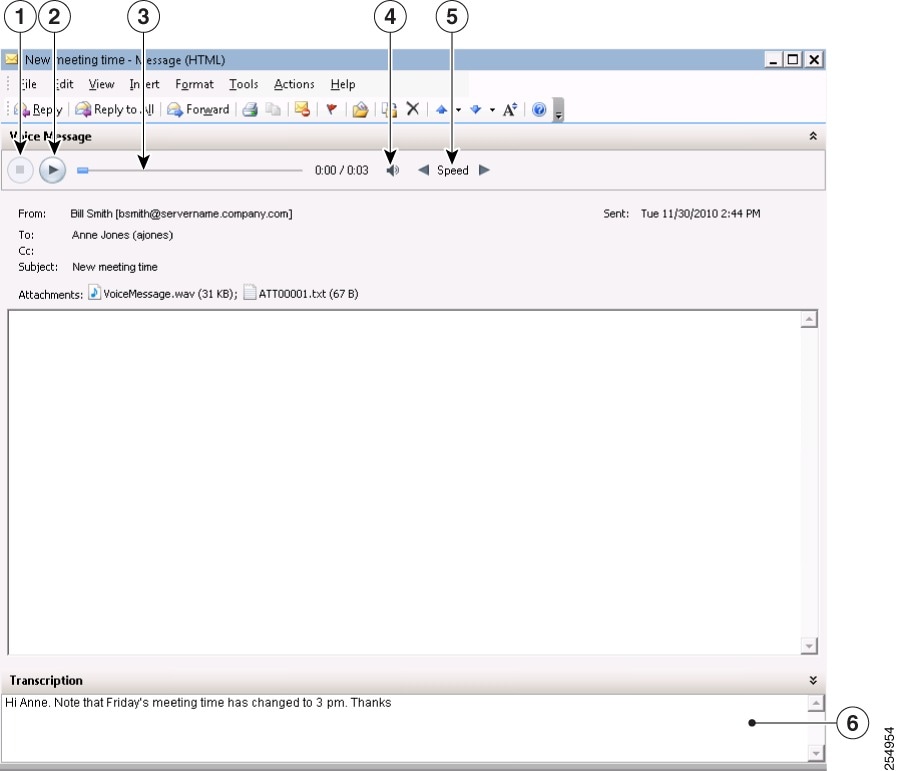
Checking Voice Messages in Outlook 2003
You can forward and reply to voice messages from other users but not to those from outside callers.
|
1 |
Stop playback. |
4 |
Select the Volume icon, then slide indicator to increase or decrease playback volume. |
|
2 |
Start/pause playback. |
5 |
Select the Speed arrows to increase or decrease playback speed. |
|
3 |
Progress and length of message recording. |
6 |
Transcription of voice message. (Depending on how your voicemail system is set up, this feature may not be available.) |
Changing ViewMail Account Settings
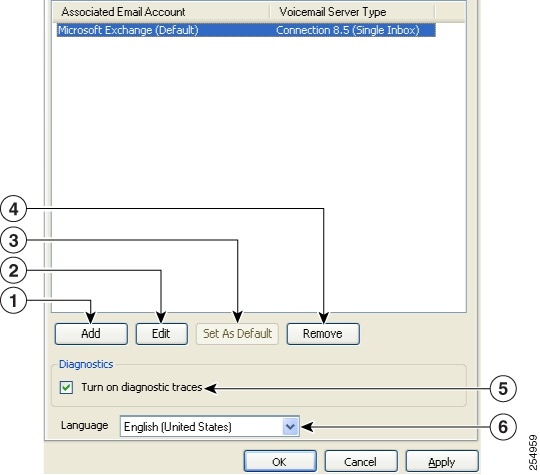
In Outlook 2010, on the ViewMail tab, select Settings.
In Outlook 2007 and 2003, from the Tools menu, select Options, then select the ViewMail tab.
|
1 |
Select to add and set up an associated email account. |
4 |
Delete the selected associated email account. |
|
2 |
Select to change the settings for the selected associated email account. |
5 |
Check or uncheck the check box to turn on or turn off diagnostic traces. |
|
3 |
Select to set the default voicemail server that sends your voice messages. (Option available only if you have more than one associated email account.) |
6 |
Select the language in which to display ViewMail fields and labels. |
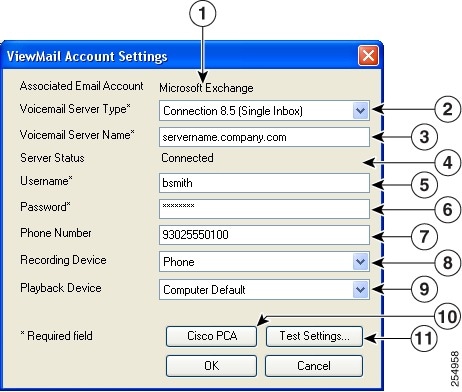
Enter or change the applicable information, then select OK.
|
1 |
The email account associated with the voicemail server. (Display only.) |
7 |
Enter the phone number or URI that the system dials for recording and playing voice messages when you select a phone as your recording or playback device. |
|
2 |
Select the type of voicemail server with which the email account is associated. |
8 |
Select the device to use for recording all voice messages. |
|
3 |
Enter the name of the voicemail server. |
9 |
Select the device to use for playing all voice messages. |
|
4 |
The status of the connection to the voicemail server. (Display only.) |
10 |
Go to the Cisco PCA to access the Messaging Assistant and Personal Call Transfer Rules web tools. |
|
5 |
Enter your username. |
11 |
Test your ViewMail account settings as currently entered. The status displays in the Server Status field. |
|
6 |
Enter your Cisco PCA (web application) password. |
Frequently Asked Questions
Managing Voice Messages
Q. I received a voice message that has another voice message as an attachment, but when I open the attached voice message, there are no audio controls like the ones I see in the original message. How do I play the attached voice message?
A.The attached voice message is a .wav file and can be played by using a media player on your computer.
Q.Why do I get a failed-delivery notice when I send a voice message to a friend’s Gmail account?
A.Your voicemail system may not support sending voice messages to recipients outside of the system. See your system administrator.
Q.I get voice messages in the same Inbox as my email. How do I tell which messages are voice messages?
A.The color category called “ViewMail” is assigned to voice messages. By default, the ViewMail category is marked with a blue square, which displays in the Categories column. (To add the Categories column to your Inbox, see Outlook Help.)
Q.I get voice messages in the same Inbox as my email, but I also see a Voice Outbox folder under Outbox. Why do I sometimes see messages in the Voice Outbox folder?
A.Voice messages queue for delivery in the Voice Outbox folder. The messages disappear when the voicemail system transmits them. Do not try to update or resend messages while they are in the Voice Outbox folder.
Q.I get voice messages in the same Inbox as my email. Is there a way I can see all my voice messages together in one place in Outlook?
A.Depending on how your voicemail system is set up, there may be a ViewMail folder under Search Folders in your Outlook Mailbox. The ViewMail folder shows all of the voice messages currently in your Inbox.
ViewMail Account Settings
Q.When I started Outlook, the Cisco ViewMail for Microsoft Outlook Initialization wizard started. What is that for?
A.The wizard starts the first time Outlook runs after ViewMail is installed on your workstation and there is required information that is missing. Follow the on-screen prompts to enter the information and complete the wizard.
Q.I just added or turned on a new recording or playback device to my computer. Why do the ViewMail device lists not show it?
A. You must restart the ViewMail for Outlook add-in so it can recognize the new device. To restart ViewMail, restart Outlook.
Q. While in Outlook, I added a new email account. Why do I not see the email account in ViewMail for Outlook Options or Settings?
A. You must restart the ViewMail for Outlook add-in so it can recognize the new account. To restart ViewMail, restartOutlook.
General
Q. Can I access the Cisco Personal Communications Assistant (PCA) from ViewMail for Outlook?
-
Outlook 2010: On the ViewMail tab, select Settings. In the Cisco ViewMail Settings dialog, select the applicable account, and select Edit.
-
Outlook 2007 and 2003: From the Tools menu, select Options. In the Options dialog, select the ViewMail tab, then select the applicable account, and select Edit.
Q. When I press F1 for more help, as the tooltip under “Cisco ViewMail for Outlook Add-In” says, why do I not see ViewMail for Outlook Help?
A. There is no ViewMail for Outlook Help. The tool tip is part of Outlook and opens a window with links to Outlook Help.
Q. My system administrator asked me to send the log files. How do I do that?
A. In Outlook 2010, on the ViewMail tab in the Help group, select Email Log Files; in Outlook 2007 and 2003, from the Help menu, select Cisco ViewMail for Outlook, then Email Log Files. ViewMail gathers log files, zips them, and attaches the .zip file to an email that you address and send.
 Feedback