- Cisco Video Management and Storage System SRE Overview
- Configuring the Host Router and Cisco Video Management and Storage System SRE Interfaces
- Administering the Cisco Video Management and Storage SRE Module
- Configuring Local and Remote Storage
- Cisco Video Management and Storage System SRE Command Reference
- Index
Configuring Local and Remote Storage
This section describes how to configure the Cisco Video Management and Storage System to store archive files on local redundant array of inexpensive disks (RAID) and external NFS storage servers. Use the Cisco Video Management and Storage System CLI commands to add or modify NFS server configurations.
This chapter describes the following:
•![]() Configuring Local Storage Devices
Configuring Local Storage Devices
•![]() Configuring NFS Mounts from NFS Servers
Configuring NFS Mounts from NFS Servers
Configuring Local Storage Devices
The following section describes the configuration of local storage devices:
•![]() Local Disk Drive RAID Array Options
Local Disk Drive RAID Array Options
Local Disk Drive RAID Array Options
RAID 1, Linear RAID, and RAID 0 are all supported by the Cisco Video Management and Storage System application version 6.2.1 and later on the Cisco SM-SRE-900 module.

Note ![]() The Cisco SM-SRE-700 module only contains one disk drive, so RAID is not an option.
The Cisco SM-SRE-700 module only contains one disk drive, so RAID is not an option.
During the installation of the Cisco Video Management and Storage System application on the Cisco SM-SRE-900, you can choose the type of RAID support as RAID 1, Linear RAID, or RAID 0.
The following sections describe the Cisco Video Management and Storage System RAID options and the CLI commands required to remove a faulty drive and add an new drive.
RAID 1 Option
With the RAID 1 option, the two-disk drive RAID 1 mirrors the root partition, swap drive, and media partitions (see Figure 2) of the two disk drives of the Cisco SM-SRE module, creating a one-for-one ratio real-time backup. It provides fault tolerance from disk errors and failure of one of the two drives. The contents of each disk in the array are identical to that of the other disk in the array. The array continues to operate as long as one of the two disk drives is functional.
Figure 2 RAID 1, Linear RAID, and RAID 0 Disk Drive Partition Mirroring
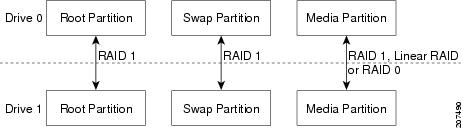
The RAID 1 option provides complete high availability and fault tolerance to the Cisco Video Management and Storage System; if one of the disk drives fails, the VSOM and VSMS configurations and archives are preserved, and the Cisco Video Management and Storage System remains operational. The cost for this high availability and fault tolerance, however, is that only half of the total potential disk storage space is available.
If the RAID 1 disk drive fails and is hot swapped with a new drive, the new drive is automatically reformatted to match the working drive and the RAID arrays are reassembled.
Hot Swapping the Faulty RAID 1 Drive
You can remove a failed disk drive when the RAID 1 option is chosen at the time of software installation. Figure 2 shows the typical partitions in the RAID 1 disk drive array.
Before you can remove the faulty drive, you must first enter the CLI command disk remove <0 | 1> for drive 0 or drive 1, whichever is the faulty drive.
Note![]() •
•![]() Determine which drive number is logical drive 0 and which drive 1 (see Figure 3).
Determine which drive number is logical drive 0 and which drive 1 (see Figure 3).
•![]() You can only remove one drive.
You can only remove one drive.
Figure 3
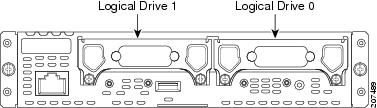
Location of Drive 0 and Drive 1 on the Cisco SRE Module
If you do not know which of the two drives is faulty, the CLI can identify which of the drives is faulty and does not allow the disk remove command to complete unless the faulty drive number is correctly entered; entering the incorrect drive number results in an error message, notifying you that the incorrect drive option has been entered in the command. If this occurs, enter the other drive number in the disk remove command.
After identifying the faulty drive, physically remove the faulty drive and replace it with a new drive on the Cisco SM-SRE module (see the "Replacing Hard Drives on Service Modules" section of the Installing Cisco Network Modules and Service Modules in Cisco Access Routers).
When the new disk drive is inserted in the Cisco SRE module to replace the faulty drive, the new drive is automatically reformatted to match the working drive and the RAID arrays are reassembled as the drive recovers.
The following is an example of a successful CLI disk remove 0 command.
cvmss-module# disk remove 0
You are about to remove disk 0 (sda) from the RAID array and SCSI
Do you wish to continue [y/n]? y
raid1: Disk failure on sda2, disabling device.
Feb 2 16:30:25 localhost kernel: raid1: Disk failure on sda2, disabling device.
mdadm: set /dev/sda1 faulty in /dev/md0
mdadm: set /dev/sda2 faulty in /dev/md1
mdadm: hot removed /dev/sda1
mdadm: hot removed /dev/sda2
/dev/md2 /media0 ext3 ro,data=ordered 0 0
Buffer I/O error on device md2, logical block 1116
mdadm: stopped /dev/md2
After the failed local disk drive 0 on the Cisco SM-SRE module is physically removed, a new replacement disk drive is swapped and plugged into the module. The following example shows the Linear RAID disk drive hot swap disk add 0 command and the show disk stats command to display the drive's recovery progress. If the disk add 0 command is successful, the following is displayed.
cvmss-module# disk add 0
You are about to add disk 0 (sda) back to the RAID array and SCSI
Do you wish to continue [y/n]? y
!!!WARNING!!!
!!!WARNING!!! You are about to start a serious operation on the
!!!WARNING!!! local media. Adding a new drive requires the
!!!WARNING!!! linear storage partition to be rebuilt and formatted.
!!!WARNING!!!
!!!WARNING!!! During this operation, your console is locked and
!!!WARNING!!! unavailable for use.
!!!WARNING!!!
!!!WARNING!!! If you are not sure what to do, answer no to the
!!!WARNING!!! following question and then exit.
!!!WARNING!!!
Do you wish to proceed [y/n]? : y
Checking that no-one is using this disk right now ...
OK
Disk /dev/sda: 60801 cylinders, 255 heads, 63 sectors/track
Old situation:
Units = cylinders of 8225280 bytes, blocks of 1024 bytes, counting from 0
Device Boot Start End #cyls #blocks Id System
/dev/sda1 0+ 365 366- 2939863+ fd Linux raid autodetect
/dev/sda2 366 609 244 1959930 fd Linux raid autodetect
/dev/sda3 610 1826 1217 9775552+ fd Linux raid autodetect
/dev/sda4 0 - 0 0 0 Empty
New situation:
No partitions found
sfdisk: no partition table present.
Checking that no-one is using this disk right now ...
OK
Disk /dev/sda: 60801 cylinders, 255 heads, 63 sectors/track
Old situation:
Units = cylinders of 8225280 bytes, blocks of 1024 bytes, counting from 0
Device Boot Start End #cyls #blocks Id System
/dev/sda1 0+ 365 366- 2939863+ fd Linux raid autodetect
/dev/sda2 366 609 244 1959930 fd Linux raid autodetect
/dev/sda3 610 1826 1217 9775552+ fd Linux raid autodetect
/dev/sda4 0 - 0 0 0 Empty
New situation:
Units = sectors of 512 bytes, counting from 0
Device Boot Start End #sectors Id System
/dev/sda1 63 5879789 5879727 fd Linux raid autodetect
/dev/sda2 5879790 9799649 3919860 fd Linux raid autodetect
/dev/sda3 9799650 29350754 19551105 fd Linux raid autodetect
/dev/sda4 0 - 0 0 Empty
Warning: no primary partition is marked bootable (active)
This does not matter for LILO, but the DOS MBR will not boot this disk.
Successfully wrote the new partition table
Re-reading the partition table ...
If you created or changed a DOS partition, /dev/foo7, say, then use dd(1)
to zero the first 512 bytes: dd if=/dev/zero of=/dev/foo7 bs=512 count=1
(See fdisk(8).)
mdadm: added /dev/sda1
mdadm: added /dev/sda2
mke2fs 1.35 (28-Feb-2004)
Filesystem label=
OS type: Linux
Block size=4096 (log=2)
Fragment size=4096 (log=2)
1224000 inodes, 2443888 blocks
122194 blocks (5.00%) reserved for the super user
First data block=0
Maximum filesystem blocks=2503999488
75 block groups
32768 blocks per group, 32768 fragments per group
16320 inodes per group
Superblock backups stored on blocks:
32768, 98304, 163840, 229376, 294912, 819200, 884736, 1605632
Writing inode tables: done
Creating journal (8192 blocks): done
Writing superblocks and filesystem accounting information: done
This filesystem will be automatically checked every 29 mounts or
180 days, whichever comes first. Use tune2fs -c or -i to override.
mdadm: chunk size defaults to 64K
mdadm: /dev/sda3 appears to contain an ext2fs file system
size=9775552K mtime=Wed Dec 31 16:00:00 1969
mdadm: /dev/sdb3 appears to contain an ext2fs file system
size=9775552K mtime=Tue Feb 2 10:57:14 2010
mdadm: /dev/sdb3 appears to be part of a raid array:
level=linear devices=2 ctime=Tue Feb 2 15:19:04 2010
Continue creating array? mdadm: array /dev/md2 started.
vmss-25-210-30# lin sh
Saving session script in: linux_session.log
cvmss-module# cat /proc/mdstat
Personalities : [linear] [raid1]
md1 : active raid1 sda2[0] sdb2[1]
1959808 blocks [2/2] [UU]
md2 : active linear sdb3[1] sda3[0]
19550976 blocks 64k rounding
md0 : active raid1 sda1[0] sdb1[1]
2939776 blocks [2/2] [UU]
unused devices: <none>
As the new RAID 1 drive recovers, use the show disk stats command to display the recovery as the new disk drive recovers. The show disk stats command can be repeated periodically to display the recovery as an incremental progress bar that indicates the percentage completion of disk recovery, as shown in the following example:
cvmss-module# show disk stats
Personalities : [linear] [raid1]
md1 : active raid1 sdb2[2] sda2[0]
1959808 blocks [2/1] [U_]
resync=DELAYED
md2 : active raid1 sdb3[2] sda3[0]
9775488 blocks [2/1] [U_]
resync=DELAYED
md0 : active raid1 sdb1[2] sda1[0]
2939776 blocks [2/1] [U_]
      [==>..................]  recovery = 13.4% (396288/2939776) finish=0.8min
speed=49536K/sec
unused devices: <none>
cvmss-module# show disk stats
Personalities : [linear] [raid1]
md1 : active raid1 sdb2[2] sda2[0]
1959808 blocks [2/1] [U_]
resync=DELAYED
md2 : active raid1 sdb3[2] sda3[0]
9775488 blocks [2/1] [U_]
      [===============>.....]  recovery = 77.6% (7589248/9775488) finish=0.7min
speed=50901K/sec
md0 : active raid1 sdb1[1] sda1[0]
2939776 blocks [2/2] [UU]
unused devices: <none>
cvmss-module# show disk stats
Personalities : [linear] [raid1]
md1 : active raid1 sdb2[1] sda2[0]
1959808 blocks [2/2] [UU]
md2 : active raid1 sdb3[1] sda3[0]
9775488 blocks [2/2] [UU]
md0 : active raid1 sdb1[1] sda1[0]
2939776 blocks [2/2] [UU]
unused devices: <none>
If the incorrect disk drive has been entered in the disk remove command, in this case disk drive 1, it results in the following example output. Note the error message, shown here in bold type for emphasis, explaining that he drive is active and cannot be removed.
cvmss-module# disk remove 1
You are about to remove disk 1 (sdb) from the RAID array and SCSI
Do you wish to continue [y/n]? y
sdb is the only active drive, can't be removed
Linear RAID Option
With the Linear RAID option, only the root partition and swap drive are mirrored, giving up only a fraction of the disk storage capacity (see Figure 2). The remainder of the available storage space is contained in a Linear RAID array used as the storage partition. Even with a drive failure with this option, the Cisco Video Management and Storage System can still be used to view live video streams from the VSOM and VSMS, and the CLI of the application is still accessible. The cost for higher disk capacity with the Linear RAID option, however, is that all archive data on the local drive is lost when there is a disk drive failure.
If the Linear RAID drive fails and is replaced with a new drive, the Cisco Video Management and Storage System reformats the media partition and provides a fresh media mount; the root partition and swap partitions are restored.
The following example shows the disk removed and Linear RAID remounted.
cvmss-module# ext3_abort called.
EXT3-fs error (device md2): ext3_journal_start_sb: Feb  2 16:27:03 Detected aborted
journal
localhost kernelRemounting filesystem read-only
: ext3_abort called.
Feb  2 16:27:03 localhost kernel: EXT3-fs error (device md2): ext3_journal_start_sb:
Detected aborted journal
Feb 2 16:27:03 localhost kernel: Remounting filesystem read-only
Buffer I/O error on device md2, logical block 1
cvmss-module# cat /proc/mdstat
Personalities : [linear] [raid1]
md1 : active raid1 sdb2[1] sda2[0]
1959808 blocks [2/2] [UU]
md2 : active linear sdb3[1] sda3[0]
19550976 blocks 64k rounding
md0 : active raid1 sdb1[1] sda1[2](F)
2939776 blocks [2/1] [_U]
unused devices: <none>
cvmss-module# cat /proc/mounts | grep md2
/dev/md2 /media0 ext3 ro,data=ordered 0 0
cvmss-module# exit
exit
Raid 0 Option
With the RAID 0 option, disk drive performance is enhanced but there is no data redundancy. RAID 0 data are evenly divided across two or more disks (striped) without redundancy.
If a drive fails, it wipes out the whole array. It is destroyed because, when data is written to a RAID 0 drive, the data is broken into fragments. With these fragments, smaller portions of the entire data can be read off the drive in parallel, increasing bandwidth and overall drive performance. However, there is no error checking with a RAID 0 array, which makes the array susceptible to unrecoverable errors. With two disks in the array there is higher bandwidth but greater risk of data loss.
The RAID 0 configuration examples are the same as those presented in the "Linear RAID Option" section, except that the output is for RAID 0.
Formatting the Local Drive
The format storages local command formats the local storage device with the media tag of media0. Use the show storages all filesystem command to get information about the current state of media0. The local command option is also available.
As shown in Examples, a data loss warning message appears immediately after this command is entered. Local storage device formatting proceeds only after a y(es) confirmation is entered.
Note ![]() If the Cisco Video Management and Storage System application is in the process of storing or reviewing an archive from media0, formatting of media0 will not proceed and a device busy message will appear.
If the Cisco Video Management and Storage System application is in the process of storing or reviewing an archive from media0, formatting of media0 will not proceed and a device busy message will appear.
SUMMARY STEPS
1. ![]() format storages local media-tag
format storages local media-tag

Caution
DETAILED STEPS
Examples
The following example shows the command to format the local storage device, media0:
cvmss-module> format storages local media0
!!!WARNING!!!
!!!WARNING!!! You are about to start a destructive sequence of
!!!WARNING!!! operations. All data on the storage device media0
!!!WARNING!!! will be lost and unrecoverable.
!!!WARNING!!! The device formatting can take up to a few minutes.
!!!WARNING!!! During formatting, your console is locked and
!!!WARNING!!! unavailable for use. Before you proceed further, back
!!!WARNING!!! up the contents of the storage device media0.
!!!WARNING!!!
!!!WARNING!!! If you are not sure what to do, answer "no" to the
!!!WARNING!!! following question and then exit.
!!!WARNING!!!
Do you wish to proceed [y/n]? :
Configuring NFS Mounts from NFS Servers
NFS allows data to be stored on central servers and easily accessed from client devices in a client/server network configuration through a process called mounting. It allows a system to share directories and files with others over a network. Files stored on external remote systems can be accessed almost as if they were local files. The Cisco Video Management and Storage System supports the CLI configuration of NFS for remote video archiving.
NFS supports multiple mounts. However, the Cisco Video Management and Storage System supports a one-to-one relationship between NFS exports and mount configurations. For example, if you had an NFS server with four exports and you wanted to configure three of those mounts for video archive storage, you need to configure three separate media enclosures.
NFS supports the target-ip command differently. You no longer need to disable an export to mount a new export. You can simply issue a target-ip ip-address exportName export-name command to mount a new export. If you want to change the media's IP address, simply issue target-ip ip-address command, which automatically unmounts the old IP address and export name and adds the new IP address.
SUMMARY STEPS
1. ![]() configure terminal
configure terminal
2. ![]() storages nfs media-tag
storages nfs media-tag
3. ![]() end
end
4. ![]() end
end
 Feedback