FlexPod Datacenter for OpenShift Container Platform 4
Available Languages
Bias-Free Language
The documentation set for this product strives to use bias-free language. For the purposes of this documentation set, bias-free is defined as language that does not imply discrimination based on age, disability, gender, racial identity, ethnic identity, sexual orientation, socioeconomic status, and intersectionality. Exceptions may be present in the documentation due to language that is hardcoded in the user interfaces of the product software, language used based on RFP documentation, or language that is used by a referenced third-party product. Learn more about how Cisco is using Inclusive Language.
- US/Canada 800-553-2447
- Worldwide Support Phone Numbers
- All Tools
 Feedback
 Feedback

FlexPod Datacenter for OpenShift Container Platform 4
Deployment Guide for FlexPod Datacenter for OpenShift Container Platform 4
Published: August 2020

In partnership with: 
About the Cisco Validated Design Program
The Cisco Validated Design (CVD) program consists of systems and solutions designed, tested, and documented to facilitate faster, more reliable, and more predictable customer deployments. For more information, go to:
http://www.cisco.com/go/designzone.
ALL DESIGNS, SPECIFICATIONS, STATEMENTS, INFORMATION, AND RECOMMENDATIONS (COLLECTIVELY, "DESIGNS") IN THIS MANUAL ARE PRESENTED "AS IS," WITH ALL FAULTS. CISCO AND ITS SUPPLIERS DISCLAIM ALL WARRANTIES, INCLUDING, WITHOUT LIMITATION, THE WARRANTY OF MERCHANTABILITY, FITNESS FOR A PARTICULAR PURPOSE AND NONINFRINGEMENT OR ARISING FROM A COURSE OF DEALING, USAGE, OR TRADE PRACTICE. IN NO EVENT SHALL CISCO OR ITS SUPPLIERS BE LIABLE FOR ANY INDIRECT, SPECIAL, CONSEQUENTIAL, OR INCIDENTAL DAMAGES, INCLUDING, WITHOUT LIMITATION, LOST PROFITS OR LOSS OR DAMAGE TO DATA ARISING OUT OF THE USE OR INABILITY TO USE THE DESIGNS, EVEN IF CISCO OR ITS SUPPLIERS HAVE BEEN ADVISED OF THE POSSIBILITY OF SUCH DAMAGES.
THE DESIGNS ARE SUBJECT TO CHANGE WITHOUT NOTICE. USERS ARE SOLELY RESPONSIBLE FOR THEIR APPLICATION OF THE DESIGNS. THE DESIGNS DO NOT CONSTITUTE THE TECHNICAL OR OTHER PROFESSIONAL ADVICE OF CISCO, ITS SUPPLIERS OR PARTNERS. USERS SHOULD CONSULT THEIR OWN TECHNICAL ADVISORS BEFORE IMPLEMENTING THE DESIGNS. RESULTS MAY VARY DEPENDING ON FACTORS NOT TESTED BY CISCO.
CCDE, CCENT, Cisco Eos, Cisco Lumin, Cisco Nexus, Cisco StadiumVision, Cisco TelePresence, Cisco WebEx, the Cisco logo, DCE, and Welcome to the Human Network are trademarks; Changing the Way We Work, Live, Play, and Learn and Cisco Store are service marks; and Access Registrar, Aironet, AsyncOS, Bringing the Meeting To You, Catalyst, CCDA, CCDP, CCIE, CCIP, CCNA, CCNP, CCSP, CCVP, Cisco, the Cisco Certified Internetwork Expert logo, Cisco IOS, Cisco Press, Cisco Systems, Cisco Systems Capital, the Cisco Systems logo, Cisco Unified Computing System (Cisco UCS), Cisco UCS B-Series Blade Servers, Cisco UCS C-Series Rack Servers, 1Cisco UCS S-Series Storage Servers, Cisco UCS Manager, Cisco UCS Management Software, Cisco Unified Fabric, Cisco Application Centric Infrastructure, Cisco Nexus 9000 Series, Cisco Nexus 7000 Series. Cisco Prime Data Center Network Manager, Cisco NX-OS Software, Cisco MDS Series, Cisco Unity, Collaboration Without Limitation, EtherFast, EtherSwitch, Event Center, Fast Step, Follow Me Browsing, FormShare, GigaDrive, HomeLink, Internet Quotient, IOS, iPhone, iQuick Study, LightStream, Linksys, MediaTone, MeetingPlace, MeetingPlace Chime Sound, MGX, Networkers, Networking Academy, Network Registrar, PCNow, PIX, PowerPanels, ProConnect, ScriptShare, SenderBase, SMARTnet, Spectrum Expert, StackWise, The Fastest Way to Increase Your Internet Quotient, TransPath, WebEx, and the WebEx logo are registered trademarks of Cisco Systems, Inc. and/or its affiliates in the United States and certain other countries. (LDW_PU1)
All other trademarks mentioned in this document or website are the property of their respective owners. The use of the word partner does not imply a partnership relationship between Cisco and any other company. (0809R)
© 2020 Cisco Systems, Inc. All rights reserved.
Table of Contents
Hardware and Software Revisions
OpenShift Container Platform Design
OpenShift Container Platform Deployment
OpenShift Container Platform - Networking Configuration
OpenShift Container Platform Management Connectivity
OpenShift Container Platform Storage Connectivity
OpenShift Container Platform – Installation Requirements
Infrastructure Virtual Machines
OpenShift Container Platform Virtual Machines
Virtual Machine Hostnames and IP addresses
OpenShift Container Platform – Infrastructure Setup
Deploy Infrastructure Virtual Machines in VMware
Install and Configure the DNS Server
Install and Configure the DHCP Server
Install and Configure Web Server
Install and Configure Load Balancer
Verify Infrastructure Services
OpenShift Container Platform – Installation
Obtain the Installation Programs
Create the Installation Configuration File
Create the Ignition Configuration Files
Create Red Hat Enterprise Linux CoreOS (RHCOS) VM Template
Install the OpenShift CLI by Downloading the Binary
Prepare the Terraform Installer
Approve the Certificate Signing Requests
Log into OpenShift Container Platform
Setup NFS Volume for Image Registry on NetApp
VMware Configuration for OCP Virtual Machines
Storage Configuration for NetApp Trident
Create Load-Sharing Mirrors of SVM Root Volume
OCP Web Console - Compute Nodes
OCP Web Console – Persistent Volumes
Load Balancer Configuration File
Red Hat OpenShift Container Platform
Cisco Validated Designs (CVDs) deliver systems and solutions that are designed, tested, and documented to facilitate and improve customer deployments. These designs incorporate a wide range of technologies and products into a portfolio of solutions that have been developed to address the business needs of the customers and to guide them from design to deployment.
Customers looking to deploy applications using a shared datacenter infrastructure face several challenges. A recurring infrastructure challenge is to achieve the required levels of IT agility and efficiency that can effectively meet the company’s business objectives. Addressing these challenges requires having an optimal solution with the following key characteristics:
· Availability: Help ensure applications and services availability at all times with no single point of failure
· Flexibility: Ability to support new services without requiring underlying infrastructure modifications
· Efficiency: Facilitate efficient operation of the infrastructure through re-usable policies
· Manageability: Ease of deployment and ongoing management to minimize operating costs
· Scalability: Ability to expand and grow with significant investment protection
· Compatibility: Minimize risk by ensuring compatibility of integrated components
Cisco and NetApp have partnered to deliver a series of FlexPod solutions that enable strategic datacenter platforms with the above characteristics. FlexPod solution delivers an integrated architecture that incorporates compute, storage, and network design best practices thereby minimizing IT risks by validating the integrated architecture to ensure compatibility between various components. The solution also addresses IT pain points by providing documented design guidance, deployment guidance and support that can be used in various stages (planning, designing and implementation) of a deployment.
Red Hat® OpenShift® is an enterprise ready Kubernetes container platform to manage hybrid cloud and multi-cloud deployments. Red Hat OpenShift Container Platform includes everything needed for hybrid cloud, enterprise container and Kubernetes development and deployments. It includes an enterprise-grade Linux operating system, container runtime, networking, monitoring, container registry, authentication, and authorization solutions.
Combining Red Hat OpenShift with FlexPod Datacenter solution can simplify the deployment and the management of the container infrastructure. Customers can benefit from improved efficiency, better data protection, lower risk, and the flexibility to scale this highly available enterprise-grade infrastructure stack to accommodate new business requirements. The pre-validated converged solution approach helps organizations achieve the speed, flexibility, and scale required for all of their application modernization and digital transformation initiatives.
Introduction
The FlexPod Datacenter solution is a pre-designed, integrated, and validated architecture for data center that combines Cisco UCS servers, Cisco Nexus family of switches, Cisco MDS fabric switches and NetApp ONTAP storage arrays into a single, flexible architecture. FlexPod solutions are designed for high availability, with no single points of failure, while maintaining cost-effectiveness and flexibility in the design to support a wide variety of workloads. FlexPod design can support different hypervisor options, bare metal servers, and can also be sized and optimized based on customer workload requirements.
To help customers, business partners, and other deployment teams with their digital transformation and to enhance their cloud-native and application modernization practices, this document provides a reference architecture that includes design guidance, best practices, and other recommendations for deploying Red Hat OpenShift Container Platform (OCP) 4 on FlexPod DC architecture.
This document is a detailed walk through of the solution build out for deploying OCP 4 on FlexPod DC and provides step by step deployment instructions for various components.
Audience
The intended audience of this document includes but is not limited to data scientists, IT architects, sales engineers, field consultants, professional services, IT managers, partner engineering, and customers who want to take advantage of an infrastructure built to deliver IT efficiency and enable IT innovation.
What’s New in this Release?
The following design elements distinguish this version of FlexPod from previous models:
· Deploying Red Hat OpenShift Container Platform (OCP) 4.4 on FlexPod Datacenter infrastructure running vSphere 6.7 Update 3.
· Showcase NetApp storage integration with the underlying container orchestration using NetApp Trident to provision and manage persistent volumes for the containerized applications.
Architecture
FlexPod Datacenter for OCP comprises of the following core hardware components:
· Cisco UCS Manager on Cisco 4th generation 6454 Fabric Interconnects to support 10GbE, 25GbE and 100GbE connectivity from various components.
· Cisco UCS 5108 Chassis with Cisco UCS B200 M5 blade servers and Cisco UCS C220 M5 rack servers to support VMware vSphere environment where Red Hat OCP is deployed.
· High-Speed Cisco NxOS based Nexus 9336C-FX2 switching design to support up to 100GbE connectivity.
· NetApp AFF A800 NVMe storage with 100GbE connectivity to Cisco Nexus switching fabric.
The FlexPod Datacenter solution for OCP closely aligns with latest NxOS based FlexPod CVD: FlexPod Datacenter with NetApp ONTAP 9.7, Cisco Intersight, and VMware vSphere 6.7 U3 Design Guide and meets the following general design requirements:
1. Resilient design across all layers of the infrastructure with no single point of failure.
2. Scalable design with the flexibility to add compute capacity, storage, or network bandwidth as needed.
3. Modular design that can be replicated to expand and grow as the needs of the business grow.
4. Flexible design that can support components beyond what is validated and documented in this guide.
5. Simplified design with ability to automate and integrate with external automation and orchestration tools.
For Red Hat OCP 4 integration into a traditional FlexPod Datacenter solution, the following specific design considerations are also observed:
1. High Availability of master nodes with a minimum of 3 master node VMs deployed.
2. A minimum of 4 worker node VMs with ability to increase the nodes as the load requirements increase.
3. Automating the OCP installation by utilizing Terraform scripts provided by Red Hat to simplify the installation and reduce the deployment time.
4. Present persistent storage (volumes) to the containerized applications by utilizing the NetApp Trident storage orchestrator.
Physical Topology
The physical topology for FlexPod Datacenter for OCP 4 deployment is shown in Figure 1.
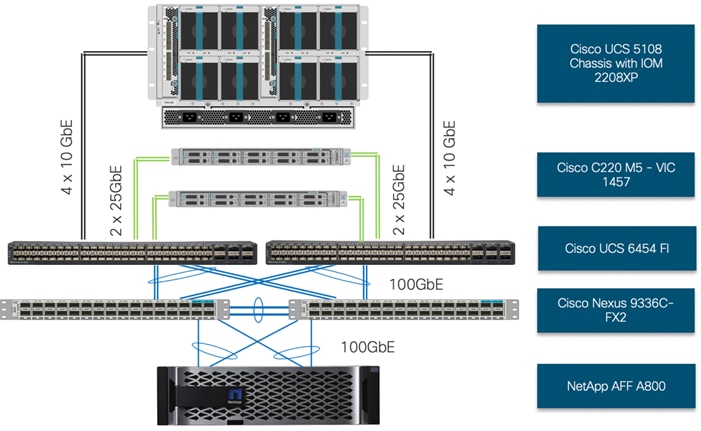
To validate the design, an environment with the following components was setup:
· Cisco UCS 6454 Fabric Interconnects (FI) to support Cisco UCS 5108 chassis and Cisco UCS C220 M5 servers.
· Cisco UCS 5108 chassis connected to FIs using 2208XP IOMs.
· Cisco Nexus 9336C running in NxOS mode provides the switching fabric.
· Cisco UCS 6454 FI’s 100GbE uplink ports were connected to Nexus 9336C as port-channels.
· NetApp AFF A800 controllers connected to Nexus 9336C switch using 100GbE port-channels.
· VMware 6.7 Update 3 ESXi software installed on Cisco UCS B200 M5 and C220 M5* servers.
![]() * The solution was validated using both Cisco UCS B200 M5 and Cisco C220 M5 servers to show the versatility of the Cisco UCS platform. Customers can choose to deploy OCP on just the Cisco UCS B-Series or Cisco UCS C-Series servers depending on their requirements.
* The solution was validated using both Cisco UCS B200 M5 and Cisco C220 M5 servers to show the versatility of the Cisco UCS platform. Customers can choose to deploy OCP on just the Cisco UCS B-Series or Cisco UCS C-Series servers depending on their requirements.
Base Infrastructure
The reference architecture described in this document leverages the components explained in FlexPod Datacenter with NetApp ONTAP 9.7, Cisco Intersight, and VMware vSphere 6.7 U3 Design Guide. The FlexPod Datacenter for OCP extends the virtual infrastructure architecture by deploying RedHat OpenShift Container Platform Virtual Machines (VM) over the VMware vSphere infrastructure as shown in Figure 2:
This deployment guide explains the OCP setup and relevant storage configuration.
![]() This deployment guide explains the OCP setup including the infrastructure prerequisites and appropriate storage configuration. However, the base virtual machine infrastructure configuration and setup is beyond the scope of this document. Customers are encouraged to refer to the FlexPod Datacenter with NetApp ONTAP 9.7, Cisco Intersight, and VMware vSphere 6.7 U3 the for step-by-step configuration procedures.
This deployment guide explains the OCP setup including the infrastructure prerequisites and appropriate storage configuration. However, the base virtual machine infrastructure configuration and setup is beyond the scope of this document. Customers are encouraged to refer to the FlexPod Datacenter with NetApp ONTAP 9.7, Cisco Intersight, and VMware vSphere 6.7 U3 the for step-by-step configuration procedures.
Hardware and Software Revisions
Table 1 lists the software versions for hardware and software components used in this solution. Each version used has been certified within interoperability matrixes supported by Cisco, NetApp, and VMware. For more information about supported versions, consult the following sources:
· Cisco UCS Hardware and Software Interoperability Tool
· NetApp Interoperability Matrix
Table 1 Hardware and Software Revisions
| Component |
Software |
|
| Network |
Cisco Nexus 9336C-FX2 |
7.0(3)I7(6) |
| Compute |
Cisco UCS Fabric Interconnect 6454 |
4.0(4g) |
|
|
Cisco UCS B-Series and C-Series M5 Servers |
4.0(4g) |
|
|
VMware ESXi |
6.7 U3 |
|
|
ESXi ENIC Driver |
1.0.29.0 |
|
|
VMware vCenter Appliance |
6.7 U3 |
| Storage |
NetApp ONTAP |
9.7 |
|
|
NetApp NFS Plugin for VMware VAAI |
1.1.2-3 |
|
|
NetApp Virtual Storage Console |
9.7 |
|
|
NetApp Trident |
20.04 |
| Software |
OpenShift Container Platform |
4.4.12 |
|
|
Red Hat Enterprise Linux CoreOS |
4.4.3 |
Required VLANs
Table 2 list various VLANs configured for setting up the FlexPod environment including their specific usage.
| VLAN ID |
Name |
Usage |
| 2 |
Native-VLAN |
Use VLAN 2 as Native VLAN instead of default VLAN (1) |
| 20 |
OOB-MGMT-VLAN |
Out of Band Management VLAN to connect the management ports for various devices |
| 120 |
IB-MGMT-VLAN |
In Band Management VLAN utilized for all the OCP components. This VLAN is also used for accessing NetApp SVMs for NFS volumes |
| 3100 |
vMotion |
VMware vMotion traffic |
| 3111 (Fabric A only) |
iSCSI-A |
iSCSI-A path for supporting boot-from-san for both Cisco UCS B-Series and Cisco UCS C-Series servers |
| 3121 (Fabric B only) |
iSCSI-B |
iSCSI-B path for supporting boot-from-san for both Cisco UCS B-Series and Cisco UCS C-Series servers |
| 3151 |
NFS-VLAN |
NFS VLAN for mounting ESXi datastores to host VMs |
Some of the key highlights of VLAN usage are as follows:
· VLAN 20 allows customers to manage and access out of band management interfaces of various devices.
· VLAN 120 is used for all the OCP infrastructure (DNS, DHCP, and so on) as well as OCP cluster VMs. This VLAN is also utilized for providing access to the dedicated NetApp Storage Virtual Machine (OCP-SVM) used by NetApp Trident for configuring persistent volumes.
· VLAN 3151 provides ESXi hosts access to the NFS datastores hosted on the NetApp Controllers for deploying VMs.
· A pair of iSCSI VLANs (3111 and 3121) are configured to provide access to boot LUNs for ESXi hosts. These VLANs are defined on individual Fabric Interconnects.
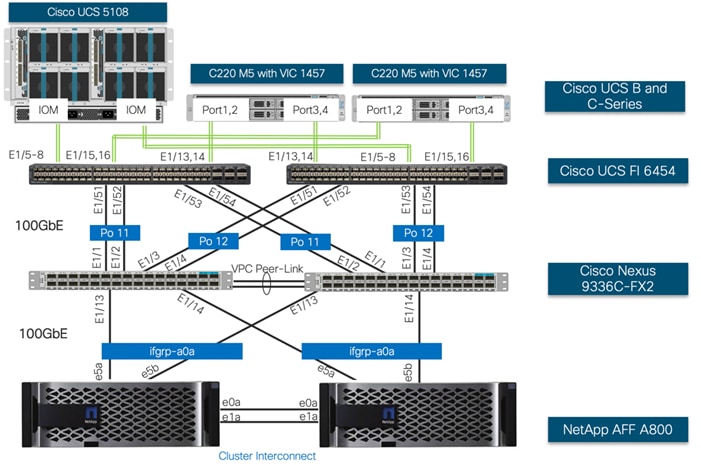
Physical Infrastructure
FlexPod Cabling
The information in this section is provided as a reference for cabling the physical equipment in a FlexPod environment. Customers can adjust the ports according to their individual setup. This document assumes that out-of-band management ports are plugged into an existing management infrastructure at the deployment sites. The interfaces shown in Figure 3 will be used in various configuration steps. Additional 1Gb management connections will be needed for an out-of-band network switch that sits apart from the FlexPod infrastructure. Each Cisco UCS fabric interconnect, Cisco Nexus switch and NetApp AFF controller is connected to the out-of-band network switch. Layer 3 network connectivity is required between the Out-of-Band (OOB) and In-Band (IB) Management Subnets.
VMware Infrastructure Design
In FlexPod Datacenter deployments, each Cisco UCS server (B-Series or C-Series), equipped with a Cisco Virtual Interface Card (VIC), is configured for multiple virtual interfaces (vNICs) which appear as standards-compliant PCIe endpoints to the OS. The service profile configuration for an ESXi host is shown in Figure 4.
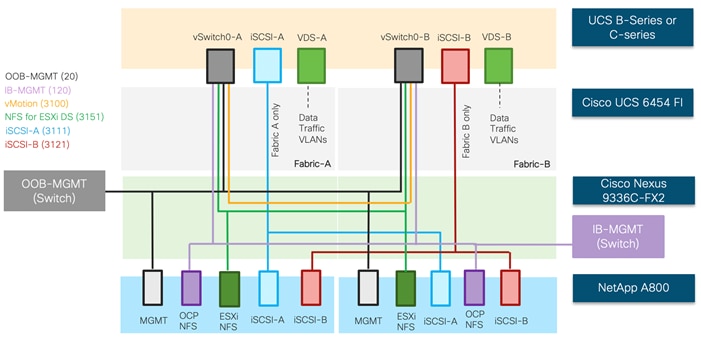
Each ESXi service profile supports:
· Managing the ESXi hosts using a common management segment
· Diskless SAN boot using iSCSI with persistent operating system installation for true stateless computing
· Six vNICs where:
- 2 redundant vNICs (vSwitch0-A and vSwitch0-B) carry out-of-band management, in-band management, and ESXi host NFS datastore VLANs. The MTU value for this interface is set as a Jumbo MTU (9000).
- 2 redundant vNICs (VDS-A and VDS-B) are used by the vSphere Distributed switch and carry VMware vMotion traffic and customer application data traffic. The MTU for these interfaces is set to Jumbo MTU (9000).
- 1 iSCSI-A vNIC utilizes iSCSI-A VLAN (defined only on Fabric A) to provide access to iSCSI-A path. The MTU value for this interface is set as a Jumbo MTU (9000).
- 1 iSCSI-B vNIC utilizes iSCSI-B VLAN (defined only on Fabric B) to provide access to iSCSI-B path. The MTU value for this interface is set as a Jumbo MTU (9000).
· Each ESXi host (blade) accesses NFS datastores hosted on NetApp A800 controllers to be used for deploying virtual machines.
· Each ESXi host provides access to the OCP image registry NFS volume using the in-band management network.
· Each ESXi host also provides access to a dedicated NetApp SVM utilized by NetApp Trident using in-band management VLAN.
Storage Design
To provide the necessary data segregation and management, two separate SVMs are configured for this design. These SVMs are as follows:
· Infra-SVM
- This SVM hosts:
§ ESXi boot LUNs
§ NFS datastores for vSphere environment
§ NFS volume for OCP image registry
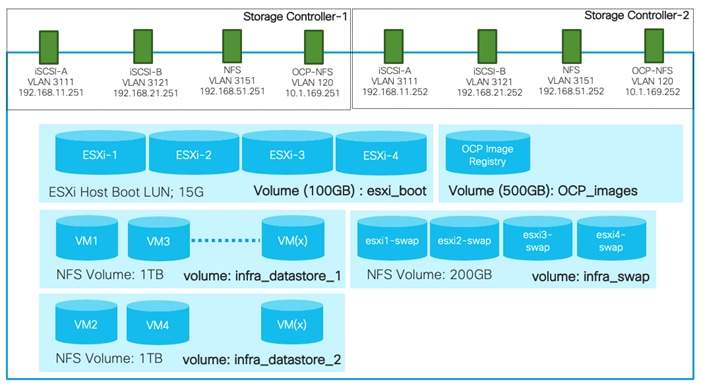
The volumes, VLANs, and Interface (LIFs) details are shown in Figure 5. The Infra-SVM setup is captured in the FlexPod Datacenter with NetApp ONTAP 9.7, Cisco Intersight, and VMware vSphere 6.7 U3. The setup for OCP Image Registry volume is covered in this deployment guide.
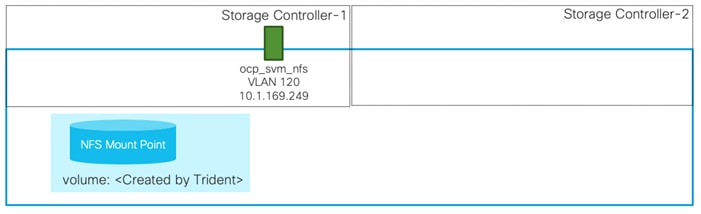
· OCP-SVM
This SVM is used by NetApp Trident to deploy persistent volumes for the container applications.
The persistent volumes are dynamically created by NetApp Trident as needed for the containers. The VLAN and Interface (LIF) details are shown in Figure 6. A single LIF is created in this instance to access the persistent storage volumes. Failover is enabled for this LIF to protect against controller failures.
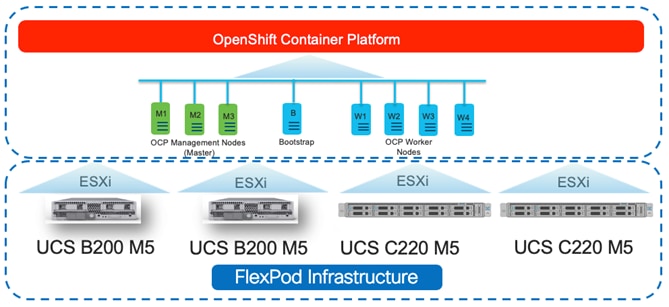
OpenShift Container Platform Design
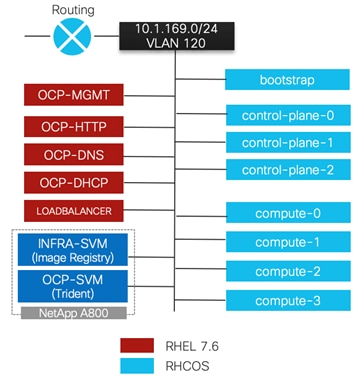
OCP 4.4 is deployed on the VMware infrastructure as a set of VMs. Three master nodes and four worker nodes are deployed in the validation environment and additional worker nodes can easily be added to increase the scalability of the solution. Figure 7 shows various VMs used for deploying and managing a Red Hat OCP cluster: The specific role and sizing guidelines for these VMs is explained in the next section.
The FlexPod Datacenter for OCP was built on a 4-node ESXi Cluster using two Cisco UCS B200 M5 and two Cisco UCS C220 M5 servers. A high-level overview of the VMs and their connectivity is covered in Figure 7:
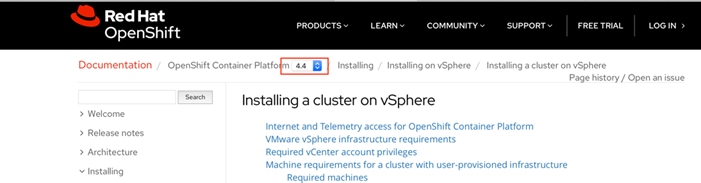
For detailed installation instruction, refer to:: https://docs.openshift.com/container-platform/4.4/welcome/index.html. Choose the correct version of the documentation by selecting the appropriate version of OCP being deployed from the drop-down list:
OpenShift Container Platform - Networking Configuration
OpenShift Container Platform Management Connectivity
Master nodes and Worker nodes have management connectivity using the in-band management VLAN (120) as shown in Figure 7. This VLAN is defined on vSwitch0 of all the ESXi hosts and customer routing and switching network provides network access to the Internet for downloading various packages during OCP installation. In the lab validation, the in-band management network was utilized to deploy all the VMs and associated services including access to storage. Customers can also choose to deploy the OCP VMs using an application data VLAN on the ESXi Virtual Distributed Switch (VDS).
All the Red Hat Enterprise Linux CoreOS (RHCOS) machines require network access during initial boot to fetch Ignition config files from the Machine Config Server. During the initial boot, the machines require either a DHCP server or that static IP addresses be set in order to establish a network connection to download their Ignition config files.
While installing all the prerequisites needed to deploy the OpenShift Container Platform configuration, all the nodes in this deployment require Internet access to complete the following actions:
· Download the installation program
· Obtain the packages required to install and update the cluster
· Perform subscription management
The in-band management subnet is configured for Internet access and a DHCP server is deployed to provide IP addresses to the OCP VMs. A DNS server with appropriate DNS records is also deployed in the same subnet. Details of DHCP and DNS servers is provided in the upcoming sections.
OpenShift Container Platform Storage Connectivity
The OpenShift Container Platform virtual machines require access to the NetApp storage system for the following two types of storage configurations:
· An NFS volume to host Image Registry in the Infra-SVM.
· Management and data (NFS) access to a dedicated SVM (OCP-SVM) for NetApp Trident. NetApp Trident accesses the NetApp A800 controller and provisions the persistent volumes in the OCP-SVM as needed for various applications.
As shown in Figure 7, this connectivity is achieved by defining data and management LIFs in the in-band management subnet over VLAN 120. All the VMs and Trident then have direct access to NFS mount points and NetApp Trident can access the A800 Management interface for persistent volume configurations.
OpenShift Container Platform – Installation Requirements
The FlexPod Datacenter for OCP utilizes user-provisioned infrastructure (UPI) cluster configuration for OCP installation therefore when provisioning and managing the FlexPod DC infrastructure, you must provide all of the supporting cluster infrastructure and resources, including the bootstrap machine, networking, load balancing, storage, and individual cluster machines.
The following supporting cluster resources are required for the UPI installation:
· The control plane and compute machines that make up the cluster
· Load balancer(s)
· Cluster networking, including the DNS records and required subnets
· Storage for the cluster infrastructure and applications
![]() For the user-provisioned infrastructure, RHEL based worker virtual machines can also be deployed however for this validation, RHCOS was used for both the control and worker VMs.
For the user-provisioned infrastructure, RHEL based worker virtual machines can also be deployed however for this validation, RHCOS was used for both the control and worker VMs.
Infrastructure Virtual Machines
The following infrastructure service VMs were deployed to support the OCP cluster:
· 1 DNS server (RHEL 7.6)
· 1 HA Proxy Load Balancer (RHEL 7.6)
· 1 Web/HTTP Server (RHEL 7.6)
· 1 DHCP Server (RHEL 7.6)
· 1 Management VM (RHEL 7.6) to setup and manage OCP environment.
The deployment details for these VMs are listed in Table 3.
Table 3 Infrastructure services VM Details
| Machine |
OS |
vCPU |
RAM (GB) |
Storage (GB) |
Comment |
| DNS |
RHEL 7.6* |
2 |
8 |
100 |
DNS servers for the lab validation |
| DHCP |
RHEL 7.6* |
2 |
4 |
100 |
DHCP server for the lab validation |
| HTTP |
RHEL 7.6* |
2 |
4 |
100 |
Apache Server on RHEL |
| MGMT |
RHEL 7.6* |
2 |
8 |
100 |
This node is used to deploy and manage OCP. Various packages including terraform are installed |
| HA Proxy |
RHEL 7.6* |
2 |
16 |
100 |
Single Load Balancer instance for the lab validation |
![]() The virtual machines sizes listed above are for lab deployment only. Customers should size their VMs according to their individual requirements.
The virtual machines sizes listed above are for lab deployment only. Customers should size their VMs according to their individual requirements.
![]() * While RHEL 7.6 was utilized during this validation, customers can use the latest RHEL versions for their specific deployments. Most of these services should already be deployed in the customer environments.
* While RHEL 7.6 was utilized during this validation, customers can use the latest RHEL versions for their specific deployments. Most of these services should already be deployed in the customer environments.
OpenShift Container Platform Virtual Machines
The following OCP Virtual Machines were set up by the terraform scripts for the cluster deployment:
· 1 Bootstrap VM (Red Hat Enterprise Linux CoreOS - RHCOS)
· 3 Control Plane VMs (RHCOS)
· 4 Compute Node VMs (RHCOS)
The bootstrap virtual machines can be safely deleted once the OCP cluster is installed. These virtual machines are deployed using a VMware OVA therefore the resources required are automatically set by the OVA and the OCP installer. Table 4 lists the number of virtual machines and their specifications as deployed in this validation.
| Machine |
Number of Nodes |
OS |
vCPU |
RAM (GB) |
Storage (GB) |
Comment |
| Bootstrap |
1 |
RHCOS |
4 |
16 |
60 |
Bootstrap node |
| Control plane |
3 |
RHCOS |
4 |
16 |
60 |
Control plane/Master nodes |
| Compute |
4 |
RHCOS |
4 |
8 |
60 |
Compute/Worker nodes |
Virtual Machine Hostnames and IP addresses
Table 5 shows the hostnames and IP addresses of all the virtual machines used in this deployment guide. These hostnames and IP addresses will be used throughout this document. Customers should plan all the hostnames and IP addresses before initiating the installation process.
Table 5 Virtual Machine Information
| Hostname |
IP address |
Description |
| ocp-mgmt |
10.1.169.5 |
Management host used for setting up OCP |
| ocp-dns |
10.1.162.10 |
DNS server |
| ocp-dhcp |
10.1.162.253 |
DHCP Server |
| ocp-http |
10.1.162.9 |
Web server to host config file(s) |
| loadbalancer |
10.1.162.100 |
Load-Balancer (HA-Proxy) |
| control-plane-0 |
10.1.169.11 |
Master Node |
| control-plane-1 |
10.1.169.12 |
Master Node |
| control-plane-2 |
10.1.169.13 |
Master Node |
| compute-0 |
10.1.169.21 |
Compute Node |
| compute-1 |
10.1.169.22 |
Compute Node |
| compute-2 |
10.1.169.23 |
Compute Node |
| compute-3 |
10.1.169.24 |
Compute Node |
OpenShift Container Platform – Infrastructure Setup
This section describes the setting up the user provisioned infrastructure services for deploying RedHat OCP. The following steps need to be completed for setting up the infrastructure:
1. Configure DNS
2. Configure DHCP
3. Configure Web Server
4. Configure Load Balancer
5. Prepare the management host by installing Terraform and other software dependencies
All the infrastructure nodes are configured as virtual machines on the FlexPod Infrastructure. The ocp-mgmt virtual machine is the management host used to run the openshift-installer program and to host the terraform platform for automating the installation.
OpenShift Container Platform requires a fully functional DNS server in the environment. A set of records must be configured in the DNS to provide name resolution for hosts and containers running on the platform.
The required bootstrap Ignition configuration files and the raw installation images were hosted on a locally configured web server (ocp-http) used as the Machine Config Server.
The following domain and OCP cluster names are used in this deployment guide:
· Base Domain: ocp.local
· OCP Cluster Name: rtp
Deploy Infrastructure Virtual Machines in VMware
Log into the VMware vCenter and deploy 5 infrastructure virtual machines as shown in Table 3. Make sure all the virtual machines are added to the in-band network. Install the RHEL 7.6 operating system on all the VMs and assign them an IP address and hostname. The host names and IP addresses for these VMs can be obtained from Table 5.
Install and Configure the DNS Server
In this deployment, a RHEL 7.6 based virtual machine was used to setup and configure a DNS server. To install and configure the DNS server, follow these steps:
1. Log into the DNS Linux VM as root and make sure subscription manager is up to date:
[root@OCP-DNS ~]# subscription-manager attach –auto
2. Install bind and bind-utils:
[root@OCP-DNS ~]# yum install bind bind-utils
3. Update the /etc/named.conf as well as the forward and reverse zone configuration files in /var/named. The DNS needs to be updated with the following values:
| Name |
Record |
Destination |
Notes |
| Kubernetes API |
api.<cluster_name>.<base_name>. |
OpenShift Admin Load Balancer |
Must be resolvable by all external clients and cluster nodes |
| Kubernetes Internal |
api-int.<cluster_name>.<base_name>. |
OpenShift Admin Load Balancer |
Must be resolvable by all cluster nodes |
| Application Routes |
*.apps. <cluster_name>.<base_name>. |
OpenShift Application Ingress |
Must be resolvable by all external clients and cluster nodes |
| Master nodes |
etcd-<index>.<cluster_name>.<base_name>. |
Master nodes |
Must be resolvable by all cluster nodes |
| SSL Server |
_etcd-server-ssl._tcp. <cluster_name>.<base_name>. |
Master nodes |
Refer below. |
In Table 6, the following variables are used:
· <index> - the number of the master node. Starting at 0. For example, the first master node would be etcd-0.
· <cluster_name> - the domain name used for the cluster (rtp).
· <base_name> - the base domain name for the intranet (ocp.local).
![]() The complete files used in the lab configuration are included in the Appendix-DNS Configuration Files for your reference. When creating the forward and reverse zone files, verify the file permissions are set correctly.
The complete files used in the lab configuration are included in the Appendix-DNS Configuration Files for your reference. When creating the forward and reverse zone files, verify the file permissions are set correctly.
4. Make sure the DNS requests are allowed through the firewall:
[root@OCP-DNS ~]# firewall-cmd --permanent --add-port=53/udp
[root@OCP-DNS ~]# firewall-cmd reload
5. Alternately, the firewall services can be stopped and disabled:
[root@OCP-DNS ~]# systemctl stop firewalld
[root@OCP-DNS ~]# systemctl disable firewalld
6. Start the named services:
[root@OCP-DNS ~]# systemctl enable named
Created symlink from /etc/systemd/system/multi-user.target.wants/named.service to /usr/lib/systemd/system/named.service.
[root@OCP-DNS ~]# systemctl start named
[root@OCP-DNS ~]#
7. You may need to restart the VM for these changes to take effect.
For detailed configuration steps, please refer to: https://access.redhat.com/documentation/en-us/red_hat_enterprise_linux/7/html/networking_guide/sec-bind
Install and Configure the DHCP Server
Dynamic IP address allocation is required during the creation of cluster nodes by Terraform to access the ignition files. In this deployment, a RHEL 7.6 based VM was used to setup and configure a DHCP server. To install and configure the DHCP server, follow these steps:
1. Log into the DHCP Linux VM as root and install dhcp:
[root@OCP-DHCP ~]# yum install dhcp
2. Configure the DHCP server by updating the IP subnet and various parameters in the configuration file /etc/dhcp/dhcpd.conf.
![]() The complete file used in the lab configuration are included in the Appendix-DHCP Configuration File for your reference.
The complete file used in the lab configuration are included in the Appendix-DHCP Configuration File for your reference.
3. Make sure the DHCP requests are allowed through the firewall:
[root@OCP-DHCP ~]# firewall-cmd --permanent --add-service=dhcp
[root@OCP-DHCP ~]# firewall-cmd reload
Alternately, the firewall services can be stopped and disabled:
[root@OCP-DHCP ~]# systemctl stop firewalld
[root@OCP-DHCP ~]# systemctl disable firewalld
4. Enable and start or restart the dhcpd service:
[root@OCP-DHCP ~]# systemctl enable dhcpd
[root@OCP-DHCP ~]# systemctl start dhcpd
Install and Configure Web Server
In this deployment, a RHEL 7.6 based virtual machine was used to setup and configure a web server. No specific configuration is required for the OCP installation other than creating a directory to hold the ignition files. To install and configure the Apache web server, follow these steps:
1. Log into the DHCP Linux VM as root and install httpd:
[root@ocp-http ~]# yum install httpd
2. Update the configuration file /etc/httpd/conf/httpd.conf as listed in “Appendix: Web Server config File”.
3. Add the following firewall rules to allow clients connection to HTTP server:
[root@ocp-http ~]# firewall-cmd --zone=public --permanent --add-service=http
[root@ocp-http ~]# firewall-cmd –reload
![]() The default web server port has been changed to 8080 during this validation. Refer to the httpd.conf file in Appendix for implementation details.
The default web server port has been changed to 8080 during this validation. Refer to the httpd.conf file in Appendix for implementation details.
[root@ocp-http ~]# firewall-cmd --zone=public --permanent --add-port 8080/tcp
4. Alternately, the firewall services can be stopped and disabled:
[root@ocp-http ~]# systemctl stop firewalld
[root@ocp-http ~]# systemctl disable firewalld
5. Start or restart the web server and enable the httpd service:
[root@ocp-http ~]# systemctl restart httpd
[root@ocp-http ~]# systemctl enable httpd
Install and Configure Load Balancer
In this lab deployment, a RHEL 7.6 based VM was used to setup and configure as an external load balancer. Customers can configure an existing load-balancer if the service already exists. To install and configure the haproxy server, follow these steps:
1. Log into the loadbalancer Linux VM as root and install haproxy:
[root@loadbalancer ~]# yum install haproxy
2. Update the configuration files /etc/haproxy/haproxy.cfg with the following information:
| Description |
Incoming Port |
Mode |
Destination |
Dest. Port |
Balance |
| OpenShift Admin |
6443 |
TCP |
Master Nodes |
6443 |
Source |
| OpenShift Installation (Removed once built) |
22623 |
TCP |
Bootstrap and Master Nodes |
22623 |
Source |
| OpenShift Application Ingress |
80 |
TCP |
Worker Nodes |
80 |
Source |
| 443 |
TCP |
Worker Nodes |
443 |
Source |
![]() The complete file used in the lab configuration is included in the Appendix – Load Balancer Configuration File for your reference.
The complete file used in the lab configuration is included in the Appendix – Load Balancer Configuration File for your reference.
3. Add the following firewall rules to allow client connections to HAProxy server:
[root@loadbalancer ~] firewall-cmd --permanent --add-service=haproxy
[root@loadbalancer ~] firewall-cmd --reload
4. Alternately, the firewall services can be stopped and disabled:
[root@loadbalancer ~]# systemctl stop firewalld
[root@loadbalancer ~]# systemctl disable firewalld
5. Start or restart the haproxy service:
[root@loadbalancer ~]# systemctl restart haproxy
[root@loadbalancer ~]# systemctl enable haproxy
![]() If the haproxy service does not start and SELinux is enabled, run the following command to allow haproxy to bind to non-standard ports: setsebool -P haproxy_connect_any on
If the haproxy service does not start and SELinux is enabled, run the following command to allow haproxy to bind to non-standard ports: setsebool -P haproxy_connect_any on
Verify Infrastructure Services
The status of all the infrastructure services can be verified using the commands below. Verify that all the services are up and running before proceeding with the OpenShift Container Platform installation.
[root@OCP-DNS named]# systemctl status named
● named.service - Berkeley Internet Name Domain (DNS)
Loaded: loaded (/usr/lib/systemd/system/named.service; enabled; vendor preset: disabled)
Active: active (running) since Fri 2020-05-08 15:29:30 EDT; 2 months 1 days ago
Process: 21991 ExecReload=/bin/sh -c /usr/sbin/rndc reload > /dev/null 2>&1 || /bin/kill -HUP $MAINPID (code=exited, status=0/SUCCESS)
Process: 6079 ExecStart=/usr/sbin/named -u named -c ${NAMEDCONF} $OPTIONS (code=exited, status=0/SUCCESS)
Process: 6059 ExecStartPre=/bin/bash -c if [ ! "$DISABLE_ZONE_CHECKING" == "yes" ]; then /usr/sbin/named-checkconf -z "$NAMEDCONF"; else echo "Checking of zone files is disabled"; fi (code=exited, status=0/SUCCESS)
Main PID: 6088 (named)
CGroup: /system.slice/named.service
└─6088 /usr/sbin/named -u named -c /etc/named.conf
Jul 09 15:33:37 OCP-DNS.ocp.local named[6088]: resolver priming query complete
Jul 09 15:34:35 OCP-DNS.ocp.local named[6088]: resolver priming query complete
Jul 09 15:35:19 OCP-DNS.ocp.local named[6088]: resolver priming query complete
Jul 09 15:36:00 OCP-DNS.ocp.local named[6088]: resolver priming query complete
Jul 09 15:36:29 OCP-DNS.ocp.local named[6088]: resolver priming query complete
Jul 09 15:37:58 OCP-DNS.ocp.local named[6088]: resolver priming query complete
Jul 09 15:38:17 OCP-DNS.ocp.local named[6088]: resolver priming query complete
Jul 09 15:38:38 OCP-DNS.ocp.local named[6088]: resolver priming query complete
Jul 09 15:39:13 OCP-DNS.ocp.local named[6088]: resolver priming query complete
Jul 09 15:40:09 OCP-DNS.ocp.local named[6088]: resolver priming query complete
---------------------------------------------------------------------------------------------------------
[root@OCP-DHCP ~]# systemctl status dhcpd
● dhcpd.service - DHCPv4 Server Daemon
Loaded: loaded (/usr/lib/systemd/system/dhcpd.service; enabled; vendor preset: disabled)
Active: active (running) since Wed 2020-05-13 17:38:00 EDT; 1 months 26 days ago
Docs: man:dhcpd(8)
man:dhcpd.conf(5)
Main PID: 10311 (dhcpd)
Status: "Dispatching packets..."
CGroup: /system.slice/dhcpd.service
└─10311 /usr/sbin/dhcpd -f -cf /etc/dhcp/dhcpd.conf -user dhcpd -group dhcpd --no-pid
Jul 09 07:05:49 OCP-DHCP dhcpd[10311]: DHCPACK on 10.1.169.108 to 00:50:56:a0:c3:7f (OCP-Jump) via ens192
Jul 09 08:55:31 OCP-DHCP dhcpd[10311]: Wrote 8 leases to leases file.
Jul 09 08:55:31 OCP-DHCP dhcpd[10311]: DHCPREQUEST for 10.1.169.109 from 00:50:56:a0:f2:bd (Al-Jump) via ens192
Jul 09 08:55:31 OCP-DHCP dhcpd[10311]: DHCPACK on 10.1.169.109 to 00:50:56:a0:f2:bd (Al-Jump) via ens192
Jul 09 13:05:49 OCP-DHCP dhcpd[10311]: Wrote 8 leases to leases file.
Jul 09 13:05:49 OCP-DHCP dhcpd[10311]: DHCPREQUEST for 10.1.169.108 from 00:50:56:a0:c3:7f (OCP-Jump) via ens192
Jul 09 13:05:49 OCP-DHCP dhcpd[10311]: DHCPACK on 10.1.169.108 to 00:50:56:a0:c3:7f (OCP-Jump) via ens192
Jul 09 14:55:33 OCP-DHCP dhcpd[10311]: Wrote 8 leases to leases file.
Jul 09 14:55:33 OCP-DHCP dhcpd[10311]: DHCPREQUEST for 10.1.169.109 from 00:50:56:a0:f2:bd (Al-Jump) via ens192
Jul 09 14:55:33 OCP-DHCP dhcpd[10311]: DHCPACK on 10.1.169.109 to 00:50:56:a0:f2:bd (Al-Jump) via ens192
---------------------------------------------------------------------------------------------------------
[root@ocp-http ~]# systemctl status httpd
● httpd.service - The Apache HTTP Server
Loaded: loaded (/usr/lib/systemd/system/httpd.service; enabled; vendor preset: disabled)
Active: active (running) since Fri 2020-05-08 16:17:12 EDT; 2 months 1 days ago
Docs: man:httpd(8)
man:apachectl(8)
Process: 4181 ExecReload=/usr/sbin/httpd $OPTIONS -k graceful (code=exited, status=0/SUCCESS)
Main PID: 5930 (httpd)
Status: "Total requests: 0; Current requests/sec: 0; Current traffic: 0 B/sec"
CGroup: /system.slice/httpd.service
├─4182 /usr/sbin/httpd -DFOREGROUND
├─4183 /usr/sbin/httpd -DFOREGROUND
├─4184 /usr/sbin/httpd -DFOREGROUND
├─4185 /usr/sbin/httpd -DFOREGROUND
├─4186 /usr/sbin/httpd -DFOREGROUND
└─5930 /usr/sbin/httpd -DFOREGROUND
Jun 07 03:31:01 ocp-http systemd[1]: Reloading The Apache HTTP Server.
Jun 07 03:31:01 ocp-http systemd[1]: Reloaded The Apache HTTP Server.
Jun 14 03:47:01 ocp-http systemd[1]: Reloading The Apache HTTP Server.
Jun 14 03:47:01 ocp-http systemd[1]: Reloaded The Apache HTTP Server.
Jun 21 03:20:01 ocp-http systemd[1]: Reloading The Apache HTTP Server.
Jun 21 03:20:01 ocp-http systemd[1]: Reloaded The Apache HTTP Server.
Jun 28 03:31:01 ocp-http systemd[1]: Reloading The Apache HTTP Server.
Jun 28 03:31:01 ocp-http systemd[1]: Reloaded The Apache HTTP Server.
Jul 05 03:32:01 ocp-http systemd[1]: Reloading The Apache HTTP Server.
Jul 05 03:32:01 ocp-http systemd[1]: Reloaded The Apache HTTP Server.
---------------------------------------------------------------------------------------------------------
[root@loadbalancer ~]# systemctl status haproxy
● haproxy.service - HAProxy Load Balancer
Loaded: loaded (/usr/lib/systemd/system/haproxy.service; enabled; vendor preset: disabled)
Active: active (running) since Wed 2020-05-13 11:13:48 EDT; 1 months 26 days ago
Main PID: 9733 (haproxy-systemd)
CGroup: /system.slice/haproxy.service
├─9733 /usr/sbin/haproxy-systemd-wrapper -f /etc/haproxy/haproxy.cfg -p /run/haproxy.pid
├─9734 /usr/sbin/haproxy -f /etc/haproxy/haproxy.cfg -p /run/haproxy.pid -Ds
└─9735 /usr/sbin/haproxy -f /etc/haproxy/haproxy.cfg -p /run/haproxy.pid -Ds
May 13 11:13:48 loadbalancer systemd[1]: Stopped HAProxy Load Balancer.
May 13 11:13:48 loadbalancer systemd[1]: Started HAProxy Load Balancer.
May 13 11:13:48 loadbalancer haproxy-systemd-wrapper[9733]: haproxy-systemd-wrapper: executing /usr/sbin/hapr...-Ds
Hint: Some lines were ellipsized, use -l to show in full.
[root@loadbalancer ~]# netstat -ltnp
Active Internet connections (only servers)
Proto Recv-Q Send-Q Local Address Foreign Address State PID/Program name
tcp 0 0 0.0.0.0:6443 0.0.0.0:* LISTEN 6991/haproxy
tcp 0 0 0.0.0.0:80 0.0.0.0:* LISTEN 6991/haproxy
tcp 0 0 0.0.0.0:22 0.0.0.0:* LISTEN 6311/sshd
tcp 0 0 0.0.0.0:443 0.0.0.0:* LISTEN 6991/haproxy
tcp 0 0 0.0.0.0:22623 0.0.0.0:* LISTEN 6991/haproxy
tcp6 0 0 :::22 :::* LISTEN 6311/sshd
Set Up the Management Host
In the following section, the installation steps are performed on the management VM (ocp-mgmt) to prepare the VM for OCP installation.
Install Terraform
Terraform is an Infrastructure as Code tool developed by HashiCorp for building, changing, and versioning infrastructure safely and efficiently. In this deployment, Terraform is used to fully automate the VM provisioning of the OCP cluster nodes.
![]() The installer github template was developed with Terraform version 11 therefore the appropriate version of Terraform was installed on the management host.
The installer github template was developed with Terraform version 11 therefore the appropriate version of Terraform was installed on the management host.
Terraform consists of following components:
· Configuration files(.tf). Terraform uses its own configuration language, designed to allow concise descriptions of infrastructure. The Terraform language is declarative, describing an intended goal rather than the steps to reach that goal.
· The Terraform binary (executable) file, which is written and compiled in the GO language. To install Terraform, find the appropriate package for your system and download it from: https://releases.hashicorp.com/terraform/0.11.14/
· Terraform state file (.tfstate), a JSON file with running configuration.
To install Terraform, run the following commands on the management host:
[root@OCP-MGMT ~]# mkdir terraform
[root@OCP-MGMT ~]# export TERRAFORM_VERSION=0.11.14
[root@OCP-MGMT ~]# cd terraform/
[root@OCP-MGMT terraform]# wget https://releases.hashicorp.com/terraform/${TERRAFORM_VERSION}/terraform_${TERRAFORM_VERSION}_linux_amd64.zip
https://releases.hashicorp.com/terraform/0.11.14/terraform_0.11.14_linux_amd64.zip
Resolving releases.hashicorp.com (releases.hashicorp.com)... 151.101.1.183, 151.101.65.183, 151.101.129.183, ...
Connecting to releases.hashicorp.com (releases.hashicorp.com)|151.101.1.183|:443... connected.
HTTP request sent, awaiting response... 200 OK
Length: 12569267 (12M) [application/zip]
Saving to: ‘terraform_0.11.14_linux_amd64.zip’
100%[=====================================================>] 12,569,267 40.5MB/s in 0.3s
2020-05-08 18:04:05 (40.5 MB/s) - ‘terraform_0.11.14_linux_amd64.zip’ saved [12569267/12569267]
[root@OCP-MGMT terraform]# unzip terraform_${TERRAFORM_VERSION}_linux_amd64.zip -d ~/bin/
Archive: terraform_0.11.14_linux_amd64.zip
inflating: /root/bin/terraform
[root@OCP-MGMT terraform]# terraform -v
Terraform v0.11.14
Your version of Terraform is out of date! The latest version
is 0.12.24. You can update by downloading from www.terraform.io/downloads.html
Generate an SSH Private Key and Add it to the Agent
In order to perform installation debugging, or disaster recovery on the OpenShift cluster, an SSH key must be added to both ssh-agent and to the installation program. This key can be used to SSH into the cluster nodes as the user core since during cluster deployment, the key is added to the core user’s ~/.ssh/authorized_keys list and enables password-less access between the cluster nodes.
To generate the SSH key for password-less authentication, on the management host, follow these steps:
1. Run the following command and specify the path and file name:
[root@OCP-MGMT ~]# ssh-keygen -t rsa -b 4096 -N '' -f ~/.ssh/id_rsa
Generating public/private rsa key pair.
Your identification has been saved in /root/.ssh/id_rsa.
Your public key has been saved in /root/.ssh/id_rsa.pub.
The key fingerprint is:
SHA256:W60YYTG1EQD/6yDOZ8lfKF0cJQqXFq0ZYQlntIxs3pE root@OCP-MGMT.rtp.ocp.local
The key's randomart image is:
+---[RSA 4096]----+
| ..*=%B. . |
| o @=*.o |
| B.E+. |
| + +o+ . |
| S + + |
| * = |
| ..=.= . |
| o .=+ . |
| oo .o |
+----[SHA256]-----+
2. Running the above command generates an SSH key that does not require a password when connecting to the cluster VMs from the management host ocp-mgmt.
3. Start the ssh-agent process as a background task:
[root@OCP-MGMT ~]# eval "$(ssh-agent -s)"
Agent pid 7758
4. Specify the path and file name for your SSH private key, such as ~/.ssh/id_rsa
[root@OCP-MGMT ~]# ssh-add ~/.ssh/id_rsa
Identity added: /root/.ssh/id_rsa (/root/.ssh/id_rsa)
![]() During OpenShift Container Platform installation, the SSH public key needs to be provided to the installation program. Since we are installing the cluster on user provided infrastructure, the key we just generated will be provided to the cluster machines.
During OpenShift Container Platform installation, the SSH public key needs to be provided to the installation program. Since we are installing the cluster on user provided infrastructure, the key we just generated will be provided to the cluster machines.
OpenShift Container Platform – Installation
Obtain the Installation Programs
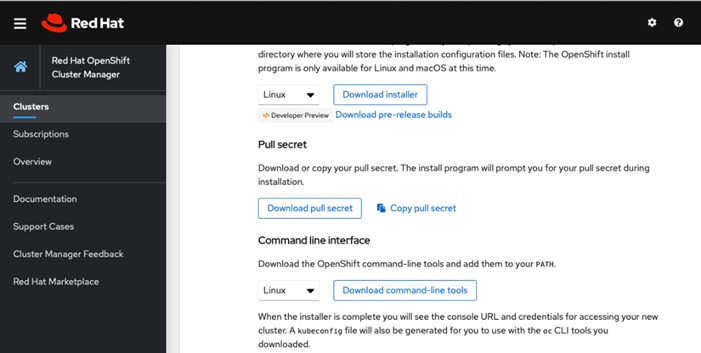
To download the OCP 4.4 installation files on the management host, access the URLs listed below and download the appropriate packages.
![]() All the files listed below can be downloaded from the portal page: https://cloud.redhat.com/openshift/install/vsphere/user-provisioned, however these files install the latest version of OCP (4.5 currently). To download an older OCP (4.4) release, you need to access the URLs listed below. The stable release for 4.4 keeps getting updated and its recommended to use the latest stable release. At the time of validation, the latest stable release was 4.4.12.
All the files listed below can be downloaded from the portal page: https://cloud.redhat.com/openshift/install/vsphere/user-provisioned, however these files install the latest version of OCP (4.5 currently). To download an older OCP (4.4) release, you need to access the URLs listed below. The stable release for 4.4 keeps getting updated and its recommended to use the latest stable release. At the time of validation, the latest stable release was 4.4.12.
1. On the management host (OCP-MGMT), create a directory to host all the install files (/root/install_files)
2. Access the following URL: https://cloud.redhat.com/openshift/install/vsphere/user-provisioned, log in with RedHat user ID and download the Pull Secret file by saving it in the txt format.
pull-secret.txt
3. Access the following URL to download the RHCOS for VMware: https://mirror.openshift.com/pub/openshift-v4/dependencies/rhcos/4.4/latest/. Download the OVA on the management host which can access the vCenter and upload the OVA for virtual machine template creation.
rhcos-4.4.3-x86_64-vmware.x86_64.ova
4. Access the following URL: https://mirror.openshift.com/pub/openshift-v4/clients/ocp/stable-4.4/ to download the OpenShift install and client programs:
openshift-install-linux-4.4.12.tar.gz
openshift-client-linux-4.4.12.tar.gz
![]() The current most stable version of OCP is 4.4.12. This version is frequently updated by RedHat.
The current most stable version of OCP is 4.4.12. This version is frequently updated by RedHat.
5. Extract the installation program at the location of your choice (/root/install_files):
[root@OCP-MGMT install_files]# tar xvf openshift-install-linux-4.4.12.tar.gz
README.md
openshift-install
[root@OCP-MGMT install_files]#
[root@OCP-MGMT install_files]# ls -l
total 1408884
-rw-r--r-- 1 root root 25285926 Jul 6 01:52 openshift-client-linux-4.4.12.tar.gz
-rwxr-xr-x 1 root root 354095104 Jul 6 01:56 openshift-install
-rw-r--r-- 1 root root 83895994 Jul 6 01:56 openshift-install-linux-4.4.12.tar.gz
-rw-r--r-- 1 root root 2723 Jul 23 08:24 pull-secret.txt
-rw-r--r-- 1 root root 706 Jul 6 01:56 README.md
[root@OCP-MGMT install_files]#
![]() The installation program creates several files on the management host that are required to install the cluster. You need to keep both the installation program and the files that the installation program creates after we finish installing the cluster.
The installation program creates several files on the management host that are required to install the cluster. You need to keep both the installation program and the files that the installation program creates after we finish installing the cluster.
Create the Installation Configuration File
For installations of OpenShift Container Platform that uses user-provisioned infrastructure, an installation configuration file must be added. Follow these steps to create an installation configuration file:
1. Create an installation directory on the management host to store the installation assets:
root@OCP-MGMT install_files]# mkdir ocp44
![]() Some installation assets, like bootstrap X.509 certificates have short expiration intervals therefore the installation directory (ocp44 in this example) cannot be reused. If you want to reuse the files you are creating, copy them into a different (new) directory. Since the file names for the installation assets might change between releases, use caution when copying installation files from an earlier OpenShift Container Platform version.
Some installation assets, like bootstrap X.509 certificates have short expiration intervals therefore the installation directory (ocp44 in this example) cannot be reused. If you want to reuse the files you are creating, copy them into a different (new) directory. Since the file names for the installation assets might change between releases, use caution when copying installation files from an earlier OpenShift Container Platform version.
2. Manually create an installation configuration file and name this file install-config.yaml:
[root@OCP-MGMT ocp44]# touch install-config.yaml
3. For the details of the install-config.yaml file, go to: https://docs.openshift.com/container-platform/4.4/installing/installing_vsphere/installing-vsphere.html#installation-vsphere-config-yaml_installing-vsphere. The following input is required to create the file:
· base domain
· OCP cluster id
· OCP pull secret
· ssh public key (~/.ssh/id_rsa.pub)
· vCenter host
· vCenter user
· vCenter password
· vCenter datacenter
· vCenter datastore
A sample install-config.yaml file is provided below.
Sample install-config.yaml file for VMware vSphere
Customize the install-config.yaml file below to match your installation requirements:
[root@OCP-MGMT ocp44]# more install-config.yaml
apiVersion: v1
baseDomain: ocp.local
compute:
- hyperthreading: Enabled
name: worker
replicas: 0
controlPlane:
hyperthreading: Enabled
name: master
replicas: 3
metadata:
name: rtp
platform:
vsphere:
vcenter: 192.168.169.100
username: administrator@vsphere.local
password: <password>
datacenter: FlexPod-DC
defaultDatastore: infra_datastore_1
fips: <false>
pullSecret:'{"auths":{"cloud.openshift.com <SNIP> }'
sshKey: 'ssh-rsa <SNIP> == root@OCP-MGMT.rtp.ocp.local'
The sample file and the explanation of all the parameters are covered here: https://docs.openshift.com/container-platform/4.4/installing/installing_vsphere/installing-vsphere.html#installation-vsphere-config-yaml_installing-vsphere.
![]() Use extreme caution when adding the pull secret and rsa keys to the file to make sure there are no unnecessary line breaks. The installation will fail if the installer cannot read these strings correctly.
Use extreme caution when adding the pull secret and rsa keys to the file to make sure there are no unnecessary line breaks. The installation will fail if the installer cannot read these strings correctly.
Back up the install-config.yaml file so that it can be used to install multiple clusters (if required). The install-config.yaml file gets deleted at the end of installation. The file can be backed up using the following command.
[root@OCP-MGMT ocp44]# cp install-config.yaml install-config.`date '+%s'`.bak
[root@OCP-MGMT ocp44]# ls
install-config.1589318105.bak install-config.yaml
Create the Ignition Configuration Files
The previously downloaded OpenShift installer is used to create the Ignition configuration files. The installer expects the YAML formatted configuration file created in the last step to generate the cluster configuration information. To modify cluster definition files and to manually start the cluster machines, Kubernetes manifest and ignition config files are generated.
To create the ignition configuration files, follow these steps:
1. Generate the Kubernetes manifests for the cluster which defines the objects bootstrap nodes will have to create initially:
[root@OCP-MGMT install_files]# ./openshift-install create manifests --dir=./ocp44
INFO Consuming Install Config from target directory
WARNING Making control-plane schedulable by setting MastersSchedulable to true for Scheduler cluster settings
The installation directory in the command above (ocp44) contains the install-config.yaml. The warning can safely be ignored because compute machines are created later in the installation process.
![]() The Ignition config files that the installation program generates contain certificates that expire after 24 hours. You must complete your cluster installation and keep the cluster running for 24 hours in a non-degraded state to ensure that the first certificate rotation has finished.
The Ignition config files that the installation program generates contain certificates that expire after 24 hours. You must complete your cluster installation and keep the cluster running for 24 hours in a non-degraded state to ensure that the first certificate rotation has finished.
2. Modify the manifests/cluster-scheduler-02-config.yml Kubernetes manifest file to prevent Pods from being scheduled on the control plane machines:
a. Open the manifests/cluster-scheduler-02-config.yml file.
b. Locate the “masters Schedulable” parameter and set its value to “False”.
c. Save and exit the file.
[root@OCP-MGMT ocp44]# more manifests/cluster-scheduler-02-config.yml
apiVersion: config.openshift.io/v1
kind: Scheduler
metadata:
creationTimestamp: null
name: cluster
spec:
mastersSchedulable: False
policy:
name: ""
status: {}
3. Create the Ignition config files. Ignition is the utility that is used by RHCOS to manipulate disks during initial configuration. It completes common disk tasks, including partitioning disks, formatting partitions, writing files, and configuring users. On first boot, Ignition reads its configuration from the installation media or the location specified and applies the configuration to the machines.
[root@OCP-MGMT install_files]# ./openshift-install create ignition-configs --dir=./ocp44
INFO Consuming Worker Machines from target directory
INFO Consuming Master Machines from target directory
INFO Consuming Openshift Manifests from target directory
INFO Consuming Common Manifests from target directory
INFO Consuming OpenShift Install (Manifests) from target directory
[root@OCP-MGMT install_files]#
The installation directory in the command above (ocp44) contains the install_config.yml.
4. Verify the following files were generated in the installation directory (ocp44). You can install the tree command using “yum install tree” or use “ls” command to verify the contents of the directory.
[root@OCP-MGMT install_files]# tree ocp44
ocp44
├── auth
│ ├── kubeadmin-password
│ └── kubeconfig
├── bootstrap.ign
├── install-config.1589318657.bak
├── master.ign
├── metadata.json
└── worker.ign
1 directory, 7 files
![]() The ignition files are valid for 24 hours - so if the installation takes longer than 24 hours due to any reason, new ignition files need to be generated.
The ignition files are valid for 24 hours - so if the installation takes longer than 24 hours due to any reason, new ignition files need to be generated.
5. Change permissions and copy the generated bootstrap.ign file to web server to make sure the file can be downloaded using http:
[root@OCP-MGMT ocp44]# chmod 777 bootstrap.ign
[root@OCP-MGMT ocp44]# scp bootstrap.ign root@ocp-http:/var/www/html
root@ocp-http's password: *****
bootstrap.ign 100% 291KB 18.4MB/s 00:00
[root@OCP-MGMT ocp44]#
6. Verify, downloading file from http server works:
[root@OCP-MGMT ocp44]# cd ..
[root@OCP-MGMT install_files]# wget ocp-http:8080/bootstrap.ign
--2020-05-12 17:35:58-- http://ocp-http:8080/bootstrap.ign
Resolving ocp-http (ocp-http)... 10.1.169.9
Connecting to ocp-http (ocp-http)|10.1.169.9|:8080... connected.
HTTP request sent, awaiting response... 200 OK
Length: 298087 (291K)
Saving to: ‘bootstrap.ign’
100%[==================================>] 298,087 --.-K/s in 0.001s
2020-05-12 17:35:58 (212 MB/s) - ‘bootstrap.ign’ saved [298087/298087]
Create Red Hat Enterprise Linux CoreOS (RHCOS) VM Template
For installing the OCP cluster on VMware vSphere, RHCOS machines will be deployed using a VM template on vSphere. To create the virtual machine template using the previously downloaded RHCOS OVA, follow these steps:
![]() The RHCOS images might not change with every release of OpenShift Container Platform. You must download an image with the highest version that is less than or equal to the OpenShift Container Platform version that you install. Use the image version that matches your OpenShift Container Platform version if it is available.
The RHCOS images might not change with every release of OpenShift Container Platform. You must download an image with the highest version that is less than or equal to the OpenShift Container Platform version that you install. Use the image version that matches your OpenShift Container Platform version if it is available.
1. Log into the VMware vCenter using a web browser.
2. From the Hosts and Clusters tab, right-click the cluster’s name and click Deploy OVF Template.
3. On the Select an OVF tab, select the RHCOS OVA file that was locally downloaded.
4. On the Select a name and folder tab, set a Virtual machine name, such as RHCOS, click the name of your vSphere cluster.
5. On the Select a compute resource tab, select the name of the vSphere cluster.
6. On the Select storage tab, configure the storage options for your virtual machine.
7. Select Thin Provision.
8. Select the datastore (infra_datastore_1) that was specified in install-config.yaml file.
9. On the Select network tab, specify the in-band management network (or a network of your choice).
10. Do not specify values for the Customize template tab.
11. Verify the selected parameters and Click Finish.
![]() In a typical FlexPod Datacenter deployment, all ESXi hosts synchronize their time with an NTP server. To avoid any certificate validation issues due to mismatched time, this virtual machine is set to synchronize its time with the ESXi host.
In a typical FlexPod Datacenter deployment, all ESXi hosts synchronize their time with an NTP server. To avoid any certificate validation issues due to mismatched time, this virtual machine is set to synchronize its time with the ESXi host.
12. Right Click the VM name and select Edit Settings.
13. Click on VM Options and expand VMware Tools.
14. Check the box: Synchronize guest time with host.
15. Click OK.
16. Right-click the newly created VM, and in the resulting context menu, select Template > Convert to Template.
17. Click Yes to proceed with the template creation by confirming at the displayed message.
Install the OpenShift CLI by Downloading the Binary
To install the OpenShift CLI (oc) on the management host in order to interact with OpenShift Container Platform using a command-line interface, follow these steps:
1. The client software (openshift-client-linux-4.4.12.tar.gz) was previously downloaded on the management host in the directory: install_files.
2. Extract the compressed file:
[root@OCP-MGMT install_files]# tar xvf openshift-client-linux-4.4.12.tar.gz
README.md
oc
kubectl
[root@OCP-MGMT install_files]#
3. Copy oc and kubectl executable files to a directory in your PATH (for example, ~/bin/):
[root@OCP-MGMT install_files]# cp oc ~/bin
[root@OCP-MGMT install_files]# cp kubectl ~/bin
4. After the CLI is installed, it is available using the oc command:
[root@OCP-MGMT install_files]# oc
OpenShift Client
This client helps you develop, build, deploy, and run your applications on any
OpenShift or Kubernetes cluster. It also includes the administrative
commands for managing a cluster under the 'adm' subcommand
<SNIP>
Prepare the Terraform Installer
Download the Terraform installer used in this validation from the following location:
https://github.com/ucs-compute-solutions/openshift43-installer
![]() The code reference to the installer can be found at Cisco DevNet Exchange: https://developer.cisco.com/codeexchange/github/repo/ucs-compute-solutions/openshift43-installer. This installer automates the OCP node virtual machine deployment and has been tested with OCP 4.3 and 4.4. If the installer does not work in your environment or you do not want to use terraform to automate the VM deployment, refer to the manual VM creation procedure covered in RedHat documentation: https://docs.openshift.com/container-platform/4.4/installing/installing_vsphere/installing-vsphere.html#installation-vsphere-machines_installing-vsphere .
The code reference to the installer can be found at Cisco DevNet Exchange: https://developer.cisco.com/codeexchange/github/repo/ucs-compute-solutions/openshift43-installer. This installer automates the OCP node virtual machine deployment and has been tested with OCP 4.3 and 4.4. If the installer does not work in your environment or you do not want to use terraform to automate the VM deployment, refer to the manual VM creation procedure covered in RedHat documentation: https://docs.openshift.com/container-platform/4.4/installing/installing_vsphere/installing-vsphere.html#installation-vsphere-machines_installing-vsphere .
To prepare the Terraform installer, follow these steps:
1. Create a directory on the management host to store required terraform repo:
[root@OCP-MGMT ~]# mkdir TFscripts
[root@OCP-MGMT ~]# cd TFscripts
[root@OCP-MGMT TFscripts]#
2. Clone the repo and change to the install directory:
[root@OCP-MGMT TFscripts ]# git clone https://github.com/ucs-compute-solutions/openshift43-installer https://github.com/ucs-compute-solutions/openshift43-installer
Cloning into 'installer'...
remote: Enumerating objects: 109463, done.
remote: Total 109463 (delta 0), reused 0 (delta 0), pack-reused 109463 Receiving objects: 100% (109463/109463), 95.26 MiB | 32.13 MiB/s, done. Resolving deltas: 100% (67555/67555), done.
3. There is an example terraform.tfvars file in this directory named terraform.tfvars.example. Copy the file and adjust the variables according to your environment.
[root@OCP-MGMT TFscripts]# cd openshift43-installer
[root@OCP-MGMT openshift43-installer]# cp terraform.tfvars.example terraform.tfvars
4. The sample config file used in this installation is shown below. Update the variables according to your environment:
[root@OCP-MGMT openshift43-installer]# more terraform.tfvars
// ID identifying the cluster to create. Use your username so that resources created can be tracked back to you.
cluster_id = "rtp"
// Domain of the cluster. This should be "${cluster_id}.${base_domain}".
cluster_domain = "rtp.ocp.local"
// Base domain from which the cluster domain is a subdomain.
base_domain = "ocp.local"
// Name of the vSphere server. The dev cluster is on "vcsa.vmware.devcluster.openshift.com".
vsphere_server = "192.168.169.100"
// User on the vSphere server.
vsphere_user = "administrator@vsphere.local"
// Password of the user on the vSphere server.
vsphere_password = “<PASSWORD>”
// Name of the vSphere cluster. The dev cluster is "devel".
vsphere_cluster = "FlexPod"
// Name of the vSphere data center. The dev cluster is "dc1".
vsphere_datacenter = "FlexPod-DC"
// Name of the vSphere data store to use for the VMs. The dev cluster uses "nvme-ds1".
vsphere_datastore = "infra_datastore_1"
// Name of the network to use for the VMs. The dev cluster uses "ocp-network".
vm_network = "10-1-169-NET"
// Name of the VM template to clone to create VMs for the cluster. The dev cluster has a template named "rhcos-latest".
vm_template = "RHCOS44"
// The machine_cidr where IP addresses will be assigned for cluster nodes.
// Additionally, IPAM will assign IPs based on the network ID.
machine_cidr = "10.1.169.0/24"
// The number of control plane VMs to create. Default is 3.
control_plane_count = 3
// The number of compute VMs to create. Default is 3.
compute_count = 4
// URL of the bootstrap ignition. This needs to be publicly accessible so that the bootstrap machine can pull the ignition.
bootstrap_ignition_url = "http://10.1.169.9:8080/bootstrap.ign"
// Ignition config for the control plane machines. You should copy the contents of the master.ign generated by the installer.
control_plane_ignition = <<END_OF_MASTER_IGNITION
{"ignition":{"config":{"append":[{"source":"https://apiint.rtp.ocp.local:22623/config/master","verification":{}}]},"security":{"tls":{"certificateAuthorities":[{"source":"data:text/plain;charset=utf-8;base64,LS0tLS1CRUdJTiBDRVJUSUZJQ0FURS0tLS0t
<SNIP>
VJUSUZJQ0FURS0tLS0tCg==","verification":{}}]}},"timeouts":{},"version":"2.2.0"},"networkd":{},"passwd":{},"storage":{},"systemd":{}}
END_OF_MASTER_IGNITION
// Ignition config for the compute machines. You should copy the contents of the worker.ign generated by the installer.
compute_ignition = <<END_OF_WORKER_IGNITION
{"ignition":{"config":{"append":[{"source":"https://apiint.rtp.ocp.local:22623/config/worker","verification":{}}]},"security":{"tls":{"certificateAuthorities":[{"source":"data:text/plain;charset=utf-8;base64,LS0tLS1CRUdJTiBDRVJUSUZJQ0FURS0tLS0tC
<SNIP>
N2tUUWI0PQotLS0tLUVORCBDRVJUSUZJQ0FURS0tLS0tCg==","verification":{}}]}},"timeouts":{},"version":"2.2.0"},"networkd":{},"passwd":{},"storage":{},"systemd":{}}
END_OF_WORKER_IGNITION
// Set bootstrap_ip, control_plane_ip, and compute_ip if you want to use static
// IPs reserved someone else, rather than the IPAM server.
// Update the IP address to assign to the bootstrap VM.
bootstrap_ip = "10.1.169.20"
// The IP addresses to assign to the control plane VMs. The length of this list
// must match the value of control_plane_count and update the IP Addresses.
control_plane_ips = ["10.1.169.11", "10.1.169.12", "10.1.169.13"]
// The IP addresses to assign to the compute VMs. The length of this list must
// match the value of compute_count and update the IP Addresses.
compute_ips = ["10.1.169.21", "10.1.169.22", "10.1.169.23", "10.1.169.24"]
5. Configure the Gateway and DNS in the TFscripts/openshift43-installer/machine/ignition.tf file:
GATEWAY= 10.1.169.254
DNS1=10.1.169.10
At this time, all the necessary prerequisites are completed and the OpenShift installation can start.
OCP Installation
Because each machine in the cluster requires information about the cluster when it is provisioned, OCP uses a temporary bootstrap VM during initial configuration to provide the required information to the permanent control plane. This VM boots by using the Ignition config file that describes how to create the cluster. The bootstrap machine creates the master machines that make up the control plane; create the control plane machines then create the compute machines. Figure 8 illustrates this process:
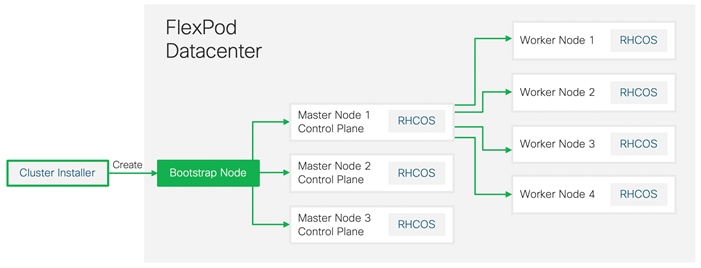
Bootstrapping a cluster involves the following high-level steps:
· The bootstrap machine boots and starts hosting the remote resources required for the master machines to boot.
· The master machines fetch the remote resources from the bootstrap machine and finish booting.
· The master machines use the bootstrap machine to form an etcd cluster.
· The bootstrap machine starts a temporary Kubernetes control plane using the new etcd cluster.
· The temporary control plane schedules the production control plane to the master machines.
· The temporary control plane shuts down and passes control to the production control plane.
· The bootstrap machine injects OpenShift Container Platform components into the production control plane.
· The control plane sets up the worker nodes.
· The control plane installs additional services in the form of a set of Operators.
· Customers can manually delete the bootstrap machine when the installation completes.
To start the OCP installation process, from the management host follow these steps:
1. Make sure you are still in the OpenShift installer directory, where the terraform files (*.tf) exists:
[root@OCP-MGMT openshift43-installer]# pwd
/root/TFscripts/openshift43-installer
2. Initialize terraform directory to download all the required providers:
![]() For more info on terraform init and terraform providers refer to the terraform documentation: https://www.terraform.io/docs/.
For more info on terraform init and terraform providers refer to the terraform documentation: https://www.terraform.io/docs/.
[root@OCP-MGMT openshift43-installer]# terraform init
Initializing modules...
- module.folder
Getting source "./folder"
- module.resource_pool
Getting source "./resource_pool"
- module.bootstrap
Getting source "./machine"
- module.control_plane
Getting source "./machine"
- module.compute
Getting source "./machine"
Initializing provider plugins...
- Checking for available provider plugins on https://releases.hashicorp.com...
- Downloading plugin for provider "vsphere" (1.18.1)...
- Downloading plugin for provider "ignition" (1.1.0)...
- Downloading plugin for provider "external" (1.2.0)...
- Downloading plugin for provider "template" (2.1.2)...
- Downloading plugin for provider "null" (2.1.2)...
The following providers do not have any version constraints in configuration,
so the latest version was installed.
To prevent automatic upgrades to new major versions that may contain breaking
changes, it is recommended to add version = "..." constraints to the
corresponding provider blocks in configuration, with the constraint strings
suggested below.
* provider.external: version = "~> 1.2"
* provider.null: version = "~> 2.1"
* provider.template: version = "~> 2.1"
* provider.vsphere: version = "~> 1.18"
Terraform has been successfully initialized!
You may now begin working with Terraform. Try running "terraform plan" to see
any changes that are required for your infrastructure. All Terraform commands
should now work.
If you ever set or change modules or backend configuration for Terraform,
rerun this command to reinitialize your working directory. If you forget, other
commands will detect it and remind you to do so if necessary.
3. The terraform plan command is used to create an execution plan. Terraform performs a refresh, unless explicitly disabled, and then determines what actions are necessary to achieve the desired state specified in the configuration files. Run Terraform Plan and check what resources will be provisioned.
[root@OCP-MGMT openshift43-installer]# terraform plan
4. Create all the resources using terraform by invoking apply:
[root@OCP-MGMT openshift43-Installer]# terraform apply -auto-approve
<SNIP>
vapp.0.properties.guestinfo.ignition.config.data.encoding: "" => "base64"
vapp_transport.#: "" => "1"
vapp_transport.0: "" => "com.vmware.guestInfo"
vmware_tools_status: "" => "<computed>"
vmx_path: "" => "<computed>"
wait_for_guest_ip_timeout: "" => "0"
wait_for_guest_net_routable: "" => "false"
wait_for_guest_net_timeout: "" => "0"
module.compute.vsphere_virtual_machine.vm.3: Still creating... (10s elapsed)
module.compute.vsphere_virtual_machine.vm.1: Still creating... (10s elapsed)
module.control_plane.vsphere_virtual_machine.vm.2: Still creating... (10s elapsed)
module.control_plane.vsphere_virtual_machine.vm.1: Still creating... (10s elapsed)
module.bootstrap.vsphere_virtual_machine.vm: Still creating... (10s elapsed)
module.compute.vsphere_virtual_machine.vm.0: Still creating... (10s elapsed)
module.compute.vsphere_virtual_machine.vm.2: Still creating... (10s elapsed)
module.control_plane.vsphere_virtual_machine.vm.0: Still creating... (10s elapsed)
module.compute.vsphere_virtual_machine.vm[1]: Creation complete after 10s (ID: 42209cf6-6d09-06d2-79b1-47a0cb276d44)
module.bootstrap.vsphere_virtual_machine.vm: Creation complete after 11s (ID: 4220afa6-1c36-bf64-834c-831d4ac037e7)
module.compute.vsphere_virtual_machine.vm[3]: Creation complete after 11s (ID: 42202bd6-40d4-802d-44bb-ce8cb5da7c26)
module.control_plane.vsphere_virtual_machine.vm[1]: Creation complete after 12s (ID: 42200fd9-cf55-1bc4-a168-cf3dc71ed18e)
module.control_plane.vsphere_virtual_machine.vm.2: Still creating... (20s elapsed)
module.compute.vsphere_virtual_machine.vm.0: Still creating... (20s elapsed)
module.compute.vsphere_virtual_machine.vm.2: Still creating... (20s elapsed)
module.control_plane.vsphere_virtual_machine.vm.0: Still creating... (20s elapsed)
module.control_plane.vsphere_virtual_machine.vm.2: Still creating... (30s elapsed)
module.compute.vsphere_virtual_machine.vm.0: Still creating... (30s elapsed)
module.compute.vsphere_virtual_machine.vm.2: Still creating... (30s elapsed)
module.control_plane.vsphere_virtual_machine.vm.0: Still creating... (30s elapsed)
module.compute.vsphere_virtual_machine.vm[2]: Creation complete after 37s (ID: 4220060f-9757-730d-1011-135848021d5a)
module.compute.vsphere_virtual_machine.vm[0]: Creation complete after 37s (ID: 422010aa-fde0-6aea-83f2-5a9df304198f)
module.control_plane.vsphere_virtual_machine.vm[0]: Creation complete after 37s (ID: 422064b8-04a6-f577-90b5-16f75d65be49)
module.control_plane.vsphere_virtual_machine.vm[2]: Creation complete after 37s (ID: 422041e2-7daa-cd9c-7c96-fa85365fb7fb)
Apply complete! Resources: 10 added, 0 changed, 0 destroyed.
5. After successful completion of the terraform apply command, check the resources created in VMware environment:
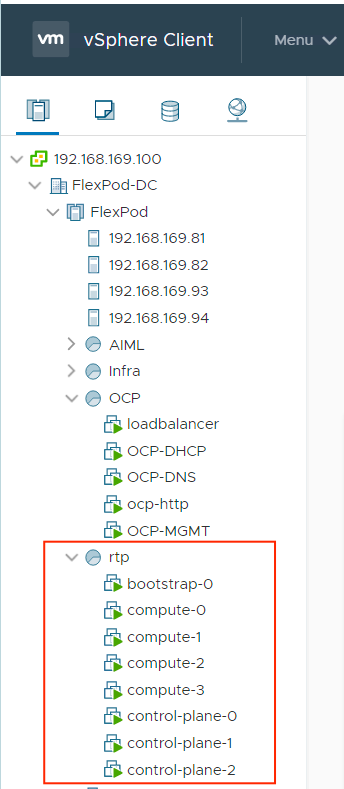
![]() If you run into configuration issues and need to delete all the OpenShift virtual machines and run the terraform installer again to recreate the virtual machines, remember to delete the terraform.tfstate file under the installer directory. This file contains state information and can cause problems when trying to delete and re-deploy the OCP nodes.
If you run into configuration issues and need to delete all the OpenShift virtual machines and run the terraform installer again to recreate the virtual machines, remember to delete the terraform.tfstate file under the installer directory. This file contains state information and can cause problems when trying to delete and re-deploy the OCP nodes.
- The bootstrap node sets up the OCP cluster. The cluster configuration succeeds when the Kubernetes API server signals that it has been bootstrapped on the control plane machines. Verify the bootstrap process is complete:
[root@OCP-MGMT install_files] pwd
[root@OCP-MGMT install_files] /root/install_files
[root@OCP-MGMT install_files] ./openshift-install --dir=./ocp44 wait-for bootstrap-complete -–log-level debug
<SNIP>
INFO Waiting up to 30m0s for bootstrapping to complete...
DEBUG Bootstrap status: complete
INFO It is now safe to remove the bootstrap resources
![]() More details about the installer’s progress can be found in the “.install.openshift_install.log” file in the installation directory.
More details about the installer’s progress can be found in the “.install.openshift_install.log” file in the installation directory.
6. After the bootstrap process is complete, remove the bootstrap machine from the load balancer by commenting or removing the entries from /etc/haproxy/haproxy.cfg and restarting the HAproxy service.
7. Remove the bootstrap node using Terraform:
[root@OCP44-MGMT openshift43-installer]# pwd
/root/TFscripts/openshift43-installer
[root@OCP-MGMT openshift43-Installer]# terraform apply -auto-approve -var 'bootstrap_complete=true'
<SNIP>
vsphere_resource_pool.resource_pool: Refreshing state... (ID: resgroup-445)
vsphere_virtual_machine.vm: Refreshing state... (ID: 42204afd-acdc-bfcd-4980-657314a8807a)
vsphere_virtual_machine.vm[0]: Refreshing state... (ID: 42204509-4bfa-6125-2351-8c0858a0c479)
vsphere_virtual_machine.vm[1]: Refreshing state... (ID: 4220d9d6-b278-9941-3839-bca52fa5a0b6)
vsphere_virtual_machine.vm[2]: Refreshing state... (ID: 42202708-67f8-aedf-3ca7-b83951e0bf52)
vsphere_virtual_machine.vm[0]: Refreshing state... (ID: 42204cfc-027b-df71-3348-7eb78b42b040)
vsphere_virtual_machine.vm[1]: Refreshing state... (ID: 42204c21-7c7e-b094-4332-02e6e86b4ffd)
vsphere_virtual_machine.vm[2]: Refreshing state... (ID: 42203168-bc66-a10f-1058-39911e75aaac)
vsphere_virtual_machine.vm[3]: Refreshing state... (ID: 42209bcf-1e39-fb08-adf7-a01dcac053ec)
module.bootstrap.vsphere_virtual_machine.vm: Destroying... (ID: 42204afd-acdc-bfcd-4980-657314a8807a)
module.bootstrap.vsphere_virtual_machine.vm: Still destroying... (ID: 42204afd-acdc-bfcd-4980-657314a8807a, 10s elapsed)
module.bootstrap.vsphere_virtual_machine.vm: Destruction complete after 11s
Apply complete! Resources: 0 added, 0 changed, 1 destroyed.
Log into the Cluster
Login to the cluster as a default system user by exporting the cluster kubeconfig file. The kubeconfig file contains information about the cluster that is used by the CLI to connect a client to the correct cluster and API server. The file is specific to a cluster and is created during OpenShift Container Platform installation.
To login to your newly created cluster, follow these steps:
1. Export the kubeadmin credentials by specifying the path to the directory where the installation files are stored:
[root@OCP-MGMT ocp44]# pwd
/root/install_files/ocp44
[root@OCP-MGMT ocp44]# export KUBECONFIG=/root/install_files/ocp44/auth/kubeconfig
[root@OCP-MGMT ocp44]#
2. Verify you can run oc commands successfully using the exported configuration:
[root@OCP-MGMT ocp44]# oc whoami
system:admin
![]() The credentials to log into the cluster using the user “kubeadmin” are saved in /root/install_files/ocp44/auth/kubeadmin-password. You can use “oc login” command and provide “kubeadmin” as the username and the password stored in the above file
The credentials to log into the cluster using the user “kubeadmin” are saved in /root/install_files/ocp44/auth/kubeadmin-password. You can use “oc login” command and provide “kubeadmin” as the username and the password stored in the above file
Approve the Certificate Signing Requests
When machines (nodes) are added to a cluster, two pending certificates signing request (CSRs) are generated for each machine that got added. You may have to approve these requests if their status does not show “approved.”
To approve the certificate signing requests, follow these steps:
1. To review the pending certificate signing requests (CSRs), issue the following command:
[root@OCP-MGMT ocp44]# oc get csr
NAME AGE REQUESTOR CONDITION
csr-7bnnz 27m system:node:compute-1 Approved,Issued
csr-88qkr 28m system:serviceaccount:openshift-machine-config-operator:node-bootstrapper Approved,Issued
csr-c7kdp 27m system:node:compute-0 Approved,Issued
csr-f7f5b 28m system:serviceaccount:openshift-machine-config-operator:node-bootstrapper Approved,Issued
csr-fvcsf 28m system:serviceaccount:openshift-machine-config-operator:node-bootstrapper Approved,Issued
csr-ggg4h 28m system:serviceaccount:openshift-machine-config-operator:node-bootstrapper Approved,Issued
csr-gvqw8 28m system:serviceaccount:openshift-machine-config-operator:node-bootstrapper Approved,Issued
csr-hbphp 28m system:node:control-plane-1 Approved,Issued
csr-hz4x6 27m system:node:control-plane-2 Approved,Issued
csr-ncsnf 28m system:serviceaccount:openshift-machine-config-operator:node-bootstrapper Approved,Issued
csr-vk46n 27m system:node:compute-2 Approved,Issued
csr-vqcqk 28m system:serviceaccount:openshift-machine-config-operator:node-bootstrapper Approved,Issued
csr-wv4cf 27m system:node:control-plane-0 Approved,Issued
csr-zj8qs 27m system:node:compute-3 Approved,Issued
![]() Since the CSRs rotate automatically, approve the CSRs within an hour of adding the machines to the cluster. If you do not approve them within an hour, the certificates will rotate, and more than two certificates will be present for each node. You must approve all of these certificates. After you approve the initial CSRs, the subsequent node client CSRs are automatically approved by the cluster kube-controller-manager. You must implement a method of automatically approving the kubelet serving certificate requests
Since the CSRs rotate automatically, approve the CSRs within an hour of adding the machines to the cluster. If you do not approve them within an hour, the certificates will rotate, and more than two certificates will be present for each node. You must approve all of these certificates. After you approve the initial CSRs, the subsequent node client CSRs are automatically approved by the cluster kube-controller-manager. You must implement a method of automatically approving the kubelet serving certificate requests
2. If the CSRs show Pending status, approve the CSRs for your cluster machines. To approve the CSRs individually, run the following command for each valid CSR:
oc adm certificate approve <csr_name>
<csr_name> is the name of a CSR from the list of current CSRs.
3. To approve all pending CSRs, run the following command:
oc get csr -o go-template='{{range .items}}{{if not .status}}{{.metadata.name}}{{"\n"}}{{end}}{{end}}' | xargs oc adm certificate approve
Log into OpenShift Container Platform
After the control plane initializes, wait for the cluster operators to come online before logging into the OCP portal. To log into the OpenShift container platform, follow these steps:
1. Verify the cluster operators to come online using the following command:
[root@OCP-MGMT ocp44]# oc get co
NAME VERSION AVAILABLE PROGRESSING DEGRADED SINCE
authentication False True False 3m27s
cloud-credential 4.4.12 True False False 23m
cluster-autoscaler 4.4.12 True False False 13m
console 4.4.12 True False False 53s
csi-snapshot-controller 4.4.12 True False False 3m40s
dns 4.4.12 True False False 21m
etcd 4.4.12 True False False 17m
image-registry 4.4.12 True False False 15m
ingress 4.4.12 True False False 119s
insights 4.4.12 True False False 14m
kube-apiserver 4.4.12 True True False 17m
kube-controller-manager 4.4.12 True False False 18m
kube-scheduler 4.4.12 True False False 16m
kube-storage-version-migrator 4.4.12 True False False 2m9s
machine-api 4.4.12 True False False 14m
machine-config 4.4.12 True False False 21m
marketplace 4.4.12 True False False 13m
monitoring 4.4.12 True False False 115s
network 4.4.12 True False False 22m
node-tuning 4.4.12 True False False 22m
openshift-apiserver 4.4.12 True False False 14m
openshift-controller-manager 4.4.12 True False False 14m
openshift-samples 4.4.12 True False False 13m
operator-lifecycle-manager 4.4.12 True False False 21m
operator-lifecycle-manager-catalog 4.4.12 True False False 21m
operator-lifecycle-manager-packageserver 4.4.12 True False False 13m
service-ca 4.4.12 True False False 22m
service-catalog-apiserver 4.4.12 True False False 22m
service-catalog-controller-manager 4.4.12 True False False 22m
storage 4.4.12 True False False 15m
[root@OCP-MGMT ocp44]#
2. Check the status of the cluster nodes:
[root@OCP-MGMT ocp44]# oc get nodes
NAME STATUS ROLES AGE VERSION
compute-0 Ready worker 5m34s v1.17.1+a1af596
compute-1 Ready worker 5m32s v1.17.1+a1af596
compute-2 Ready worker 5m35s v1.17.1+a1af596
compute-3 Ready worker 5m41s v1.17.1+a1af596
control-plane-0 Ready master 23m v1.17.1+a1af596
control-plane-1 Ready master 23m v1.17.1+a1af596
control-plane-2 Ready master 23m v1.17.1+a1af596
3. The cluster creation process continues with the creation of many OpenShift operators:
[root@OCP-MGMT ocp44]# cd ..
[root@OCP-MGMT install_files]# ./openshift-install --dir=./ocp44 wait-for install-complete
INFO Waiting up to 30m0s for the cluster at https://api.rtp.ocp.local:6443 to initialize...
INFO Waiting up to 10m0s for the openshift-console route to be created...
INFO Install complete!
INFO To access the cluster as the system:admin user when using 'oc', run 'export KUBECONFIG=/root/install_files/ocp44/auth/kubeconfig'
INFO Access the OpenShift web-console here: https://console-openshift-console.apps.rtp.ocp.local
INFO Login to the console with user: kubeadmin, password: xxxxx-xxxxx-xxxxx-xxxxx
4. On successful completion of the installation, message with access information will be displayed as shown above.
5. Point your browser to your web-console URL to login to OCP. Use kubeadmin for the username and displayed password in Step 3 to log into the system.
6. The OCP Dashboard is loaded upon successful login:
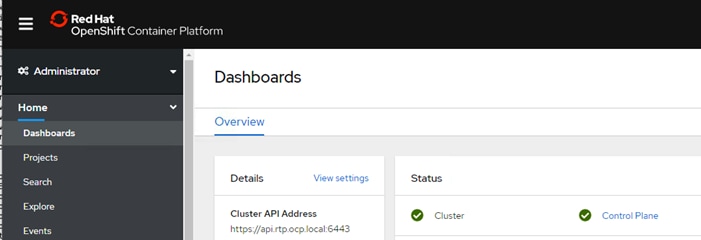
Setup NFS Volume for Image Registry on NetApp
In this procedure, a 500GB NFS volume is setup in the Infrastructure Storage Virtual Machine (SVM). This volume will be used by OCP as Image Registry. Since all the OCP VMs in this deployment are part of the in-band management network (VLAN 120; Subnet 10.1.169.0/24), two data LIFs are created in the same subnet so the VMs have direct access to the NFS volume. Figure 9 shows the overview of the storage systems:
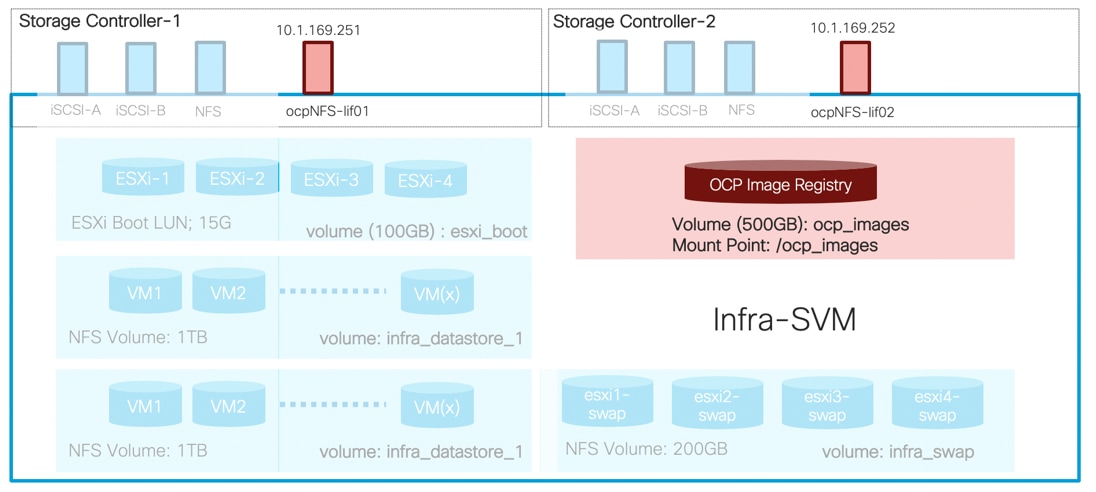
To setup the NFS volume, log into the NetApp A800 controller and follow these steps.
![]() It is possible that some of the configuration is already present on the controller depending on the VLANs and interfaces in use. If the configuration is already present, skip the appropriate steps.
It is possible that some of the configuration is already present on the controller depending on the VLANs and interfaces in use. If the configuration is already present, skip the appropriate steps.
1. Create a broadcast domain if the broadcast domain does not exist:
aa14-a800::> network port broadcast-domain create -broadcast-domain OCP_NFS -mtu 1500
2. Create the port VLAN if the vlan does not exist:
aa14-a800::> network port vlan create -node aa14-a800-1 -vlan-name a0a-120
aa14-a800::> network port vlan create -node aa14-a800-2 -vlan-name a0a-120
3. Add the ports to the broadcast domain:
aa14-a800::> network port broadcast-domain add-ports -broadcast-domain OCP_NFS -ports aa14-a800-1:a0a-120, aa14-a800-2:a0a-120
4. Verify that the ports were correctly added to the broadcast domain and the MTU is set correctly. In this deployment, an MTU value of 1500 was used to match the MTU on the VMs.
aa14-a800::> network port broadcast-domain show -broadcast-domain OCP_NFS
IPspace Broadcast Update
Name Domain Name MTU Port List Status Details
------- ----------- ------ ----------------------------- --------------
Default OCP_NFS 1500
aa14-a800-1:a0a-120 complete
aa14-a800-2:a0a-120 complete
5. Create the volume to host the Image Registry:
aa14-a800::> volume create -vserver Infra-SVM -volume ocp_images -aggregate aggr1_node01 -size 500GB -state online -policy default -junction-path /ocp_images -space-guarantee none -percent-snapshot-space 0
[Job 10626] Job succeeded: Successful
Notice: Volume ocp_images now has a mount point from volume Infra-SVM_root_vol. The load sharing (LS) mirrors of volume Infra-SVM_root_vol will be updated according to the SnapMirror schedule in place for volume Infra-SVM_root_vol. Volume ocp_images will not be visible in the global namespace until the LS mirrors of volume Infra-SVM_root_vol have been updated.
6. Update the root volume mirrors:
aa14-a800::> snapmirror update-ls-set -source-path Infra-SVM:Infra-SVM_root_vol
[Job 10629] Job is queued: snapmirror update-ls-set for source "aa14-a800://Infra-SVM/Infra-SVM_root_vol".
7. Create two LIFs, one for each controller.
![]() Customers can choose to configure a single LIF if they do not plan to create additional volumes in the future to be accessed from either of the two controllers.
Customers can choose to configure a single LIF if they do not plan to create additional volumes in the future to be accessed from either of the two controllers.
aa14-a800::> network interface create -vserver Infra-SVM -lif ocpNFS-lif01 -role data -data-protocol nfs -home-node aa14-a800-1 -home-port a0a-120 -address 10.1.169.251 -netmask 255.255.255.0 -status-admin up -failover-policy broadcast-domain-wide -firewall-policy data -auto-revert true
aa14-a800::> network interface create -vserver Infra-SVM -lif ocpNFS-lif02 -role data -data-protocol nfs -home-node aa14-a800-2 -home-port a0a-120 -address 10.1.169.252 -netmask 255.255.255.0 -status-admin up -failover-policy broadcast-domain-wide -firewall-policy data -auto-revert true
8. Create an export control policy to allow OCP VM network to access the NFS volume just created
aa14-a800::> vserver export-policy rule create -vserver Infra-SVM -policyname default -ruleindex 3 -protocol nfs -clientmatch 10.1.169.0/24 -rorule sys -rwrule sys -superuser sys -allow-suid false
aa14-a800::> volume modify -vserver Infra-SVM -volume ocp_images -policy default
Volume modify successful on volume ocp_images of Vserver AI-ML-SVM.
Setup Image Registry in OCP
For production deployments, a private image registry should be configured with persistent storage. The persistent storage must support ReadWriteMany access mode and the NFS volume created on NetApp controller will be setup as the Image Registry in this deployment. The image-registry Operator is not initially available for platforms that do not provide default storage therefore after installation, the registry must be configured so the Registry Operator can be made available. Log into the management host to complete the following steps. You can consult the RedHat documentation for sample files and details of setting up the image registry: https://docs.openshift.com/container-platform/4.4/installing/installing_vsphere/installing-vsphere.html#registry-configuring-storage-vsphere_installing-vsphere.
To setup the image registry in OCP, follow these steps:
1. Verify the image registry operator is running in the openshift-image-registry namespace:
[root@OCP-MGMT install_files]# oc get pod -n openshift-image-registry
NAME READY STATUS RESTARTS AGE
cluster-image-registry-operator-86476f46bc-psrng 2/2 Running 0 20h
2. Change ManagementState Image Registry Operator configuration from Removed to Managed:
[root@OCP-MGMT install_files]# oc patch configs.imageregistry.operator.openshift.io cluster --type merge --patch '{"spec":{"managementState": "Managed"}}'
config.imageregistry.operator.openshift.io/cluster patched
![]() Wait until the initialization completes; if executed before the Image Registry Operator initializes its components, the ‘oc patch’ command will fail with an error.
Wait until the initialization completes; if executed before the Image Registry Operator initializes its components, the ‘oc patch’ command will fail with an error.
3. To add a new storage class to a PV, create a YML file. This file was created under the install_files directory.
[root@OCP-MGMT install_files]# more create_pv.yaml
apiVersion: v1
kind: PersistentVolume
metadata:
name: image-registry-pv
spec:
capacity:
storage: 500Gi
accessModes:
- ReadWriteMany
nfs:
path: /ocp_images
server: 10.1.169.251
persistentVolumeReclaimPolicy: Retain
storageClassName: ocp-images
4. Use the following command to create the storage class using the YML file created in the last step:
[root@OCP-MGMT install_files]# oc create -f create_pv.yaml
persistentvolume/image-registry-pv created
5. Verify the status of PV using the following commands:
[root@OCP-MGMT install_files]# oc get pv
NAME CAPACITY ACCESS MODES RECLAIM POLICY STATUS CLAIM STORAGECLASS REASON AGE
image-registry-pv 500Gi RWX Retain Available ocp-images 24s
[root@OCP-MGMT install_files]#
6. To set up the PVC, create another YML file. This file was created under the install_files directory
[root@OCP-MGMT install_files]# more create_pvc.yaml
apiVersion: v1
kind: PersistentVolumeClaim
metadata:
name: image-registry-pvc
spec:
accessModes:
- ReadWriteMany
resources:
requests:
storage: 500Gi
storageClassName: ocp-images
volumeMode: Filesystem
7. Use the following command to create the PVC using the YML file created in the last step:
[root@OCP-MGMT install_files]# oc create -n openshift-image-registry -f create_pvc.yaml
persistentvolumeclaim/image-registry-pvc created
8. Verify the status of the newly created PVC:
[root@OCP-MGMT install_files]# oc get pvc -n openshift-image-registry
NAME STATUS VOLUME CAPACITY ACCESS MODES STORAGECLASS AGE
image-registry-pvc Bound image-registry-pv 500Gi RWX ocp-images 14s
9. Add the name of the PVC using following command and editing the lines shown in bold:
[root@OCP-MGMT install_files]# oc edit configs.imageregistry.operator.openshift.io -o yaml
apiVersion: imageregistry.operator.openshift.io/v1
kind: Config
metadata:
creationTimestamp: "2020-05-13T21:55:38Z"
finalizers:
- imageregistry.operator.openshift.io/finalizer
generation: 3
name: cluster
resourceVersion: "365572"
selfLink: /apis/imageregistry.operator.openshift.io/v1/configs/cluster
uid: 3f26f43f-f1e1-4773-b16e-abf9ac1288db
spec:
defaultRoute: false
disableRedirect: false
httpSecret: eaae1e56b365cc395fe14bf5c5f4646982beb388311b9d0ff522adffdefa4629af384c48b6c6d6e51178d3bb7f4010560a8c43d4d350dd5b238f2f93c1fe193b
logging: 2
managementState: Managed
proxy:
http: ""
https: ""
noProxy: ""
readOnly: false
replicas: 1
requests:
read:
maxInQueue: 0
maxRunning: 0
maxWaitInQueue: 0s
write:
maxInQueue: 0
maxRunning: 0
maxWaitInQueue: 0s
storage:
pvc:
claim: image-registry-pvc
<SNIP>
10. Verify the cluster operator status by executing the following commands:
[root@OCP-MGMT install_files]# oc get clusteroperator image-registry
NAME VERSION AVAILABLE PROGRESSING DEGRADED SINCE
image-registry 4.4.12 True False False 8s
[root@OCP-MGMT install_files]# oc get pod -n openshift-image-registry
NAME READY STATUS RESTARTS AGE
cluster-image-registry-operator-86476f46bc-psrng 2/2 Running 0 21h
image-registry-84c4fbbcb5-zqkdn 1/1 Running 0 3m43s
node-ca-gkm46 1/1 Running 0 3m43s
node-ca-jtpx7 1/1 Running 0 3m43s
node-ca-nb57g 1/1 Running 0 3m43s
node-ca-pgdb7 1/1 Running 0 3m43s
node-ca-sbv4l 1/1 Running 0 3m43s
node-ca-vh7lr 1/1 Running 0 3m43s
node-ca-vkbts 1/1 Running 0 3m43s
[root@OCP-MGMT install_files]# oc describe pod image-registry-84c4fbbcb5-zqkdn -n openshift-image-registry | grep -i volumes -A 4
Volumes:
registry-storage:
Type: PersistentVolumeClaim (a reference to a PersistentVolumeClaim in the same namespace)
ClaimName: image-registry-pvc
ReadOnly: false
Multiple master nodes are required in a high availability environment to allow for failover if the leading master host fails. Each of these nodes should be deployed on a separate ESXi host for redundancy and VMware anti-affinity rules need to be configured to keep these VMs distributed at all times. To set the anti-affinity rules, follow these steps:
1. Log into VMware vCenter.
2. Go to Hosts and Clusters and expand the Datacenter and the Click on the Cluster where the Master Nodes (VMs) are deployed.
3. Click Configure in the main panel and select VM/Host Rules under Configuration.
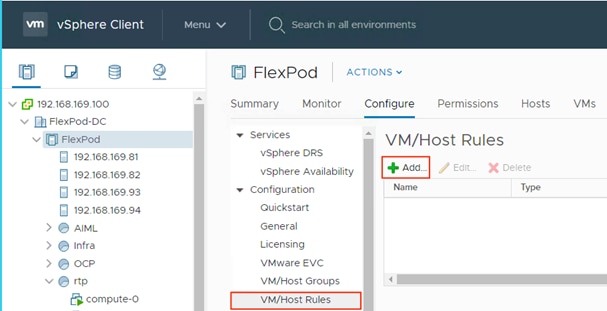
4. Click + Add.
5. Provide a name for the Rule (Distribute OCP Masters).
6. From the drop-down list, select Separate Virtual Machines.
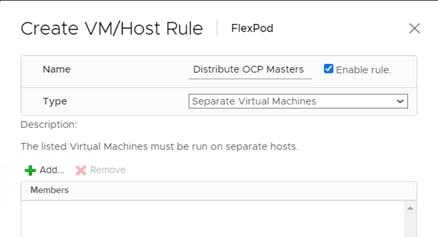
7. Click +Add and add all three control plane machines.
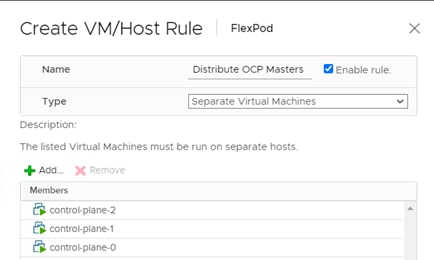
8. Click OK.
9. Optional: Repeat these steps to create a rule for separating all the OCP worker VMs as well to distribute the load across all the ESXi servers.
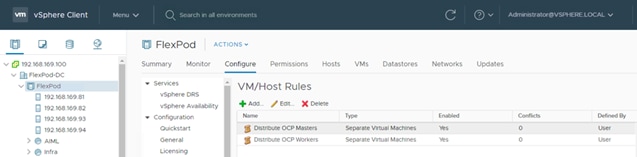
![]() Although not a hard requirement, the worker VMs were also distributed across the 4 ESXi servers in this deployment for evenly distributing the load and to increase resiliency in case of ESXi server failure.
Although not a hard requirement, the worker VMs were also distributed across the 4 ESXi servers in this deployment for evenly distributing the load and to increase resiliency in case of ESXi server failure.
During deployment, if two control plane virtual machines were installed on the same ESXi host, VMware vCenter will vMotion the virtual machines to different hosts.
Storage Configuration for NetApp Trident
When deploying Trident, a dedicated SVM is created for provisioning persistent container volumes. The data LIF in this SVM is made accessible to the OCP nodes through direct layer-2 access. Since the volumes are created on-demand, it is recommended to use a dedicated SVM for ease of management and to allow for segregation from the infrastructure workloads.
In this section, a new Storage Virtual Machine is configured to be used with Trident as shown in Figure 10:
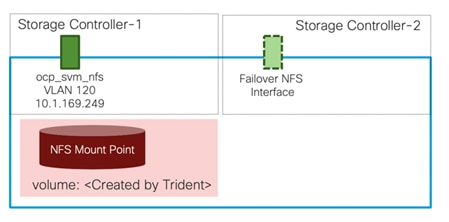
Create SVM
To create an SVM to be used by Trident, follow these steps:
1. Run the vserver create command.
aa14-a800::> vserver create -vserver OCP-SVM -rootvolume ocp_svm_root -aggregate aggr1_node01 -rootvolume-security-style unix
[Job 10720] Job succeeded:
Vserver creation completed.
2. Remove the unused data protocols from the SVM:
aa14-a800::> vserver remove-protocols -vserver OCP-SVM -protocols fcp cifs
3. Add the two data aggregates to the SVM aggregate list.
aa14-a800::> vserver modify -vserver OCP-SVM -aggr-list aggr1_node01, aggr1_node02
4. Enable and run the NFS protocol.
aa14-a800::> vserver nfs create -vserver OCP-SVM -udp disabled
5. Set the SVM vstorage parameter.
aa14-a800::> vserver nfs modify -vserver OCP-SVM -vstorage enabled
aa14-a800::> vserver nfs show -fields vstorage
vserver vstorage
--------- --------
Infra-SVM enabled
OCP-SVM enabled
2 entries were displayed.
Create Load-Sharing Mirrors of SVM Root Volume
To create a load-sharing mirror of an SVM root volume, follow these steps:
1. Create a volume to be the load-sharing mirror of the AI-ML-SVM root volume on each node.
aa14-a800::> volume create -vserver OCP-SVM -volume ocp_svm_root_m01 -aggregate aggr1_node01 -size 1GB -type DP
[Job 10722] Job succeeded: Successful
aa14-a800::> volume create -vserver OCP-SVM -volume ocp_svm_root_m02 -aggregate aggr1_node02 -size 1GB -type DP
[Job 10724] Job succeeded: Successful
2. If the schedule was not previously created, create a job schedule to update the root volume mirror relationships every 15 minutes.
aa14-a800::> job schedule interval create -name 15min -minutes 15
3. Create the mirroring relationships.
aa14-a800::> snapmirror create -source-path OCP-SVM:ocp_svm_root -destination-path OCP-SVM:ocp_svm_root_m01 -type LS -schedule 15min
[Job 10726] Job is queued: snapmirror create for the relationship with destination "aa14-a800://OCP-SVM/ocp_svm_roo[Job 10726] Job succeeded: SnapMirror: done
aa14-a800::> snapmirror create -source-path OCP-SVM:ocp_svm_root -destination-path OCP-SVM:ocp_svm_root_m02 -type LS -schedule 15min
[Job 10728] Job is queued: snapmirror create for the relationship with destination "aa14-a800://OCP-SVM/ocp_svm_roo[Job 10728] Job succeeded: SnapMirror: done
4. Initialize the mirroring relationship.
aa14-a800::> snapmirror initialize-ls-set -source-path OCP-SVM:ocp_svm_root
[Job 10729] Job is queued: snapmirror initialize-ls-set for source "aa14-a800://OCP-SVM/ocp_svm_root".
You can use the “snapmirror show -type ls” command to verify the snapmirror status.
Configure NFSv3
To configure NFSv3, follow these steps:
1. Create a new rule for the infrastructure NFS subnet in the default export policy.
aa14-a800::> vserver export-policy rule create -vserver OCP-SVM -policyname default -ruleindex 1 -protocol nfs -clientmatch 10.1.169.0/24 -rorule sys -rwrule sys -superuser sys -allow-suid false
2. Assign the export policy to the root volume.
aa14-a800::> volume modify –vserver OCP-SVM –volume ocp_svm_root –policy default
Create NFS LIF
To create an NFS LIFs for the SVM, run the following commands:
aa14-a800::> network interface create -vserver OCP-SVM -lif ocp_svm_mgmt -role data -data-protocol nfs -home-node aa14-a800-1 -home-port a0a-120 -address 10.1.169.249 -netmask 255.255.255.0 -status-admin up -failover-policy broadcast-domain-wide -firewall-policy data -auto-revert true
aa14-a800::> network interface show -vserver OCP-SVM
Logical Status Network Current Current Is
Vserver Interface Admin/Oper Address/Mask Node Port Home
----------- ---------- ---------- ------------------ ------------- ------- ----
OCP-SVM
ocp_svm_mgmt up/up 10.1.169.249/24 aa14-a800-1 a0a-120 true
The new SVM is now ready to be used by Trident.
![]() Make sure the NetApp controller Management IP address is accessible from the OpenShift pod network. Trident uses the ONTAP management IP to perform administrative actions for the persistent volumes even though the volumes themselves are accessed over the NFS data LIFs. In this deployment, the in-band management network interface on NetApp controller was in the same subnet as the OCP VMs and no additional routing configuration was needed.
Make sure the NetApp controller Management IP address is accessible from the OpenShift pod network. Trident uses the ONTAP management IP to perform administrative actions for the persistent volumes even though the volumes themselves are accessed over the NFS data LIFs. In this deployment, the in-band management network interface on NetApp controller was in the same subnet as the OCP VMs and no additional routing configuration was needed.
In a FlexPod environment, Trident is utilized to allow end users to dynamically provision and manage persistent volumes for containers backed by FlexVols and LUNs hosted on NetApp A800. Beginning with version 20.04, NetApp Trident is available to install with an operator. The following procedure details the steps required to install and configure Trident to manage persistent storage for containers in the OpenShift on FlexPod solution.
1. Ensure that the user that is logged in to the OCP cluster has sufficient privileges for installing Trident:
[root@OCP-MGMT ~]# oc auth can-i '*' '*' --all-namespaces
yes
2. Verify that you can download an image from the registry and access both the cluster management LIF and the NFS data LIF in your Trident SVM from the ONTAP system in your FlexPod:
[root@OCP-MGMT ~]# oc run -i --tty ping --image=busybox --restart=Never --rm -- ping 10.1.169.250
If you don't see a command prompt, try pressing enter.
64 bytes from 10.1.169.250: seq=1 ttl=63 time=0.195 ms
64 bytes from 10.1.169.250: seq=2 ttl=63 time=0.167 ms
64 bytes from 10.1.169.250: seq=3 ttl=63 time=0.158 ms
^C
--- 10.1.169.250 ping statistics ---
4 packets transmitted, 4 packets received, 0% packet loss
round-trip min/avg/max = 0.158/0.325/0.782 ms
pod "ping" deleted
[root@OCP-MGMT ~]# oc run -i --tty ping --image=busybox --restart=Never --rm -- ping 10.1.169.249
If you don't see a command prompt, try pressing enter.
64 bytes from 10.1.169.249: seq=1 ttl=63 time=0.340 ms
64 bytes from 10.1.169.249: seq=2 ttl=63 time=0.288 ms
64 bytes from 10.1.169.249: seq=3 ttl=63 time=0.244 ms
^C
--- 10.1.169.249 ping statistics ---
4 packets transmitted, 4 packets received, 0% packet loss
round-trip min/avg/max = 0.244/0.413/0.780 ms
pod "ping" deleted
3. Download the Trident installer bundle using the below commands and extract it to a directory:
[root@OCP-MGMT ~]# wget https://github.com/NetApp/trident/releases/download/v20.04.0/trident-installer-20.04.0.tar.gz
[root@OCP-MGMT ~]# tar -xvf trident-installer-20.04.0.tar.gz
[root@OCP-MGMT ~]# cd trident-installer
[root@OCP-MGMT trident-installer]#
4. The Trident installer folder extracted from the archive contains several manifests which can be used to install Trident. OpenShift 4.4 is based on Kubernetes 1.16, so you will need to use the manifest for that version (filename containing post1.16) and create the TridentProvisioner custom resource definition:
[root@OCP-MGMT trident-installer]# oc create -f deploy/crds/trident.netapp.io_tridentprovisioners_crd_post1.16.yaml
customresourcedefinition.apiextensions.k8s.io/tridentprovisioners.trident.netapp.io created
5. Create a ‘trident’ namespace which is required for the Trident operator:
[root@OCP-MGMT trident-installer]# oc create namespace trident
namespace/trident created
6. Create the resources required for Trident operator deployment, i.e. a ServiceAccount for the operator, a ClusterRole and ClusterRoleBinding to the ServiceAccount, a dedicated PodSecurityPolicy, and the Operator itself.
[root@OCP-MGMT trident-installer]# oc kustomize deploy/ > deploy/bundle.yaml
[root@OCP-MGMT trident-installer]# oc create -f deploy/bundle.yaml
serviceaccount/trident-operator created
clusterrole.rbac.authorization.k8s.io/trident-operator created
clusterrolebinding.rbac.authorization.k8s.io/trident-operator created
deployment.apps/trident-operator created
podsecuritypolicy.policy/tridentoperatorpods created
7. Verify that the Trident operator is deployed:
[root@OCP-MGMT trident-installer]# oc get deployment -n trident
NAME READY UP-TO-DATE AVAILABLE AGE
trident-operator 1/1 1 1 26s
[root@OCP-MGMT trident-installer]# oc get pods -n trident
NAME READY STATUS RESTARTS AGE
trident-operator-564d7d66f-rvp8p 1/1 Running 0 19s
8. Once the Trident operator is installed, the next step is to install Trident itself using the operator. To do this, the TridentProvisioner custom resource (CR) needs to be created. The Trident installer includes the definitions for creating a TridentProvisioner CR:
[root@OCP-MGMT trident-installer]# oc create -f deploy/crds/tridentprovisioner_cr.yaml
tridentprovisioner.trident.netapp.io/trident created
9. Approve any outstanding CSR certificates for the OpenShift install. You can approve all the CSR certificates using the following command:
[root@OCP-MGMT trident-installer]# oc get csr -o name | xargs oc adm certificate approve
certificatesigningrequest.certificates.k8s.io/csr-457fh approved
certificatesigningrequest.certificates.k8s.io/csr-4jkwc approved
certificatesigningrequest.certificates.k8s.io/csr-5bgj7 approved
certificatesigningrequest.certificates.k8s.io/csr-5i48t approved
certificatesigningrequest.certificates.k8s.io/csr-5k9lp approved
certificatesigningrequest.certificates.k8s.io/csr-5p9h7 approved
certificatesigningrequest.certificates.k8s.io/csr-67ki8 approved
certificatesigningrequest.certificates.k8s.io/csr-6rp97 approved
certificatesigningrequest.certificates.k8s.io/csr-6w875 approved
certificatesigningrequest.certificates.k8s.io/csr-72j7t approved
certificatesigningrequest.certificates.k8s.io/csr-74p9p approved
certificatesigningrequest.certificates.k8s.io/csr-7f84g approved
certificatesigningrequest.certificates.k8s.io/csr-8lh8r approved
certificatesigningrequest.certificates.k8s.io/csr-8t95q approved
10. Verify that Trident 20.04 is installed using the TridentProvisioner CR.
[root@OCP-MGMT trident-installer]# oc get tprov -n trident
NAME AGE
trident 6m9s
[root@OCP-MGMT trident-installer]# oc describe tprov trident -n trident
Name: trident
Namespace: trident
Labels: <none>
Annotations: <none>
API Version: trident.netapp.io/v1
Kind: TridentProvisioner
Metadata:
Creation Timestamp: 2020-06-18T13:51:50Z
Generation: 1
Resource Version: 14315192
Self Link: /apis/trident.netapp.io/v1/namespaces/trident/tridentprovisioners/trident
UID: c71f1187-885d-4c74-933b-8970a9912d15
Spec:
Debug: true
Status:
Message: Trident installed *
Status: Installed
Version: v20.04
Events:
Type Reason Age From Message
---- ------ ---- ---- -------
Normal Installing 7m12s trident-operator.netapp.io Installing Trident
Normal Installed 4m14s (x5 over 6m37s) trident-operator.netapp.io Trident installed
![]() * Instead of “Trident installed”, you may see following error message: “Failed to install Trident; err: could not create the Trident service account; could not create service account”. This issue is due to a bug related to incorrect handling of k8s major/minor version. If you issue “oc version” command to verify the Kubernetes version and the version includes “major+minor” fields such as “Kubernetes Version: v1.17.1+a1af596”, you will need to install trident using tridentctl as shown below. Follow this step only if the NetApp Trident installation fails in step 8.
* Instead of “Trident installed”, you may see following error message: “Failed to install Trident; err: could not create the Trident service account; could not create service account”. This issue is due to a bug related to incorrect handling of k8s major/minor version. If you issue “oc version” command to verify the Kubernetes version and the version includes “major+minor” fields such as “Kubernetes Version: v1.17.1+a1af596”, you will need to install trident using tridentctl as shown below. Follow this step only if the NetApp Trident installation fails in step 8.
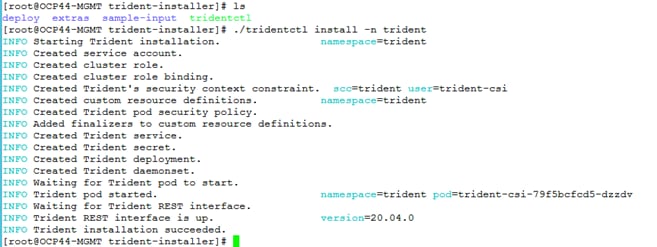
11. Verify that the pods related to Trident are up and verify the version of Trident:
[root@OCP-MGMT trident-installer]# oc get pods -n trident
NAME READY STATUS RESTARTS AGE
trident-csi-2v8mg 2/2 Running 0 6m35s
trident-csi-588qm 2/2 Running 0 6m35s
trident-csi-69966f55d8-k99ht 4/4 Running 0 6m35s
trident-csi-6bwkk 2/2 Running 0 6m35s
trident-csi-ccc88 2/2 Running 0 6m35s
trident-csi-jw4qq 2/2 Running 0 6m35s
trident-csi-vkwt6 2/2 Running 0 6m35s
trident-csi-vvsb9 2/2 Running 0 6m35s
trident-operator-564d7d66f-rvp8p 1/1 Running 0 14m
[root@OCP-MGMT trident-installer]# ./tridentctl version -n trident
+----------------+----------------+
| SERVER VERSION | CLIENT VERSION |
+----------------+----------------+
| 20.04.0 | 20.04.0 |
+----------------+----------------+
12. Create a storage backend that will be used by Trident to provision volumes. The storage backend is specific to the NetApp storage system in the solution and the protocol being used. In this deployment, these values are ONTAP and NAS specifically. The sample backend.json files available in the sample-input folder can be used to create a customized backend:
[root@OCP-MGMT trident-installer]# cp sample-input/backend-ontap-nas.json ./backend.json
[root@OCP-MGMT trident-installer]# vi backend.json
{
"version": 1,
"storageDriverName": "ontap-nas",
"backendName": "nas-backend",
"managementLIF": "10.1.169.250",
"dataLIF": "10.1.169.249",
"svm": "OCP-SVM",
"username": "admin",
"password": "adminpass"
}
[root@OCP-MGMT trident-installer]# ./tridentctl create backend -f backend.json -n trident
+-------------+-----------+--------------------------------------+--------+---------+
| NAME | DRIVER | UUID | STATE | VOLUMES |
+-------------+-----------+--------------------------------------+--------+---------+
| nas-backend | ontap-nas | 5314744c-666f-4ef8-8437-746617bdb9ec | online | 0 |
+-------------+-----------+--------------------------------------+--------+---------+
Modify the backend.json to accommodate the details/requirements of your environment for the following values:
backendName: The name you would like to refer to this backend as in the additional steps that follow.
managementLIF: The cluster management LIF for the ONTAP cluster in the FlexPod.
dataLIF: The NFS data LIF in the SVM created to manage Trident.
svm: The name of the SVM created to manage Trident.
username: The cluster admin username.
password: The cluster admin password.
13. Create a StorageClass based on a sample storage class template in the sample-inputs folder that specifies Trident as the provisioner and the storage backend as ontap-nas.
[root@OCP-MGMT trident-installer]# cp sample-input/storage-class-basic.yaml.templ ./storage-class.yaml
[root@OCP-MGMT trident-installer]# vi storage-class.yaml
apiVersion: storage.k8s.io/v1
kind: StorageClass
metadata:
name: basic
provisioner: csi.trident.netapp.io
parameters:
backendType: "ontap-nas"
[root@OCP-MGMT trident-installer]# oc create -f storage-class.yaml
storageclass.storage.k8s.io/basic created
![]() In this case, the StorageClass created is basic and set as a default. An OpenShift administrator can define multiple storage classes corresponding to different requirements based upon the applications being deployed. Trident selects a storage backend that can satisfy all the criteria specified in the parameters section in the storage class definition. End users can then provision storage as needed, without administrative intervention.
In this case, the StorageClass created is basic and set as a default. An OpenShift administrator can define multiple storage classes corresponding to different requirements based upon the applications being deployed. Trident selects a storage backend that can satisfy all the criteria specified in the parameters section in the storage class definition. End users can then provision storage as needed, without administrative intervention.
14. With the backend and storageclass configured, we can provision our first volume. In the sample inputs folder, there is also a file for creating a basic persistent volume. This file does not have to be modified for our example and can used as is to create the volume:
[root@OCP-MGMT trident-installer]# oc create -f sample-input/pvc-basic.yaml
persistentvolumeclaim/basic created
[root@OCP-MGMT trident-installer]# oc get pvc basic
NAME STATUS VOLUME CAPACITY ACCESS MODES STORAGECLASS AGE
basic Bound pvc-3b032ce6-9572-4a58-b0bf-0c8a2cccb161 1Gi RWO basic 15s
15. The volume created in the last step can now be mounted to a pod to test functionality. A simple example pod, running the nginx webserver, with the persistent volume mounted at /usr/share/nginx/html can be deployed as follows:
[root@OCP-MGMT trident-installer]# cat task-pv-pod.yaml
kind: Pod
apiVersion: v1
metadata:
name: task-pv-pod
spec:
volumes:
- name: task-pv-storage
persistentVolumeClaim:
claimName: basic
containers:
- name: task-pv-container
image: nginx
ports:
- containerPort: 80
name: "http-server"
volumeMounts:
- mountPath: "/usr/share/nginx/html"
name: task-pv-storage
![]() In this example pod, the value for claimName is set to the name of the PVC we created in the previous step.
In this example pod, the value for claimName is set to the name of the PVC we created in the previous step.
16. Create the pod using the oc create command and use oc describe to confirm that volume attachment was successful.
[root@OCP-MGMT trident-installer]# oc create -f task-pv-pod.yaml
pod/task-pv-pod created
[root@OCP-MGMT trident-installer]# oc describe pod task-pv-pod
Name: task-pv-pod
Namespace: default
Priority: 0
Node: compute-1/10.1.169.22
Start Time: Thu, 18 Jun 2020 11:31:41 -0400
Labels: <none>
Annotations: k8s.v1.cni.cncf.io/networks-status:
[{
"name": "openshift-sdn",
"interface": "eth0",
"ips": [
"10.130.2.110"
],
"dns": {},
"default-route": [
"10.130.2.1"
]
}]
Status: Running
IP: 10.130.2.110
IPs:
IP: 10.130.2.110
Containers:
task-pv-container:
Container ID: cri-o://68855bc249d4691f850a34274e20da488ab7491ba381c9272b790856fc2d48d1
Image: nginx
Image ID: docker.io/library/nginx@sha256:0efad4d09a419dc6d574c3c3baacb804a530acd61d5eba72cb1f14e1f5ac0c8f
Port: 80/TCP
Host Port: 0/TCP
State: Running
Started: Thu, 18 Jun 2020 11:31:50 -0400
Ready: True
Restart Count: 0
Environment: <none>
Mounts:
/usr/share/nginx/html from task-pv-storage (rw)
/var/run/secrets/kubernetes.io/serviceaccount from default-token-w69kt (ro)
Conditions:
Type Status
Initialized True
Ready True
ContainersReady True
PodScheduled True
Volumes:
task-pv-storage:
Type: PersistentVolumeClaim (a reference to a PersistentVolumeClaim in the same namespace)
ClaimName: basic
ReadOnly: false
default-token-w69kt:
Type: Secret (a volume populated by a Secret)
SecretName: default-token-w69kt
Optional: false
QoS Class: BestEffort
Node-Selectors: <none>
Tolerations: node.kubernetes.io/not-ready:NoExecute for 300s
node.kubernetes.io/unreachable:NoExecute for 300s
Events:
Type Reason Age From Message
---- ------ ---- ---- -------
Normal Scheduled <unknown> default-scheduler Successfully assigned default/task-pv-pod to compute-1
Normal Pulling 46s kubelet, compute-1 Pulling image "nginx"
Normal Pulled 42s kubelet, compute-1 Successfully pulled image "nginx"
Normal Created 42s kubelet, compute-1 Created container task-pv-container
Normal Started 41s kubelet, compute-1 Started container task-pv-container
Normal SuccessfulAttachVolume 9s attachdetach-controller AttachVolume.Attach succeeded for volume "pvc-3b032ce6-9572-4a58-b0bf-0c8a2cccb161"
17. Connect to the pod directly and verify the NFS volume from ONTAP system is mounted as the /usr/share/nginx/html directory.
[root@OCP-MGMT trident-installer]# oc exec -it task-pv-pod -- df -h /usr/share/nginx/html
Filesystem Size Used Avail Use% Mounted on
10.1.169.249:/trident_pvc_3b032ce6_9572_4a58_b0bf_0c8a2cccb161 1.0G 256K 1.0G 1% /usr/share/nginx/html
The OpenShift Container Platform web console is a user interface accessible from a web browser. Developers can use the web console to visualize, browse, and manage the contents of projects. The web console runs as a pod on the master. The static assets required to run the web console are served by the pod. Once OpenShift Container Platform is successfully installed, find the URL for the web console and login credentials for your installed cluster in the CLI output of the installation program as covered in Log into OpenShift Container Platform.
This section provides a very high-level overview of the web console. Customers are encouraged to consult RedHat documentation to get an in-depth understanding of the console.
If you misplaced the credentials to log into the web console, you can use “kubeadmin” as the user and password saved in the install directory/auth/ kubeadmin-password:
[root@OCP-MGMT auth]# pwd
/root/install_files/ocp44/auth
[root@OCP-MGMT auth]# cat kubeadmin-password
xxxxx-xxxxx-xxxxx-xxxxx
[root@OCP-MGMT auth]
OCP Web Console - Dashboard
Access the OpenShift Container Platform dashboard, which captures high-level information about the cluster, by navigating to Home > Dashboards > Overview from the OpenShift Container Platform web console.
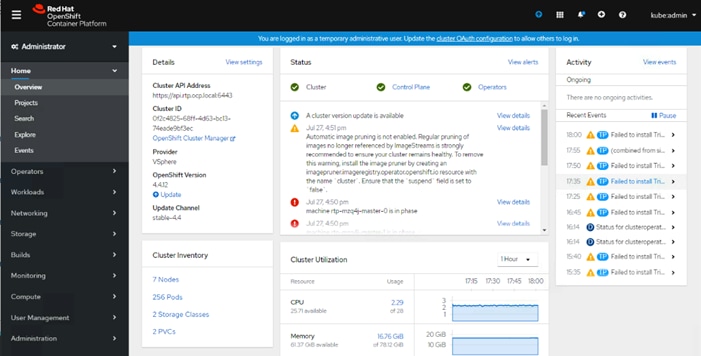
The OpenShift Container Platform dashboard provides various cluster information, captured in individual dashboard cards. The OpenShift Container Platform dashboard consists of the following cards:
Details: provides a brief overview of informational cluster details.
Status: information includes ok, error, warning, in progress, and unknown. Resources can add custom status names.
Activity: outlines any ongoing activity.
Cluster Inventory: details number of resources and associated statuses.
Cluster Utilization shows the capacity of various resources over a specified period.
OCP Web Console - Compute Nodes
This OCP dashboard provides an overview and status of both compute nodes. From the navigation menu on the left, follow Compute > Nodes.
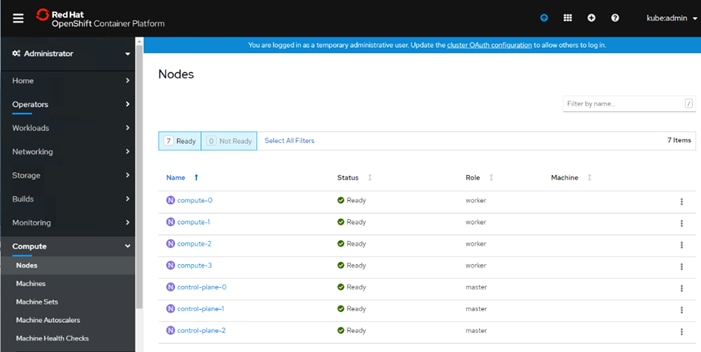
OCP Web Console – Persistent Volumes
This OCP dashboard provides an overview and status of configured persistent volumes in the system. From the navigation menu on the left, follow Storage > Persistent Volumes:
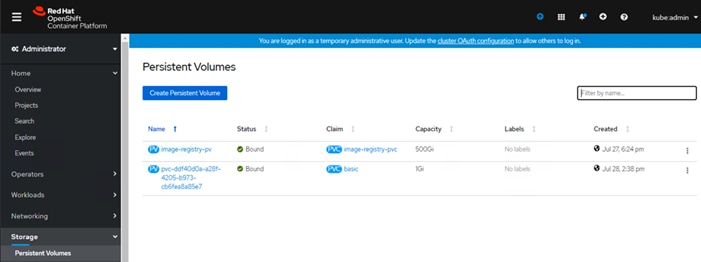
OCP Web Console – Operators
Operators are a method of packaging, deploying, and managing a Kubernetes application. OCP dashboard provides an Operator Hub to deploy Operators from the Kubernetes community and RedHat partners. From the navigation menu on the left, follow Operators > OperatorHub:
For more details about the OCP Web Console, consult the RedHat documentation.
The FlexPod Datacenter for Red Hat OpenShift Container Platform 4 delivers seamless integration of Red Hat’s enterprise grade container platform into the current FlexPod portfolio to enable repeatable, successful customer deployments using:
· FlexPod Portfolio: Pre-validated infrastructure for a wide variety of customer workloads.
· Red Hat’s OpenShift Container Platform: Open-source, enterprise-grade Kubernetes environment that empowers developers and DevOps engineers to each respectively focus on creating robust applications and deploy them at scale.
· NetApp Trident: Fully supported open-source project that integrates natively with Kubernetes and its Persistent Volume framework to seamlessly provision and manage volumes from storage systems running NetApp’s ONTAP.
This section includes the configuration files used to deploy the infrastructure services during the validation of this solution. These files are presented as a reference.
DNS Configuration Files
/etc/named.conf
[root@OCP-DNS ~]# more /etc/named.conf
//
// named.conf
//
// Provided by Red Hat bind package to configure the ISC BIND named(8) DNS
// server as a caching only nameserver (as a localhost DNS resolver only).
//
// See /usr/share/doc/bind*/sample/ for example named configuration files.
//
// See the BIND Administrator's Reference Manual (ARM) for details about the
// configuration located in /usr/share/doc/bind-{version}/Bv9ARM.html
options {
listen-on port 53 { 10.1.169.10; };
# listen-on-v6 port 53 { ::1; };
forwarders { 208.67.222.222; 208.67.220.220; };
directory "/var/named";
dump-file "/var/named/data/cache_dump.db";
statistics-file "/var/named/data/named_stats.txt";
memstatistics-file "/var/named/data/named_mem_stats.txt";
# recursing-file "/var/named/data/named.recursing";
# secroots-file "/var/named/data/named.secroots";
allow-query { localhost; 127.0.0.1; 10.1.169.0/24; 192.168.169.0/24; };
/*
- If you are building an AUTHORITATIVE DNS server, do NOT enable recursion.
- If you are building a RECURSIVE (caching) DNS server, you need to enable
recursion.
- If your recursive DNS server has a public IP address, you MUST enable access
control to limit queries to your legitimate users. Failing to do so will
cause your server to become part of large scale DNS amplification
attacks. Implementing BCP38 within your network would greatly
reduce such attack surface
*/
recursion yes;
allow-recursion { localhost; 127.0.0.1; 10.1.169.0/24; 192.168.169.0/24; };
dnssec-enable no;
dnssec-validation no;
/* Path to ISC DLV key */
bindkeys-file "/etc/named.root.key";
managed-keys-directory "/var/named/dynamic";
pid-file "/run/named/named.pid";
session-keyfile "/run/named/session.key";
};
logging {
channel default_debug {
file "data/named.run";
severity dynamic;
};
};
zone "." IN {
type hint;
file "named.ca";
};
zone "rtp.ocp.local" IN {
type master;
file "forward.rtp.ocp";
allow-update { none; };
};
zone "169.1.10.in-addr.arpa" IN {
type master;
file "reverse.rtp.ocp";
allow-update { none; };
};
include "/etc/named.rfc1912.zones";
include "/etc/named.root.key";
/var/named/forward.rtp.ocp
[root@OCP-DNS named]# more /var/named/forward.rtp.ocp
$TTL 3H
@ IN SOA @ rname.invalid. (
0 ; serial
1D ; refresh
1H ; retry
1W ; expire
3H ) ; minimum
@ IN NS ocp-dns.ocp.local.
ocp-mgmt IN A 10.1.169.5
ocp-dns IN A 10.1.169.10
ocp-http IN A 10.1.169.9
loadbalancer IN A 10.1.169.100
ocp-dhcp IN A 10.1.169.253
control-plane-0 IN A 10.1.169.11
control-plane-1 IN A 10.1.169.12
control-plane-2 IN A 10.1.169.13
bootstrap-0 IN A 10.1.169.20
compute-0 IN A 10.1.169.21
compute-1 IN A 10.1.169.22
compute-2 IN A 10.1.169.23
compute-3 IN A 10.1.169.24
etcd-0 IN A 10.1.169.11
etcd-1 IN A 10.1.169.12
etcd-2 IN A 10.1.169.13
api IN A 10.1.169.100
api-int IN A 10.1.169.100
*.apps IN A 10.1.169.100
_etcd-server-ssl._tcp.rtp.ocp.local. IN SRV 0 10 2380 etcd-0.rtp.ocp.local.
_etcd-server-ssl._tcp.rtp.ocp.local. IN SRV 0 10 2380 etcd-1.rtp.ocp.local.
_etcd-server-ssl._tcp.rtp.ocp.local. IN SRV 0 10 2380 etcd-2.rtp.ocp.local.
/var/named/reverse.rtp.ocp
[root@OCP-DNS named]# more /var/named/reverse.rtp.ocp
$TTL 3H
@ IN SOA @ rname.invalid. (
0 ; serial
1D ; refresh
1H ; retry
1W ; expire
3H ) ; minimum
@ IN NS ocp-dns.ocp.local.
@ IN PTR ocp.local.
9 IN PTR ocp-http.rtp.ocp.local
10 IN PTR ocp-dns.ocp.local
11 IN PTR control-plane-0.rtp.ocp.local
12 IN PTR control-plane-1.rtp.ocp.local
13 IN PTR control-plane-2.rtp.ocp.local
20 IN PTR bootstrap-0.rtp.ocp.local
21 IN PTR compute-0.rtp.ocp.local
22 IN PTR compute-1.rtp.ocp.local
23 IN PTR compute-2.rtp.ocp.local
24 IN PTR compute-3.rtp.ocp.local
100 IN PTR loadbalancer.rtp.ocp.local
253 IN PTR ocp-dhcp.rtp.ocp.local
DHCP Configuration File
/etc/dhcp/dhcpd.conf
[root@OCP-DHCP ~]# more /etc/dhcp/dhcpd.conf
#
# DHCP Server Configuration file.
# see /usr/share/doc/dhcp*/dhcpd.conf.example
# see dhcpd.conf(5) man page
#
subnet 10.1.169.0 netmask 255.255.255.0 {
option routers 10.1.169.254;
option subnet-mask 255.255.255.0;
option domain-search "rtp.ocp.local", "ocp.local";
option domain-name-servers 10.1.169.10;
option ntp-servers 10.1.169.254;
range 10.1.169.101 10.1.169.120;
}
Web Server Configuration File
/etc/httpd/conf/httpd.conf
[root@ocp-http ~]# more /etc/httpd/conf/httpd.conf
#
# This is the main Apache HTTP server configuration file. It contains the
# configuration directives that give the server its instructions.
# See <URL:http://httpd.apache.org/docs/2.4/> for detailed information.
# In particular, see
# <URL:http://httpd.apache.org/docs/2.4/mod/directives.html>
# for a discussion of each configuration directive.
#
# Do NOT simply read the instructions in here without understanding
# what they do. They're here only as hints or reminders. If you are unsure
# consult the online docs. You have been warned.
#
# Configuration and logfile names: If the filenames you specify for many
# of the server's control files begin with "/" (or "drive:/" for Win32), the
# server will use that explicit path. If the filenames do *not* begin
# with "/", the value of ServerRoot is prepended -- so 'log/access_log'
# with ServerRoot set to '/www' will be interpreted by the
# server as '/www/log/access_log', where as '/log/access_log' will be
# interpreted as '/log/access_log'.
#
# ServerRoot: The top of the directory tree under which the server's
# configuration, error, and log files are kept.
#
# Do not add a slash at the end of the directory path. If you point
# ServerRoot at a non-local disk, be sure to specify a local disk on the
# Mutex directive, if file-based mutexes are used. If you wish to share the
# same ServerRoot for multiple httpd daemons, you will need to change at
# least PidFile.
#
ServerRoot "/etc/httpd"
#
# Listen: Allows you to bind Apache to specific IP addresses and/or
# ports, instead of the default. See also the <VirtualHost>
# directive.
#
# Change this to Listen on specific IP addresses as shown below to
# prevent Apache from glomming onto all bound IP addresses.
#
#Listen 12.34.56.78:80
Listen 8080
#
# Dynamic Shared Object (DSO) Support
#
# To be able to use the functionality of a module which was built as a DSO you
# have to place corresponding `LoadModule' lines at this location so the
# directives contained in it are actually available _before_ they are used.
# Statically compiled modules (those listed by `httpd -l') do not need
# to be loaded here.
#
# Example:
# LoadModule foo_module modules/mod_foo.so
#
Include conf.modules.d/*.conf
#
# If you wish httpd to run as a different user or group, you must run
# httpd as root initially and it will switch.
#
# User/Group: The name (or #number) of the user/group to run httpd as.
# It is usually good practice to create a dedicated user and group for
# running httpd, as with most system services.
#
User apache
Group apache
# 'Main' server configuration
#
# The directives in this section set up the values used by the 'main'
# server, which responds to any requests that aren't handled by a
# <VirtualHost> definition. These values also provide defaults for
# any <VirtualHost> containers you may define later in the file.
#
# All of these directives may appear inside <VirtualHost> containers,
# in which case these default settings will be overridden for the
# virtual host being defined.
#
#
# ServerAdmin: Your address, where problems with the server should be
# e-mailed. This address appears on some server-generated pages, such
# as error documents. e.g. admin@your-domain.com
#
ServerAdmin root@localhost
#
# ServerName gives the name and port that the server uses to identify itself.
# This can often be determined automatically, but we recommend you specify
# it explicitly to prevent problems during startup.
#
# If your host doesn't have a registered DNS name, enter its IP address here.
#
ServerName 10.1.169.9
#
# Deny access to the entirety of your server's filesystem. You must
# explicitly permit access to web content directories in other
# <Directory> blocks below.
#
<Directory />
AllowOverride none
Require all denied
</Directory>
#
# Note that from this point forward you must specifically allow
# particular features to be enabled - so if something's not working as
# you might expect, make sure that you have specifically enabled it
# below.
#
#
# DocumentRoot: The directory out of which you will serve your
# documents. By default, all requests are taken from this directory, but
# symbolic links and aliases may be used to point to other locations.
#
DocumentRoot "/var/www/html"
#
# Relax access to content within /var/www.
#
<Directory "/var/www">
AllowOverride None
# Allow open access:
Require all granted
</Directory>
# Further relax access to the default document root:
<Directory "/var/www/html">
#
# Possible values for the Options directive are "None", "All",
# or any combination of:
# Indexes Includes FollowSymLinks SymLinksifOwnerMatch ExecCGI MultiViews
#
# Note that "MultiViews" must be named *explicitly* --- "Options All"
# doesn't give it to you.
#
# The Options directive is both complicated and important. Please see
# http://httpd.apache.org/docs/2.4/mod/core.html#options
# for more information.
#
Options Indexes FollowSymLinks
#
# AllowOverride controls what directives may be placed in .htaccess files.
# It can be "All", "None", or any combination of the keywords:
# Options FileInfo AuthConfig Limit
#
AllowOverride None
#
# Controls who can get stuff from this server.
#
Require all granted
</Directory>
#
# DirectoryIndex: sets the file that Apache will serve if a directory
# is requested.
#
<IfModule dir_module>
DirectoryIndex index.html
</IfModule>
#
# The following lines prevent .htaccess and .htpasswd files from being
# viewed by Web clients.
#
<Files ".ht*">
Require all denied
</Files>
#
# ErrorLog: The location of the error log file.
# If you do not specify an ErrorLog directive within a <VirtualHost>
# container, error messages relating to that virtual host will be
# logged here. If you *do* define an error logfile for a <VirtualHost>
# container, that host's errors will be logged there and not here.
#
ErrorLog "logs/error_log"
#
# LogLevel: Control the number of messages logged to the error_log.
# Possible values include: debug, info, notice, warn, error, crit,
# alert, emerg.
#
LogLevel warn
<IfModule log_config_module>
#
# The following directives define some format nicknames for use with
# a CustomLog directive (see below).
#
LogFormat "%h %l %u %t \"%r\" %>s %b \"%{Referer}i\" \"%{User-Agent}i\"" combined
LogFormat "%h %l %u %t \"%r\" %>s %b" common
<IfModule logio_module>
# You need to enable mod_logio.c to use %I and %O
LogFormat "%h %l %u %t \"%r\" %>s %b \"%{Referer}i\" \"%{User-Agent}i\" %I %O" combinedio
</IfModule>
#
# The location and format of the access logfile (Common Logfile Format).
# If you do not define any access logfiles within a <VirtualHost>
# container, they will be logged here. Contrariwise, if you *do*
# define per-<VirtualHost> access logfiles, transactions will be
# logged therein and *not* in this file.
#
#CustomLog "logs/access_log" common
#
# If you prefer a logfile with access, agent, and referer information
# (Combined Logfile Format) you can use the following directive.
#
CustomLog "logs/access_log" combined
</IfModule>
<IfModule alias_module>
#
# Redirect: Allows you to tell clients about documents that used to
# exist in your server's namespace, but do not anymore. The client
# will make a new request for the document at its new location.
# Example:
# Redirect permanent /foo http://www.example.com/bar
#
# Alias: Maps web paths into filesystem paths and is used to
# access content that does not live under the DocumentRoot.
# Example:
# Alias /webpath /full/filesystem/path
#
# If you include a trailing / on /webpath then the server will
# require it to be present in the URL. You will also likely
# need to provide a <Directory> section to allow access to
# the filesystem path.
#
# ScriptAlias: This controls which directories contain server scripts.
# ScriptAliases are essentially the same as Aliases, except that
# documents in the target directory are treated as applications and
# run by the server when requested rather than as documents sent to the
# client. The same rules about trailing "/" apply to ScriptAlias
# directives as to Alias.
#
ScriptAlias /cgi-bin/ "/var/www/cgi-bin/"
</IfModule>
#
# "/var/www/cgi-bin" should be changed to whatever your ScriptAliased
# CGI directory exists, if you have that configured.
#
<Directory "/var/www/cgi-bin">
AllowOverride None
Options None
Require all granted
</Directory>
<IfModule mime_module>
#
# TypesConfig points to the file containing the list of mappings from
# filename extension to MIME-type.
#
TypesConfig /etc/mime.types
#
# AddType allows you to add to or override the MIME configuration
# file specified in TypesConfig for specific file types.
#
#AddType application/x-gzip .tgz
#
# AddEncoding allows you to have certain browsers uncompress
# information on the fly. Note: Not all browsers support this.
#
#AddEncoding x-compress .Z
#AddEncoding x-gzip .gz .tgz
#
# If the AddEncoding directives above are commented-out, then you
# probably should define those extensions to indicate media types:
#
AddType application/x-compress .Z
AddType application/x-gzip .gz .tgz
#
# AddHandler allows you to map certain file extensions to "handlers":
# actions unrelated to filetype. These can be either built into the server
# or added with the Action directive (see below)
#
# To use CGI scripts outside of ScriptAliased directories:
# (You will also need to add "ExecCGI" to the "Options" directive.)
#
#AddHandler cgi-script .cgi
# For type maps (negotiated resources):
#AddHandler type-map var
#
# Filters allow you to process content before it is sent to the client.
#
# To parse .shtml files for server-side includes (SSI):
# (You will also need to add "Includes" to the "Options" directive.)
#
AddType text/html .shtml
AddOutputFilter INCLUDES .shtml
</IfModule>
#
# Specify a default charset for all content served; this enables
# interpretation of all content as UTF-8 by default. To use the
# default browser choice (ISO-8859-1), or to allow the META tags
# in HTML content to override this choice, comment out this
# directive:
#
AddDefaultCharset UTF-8
<IfModule mime_magic_module>
#
# The mod_mime_magic module allows the server to use various hints from the
# contents of the file itself to determine its type. The MIMEMagicFile
# directive tells the module where the hint definitions are located.
#
MIMEMagicFile conf/magic
</IfModule>
#
# Customizable error responses come in three flavors:
# 1) plain text 2) local redirects 3) external redirects
#
# Some examples:
#ErrorDocument 500 "The server made a boo boo."
#ErrorDocument 404 /missing.html
#ErrorDocument 404 "/cgi-bin/missing_handler.pl"
#ErrorDocument 402 http://www.example.com/subscription_info.html
#
#
# EnableMMAP and EnableSendfile: On systems that support it,
# memory-mapping or the sendfile syscall may be used to deliver
# files. This usually improves server performance, but must
# be turned off when serving from networked-mounted
# filesystems or if support for these functions is otherwise
# broken on your system.
# Defaults if commented: EnableMMAP On, EnableSendfile Off
#
#EnableMMAP off
EnableSendfile on
# Supplemental configuration
#
# Load config files in the "/etc/httpd/conf.d" directory, if any.
IncludeOptional conf.d/*.conf
Load Balancer Configuration File
/etc/haproxy/haproxy.cfg
[root@loadbalancer ~]# more /etc/haproxy/haproxy.cfg
#---------------------------------------------------------------------
# Example configuration for a possible web application. See the
# full configuration options online.
#
# http://haproxy.1wt.eu/download/1.4/doc/configuration.txt
#
#---------------------------------------------------------------------
#---------------------------------------------------------------------
# Global settings
#---------------------------------------------------------------------
global
# to have these messages end up in /var/log/haproxy.log you will
# need to:
#
# 1) configure syslog to accept network log events. This is done
# by adding the '-r' option to the SYSLOGD_OPTIONS in
# /etc/sysconfig/syslog
#
# 2) configure local2 events to go to the /var/log/haproxy.log
# file. A line like the following can be added to
# /etc/sysconfig/syslog
#
# local2.* /var/log/haproxy.log
#
log 127.0.0.1 local2
chroot /var/lib/haproxy
pidfile /var/run/haproxy.pid
maxconn 4000
user haproxy
group haproxy
daemon
# turn on stats unix socket
stats socket /var/lib/haproxy/stats
#---------------------------------------------------------------------
# common defaults that all the 'listen' and 'backend' sections will
# use if not designated in their block
#---------------------------------------------------------------------
defaults
mode tcp
log global
option httplog
option dontlognull
# option http-server-close
# option forwardfor except 127.0.0.0/8
option redispatch
retries 3
timeout http-request 10s
timeout queue 1m
timeout connect 10s
timeout client 1m
timeout server 1m
timeout http-keep-alive 10s
timeout check 10s
maxconn 3000
#---------------------------------------------------------------------
# main frontend which proxys to the backends
#---------------------------------------------------------------------
frontend openshift-api-server
bind *:6443
default_backend openshift-api-server
mode tcp
option tcplog
backend openshift-api-server
balance source
mode tcp
server bootstrap-0 10.1.169.20:6443 check
server control-plane-0 10.1.169.11:6443 check
server control-plane-1 10.1.169.12:6443 check
server control-plane-2 10.1.169.13:6443 check
frontend machine-config-server
bind *:22623
default_backend machine-config-server
mode tcp
option tcplog
backend machine-config-server
balance source
mode tcp
server bootstrap-0 10.1.169.20:22623 check
server control-plane-0 10.1.169.11:22623 check
server control-plane-1 10.1.169.12:22623 check
server control-plane-2 10.1.169.13:22623 check
frontend ingress-http
bind *:80
default_backend ingress-http
mode tcp
option tcplog
backend ingress-http
balance source
mode tcp
server compute-0 10.1.169.21:80 check
server compute-1 10.1.169.22:80 check
server compute-2 10.1.169.23:80 check
server compute-3 10.1.169.24:80 check
frontend ingress-https
bind *:443
default_backend ingress-https
mode tcp
option tcplog
backend ingress-https
balance source
mode tcp
option ssl-hello-chk
server compute-0 10.1.169.21:443 check
server compute-1 10.1.169.22:443 check
server compute-2 10.1.169.23:443 check
server compute-3 10.1.169.24:443 check
Compute
Cisco Unified Computing System:
http://www.cisco.com/en/US/products/ps10265/index.html
Cisco UCS 6400 Series Fabric Interconnects:
Cisco UCS 5100 Series Blade Server Chassis:
http://www.cisco.com/en/US/products/ps10279/index.html
Cisco UCS 2400 Series Fabric Extenders:
Cisco UCS 2200 Series Fabric Extenders:
https://www.cisco.com/c/en/us/products/collateral/servers-unified-computing/ucs-6300-series-fabric-interconnects/data_sheet_c78-675243.html
Cisco UCS B-Series Blade Servers:
http://www.cisco.com/en/US/partner/products/ps10280/index.html
Cisco UCS C-Series Rack Servers:
Cisco UCS VIC Adapters:
http://www.cisco.com/en/US/products/ps10277/prod_module_series_home.html
Cisco UCS Manager:
http://www.cisco.com/en/US/products/ps10281/index.html
Cisco Intersight
Network and Management
Cisco Nexus 9000 Series Switches:
http://www.cisco.com/c/en/us/products/switches/nexus-9000-series-switches/index.html
Cisco Nexus 9000 vPC Configuration Guide:
https://www.cisco.com/c/en/us/td/docs/switches/datacenter/nexus9000/sw/6-x/interfaces/configuration/guide/b_Cisco_Nexus_9000_Series_NX-OS_Interfaces_Configuration_Guide/b_Cisco_Nexus_9000_Series_NX-OS_Interfaces_Configuration_Guide_chapter_0111.html
Cisco Data Center Network Manager:
Storage
NetApp ONTAP
https://docs.netapp.com/ontap-9/index.jsp
NetApp Trident
https://netapp-trident.readthedocs.io/en/stable-v20.04/introduction.html
Virtualization Layer
VMware vCenter Server:
http://www.vmware.com/products/vcenter-server/overview.html
VMware vSphere:
https://www.vmware.com/products/vsphere
Red Hat OpenShift Container Platform
RedHat OpenShift
OCP 4.4 Documentation:
https://docs.openshift.com/container-platform/4.4/welcome/index.html
Compatibility Matrixes
Cisco UCS Hardware Compatibility Matrix:
https://ucshcltool.cloudapps.cisco.com/public/
Cisco Nexus Recommended Releases for Nexus 9K:
VMware and Cisco Unified Computing System:
http://www.vmware.com/resources/compatibility
NetApp Interoperability Matric Tool:
http://mysupport.netapp.com/matrix/
Haseeb Niazi, Technical Marketing Engineer, Cisco Systems, Inc.
Haseeb Niazi has over 21 years of experience at Cisco in the Datacenter, Enterprise and Service Provider Solutions and Technologies. As a member of various solution teams and Advanced Services, Haseeb has helped many enterprise and service provider customers evaluate and deploy a wide range of Cisco solutions. As a technical marking engineer at Cisco UCS Solutions group, Haseeb focuses on network, compute, virtualization, storage, and orchestration aspects of various Compute Stacks. Haseeb holds a master's degree in Computer Engineering from the University of Southern California and is a Cisco Certified Internetwork Expert (CCIE 7848).
Alan Cowles, Solutions Architect, NetApp.
Alan Cowles is a Solutions Architect at NetApp focusing on Converged Infrastructure and Hybrid Cloud solutions, specifically in the Open Source Software space. This role includes researching and implementing new open-source or cloud-based solutions, helping to validate them in our labs in RTP, and publishing the results as Technical Reports, Cisco Validated Designs, or NetApp Verified Architectures. In the world away from work, Alan can be often found running or biking on one of the many trail systems in central North Carolina, playing softball, or hanging out at home with his wife and two children.
Acknowledgements
For their support and contribution to the design, validation, and creation of this Cisco Validated Design, the authors would like to thank:
· Sreeni Edula, Technical Marketing Engineer, Cisco Systems, Inc.