- Preface
- Cisco Edge 300 Series Switch
- Configuring the Smart Install Network
- Monitoring Cisco Edge Switches
- Configuring Local CLI - Clish
- Configuring the Web GUI
- Configuring HTTP API
- Installing Third-Party Applications from the SMI Server
- Importing a Spreadsheet with Client Switch Information
- Setting Up Image Servers for the Smart Install GUI
- Troubleshooting
Cisco Edge 300 Series Switch Software Configuration Guide, Release 1.6
Bias-Free Language
The documentation set for this product strives to use bias-free language. For the purposes of this documentation set, bias-free is defined as language that does not imply discrimination based on age, disability, gender, racial identity, ethnic identity, sexual orientation, socioeconomic status, and intersectionality. Exceptions may be present in the documentation due to language that is hardcoded in the user interfaces of the product software, language used based on RFP documentation, or language that is used by a referenced third-party product. Learn more about how Cisco is using Inclusive Language.
- Updated:
- July 21, 2014
Chapter: Configuring Local CLI - Clish
- Configuration Guidelines
- Relationship Between Local Configuration and Smart Install Configuration
- Switch Command Reference
- configure terminal
- copy running-config startup-config
- exit
- export-config
- import-config
- next-reboot
- reboot
- remove
- show
- wifi-mode
- wifi-mode client
- agent3g
- bluetooth
- data-store
- desktop resolution
- do
- done
- hostname
- hosts
- interface
- ip address
- ip default-gateway
- ip name-server
- language support
- locale
- login-window
- mac address-table aging-time
- mac address-table static
- mgrvlan
- no
- ntp server
- password
- snmp-server
- snmp-server community
- snmp-server contact
- snmp-server group
- snmp-server location
- snmp-server user
- snmp-server view
- ssid
- system identifier local
- timezone
- vlan
- volume-ctl
- wvlan
- disable
- duplex
- enable
- output-queue-strategy
- priority
- rate-limit
- speed
- switchport mode
- ap-isolation
- apsd
- beacon-interval
- bg-protection
- channel bandwidth
- channel number
- data-beacon-rate
- extension channel
- guard-interval
- igmp-snoop
- mcs
- multicast-mcs
- multicast-phy-mode
- operating-mode
- packet aggregation
- radio
- rdg
- short-slot
- transmit burst
- transmit preamble
- transmit power
- wireless-mode
- wmm
- broadcast ssid
- encryption mode (open, shared, or WEP configuration)
- encryption mode (WPA configuration)
- encryption mode (802.1x)
- radius-server
Configuring Local CLI - Clish
Configuration Guidelines
You can configure the Cisco Edge 300 series switch in Clish, which is used for the local CLI configuration. The CLI uses only commands that are specific to the Cisco Edge 300 series switch. Although the syntax is similar to the Cisco IOS CLI, the commands are incompatible with Cisco IOS commands.
Use the CLI to configure these switch settings:
- Basic switch settings—Hostname, MAC address, Bluetooth settings, password, Network Time Protocol (NTP) server, and switch language
- Ethernet interface settings—Status, speed, and quality of service (QoS)
- Wireless interface settings—Status, radio, wireless mode, channel, wireless separation, transmission power, Wi-Fi Multimedia (WMM), and advanced wireless settings
- SSID security settings—Broadcast, authentication, and encryption
Follow these configuration guidelines:
- Enter ssh root@ip-address in the command prompt in your PC, and enter the password after the welcome screen is displayed. Enter the clish command to enter the Global Configuration mode.
- Start a Cisco Edge configuration with the configure terminal global command. End the Cisco Edge configuration file with the exit global command.
- Within a Cisco Edge configuration, start each individual switch configuration with the system identifier local system configuration command. End each individual switch configuration with the done system configuration command.

Note![]() Use the system identifier local command for a local CLI configuration.
Use the system identifier local command for a local CLI configuration.
Use the interface system configuration command to enter this mode. Use the exit global configuration command to return to the system configuration mode.
–![]() WiFi interface configuration mode
WiFi interface configuration mode
Use the interface system configuration command to enter this mode. We recommend that before you configure any wireless settings, that you first use the wireless-mode WiFi configuration command to set the 802.11 wireless mode. Use the exit global configuration command to return to the system configuration mode.
Use the ssid system configuration command to enter this mode. Use the exit global configuration command to return to the system configuration mode.
- All commands must be entered in lowercase letters. Arguments can include uppercase letters.
- If there is a configuration conflict, the most recent configuration takes precedence. In this example, the SSID is not broadcast:
ssid NEWAP1
broadcast ssid on
broadcast ssid off
exit
Relationship Between Local Configuration and Smart Install Configuration
The local configuration and Smart Install (SMI) both have a configuration file on the Cisco Edge 300 series switch. The local configuration and SMI also both have scripts to execute configuration files on the Cisco Edge 300 series switch, and there is an execution flag that decides which script to run. By default, the flag is SMI.
If show running-configuration is configured on the Cisco Edge 300 series switch, it will display the running configuration, and also display the source file that the running configuration is derived from. The next-reboot command specifies the configuration file to run next after the reboot. For example, if the next reboot local command is configured, the configuration file will be changed to the local configuration.
In release 1.1 and earlier, the Cisco Edge 300 series switch checks the flag when the system reboots. If the flag points to a local configuration file, then the system changes the flag back to SMI for the next reboot to make sure that the SMI works.
In release 1.2 and later, the Cisco Edge 300 series switch treats local configuration in two different ways based on the network status:
–![]() If the Cisco Edge 300 series switch is connected to a SMI network and it is configured to apply SMI configuration, SMI configuration will always be applied instead of local configuration.
If the Cisco Edge 300 series switch is connected to a SMI network and it is configured to apply SMI configuration, SMI configuration will always be applied instead of local configuration.
–![]() If the Cisco Edge 300 series switch is connected to a non-smart install environment, it will supports remain local configuration in nand flash for every reboot if smi-environment is not setup for this particular box, you can do local configuration on it by the methods described in this chapter and then enter the following two commands to make sure that the Cisco Edge 300 series switch reboots from local configuration startup-config file next time, otherwise, all the configuration will be stored in RAM and will get lost after the reboot.
If the Cisco Edge 300 series switch is connected to a non-smart install environment, it will supports remain local configuration in nand flash for every reboot if smi-environment is not setup for this particular box, you can do local configuration on it by the methods described in this chapter and then enter the following two commands to make sure that the Cisco Edge 300 series switch reboots from local configuration startup-config file next time, otherwise, all the configuration will be stored in RAM and will get lost after the reboot.
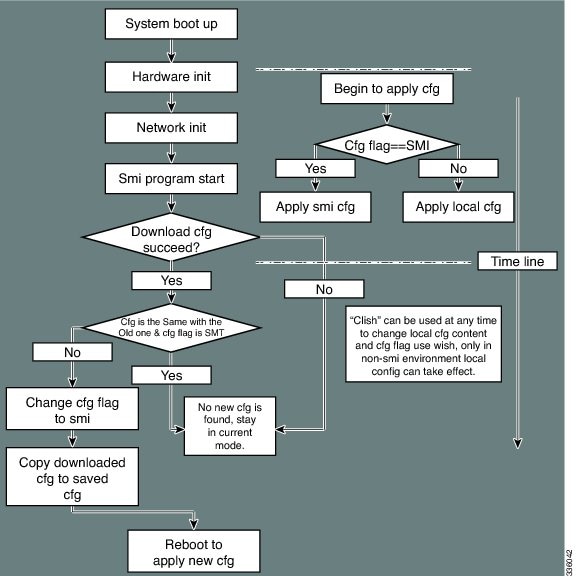
Figure 4-1 shows the logic sequence for the local configuration and the SMI configuration.
Figure 4-1 Logic Sequence for the Local Configuration and the SMI Configuration
Switch Command Reference
Note![]() A syntax description, the command default mode, usage guidelines, and examples are provided only for commands that are not self-explanatory.
A syntax description, the command default mode, usage guidelines, and examples are provided only for commands that are not self-explanatory.
- Enable Mode
- System Configuration Mode
- Ethernet Interface Configuration Mode
- WiFi Interface Configuration Mode
- SSID Configuration Mode
- Show Commands
Enable Mode
|
|
|
|---|---|
Starts the Cisco Edge configuration file, and enters global configuration mode. |
|
Saves the running configuration as the startup configuration file. |
|
configure terminal
To start the Cisco Edge configuration file and enter the global configuration mode, use the configure terminal in the global configuration mode.
Usage Guidelines
Each Cisco Edge configuration file must start with the configure terminal command.
copy running-config startup-config
To save the running configuration as the startup configuration file, use the copy running-config startup-config command in the global configuration mode.
Command Modes
exit
To exit the configuration mode that you are in, use the exit command in any configuration mode.
Command Modes
Ethernet Interface configuration
Usage Guidelines
Use exit to leave a configuration mode and return to the previous configuration mode.
At the end of a Cisco Edge configuration file, use exit after the done system configuration command.
export-config
To export a configuration file to the USB storage or a local directory, use the export-config command in the global configuration mode.
export-config type type to destination
Syntax Description
The destination that you want to export the configuration file. The destination can be either USB or a local directory. |
Command Modes
Usage Guidelines
There are three types of configuration files on the Cisco Edge 300 series switch:
- Startup config—Local configurations of the Cisco Edge 300 series switch stored in /etc/startup-config.
- Mode file—The file used to mark whether the startup configuration is local or smart install, and whether the WiFi mode is AP or client.
- WiFi client network configuration—Stored in /etc/wpa_supplicant.
You can export a configuration file to either the USB storage or a local directory. If you choose to export a configuration file to the USB storage, the configuration is automatically detected, mounted, and exported to the external USB storage.
import-config
To import a configuration file from the USB storage or a local directory, use the import-config command in the global configuration mode.
import-config type type from source
Syntax Description
The import type that imports a configuration file from the source: |
|
The location of the configuration file that you want to import. The source can be either USB or a local directory. |
Command Modes
Usage Guidelines
There are three types of configuration files on the Cisco Edge 300 series switch:
- Startup config—Local configurations of the Cisco Edge 300 series switch stored in /etc/startup-config.
- Mode file—The file used to mark whether the startup configuration is local or smart install, and whether the WiFi mode is AP or client.
- WiFi client network configuration—Stored in /etc/wpa_supplicant.
You can import a configuration file from either the USB storage or a local directory. If you choose to import a configuration file from the USB storage, the configuration is automatically detected, mounted, and imported from the external USB storage.
next-reboot
To select next-reboot mode, use the next-reboot command in the global configuration mode.
Command Modes
reboot
To halt and perform a cold restart, use the reboot command in the global configuration mode.
Command Modes
remove
To remove local startup configuration, use the remove command in the global configuration mode.
Command Modes
show
To display running system information, use the show command in the global configuration mode.
Command Modes
wifi-mode
To set the WiFi mode of the Cisco Edge 300 series switch, use the wifi-mode command in the global configuration mode.
Syntax Description
Usage Guidelines
This command will take effect after the reboot of the Cisco Edge 300 series switch. If you choose the AP mode, the Cisco Edge 300 will work in AP mode after reboot and only the commands that are specific to the AP mode are visible. If you choose the client mode, the Cisco Edge 300 will work in the client mode after reboot and only the commands that are specific to the client mode are visible.
wifi-mode client
To set the WiFi mode of Cisco Edge 300 series switch to client mode, use the wifi-mode client command in the global configuration mode.
Usage Guidelines
This command will take effect after the reboot of Cisco Edge 300 series switch.
System Configuration Mode
agent3g
To enable or disable 3G service on the switch, use the agent3g command in the system configuration mode.
Command Default
bluetooth
To enable or disable Bluetooth on the switch, use the bluetooth command in the system configuration mode.
Command Default
data-store
To set the network file system (NFS) server location, use the data-store command in the system configuration mode.
data-store remote_ip_addr remote_path destination_path
Syntax Description
Usage Guidelines
Do not mount the server to local system directories other than /mnt.
Examples
desktop resolution
To configure the resolution on the desktop, use the desktop resolution command in the system configuration mode.
desktop resolution { 1 | 2 | 3 | 4 | 5 | 6 | 7 | 8 | 9 | help}
Syntax Description
Command Default
Usage Guidelines
do
To execute user EXEC or privileged EXEC commands from global configuration mode or other configuration modes or submodes, use the do command in any configuration mode.
Syntax Description
Command Default
A user EXEC or privileged EXEC command is not executed from a configuration mode.
Command Modes
Usage Guidelines
Use this command to execute user EXEC or privileged EXEC commands (such as show, clear, and debug commands) while configuring your routing device. After the EXEC command is executed, the system will return to the configuration mode that you were using.
done
To define the end of an individual switch configuration and return to the global configuration mode, use the done command in the system configuration mode.
Usage Guidelines
Each individual switch configuration must end with the done command.
hostname
To configure the hostname of the switch, use the hostname command in the system configuration mode.
Syntax Description
Command Default
Usage Guidelines
hosts
To configure the IP address of the switch, use the hosts command in the system configuration mode.
Syntax Description
interface
To enter Ethernet interface configuration mode to configure a Fast Ethernet or the Gigabit Ethernet interface or to enter WiFi interface configuration mode to configure the wireless interface, use the interface command in the system configuration mode.
interface { fe1 | fe2 | fe3 | fe4 | gi1 | bvi1 }
Syntax Description
Usage Guidelines
Use the interface command to enter the Ethernet interface configuration mode or WiFi interface configuration mode.
Related Commands
Use the exit command to leave Ethernet interface configuration mode or WiFi interface configuration mode.
Table 4-3 lists the Ethernet interface configuration commands.
Table 4-4 lists the WiFi interface configuration commands.
ip address
To set the IP address for an interface, use the ip address command.
ip address { dhcp | ip_address }
Syntax Description
Command Default
ip default-gateway
To specify the default gateway, use the ip default-gateway command.
Syntax Description
ip name-server
To specify the DNS server, use the ip name-server command.
Syntax Description
language support
To configure the switch language, use the language support command in the system configuration mode.
language support { 1 | 2 | 3 | 4 | 5 | 6 | 7 | 8 | 9 }
Syntax Description
Command Default
Usage Guidelines
locale
To configure the time zone, use the locale command in the system configuration mode.
Syntax Description
|
|
|
|---|---|
Command Default
login-window
To enable or disable the login window, use the login-window command in the system configuration mode.
Syntax Description
Command Default
mac address-table aging-time
To configure the period that a dynamic MAC address remains in the MAC address table after the address is used or updated, use the mac address-table aging-time command in the system configuration mode.
mac address-table aging-time aging-time
Syntax Description
The period in seconds after which a dynamic MAC address is no longer available in the MAC address table. The range is from 15 to 3825 seconds. |
Command Default
Usage Guidelines
When no packets arrive within the aging time period for a MAC address, it is removed from the MAC address table. If packets arrive for the MAC address after it has been removed from the table, the packets are forwarded to all interfaces except to the one on which they arrived. If the MAC address is received again, it is added to the table.
Configure 0 seconds to disable the timer and to prevent MAC addresses from being removed from the MAC address table.
mac address-table static
To add a static MAC address to one or more VLANs and interfaces and set the default QoS mode, use the mac address-table static command in the system configuration mode.
mac address-table static mac-address vlan vlan id [ interface interface id ] [ default | critical ]
Syntax Description
Usage Guidelines
To prevent flooding, you can add a static MAC address to an interface. For example, you can configure a static MAC address for an attached uplink switch to prevent packet flooding to the Cisco Edge 300 series switch.
Configure critical QoS for an interface that receives relative important information in relation to the other interfaces. For example, to ensure high video quality, you can configure critical QoS for an interface that is connected to a surveillance camera.
Examples
This example shows how to assign the 1111.1111.1111 static MAC address to vlan 2 fe1 interfaces and sets the QoS mode to default:
mgrvlan
To configure the management VLAN of the switch, use the mgrvlan command in the system configuration mode.
Syntax Description
The VLAN ID you assigned to the switch as the management VLAN. Range is 1 to 4094. |
Command Default
no
To remove the configuration for a command or set the command to default, use the no command in the system configuration mode.
Command Modes
ntp server
To configure the IP address of the NTP server that is used by the switch, use the ntp server command in the system configuration mode.
Syntax Description
password
To set the root password and the student password, use password in the global configuration mode.
Command Modes
snmp-server
To enable the Simple Network Management Protocol (SNMP) agent, use the snmp-server command in the system configuration mode. To disable the service, use the no form of this command.
Syntax Description
Command Default
snmp-server community
To configure the community access string to access the Simple Network Management Protocol (SNMP), use the snmp-server community in the system configuration command. To remove the specified community string, use the no form of this command.
snmp-server community string [view view-name] [ro | rw]
no snmp-server community string
Syntax Description
Command Default
By default, an SNMP community string permits read-only access to all objects.
snmp-server contact
To configure the system contact (sysContact) string, use the snmp-server contact in the system configuration mode. To remove the system contact information, use the no form of this command.
Syntax Description
Command Default
snmp-server group
To configure a new Simple Network Management Protocol (SNMP) group, or configure a table that maps SNMP users to SNMP views, use the snmp-server group in the system configuration mode. To remove a specified SNMP group, use the no form of this command.
snmp-server group groupname {v1 | v2c | v3 {auth | noauth | priv}} [read readview] [write writeview]
Syntax Description
Command Default
snmp-server location
To configure the SNMP server system location string, use the snmp-server location in the system configuration mode. To remove the location string, use the no form of this command.
Syntax Description
Defaults
snmp-server user
To configure a new user to an Simple Network Management Protocol (SNMP) group, use the snmp-server user in the system configuration mode. To remove a user from an SNMP group, use the no form of the command.
snmp-server user username groupname {v1 | v2c | v3} auth {md5 | sha} auth-password [priv {des | aes} password]
Syntax Description
snmp-server view
To add or update a view entry, use the snmp-server view global configuration command. To remove the specified Simple Network Management Protocol server view entry, use the no form of this command.
snmp-server view view-name oid-tree {included | excluded}
Syntax Description
Command Default
ssid
To set the SSID name and enter SSID configuration mode to configure the security settings for the access point of the switch, use the ssid command in the system configuration mode.
Syntax Description
SSID name for the access point. The name can consist of up to 32 characters. |
Command Default
Related Commands
Use the exit command to leave SSID configuration mode.
Table 4-5 lists the SSID configuration commands.
system identifier local
To set all switches to their default setting or to enter the system configuration mode to configure an individual switch, use the system identifier local command in the global configuration mode.
Command Modes
timezone
To configure the time zone by city, use the timezone command in the system configuration mode.
Syntax Description
Command Default
Note![]() Although timezone setting will take effect immediately, some applications or services may need to be restarted to reload the new timezone (for example, the rsyslog service). You are recommended to reboot the system after changing the timezone.
Although timezone setting will take effect immediately, some applications or services may need to be restarted to reload the new timezone (for example, the rsyslog service). You are recommended to reboot the system after changing the timezone.
vlan
To add a VLAN in the system, use the vlan command in the system configuration mode.
Syntax Description
VLAN ID assigned to the port. Range: 1 to 4094. Concurrent number should be less than 6. |
Command Default
volume-ctl
To configure the volume of a 3.5 mm microphone or speaker, use the volume-ctl command in the system configuration mode.
Syntax Description
Volume value to be set to a 3.5 mm microphone or speaker. Range: 1 to 4094. |
Command Default
wvlan
To configure the wireless VLAN of the switch, use the wvlan command in the system configuration mode.
Syntax Description
Command Default
Ethernet Interface Configuration Mode
disable
To disable an interface, use the disable command in the Ethernet interface configuration mode.
disable { fe1 | fe2 | fe3 | fe4 | gi1 }
Syntax Description
Defaults
Related Commands
The enable command enables an interface.
duplex
To configure the duplex mode for an interface, use the duplex command in the Ethernet configuration mode.
Syntax Description
Defaults
enable
To disable an interface, use the enable command in Ethernet interface configuration mode or WiFi interface configuration mode.
enable { fe1 | fe2 | fe3 | fe4 | bvi1 }
Syntax Description
Defaults
Related Commands
The disable command disables an interface.
output-queue-strategy
To configure the type of output traffic scheduling on an interface, use the output-queue-strategy command in the Ethernet configuration mode.
output-queue-strategy { strict | wrr }
Syntax Description
Configures traffic scheduling based on weighted round robin (WRR). |
Defaults
priority
To configure the QoS priority for incoming traffic on an interface, use the priority command in the Ethernet interface configuration mode.
Syntax Description
Defaults
rate-limit
To configure rate-limiting for broadcast and unknown unicast traffic on an interface, use the rate-limit command in the Ethernet interface configuration mode.
rate-limit { none | set broadcast | set unknown-unicast | set both } rate
Syntax Description
Configures rate-limiting for both broadcast traffic and unknown unicast traffic. |
|
Defaults
speed
To configure the speed for an interface, use the speed command in the Ethernet configuration mode.
speed { auto | 10 | 100 | 1000 }
Syntax Description
Configures 1000 Mb/s speed and full-duplex mode. Note 1000 Mb/s speed is supported only on the Gi1 interface. |
Defaults
switchport mode
To configure the switchport mode of the switch, use the switchport mode command in the Ethernet configuration mode.
switchport mode trunk | access vlan vlan-id
Syntax Description
Sets the switch port mode to trunkmode with a specific VLAN. After you configured switchport mode trunk, the following three commands can be configured under the switchport mode trunk mode: |
|
Command Default
WiFi Interface Configuration Mode
ap-isolation
To configure wireless separation for clients that are connected to the same SSID, use the ap-isolation command in the WiFi interface configuration mode.
Syntax Description
Related Commands
apsd
To configure Wi-Fi Multimedia (WMM) power save mode for the access point, use the apsd command in the WiFi interface configuration mode.
Syntax Description
Command Default
Usage Guidelines
You can configure the apsd command only when the Wi-Fi Multimedia (WMM) is enabled.
Related Commands
Use the wmm command to enable WMM.
beacon-interval
To configure the beacon interval for the access point, use the beacon-interval command in the WiFi interface configuration mode.
Syntax Description
Command Default
Usage Guidelines
bg-protection
Note![]() This command applies to 802.11b/g mixed mode, 802.11n/g mixed mode, and 802.11b/g/n mixed mode.
This command applies to 802.11b/g mixed mode, 802.11n/g mixed mode, and 802.11b/g/n mixed mode.
To configure the CTS-to-self protection for the access point, use the bg-protection command in the WiFi interface configuration mode.
bg-protection { auto | on | off }
Syntax Description
Command Default
The default is automatic selection of CTS-to-self protection.
Usage Guidelines
CTS-to-self protection minimizes collisions among clients in a mixed mode environment but reduces throughput performance.
channel bandwidth
Note![]() This command applies to 802.11n mode or 802.11n mixed mode.
This command applies to 802.11n mode or 802.11n mixed mode.
To configure the channel width when the access point functions in 802.11n mode, use the channel bandwidth command in the WiFi interface configuration mode.
channel bandwidth { 20 | 20/40 }
Syntax Description
Configures automatic selection of 20-MHz or 40-MHz channel width. |
Command Default
The default is automatic selection of 20-MHz or 40-MHz channel width.
Usage Guidelines
The default setting should work well for most networks.
A 40-MHz channel provides a higher throughput performance for 802.11n clients.
802.11b and 802.11g clients can function only with a 20-MHz channel.
Related Commands
The setting of the channel bandwidth command affects the options for the mcs command.
channel number
To configure the channel number (which sets the frequency) for the access point, use the channel number command in the WiFi interface configuration mode.
channel number { auto | number }
Syntax Description
Command Default
Usage Guidelines
We recommend that you either use the default channel number or the automatic selection of the channel number and only change the channel number if you experience interference in the network.
If you need to change the channel number, use the following numbers based on your location:
data-beacon-rate
To configure the Delivery Traffic Indication Message (DTIM) interval for the access point, use the data-beacon-rate command in the WiFi interface configuration.
Syntax Description
Command Default
Usage Guidelines
The DTIM interval is a multiple of the beacon interval. Before you change the DTIM interval, consider the types of clients in the network: laptops might function better with a short interval, but mobile phones might function better with a long interval.
A long interval allows clients to save power but can delay multicast and broadcast traffic.
A short interval decreases delivery time of multicast and broadcast traffic but can increase power consumption by clients.
Related Commands
The setting of the beacon-interval command affects the data-beacon-rate command.
extension channel
Note![]() This command applies to 802.11n mode or 802.11n mixed mode.
This command applies to 802.11n mode or 802.11n mixed mode.
To configure the control sideband that is used for the extension or secondary channel when the access point functions in 802.11n mode, use the extension channel command in the WiFi interface configuration mode.
extension channel { upper | lower }
Syntax Description
Command Default
Usage Guidelines
This command takes effect only when you configure a 40-MHz channel width.
When the main channel number is in the lower range (for example, in the 1–4 range), use the upper extension channel.
When the main channel number is in the upper range (for example, in the 10–13 range), use the lower extension channel.
When the main channel number is in the middle range (for example, in the 5–9 range), use either the upper or lower extension channel.
Related Commands
Use the channel bandwidth command to configure the channel width.
Use the channel number command to configure the main channel number.
guard-interval
Note![]() This command applies to 802.11n mode or 802.11n mixed mode.
This command applies to 802.11n mode or 802.11n mixed mode.
To configure the period between packets when the access point functions in 802.11n mode, use the guard-interval command in the WiFi interface configuration mode.
Syntax Description
Command Default
Usage Guidelines
Use a 400-ns interval to increase the throughput performance for 802.11n clients but risk some packet errors and multipath interference.
Use an 800-ns interval to minimize packet errors and multipath interference but decrease the throughput performance for 802.11n clients.
Related Commands
The setting of the guard-interval command affects the options for the mcs command.
igmp-snoop
To enable or disable IGMP snooping on the wireless interface, use the igmp-snoop command in the WiFi interface configuration mode.
Command Default
mcs
Note![]() This command applies to 802.11n mode or 802.11n mixed mode.
This command applies to 802.11n mode or 802.11n mixed mode.
To configure the high throughput Modulation and Coding Schemes (MCS) rate when the access point functions in 802.11n mode, use the mcs command in the WiFi interface configuration mode.
Syntax Description
Command Default
Usage Guidelines
This table shows the MCS index numbers with their potential data rates in Mb/s based on MCS, guard interval, and channel width.
|
|
|
|
||
|
|
|
|
|
|
We recommend that you use automatic selection of the MCS index number. Change the MCS index to a fixed number only if the Received Signal Strength Indication (RSSI) for the clients in the network can support the selected MCS index number.
Related Commands
The setting of the channel bandwidth command affects the options for the mcs command.
The setting of the guard-interval command affects the options for the mcs command.
multicast-mcs
Note![]() This command applies to 802.11n mode or 802.11n mixed mode.
This command applies to 802.11n mode or 802.11n mixed mode.
To configure the high throughput Modulation and Coding Schemes (MCS) rate on multicast frames when the access point functions in 802.11n mode, use the multicast-mcs command in the WiFi interface configuration mode.
Syntax Description
Command Default
Usage Guidelines
This table shows the MCS index numbers with their potential data rates in Mb/s based on MCS, guard interval, and channel width.
|
|
|
|
||
|
|
|
|
|
|
multicast-phy-mode
To configure PHY mode on multicast frames when the access point functions in 802.11n mode, use the multicast-phy-mode command in the WiFi interface configuration mode.
multicast-phy-mode { 0 | 1 | 2 | 3 }
Syntax Description
Command Default
operating-mode
Note![]() This command applies to 802.11n mode.
This command applies to 802.11n mode.
To configure greenfield or mixed mode when the access point functions in 802.11n mode, use the operating-mode command in the WiFi interface configuration mode.
operating-mode { greenfield | mixed }
Syntax Description
Command Default
Usage Guidelines
Use greenfield mode if there are only 802.11n clients in the coverage area. If you use greenfield mode when 802.11b, 802.11g, and 802.11n clients coexist in the same coverage area, packet collisions might occur.
Use mixed mode when 802.11b, 802.11g, and 802.11n clients coexist in the same coverage area.
packet aggregation
Note![]() This command applies to 802.11n mode or 802.11n mixed mode.
This command applies to 802.11n mode or 802.11n mixed mode.
To configure Aggregate MAC Service Data Unit (A-MSDU) packet aggregation when the access point functions in 802.11n mode, use the packet aggregation command in the WiFi interface configuration mode.
packet aggregation { on | off }
Syntax Description
Command Default
Usage Guidelines
Enable packet aggregration if network traffic consists primarily of data.
Disable packet aggregration if network traffic consists primarily of voice, video, or other multimedia traffic.
radio
To turn the access point wireless radio on or off, use the radio command in the WiFi interface configuration mode.
Syntax Description
Command Default
Usage Guidelines
If you do not intend to use the access point, turn off the radio. If you want to use the AP function, make sure to turn on the radio.
rdg
Note![]() This command applies to 802.11n mode or 802.11n mixed mode.
This command applies to 802.11n mode or 802.11n mixed mode.
To configure the Reverse Direction Grant (RDG) when the access point functions in 802.11n mode, use the rdg command in the WiFi interface configuration mode.
Syntax Description
Command Default
Usage Guidelines
When RDG is enabled, a transmitter that has reserved the channel transmission opportunity allows the receiver to send packets in the reserved direction. When RDG is disabled, packets can be transmitted only in one direction during the channel transmission opportunity reservation.
Enable RDG for better throughput performance for 802.11n traffic.
short-slot
Note![]() This command applies to 802.11g mode or 802.11g mixed mode.
This command applies to 802.11g mode or 802.11g mixed mode.
To configure the short-slot time when the access point functions in 802.11g mode or 802.11g mixed mode, use the short-slot command in the WiFi interface configuration mode.
Syntax Description
Command Default
Usage Guidelines
Enable the short-slot time for better throughput performance for 802.11g clients.
If there are mostly 802.11b clients in the network, disable the short-slot time.
transmit burst
To configure the transmit burst (Tx burst) for the access point, use the transmit burst command in the WiFi interface configuration mode.
Syntax Description
Command Default
Usage Guidelines
Leave Tx burst on for better throughput performance.
Disable Tx burst if you notice wireless interference in the network.
transmit preamble
To configure the preamble for the access point, use the transmit preamble command in the WiFi interface configuration mode.
transmit preamble { long | short | auto }
Syntax Description
Command Default
Usage Guidelines
Use the long preamble setting for compatibility with legacy 802.11 systems operating at 1 and 2 Mb/s.
Configure a short preamble setting to improve throughput performance.
transmit power
To configure the power at which the access point radio transmits its wireless signal, use the transmit power command in the WiFi interface configuration mode.
Syntax Description
Command Default
Usage Guidelines
For transmission of the wireless signal over a long distance, use the 100 percent setting.
For transmission of the wireless signal over a short distance, for example, when all clients are in a small room, lower the percentage.
wireless-mode
To configure the 802.11 wireless mode for the access point, use the wireless-mode command in the WiFi interface configuration mode.
wireless-mode { 0 | 1 | 4 | 6 | 7 | 9 }
Syntax Description
Command Default
Usage Guidelines
802.11b/g mixed mode—Select this mode if you have devices in the network that support 802.11b and 802.11g.
802.11b mode—Select this mode if all devices in the wireless network only support 802.11b.
802.11g mode—Select this mode if all devices in the wireless network only support 802.11g.
802.11n mode—Select this mode if all devices in the wireless network only support 802.11n.
802.11b/g/n mixed mode—Select this mode if you have devices in the network that support 802.11b, 802.11g, and 802.11n.
wmm
To configure Wi-Fi Multimedia (WMM) for the access point, use the wmm command in the WiFi interface configuration mode.
Syntax Description
Command Default
Usage Guidelines
WMM provides QoS for wireless traffic. If there is a lot of mixed media traffic (voice, video, data), enable WMM.
Related Commands
Use the apsd command to configure WMM power save mode.
SSID Configuration Mode
To enter SSID mode, perform the following steps:
Note![]() Configuration for SSID will take effect after exiting the SSID configuring mode.
Configuration for SSID will take effect after exiting the SSID configuring mode.
broadcast ssid
To enable or disable broadcast of the SSID name, use the broadcast ssi d command in the SSID configuration mode.
Syntax Description
Command Default
Usage Guidelines
Disable broadcast of the SSID for enhanced security. Only wireless clients who know the SSID can connect to the access point.
Enable broadcast of the SSID for wider availability and easier access.
encryption mode (open, shared, or WEP configuration)
To configure open, shared, or Wired Equivalency Privacy (WEP) authentication and associated encryption for the access point, use the encryption mode command in the SSID configuration mode.
encryption mode { open | shared } type { none | wep { key { 1 | 2 | 3 | 4 } { hex number | ascii phrase }}}
Syntax Description
Command Default
Usage Guidelines
For shared access without encryption, the WEP hexadecimal number or passphrase is used only for authentication.
For shared access with WEP encryption, the WEP hexadecimal number or passphrase is used for both authentication and encryption.
Examples
This example shows how to configure shared authentication and WEP encryption, using key 3 and a passphrase of 3uifsfis-_0r5:
encryption mode (WPA configuration)
To configure Wi-Fi Protected Access (WPA) authentication and associated encryption for the access point, use the encryption mode command in the SSID configuration mode.
encryption mode { wpapsk | wpa2psk | wpapskwpa2psk } type { tkip | aes | tkipaes }
pass-phrase phrase
Syntax Description
Command Default
Examples
This example shows how to configure combined WPA and WPA2 authentication with combined TKIP and AES encryption, using a passphrase of safE478_Ty33Yep-:
encryption mode (802.1x)
To configure Wi-Fi Protected Access (WPA) authentication and associated encryption for the access point, use the encryption mode command in the SSID configuration mode.
Note![]() The encryption mode (802.1x) should be used in combination with RADIUS server.
The encryption mode (802.1x) should be used in combination with RADIUS server.
encryption mode { wpa | wpa2 | wpa1wpa2 } type { tkip | aes | tkipaes }
Syntax Description
Configures combined WPA and WPA2 with 802.1x authentication. |
|
Configures Temporal Key Integrity Protocol (TKIP) encryption. |
|
Command Default
The default mode is wpa2psk access, tkipaes encryption, and the password is Cisco123.
Examples
This example shows how to configure combined WPA and WPA2 authentication with combined TKIP and AES encryption, using 802.1x authentication method:
radius-server
To configure the related information of a radius-server, use the radius-server in the SSID configuration mode.
radius-server host hostname [auth-port port_number] [key secret]
Syntax Description
Specifies the authentication port number of the radius server. |
|
Specifies the password of the authentication service on the radius server. |
|
The password of the authentication service on radius server. |
Command Default
Examples
This example shows how to configure the related information of a radius-server:
Show Commands
You can use the following show commands in the global configuration mode to display the configuration on the Cisco Edge 300 series switch:
- show 3rd-party-software-version: Displays the third-party software version.
- show bluetooth: Displays the bluetooth status.
- show channel: Displays the AP wireless channel setting.
- show cisco-software-version: Displays the Cisco software version.
- show cpu: Displays the CPU.
- show desktop-resolution: Displays the desktop resolution information.
- show dhcp: Displays the DHCP information.
- show disk: Displays the disk usage.
- show dns: Displays the DNS information.
- show factory-mode-os-version: Displays the Factoy-Mode OS version.
- show hdmi-display-info : Displays the current connected HDMI sink information.
- show hostname: Displays the hostname.
- show interfaces: Displays the interface status and configuration.
- show ip: Displays the IP information.
- show mac: Displays the MAC table information.
- show memory: Displays the memory usage.
- show nfs: Displays NFS mount status.
- show os-version: Displays the Normal-Mode OS version.
- show port-statistics: Displays the switch port statistics.
- show port-status: Displays the switch port status.
- show qos: Displays the current QoS configuration.
- show running-config: Displays the current operating configuration.
- show snmp: Displays the status of SNMP communications.
- show snmp group: Displays the names of groups on the router, the security model, the status of the different views, and the storage type of each group.
- show snmp user: Displays the information on each Simple Network Management Protocol (SNMP) username in the group username table.
- show snmp view: Displays the family name, storage type, status of a Simple Network Management Protocol (SNMP) configuration and associated MIB.
- show ssid: Displays the AP wireless ssid setting.
- show startup-config: Displays the contents of startup configuration.
- show USB: Displays the USB device information.
- show vlan: Displays the VLAN configuration.
- show vstack config: Displays the Smart Install VLAN configuration.
- show wifi-client-status : Displays the WiFi client status (for WiFi client mode only).
- show wireless-clients: Displays the AP wireless wireless-clients associated.
- show wireless-clients-number: Displays the associated wireless clients number.
- show wireless-mode: Displays the AP wireless wireless-mode setting.
 Feedback