- Preface
- New and Changed Information for this Release
- Overview
- Configuring Ethernet Interfaces
- Configuring VLANs
- Configuring Private VLANs
- Configuring Access and Trunk Interfaces
- Configuring Switching Modes
- Configuring Rapid PVST+
- Configuring Multiple Spanning Tree
- Configuring STP Extensions
- Configuring LLDP
- Configuring the MAC Address Table
- Configuring IGMP Snooping
- Configuring Traffic Storm Control
- Index
Cisco Nexus 3000 NX-OS Layer 2 Switching Configuration Guide, Release 5.0(3)U3(1)
Bias-Free Language
The documentation set for this product strives to use bias-free language. For the purposes of this documentation set, bias-free is defined as language that does not imply discrimination based on age, disability, gender, racial identity, ethnic identity, sexual orientation, socioeconomic status, and intersectionality. Exceptions may be present in the documentation due to language that is hardcoded in the user interfaces of the product software, language used based on RFP documentation, or language that is used by a referenced third-party product. Learn more about how Cisco is using Inclusive Language.
- Updated:
- September 17, 2014
Chapter: Configuring Private VLANs
- Information About Private VLANs
- Guidelines and Limitations for Private VLANs
- Configuring a Private VLAN
- Enabling Private VLANs
- Configuring a VLAN as a Private VLAN
- Associating Secondary VLANs with a Primary Private VLAN
- Configuring an Interface as a Private VLAN Host Port
- Configuring an Interface as a Private VLAN Promiscuous Port
- Configuring a Promiscuous Trunk Port
- Configuring an Isolated Trunk Port
- Configuring the Allowed VLANs for PVLAN Trunking Ports
- Configuring Native 802.1Q VLANs on Private VLANs
- Verifying the Private VLAN Configuration
Configuring Private VLANs
This chapter contains the following sections:
- Information About Private VLANs
- Guidelines and Limitations for Private VLANs
- Configuring a Private VLAN
- Verifying the Private VLAN Configuration
Information About Private VLANs
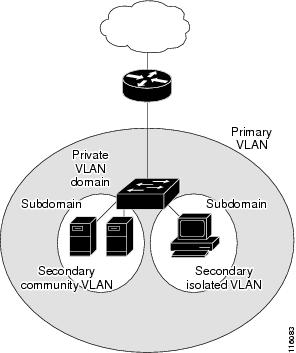
A private VLAN (PVLAN) partitions the Ethernet broadcast domain of a VLAN into subdomains, allowing you to isolate the ports on the switch from each other. A subdomain consists of a primary VLAN and one or more secondary VLANs (see the following figure). All VLANs in a PVLAN domain share the same primary VLAN. The secondary VLAN ID differentiates one subdomain from another. The secondary VLANs may either be isolated VLANs or community VLANs. A host on an isolated VLAN can only communicate with the associated promiscuous port in its primary VLAN. Hosts on community VLANs can communicate among themselves and with their associated promiscuous port but not with ports in other community VLANs.
 Note | You must first create the VLAN before you can convert it to a PVLAN, either primary or secondary. |
- Primary and Secondary VLANs in Private VLANs
- Private VLAN Ports
- Primary, Isolated, and Community Private VLANs
- Private VLAN Promiscuous Trunks
- Private VLAN Isolated Trunks
- Broadcast Traffic in Private VLANs
- Private VLAN Port Isolation
Primary and Secondary VLANs in Private VLANs
A private VLAN domain has only one primary VLAN. Each port in a private VLAN domain is a member of the primary VLAN; the primary VLAN is the entire private VLAN domain.
Secondary VLANs provide isolation between ports within the same private VLAN domain. The following two types are secondary VLANs within a primary VLAN:
Private VLAN Ports
The three types of PVLAN ports are as follows:
- Promiscuous port—A promiscuous port belongs to the primary VLAN. The promiscuous port can communicate with all interfaces, including the community and isolated host ports, that belong to those secondary VLANs associated to the promiscuous port and associated with the primary VLAN. You can have several promiscuous ports in a primary VLAN. Each promiscuous port can have several secondary VLANs or no secondary VLANs that are associated to that port. You can associate a secondary VLAN to more than one promiscuous port, as long as the promiscuous port and secondary VLANs are within the same primary VLAN. You may want to do this for load-balancing or redundancy purposes. You can also have secondary VLANs that are not associated to any promiscuous port. A promiscuous port can be configured as an access port.
- Isolated port—An isolated port is a host port that belongs to an isolated secondary VLAN. This port has complete isolation from other ports within the same PVLAN domain, except that it can communicate with associated promiscuous ports. PVLANs block all traffic to isolated ports except traffic from promiscuous ports. Traffic received from an isolated port is forwarded only to promiscuous ports. You can have more than one isolated port in a specified isolated VLAN. Each port is completely isolated from all other ports in the isolated VLAN. An isolated port can be configured an access port.
- Community port—A community port is a host port that belongs to a community secondary VLAN. Community ports communicate with other ports in the same community VLAN and with associated promiscuous ports. These interfaces are isolated from all other interfaces in other communities and from all isolated ports within the PVLAN domain. A community port must be configured as an access port.
Primary, Isolated, and Community Private VLANs
Primary VLANs and the two types of secondary VLANs (isolated and community) have these characteristics:
- Primary VLAN— The primary VLAN carries traffic from the promiscuous ports to the host ports, both isolated and community, and to other promiscuous ports.
- Isolated VLAN —An isolated VLAN is a secondary VLAN that carries unidirectional traffic upstream from the hosts toward the promiscuous ports. You can configure only one isolated VLAN in a PVLAN domain. An isolated VLAN can have several isolated ports. The traffic from each isolated port also remains completely separate.
- Community VLAN—A community VLAN is a secondary VLAN that carries upstream traffic from the community ports to the promiscuous port and to other host ports in the same community. You can configure multiple community VLANs in a PVLAN domain. The ports within one community can communicate, but these ports cannot communicate with ports in any other community or isolated VLAN in the private VLAN.
The following figure shows the traffic flows within a PVLAN, along with the types of VLANs and types of ports.
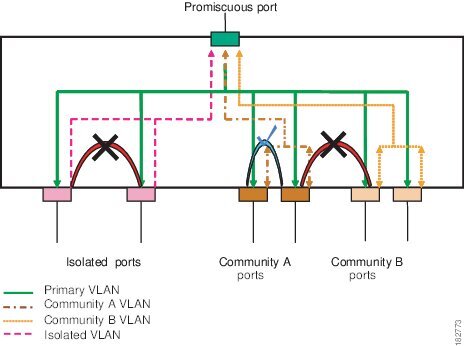
Note | The PVLAN traffic flows are unidirectional from the host ports to the promiscuous ports. Traffic received on primary VLAN enforces no separation and forwarding is done as in a normal VLAN. |
A promiscuous access port can serve only one primary VLAN and multiple secondary VLANs (community and isolated VLANs). With a promiscuous port, you can connect a wide range of devices as access points to a PVLAN. For example, you can use a promiscuous port to monitor or back up all the PVLAN servers from an administration workstation.
In a switched environment, you can assign an individual PVLAN and associated IP subnet to each individual or common group of end stations. The end stations need to communicate only with a default gateway to communicate outside the private VLAN.
Associating Primary and Secondary VLANs
To allow host ports in secondary VLANs to communicate outside the PVLAN, you associate secondary VLANs to the primary VLAN. If the association is not operational, the host ports (community and isolated ports) in the secondary VLAN are brought down.
Note | You can associate a secondary VLAN with only one primary VLAN. |
For an association to be operational, the following conditions must be met:
- The primary VLAN must exist and be configured as a primary VLAN.
- The secondary VLAN must exist and be configured as either an isolated or community VLAN.
Note | Use the show vlan private-vlan command to verify that the association is operational. The switch does not display an error message when the association is nonoperational. |
If you delete either the primary or secondary VLAN, the ports that are associated with the VLAN become inactive. Use the no private-vlan command to return the VLAN to the normal mode. All primary and secondary associations on that VLAN are suspended, but the interfaces remain in PVLAN mode. When you convert the VLAN back to PVLAN mode, the original associations are reinstated.
If you enter the no vlan command for the primary VLAN, all PVLAN associations with that VLAN are deleted. However, if you enter the no vlan command for a secondary VLAN, the PVLAN associations with that VLAN are suspended and are restored when you recreate the specified VLAN and configure it as the previous secondary VLAN.
In order to change the association between a secondary and primary VLAN, you must first remove the current association and then add the desired association.
Private VLAN Promiscuous Trunks
The Cisco Nexus 3000 Series device does not support Private VLAN trunk ports.
Private VLAN Isolated Trunks
The Cisco Nexus 3000 Series device does not support Private VLAN trunk ports.
Broadcast Traffic in Private VLANs
Broadcast traffic from ports in a private VLAN flows in the following ways:
- The broadcast traffic flows from a promiscuous port to all ports in the primary VLAN (which includes all the ports in the community and isolated VLANs). This broadcast traffic is distributed to all ports within the primary VLAN, including those ports that are not configured with private VLAN parameters.
- The broadcast traffic from an isolated port is distributed only to those promiscuous ports in the primary VLAN that are associated to that isolated port.
- The broadcast traffic from community ports is distributed to all ports within the port’s community and to all promiscuous ports that are associated to the community port. The broadcast packets are not distributed to any other communities within the primary VLAN or to any isolated ports.
Private VLAN Port Isolation
You can use PVLANs to control access to end stations as follows:
- Configure selected interfaces connected to end stations as isolated ports to prevent any communication. For example, if the end stations are servers, this configuration prevents communication between the servers.
- Configure interfaces connected to default gateways and selected end stations (for example, backup servers) as promiscuous ports to allow all end stations access to a default gateway.
Guidelines and Limitations for Private VLANs
When configuring PVLANs, follow these guidelines:
- You must have already created the VLAN before you can assign the specified VLAN as a private VLAN.
- You must enable PVLANs before the switch can apply the PVLAN functionality.
- You cannot disable PVLANs if the switch has any operational ports in a PVLAN mode.
- Enter the private-vlan synchronize command from within the Multiple Spanning Tree (MST) region definition to map the secondary VLANs to the same MST instance as the primary VLAN.
Configuring a Private VLAN
Enabling Private VLANs
You must enable PVLANs on the switch to use the PVLAN functionality.
Note | The PVLAN commands do not appear until you enable the PVLAN feature. |
This example shows how to enable the PVLAN feature on the switch:
switch# configure terminal
switch(config)# feature private-vlan
Configuring a VLAN as a Private VLAN
To create a PVLAN, you first create a VLAN, and then configure that VLAN to be a PVLAN.
Ensure that the PVLAN feature is enabled.
| Command or Action | Purpose | |
|---|---|---|
| Step 1 |
switch#
configure terminal
|
Enters configuration mode. |
| Step 2 |
switch(config)#
vlan {vlan-id |
vlan-range}
|
Places you into the VLAN configuration submode. |
| Step 3 |
switch(config-vlan)#
private-vlan {community |
isolated |
primary}
|
Configures the VLAN as either a community, isolated, or primary PVLAN. In a PVLAN, you must have one primary VLAN. You can have multiple community and isolated VLANs. |
| Step 4 |
switch(config-vlan)#
no private-vlan {community |
isolated |
primary}
| (Optional)
Removes the PVLAN configuration from the specified VLAN(s) and returns it to normal VLAN mode. If you delete either the primary or secondary VLAN, the ports that are associated with the VLAN become inactive. |
This example shows how to assign VLAN 5 to a PVLAN as the primary VLAN:
switch# configure terminal
switch(config)# vlan 5
switch(config-vlan)# private-vlan primary
This example shows how to assign VLAN 100 to a PVLAN as a community VLAN:
switch# configure terminal
switch(config)# vlan 100
switch(config-vlan)# private-vlan community
This example shows how to assign VLAN 200 to a PVLAN as an insolated VLAN:
switch# configure terminal
switch(config)# vlan 200
switch(config-vlan)# private-vlan isolated
Associating Secondary VLANs with a Primary Private VLAN
When you associate secondary VLANs with a primary VLAN, follow these guidelines:
- The secondary-vlan-list parameter cannot contain spaces. It can contain multiple comma-separated items. Each item can be a single secondary VLAN ID or a hyphenated range of secondary VLAN IDs.
- The secondary-vlan-list parameter can contain multiple community VLAN IDs and one isolated VLAN ID.
- Enter a secondary-vlan-list or use the add keyword with a secondary-vlan-list to associate secondary VLANs with a primary VLAN.
- Use the remove keyword with a secondary-vlan-list to clear the association between secondary VLANs and a primary VLAN.
- You change the association between a secondary and primary VLAN by removing the existing association and then adding the desired association.
If you delete either the primary or secondary VLAN, the VLAN becomes inactive on the port where the association is configured. When you enter the no private-vlan command, the VLAN returns to the normal VLAN mode. All primary and secondary associations on that VLAN are suspended, but the interfaces remain in PVLAN mode. If you again convert the specified VLAN to PVLAN mode, the original associations are reinstated.
If you enter the no vlan command for the primary VLAN, all PVLAN associations with that VLAN are lost. However, if you enter the no vlan command for a secondary VLAN, the PVLAN associations with that VLAN are suspended and are reinstated when you recreate the specified VLAN and configure it as the previous secondary VLAN.
Ensure that the PVLAN feature is enabled.
| Command or Action | Purpose | |
|---|---|---|
| Step 1 |
switch#
configure terminal
|
Enters configuration mode. |
| Step 2 |
switch(config)#
vlan
primary-vlan-id
|
Enters the number of the primary VLAN that you are working in for the PVLAN configuration. |
| Step 3 |
switch(config-vlan)#
private-vlan
association {[add]
secondary-vlan-list |
remove
secondary-vlan-list}
|
Associates the secondary VLANs with the primary VLAN. Use the remove keyword with a secondary-vlan-list to clear the association between secondary VLANs and a primary VLAN. |
| Step 4 |
switch(config-vlan)#
no private-vlan
association
| (Optional)
Removes all associations from the primary VLAN and returns it to normal VLAN mode. |
This example shows how to associate community VLANs 100 through 110 and isolated VLAN 200 with primary VLAN 5:
switch# configure terminal
switch(config)# vlan 5
switch(config-vlan)# private-vlan association 100-110, 200
Configuring an Interface as a Private VLAN Host Port
In PVLANs, host ports are part of the secondary VLANs, which are either community VLANs or isolated VLANs. Configuring a PVLAN host port involves two steps. First, you define the port as a PVLAN host port and then you configure a host association between the primary and secondary VLANs.
Note | We recommend that you enable BPDU Guard on all interfaces configured as a host ports. |
Ensure that the PVLAN feature is enabled.
| Command or Action | Purpose | |
|---|---|---|
| Step 1 |
switch#
configure terminal
|
Enters configuration mode. |
| Step 2 |
switch(config)#
interface
type
[chassis/]slot/port
|
Selects the port to configure as a PVLAN host port. This port can be on a FEX (identified by the chassis option). |
| Step 3 |
switch(config-if)#
switchport mode private-vlan
host
|
Configures the port as a host port for a PVLAN. |
| Step 4 |
switch(config-if)#
switchport private-vlan
host-association {primary-vlan-id} {secondary-vlan-id}
|
Associates the port with the primary and secondary VLANs of a PVLAN. The secondary VLAN can be either an isolated or community VLAN. |
| Step 5 |
switch(config-if)#
no switchport private-vlan
host-association
| (Optional)
Removes the PVLAN association from the port. |
This example shows how to configure Ethernet port 1/12 as a host port for a PVLAN and associate it to primary VLAN 5 and secondary VLAN 101:
switch# configure terminal
switch(config)# interface ethernet 1/12
switch(config-if)# switchport mode private-vlan host
switch(config-if)# switchport private-vlan host-association 5 101
Configuring an Interface as a Private VLAN Promiscuous Port
In a PVLAN domain, promiscuous ports are part of the primary VLAN. Configuring a promiscuous port involves two steps. First, you define the port as a promiscuous port and then you configure the mapping between a secondary VLAN and the primary VLAN.
Ensure that the PVLAN feature is enabled.
| Command or Action | Purpose | |
|---|---|---|
| Step 1 |
switch#
configure terminal
|
Enters configuration mode. |
| Step 2 |
switch(config)#
interface
type
slot/port
|
Selects the port to configure as a PVLAN promiscuous port. A physical interface is required. This port cannot be on a FEX. |
| Step 3 |
switch(config-if)#
switchport mode private-vlan
promiscuous
|
Configures the port as a promiscuous port for a PVLAN. You can only enable a physical Ethernet port as the promiscuous port. |
| Step 4 |
switch(config-if)#
switchport private-vlan
mapping {primary-vlan-id} {secondary-vlan-list |
add
secondary-vlan-list |
remove
secondary-vlan-list}
|
Configures the port as a promiscuous port and associates the specified port with a primary VLAN and a selected list of secondary VLANs. The secondary VLAN can be either an isolated or community VLAN. |
| Step 5 |
switch(config-if)#
no switchport private-vlan
mapping
| (Optional)
Clears the mapping from the PVLAN. |
This example shows how to configure Ethernet interface 1/4 as a promiscuous port associated with primary VLAN 5 and secondary isolated VLAN 200:
switch# configure terminal
switch(config)# interface ethernet 1/4
switch(config-if)# switchport mode private-vlan promiscuous
switch(config-if)# switchport private-vlan mapping 5 200
Configuring a Promiscuous Trunk Port
You cannot perform this task because the Cisco Nexus 3000 Series device does not support Private VLAN trunk ports.
Configuring an Isolated Trunk Port
You cannot perform this task because the Cisco Nexus 3000 Series device does not support Private VLAN trunk ports.
Configuring the Allowed VLANs for PVLAN Trunking Ports
You cannot perform this task because the Cisco Nexus 3000 Series device does not support Private VLAN trunk ports.
Configuring Native 802.1Q VLANs on Private VLANs
You cannot perform this task because the Cisco Nexus 3000 Series device does not support Private VLAN trunk ports.
Verifying the Private VLAN Configuration
To display PVLAN configuration information, use the following commands:
|
Command |
Purpose |
|---|---|
| switch# show feature |
Displays the features enabled on the switch. |
| switch# show interface switchport |
Displays information on all interfaces configured as switch ports. |
| switch# show vlan private-vlan [type] |
Displays the status of the PVLAN. |
This example shows how to display the PVLAN configuration:
switch# show vlan private-vlan
Primary Secondary Type Ports
------- --------- --------------- -------------------------------------------
5 100 community
5 101 community Eth1/12, Eth100/1/1
5 102 community
5 110 community
5 200 isolated Eth1/2
switch# show vlan private-vlan type
Vlan Type
---- -----------------
5 primary
100 community
101 community
102 community
110 community
200 isolated
The following example shows how to display enabled features (some of the output has been removed for brevity):
switch# show feature
Feature Name Instance State
-------------------- -------- --------
fcsp 1 enabled
...
interface-vlan 1 enabled
private-vlan 1 enabled
udld 1 disabled
...
 Feedback