Cisco Nexus 1000V Port Profile Configuration Guide, Release 4.2(1) SV1(4a)
Bias-Free Language
The documentation set for this product strives to use bias-free language. For the purposes of this documentation set, bias-free is defined as language that does not imply discrimination based on age, disability, gender, racial identity, ethnic identity, sexual orientation, socioeconomic status, and intersectionality. Exceptions may be present in the documentation due to language that is hardcoded in the user interfaces of the product software, language used based on RFP documentation, or language that is used by a referenced third-party product. Learn more about how Cisco is using Inclusive Language.
- Updated:
- January 31, 2011
Chapter: Creating Port Profiles
- Information About Port Profiles
- Guidelines and Limitations
- Default Settings
- Configuring Port Profiles
- Additional References
- Feature History for Port Profiles
Creating Port Profiles
This chapter describes how to create, enable, or remove a port profile or add VMware attributes, access or trunk ports, ACLs, and NetFlow.
This chapter includes the following sections:
•![]() Information About Port Profiles
Information About Port Profiles
•![]() Feature History for Port Profiles
Feature History for Port Profiles
Information About Port Profiles
Port profiles simplify interface configuration by defining policies that can be reused for multiple interfaces. For more information about port profiles, see Chapter 1 "Overview".
Port Profile States
A port profile can be in one of two states: enabled or disabled. Port profiles are disabled by default. Table 2-1 describes port profile behavior in these two states.
To enable a port profile, see the "Enabling a Port Profile" procedure.
vEthernet Port Binding
You can configure either static, dynamic, or ephemeral port binding for vEthernet port profiles. Table 2-2 shows how this setting controls how ports are assigned in the VMware port group.
Guidelines and Limitations
Use the following guidelines and limitations when configuring port profiles:
•![]() Once a port profile is created as either an Ethernet or vEthernet type, you cannot change the type.
Once a port profile is created as either an Ethernet or vEthernet type, you cannot change the type.
•![]() In an installation where multiple Ethernet port profiles are active on the same VEM, it is recommended that they do not carry the same VLAN(s). The allowed VLAN list should be mutually exclusive. Overlapping VLANs can be configured but may cause duplicate packets to be received by virtual machines in the network.
In an installation where multiple Ethernet port profiles are active on the same VEM, it is recommended that they do not carry the same VLAN(s). The allowed VLAN list should be mutually exclusive. Overlapping VLANs can be configured but may cause duplicate packets to be received by virtual machines in the network.
•![]() To maintain consistency between the port profile definition and what is applied to an interface, if a port profile modification is rejected by any port, the modification is rejected by the port profile too.
To maintain consistency between the port profile definition and what is applied to an interface, if a port profile modification is rejected by any port, the modification is rejected by the port profile too.
•![]() If you create a port profile with a command error, for example a private VLAN mapping error or service policy map error, then an attempt to apply this port profile to an interface shuts down the interface. The error is not copied to the interface and a system message is generated with details of the error. In this case, you must correct the error in the port profile. Then return the interface to service and apply the corrected port profile using the following command sequence:
If you create a port profile with a command error, for example a private VLAN mapping error or service policy map error, then an attempt to apply this port profile to an interface shuts down the interface. The error is not copied to the interface and a system message is generated with details of the error. In this case, you must correct the error in the port profile. Then return the interface to service and apply the corrected port profile using the following command sequence:
1. no shutdown
2. default shutdown
For more information, see the Cisco Nexus 1000V Troubleshooting Guide, Release 4.2(1)SV1(4a).
•![]() MTU can only be configured for uplink, Ethernet type port profiles.
MTU can only be configured for uplink, Ethernet type port profiles.
•![]() CSCtk05901 If you configure MTU for an Ethernet port profile, your ESX host may generate the following error:
CSCtk05901 If you configure MTU for an Ethernet port profile, your ESX host may generate the following error:
2010 Nov 15 04:35:27 my-n1k %VEM_MGR-SLOT3-1-VEM_SYSLOG_ALERT: vssnet :
sf_platform_set_mtu: Failed setting MTU for VMW port with portID 33554475.
In this case, the MTU value you have set is not supported by the VEM physical NIC. See your VMware documentation for more information about supported MTU for PNIC.
•![]() Before configuring a port profile, the Cisco Nexus 1000V software must be initially configured. For information, see the Cisco Nexus 1000V Getting Started Guide, Release 4.2(1)SV1(4a).
Before configuring a port profile, the Cisco Nexus 1000V software must be initially configured. For information, see the Cisco Nexus 1000V Getting Started Guide, Release 4.2(1)SV1(4a).
•![]() The Cisco Nexus 1000V must be connected to the vCenter Server.
The Cisco Nexus 1000V must be connected to the vCenter Server.
Default Settings
Table 2-3 lists the default settings in the port profile configuration.
Configuring Port Profiles
This section include the following topics:
•![]() Configuring VMware Attributes
Configuring VMware Attributes
•![]() Configuring Port Binding for vEthernet Port Profiles
Configuring Port Binding for vEthernet Port Profiles
Creating a Port Profile
You can use this procedure to create a new port profile.
BEFORE YOU BEGIN
Before beginning this procedure, you must know or do the following:
•![]() You are logged in to the CLI in EXEC mode.
You are logged in to the CLI in EXEC mode.
•![]() You know whether the ports need to be initialized with system settings.
You know whether the ports need to be initialized with system settings.
•![]() You have identified the characteristics needed for this port profile.
You have identified the characteristics needed for this port profile.
SUMMARY STEPS
1. ![]() config t
config t
2. ![]() port-profile [type {ethernet | vethernet}] name
port-profile [type {ethernet | vethernet}] name
3. ![]() (Optional) description profiledescription
(Optional) description profiledescription
4. ![]() show port-profile [brief | expand-interface | usage] [name profile-name]
show port-profile [brief | expand-interface | usage] [name profile-name]
5. ![]() copy running-config startup-config
copy running-config startup-config
DETAILED STEPS
EXAMPLES
This example shows how to create a new port profile:
n1000v(config)# port-profile type ethernet AllAccess1
n1000v(config-port-prof)# description all_access
n1000v(config-port-prof)# show port-profile name AllAccess1
port-profile AllAccess1
description: all_access
type: ethernet
status: disabled
capability l3control: no
pinning control-vlan: -
pinning packet-vlan: -
system vlans: none
port-group:
max ports: -
inherit:
config attributes:
evaluated config attributes:
assigned interfaces:
n1000v(config-port-prof)#
Configuring VMware Attributes
You can use this procedure to designate a port profile as a VMware port profile.
BEFORE YOU BEGIN
Before beginning this procedure, you must know or do the following:
•![]() You are logged in to the CLI in EXEC mode.
You are logged in to the CLI in EXEC mode.
•![]() You know if you will configure the VMware port group with the same name as the port profile or if you will specify an alternate name for the VMware port group.
You know if you will configure the VMware port group with the same name as the port profile or if you will specify an alternate name for the VMware port group.
•![]() The max-ports command is available only for non-uplink profiles.
The max-ports command is available only for non-uplink profiles.
•![]() You know if you want to restrict the maximum number of ports that can be assigned to the port profile. If so, you know what the maximum number is.
You know if you want to restrict the maximum number of ports that can be assigned to the port profile. If so, you know what the maximum number is.
SUMMARY STEPS
1. ![]() config t
config t
2. ![]() port-profile [type {ethernet | vethernet}] name
port-profile [type {ethernet | vethernet}] name
3. ![]() vmware port-group [pg_name]
vmware port-group [pg_name]
4. ![]() max-ports number
max-ports number
5. ![]() show port-profile [brief | expand-interface | usage] [name profile-name]
show port-profile [brief | expand-interface | usage] [name profile-name]
6. ![]() copy running-config startup-config
copy running-config startup-config
DETAILED STEPS
Configuring Port Mode
You can use the following procedures to designate trunking or access ports and configure VLANs for an existing port profile.
•![]() Configuring a Trunking Profile
Configuring a Trunking Profile
•![]() Configuring an Access Profile
Configuring an Access Profile
•![]() Clearing a Port Management Policy
Clearing a Port Management Policy
BEFORE YOU BEGIN
Before beginning the procedures in this section, you must know or do the following:
•![]() You are logged in to the CLI in EXEC mode.
You are logged in to the CLI in EXEC mode.
•![]() You know whether you are configuring the port profile as an access port or trunk port.
You know whether you are configuring the port profile as an access port or trunk port.
–![]() An access port transmits packets on only one untagged VLAN. You can specify the VLAN, and it becomes the access VLAN. If you do not specify a VLAN for an access port, that interface carries traffic only on the default VLAN 1.
An access port transmits packets on only one untagged VLAN. You can specify the VLAN, and it becomes the access VLAN. If you do not specify a VLAN for an access port, that interface carries traffic only on the default VLAN 1.
–![]() A trunk port transmits untagged packets for the native VLAN and transmits encapsulated, tagged packets for all other VLANs.
A trunk port transmits untagged packets for the native VLAN and transmits encapsulated, tagged packets for all other VLANs.
•![]() You know the needed VLAN configuration for this port profile.
You know the needed VLAN configuration for this port profile.
•![]() A VLAN must already be created on the switch before you can assign it to a port profile.
A VLAN must already be created on the switch before you can assign it to a port profile.
•![]() You know the VLAN ID for the VLAN that you are assigning.
You know the VLAN ID for the VLAN that you are assigning.
•![]() VLAN 1 is the default VLAN. You cannot create, modify, or delete this VLAN.
VLAN 1 is the default VLAN. You cannot create, modify, or delete this VLAN.
•![]() In accordance with the IEEE 802.1Q standard, up to 4094 VLANs are supported. Table 2-4 describes the available VLAN ranges and their use.
In accordance with the IEEE 802.1Q standard, up to 4094 VLANs are supported. Table 2-4 describes the available VLAN ranges and their use.
Configuring a Trunking Profile
You can use this procedure to define a trunking port profile including the VLANs that are allowed on the interfaces.
BEFORE YOU BEGIN
Before beginning this procedure, you must know or do the following:
•![]() You are logged in to the CLI in EXEC mode.
You are logged in to the CLI in EXEC mode.
•![]() You have already created the port profile using the "Creating a Port Profile" procedure.
You have already created the port profile using the "Creating a Port Profile" procedure.
•![]() You know the needed VLAN configuration for this port profile and that it is to be used in trunk mode.
You know the needed VLAN configuration for this port profile and that it is to be used in trunk mode.
•![]() A VLAN must already be created on the switch before you can assign it to a port profile.
A VLAN must already be created on the switch before you can assign it to a port profile.
•![]() You know the supported VLAN ranges described in Table 2-4.
You know the supported VLAN ranges described in Table 2-4.
•![]() If you do not configure allowed VLANs in this procedure, then the default VLAN 1 is used.
If you do not configure allowed VLANs in this procedure, then the default VLAN 1 is used.
•![]() If you do not configure a native VLAN in this procedure, then the default VLAN 1 is used.
If you do not configure a native VLAN in this procedure, then the default VLAN 1 is used.
SUMMARY STEPS
1. ![]() config t
config t
2. ![]() port-profile name
port-profile name
3. ![]() switchport mode {access | trunk}
switchport mode {access | trunk}
4. ![]() no shutdown
no shutdown
5. ![]() switchport trunk allowed vlan {allowed-vlans | add add-vlans | except except-vlans | remove remove-vlans | all | none}
switchport trunk allowed vlan {allowed-vlans | add add-vlans | except except-vlans | remove remove-vlans | all | none}
6. ![]() switchport trunk native vlan vlan-id
switchport trunk native vlan vlan-id
7. ![]() show port-profile [brief | expand-interface | usage] [name profile-name]
show port-profile [brief | expand-interface | usage] [name profile-name]
8. ![]() copy running-config startup-config
copy running-config startup-config
DETAILED STEPS
EXAMPLES
This example shows how to configure a trunking port profile, allowing all VLANs, and setting VLAN 3 as its native VLAN.
Example:
n1000v# config t
n1000v(config)# port-profile TrunkProf
n1000v(config-port-prof)# switchport mode trunk
n1000v(config-port-prof)# no shutdown
n1000v(config-port-prof)# switchport trunk allowed vlan all
n1000v(config-port-prof)# switchport trunk native vlan 3
n1000v(config-port-prof)# show port-profile name TrunkProf
port-profile TrunkProf
description:
type: vethernet
status: disabled
capability l3control: no
pinning control-vlan: -
pinning packet-vlan: -
system vlans: none
port-group:
max ports: 32
inherit:
config attributes:
switchport mode trunk
switchport trunk native vlan 3
switchport trunk allowed vlan all
no shutdown
evaluated config attributes:
switchport mode trunk
switchport trunk native vlan 3
switchport trunk allowed vlan all
no shutdown
assigned interfaces:
n1000v(config-port-prof)#
Configuring an Access Profile
Use this procedure to add an access VLAN to the access port in an existing port profile.
BEFORE YOU BEGIN
Before beginning this procedure, you must know or do the following:
•![]() An access port transmits packets on only one untagged VLAN. You can specify the VLAN, and it becomes the access VLAN. If you do not specify a VLAN for an access port, that interface carries traffic only on the default VLAN 1.
An access port transmits packets on only one untagged VLAN. You can specify the VLAN, and it becomes the access VLAN. If you do not specify a VLAN for an access port, that interface carries traffic only on the default VLAN 1.
SUMMARY STEPS
1. ![]() config t
config t
2. ![]() port-profile name
port-profile name
3. ![]() switchport mode {access | trunk}
switchport mode {access | trunk}
4. ![]() no shutdown
no shutdown
5. ![]() switchport access vlan vlan-id-access
switchport access vlan vlan-id-access
6. ![]() show port-profile [brief | expand-interface | usage] [name profile-name]
show port-profile [brief | expand-interface | usage] [name profile-name]
7. ![]() copy running-config startup-config
copy running-config startup-config
DETAILED STEPS
EXAMPLES
This example shows how to configure a port profile with switch access ports, enable the ports, and then add an access VLAN:
Example:
n1000v# config t
n1000v(config)# port-profile AccessProf
n1000v(config-port-prof)# switchport mode access
n1000v(config-port-prof)# no shutdown
n1000v(config-port-prof)# switchport access vlan 300
n1000v(config-port-prof)# show port-profile name AccessProf
port-profile AccessProf
description: allaccess4
type: vethernet
status: disabled
capability l3control: no
pinning control-vlan: -
pinning packet-vlan: -
system vlans: none
port-group: AccessProf
max ports: 5
inherit:
config attributes:
switchport mode access
switchport access vlan 300
no shutdown
evaluated config attributes:
switchport mode access
switchport access vlan 300
no shutdown
assigned interfaces:
n1000v(config-port-prof)#
Clearing a Port Management Policy
You can use this procedure to remove either of the following port management policies from an existing port profile configuration.
•![]() shutdown
shutdown
•![]() switchport mode
switchport mode
BEFORE YOU BEGIN
Before beginning this procedure, you must know or do the following:
•![]() You are logged in to the CLI in EXEC mode.
You are logged in to the CLI in EXEC mode.
•![]() Removing the shutdown configuration changes the state of the port profile ports to shutdown.
Removing the shutdown configuration changes the state of the port profile ports to shutdown.
•![]() Removing the switchport mode converts the port profile ports to switch access ports.
Removing the switchport mode converts the port profile ports to switch access ports.
•![]() After removing the configuration for an attribute, the attribute does not appear in show command output.
After removing the configuration for an attribute, the attribute does not appear in show command output.
SUMMARY STEPS
1. ![]() config t
config t
2. ![]() port-profile name
port-profile name
3. ![]() default {shutdown | switchport mode}
default {shutdown | switchport mode}
4. ![]() show port-profile [brief | expand-interface | usage] [name profile-name]
show port-profile [brief | expand-interface | usage] [name profile-name]
5. ![]() copy running-config startup-config
copy running-config startup-config
DETAILED STEPS
EXAMPLES
This example shows how to change the administrative state of a port profile back to its default setting (all ports disabled):
n1000v# config t
n1000v(config)# port-profile AccessProf
n1000v(config-port-prof)# default shutdown
n1000v(config-port-prof)# show port-profile name AccessProf
port-profile AccessProf
description: allaccess4
type: vethernet
status: disabled
capability l3control: no
pinning control-vlan: 8
pinning packet-vlan: 8
system vlans: none
port-group: AccessProf
max ports: 5
inherit:
config attributes:
switchport mode access
evaluated config attributes:
switchport mode access
assigned interfaces:
n1000v(config-port-prof)#
Configuring Port Binding for vEthernet Port Profiles
You can use the following procedures in this section to configure port binding for vEthernet port profiles:
•![]() Configuring a Default Port Binding Type
Configuring a Default Port Binding Type
•![]() Configuring Port Binding for a vEthernet Port Profile
Configuring Port Binding for a vEthernet Port Profile
•![]() Configuring a Port Profile with Dynamic or Static Port Binding with the Auto Option
Configuring a Port Profile with Dynamic or Static Port Binding with the Auto Option
•![]() Verifying Port Binding on vCenter Server
Verifying Port Binding on vCenter Server
BEFORE YOU BEGIN
Before beginning the procedures in this section, you must know or do the following:
•![]() You have read the "vEthernet Port Binding" section.
You have read the "vEthernet Port Binding" section.
•![]() Once a vEthernet port profile has been created as a port group on the vCenter Server, you are not allowed to change its port binding type.
Once a vEthernet port profile has been created as a port group on the vCenter Server, you are not allowed to change its port binding type.
•![]() You are not allowed to configure max ports for vEthernet port profiles with ephemeral port binding.
You are not allowed to configure max ports for vEthernet port profiles with ephemeral port binding.
•![]() You are not allowed to configure port binding for Ethernet type port profiles. Port binding is only available for vEthernet port profiles.
You are not allowed to configure port binding for Ethernet type port profiles. Port binding is only available for vEthernet port profiles.
•![]() Manual configurations on an interface are purged when the system administrator changes its port profile if either port profile is configured with ephemeral port binding. This occurs regardless of your auto purge setting.
Manual configurations on an interface are purged when the system administrator changes its port profile if either port profile is configured with ephemeral port binding. This occurs regardless of your auto purge setting.
For more information about the svs auto-config-purge command, see the Cisco Nexus 1000V Interface Configuration Guide, Release 4.2(1)SV1(4a).
Configuring a Default Port Binding Type
You can use this procedure to configure the type of port binding (static, dynamic, or ephemeral) to apply by default to all new vEthernet port profiles.
BEFORE YOU BEGIN
Before beginning this procedure, you must know or do the following:
•![]() You are logged in to the CLI in EXEC mode.
You are logged in to the CLI in EXEC mode.
•![]() You know the type of port binding (static, dynamic, or ephemeral) you want to use as a default for all new vEthernet port profiles.
You know the type of port binding (static, dynamic, or ephemeral) you want to use as a default for all new vEthernet port profiles.
SUMMARY STEPS
1. ![]() config t
config t
2. ![]() port-profile default port-binding {static [auto] | dynamic [auto] | ephemeral}
port-profile default port-binding {static [auto] | dynamic [auto] | ephemeral}
3. ![]() show running-config
show running-config
4. ![]() copy running-config startup-config
copy running-config startup-config
DETAILED STEPS
EXAMPLES
This example shows how to configure the dynamic port binding type as the default for all new vEthernet port profiles created:
n1000v# config t
n1000v(config)# port-profile default port-binding dynamic
n1000v(config)#
Configuring Port Binding for a vEthernet Port Profile
You can use this procedure to configure the type of port binding (static, dynamic, or ephemeral) for an existing vEthernet port profile.
BEFORE YOU BEGIN
Before beginning this procedure, you must know or do the following:
•![]() You are logged in to the CLI in EXEC mode.
You are logged in to the CLI in EXEC mode.
•![]() You have already created the vEthernet port profile using the "Creating a Port Profile" procedure.
You have already created the vEthernet port profile using the "Creating a Port Profile" procedure.
•![]() You know the type of port binding (static, dynamic, or ephemeral) you want to apply to this vEthernet port profile.
You know the type of port binding (static, dynamic, or ephemeral) you want to apply to this vEthernet port profile.
SUMMARY STEPS
1. ![]() config t
config t
2. ![]() port-profile [type {vethernet}] profile-name
port-profile [type {vethernet}] profile-name
3. ![]() port-binding {static [auto] | dynamic [auto] | ephemeral}
port-binding {static [auto] | dynamic [auto] | ephemeral}
4. ![]() show port-profile [brief | expand-interface | usage] [name profile-name]
show port-profile [brief | expand-interface | usage] [name profile-name]
5. ![]() copy running-config startup-config
copy running-config startup-config
DETAILED STEPS
EXAMPLES
This example shows how to configure the dynamic port binding type for the existing port profile named target-pp:
n1000v# config t
n1000v(config)# port-profile target-pp
n1000v(config-port-prof)# port-binding dynamic
n1000v(config-port-prof)#
Configuring a Port Profile with Dynamic or Static Port Binding with the Auto Option
You can use this procedure to configure a port profile (static or dynamic) with or without the auto option.
BEFORE YOU BEGIN
Before beginning this procedure, you must know or do the following:
•![]() You are logged in to the CLI in EXEC mode.
You are logged in to the CLI in EXEC mode.
SUMMARY STEPS
1. ![]() config t
config t
2. ![]() port-profile [type {vethernet}] profile-name
port-profile [type {vethernet}] profile-name
3. ![]() vmware port-group [pg_name]
vmware port-group [pg_name]
4. ![]() port-binding {static [auto] | dynamic [auto] | ephemeral}
port-binding {static [auto] | dynamic [auto] | ephemeral}
5. ![]() max-ports number
max-ports number
6. ![]() min-ports number
min-ports number
7. ![]() state enabled
state enabled
8. ![]() copy running-config startup-config
copy running-config startup-config
DETAILED STEPS
EXAMPLES
This example shows how to configure the dynamic auto port binding type:
n1000v# config t
n1000v(config)# port-profile type vethernet dynamic_auto_pp
n1000v(config-port-prof)# vmware port-group
n1000v(config-port-prof)# port-binding dynamic auto
n1000v(config-port-prof)# max-ports 128
n1000v(config-port-prof)# min-ports 64
n1000v(config-port-prof)# state enabled
n1000v(config-port-prof)# copy running-config startup-config
Verifying Port Binding on vCenter Server
You can use this procedure to verify the port binding configuration for a port group in vCenter Server.
BEFORE YOU BEGIN
Before beginning this procedure, you must know or do the following:
•![]() You are logged in to vCenter Server on the host.
You are logged in to vCenter Server on the host.
DETAILED STEPS
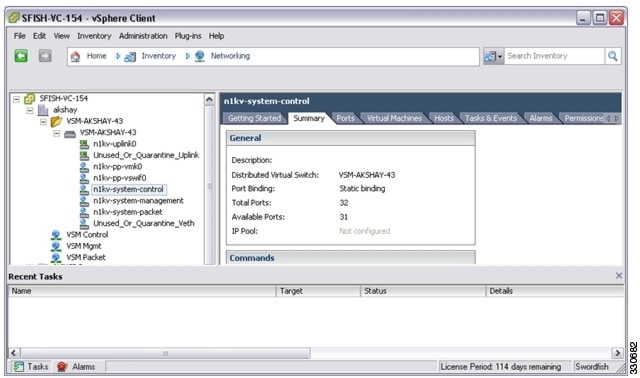
Step 1 ![]() From your DVS in the Networking tab, choose the port group, and then click the Summary tab.
From your DVS in the Networking tab, choose the port group, and then click the Summary tab.
The General section of the Summary tab displays the type of port binding for this port group.
Enabling a Port Profile
You can use this procedure to enable an existing port profile.
BEFORE YOU BEGIN
Before beginning this procedure, you must know or do the following:
•![]() You are logged in to the CLI in EXEC mode.
You are logged in to the CLI in EXEC mode.
•![]() You have already created the port profile using the "Creating a Port Profile" procedure.
You have already created the port profile using the "Creating a Port Profile" procedure.
SUMMARY STEPS
1. ![]() config t
config t
2. ![]() port-profile [type {ethernet | vethernet}] name
port-profile [type {ethernet | vethernet}] name
3. ![]() state enabled
state enabled
4. ![]() show port-profile [brief | expand-interface | usage] [name profile-name]
show port-profile [brief | expand-interface | usage] [name profile-name]
5. ![]() copy running-config startup-config
copy running-config startup-config
DETAILED STEPS
EXAMPLES
This example shows how to enable a port profile:
n1000v# config t
n1000v(config)# port-profile AccessProf
n1000v(config-port-prof)# state enabled
n1000v(config-port-prof)# show port-profile name AccessProf
port-profile AccessProf
description: allaccess4
status: enabled
capability l3control: no
pinning control-vlan: -
pinning packet-vlan: -
system vlans: none
port-group:
max ports: 32
inherit:
config attributes:
channel-group auto mode on
evaluated config attributes:
channel-group auto mode on
assigned interfaces:
n1000v(config-port-prof)#
Removing a Port Profile
You can use this procedure to remove a port profile.
BEFORE YOU BEGIN
Before beginning this procedure, you must know or do the following:
•![]() You are logged in to the CLI in EXEC mode.
You are logged in to the CLI in EXEC mode.
•![]() If the port profile is inherited by another port profile, you need to remove the inheritance from the other port profile before removing this port profile. If you do not remove the inheritance first, the procedure fails. See Removing Inherited Policies from a Port Profile.
If the port profile is inherited by another port profile, you need to remove the inheritance from the other port profile before removing this port profile. If you do not remove the inheritance first, the procedure fails. See Removing Inherited Policies from a Port Profile.
•![]() When you remove a port profile that is mapped to a VMware port group, the associated port group and settings within the vCenter Server are also removed.
When you remove a port profile that is mapped to a VMware port group, the associated port group and settings within the vCenter Server are also removed.
SUMMARY STEPS
1. ![]() config t
config t
2. ![]() (Optional) show port-profile virtual usage name profile_name
(Optional) show port-profile virtual usage name profile_name
3. ![]() no port-profile profile_name
no port-profile profile_name
4. ![]() show port-profile name profile_name
show port-profile name profile_name
5. ![]() copy running-config startup-config
copy running-config startup-config
DETAILED STEPS
EXAMPLES
This example shows how to remove a port profile:
n1000v# config t
n1000v(config)# show port-profile virtual usage name AccessProf
--------------------------------------------------------------------------------
Port Profile Port Adapter Owner
--------------------------------------------------------------------------------
n1kv-uplink0 Po1
Eth3/2 vmnic1 localhost.
Eth3/3 vmnic2 localhost.
vlan1767 Veth7 Net Adapter 1 all-tool-7
AccessProf vEth12 vmnic1 localhost.
n1000v(config)# no port-profile AccessProf
n1000v(config)# show port-profile name
AccessProf
ERROR: port-profile AccessProf does not
exist
n1000v(config)# copy running-config startup-config
Additional References
For additional information related to port profiles, see the following sections:
Related Documents
Standards
Feature History for Port Profiles
This section provides the feature history for port profiles.
 Feedback