- Preface
- Hardware and Software Requirements
- Prerequisite
- OpenStack for Nexus Fabric Overview
- Before You Start
- Servers Topology
- Nexus Fabric Enabler Installation
- Post Installation
- Configuration in the Leaf and Cisco Prime DCNM
- Create Project and Launch VM
- Scalability
- Known Limitations and Caveats
- Technical Support Model
Cisco Nexus Fabric OpenStack Enabler Install Guide Version 1.0
Bias-Free Language
The documentation set for this product strives to use bias-free language. For the purposes of this documentation set, bias-free is defined as language that does not imply discrimination based on age, disability, gender, racial identity, ethnic identity, sexual orientation, socioeconomic status, and intersectionality. Exceptions may be present in the documentation due to language that is hardcoded in the user interfaces of the product software, language used based on RFP documentation, or language that is used by a referenced third-party product. Learn more about how Cisco is using Inclusive Language.
- Updated:
- March 16, 2015
Chapter: Create Project and Launch VM
Create Project and Launch VM
- Create Project and Launch VM
- Known Caveats
- Steps to Create a Project
- Steps to Create a User for the Project
- Steps to Create the Network
- Steps to Create Security Group
- Steps to Launch the VM
Create Project and Launch VM
The information provided in this section is generic to OpenStack and it is provided here for your convenience with the exception of ConfigProfile, which is Cisco Fabric specific.
Known Caveats
Following are the known caveats:
Steps to Create a Project
Follow the steps to create a project:
-
Login to Horizon as admin, use the password you put into the OpenStack config file.
-
Click projects and then create project.
-
Click Create Project.

Note
The project name is used as the vrfName in the fabric (vrfName = “project_name:CTX”) for fabric auto-configuration. The fabric limits the size of vrfName string to be 32 characters long currently. So make sure the project name length is less than 29 characters when creating the project. Do not use hyphens in the project name.
DCI Support
You can use OpenStack to configure DC Inter-connect. Note that we support only L3 DCI with Cisco Prime DCNM 7.1(1) release and Cisco NX-OS 7.1(0)N1(1) release or later.
As part of the project name string, type xyx:dci_id:129 to create it (“129” used here is just an example). Type xyz or xyz:dci_id:0 to remove the DCI support for this project.
The integer entered is the DCI ID. Cisco Prime DCNM uses it as an indication that user desires to auto-configure the border leaves with this VRF and extend to the DCI edge devices (s). A zero value is interpreted by Cisco Prime DCNM to remove the VRF configurations from border leaf and the configurations to extend the VRF from border leaf to DC Edge devices.
Steps to Create a User for the Project
Follow the steps to create a user for the project:
Steps to Create the Network
Follow the steps to create the network:
-
Login as the user created by the admin.
-
Click the project tab.
-
Click Networks and then click Create Network. Specify a Name for the network and go to the subnet tab. This is mandatory.
-
Specify a Network Address for the subnet.
Use non-default network profiles
By default for DCNM with version 7.1, defaultNetworkUniversalEfProfile will be the network profile automatically used by the system. Additionally defaultNetworkUniversalTfProfile can be specified too when creating network in OpenStack:
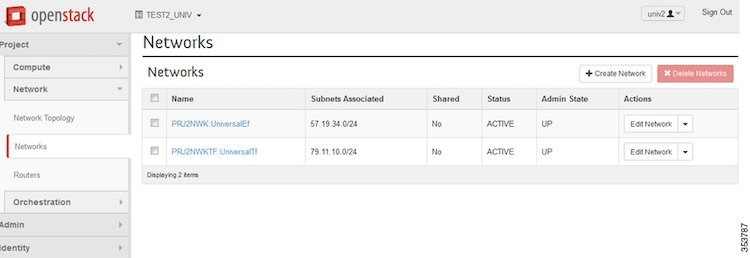
Following are the supported network profiles with DCNM 7.1(1):
The syntax to specify the non-default profiles is the following when creating network in OpenStack by specifying the following name of network (“network_name” in the examples below) and a sub-string of the profile name:
-
network_name:L2
-
network_name: Ipv4Ef
-
network_name: Ipv4Tf
-
network_name: UniversalTf
-
network_name: UniversalEf
Use defaultNetworkL2Profile
If this profile is chosen when a network is created in OpenStack, DCNM DHCP server will not assign IP address for the VM associated with this network. User is required to configure static IP address for the VM. Additionally, the following command needs to be run on the OpenStack control node:
$fabric_enabler_cli
Cisco Nexus Fabric Command Line Interface
(Nexus-Fabric) set_static_ip --mac fa:16:3e:72:ab:dc --ip 136.10.0.16
MAC address is of VNIC of the VM and IP address of the statically configured VM IP address. When a VM is removed from OpenStack, the above entry is automatically removed by the system.
Create networks from DCNM
In an OpenStack and Nexus Fabric powered cloud deployment, it is sometimes more desirable for some users to maintain management separation between servers and networks. This is possible by creating networks through DCNM, which is for network/fabric management primarily. First the project/tenant is created from OpenStack and then gets registered with DCNM. Then you can create network from DCNM.
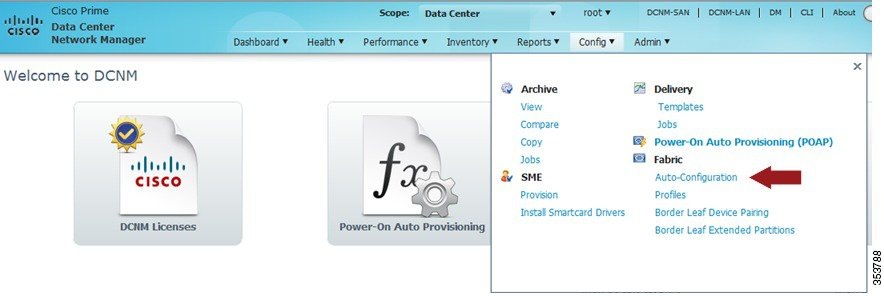
Select Config and Auto-Configuration under Fabric as shown below:
Then select the organization/partition in the following window:
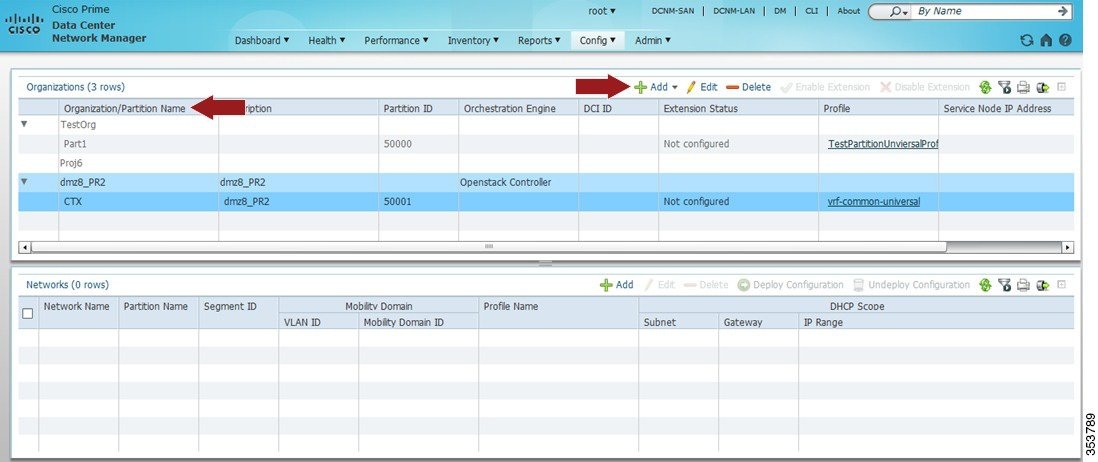
Select dmz8_PR2 and click Add to add a network. Network created in DCNM can be deleted by selecting the network in the lower panel and click Delete. When performing Add Network, ensure Organization and Partition are the same as the project/tenant name in OpenStack and make sure the segment ID is in the same range as set in the enabler_conf.ini file and it is not used by any existing networks. The vrfName with the correct format must be filled.
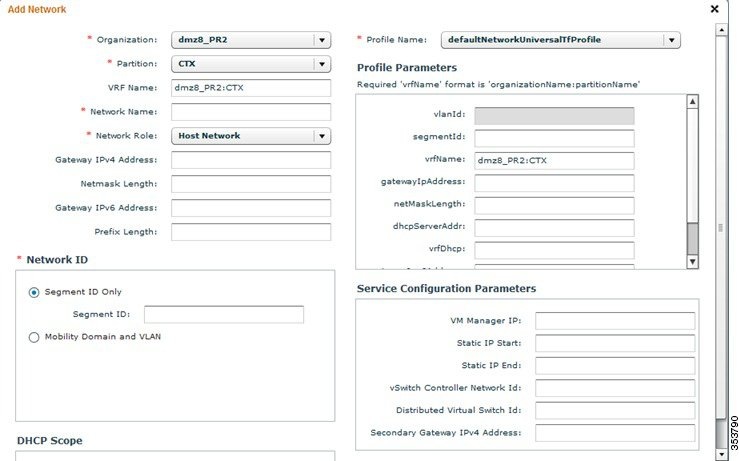
Also scroll down to add the DHCP range – this will make sure the VM will get DHCP IP address from this DCNM.
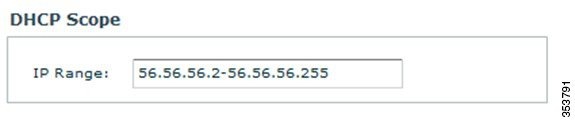
Click OK to save it. Log into OpenStack Horizon for that project/tenant and you can see network dmz6_net136 (2nd entry) is created with a suffix (DCNM) in the network name:
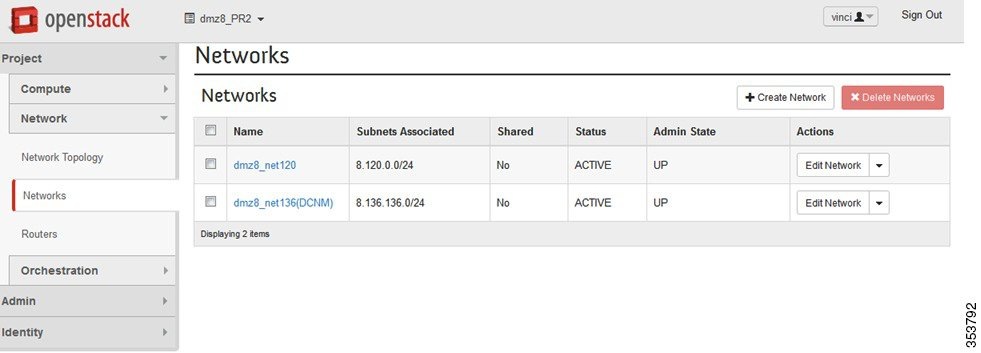
This network is now available for you to associate when creating VMs. It is strongly recommended that the networks created by DCNM must be removed by DCNM after you remove all the VMs using this network.
Steps to Create Security Group
A security group with appropriate rules needs to be created and added before you can launch the VM. Create a security group and rules that allows DHCP (from DCNM) and your data traffic to go through. After logging into Horizon as a user, click Project > Compute > Access Security. Use the Create Security Group tab to create sample security group security_group_ex in the figure below.
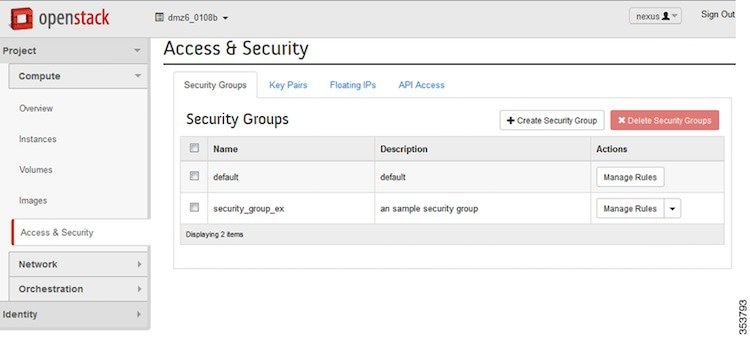
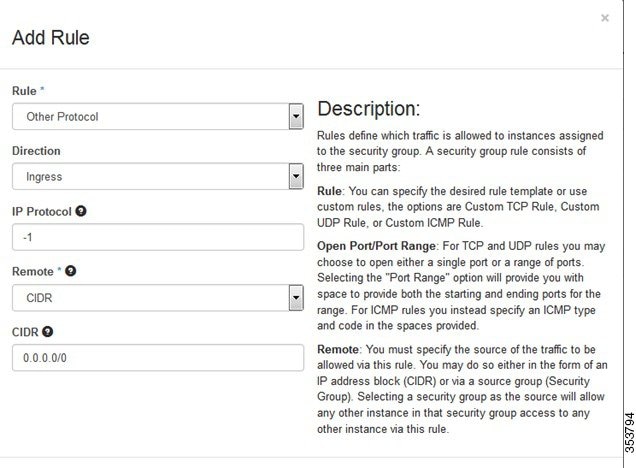
Click Manage Rules for the security group you just created and add new rules. For example, if the following rule is added for the security group created, it will allow all traffic:
Steps to Launch the VM
Follow the steps to launch the VM:
-
Click Instances and then click Launch Instance.
-
Click Image drop-down menu and select the image.
There will be cirros image by default.
-
Specify a name for the Instance.
-
Select Security tab and choose the security group created (it is recommended to uncheck the default rule and select the one you specified).
-
Click Networking tab and select the network from the Available network list.
-
Click Launch.
 Feedback